
4
Using the Actions Menu
A lot of the most commonly used tools in Procreate are available on the Actions menu. We briefly touched upon it in the previous chapter while discussing Advanced Features. Tapping on the wrench-shaped tool in the top-left corner of your workspace will bring up the Actions menu.
Actions is a widely used menu from where you can make changes that will affect a canvas as a whole. From here, we will elaborate on these functions further.
We’re going to cover the following broad topics in this chapter:
- The Add menu
- The Canvas menu
- The Share menu
- The Video menu
- The Prefs menu
- The Help menu
The Add menu
This is the first submenu under Actions. Add allows you to import any kind of image file or text into your canvas. Additionally, clipboard tools such as Cut, Copy, and Paste are also available here. The Add menu looks like this:
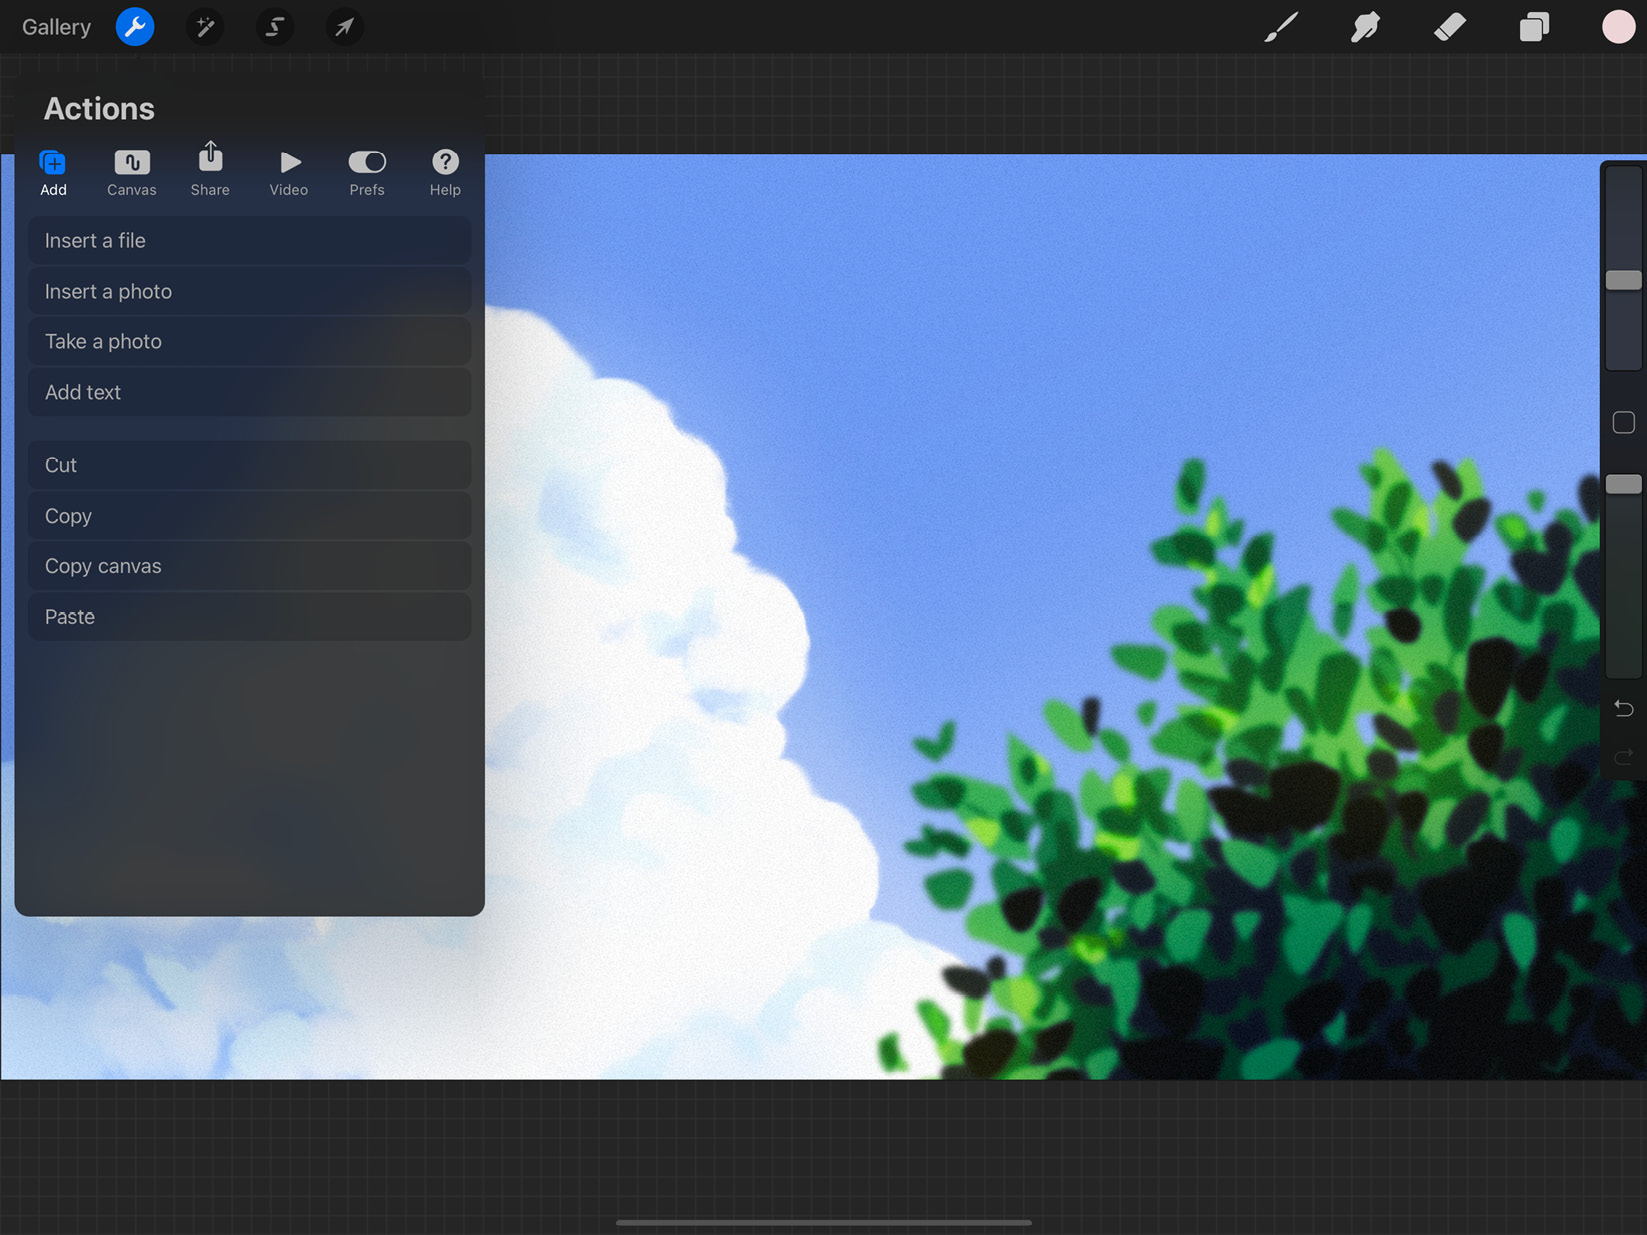
Figure 4.1: The Add menu
This menu has several options, which we will look at in the following subsections.
Insert a file
This option allows you to import an image from Files. When you tap on it, the Files app on your iPad will open up, as shown in Figure 4.2. From here, you can locate the specific image you want to insert and select it. The imported file will be added to your Procreate canvas as a new layer on top of your currently selected layer:
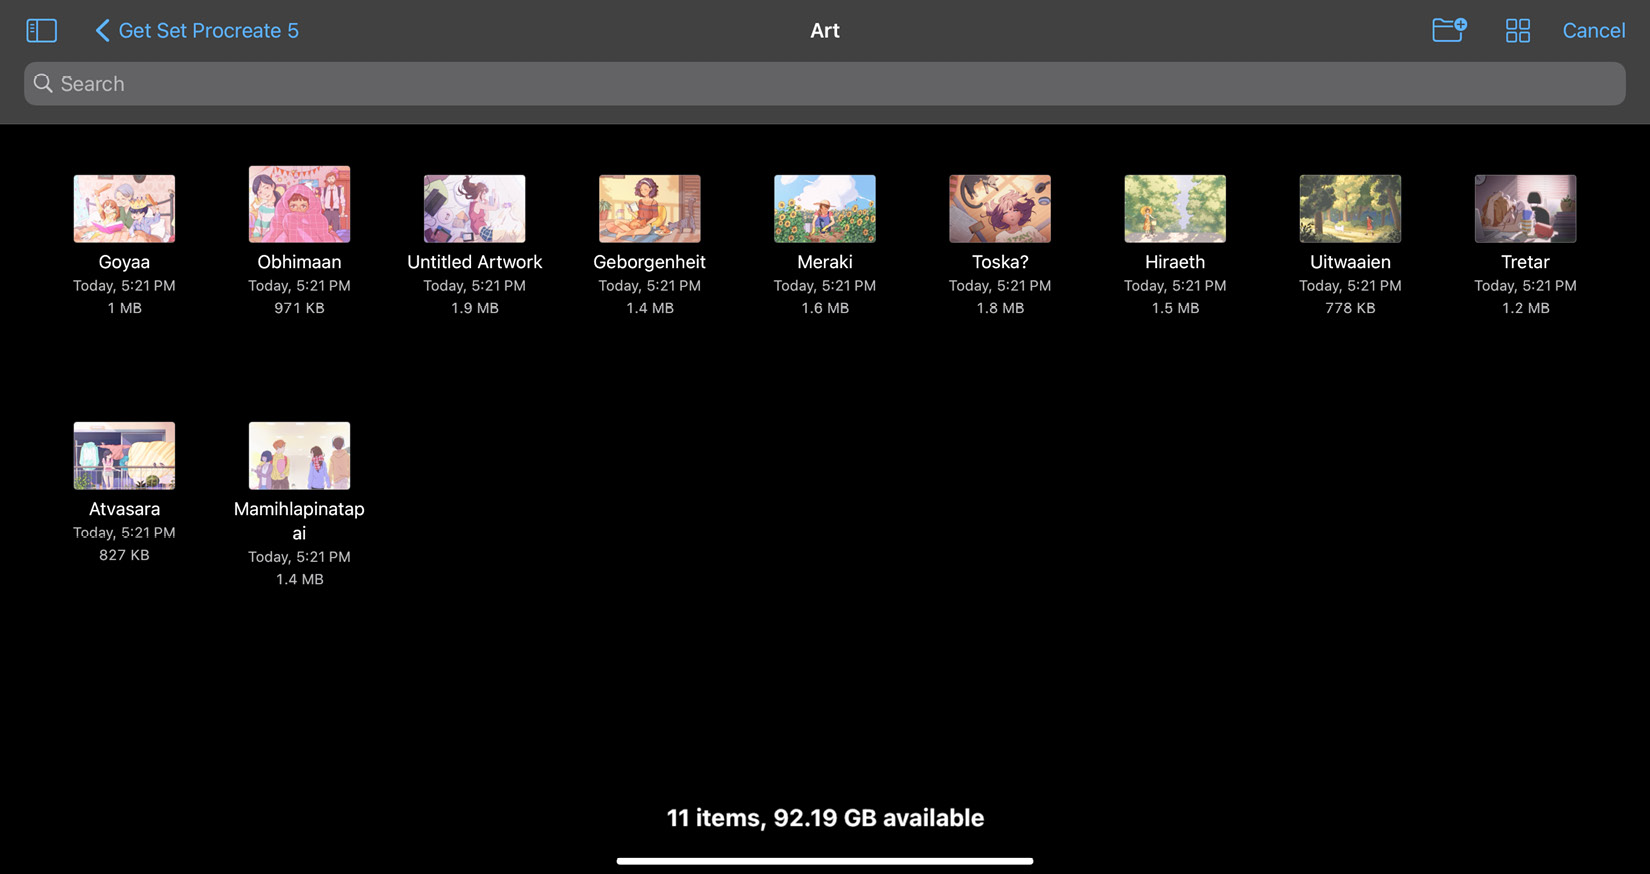
Figure 4.2: Insert a file
If you want to import a file but don’t want it to appear on your time-lapse video, you can swipe left on Insert a file to reveal a button that says Insert a private file. If you tap this button, any image file you insert will not show up on the time-lapse video.
Insert a photo
Similar to the previous option, Insert a photo lets you import an image from the Photos app. Tapping on this option will open up the image gallery on your iPad, as shown in the following screenshot, from where you can choose which photo to insert. The selected image will be added as a new layer on top of the currently selected layer:
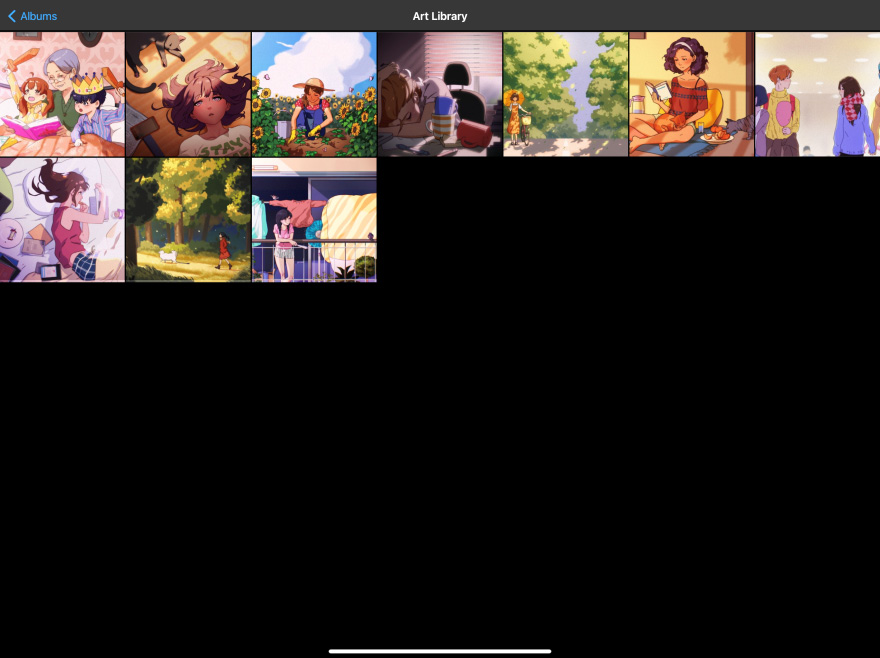
Figure 4.3: Insert a photo
Similar to the last option, swipe left on Insert a photo and tap on Insert a private photo, which won’t show up on your time-lapse.
Take a photo
This option allows you to take a photo using your camera and insert it directly into your canvas. Tapping on Take a photo will automatically open your iPad’s camera, from where you can snap a photograph.
Here, too, you can swipe left on Take a photo and tap on Take a private photo to make sure that the photo doesn’t appear on your time-lapse.
Add text
Procreate offers you a convenient way to add and edit text in your artwork. When you tap on Add text, it creates a textbox on a new text editing layer, as shown here:
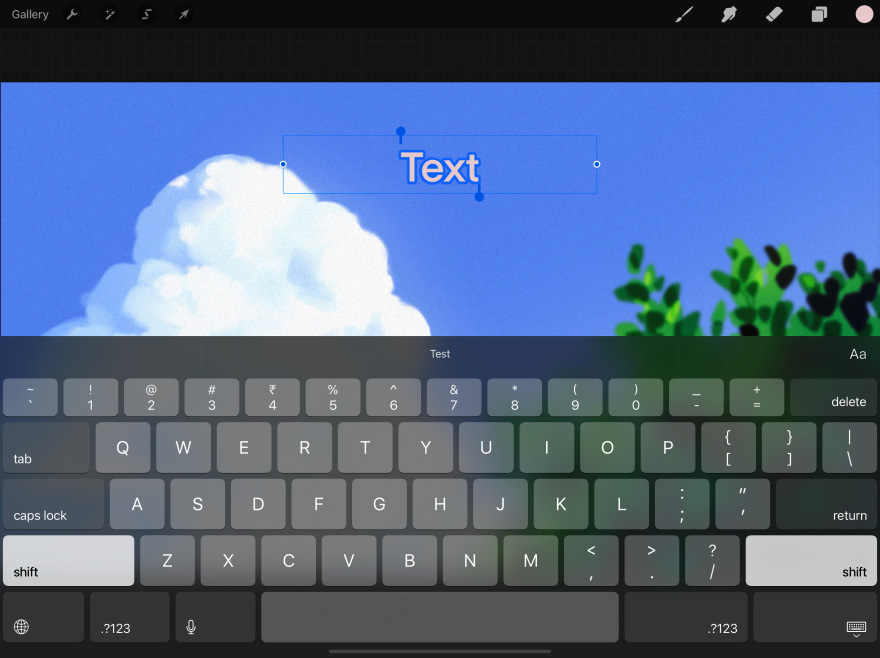
Figure 4.4: Add text
To edit text in Procreate, follow these steps:
- Tap on the textbox to edit the text.
- Double-tap anywhere on the textbox to invoke the text selection and formatting tools, as shown here:
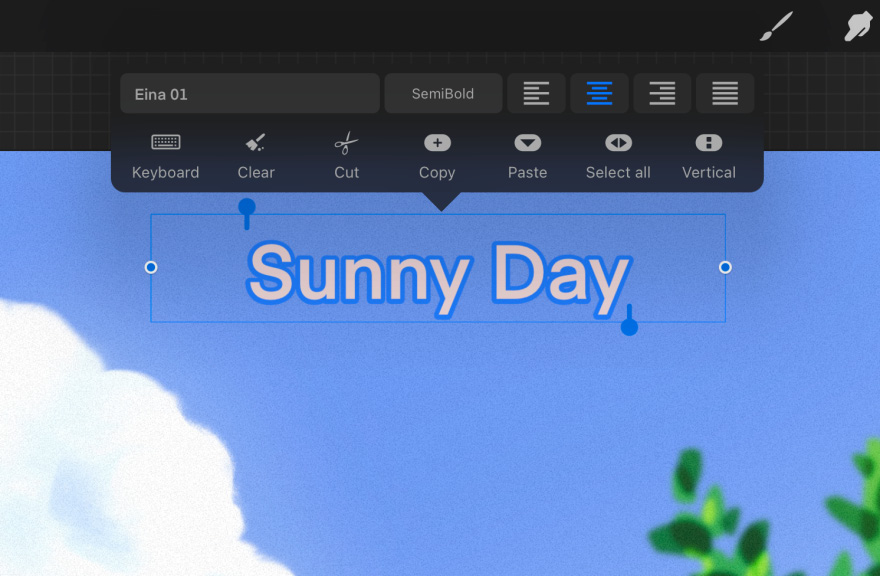
Figure 4.5: Text selection
- Tap on any option on the top row to bring up the advanced text editor, as shown in Figure 4.6.
- You can use the advanced text editor to select a font and change the style, design, and attributes of your text, as shown here:
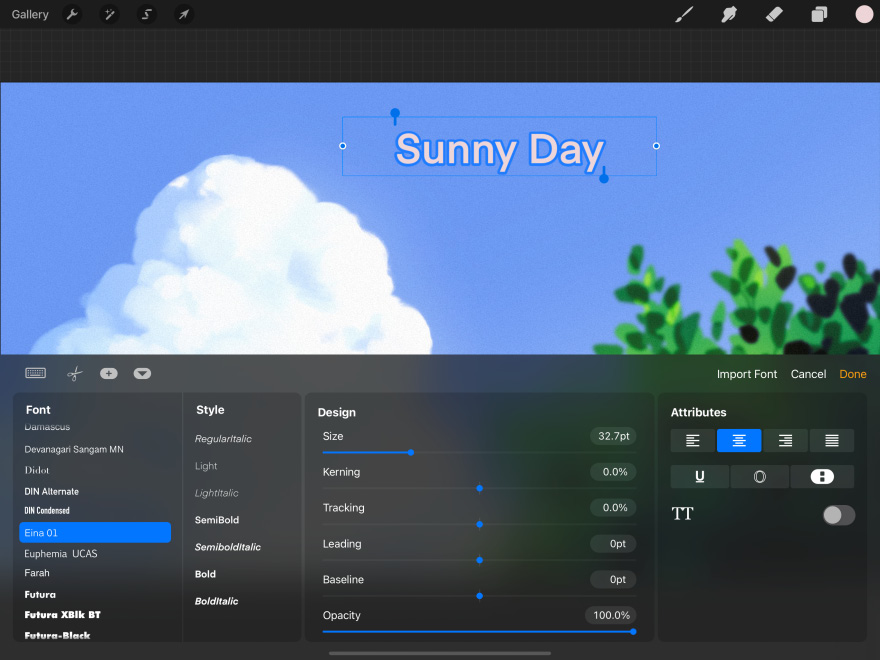
Figure 4.6: The advanced text editor
- Use the Import Font option, as shown in the previous screenshot, to add an external font to Procreate from Files.
Important Note
You can scale, resize, and rotate a textbox using the Transform tool without needing to rasterize it. The font size will change automatically to accommodate resizing. However, in case of a non uniform transformation (like Distort and Warp), a text layer is automatically rasterised.
To learn more about the Transform tool, refer to Chapter 5, Selecting and Transforming.
Cut, Copy, Copy Canvas, and Paste
Next, we will look at the cluster of options commonly called clipboard tools, which are shown here:
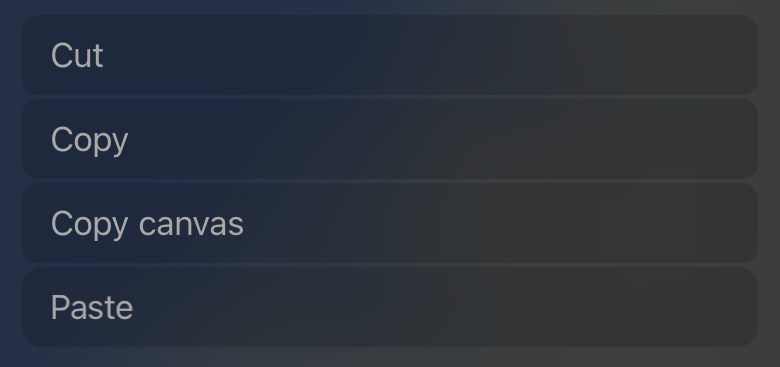
Figure 4.7: Clipboard tools
These functions are common to most software. Let’s briefly explain them:
- Cut: Using Cut clears the current layer or selected area, which can be reapplied on another layer using Paste.
- Copy: Applying Copy to a layer or a selected area will create a duplicate of it wherever Paste is applied.
- Copy canvas: This function works similarly to Copy, but instead of just the selected area or layer, it copies the contents of the entire canvas as a flattened image while keeping your layers intact. This feature is useful when you want to duplicate the complete artwork onto a layer without merging the layers or having to export and reinsert it.
- Paste: Use the Paste option to insert the content that you have cut or copied as a new layer on top of the current layer.
There are gesture-based shortcuts you can use to invoke the clipboard tools menu. We will look at all such functions in Chapter 6, Using Gestures and Shortcuts.
With the Add menu, you can try importing files from different locations to get the hang of it. Additionally, you can use the clipboard tools to perform Cut, Copy, and Paste actions, as well as a Procreate-specific Copy Canvas action.
With that, let’s move on to the next set of tools in the Actions section – Canvas.
The Canvas menu
The Canvas menu is right next to the Add menu. The functions available in this menu are used to make sweeping changes to a whole canvas. This means that choices made in the Canvas menu affect the canvas as a whole and alter its properties. It looks like this:
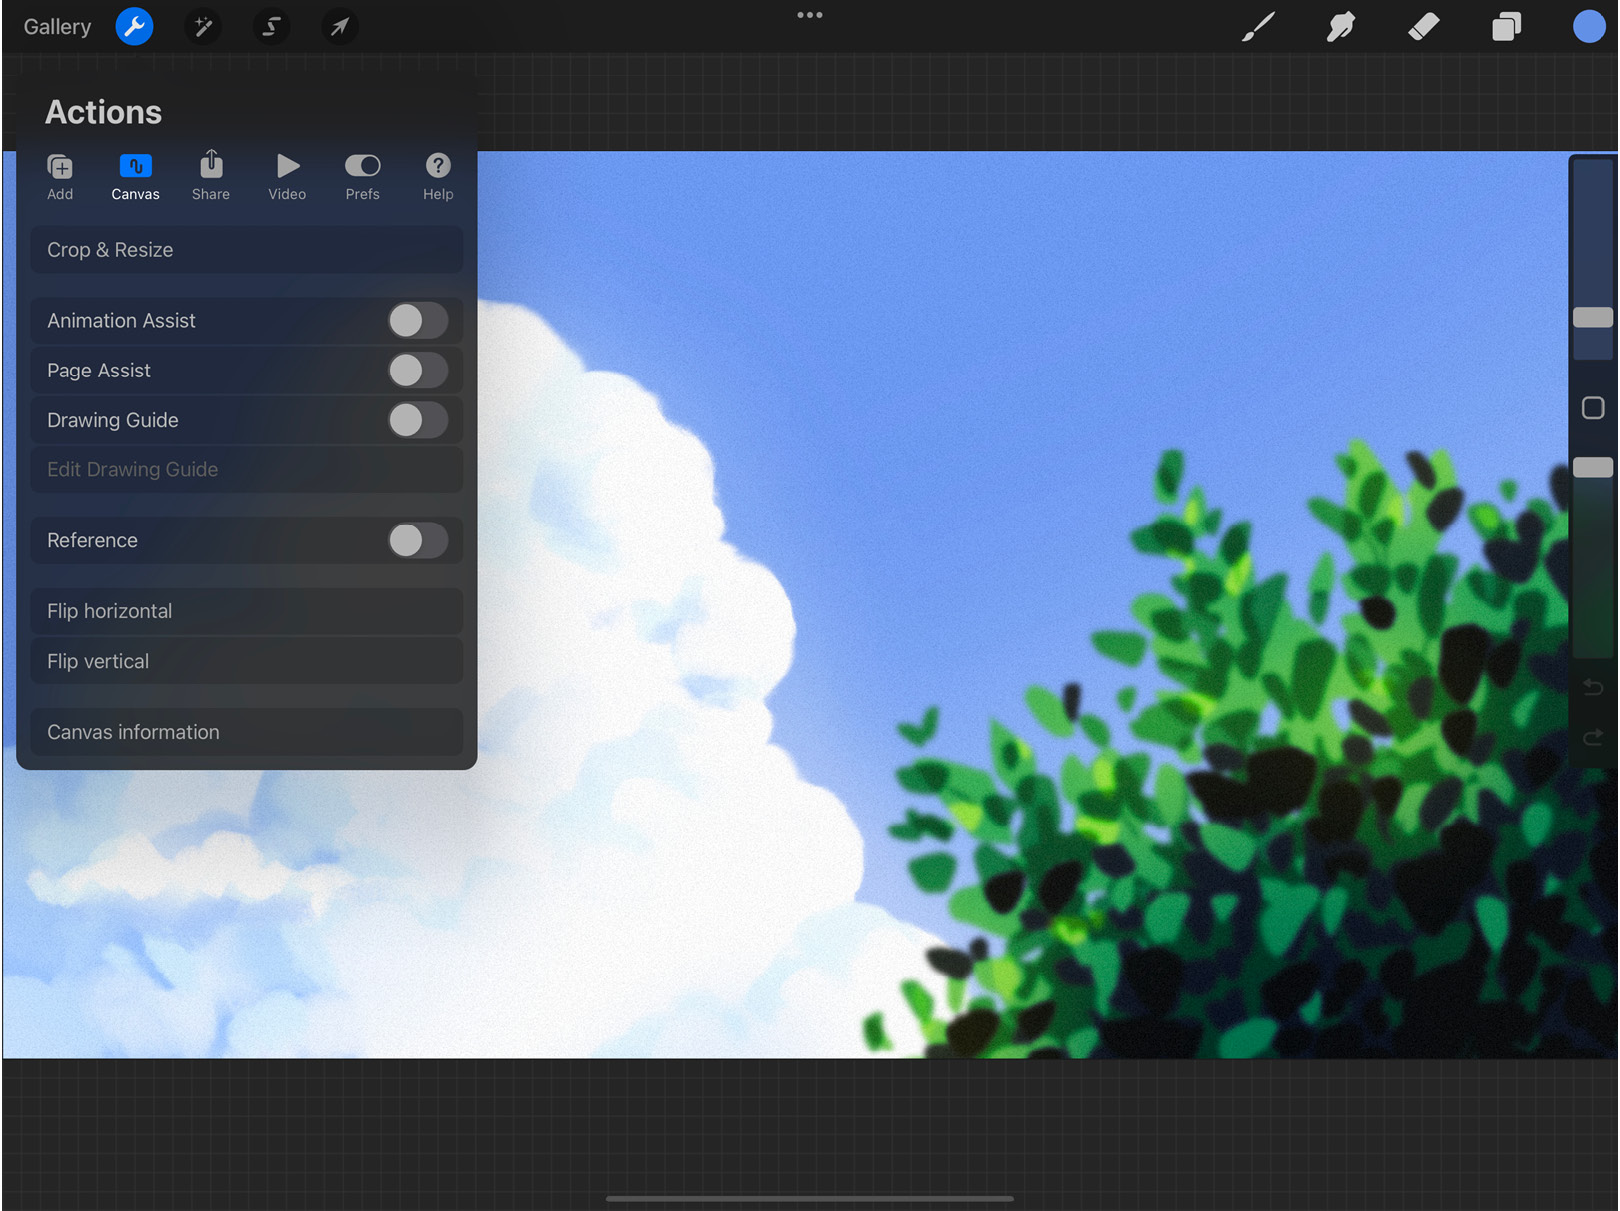
Figure 4.8: The Canvas menu
The functions of this menu will become clear once we look at it in detail. There are several sub-options available. We will look at them in the following sections.
Crop and Resize
This is where you can edit the dimensions, aspect ratio, and resolution of the canvas. Tapping on Crop and Resize will bring you to this screen:
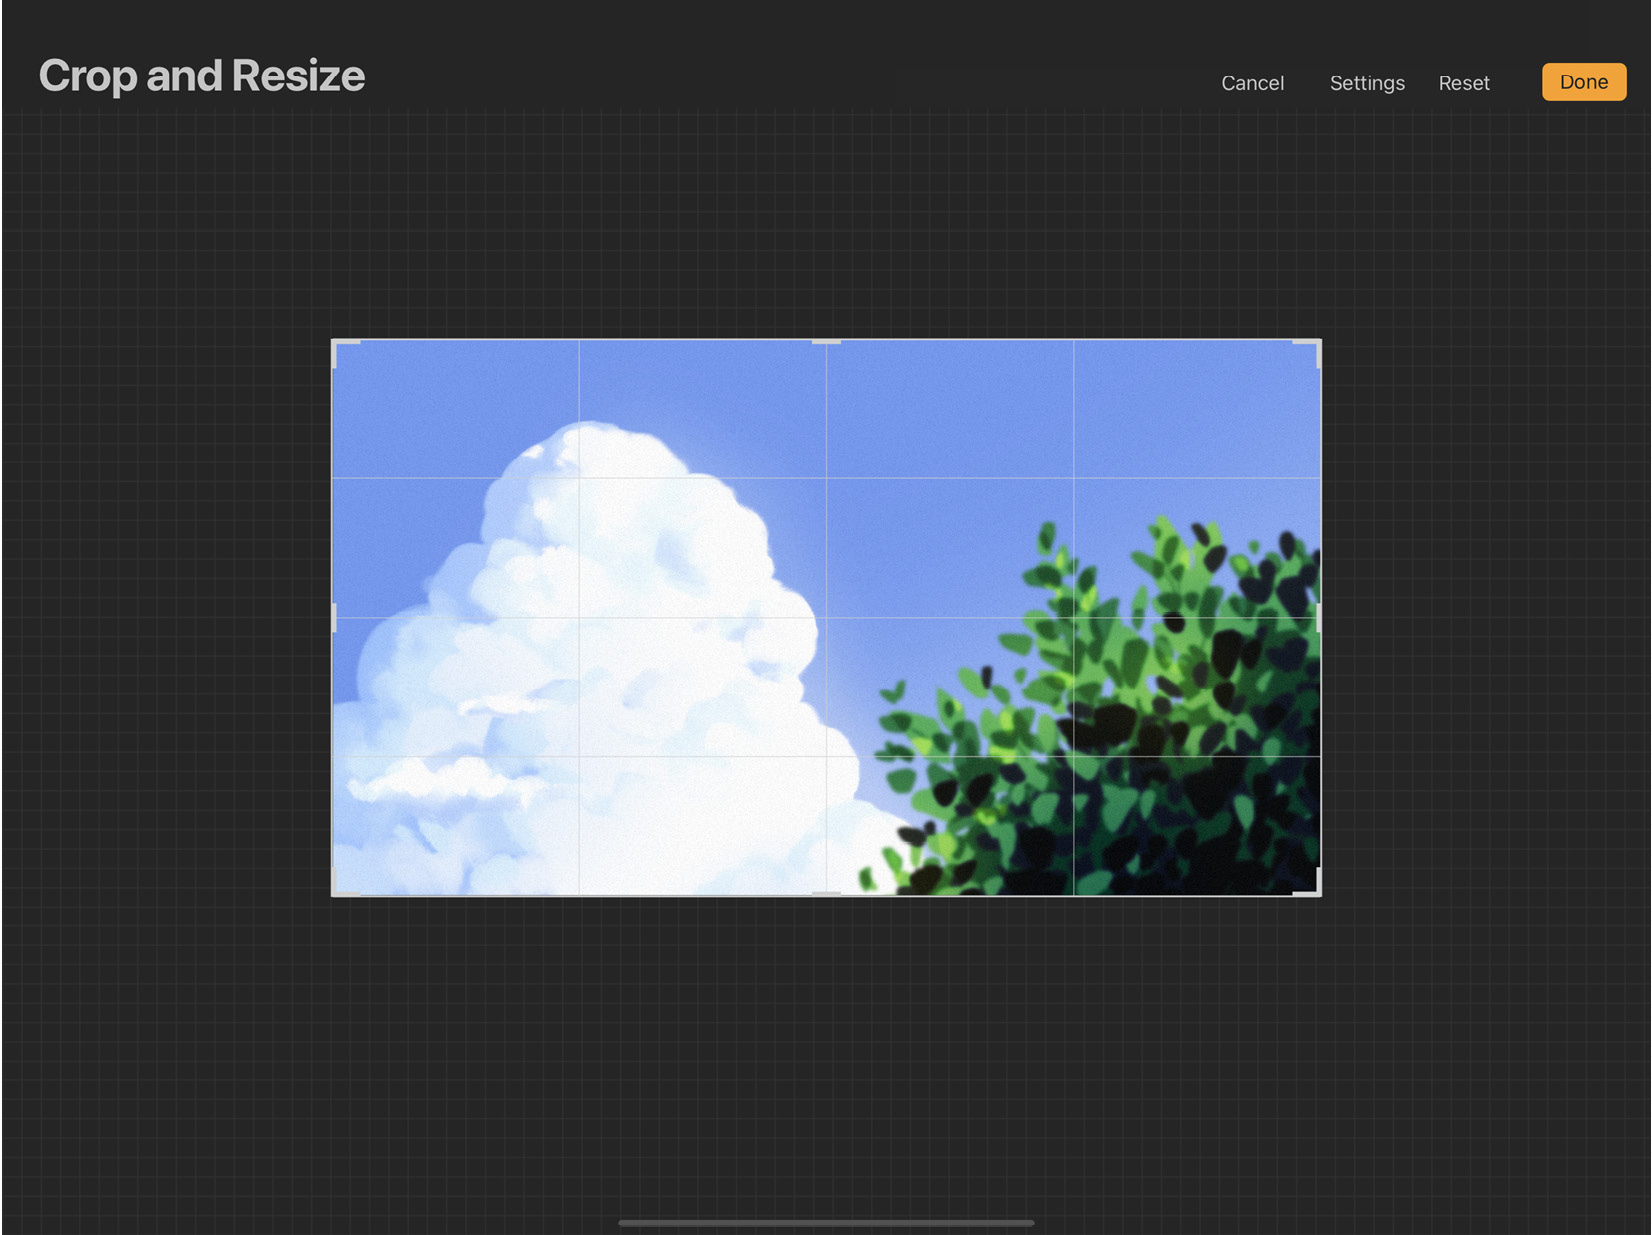
Figure 4.9: Crop and Resize
You will see four options in the top-right corner, namely Cancel, Settings, Reset, and Done. The Settings button will help you tweak the attributes of your canvas, such as size and resolution. A grid will appear over the canvas, as well as a Settings popover with editable fields. You can stretch the corners or edges of the grid to make your new canvas, like this:
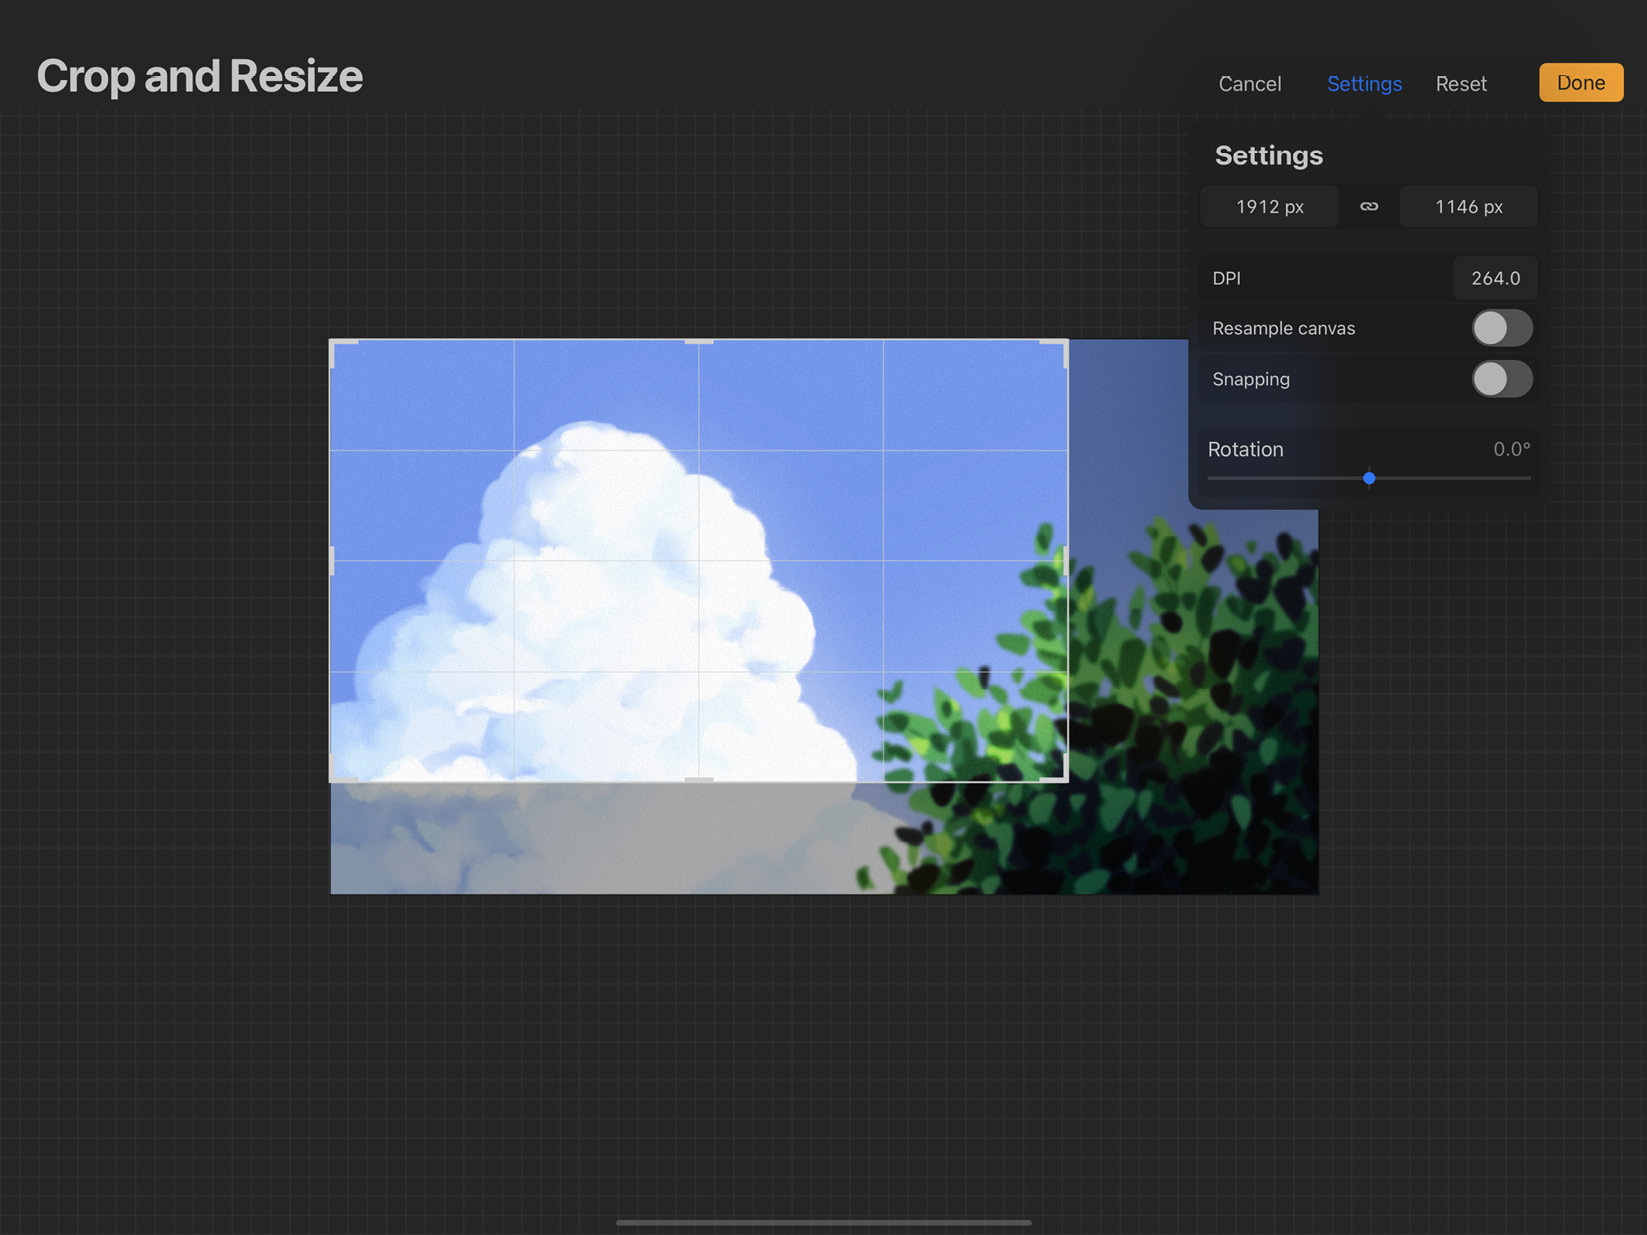
Figure 4.10: Crop settings
In the popover, you can see and edit the values to alter canvas dimensions and Dots Per Inch (DPI), which is shown here:
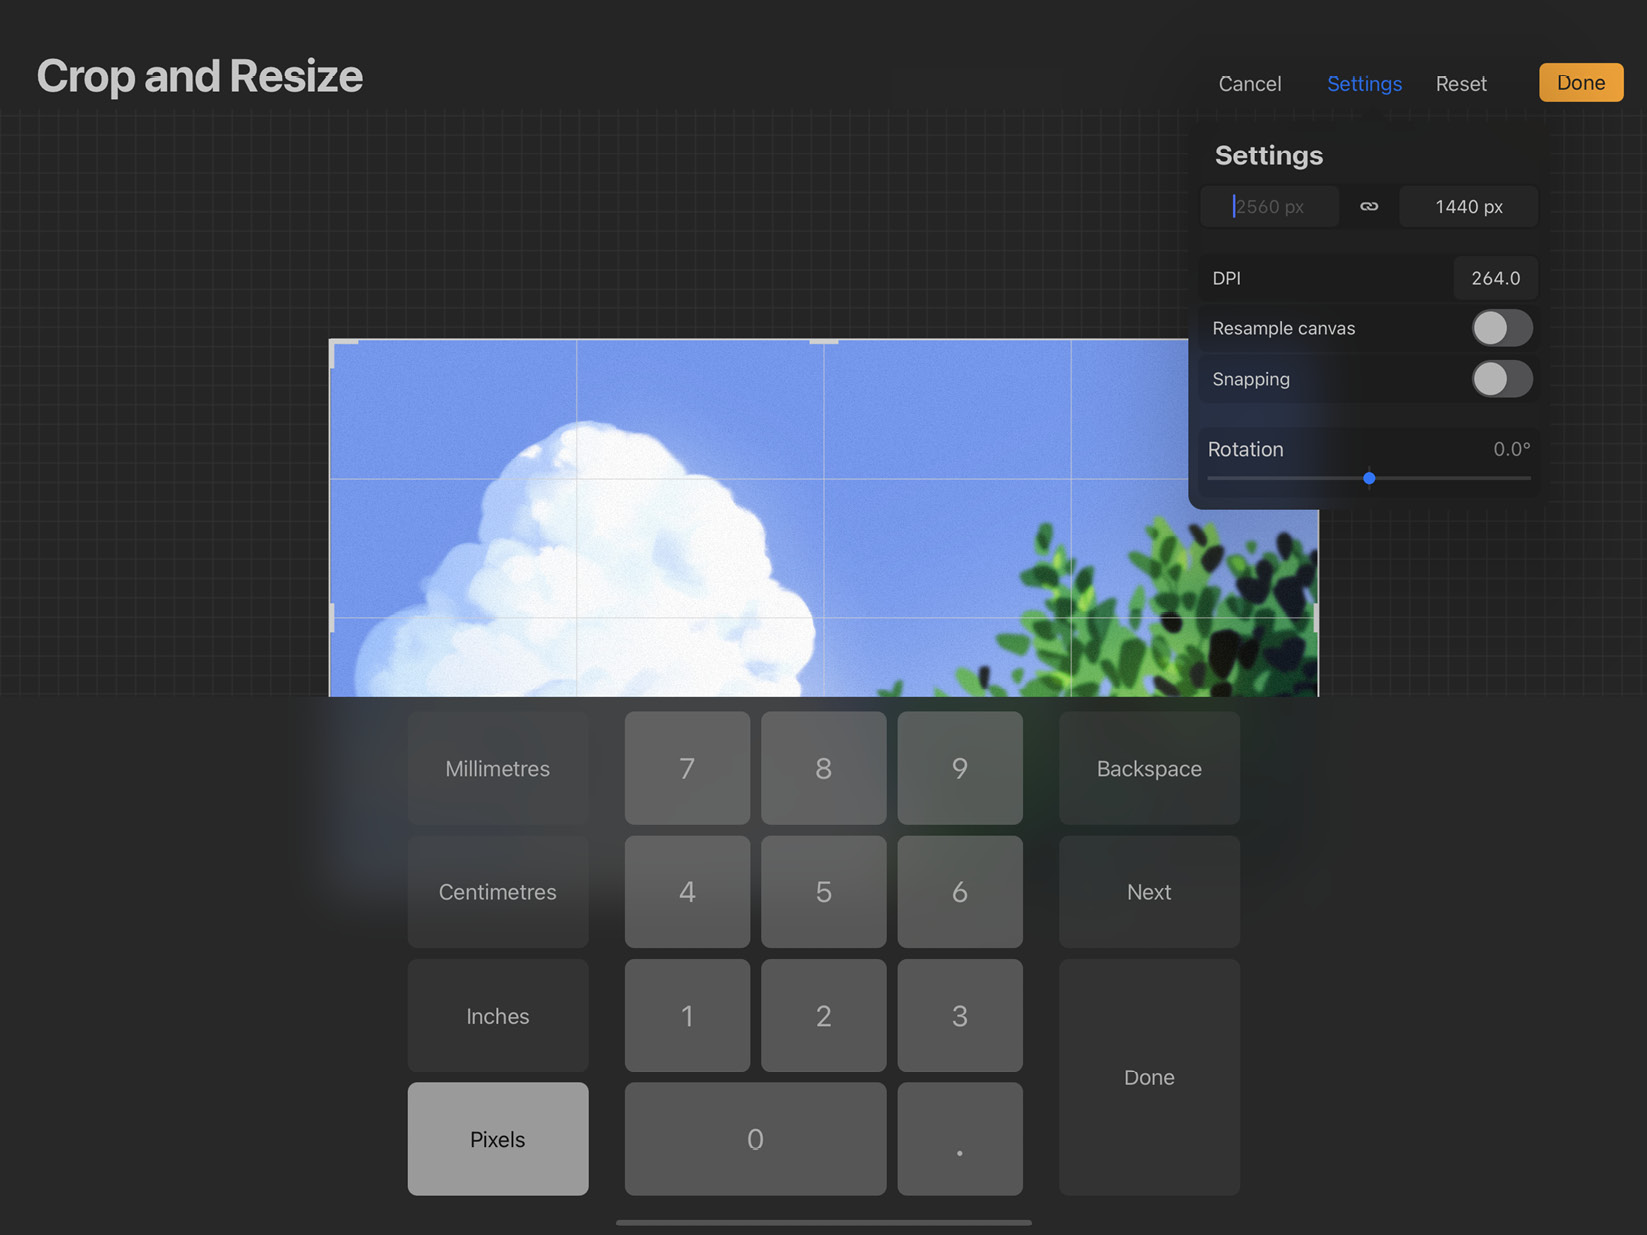
Figure 4.11: The Add menu
Tapping on the chainlink symbol will enable Aspect Lock. That means editing the height will proportionately change the width. In short, this allows you to uniformly scale the canvas boundaries without scaling its contents.
You can also edit the DPI value of your canvas. You should note that changing the DPI will proportionately alter the dimensions to fit the same number of pixels into your canvas. Note how the height and width values change depending on the DPI in these images:
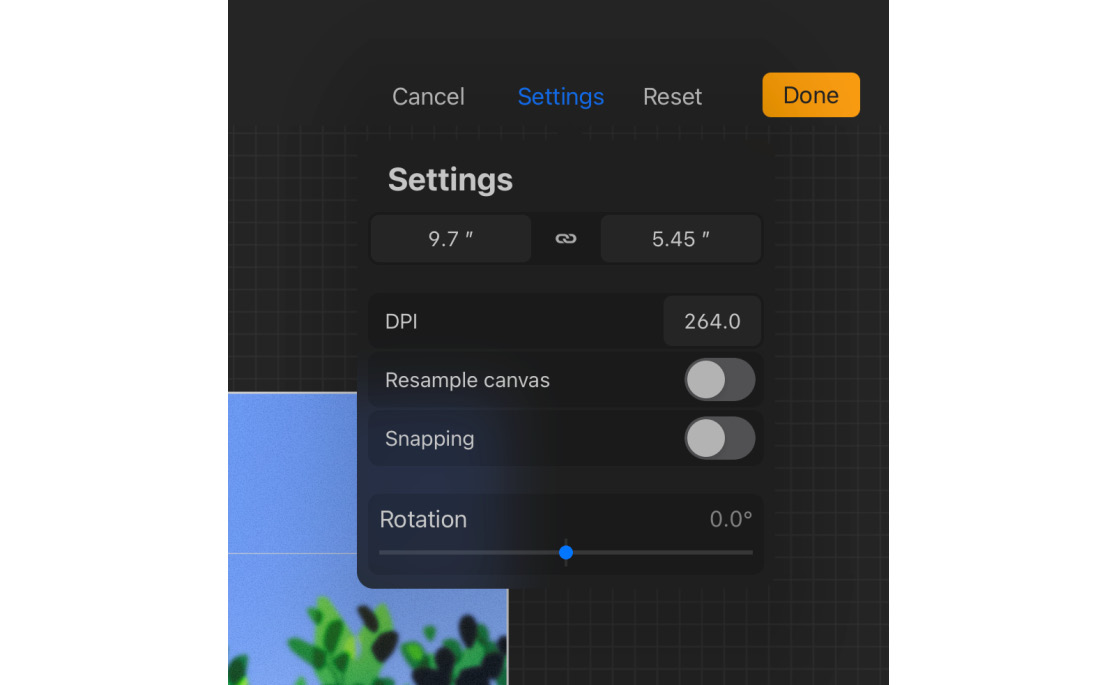
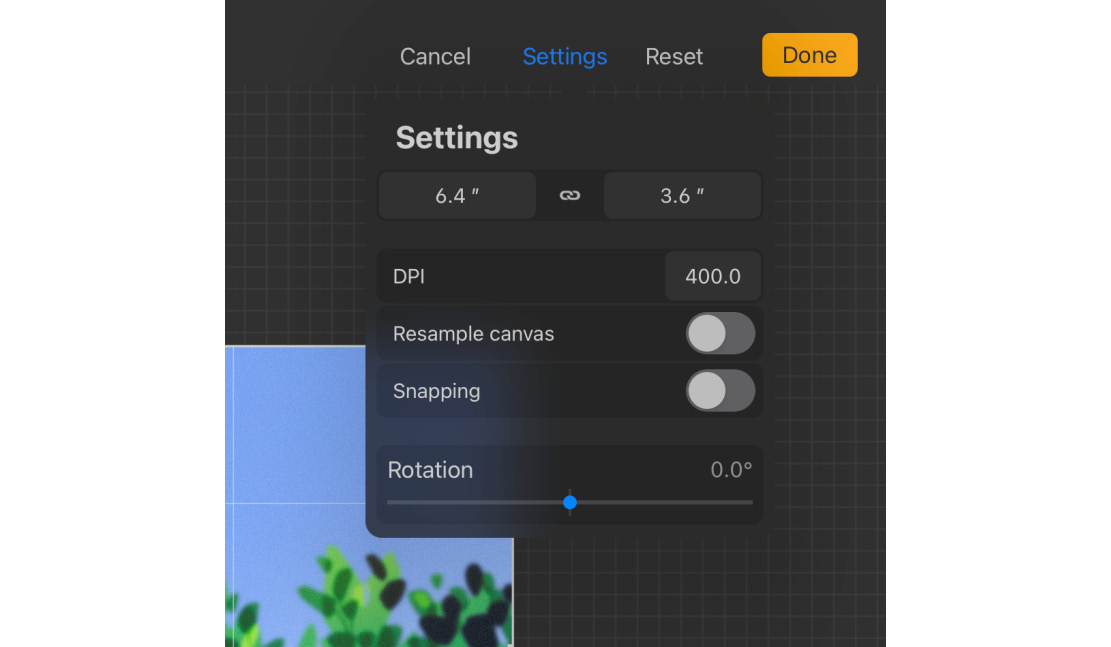
Figure 4.12: Dimensions with 264 DPI versus 400 DPI
The most versatile function available here is Resample canvas. Simply put, it helps you to scale an entire image up and down. Here are the ways to use it:
- Dragging and scaling the grid overlay: Doing this allows you to keep the dimensions of the canvas the same while choosing which part you want to keep inside the grid. For example, let’s use a 9.7 ” x 5.45 ” canvas. Now, let’s resample it, as shown here:
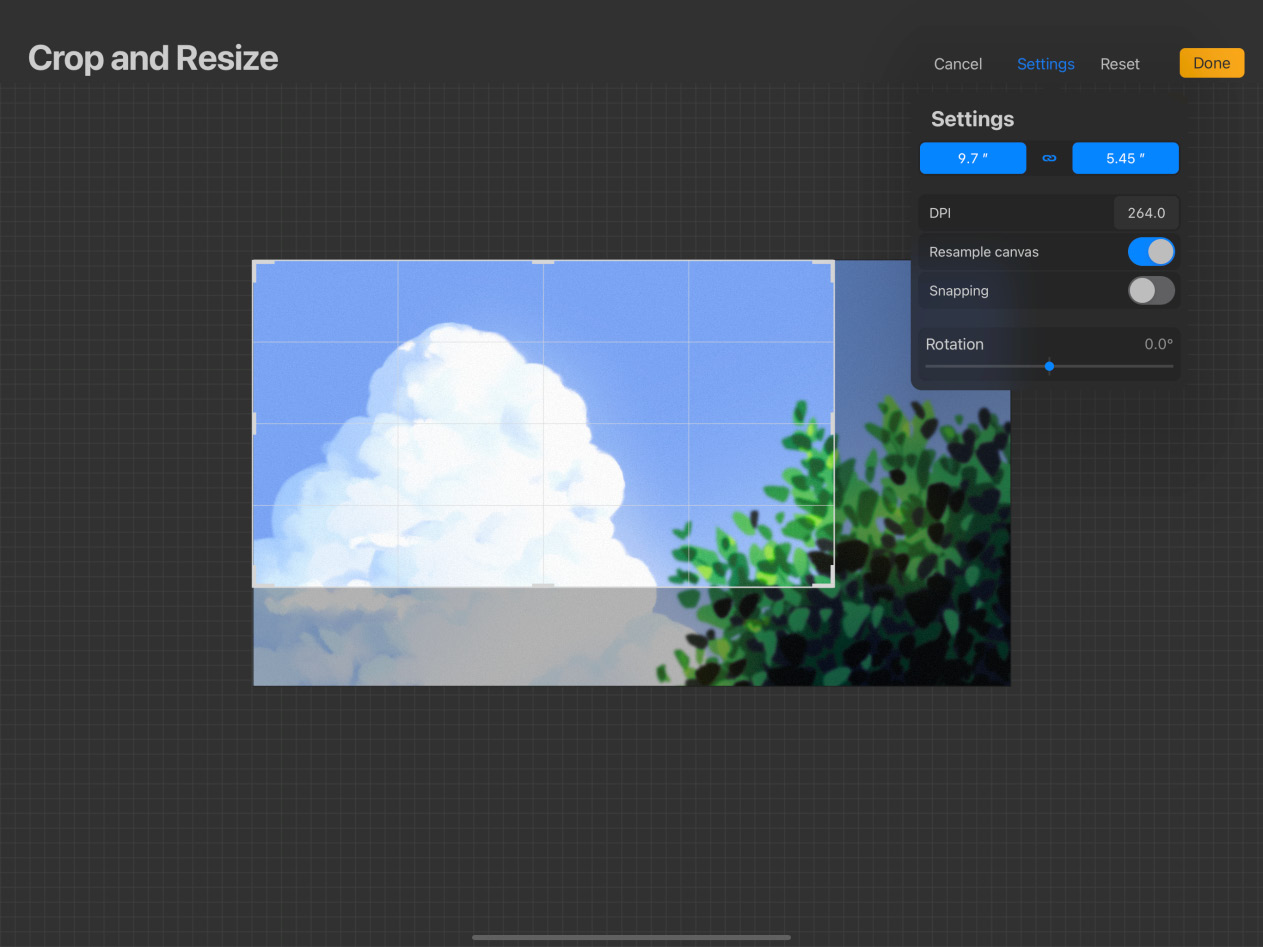
Figure 4.13: Resample canvas
Once we’ve done so, the final canvas will still be 9.7 ” x 5.45 ” but only have the portion visible in the grid. This will be the result:

Figure 4.14: The result of resampling
In short, this allows you to uniformly scale the contents without resizing the canvas boundaries.
- Entering values: If you would prefer to change the physical size of your canvas, tap on the numbers to edit them, as shown here:
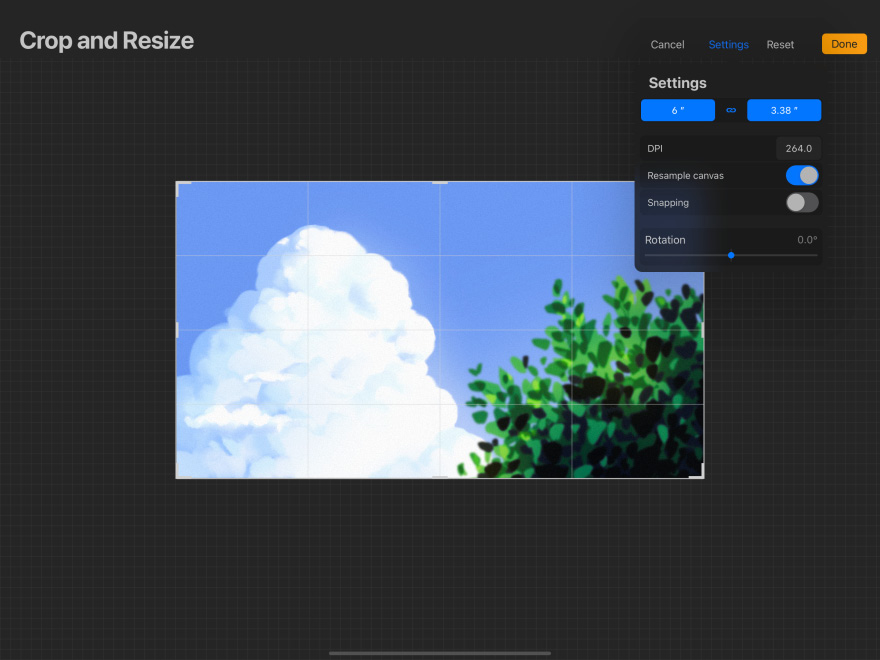
Figure 4.15: Resampling dimensions
This will change the dimensions of your artwork to fit into the overlay grid, which now has the size 6” x 3.38”. This essentially means scaling the entire canvas up or down, which can cause a loss of pixel information.
In short, this allows you to uniformly scale both the canvas and its contents together.
Important Note
Toggling Resample automatically enables Aspect Lock. If you would like the new canvas to have a different aspect ratio, edit the dimensions first and then hit Resample.
The next option under Settings is Snapping. Enabling this option will make the overlay grid snap to the edges, corners, or center of the present canvas, as shown in Figure 4.16:
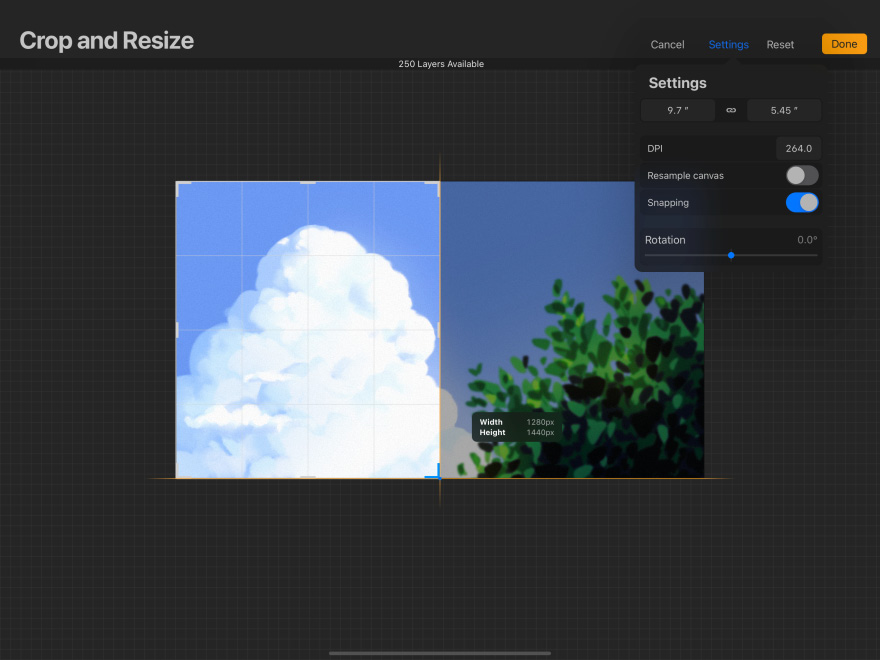
Figure 4.16: Snapping
This is a handy tool to extend your canvas to make a uniform border or trim it evenly from all sides. You can also use it to extend the canvas toward one side or diagonally.
The last setting option is called Rotation. Move the slider to rotate the canvas up to 45° on each side, with respect to the grid, as shown here:
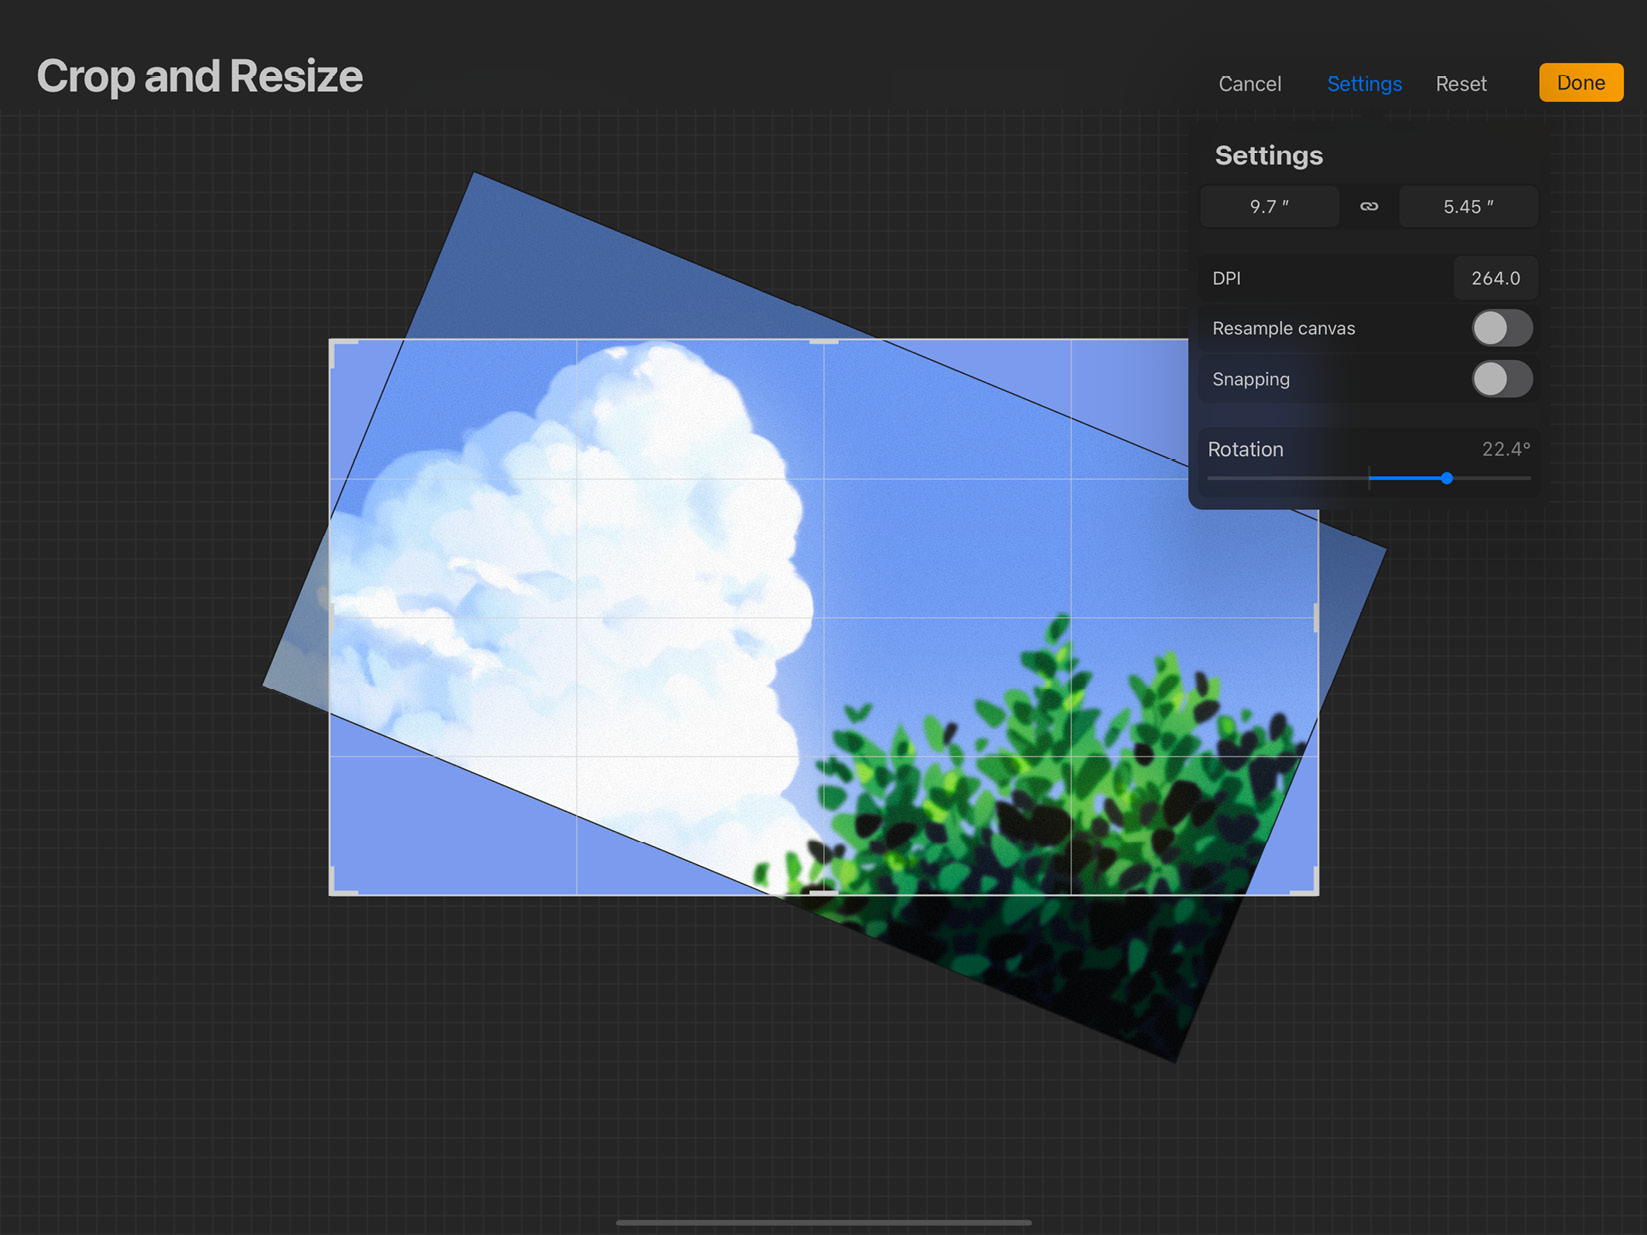
Figure 4.17: Rotation
Once you are happy with the resizing, tap on Done to finalize your adjustments. If you’d like to start over, tap on Reset to revert the canvas to the original settings. To discard your resizing, tap on Cancel.
Animation Assist
The next option in the menu is called Animation Assist. As the name suggests, it helps you to make animations on Procreate. When Animation Assist is toggled on, it transforms the interface into one suited for animation, as shown in the following screenshot. Refer to Chapter 12, Using Assisted Drawing Tools, for a detailed rundown of this feature:
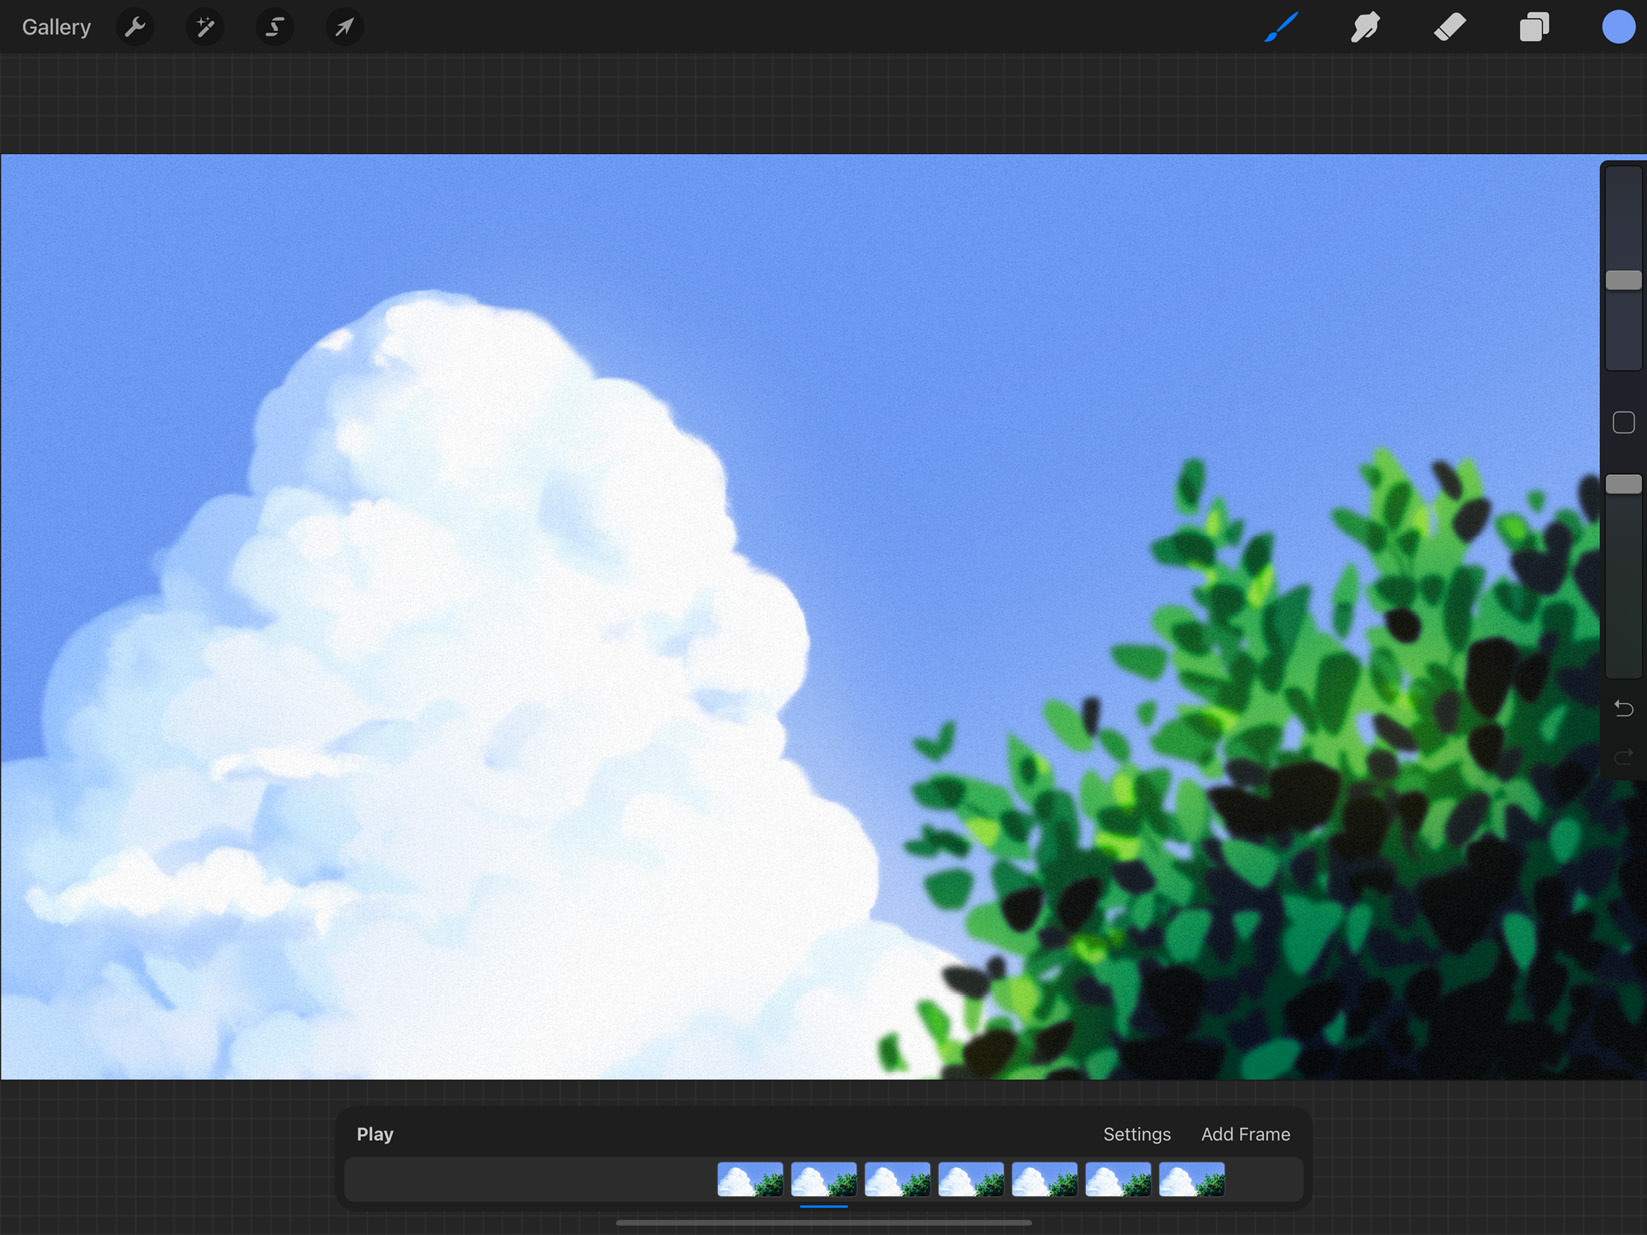
Figure 4.18: Animation Assist
Page Assist
This is the next option, called Page Assist, which turns your canvas into a multi-page structure. With this toggled on, you can create pages like that of a sketchbook or comic book, as shown in the image below:
Fig. 4.19: Page Assist
For more information about this feature, refer to Chapter 14, Sketchbooking with Page Assist.
Drawing Guide
Drawing Guide is used when you want to draw precisely within constraints such as perspective, symmetry, or grids. When toggled on, you can tap on the option called Edit Drawing Guide right below it to customize the kind of drawing tools you need, as shown in the following screenshot. Chapter 12, Using Assisted Drawing Tools, explains this tool in further detail:
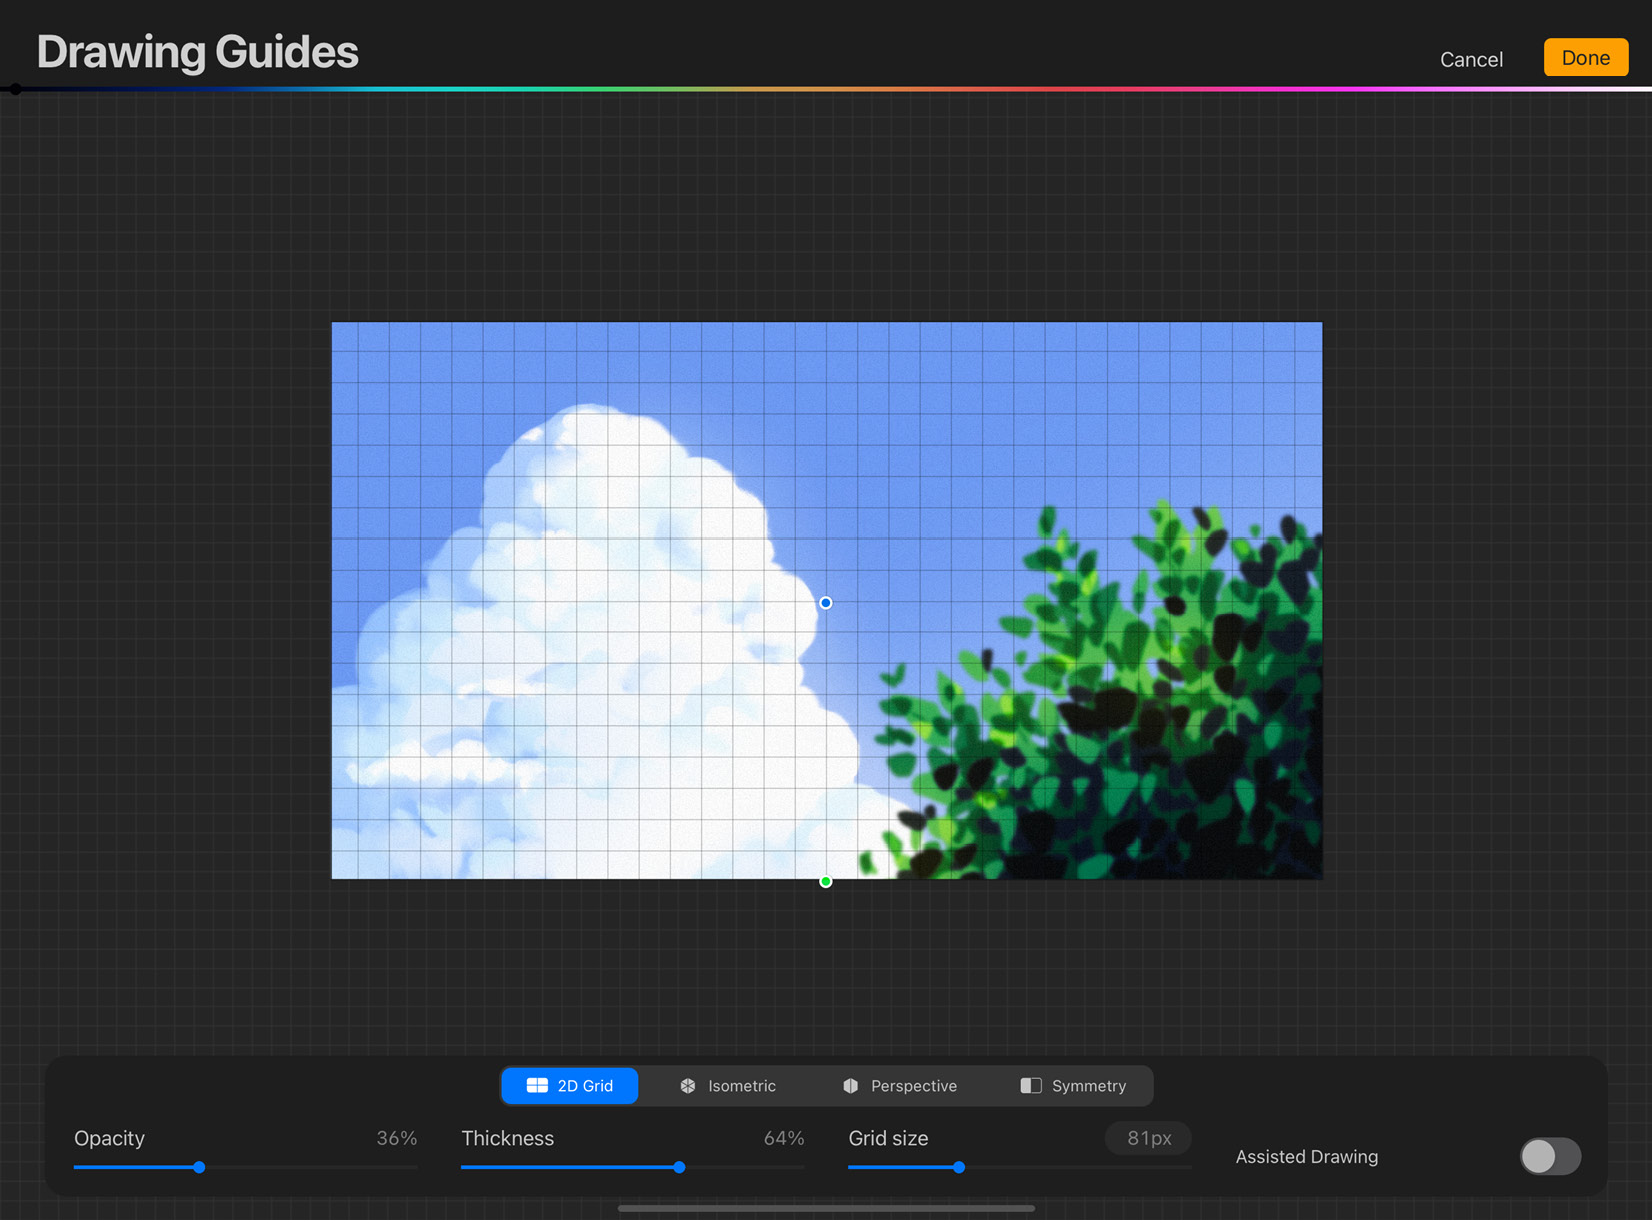
Figure 4.20: Edit Drawing Guide
The Reference companion
Using the Reference feature allows you to view an image separately over your canvas, in a floating window. The Reference companion looks like this:
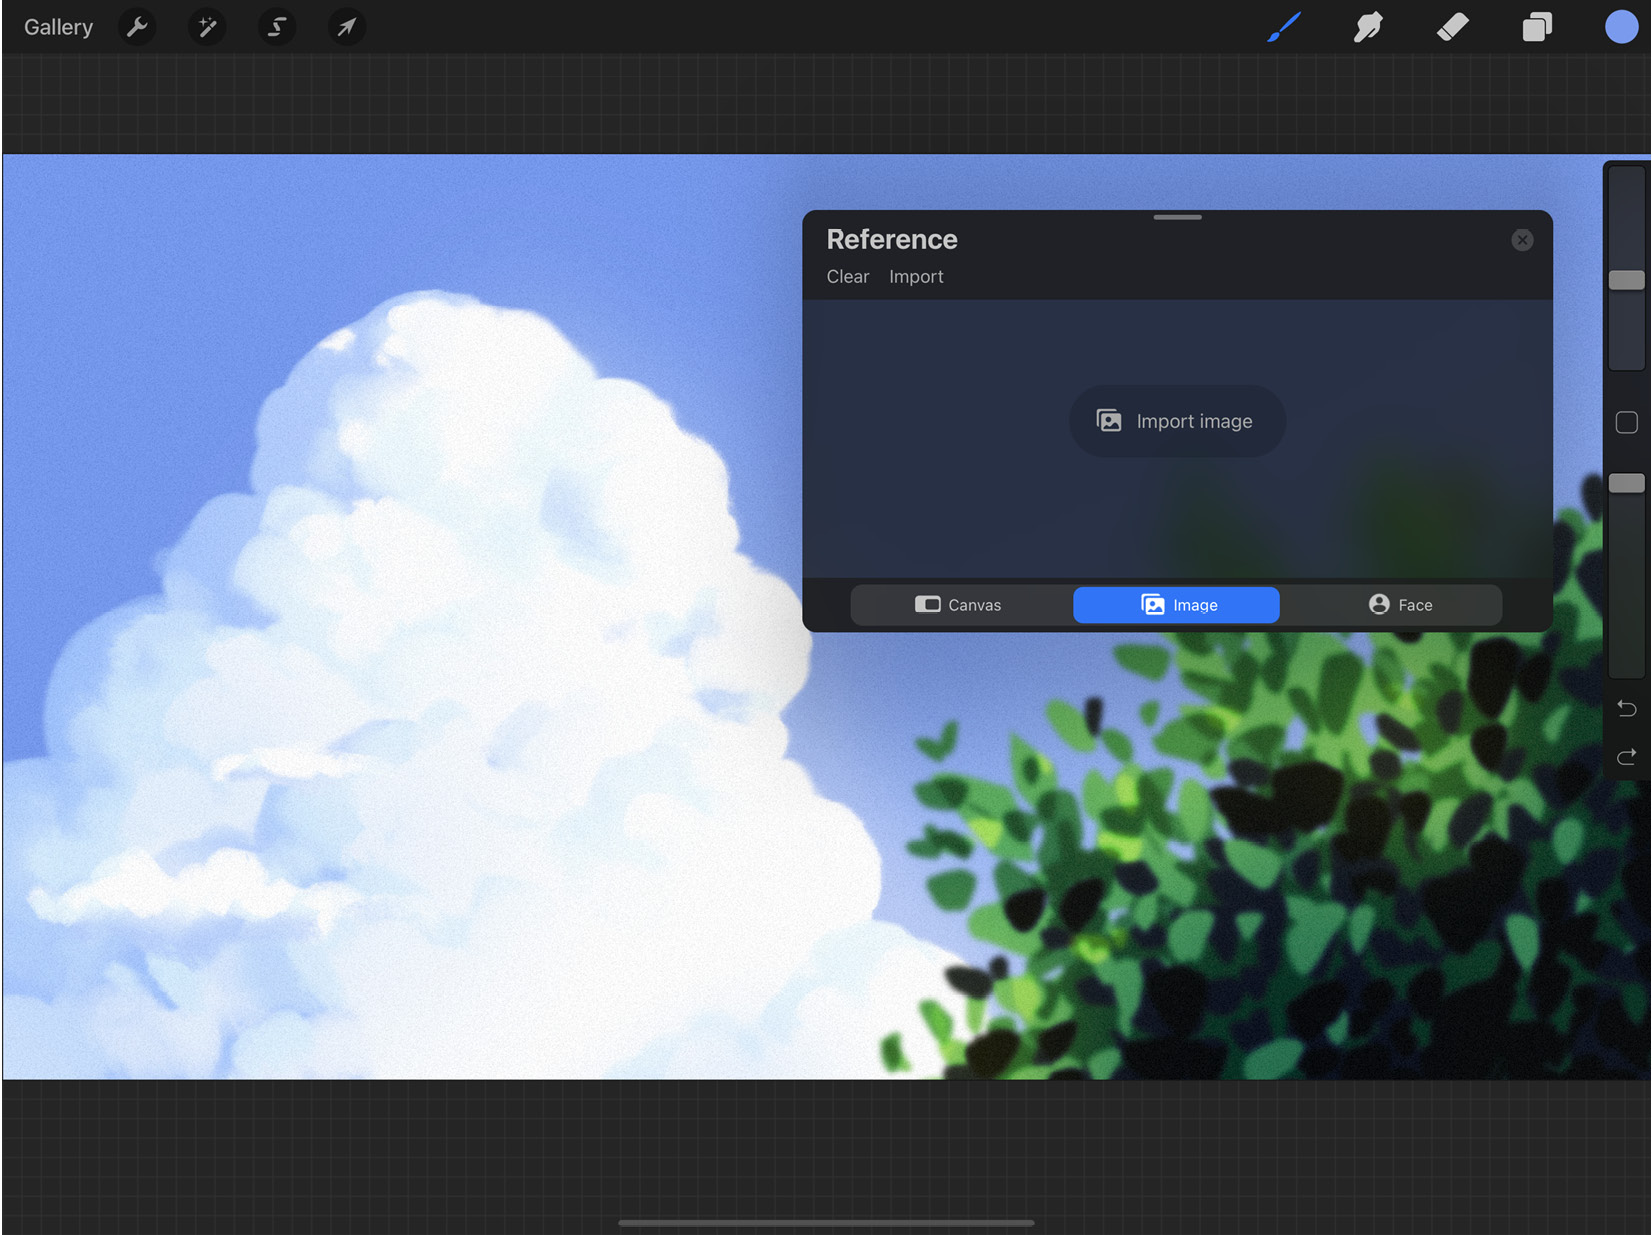
Figure 4.21: The Reference companion
There are several sources you can choose to reference from, namely Canvas, Image, and Face, as explained here:
- Canvas: Use your canvas itself as a reference. This saves you the trouble of having to zoom in and out repeatedly, since you can view the whole canvas separately while drawing or look at one part of the drawing while you work on a different part. You can also pick colors from the reference window using the eyedropper tool. The Reference window looks like this:
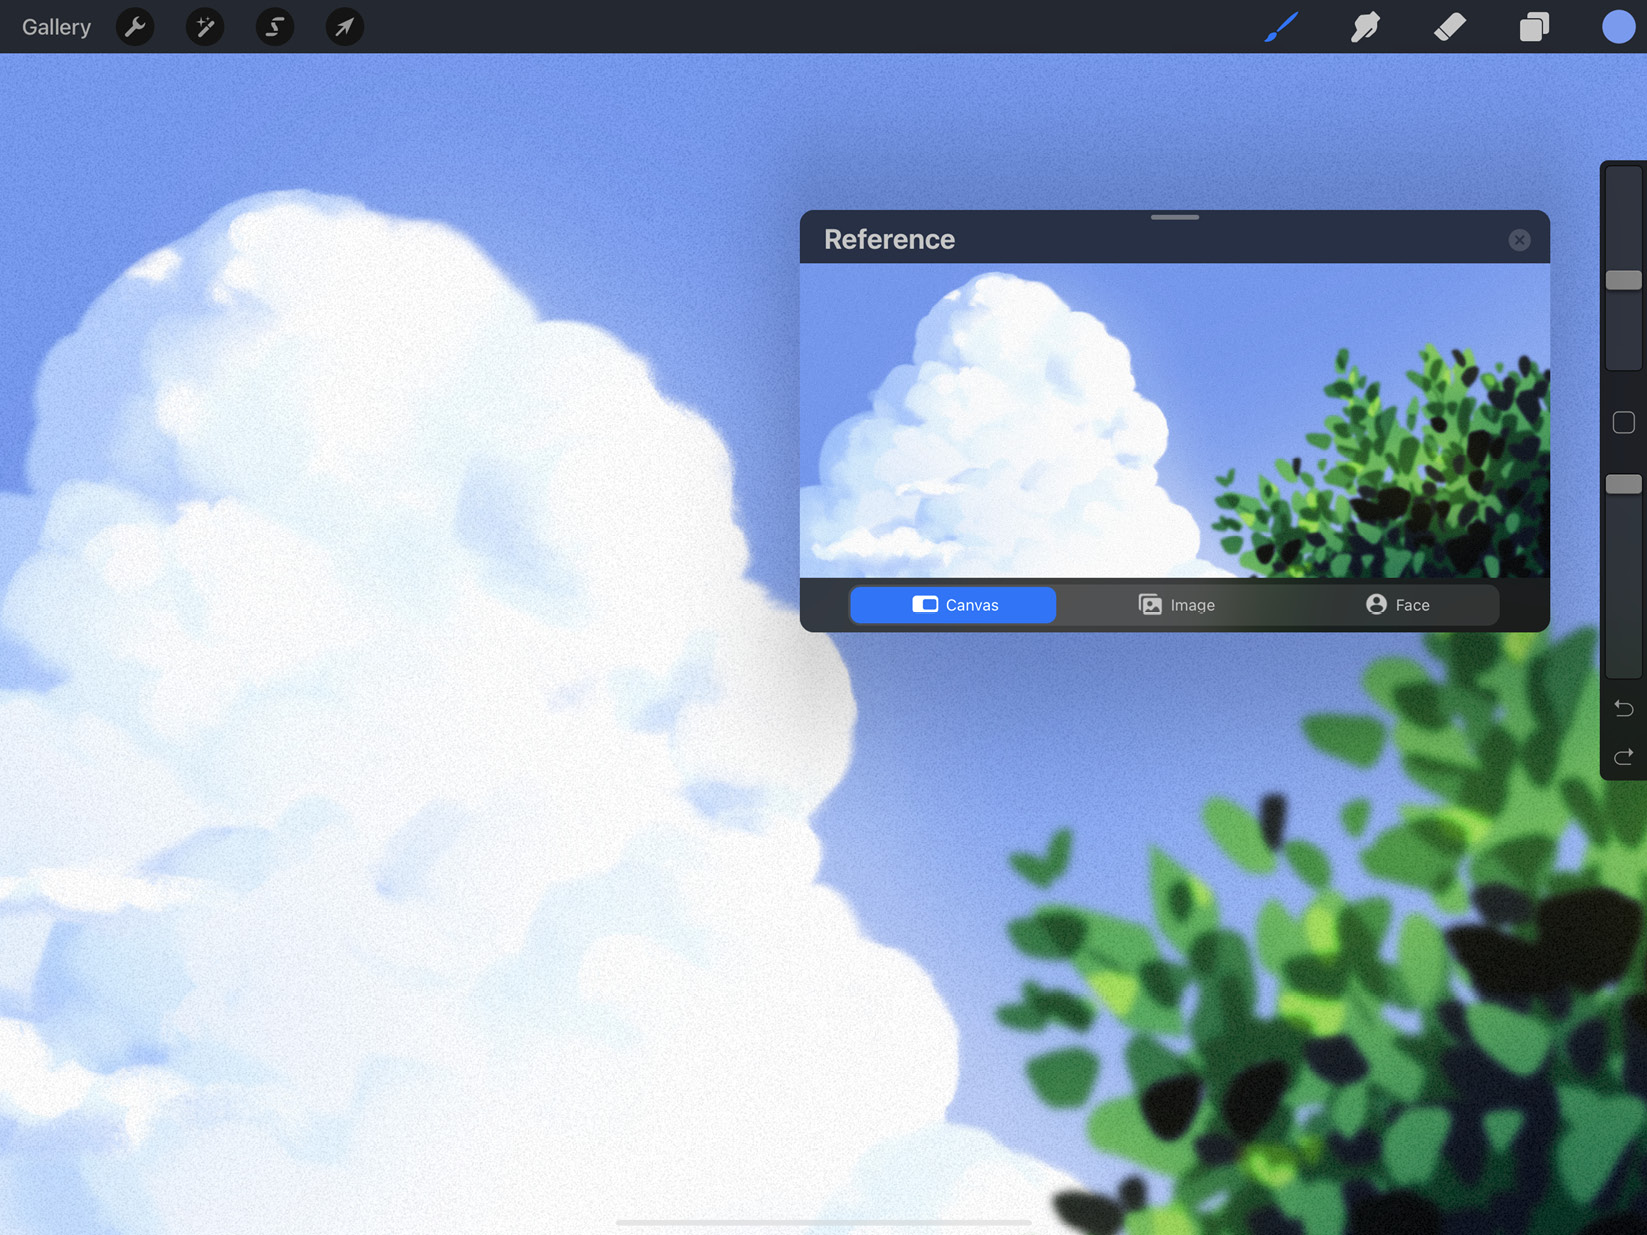
Figure 4.22: Reference Canvas
- Image: Import a different image from your gallery to use as a reference without having to use Split View or a separate layer for it. Tap on Import Image to select a reference picture from Photos, as shown here:
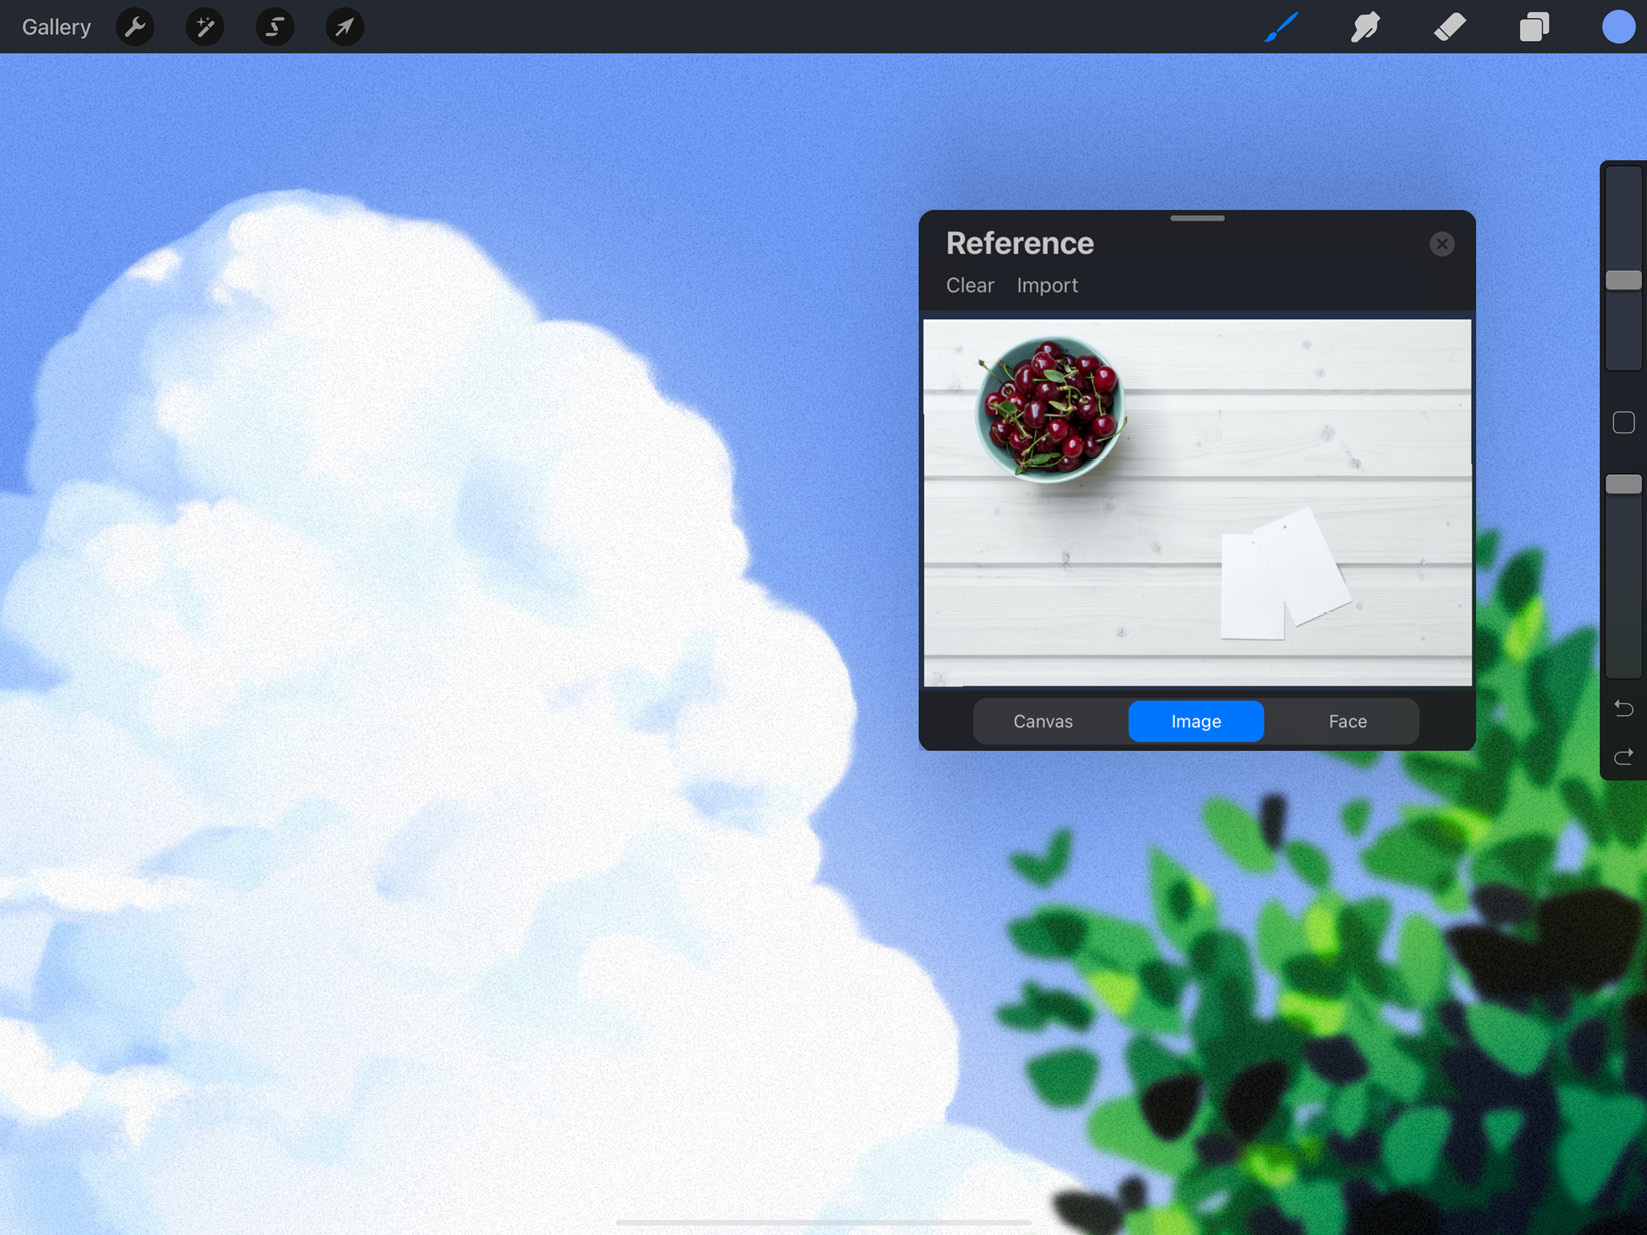
Figure 4.23: A reference image
Tap on Clear to remove the current reference image. Here too, you can use the eyedropper to pick colors directly from the reference image.
- Face: On supported iPad models, you will find another button that says Face. This feature lets you use Augmented Reality to “draw on your face” using FacePaint. This will turn on your front camera inside your reference window and automatically detect your face. Whatever you draw on the canvas will now appear on your face, similar to a camera filter.
Use the light gray horizontal bar on the top edge of the reference window to move it around. To resize the window, simply place your finger on any of its four corners and drag.
Flip Canvas
The next two options are Flip Canvas Horizontally and Flip Canvas Vertically, which are used to flip your canvas about these two axes.
Important Note
Flipping your canvas affects how your exports look. The exported image will have the same orientation as the flipped canvas. However, the time-lapse of the canvas will still retain the original orientation. Hence, the image and the time-lapse may look like flipped versions of each other.
Canvas Info
The last option on the menu is Canvas Info. This is where you can access all the specific information about your canvas. This data is sectioned as follows:
- About this artwork: Here, you can add personal information such as a profile image, name, and signature that will be embedded into your Procreate file. You will also be able to view the file’s date of creation and latest modification, as shown here:
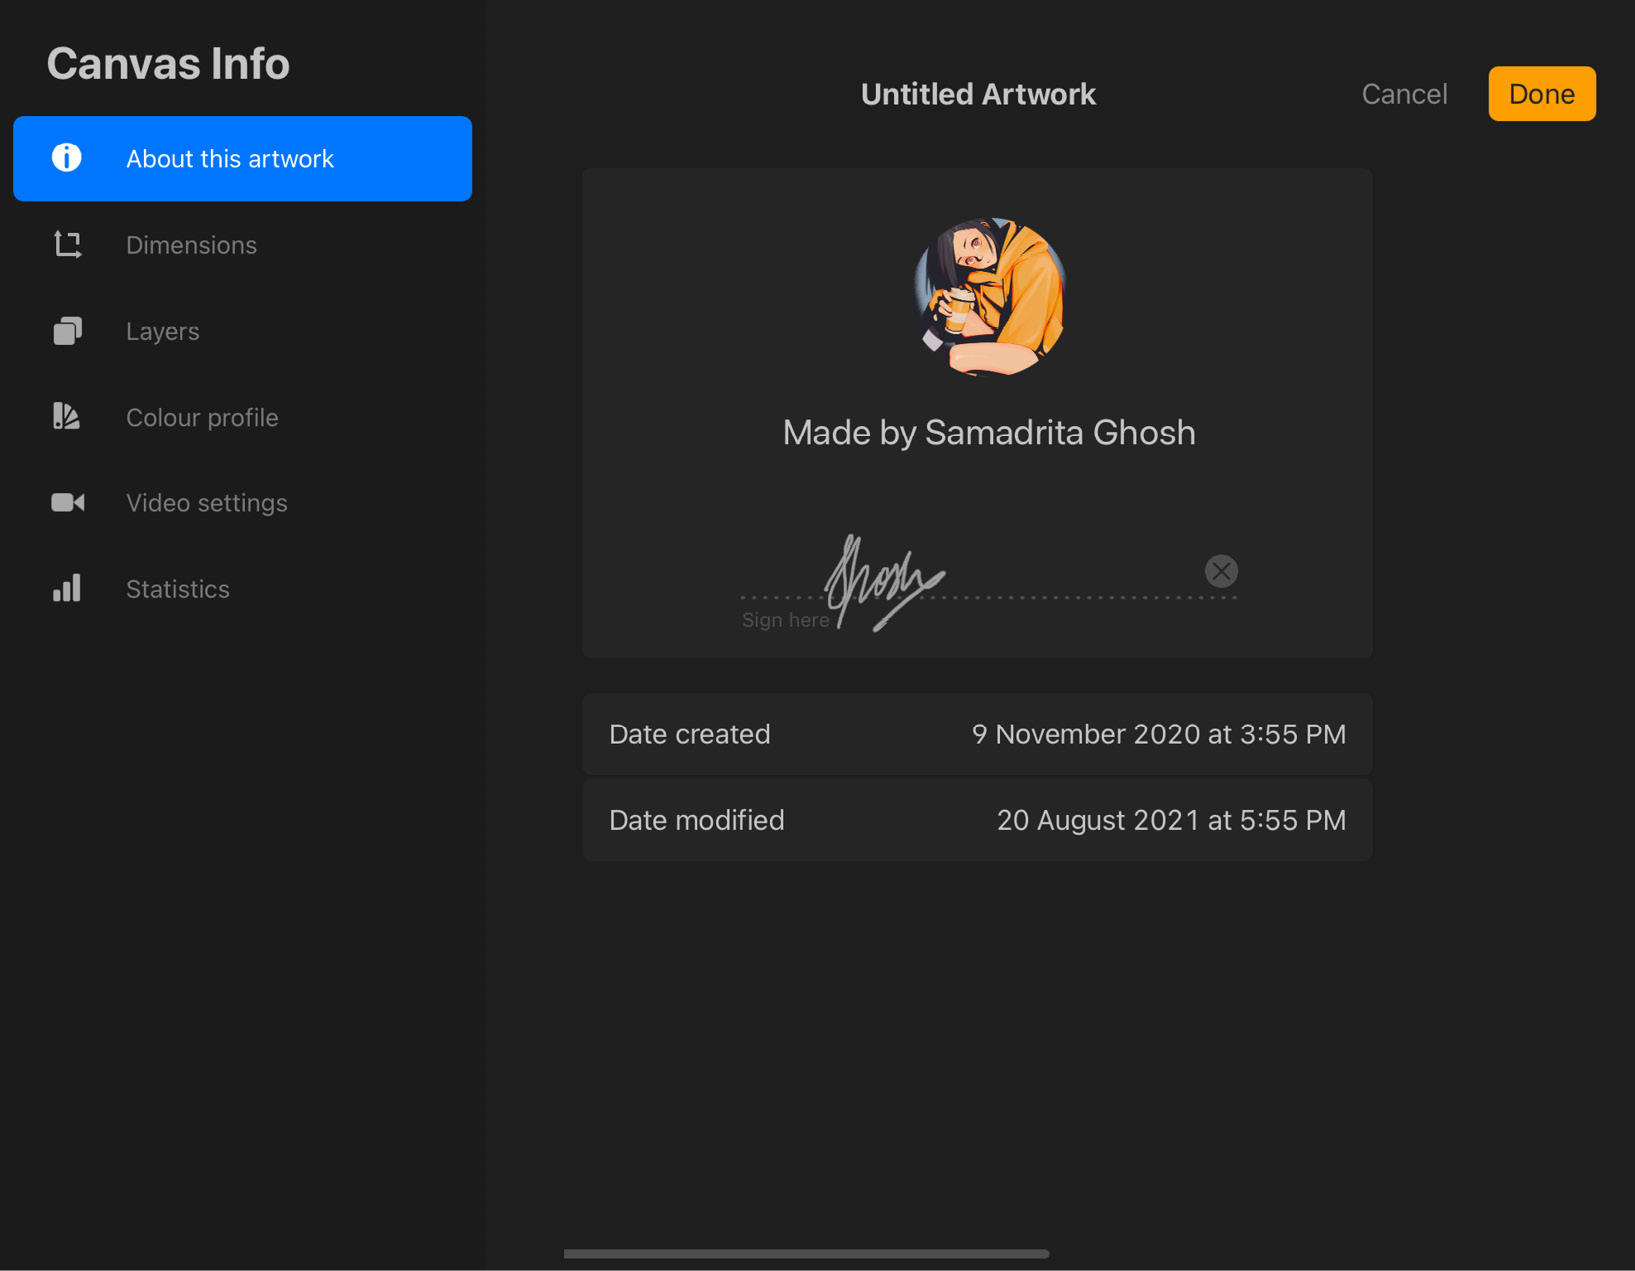
Figure 4.24: About this artwork
- Dimensions: This tab lets you check the height/width of a canvas in pixels as well as physical units of measurement, as shown here:
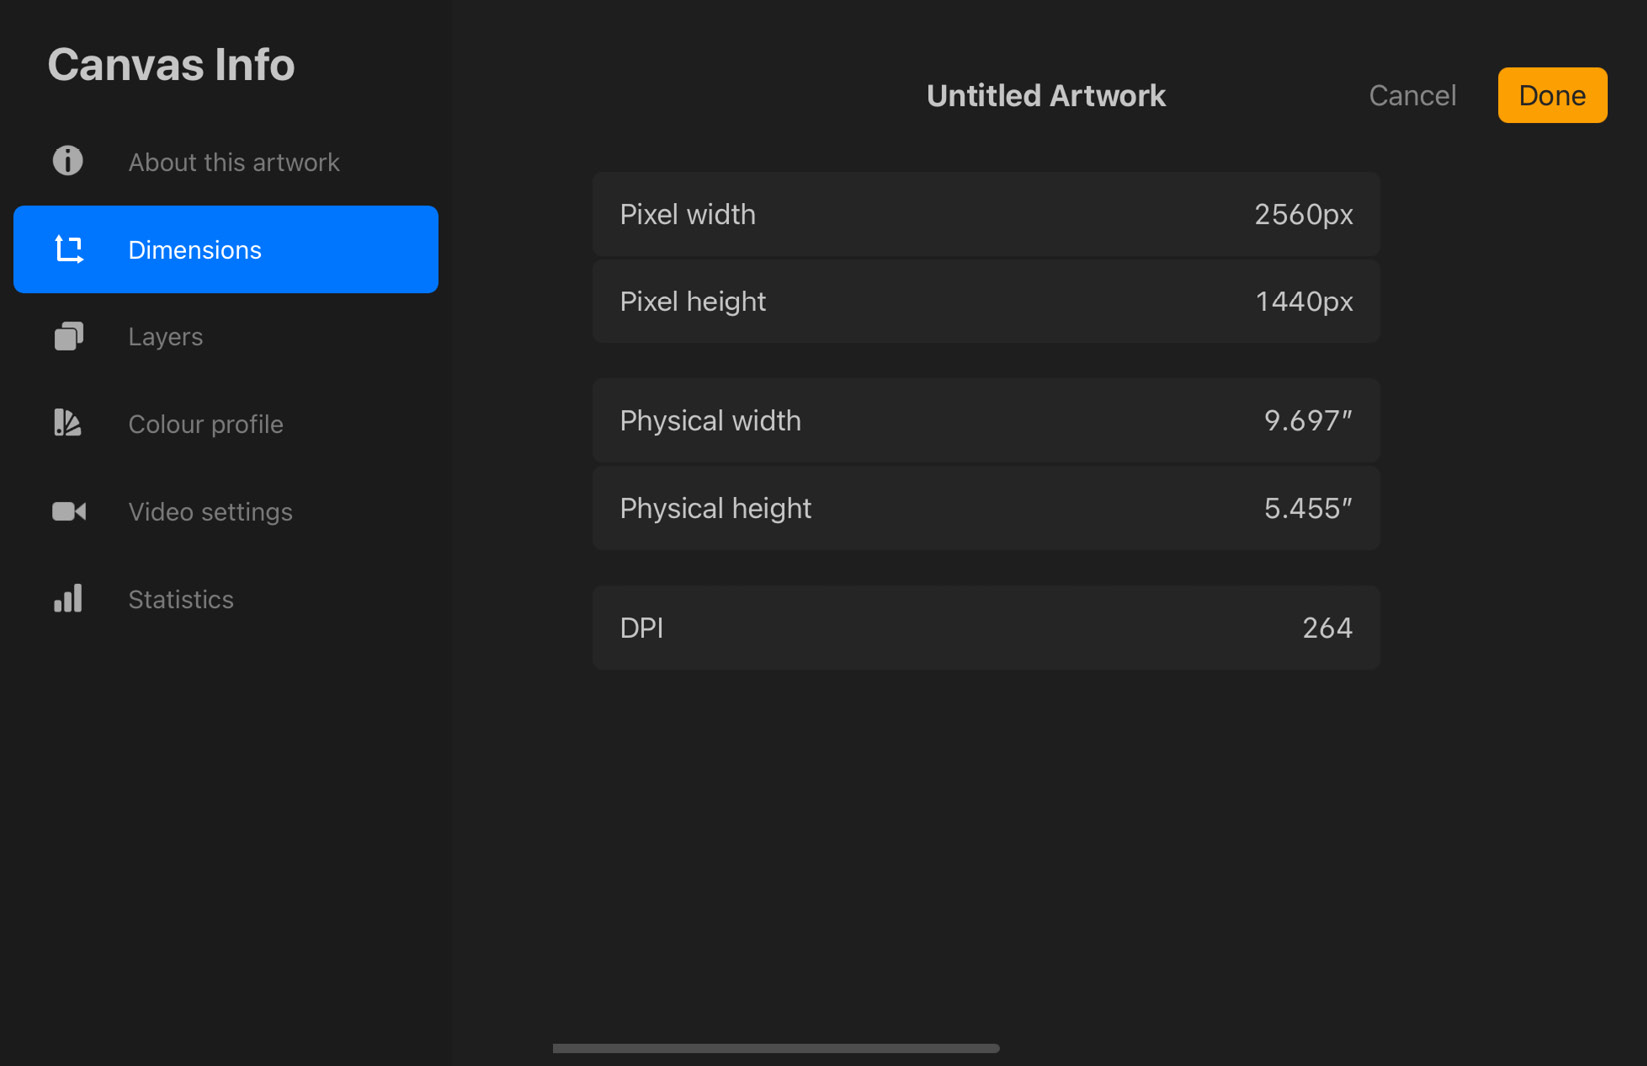
Figure 4.25: Dimensions
The DPI of your canvas can also be checked here. Refer to Chapter 2, Getting Started – Setting Up a Canvas, to learn more about dimensions and DPI.
- Layers: Check the layer limit of your canvas, how many layers you have already used, the number of layers still available to be added, and the number of assisted layers, clipping layers, layer masks, and layer groups that are currently in use:
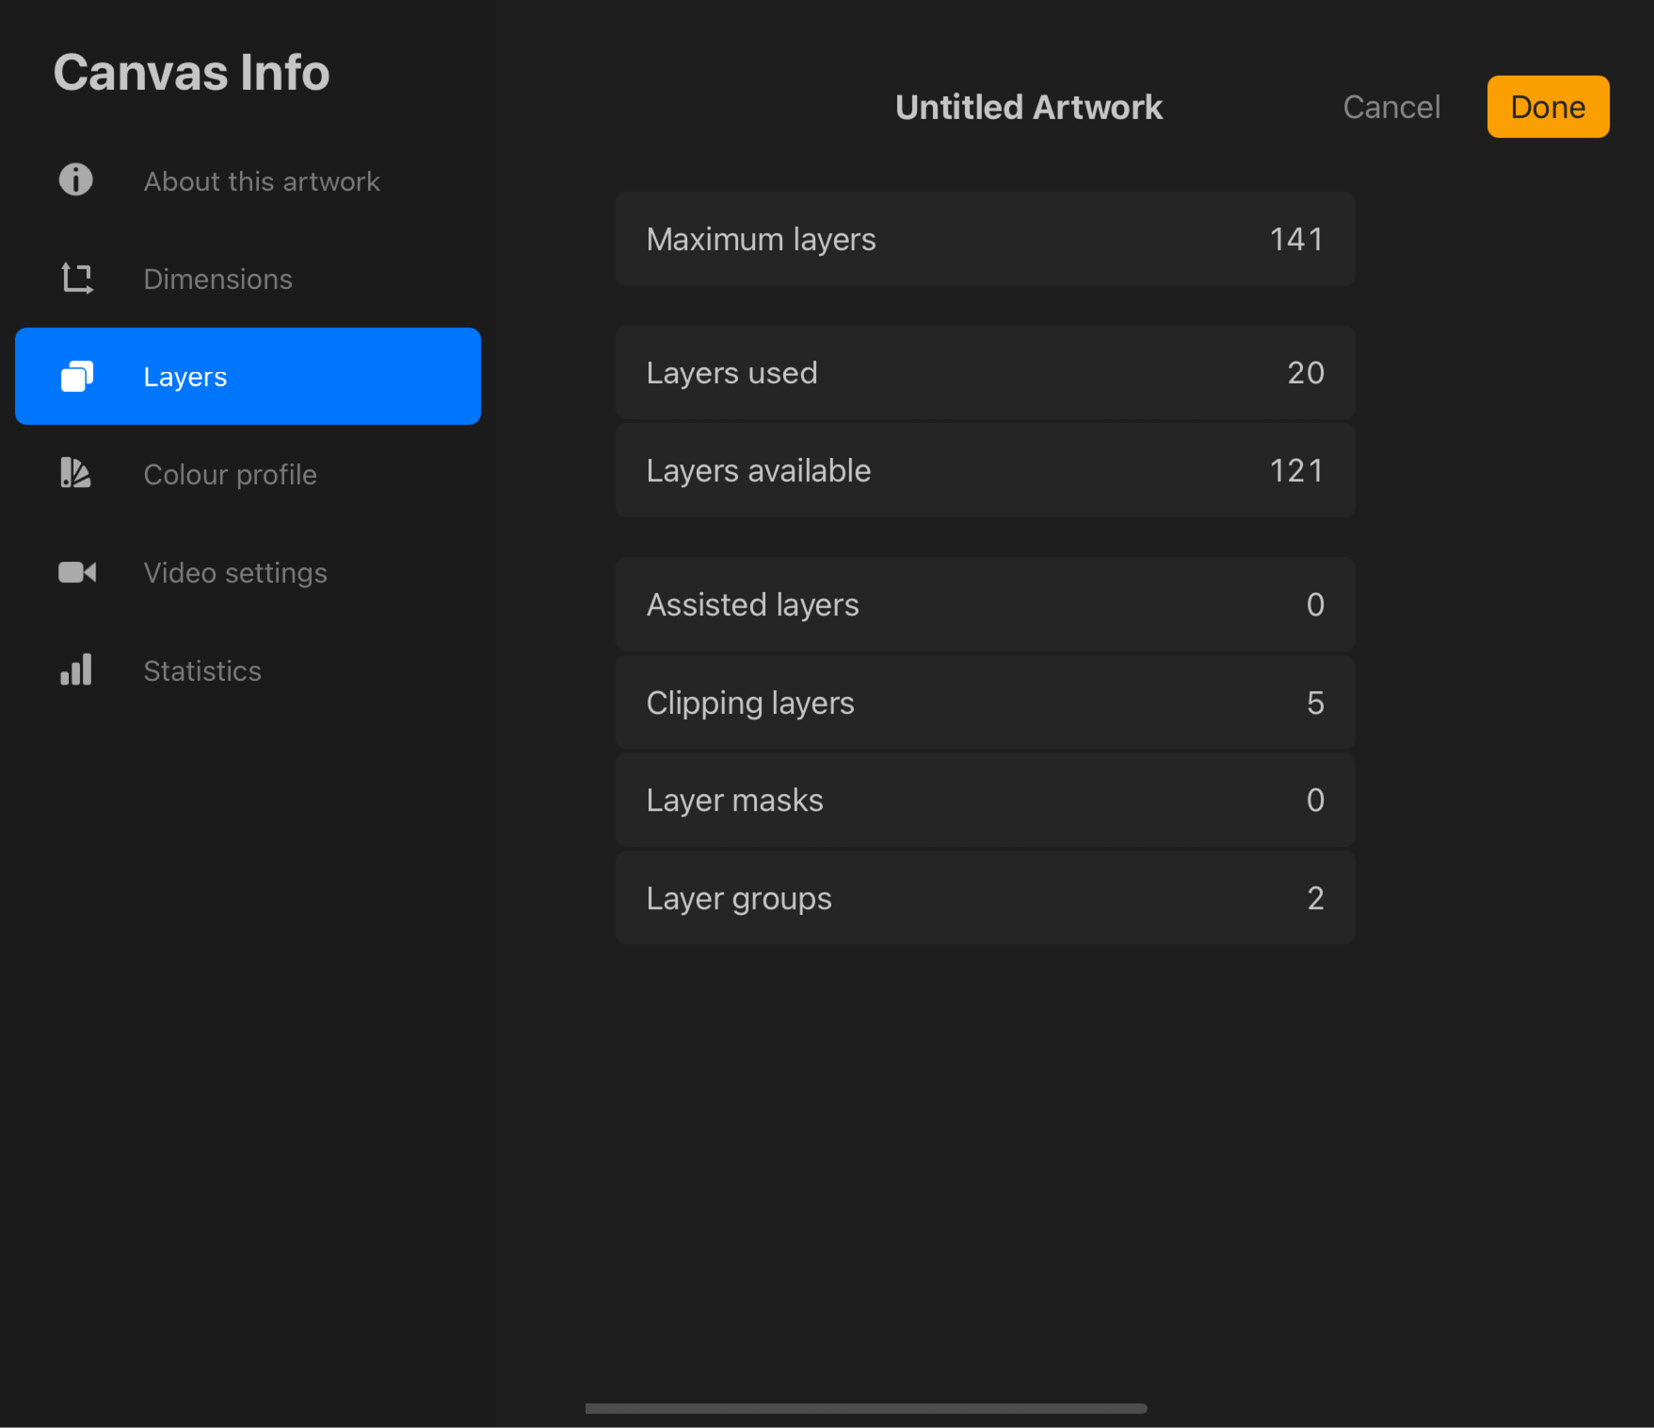
Figure 4.26: Layers
Find detailed information about the different properties of layers in Chapter 7, Organizing Your Layers.
- Colour profile: This tab lets you check which color profile you chose for the canvas while creating it.
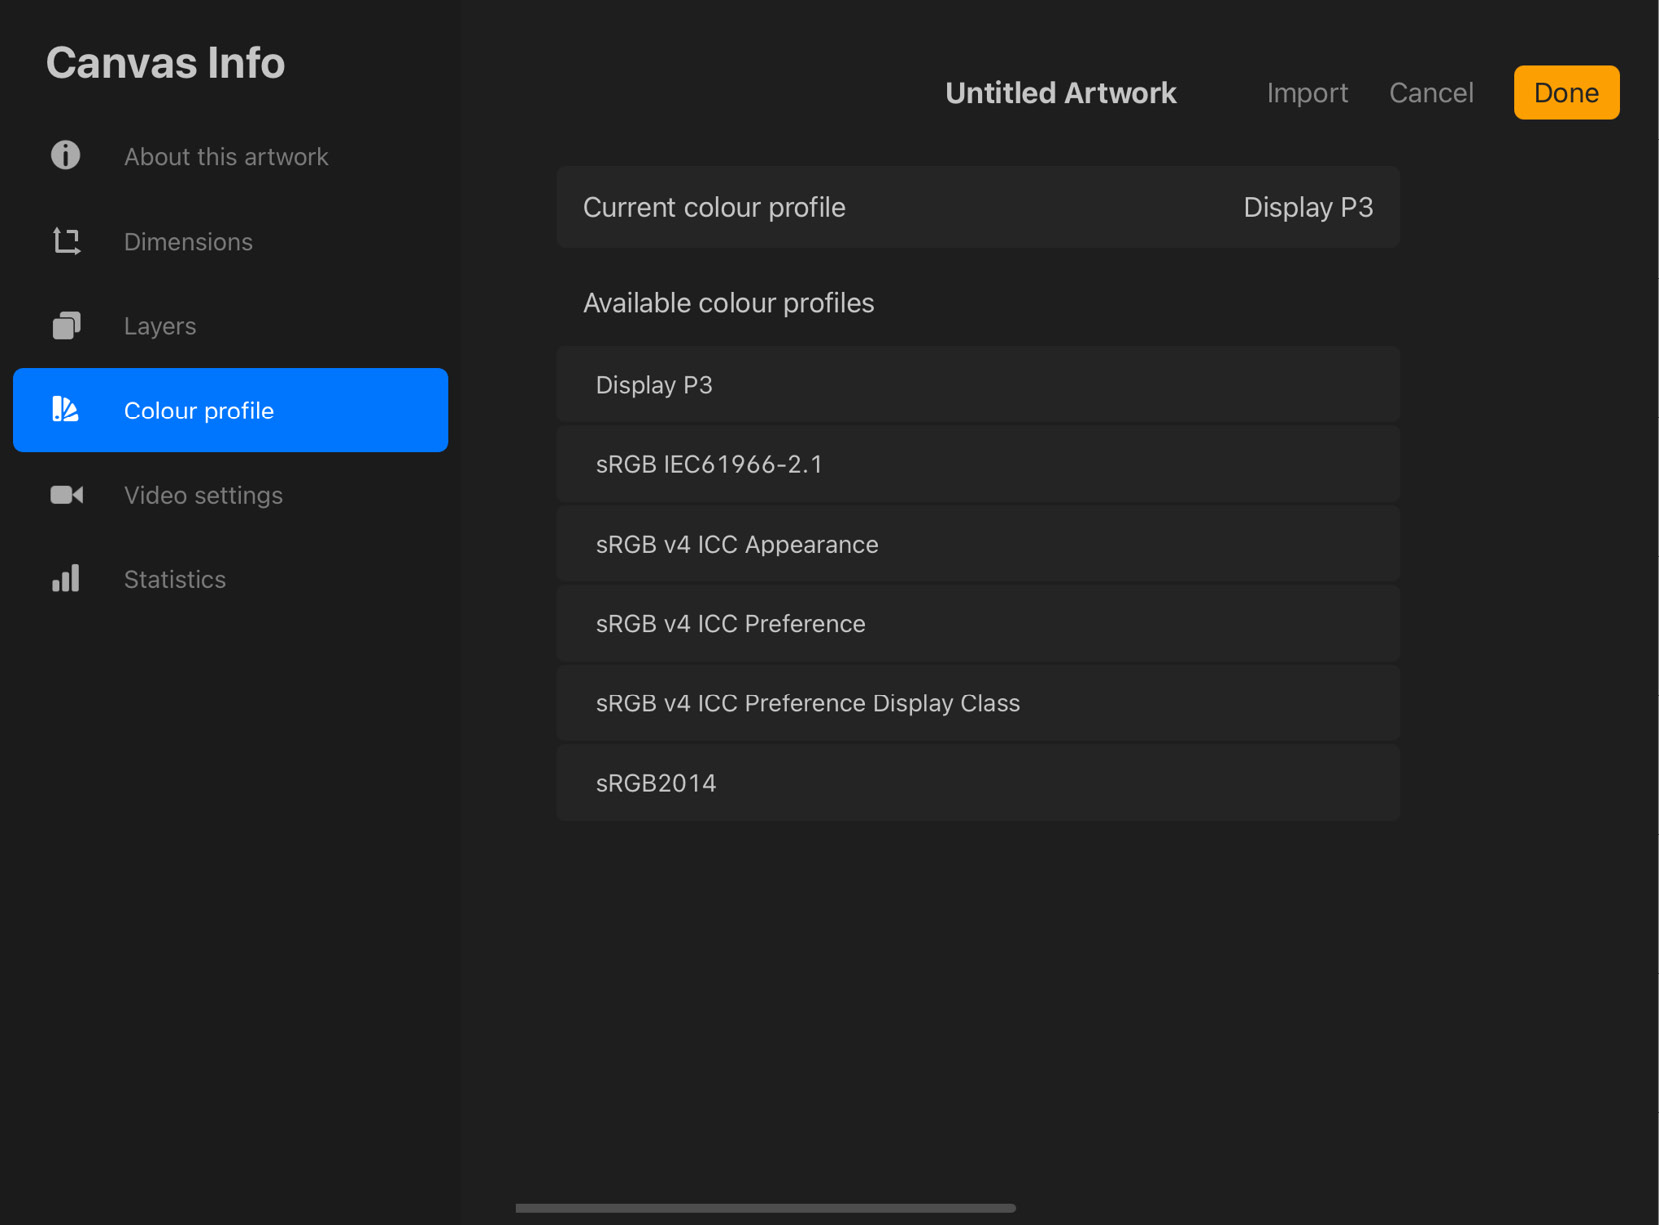
Figure 4.27: Colour profile
Color profiles determine how your canvas treats color when printed or viewed on screens. Refer to Chapter 2, Getting Started – Setting Up a Canvas, to learn more about color profiles and their uses.
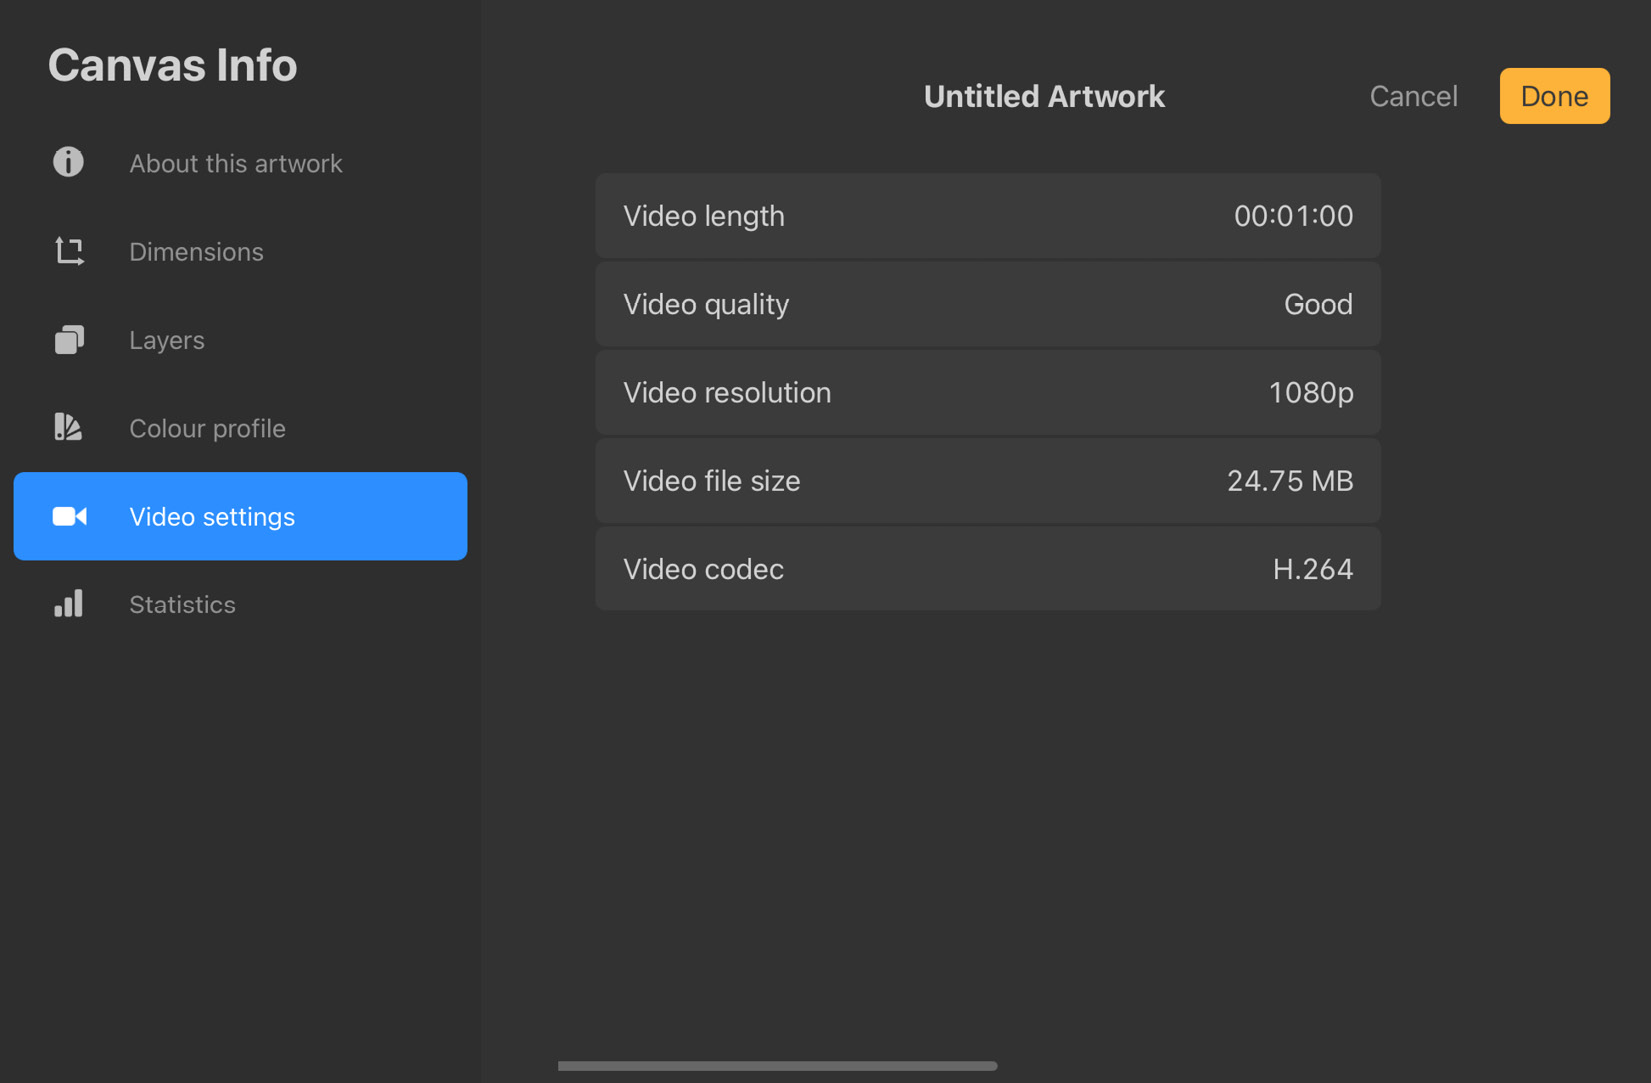
Figure 4.28: Video settings
Video length refers to the length of the time-lapse video recorded from the artwork. Video quality and Video resolution determine how large and high-definition the time-lapse video will be respectively. Video file size is the size of the time-lapse video once it is exported. Video codec is the type of compression your video uses.
Important Note
Video quality and resolution cannot be edited in the middle of drawing, but you can choose your preferred settings while making a new canvas.
- Statistics: As the name suggests, this tab has data about your artwork such as Total strokes made, which is the number of strokes you have made; Tracked time, which is the total span of time the canvas has been open for; and Total file size, which is the size of your Procreate file in MB (megabytes):
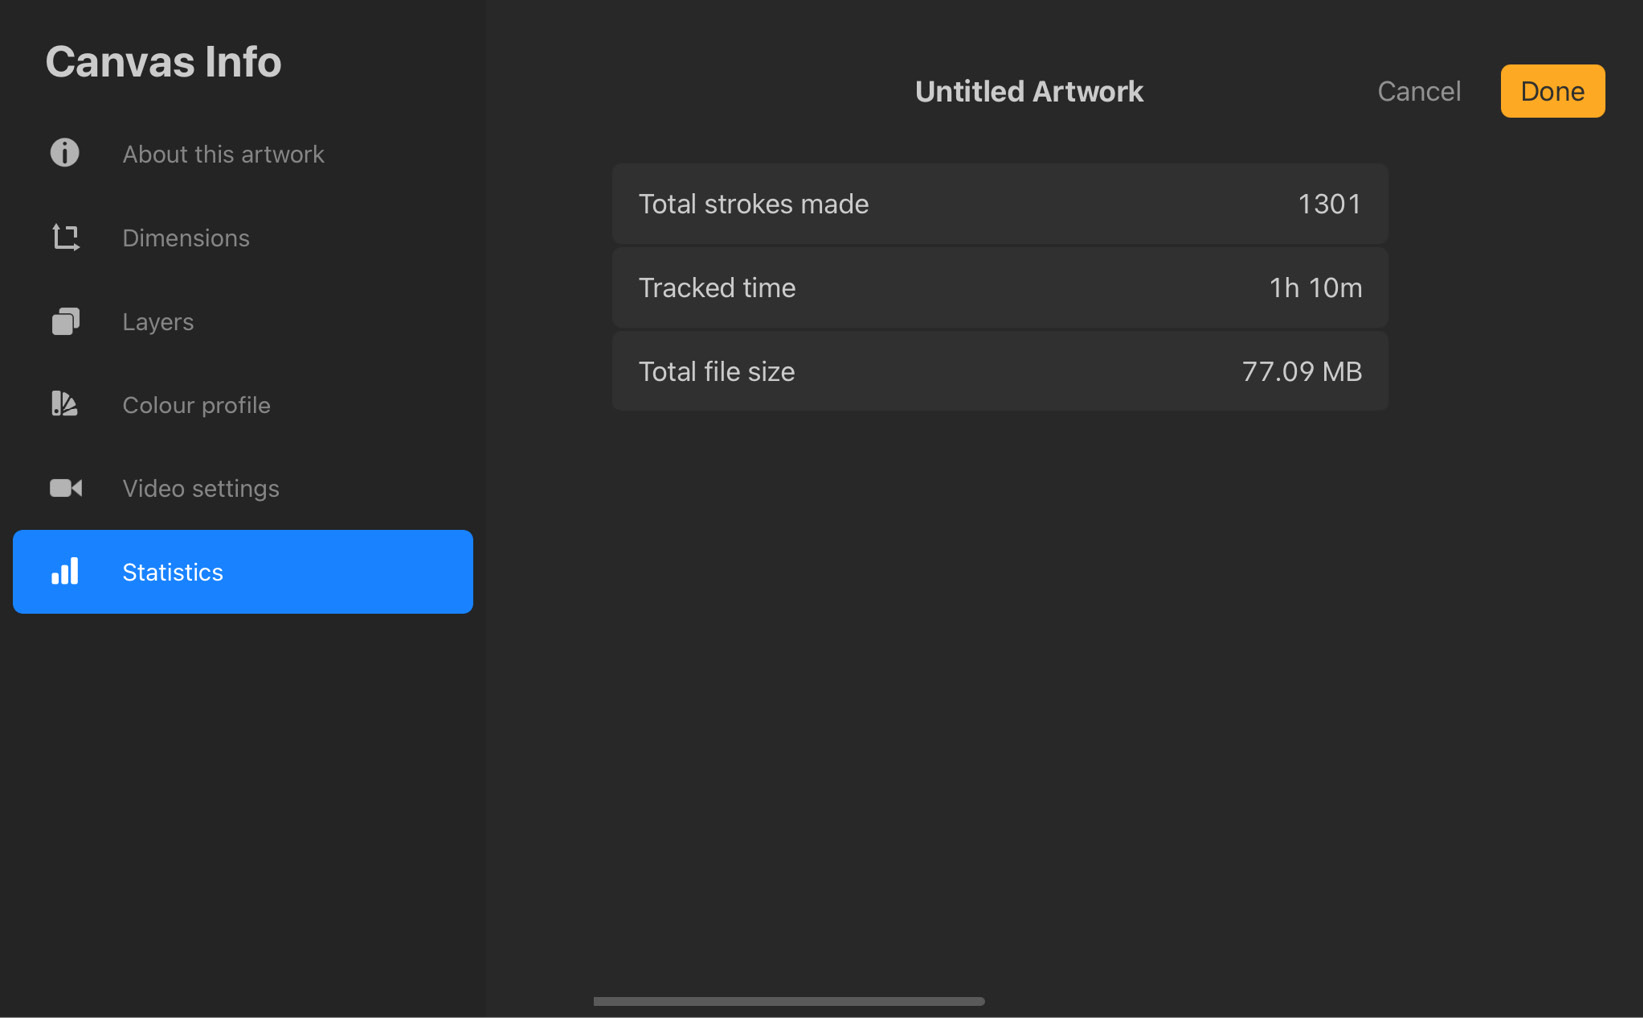
Figure 4.29: Statistics
This has been a discussion of the Canvas menu, used to make broad, sweeping changes to your canvas. It’s a crucial menu, so it’s recommended that you explore these features and get used to them at your own pace.
The next topic we will look at is the Share menu.
The Share menu
To the right of Canvas, you will find a tab called Share. This menu has all the options you will need to export your artwork. It can be seen in the following screenshot:
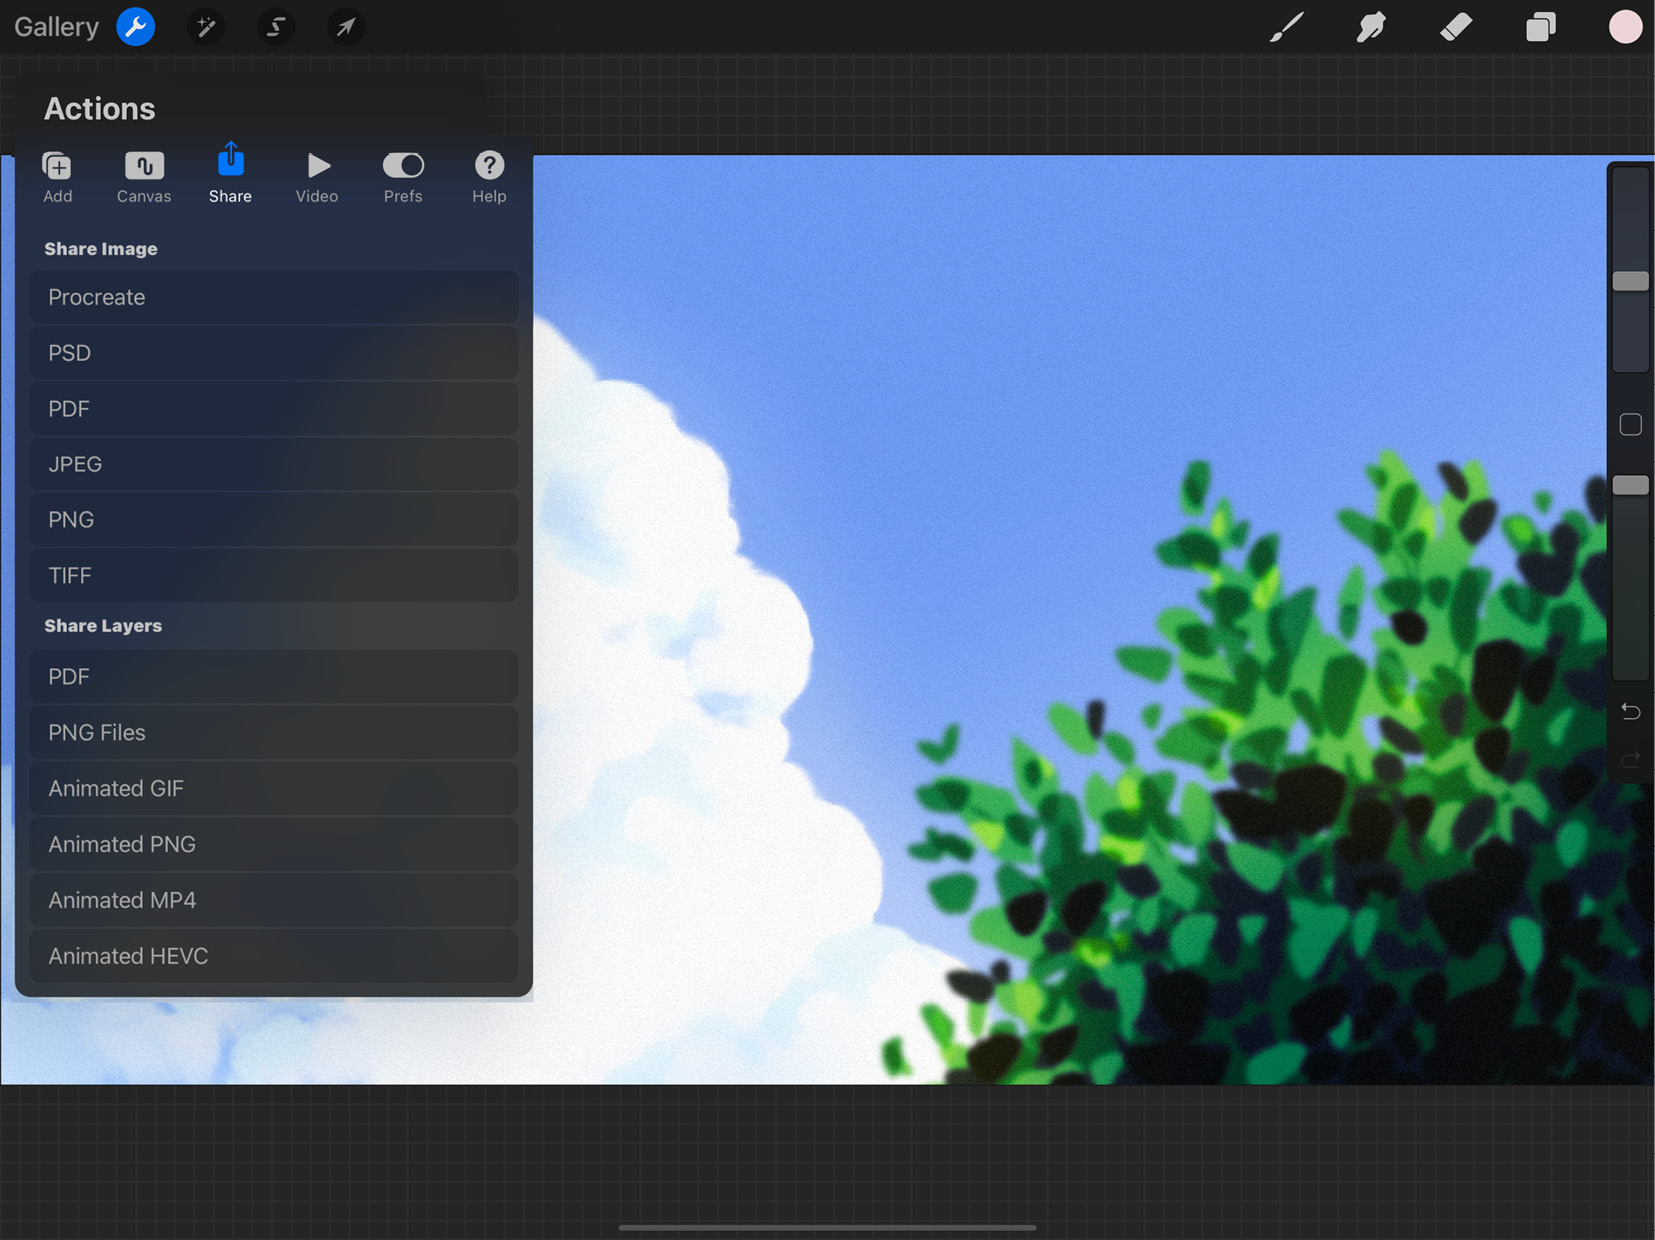
Figure 4.30: The Share menu
There are two broad ways Procreate treats your canvas while exporting. Let’s elaborate on each.
Share Image
If you want your export to show how the canvas looks as a whole, in the form of a single image or file, you can do so using the Share Image menu. The following options are available for image export:
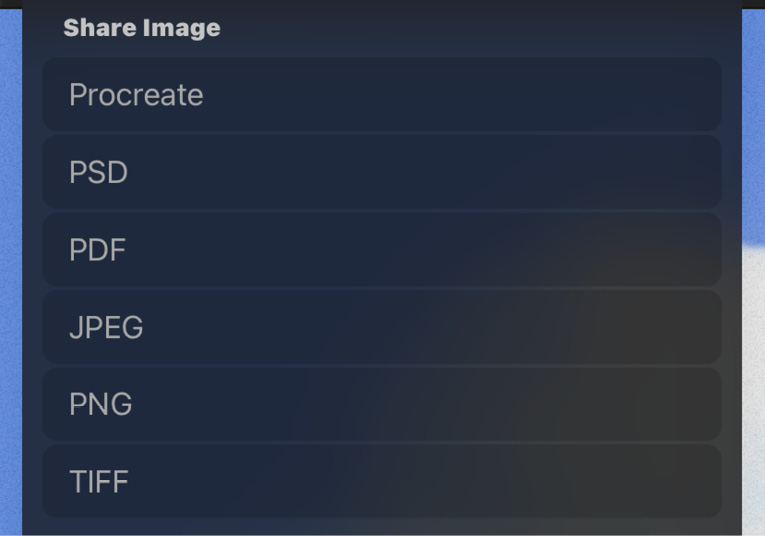
Figure 4.31: The Share Image options
Out of these, Procreate and PSD files will retain your layer information, which will let you work on the exported file using painting software on another device.
Share Layers
Share Layers treats the visible layers of your canvas as separate images while exporting. The following are the options available under it:
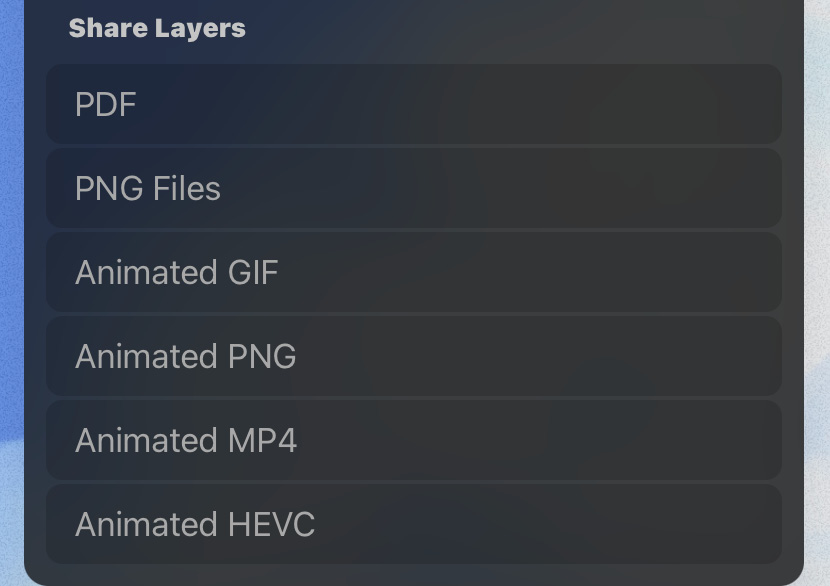
Figure 4.32: The Share Layers menu
Each of these options handles layers differently. Let’s look at them one by one:
- PDF: This option is not to be confused with the PDF option under Share Image, which exports the canvas as a whole as a single-page PDF. Conversely, choosing the PDF option under Share Layers exports every visible layer as a separate page of a multi-page PDF file.
Once you tap on PDF, a screen will appear asking you to choose your preferred file quality. Remember that higher quality means a larger file size.
- PNG Files: This option exports all your visible layers as separate transparent PNG files.
- Animated GIF/Animated PNG/Animated MP4/Animated HEVC: The last four options are used to export animations from Procreate. These exports types treat each ungrouped layer and layer group as a separate frame of animation and then export the animated result in the chosen format. Learn more about animation in Chapter 12, Using Assisted Drawing Tools.
After you have chosen your preferred method of exporting, a popup like this will appear:
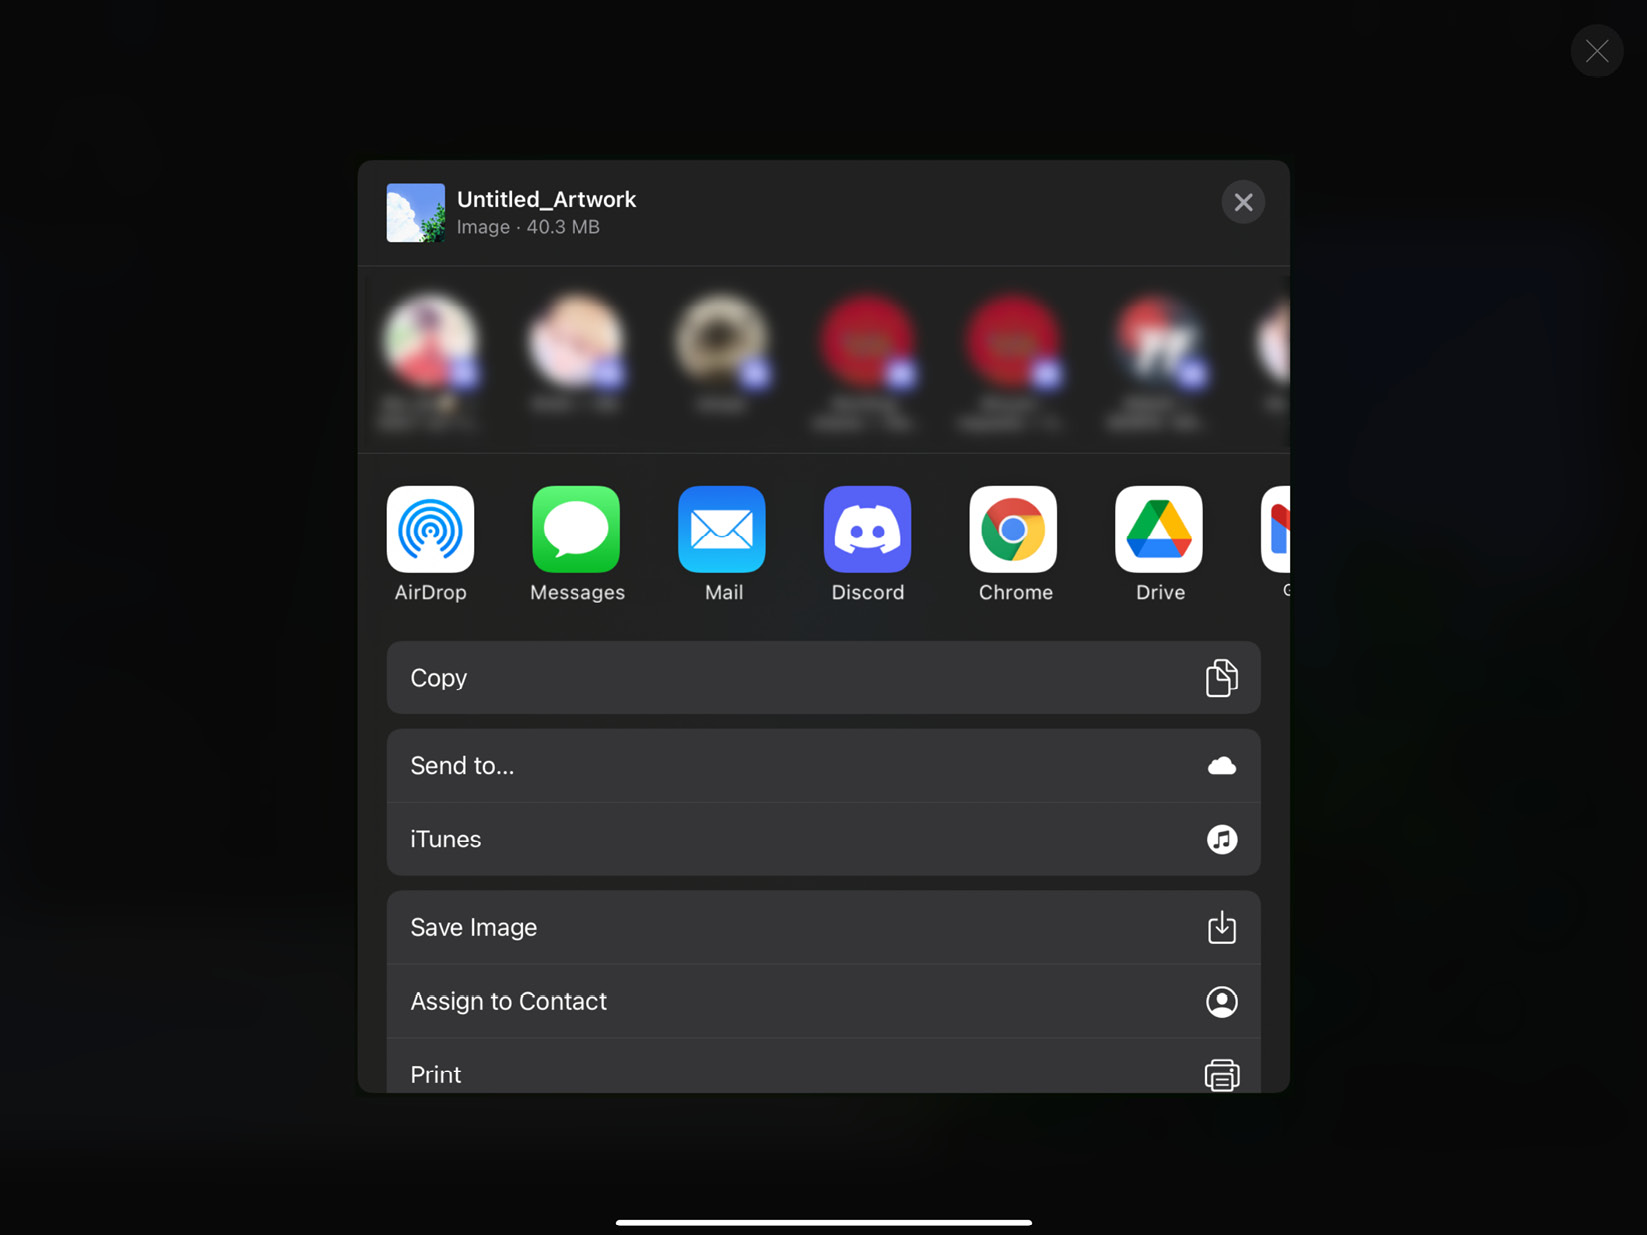
Figure 4.33: Export options
At the very top, you will see the details of what you are exporting. This includes the name of the file, its format, and its size. The next row will feature the apps you commonly export to or have used recently. On the row below that will be the list of apps that you can export to. This list can be edited to your requirements by clicking on the button titled More, as shown here:
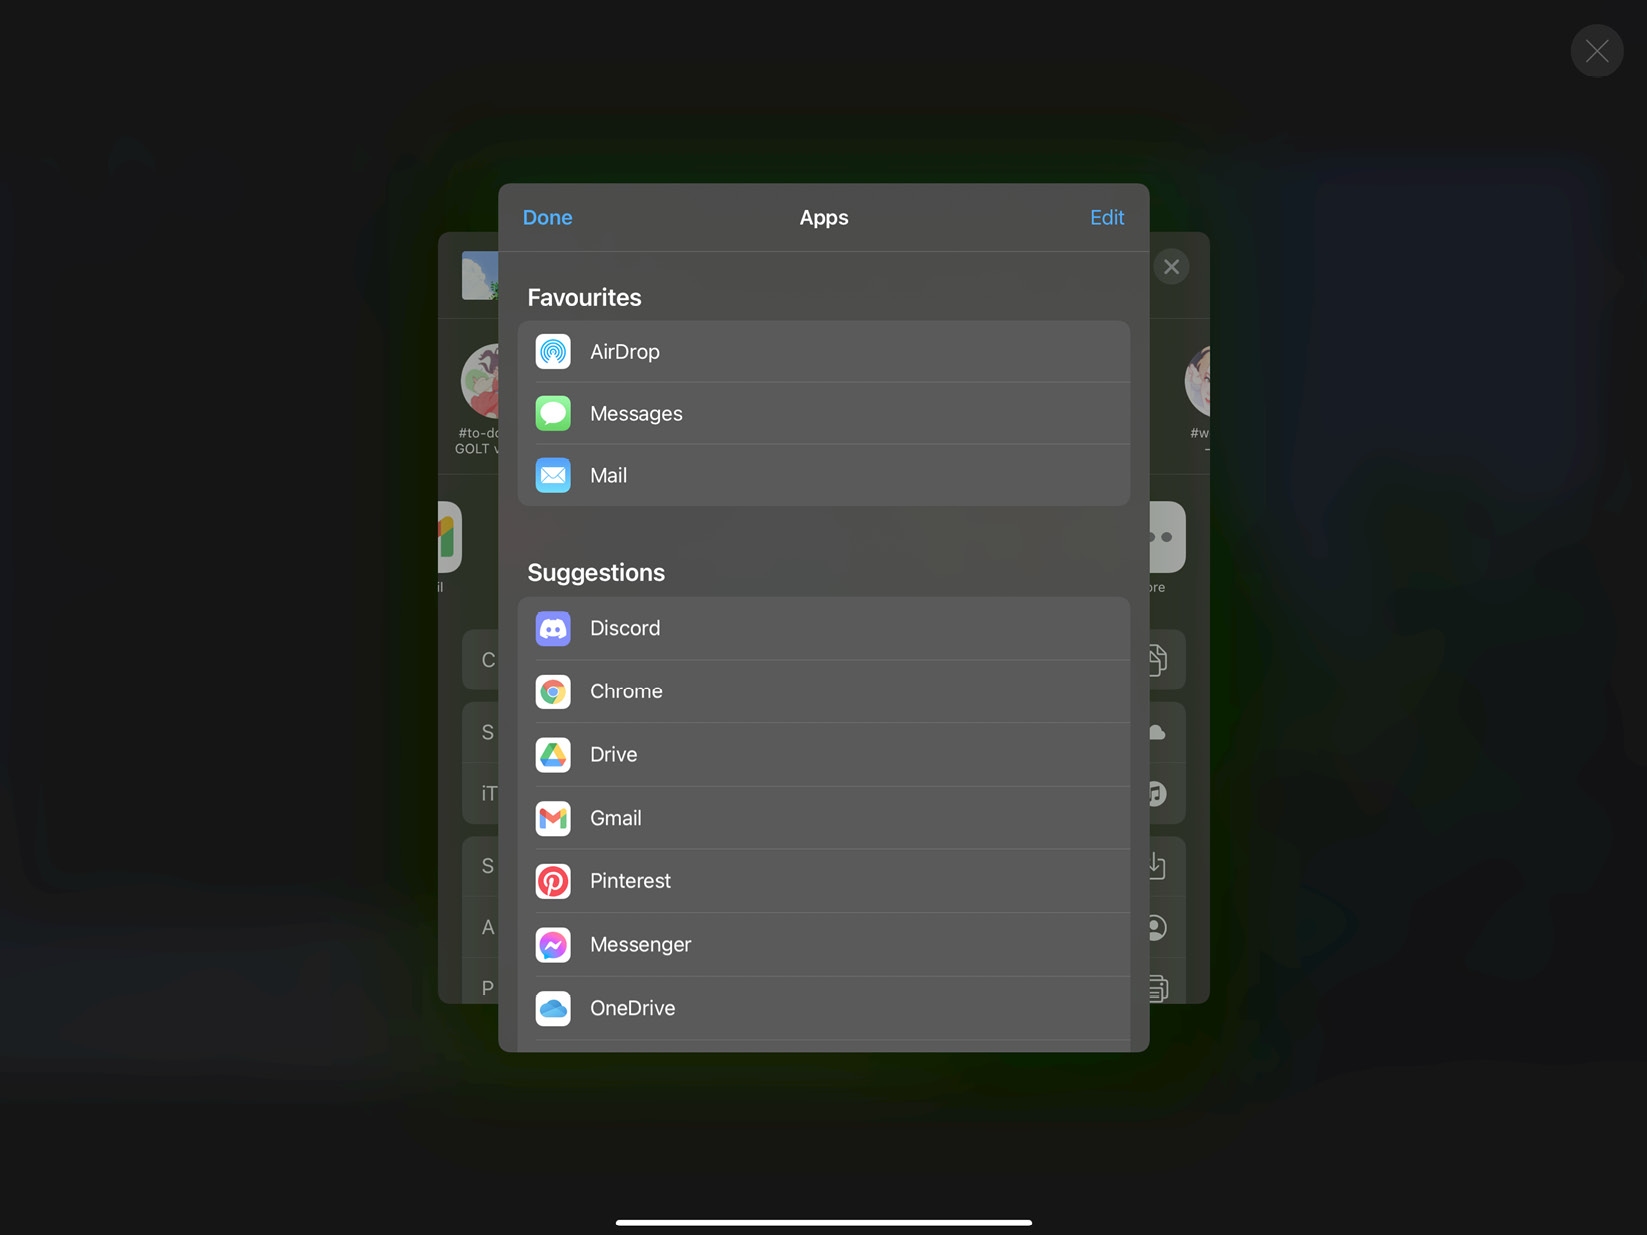
Figure 4.34: More apps
Next, you will see a list of actions you can perform to complete the export. The action I choose is usually Save Image/Video, which exports my artwork straight to Photos. If you’ve changed your mind, you can tap on the X icon in the top-right corner of the popup to cancel the export. When you do so, a screen will appear, informing you that the export was unsuccessful, as shown here:
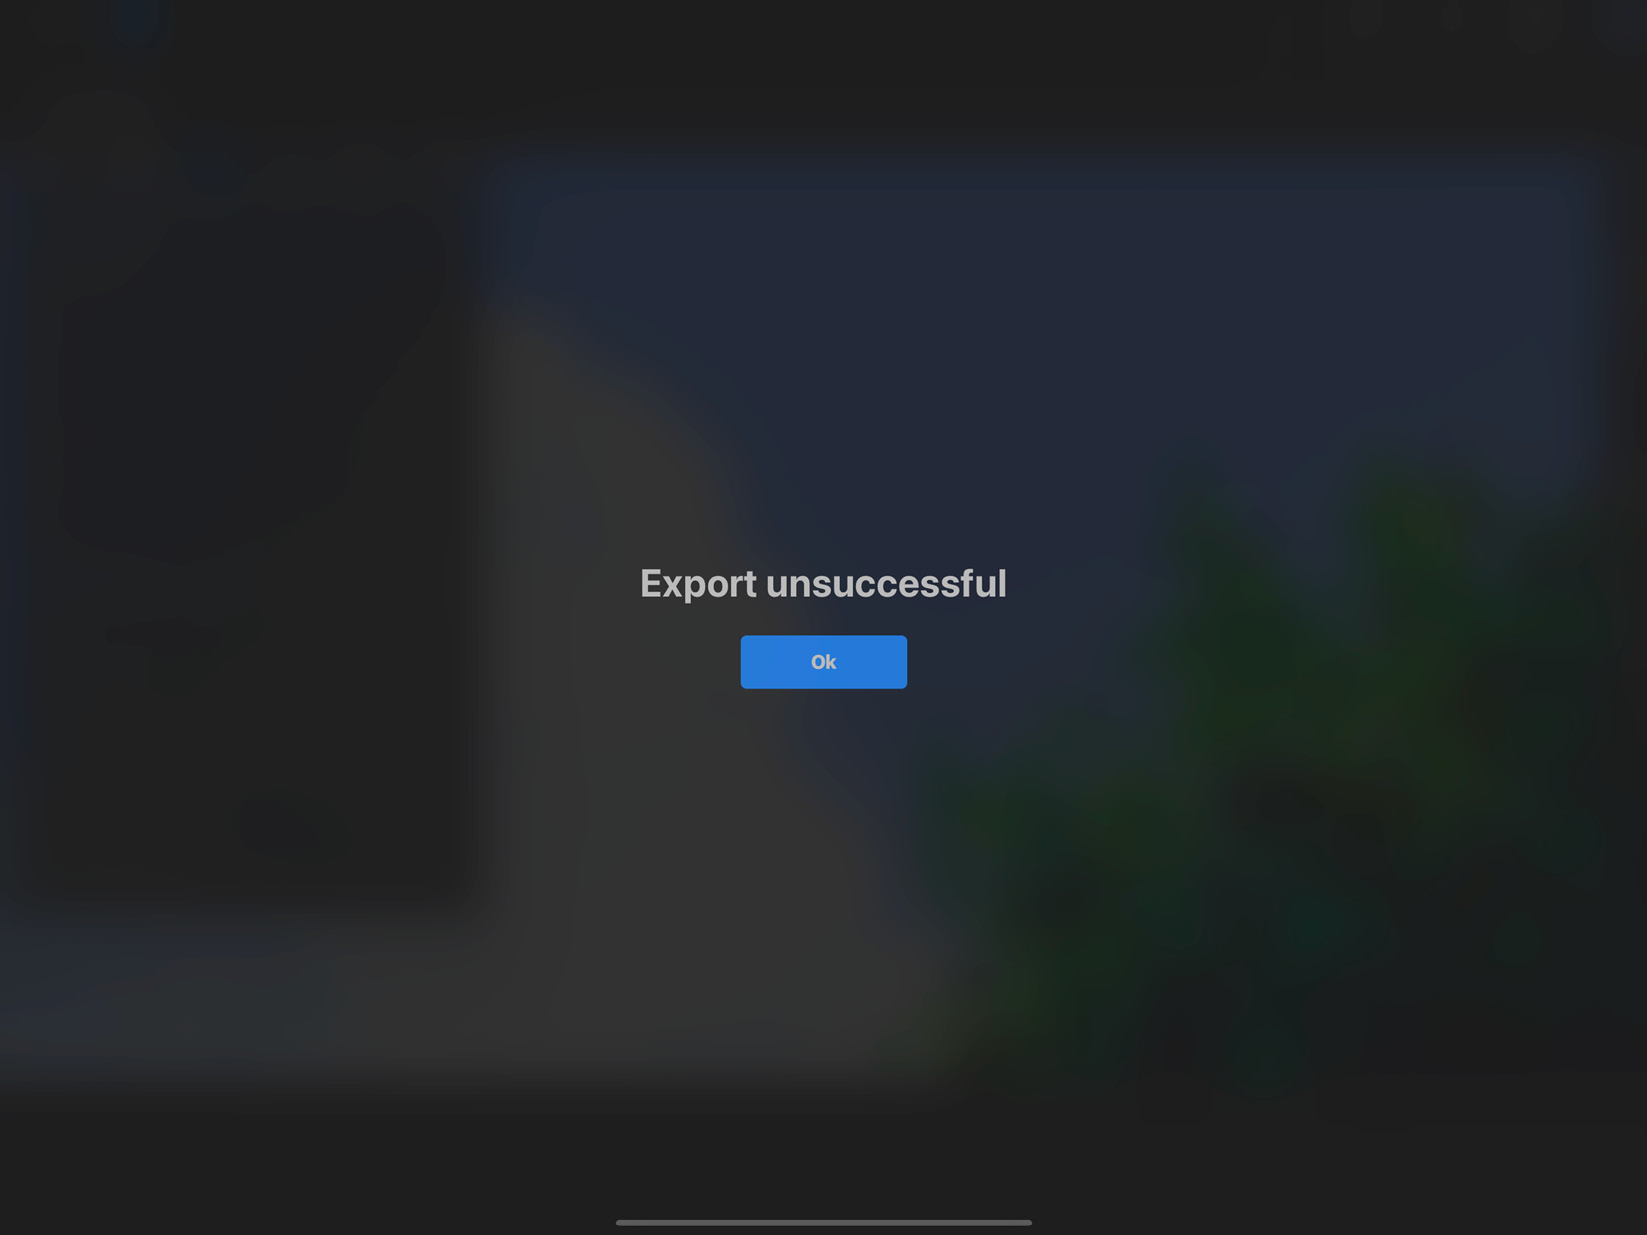
Figure 4.35: Export unsuccessful
You now know how to export your artwork in any format, be it a still image, GIF, or video, and send it to a destination folder or app of your choice.
We will now move on to the next tab on the Actions menu, which is Video.
The Video menu
A great feature of Procreate is that it automatically records a stroke-by-stroke time-lapse video of your artwork. The Video menu is where you can view or otherwise manage this video and how it’s recorded:
Figure 4.36: The Video menu
In the following sections, we will cover the options available under the Video menu.
Time-lapse Replay
As the name suggests, tap on Time-lapse Replay to play back the entire time-lapse that has been recorded up to this point. The screen looks like this while the video plays:

Figure 4.37: Time-lapse Replay
The progress bar at the top of the screen shows you how much of the video has been played. You can place your finger anywhere on the screen and move it to the left or right to skim through the video quickly. Dragging your finger to the right will fast-forward the playback, while dragging it to the left will rewind it. Dragging and holding your finger in one place will pause the playback until your finger is lifted again.
At the top right, you can see the total runtime of the time-lapse. Next to it is a button that says Done, which will close the time-lapse replay and take you back to the drawing interface.
Time-lapse Recording
Next, you will see an option called Time-lapse Recording, which can be toggled on and off. When toggled on, your document will record a time-lapse, and when toggled off, it will stop recording it for all the edits you make after that. Time-lapse Recording is toggled on by default when you make a new canvas.
You can disable it anytime, at which point Procreate gives you a Purge Video? option, like this:
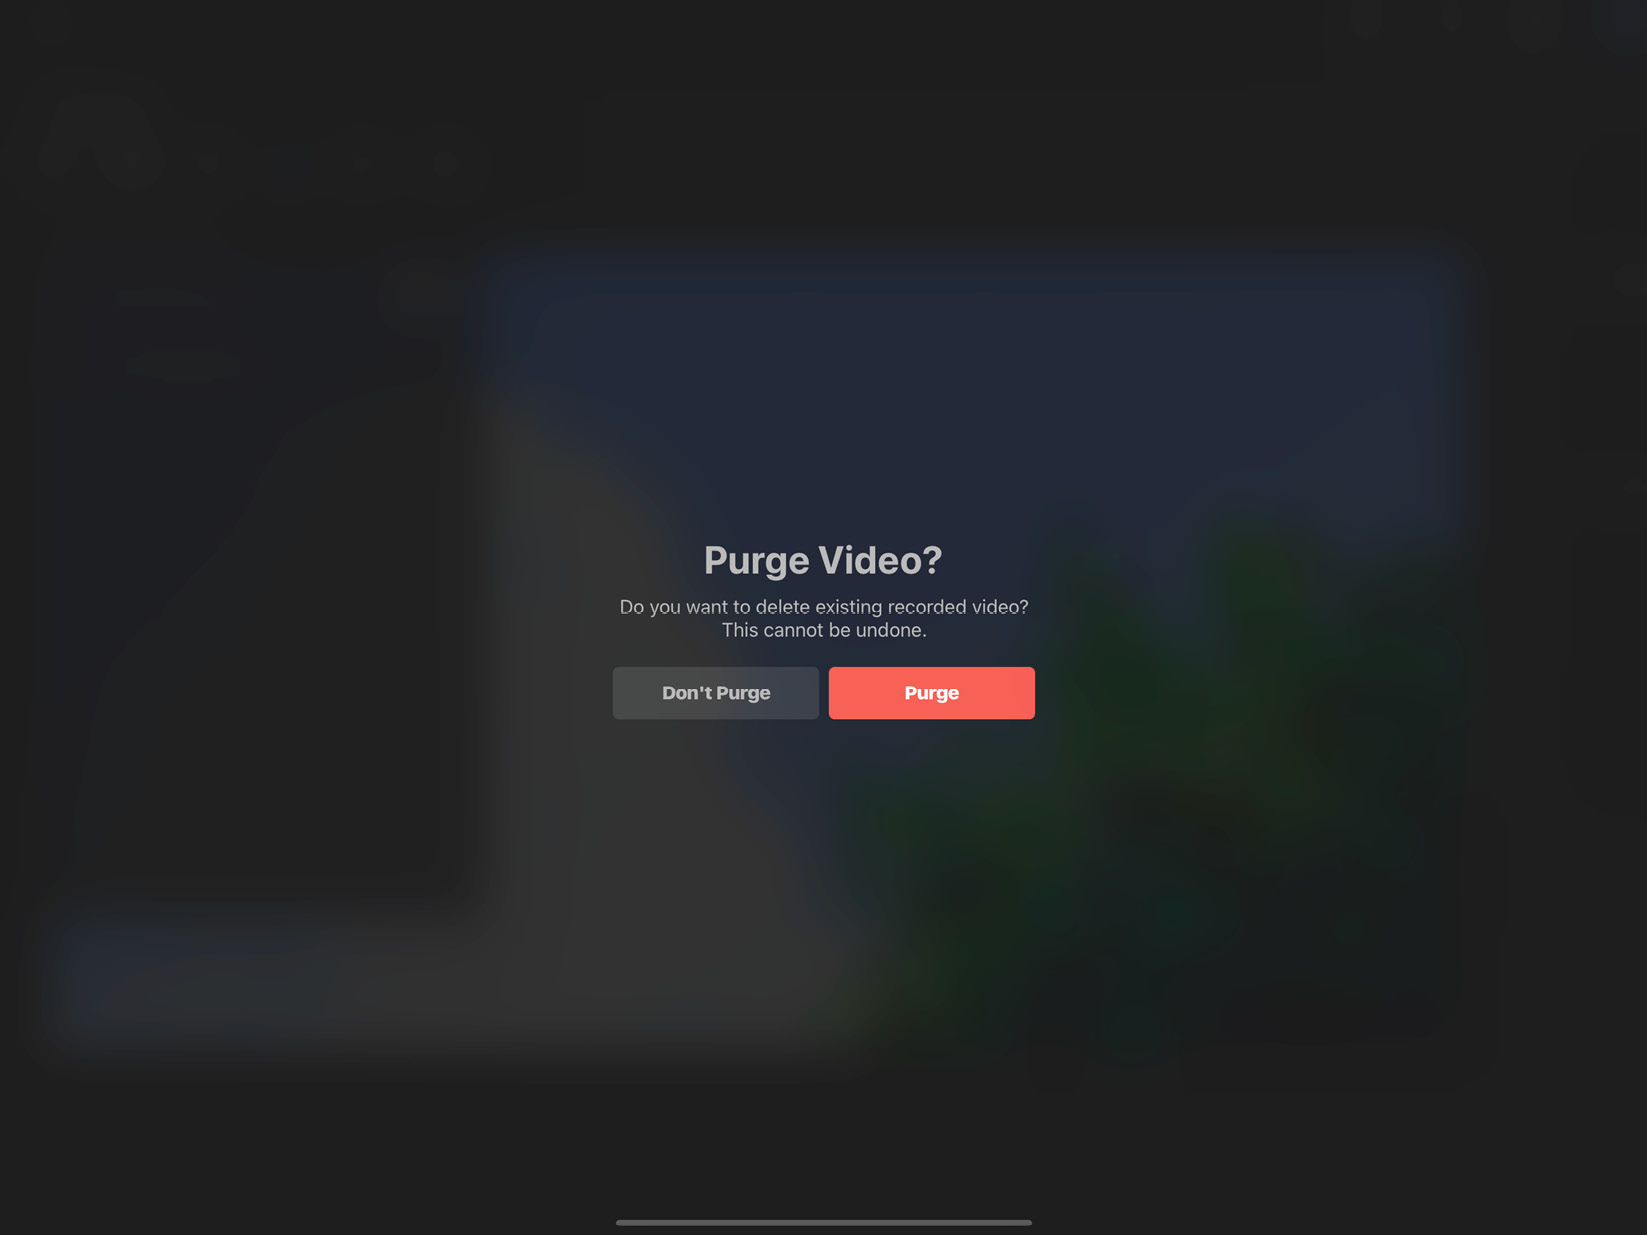
Figure 4.38: Purge Video?
If you tap on Purge, the whole time-lapse recorded up to this point will be permanently deleted. Alternatively, you can choose Don’t Purge, which will retain the preceding time-lapse and then stop recording beyond it.
You can turn this setting back on whenever you like.
Export Time-lapse video
The last option on the Video menu allows you to export the time-lapse of your artwork. You can either export the full-length process video or a shorter 30-second version:

Figure 4.39: Exporting a time-lapse video
Once you select your preference, an export window similar to the one we discussed for Share will appear. From here, you can specify the destination of the exported time-lapse video:
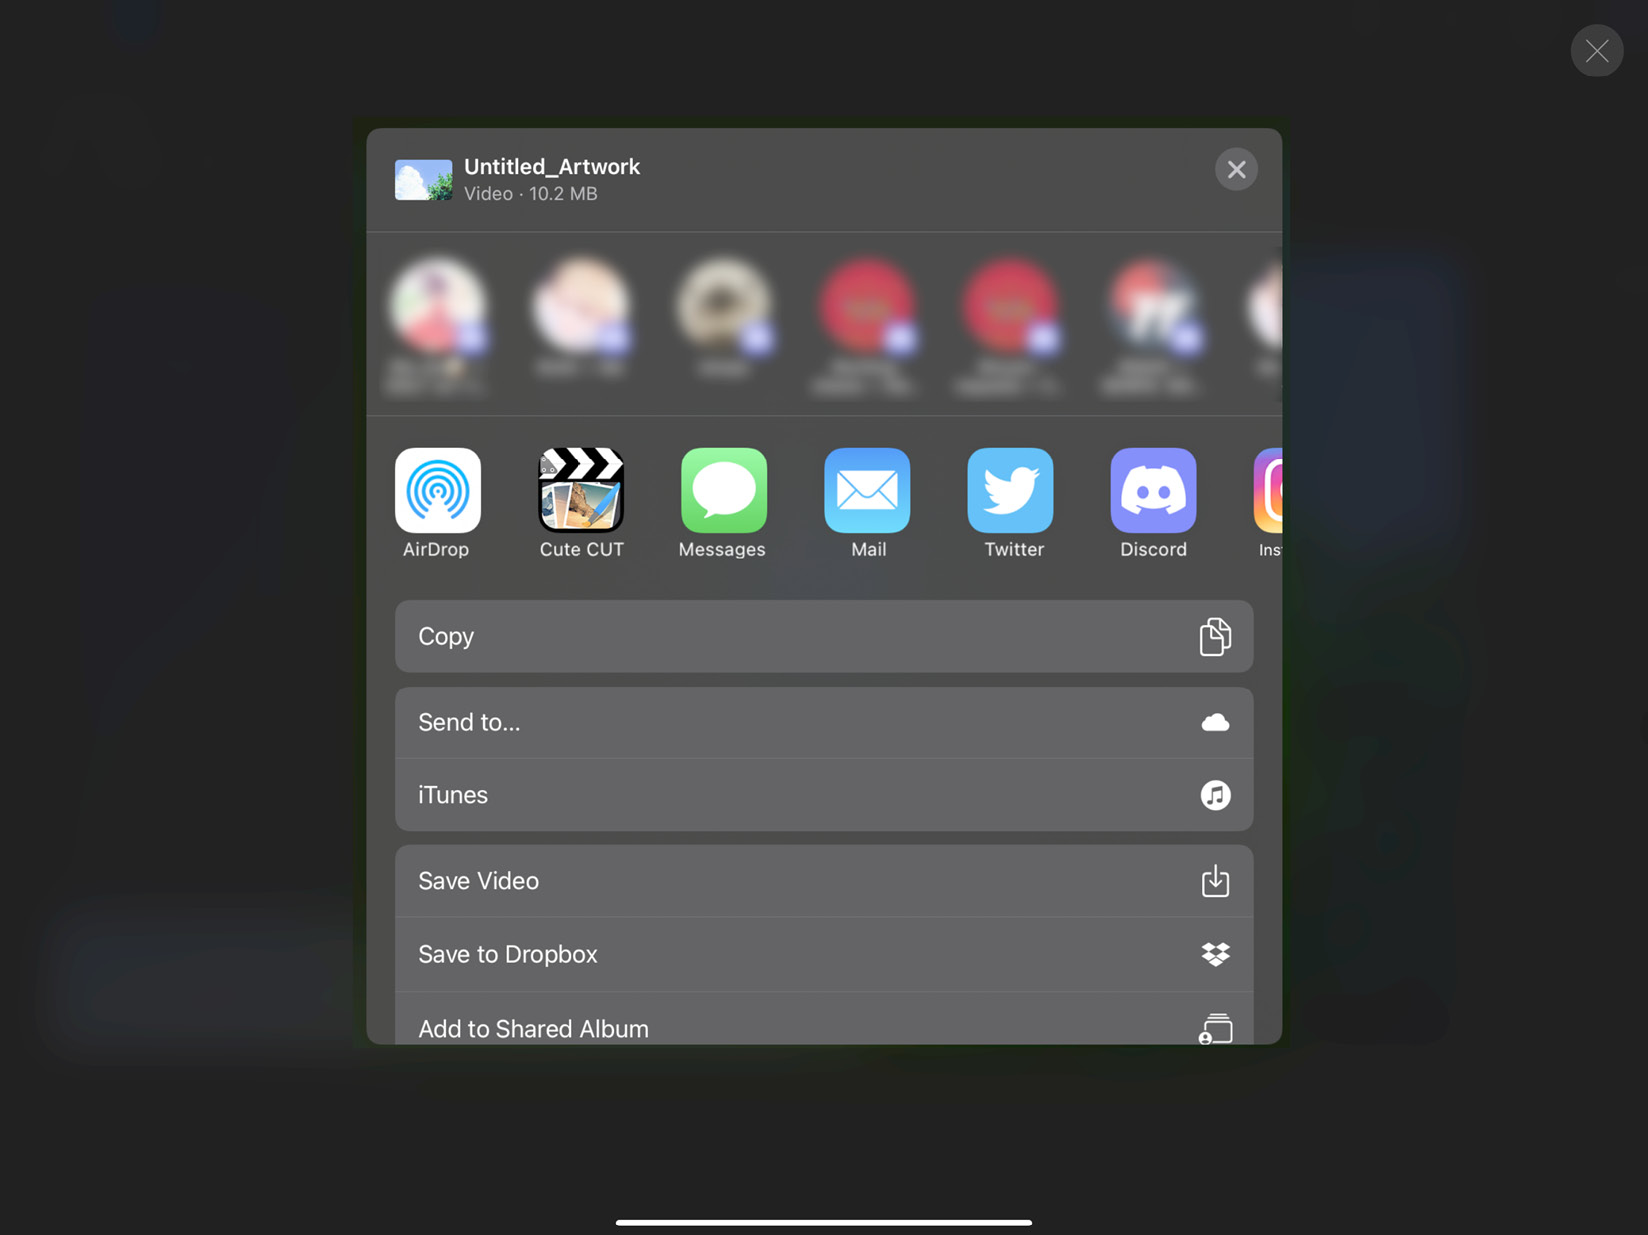
Figure 4.40: Saving a time-lapse video
Now that we have learned all about the time-lapse feature, you’ll be able to test it out for yourself. Play around with different quality settings and export lengths to figure out what works best for you.
Next, we will look into customizing your experience with the Prefs menu.
The Prefs (Preferences) menu
Procreate is a very versatile piece of software that can be tweaked to match a user’s requirements. The Prefs menu has everything you need to personalize the interface, gestures, and sensitivity of Procreate to suit your needs:
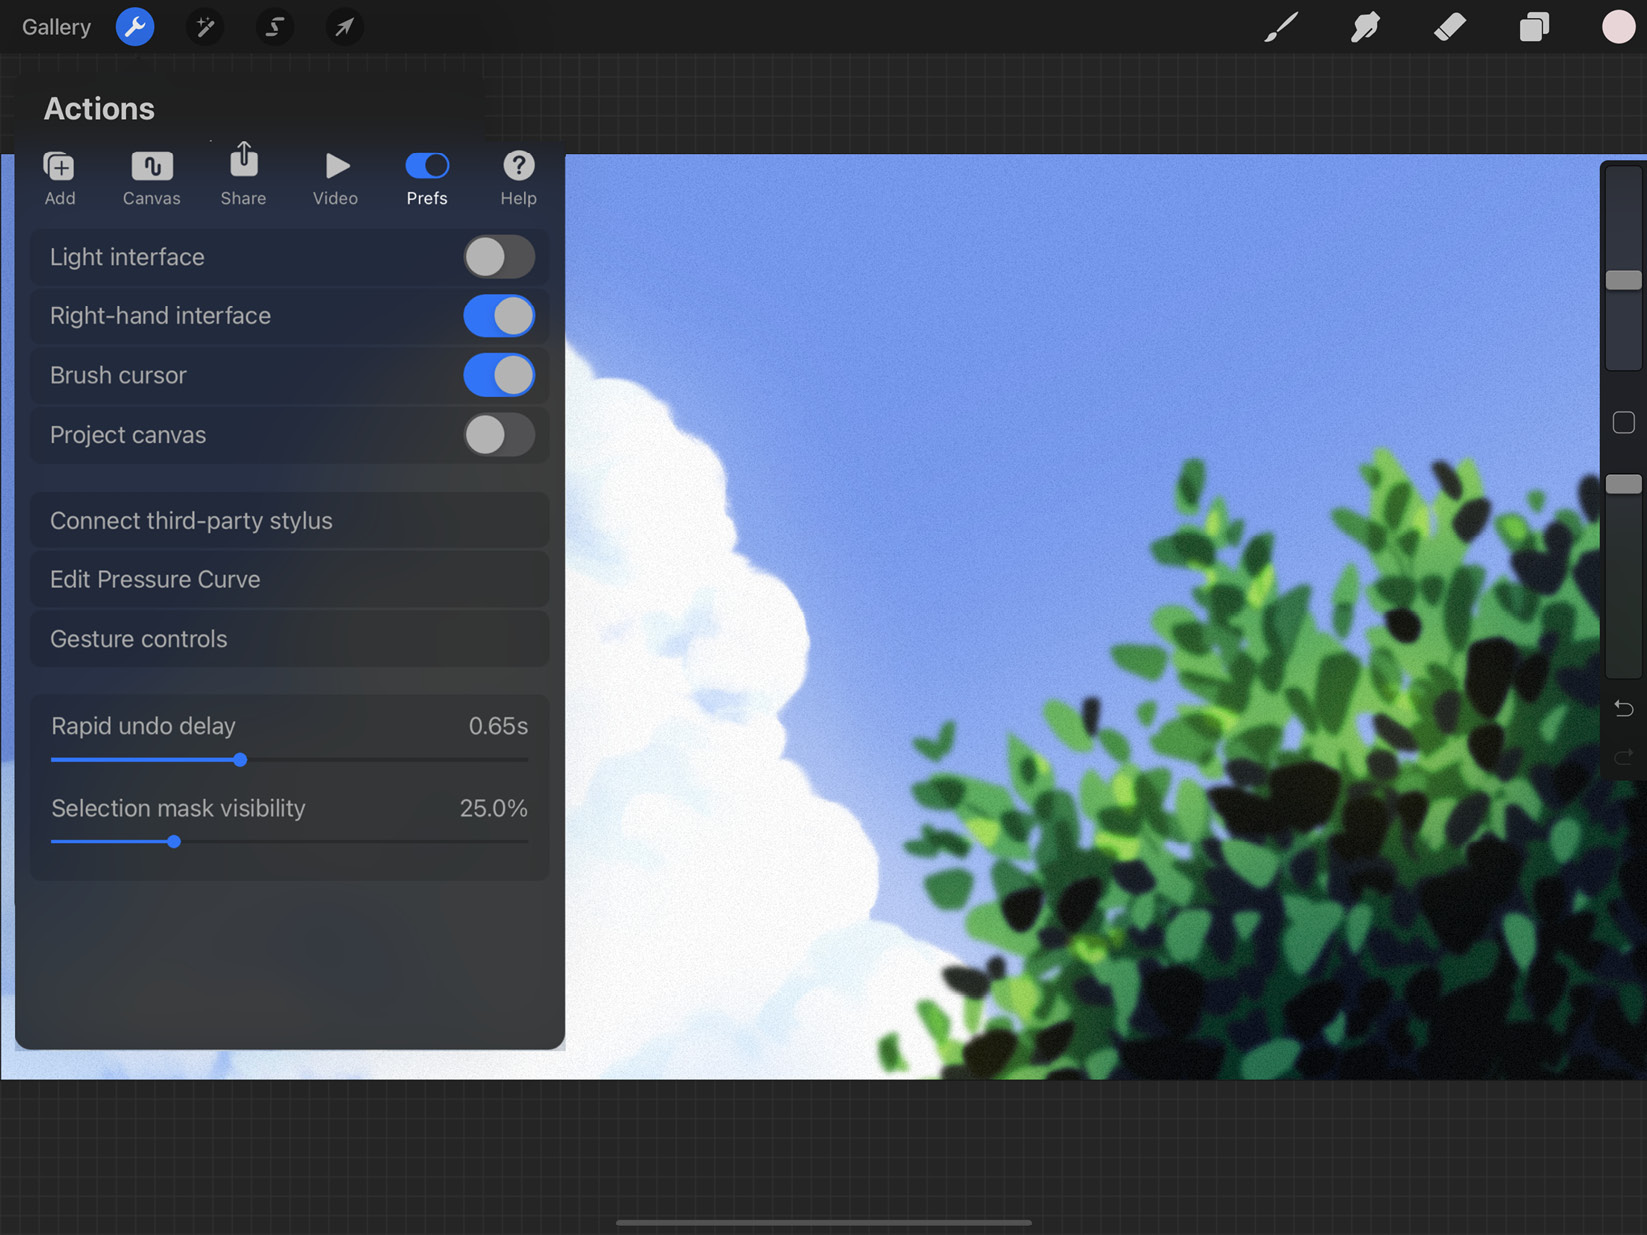
Figure 4.41: The Prefs menu
In the following sections, we will learn about the options in the Prefs menu.
Interface toggles
The first four options you will see on this menu are a few ways you can edit the look of your interface. All of these can be toggled on and off. The following are the interface preferences available:
- Light interface: Switch between light and dark mode using this button:
_B16577.jpg)
Figure 4.42: Light interface versus dark interface
- Right-hand interface: When toggled on, the sidebar will appear on the right edge of the screen, which is more suited to left-handed users. When toggled off, the sidebar appears on the left edge, aiding right-handed users:
_B16577.jpg)
Figure 4.43: Right-hand interface versus left-hand interface
- Brush cursor: Using this option, you can choose whether or not your brush cursor will be visible while you draw. The brush cursor is an outline of your brush, showing its shape and size when you draw, as shown here:
Figure 4.44: Visible brush cursor
- Dynamic brush scaling: By default, this toggle is on. This means that your brush size changes when you zoom in and out of the canvas, ensuring that the brush affects the same number of pixels on the canvas no matter the zoom. This means that the brush appears “larger” when you zoom in and vice versa. Turn off this toggle if you want your brush size to stay constant with respect to the screen, irrespective of zoom.
- Project canvas: This enables you to connect a second display using AirPlay or a cable, which shows your entire canvas in fullscreen mode without the interface or zoom.
Connect legacy stylus
Procreate supports a number of third-party stylus types. Through this option, you’ll be able to connect any stylus that you see mentioned:
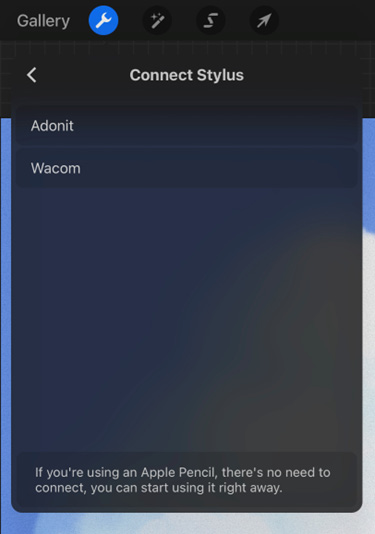
Figure 4.45: Connect legacy stylus
If you’re using Apple Pencil, this step is not required, as it connects automatically via Bluetooth.
Pressure and Smoothing
This option affects how brushes respond to inputs from Apple Pencil. Its interface is shown in the following screenshot:
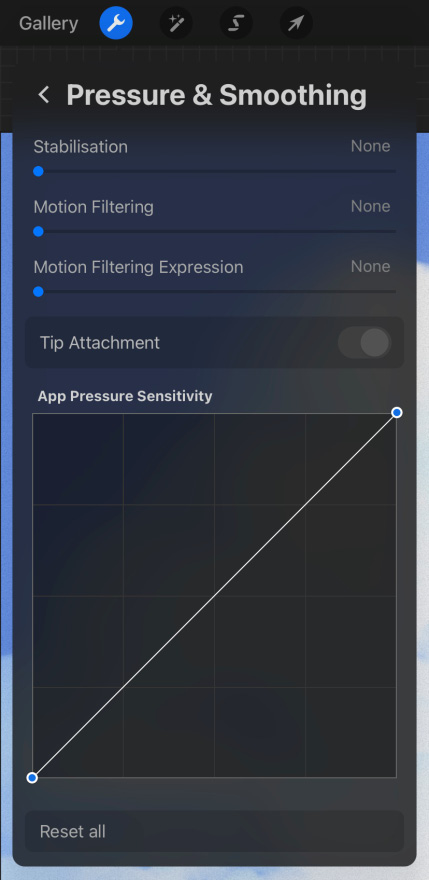
Figure 4.46: Pressure and Smoothing
Let’s look at all these options:
- Stabilisation/Motion Filtering: These settings smoothen out brushstrokes to minimize shakiness. It’s useful as an accessibility tool for artists who experience hand tremors. This is a global setting, which means it applies to brushes as a whole. To learn more about the specifics of stabilization and motion filtering, refer to Chapter 9, Brush Studio Settings – Editing and Combining Brushes.
- App Pressure Sensitivity: Apple Pencil offers a wide range of pressures to work with. The App Pressure Sensitivity graph allows you to adjust how the size and opacity of your brush will change with pressure.
Important Note
Apple Pencil supports all types of pressure and gesture settings in Procreate. This is because it was specifically created to be used in sync with the iPad. Procreate does support other stylus brands, but often certain features, such as pressure sensitivity, are not supported on some of them. It is highly recommended that you use Apple Pencil to fully enjoy the features of this program.
The horizontal axis is for pressure and the vertical axis is for brush response. The graph is a straight diagonal line by default. You can edit this curve as per your preference by adding up to six control points or handles, as shown here:

Figure 4.47: An edited pressure curve
This pressure curve applies to all brushes, but you can edit each brush’s pressure curve from the Brush Studio, explained in Chapter 9, Brush Studio Settings – Editing and Combining Brushes.
The leftmost point on the horizontal axis pertains to zero pressure, and the rightmost point is the highest pressure your stylus can register. The topmost point on the vertical axis pertains to the highest size and opacity response of the brush.
The steeper the curve is, the quicker your brush will respond to light pressure. This is great if you want to consistently draw thick, bold lines without having to apply pressure constantly.
Inversely, the flatter the curve is, the more pressure you will need to apply to make your brush respond. This is applicable if you prefer drawing with thin, light lines.
- Reset: Tap on this button to revert back to the default curve.
Gesture controls
Procreate offers a range of gesture inputs that make it easier to perform certain actions in the app. If you are familiar with computer-based painting software, these will sound similar to keyboard shortcuts. The Gesture controls menu is used to assign your preferred gesture shortcuts to each applicable action, in the following way:

Figure 4.48: Gesture controls
There is a lot to be said when it comes to gestures on Procreate, all of which we cover in more detail in Chapter 6, Using Gestures and Shortcuts.
Rapid Undo Delay
Pressing down on the Undo button (on the sidebar), or the undo gesture (a two-finger tap by default) for a set interval of time activates what is called “rapid undo”, which means your actions will be rapidly undone in quick succession until you release the button. The Rapid Undo Delay slider lets you decide how long you have to long-press the Undo button or gesture to activate rapid undo. This interval can be anywhere between no delay to 1.5 seconds.
Selection Mask Visibility
Whenever the Select tool is used to select an area of the canvas, the area outside the selection is overlaid by moving gray diagonal lines, which are usually semi-transparent. This overlay is called the selection mask. The Selection Mask Visibility slider lets you adjust the opacity of the selection mask.
Positioning the slider at different points can make a visual difference in the selection mask, as shown here:
_B16577.jpg)
Figure 4.49: The selection mask at 25% opacity versus 80% opacity
You can now go ahead and select your preferred settings from Prefs. It might take a bit of trial and error to fine-tune certain options, but sorting it out early can save you a lot of time later.
We are moving closer to the end of this chapter, now that almost all of the functions of the Actions menu have been discussed. The last menu we will cover is Help.
The Help menu
The last tab to be found in Actions is titled Help. As the name suggests, here’s where you will find any kind of guidance required to operate the app. The following options are available on this menu:
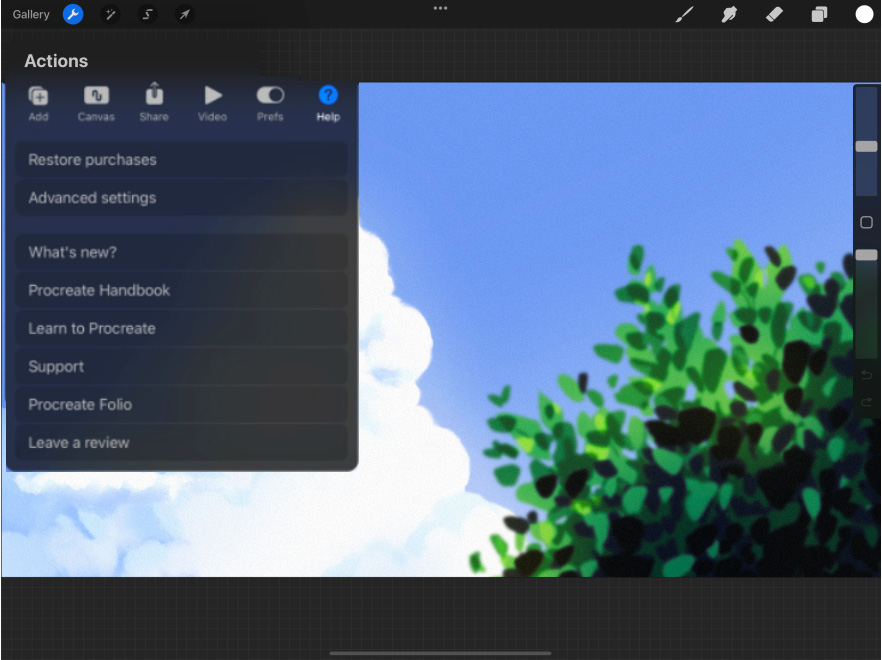
Figure 4.50: The Help menu
Procreate has a simple but extremely useful Help menu where the developers have linked the user to various kinds of external assistance and communities. Let’s cover these options one by one.
Restore purchases
Procreate currently has no in-app purchases, but some of its older versions did. This option helps you restore any purchases you might have made while using those versions. If Procreate 5 is the first version you are using, then it will not apply to you.
Advanced settings
Tapping on this option will take you to Settings on your iPad, specifically the app settings tab of Procreate, which looks like this:
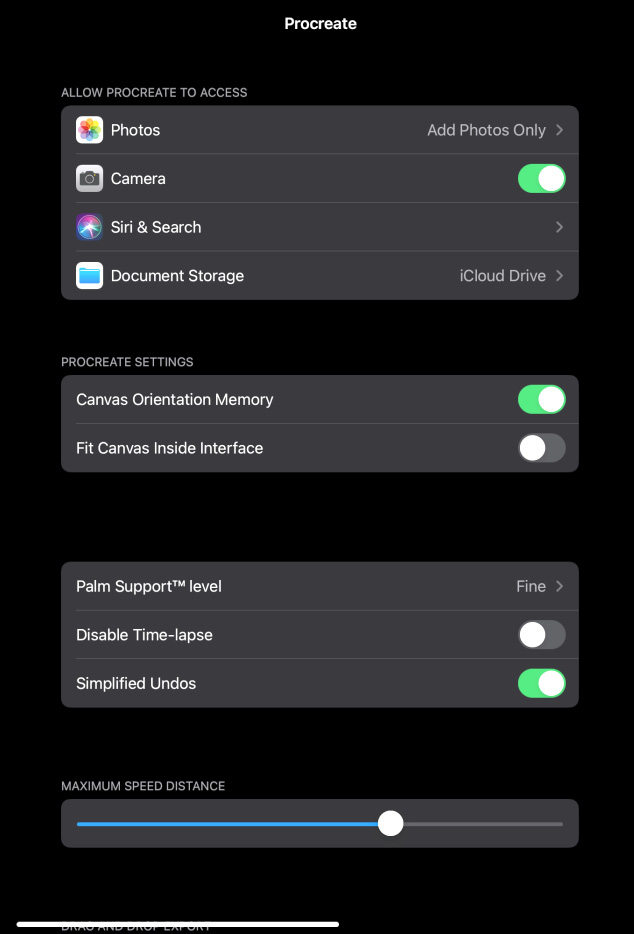
Figure 4.51: Advanced settings
There are the following broad types of settings:
- ALLOW PROCREATE TO ACCESS: Using these options, you can toggle which apps Procreate can access. Some of these are important to the functioning of Procreate. For instance, the app must have access to Photos to be able to import and export images from it.
- Document Storage decides where your Procreate files are backed up. You can choose your iPad or iCloud. Using iCloud is recommended, since it can be accessed from all your Apple devices.
- Procreate Settings: Adjust in-app settings using the next few options.
Canvas Orientation Memory lets you choose whether Procreate will remember the orientation (rotation) you left your canvas at when you last closed it.
Fit Canvas Inside Interface, when toggled on, means that when you load a canvas, it will fit border to border within the drawing area, like this:
Figure 4.52: Fit Canvas Inside Interface
When toggled off, the canvas will fit the whole screen, with some part of it overlaid by the Procreate interface, as shown here:
Figure 4.53: The canvas overlaid by interface
- Palm Support™ level: Palm Support is a feature of Procreate that lets you rest your palm on the screen while drawing, which will not be interpreted as drawing input. There are two sensitivity levels available. Use Standard mode for bigger hands and Fine mode for smaller hands. It is also possible to disable Palm Support completely.
- Disable Time-lapse: Toggle this setting on or off to decide whether you’d like every new canvas to have time-lapse enabled by default.
- Simplified Undos: When you perform a Transform or Adjustments action in Procreate, the whole transformation or adjustment is registered as a single action. Hence, when you hit undo, your layer reverts back to the original state in a single step, without going through the intermediate stages of transformation. This is called a Simplified Undo. Disabling it lets you register each individual change you make in a single transform or adjustments session as a separate step, allowing you finer control. However, this also means that you will exhaust your undos faster and won’t be able to reach as far back into your process. It is toggled on by default.
- Maximum Speed Distance: Some brushes have a speed-based setting, which means that after a stroke is drawn beyond a certain distance, its speed registers as 100%. This makes subtle changes to the brush to better mimic how brushes work in real life. The Maximum Speed Distance slider helps you fine-tune the distance your brush must run before hitting maximum speed. If you find the current settings too slow or too rushed, then adjust the slider accordingly.
- Drag and Drop Export: Select your preferred file format and preferred image format when performing drag and drop export. We covered drag and drop export in more detail in Chapter 1, The Gallery – Organizing Your Files.
What’s new?
This option takes you through the new features added to the application with Procreate 5.2. Tap this to open this screen:
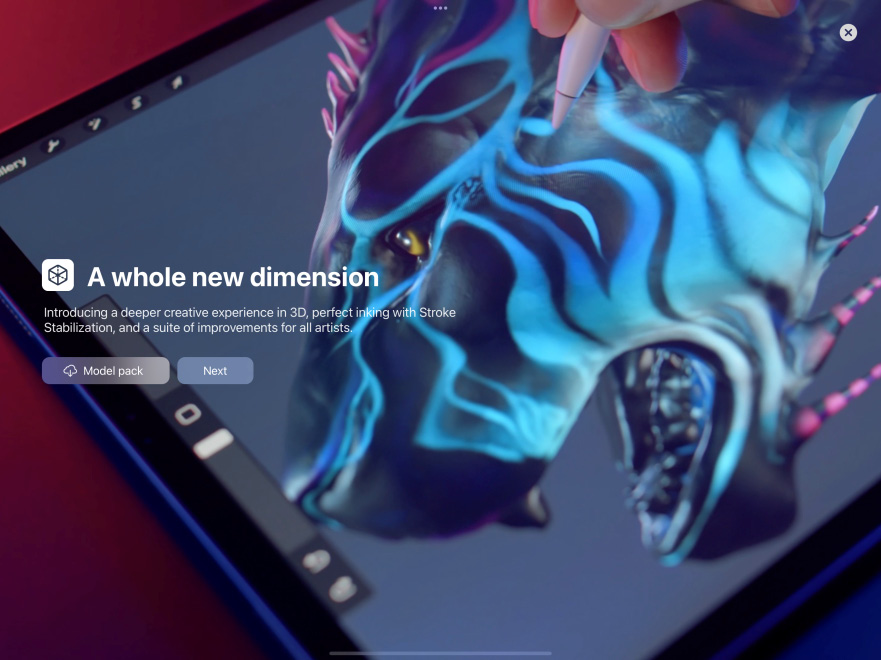
Figure 4.54: What’s new?
Tap on Model pack to import Procreate’s own pack of 3D models. We will discuss this in more detail in Chapter 15, Painting on 3D Models.
Keep tapping on the Next button as each screen tells you more about Procreate’s new features, as shown in the following screenshots:
_B16577.jpg)
Figure 4.55: (a) 3D Painting, and (b) accessibility
The last screen sports a button labeled Start Using Procreate, which will exit this demo and take you back to the drawing interface, as shown in the following screenshot:
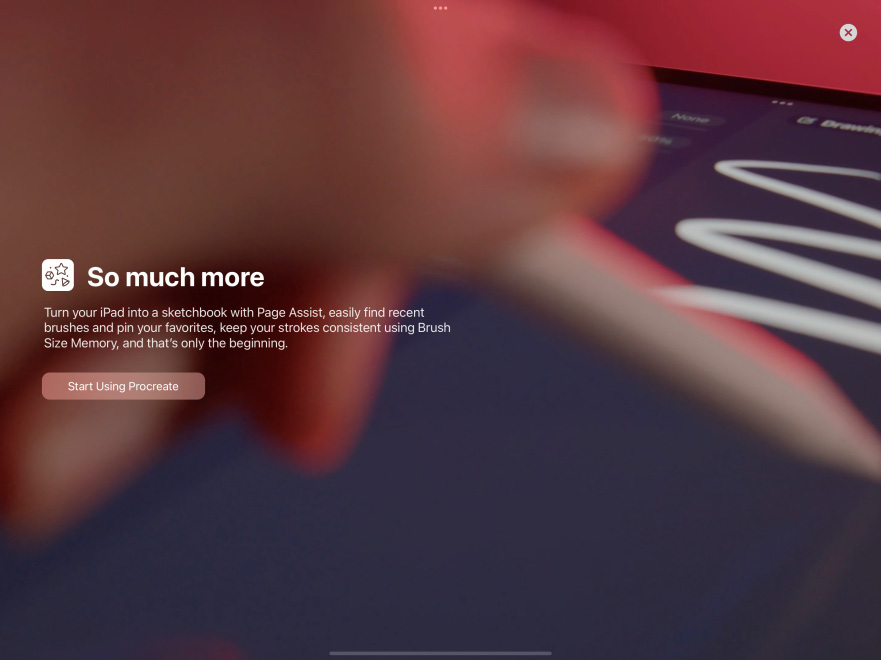
Figure 4.56: The end screen
At any point, you can tap the x icon in the top-right corner of the screen to exit the demo.
Procreate Handbook
This option will take you to the official instructional handbook on Procreate’s website, which has a comprehensive breakdown of all their features with examples, including “Pro-tips,” which are shown here:
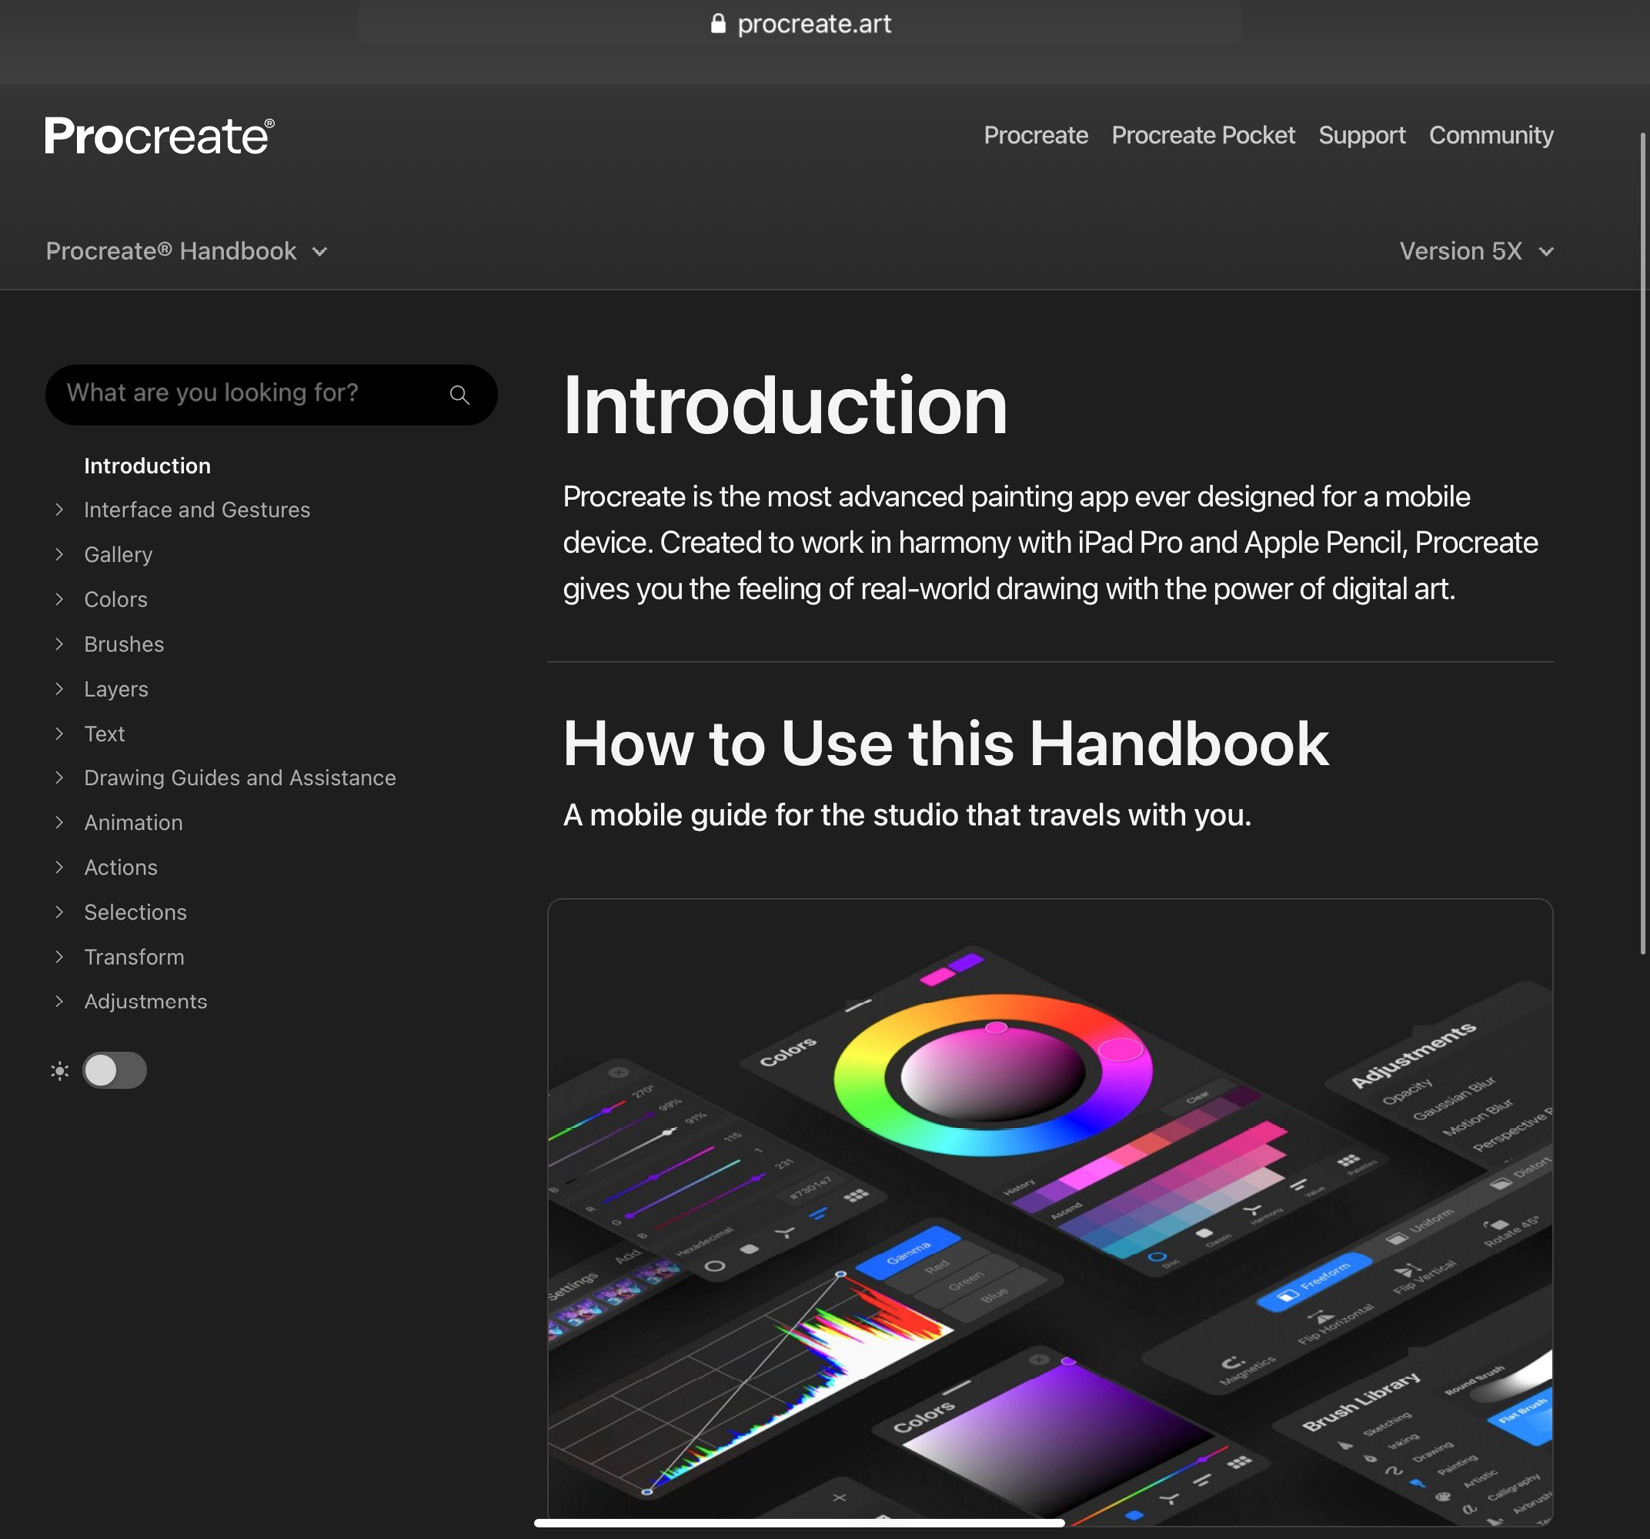
Figure 4.57: Procreate Handbook
This handbook is an excellent resource to keep handy, to understand the full extent of Procreate’s functionality.
Learn to Procreate
Access a playlist from Procreate’s official YouTube channel, which has live demonstrations of its features in a series of videos. The playlist, titled Learn to Procreate, has 50+ short videos, as shown in the following screenshot. It’s a great way to learn the software at your own pace:

Figure 4.58: Learn to Procreate
Customer support
Directly get in touch with Procreate’s customer support from their website using this option.
Procreate Folio
Procreate Folio is an online community of creators who use Procreate, where they can create an account and showcase their art. Tapping on Procreate Folio will take you to its website, as shown here:
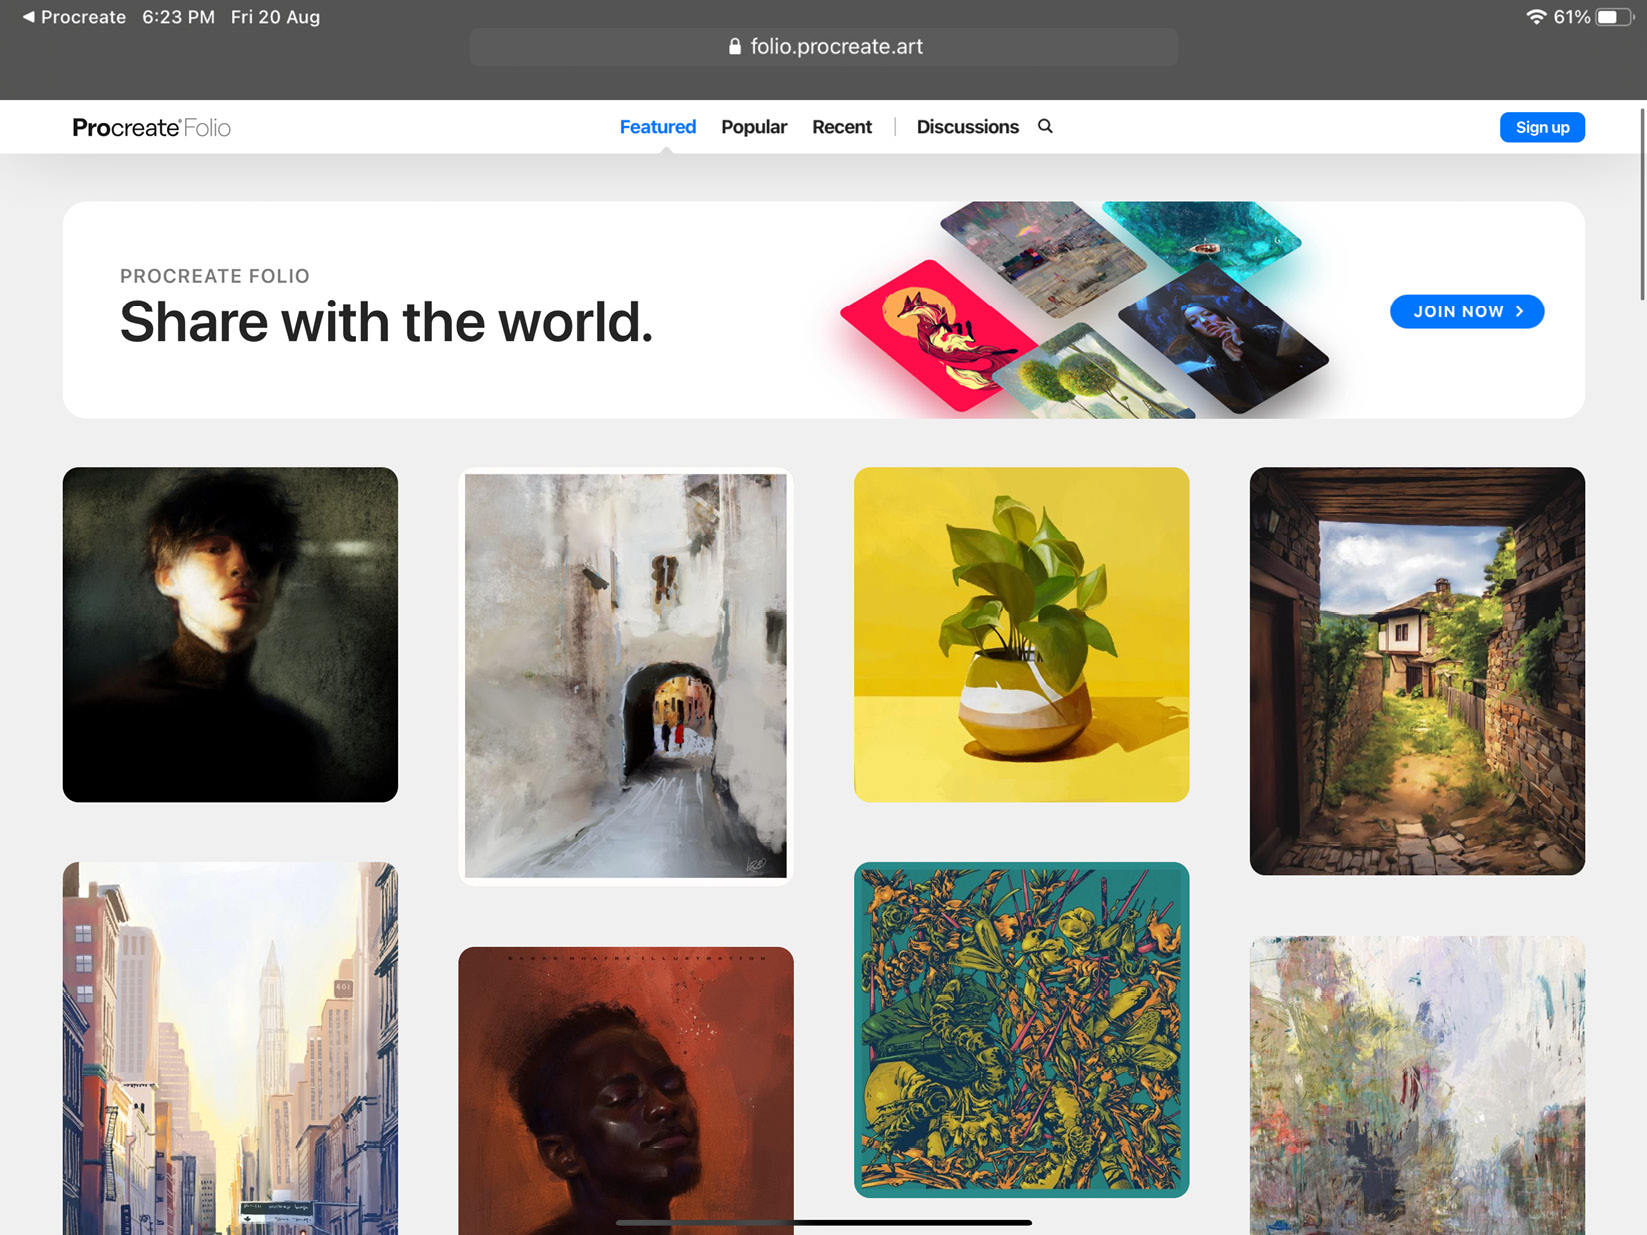
Figure 4.59: Procreate Folio
Write a Review
Tap on this option to visit the App Store and leave a review for the Procreate app, as shown here:
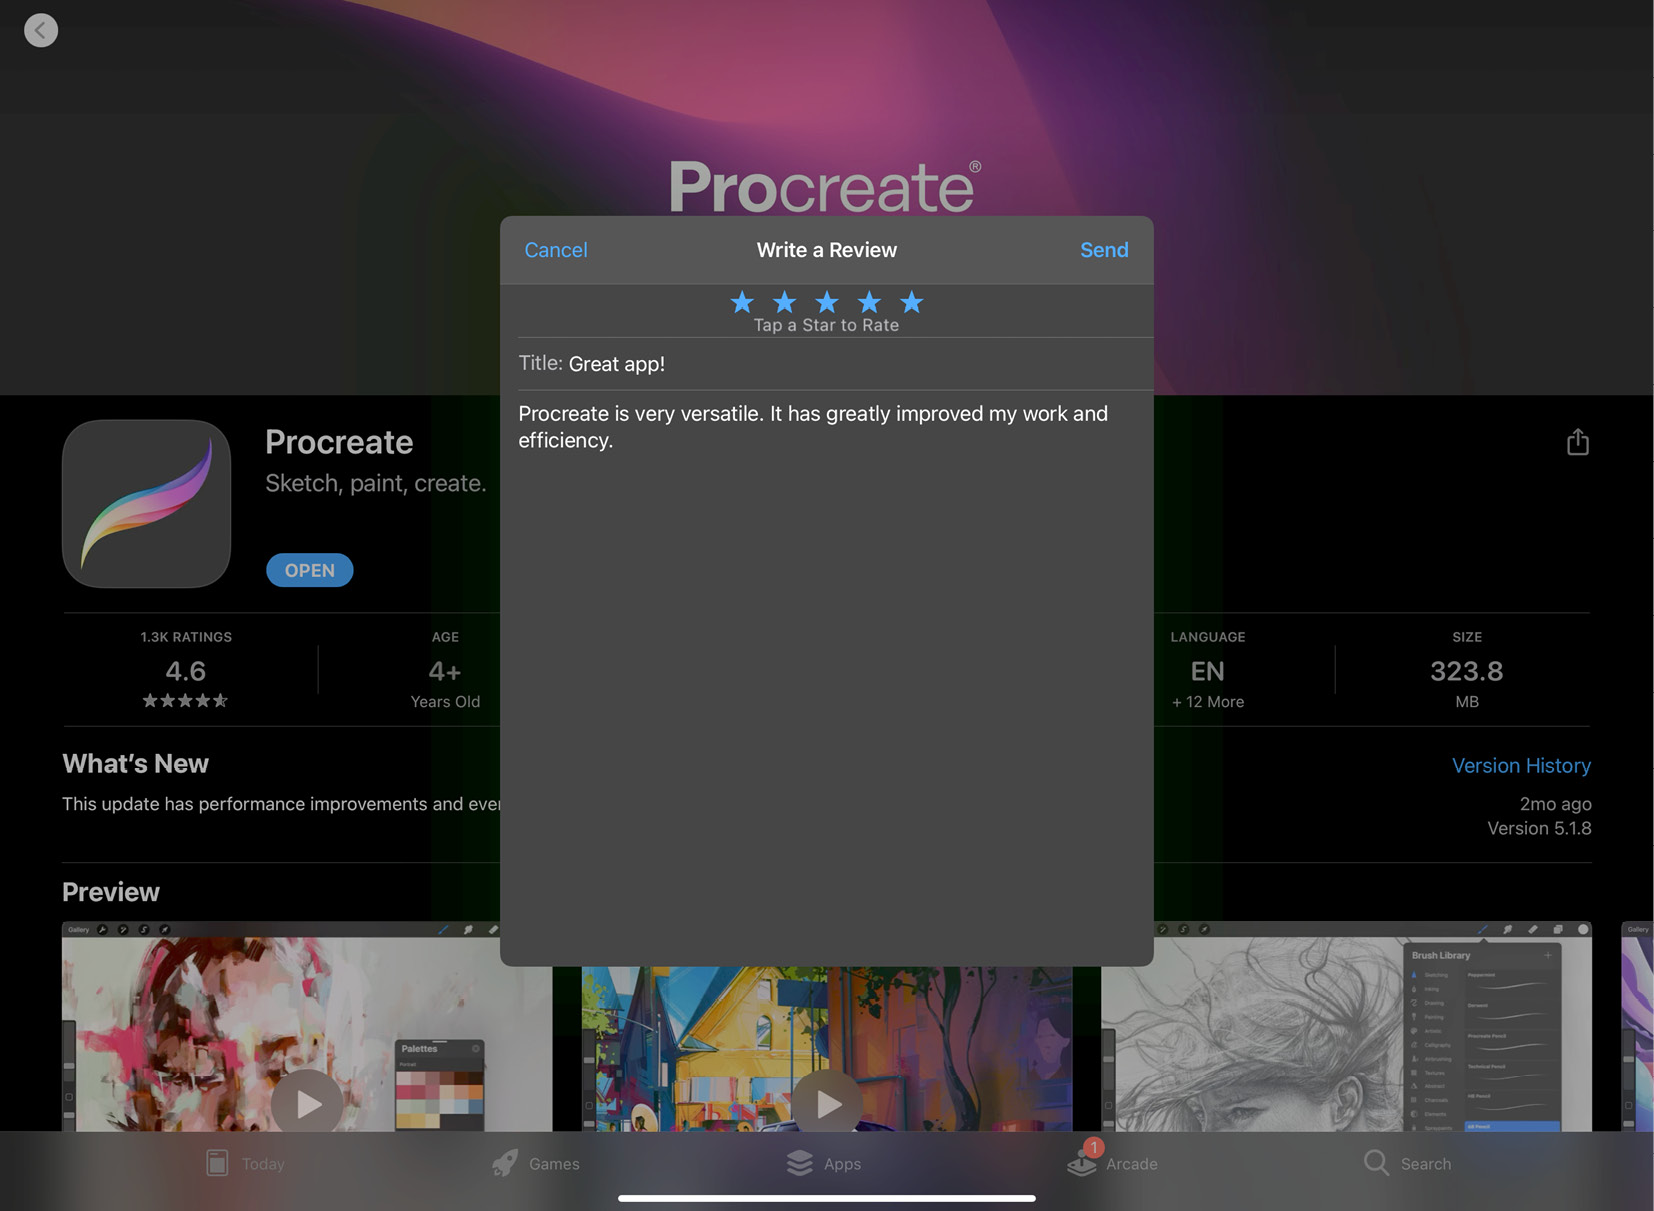
Figure 4.60: Write a Review
With that, we have covered all of the Actions menu. Let’s summarize.
Summary
The Actions menu is one of the most robust sets of features offered by Procreate. In this chapter, we covered how to add images and text using Add, how to make sweeping changes to your document using Canvas, and how to export your artwork in your desired format using Share. You also learned how the time-lapse feature of Procreate works in Video, and how you can export or disable it.
Additionally, you were introduced to tweaking the interface to suit your needs using Preferences, where we briefly touched upon gesture controls.
Lastly, you now know how to access technical know-how, external support, and advanced settings using the Help menu.
With this, we are ready to move on to Select and Transform, a combination of feature-rich tools in Procreate, which we will cover in the next chapter.