
7
Organizing Your Layers
One of the major differences between digital painting applications such as Procreate and traditional paper or canvas-based art is the concept of layers. If you are familiar with other software, you already know this. However, for beginners or artists who are transitioning from traditional to digital art, layers can be hard to get used to. So, what are layers?
Unlike traditional art, which usually happens on a single surface, digital art often uses multiple layers stacked on top of each other to create the final image. You can visualize them as layered transparent plastic sheets, where each sheet contains a different part of the artwork, as shown in the following figure:
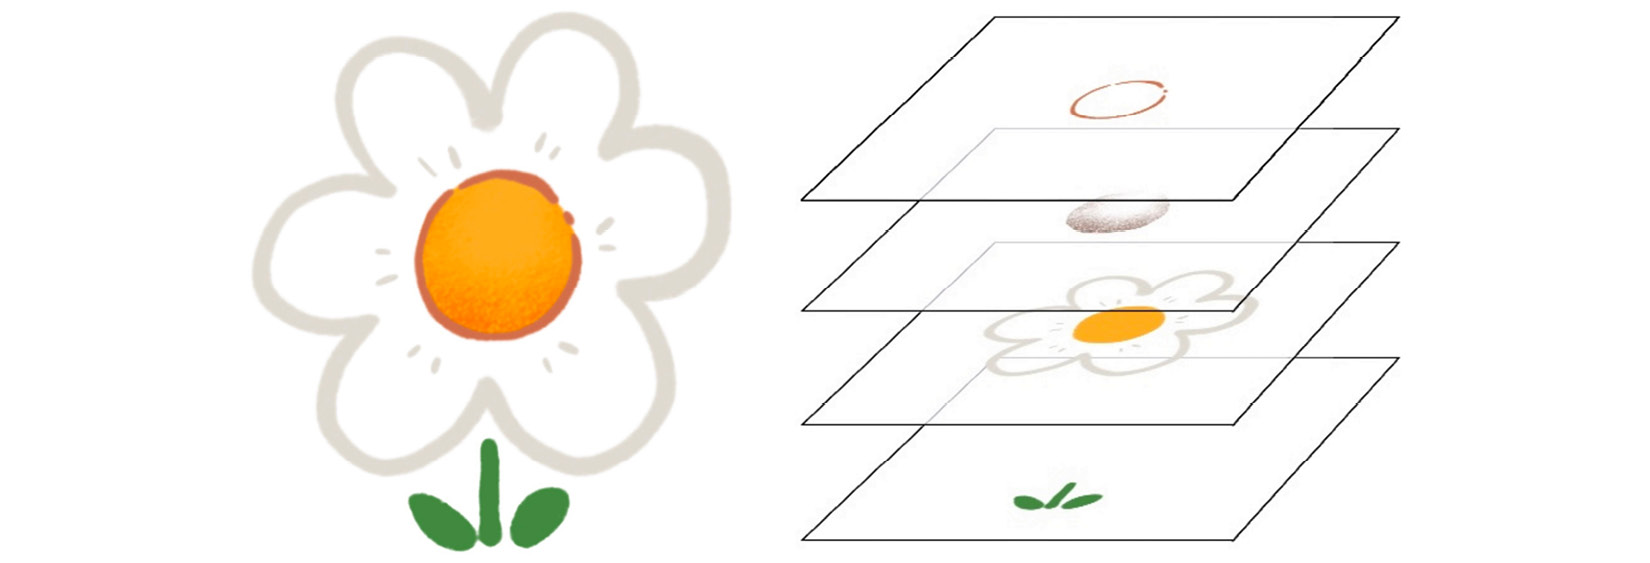
Figure 7.1: The artwork (left) and the separated layers (right)
Working with multiple layers instead of a single one is advantageous. It allows you to work on different elements without affecting the others. But, there’s much more to layers than just convenience. They can actively augment and improve your workflow. In this chapter, we will look at all the different functions of layers and how to use them.
We’re going to cover the following broad topics in this chapter:
- The Layers interface
- Organizing layers
- Exploring Layer Options
- Understanding blend modes
- Sharing layers
The Layers interface
The Layers panel can be opened using the overlapping squares icon at the top right-hand corner of the Procreate interface, as shown in the following screenshot:
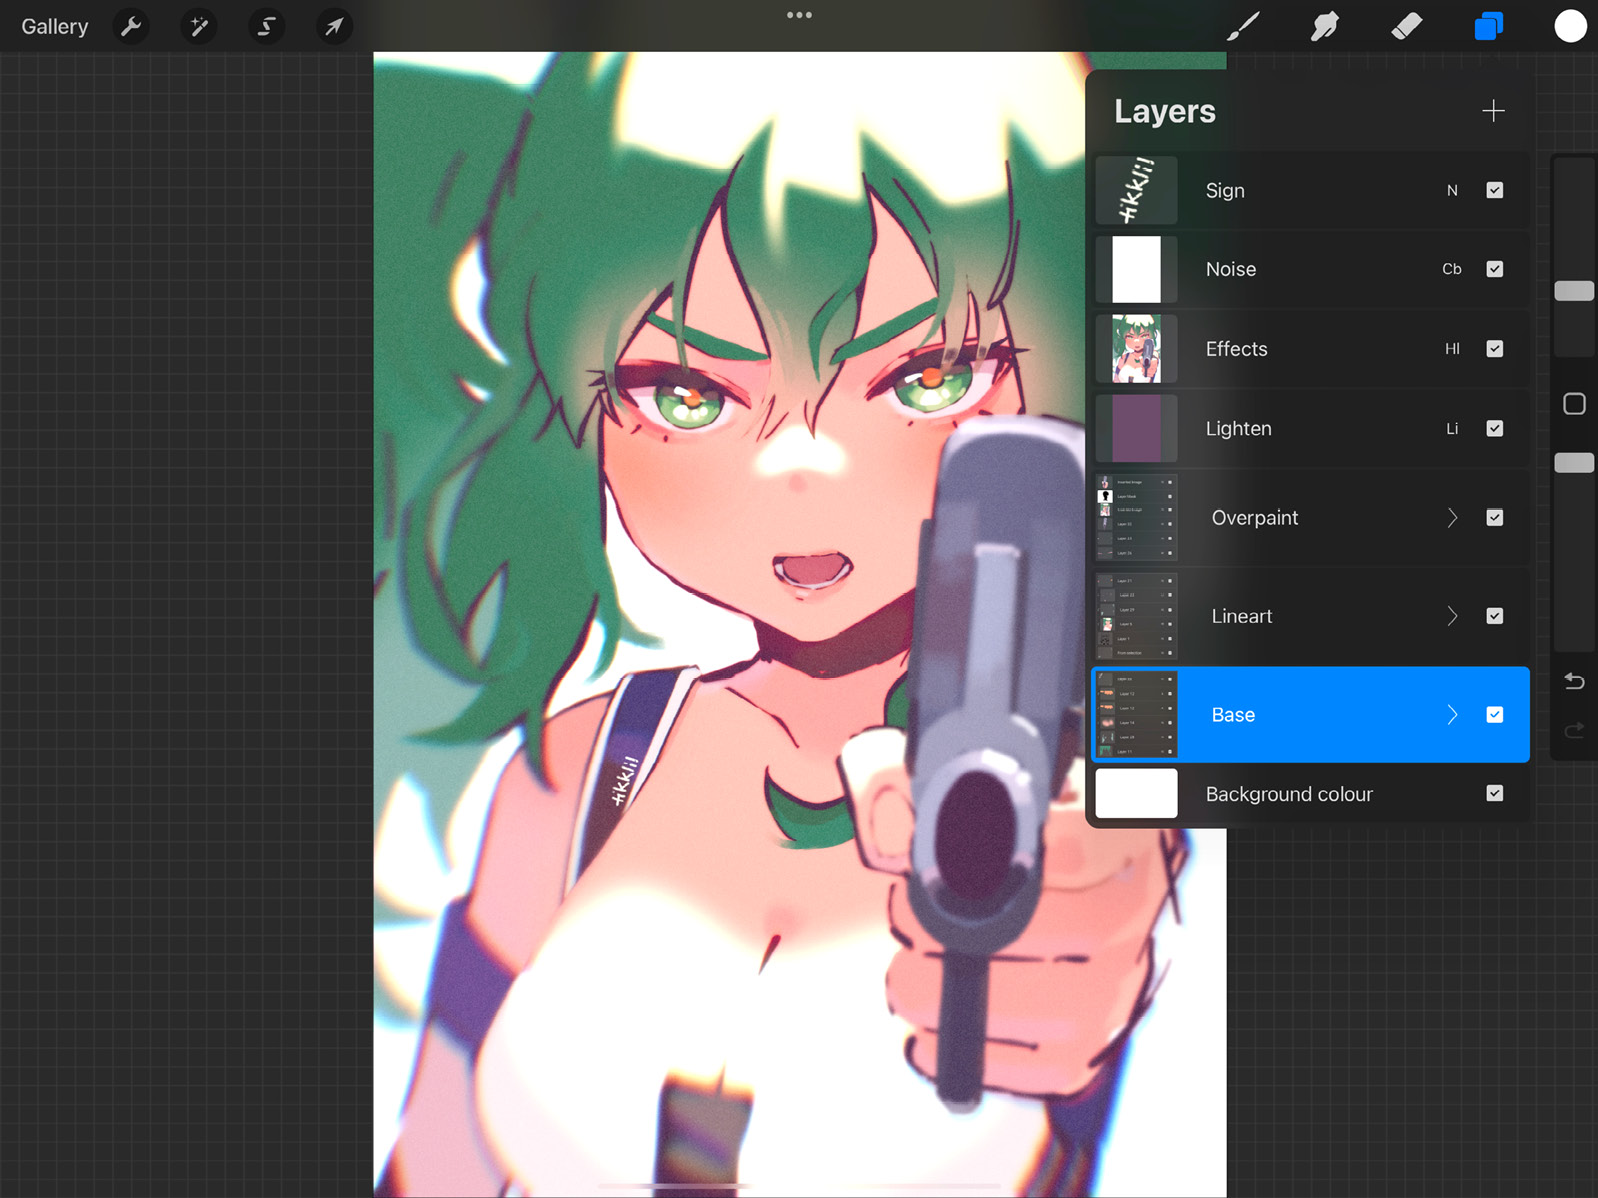
Figure 7.2: The Layers panel
To be able to effectively work with layers, let’s first get familiar with the different elements of the interface in the following sections.
Create a new layer
In the top right-hand corner of the Layers panel, you will spot a + icon. This button lets you create a new layer on top of your current layer.
Any image you import into the canvas automatically gets inserted as a new layer. This is done using the Add menu, shown in the following screenshot:
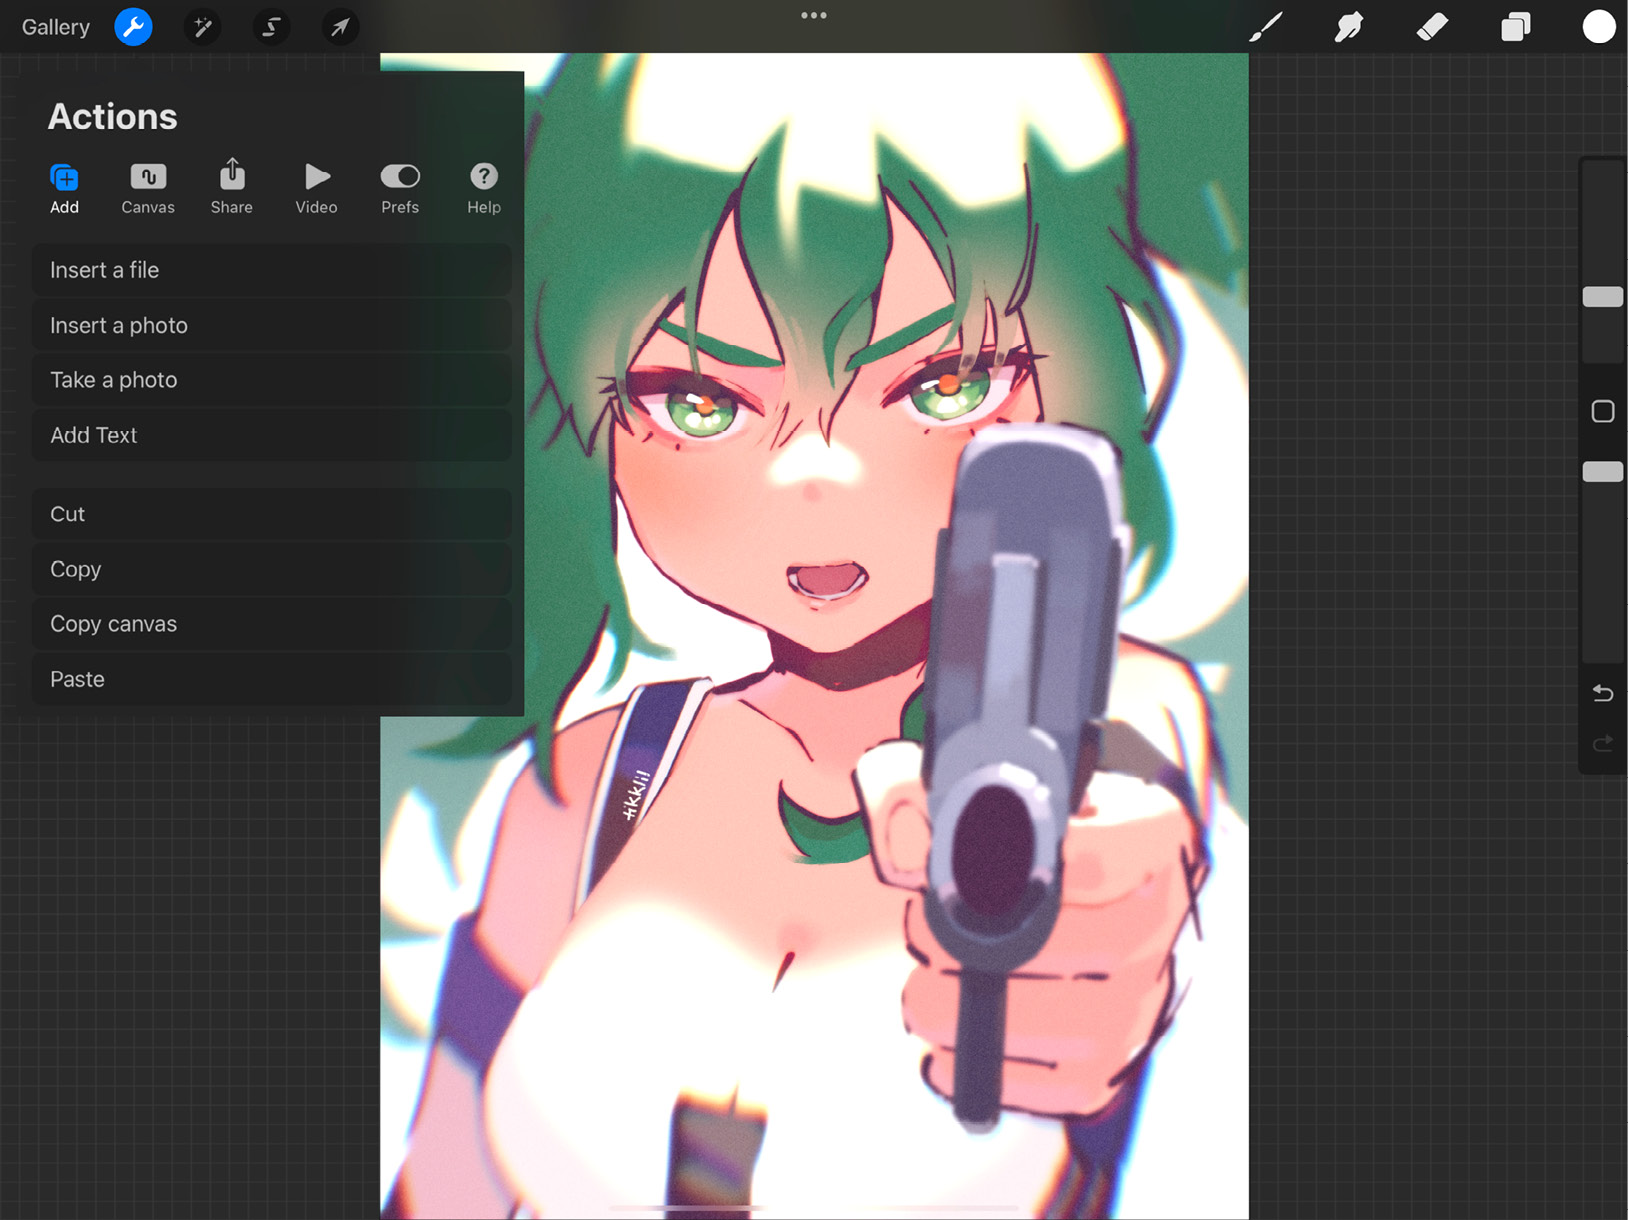
Figure 7.3: The Add menu
If you want to import an image or file but don’t want it to appear on your time-lapse video, you can swipe left on Insert a file or Insert a photo to reveal a button that says Insert a private file/photo. If you tap this button, any image file you insert will not show up on the time-lapse video.
Layer thumbnail
On each layer, you can see a small box with a preview of the contents of that layer. This is the layer thumbnail:

Figure 7.4: Layer thumbnail
Layer name
Every layer, by default, is named “Layer x”, where “x” is the order in which it was created. Layer names are customizable, as we will learn later in this chapter.
Primary layer
The primary layer is the one that is currently selected. When you draw, erase, or smudge, it will affect this layer. In the Layers panel, the primary layer is indicated with light blue. Tap on any layer to select it:
Figure 7.5: The primary layer
Blend mode
Procreate lets you use the contents of one layer and blend them with others using different modes. The blend mode of a layer is indicated by the small letter/s next to the layer name.
Tapping on the blend mode opens a drop-down menu below the layer, which has an opacity slider as well as a list of all the possible blend modes. This slider can be used to adjust the opacity of the layer.
Blend modes are discussed in further detail later in this chapter.
Layer visibility
The checkbox to the right of the blend mode can toggle layer visibility on and off. Check it to make a layer visible, and uncheck it to hide it.
Background color
Every Procreate document comes preloaded with a white canvas background. It appears at the very bottom of the Layers panel. The background can’t be deleted like regular layers, only made invisible. Tap it to bring up the color slider and select a new background color, as shown in the following screenshot. If you disable it, it becomes possible to export PNG images with a transparent background.
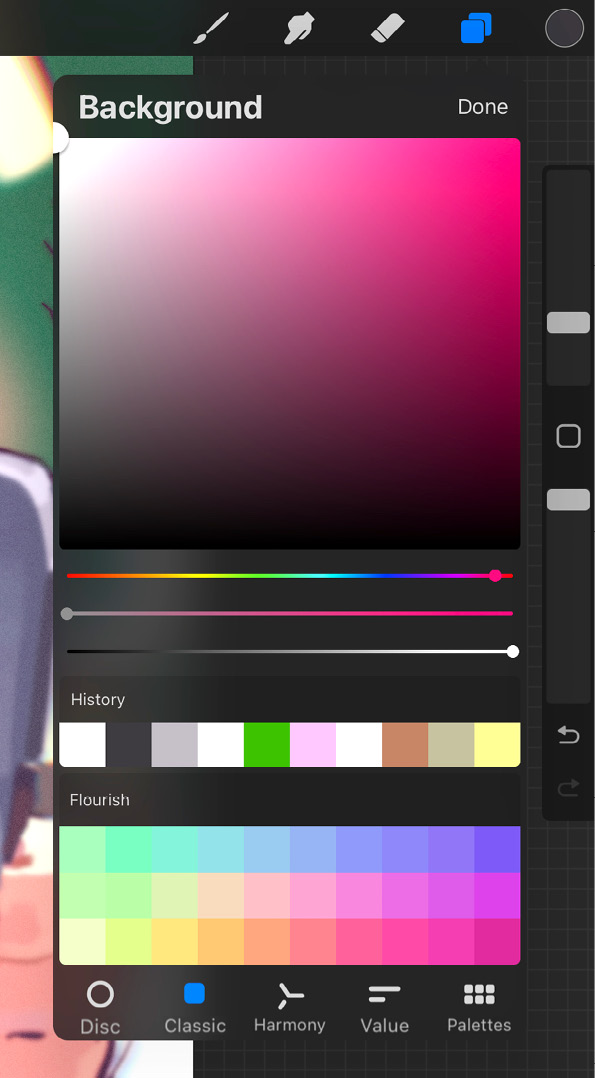
Figure 7.6: Background color
Layer Options menu
When you tap on a layer, it brings up a menu, as shown in the following screenshot:

Figure 7.7: The Layer Options menu
This is the Layer Options menu. This offers you a wide variety of functions that you can perform using layers. We will learn more about Layer Options further ahead in this chapter. Now that we know the basic interface of the Layers panel, let’s move on to the next section where we will be learning how to organize layers.
Organizing layers
There are several ways you can work with layers to take advantage of the numerous features they offer, such as selecting, grouping, moving, and transferring them. You will also learn about actions such as locking, duplicating, and deleting layers in the following sections.
Selecting layers
When selecting layers to work with, there are several ways you can do it:
- Primary layer: Also called the active layer, this is the layer that your drawing will apply to. Tap on a layer to select it as your primary layer. In the Layers panel, it will be highlighted with light blue.
- Secondary layers: To select more than one layer, select any one of them as the primary layer, then swipe right on all the other layers you wish to select, as shown in the following screenshot:
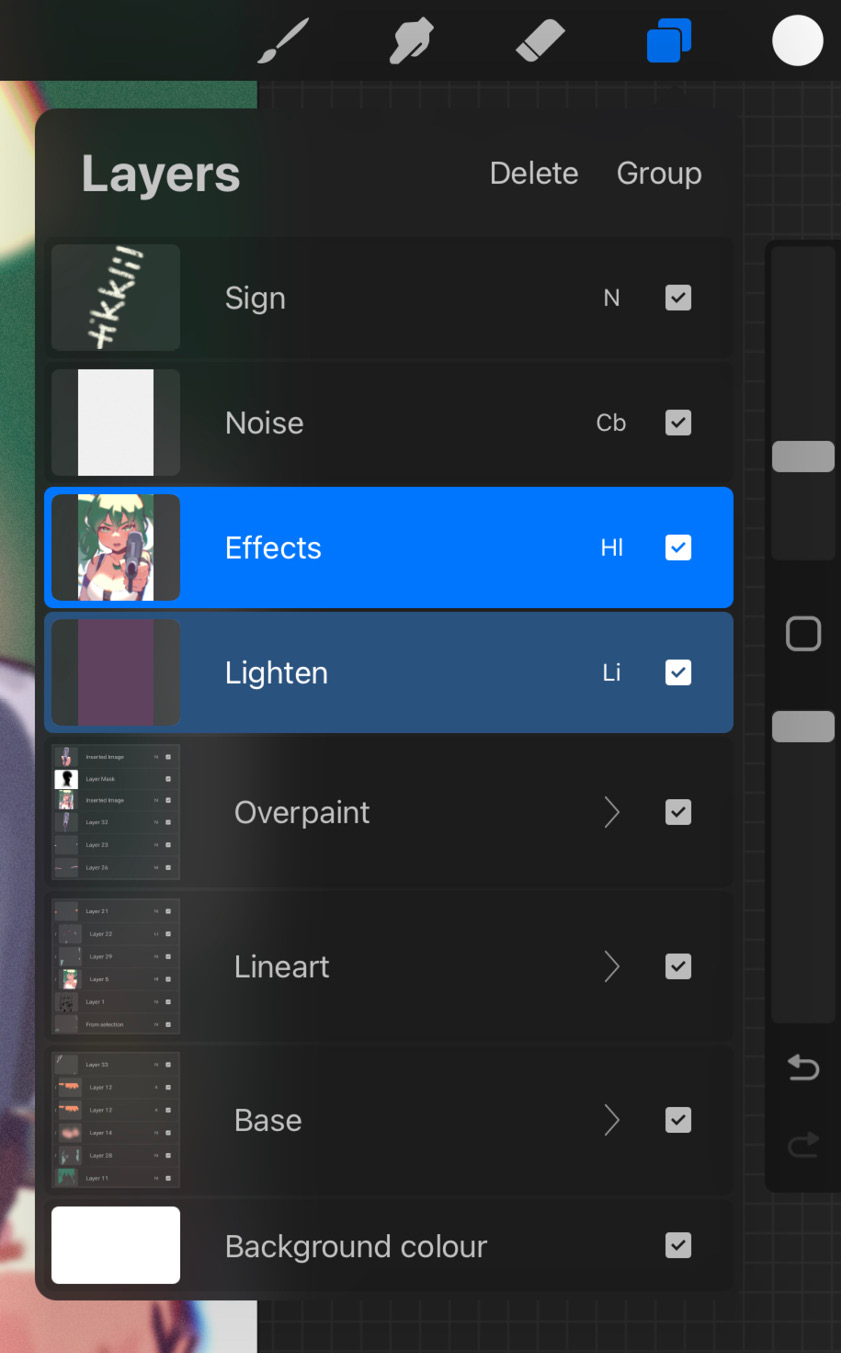
Figure 7.8: Primary and secondary layers
The primary layer is indicated in light blue and the secondary layers in dark blue. When multiple layers are selected, it makes it easier for you to transform, reposition, group, or delete them all at once.
All drawing, erasing, smudging, and adjustments, however, will only apply to the primary layer. For instance, you cannot apply Hue, Saturation, and Value adjustments to multiple layers at once.
Moreover, clipboard actions such as Cut and Copy also apply only to the primary layer.
- Select Layer Contents: You can select the layer as a whole or only the pixels used by its contents. This is done by a two-finger hold on the layer in question. Doing so will activate the Selections tool around those pixels and keep it active irrespective of which layer is currently the primary one. This is especially useful when you want to work on the area occupied by the contents of one layer, while being on a different layer. To learn more about the Selections tool, refer to Chapter 5, Selecting and Transforming.
- Layer Select: Though it sounds similar to the previous point, Layer Select refers to a completely different function. It’s useful when you want to locate an element but can’t find the layer it’s sitting on. Layer Select can be invoked by a gesture of your choice. You can do so using the pathway Actions | Prefs | Gesture Controls, which will bring up the following screen, where you can assign a gesture to Layer Select:
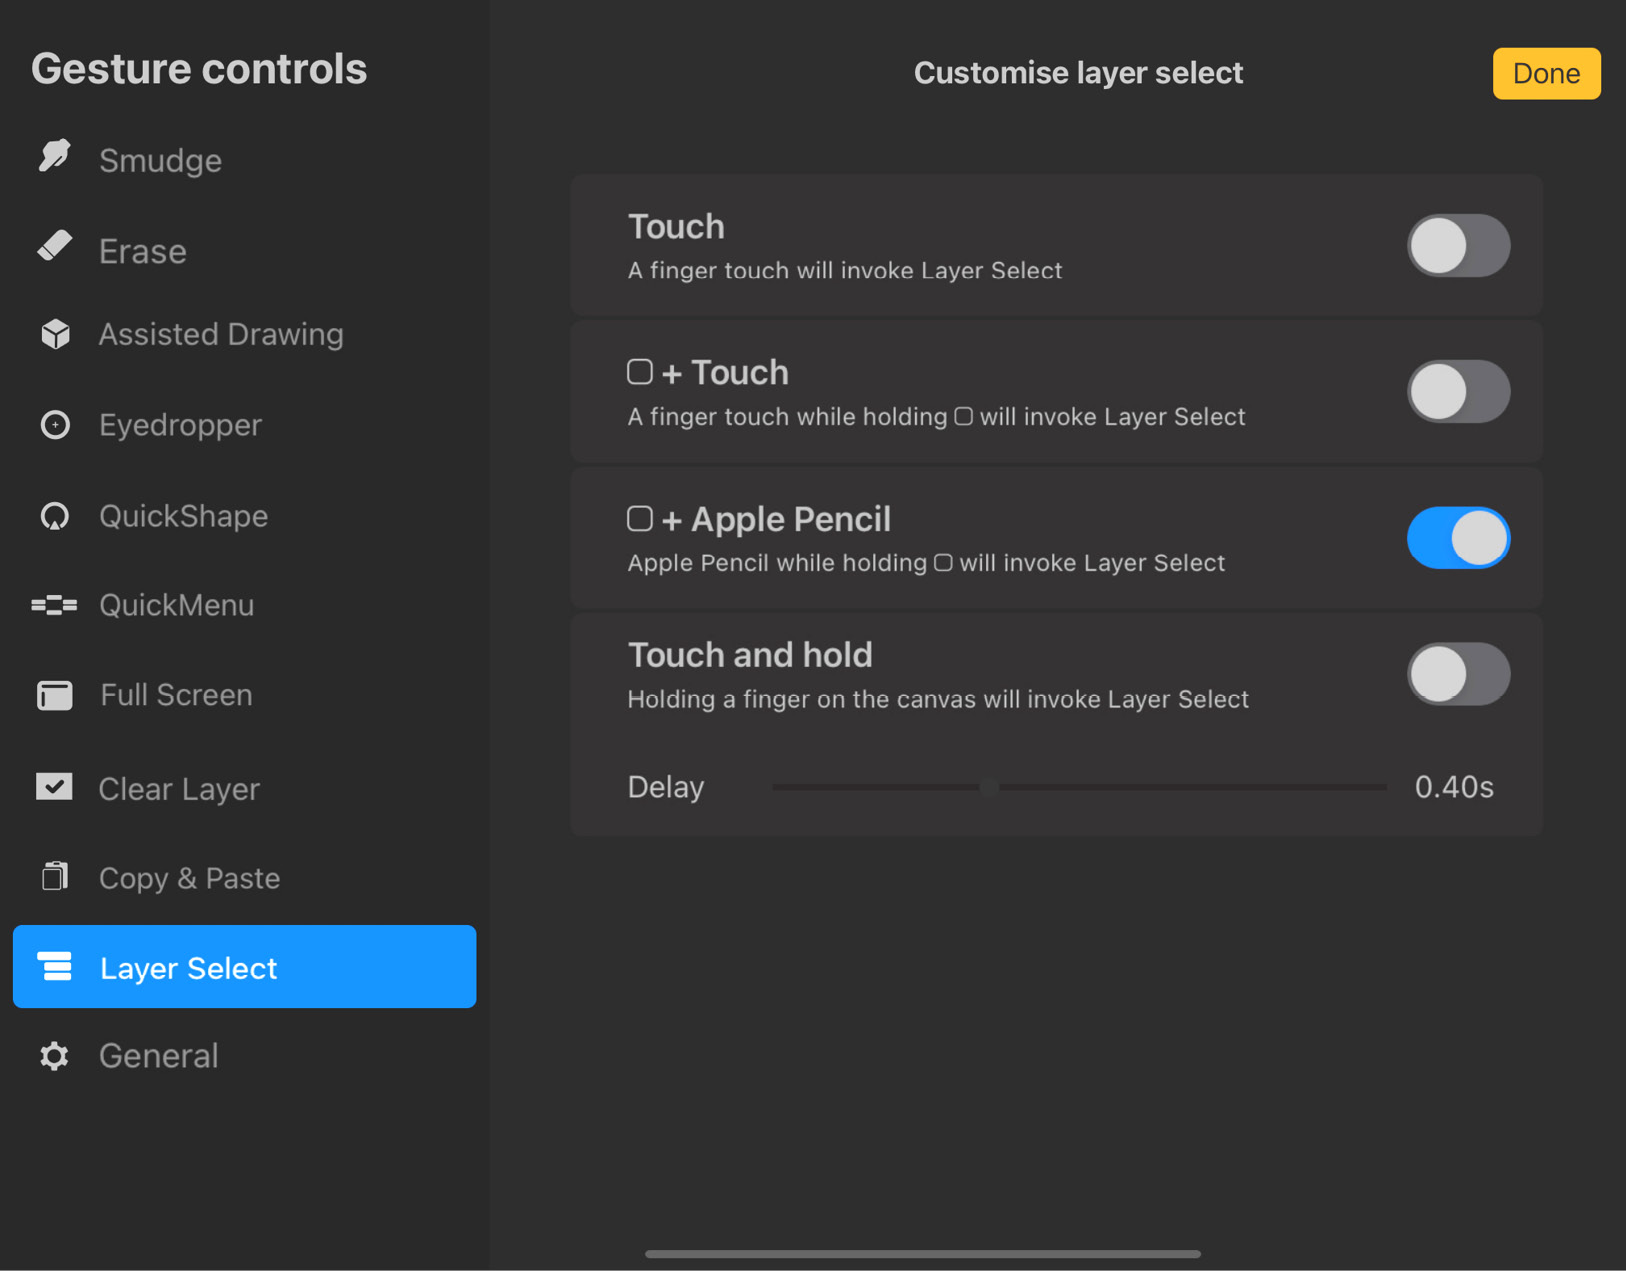
Figure 7.9: Layer Select gesture controls
To learn more about gestures, refer to Chapter 6, Using Gestures and Shortcuts.
Once you have activated this feature, follow these steps to use it:
- Invoke Layer Select using your assigned gesture.
- Hold and drag on the canvas until you’re touching the element you want to focus on.
- Wait for a moment until a layer menu pops up containing the possible layers the element could be on, as shown in the following screenshot:
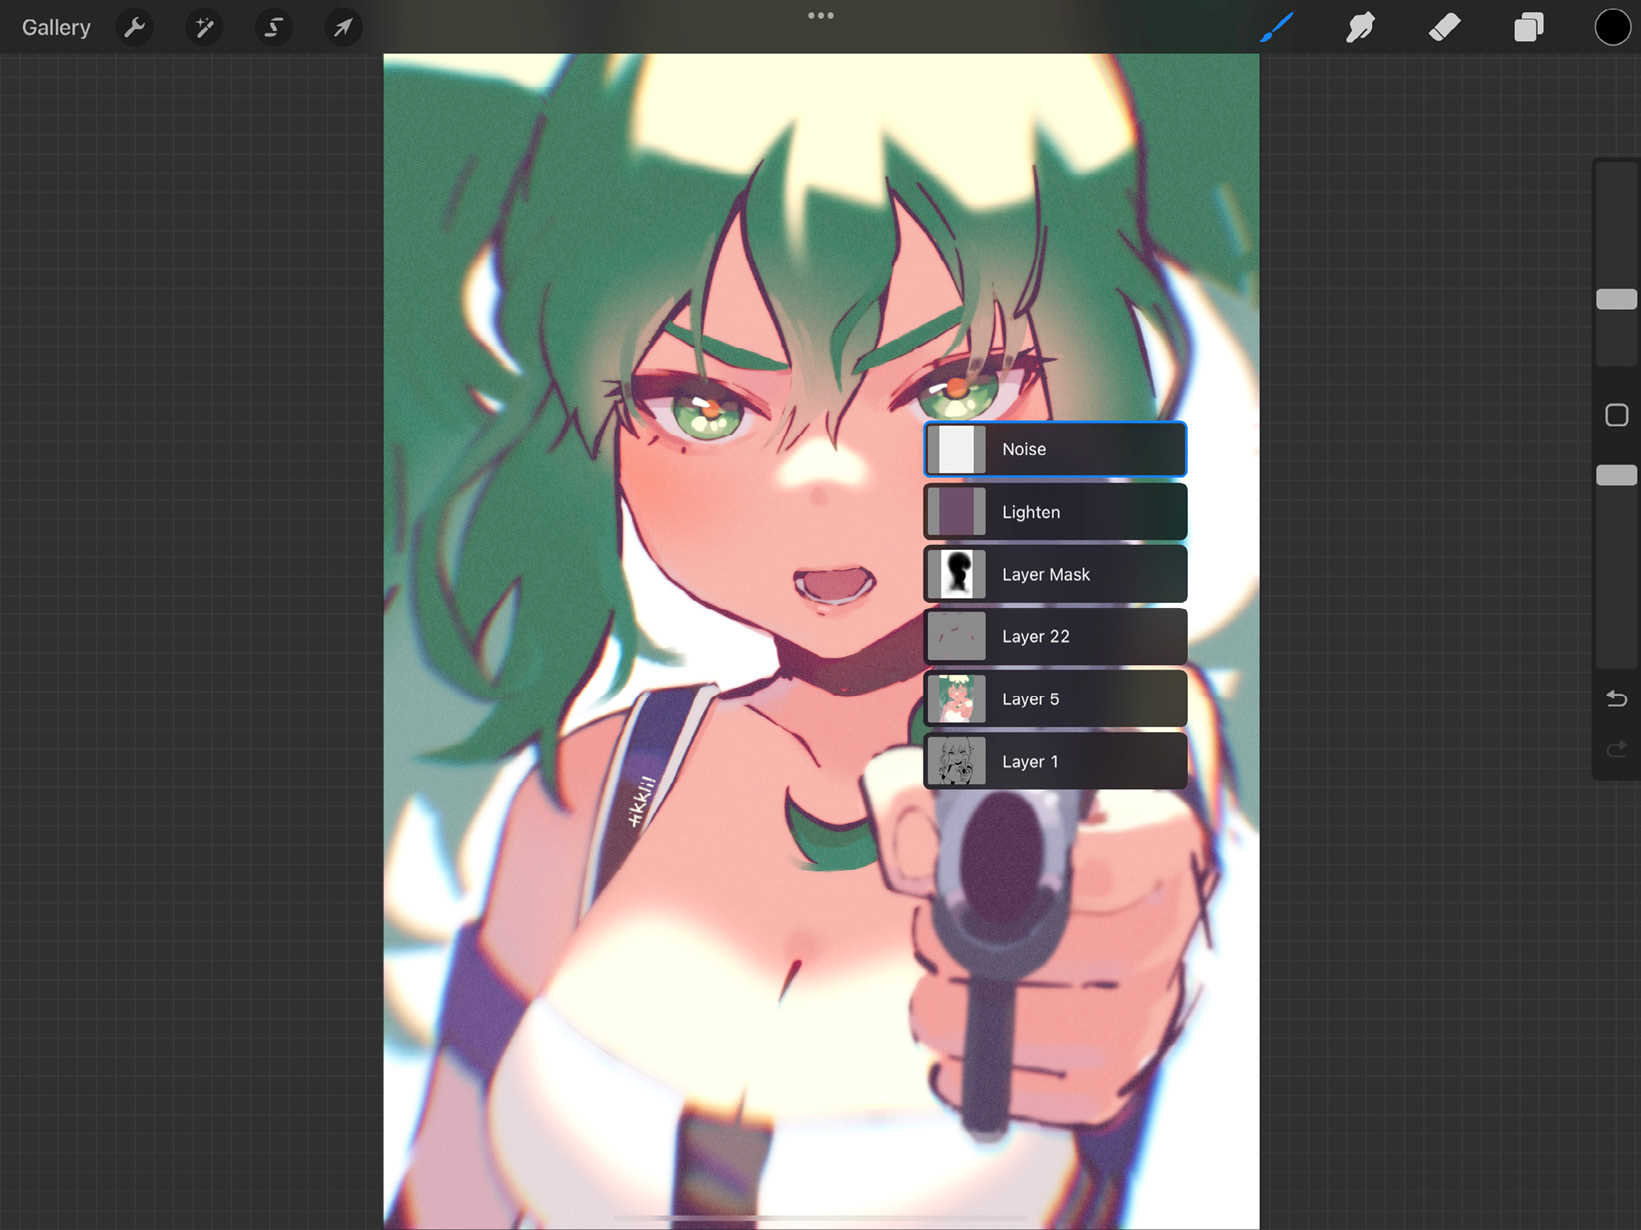
Figure 7.10: Layer Select
Grouping layers
Layer groups are like collapsible folders that contain multiple layers. They are a great way to arrange and compartmentalize your layers to avoid confusion. There are three main ways to group layers:
- Selecting multiple layers: When you select more than one layer using the right-swipe gesture, a button called Group appears at the top of your Layers panel, as shown here:
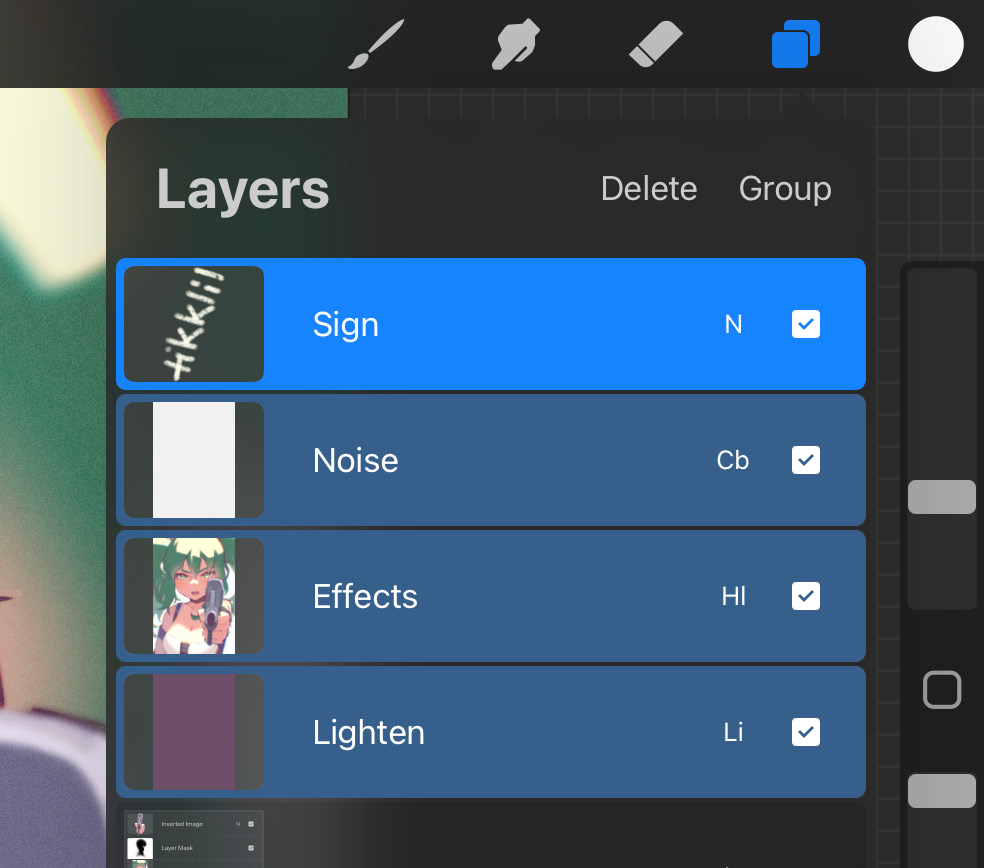
Figure 7.11: Grouping by selecting multiple layers
Tap this to group all selected layers into a single layer group.
- Using Layer Options: Tap on your primary layer to bring up the Layer Options menu.
Tap on the Combine Down option to create a group with the layer immediately below. This works on layer groups as well, in which case the bottom layer gets shifted into the primary group. Moreover, you can also use this feature to combine two groups sitting back-to-back in the Layers panel.
- Using gestures: In the Layers panel, drag any layer or group over to another layer or group and hold until a blue box appears around the thumbnail of the latter, as shown in the following screenshot:

Figure 7.12: Grouping by dragging
At this point, release it to instantly group the elements together. Similarly, you can select multiple layers to drag and group.
Important Note
It’s not possible to draw on a single layer when a group is selected. If this situation arises, Layer Select will be invoked and you’ll have the option to hop to any layer in that group.
Similarly, no effects and adjustments (such as Gaussian Blur) can be applied to a group as a whole.
Moving layers
It’s very easy to re-order or move layers in the Layers panel. You might want to move a single layer, multiple selected layers, or a group of layers. To do so, simply press and hold the selected layers or groups. Then, drag them along the list of layers and release them at your preferred position, as shown in the following screenshot:
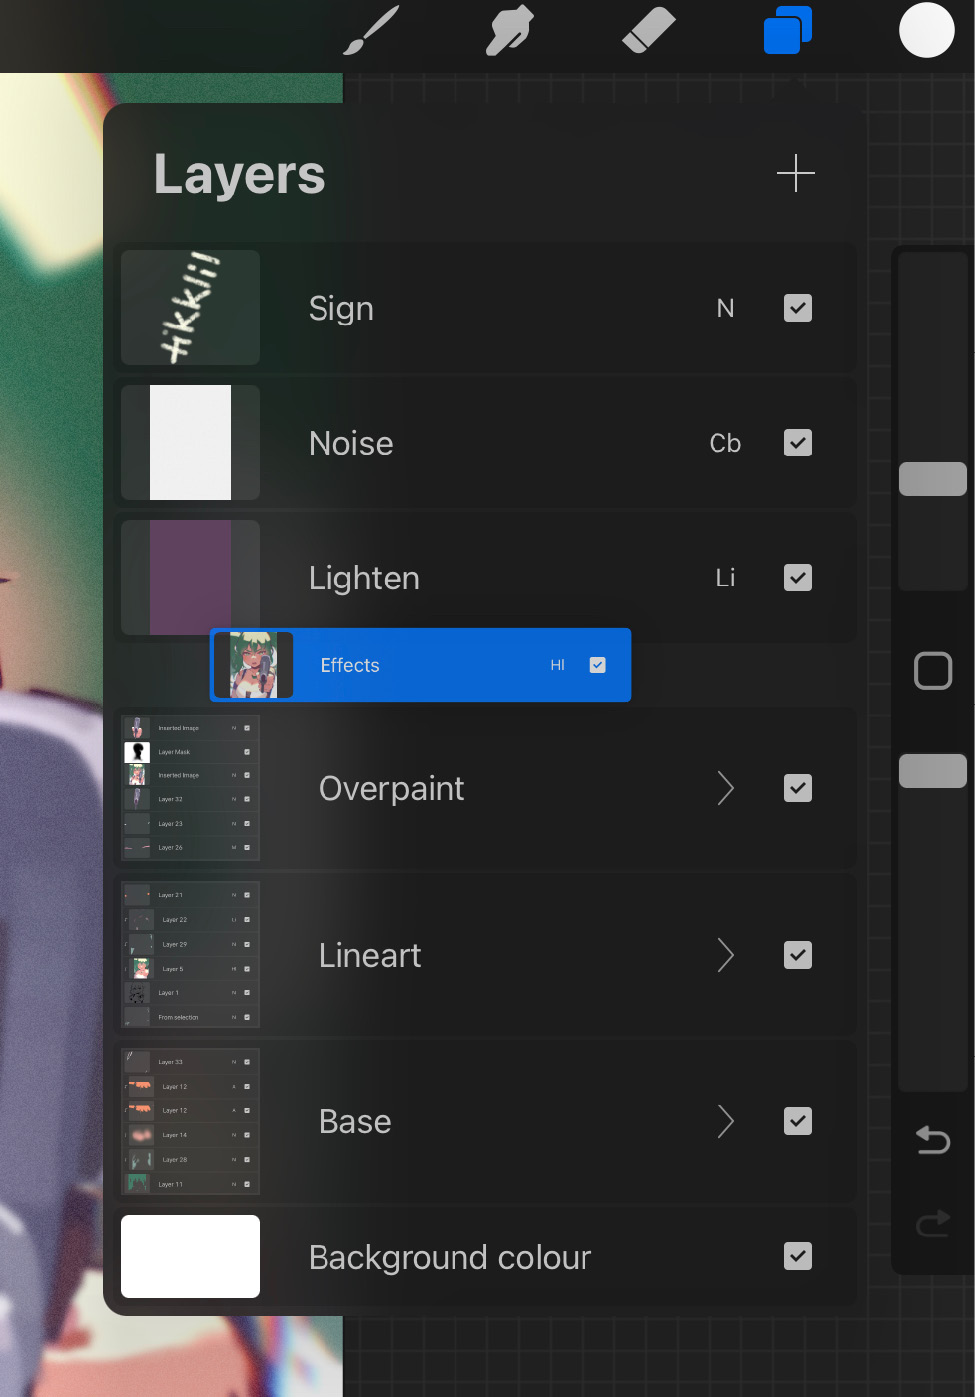
Figure 7.13: Moving layers
Transferring layers between canvases
It’s possible to transfer layers from one canvas to another. This is useful when you want to reuse elements of one canvas in another. This action is performed by a series of simple gestures, as follows:
- From the Layers panel, hold and pop out a layer, as shown in the following screenshot:
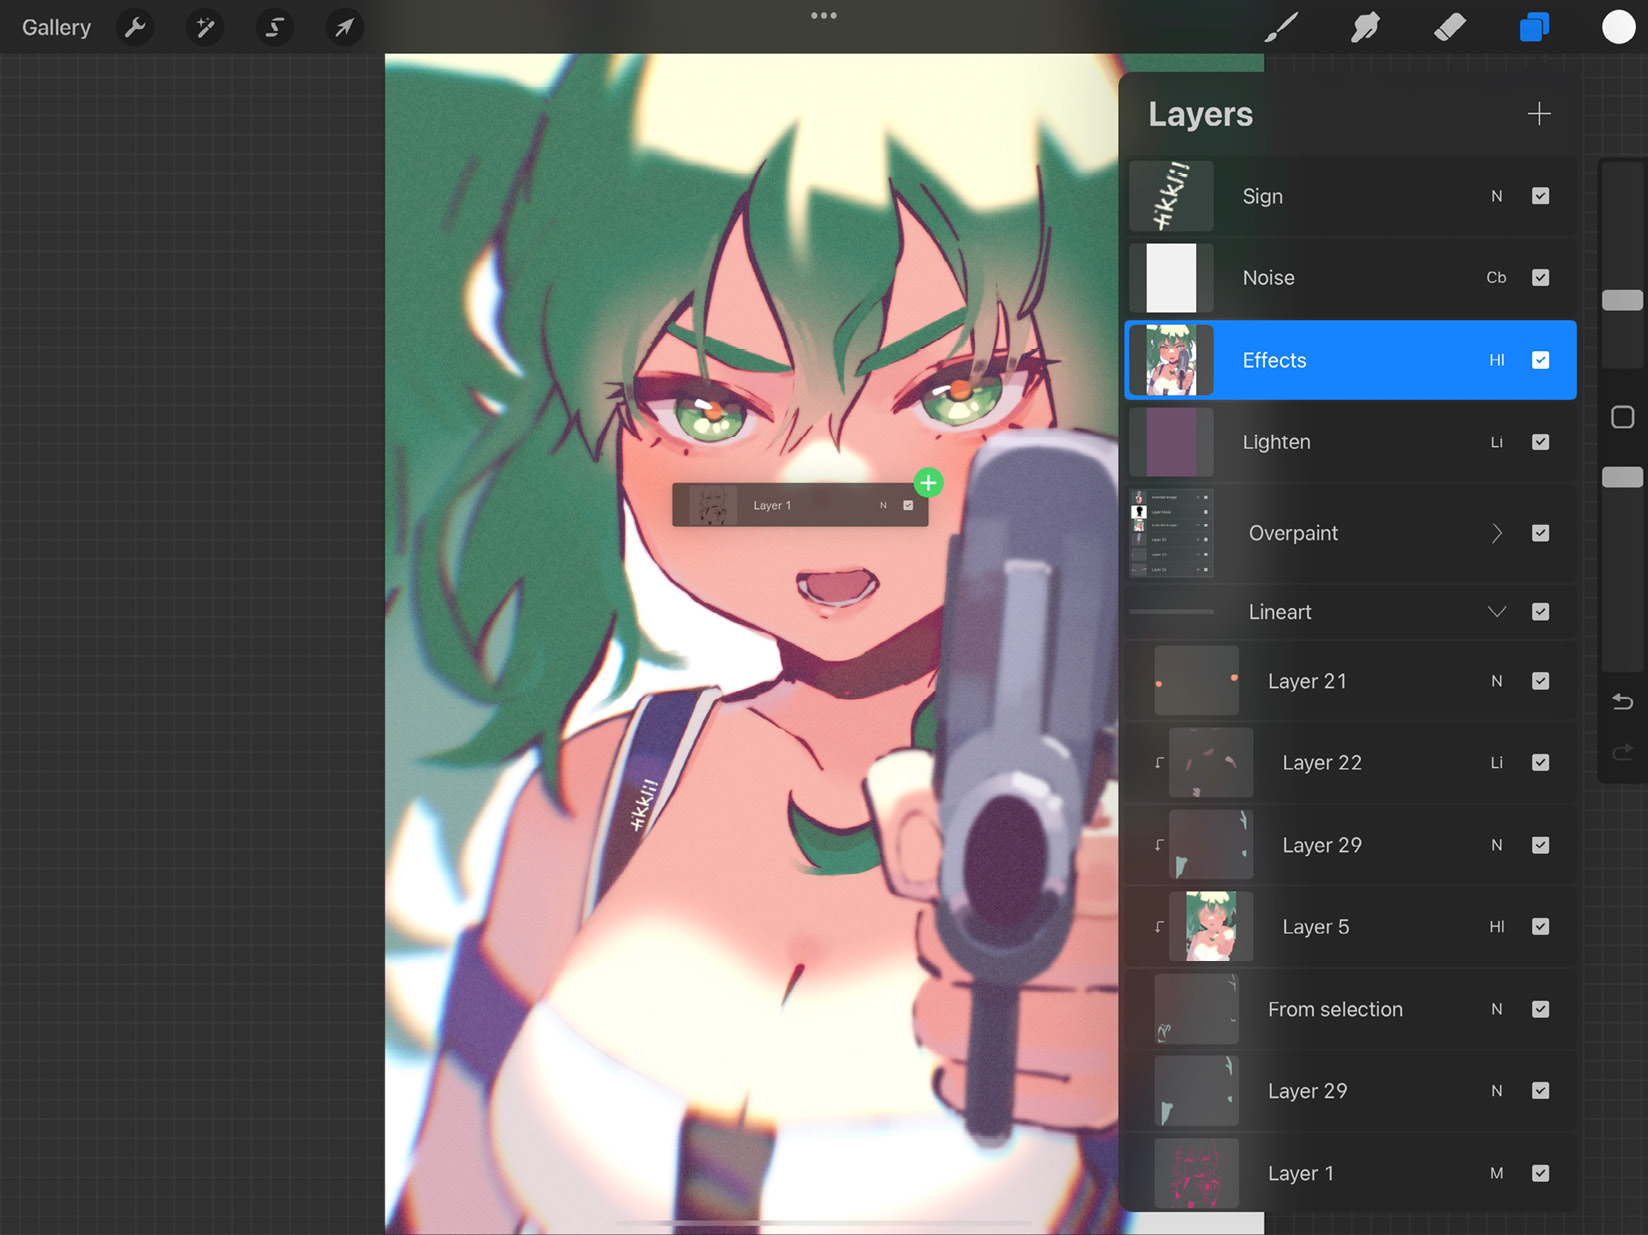
Figure 7.14: Popping out a layer
- While holding the floating layer, use another finger to tap on Gallery at the top-left corner of the screen, and exit the canvas.
At this point, you could directly release the layers into the Gallery. It will create a new canvas from each layer. This canvas will have the same dimensions as the parent canvas. If you had selected multiple layers in the first place, each layer will create a separate new canvas.
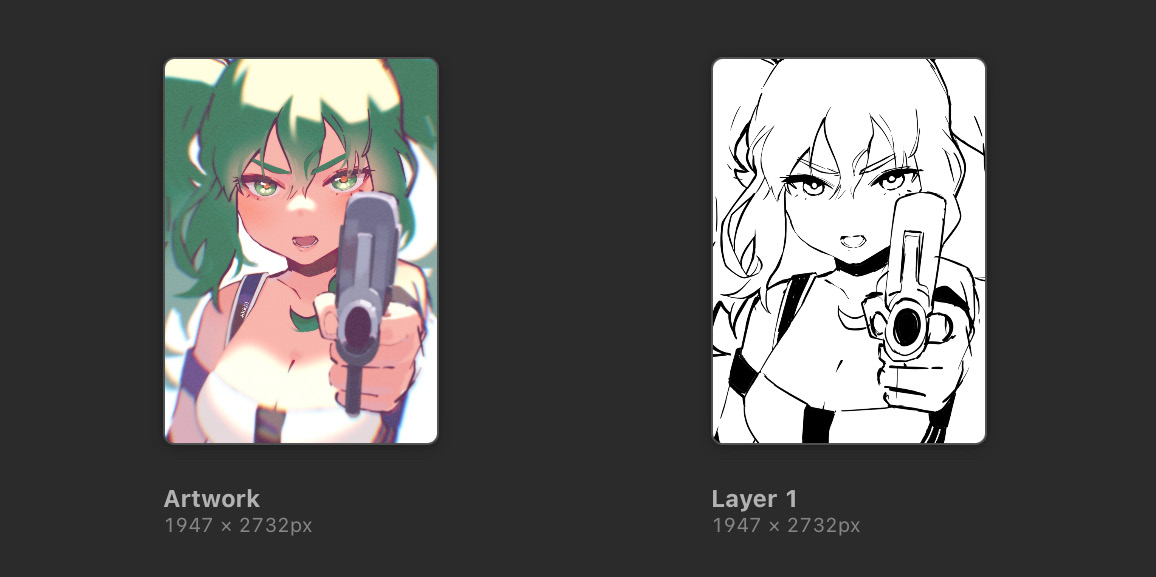
Figure 7.15: New canvas from transferred layer
- Alternatively, keep holding the floating layer and use a free finger to tap on the canvas into which you want to transfer it.
- Once the destination canvas loads, release the layer. Doing so will import the transferred layer into the current canvas right above its active layer.
These steps work with single as well as multiple layers.
Lock, duplicate, and delete layers
The last set of actions we’re going to learn about are Lock, Duplicate, and Delete. In the Layers panel, swipe left on any layer to reveal these three buttons, as shown here:

Figure 7.16: The Lock, Duplicate, and Delete buttons
These actions work in the following ways:
- Lock: A locked layer shows a little lock icon next to its name. Turning on this option prevents any edits to the layer in question. This includes drawing, transforming, performing adjustments, or even deleting the layer. The Lock feature is useful when you want to preserve a layer and make sure you don’t make any accidental edits to it.
- Duplicate: This option creates a copy of the layer on top of it.
- Delete: This option removes the layer from your canvas. This deletion can be reversed using Undo, but once you’ve closed the canvas or run out of Undo chances, it can’t be undone.
Now that we have covered all the different ways to organize your layers, let’s move on to the Layer Options menu, an essential feature associated with layers.
Exploring Layer Options
Each layer has an associated menu called Layer Options, which has an array of actions you can perform on that layer. Select any layer and tap on it again to bring up the Layer Options menu, as shown in the following screenshot:
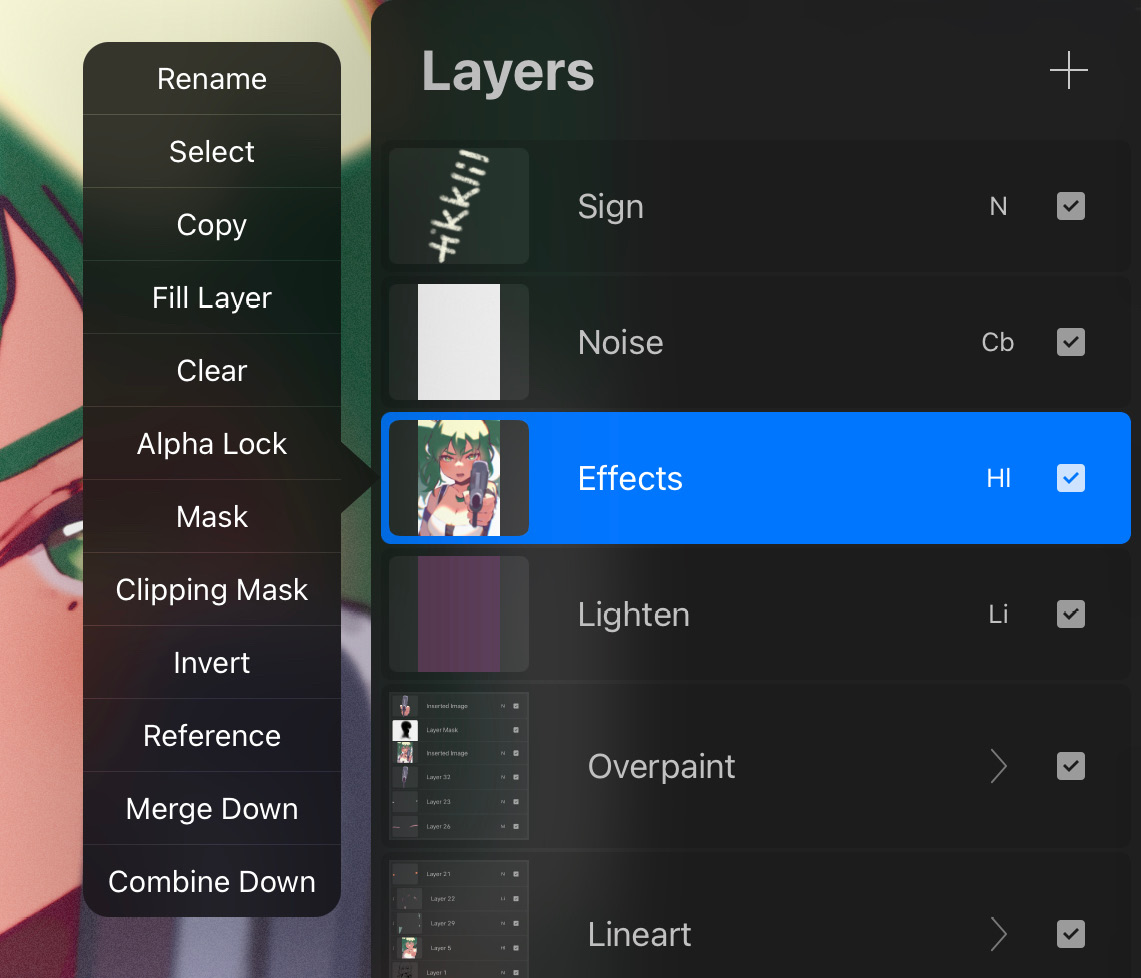
Figure 7.17: The Layer Options menu
In this section, we’ll look at this menu, one item at a time, to understand how to access the full functionality of your layers.
Rename
The first option is Rename. Use this to give your layer a custom name, as shown here:
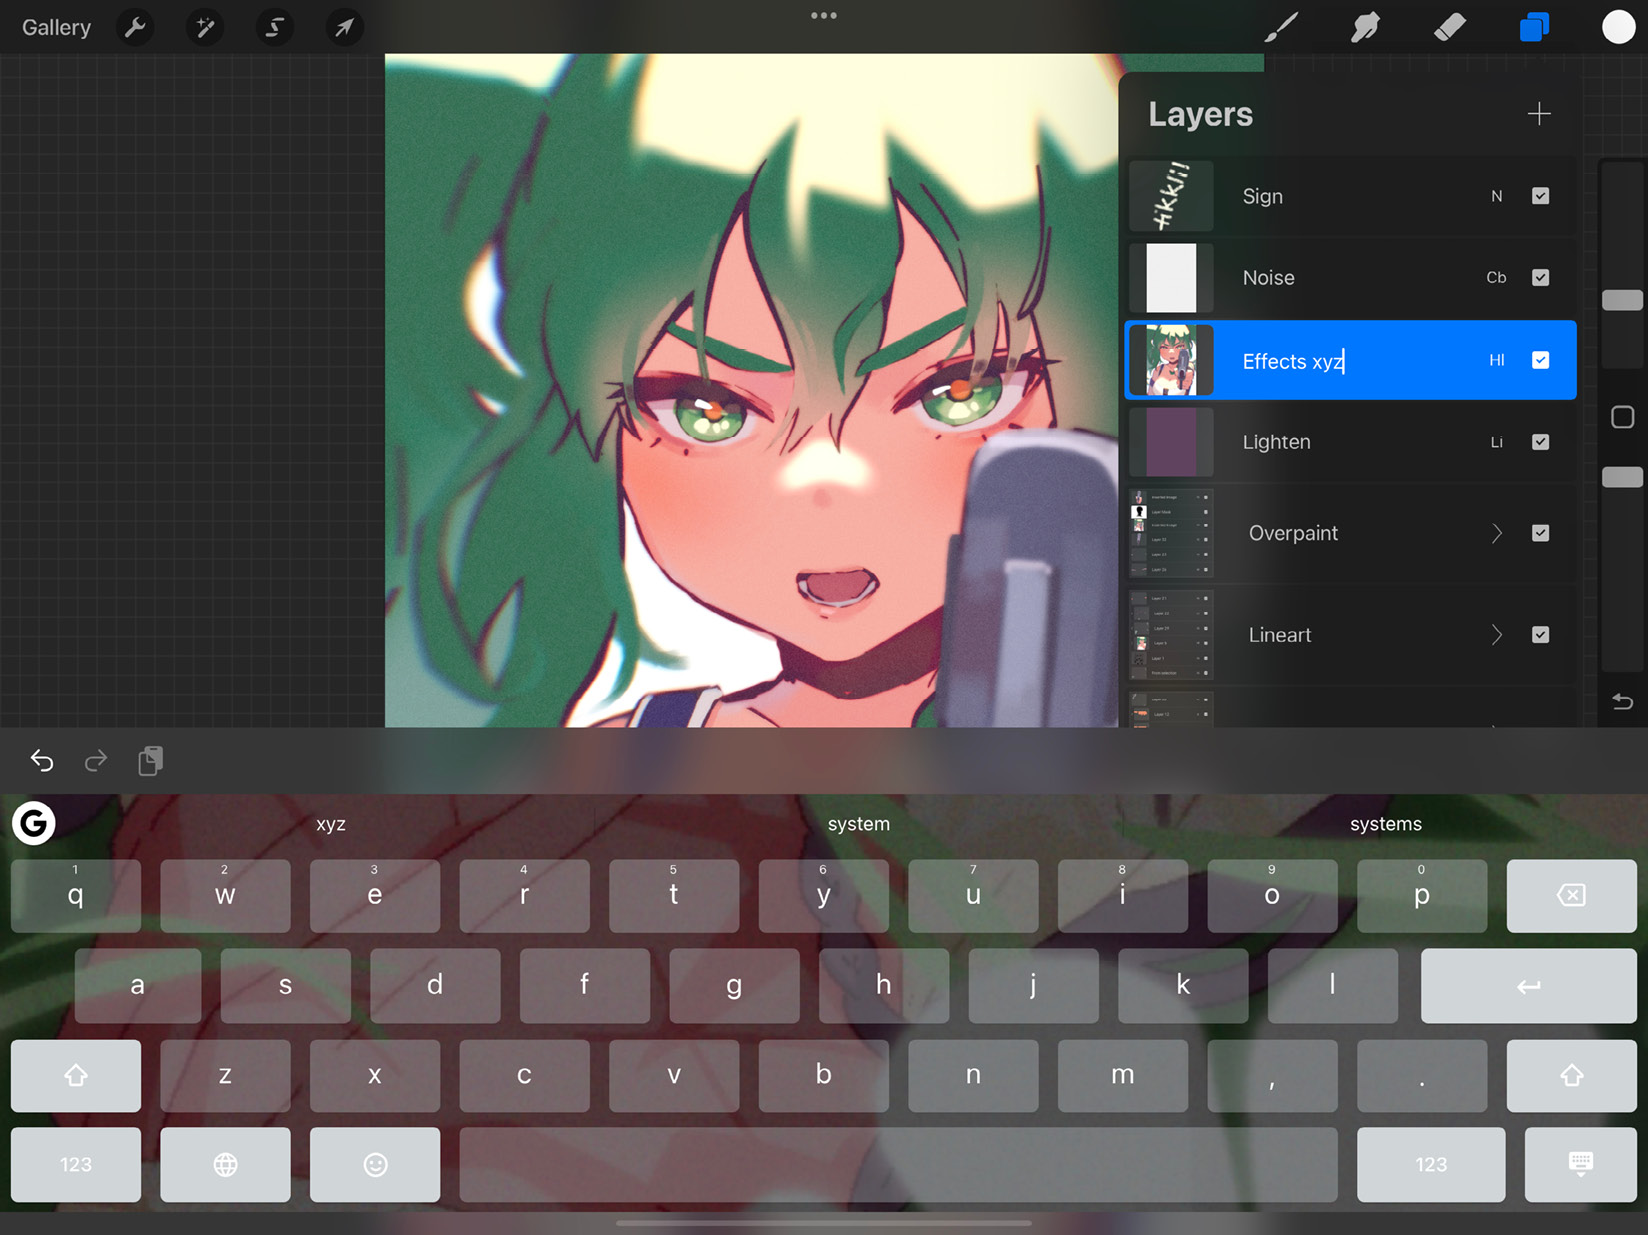
Figure 7.18: Renaming a layer
Simply select any other tool or minimize the keyboard to save the new layer name.
Select
The Select option allows you to select layer contents. This will invoke the Selections tool around the pixels taken up by the contents of the layer. The selection will remain active until you turn it off, irrespective of which layer you’re working on.
An easier way to select layer contents is by using two fingers to press and hold on a layer until the selection is activated.
Copy
Use the Copy option to copy the contents of the layer and make it available on your clipboard. You can paste these contents into the same canvas, a different canvas, or even create a fresh canvas from the Gallery. You can also paste it onto the text editor of most apps, messaging platforms, and emails.
Fill Layer
Tapping on Fill Layer fills the whole layer with the currently selected color. If the layer is alpha locked, only the non-transparent pixels will be filled.
Clear
The Clear option is used to clear the contents of the layer. This can be reversed using Undo, but can’t if you have run out of the Undo option or closed the canvas.
An easier way to clear the layer is by scrubbing the screen with three fingers.
Alpha Lock
The Alpha Lock option locks the opacity of the layer. This means that you can no longer paint on the transparent pixels of the layer. To turn off the alpha lock, simply tap on this option again.
Mask
The Mask option helps you create a layer mask on top of a layer.
A layer mask is an adjustment layer that is automatically clipped to the primary layer. The mask is white by default. You can only paint in grayscale on a layer mask. Drawing with black will make the parent layer disappear, while the lightness or darkness of gray directly affects its opacity. We’ll create a new white layer over the painting to demonstrate the function of layer masks:
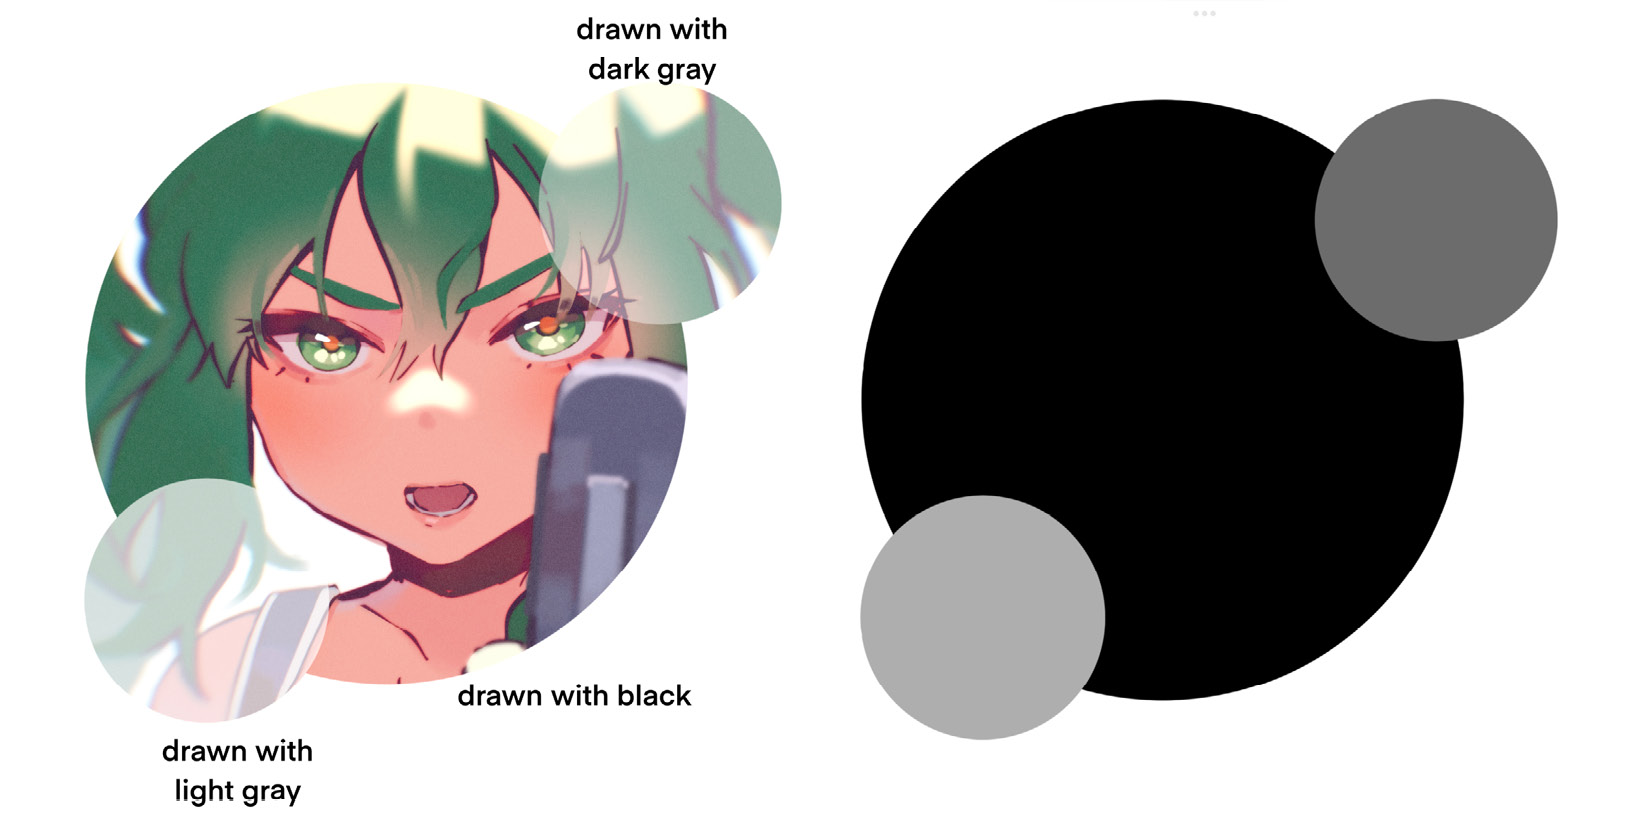
Figure 7.19: Result of a layer mask (left), and how the layer mask looks (right)
As you can see, the portion on the mask drawn in black completely removes the contents of the white layer, like creating a “window” in it. Additionally, the lighter the gray, the more opaque the white appears. A layer mask allows us to make edits to the parent layer non-invasively. This means that you can manipulate how the white fill layer will appear without making any actual edits to it. You can also transform and move the mask layer independently, as shown in the following:
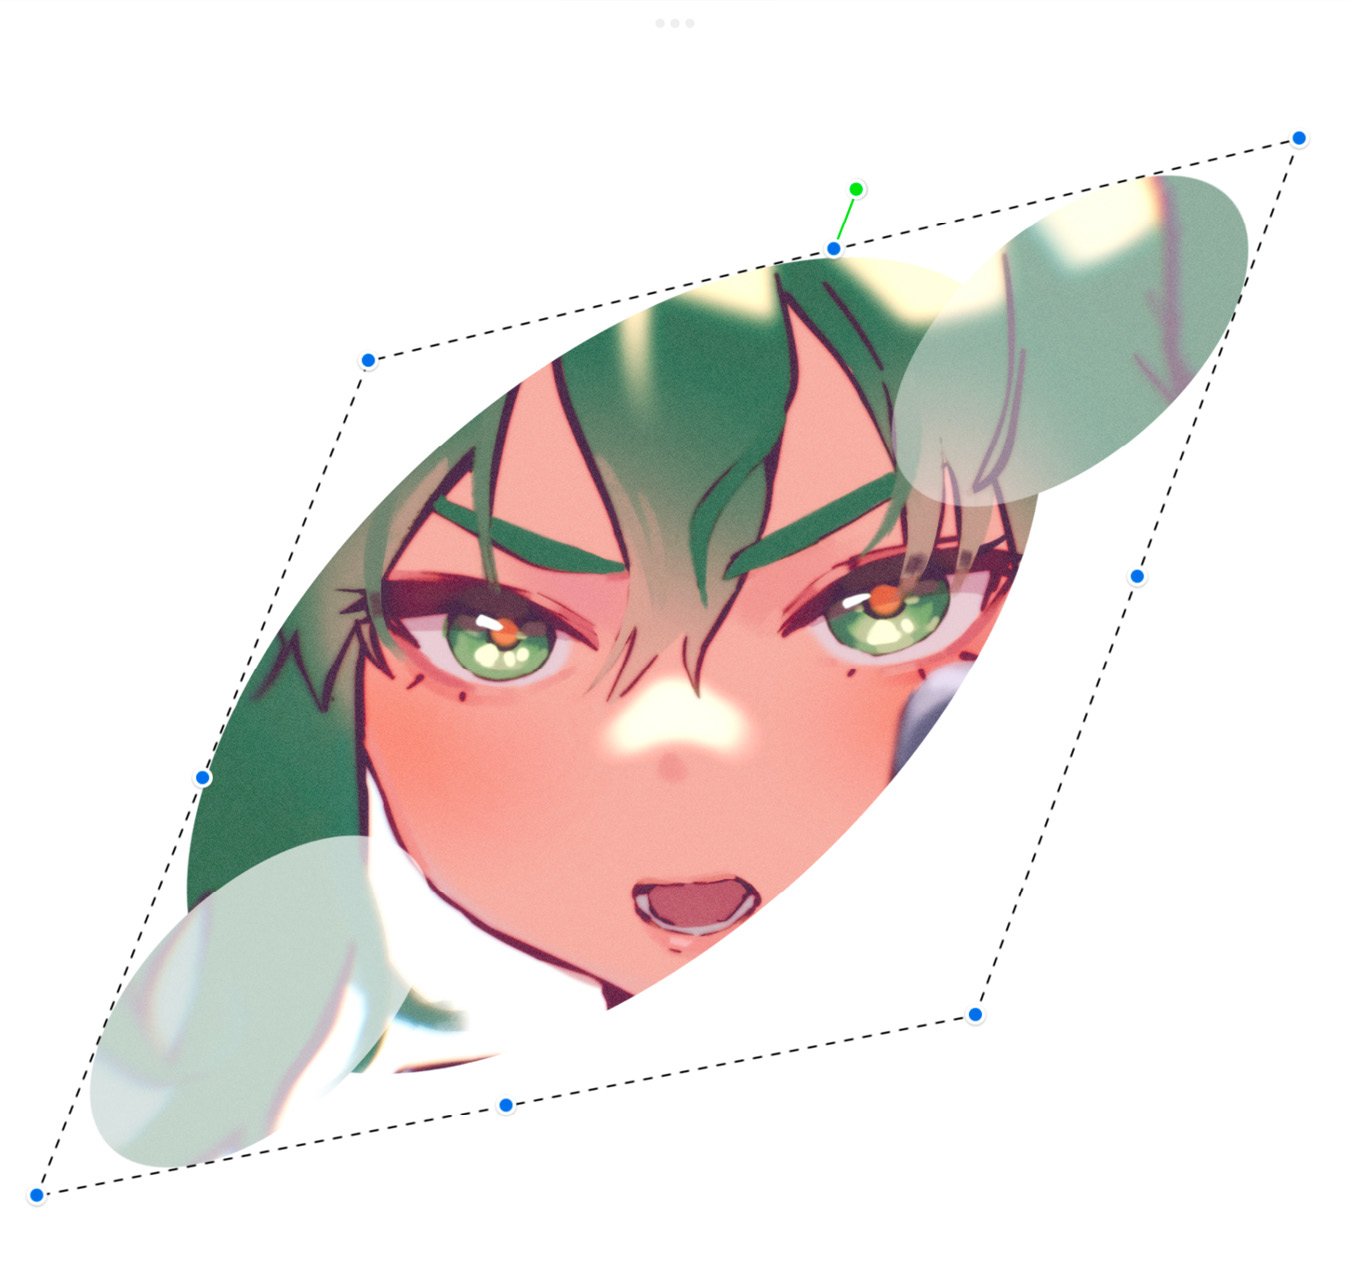
Figure 7.20: Transforming a layer mask
Clipping Mask
The Clipping Mask option lets you clip the current layer to the one below it. This means that the layer on top will now follow the opacity rules of the layer on the bottom, and you will only be able to paint on pixels that are opaque on the bottom layer. It’s very useful when you don’t want your shading or other elements to spill over the edges of the base, as shown here:
Figure 7.21: Drawing unclipped (top), and drawing clipped to line art (bottom)
Drawing Assist
Procreate allows you to apply various kinds of assisted drawing tools to your art, such as perspective, symmetry, and grids. The Drawing Assist option lets you decide whether these settings will apply to a layer. When turned on, drawing on that layer will adhere to whichever assisted drawing tool is active until turned off again.
Learn more about the app’s automated drawing tools in Chapter 12, Using Assisted Drawing Tools.
Invert
The Invert option changes all colors on the layer to their diametrically opposite color on the color wheel. This gives the layer a “photo negative” look, as demonstrated in the following screenshot:
Figure 7.22: Inverted layer
Reference
Reference is a great feature when you want to fill color easily into line-art. If you set the line layer as the reference, all other layers will respect the line-art while color dropping.
Merge Down
Tap on Merge Down to merge the current layer with the one below into a single layer.
Combine Down
Tap on Combine Down to group the current layer with the layer below into a layer group. When there is a group below the primary layer, it adds the layer to this group. Inversely, when this option is applied to a group, the layer underneath is added to it.
Now that we have gone through all the Layer Options, we are going to look into different blend modes in the next section, which are essential for making layers interact with each other.
Understanding blend modes
Usually, while drawing on a layer, you will notice that your strokes are appearing as opaque areas of digital “paint” obscuring the contents of any underlying layers. However, there are several ways to make layers “blend” and create different visual effects with each other. Blend modes allow you to choose how your layers interact. The layer on top that affects the layer below with its blend mode is called the blend layer. The layer below the blend layer is called the base layer.
The default blend mode is called Normal and is indicated by the letter N next to the layer name.
When you tap on N, you will see a menu open up under the layer. Aside from the layer opacity slider, it also lists all the blend modes available on Procreate. We will learn more about those in the following sections. They will be demonstrated by placing a block of magenta over the same illustration and applying different blend modes to it.
Multiply
The Multiply mode darkens the luminosity of the base layer by multiplying it with the blend layer. The resulting color depends on both the base and blend colors. It’s a great option to use for shading:
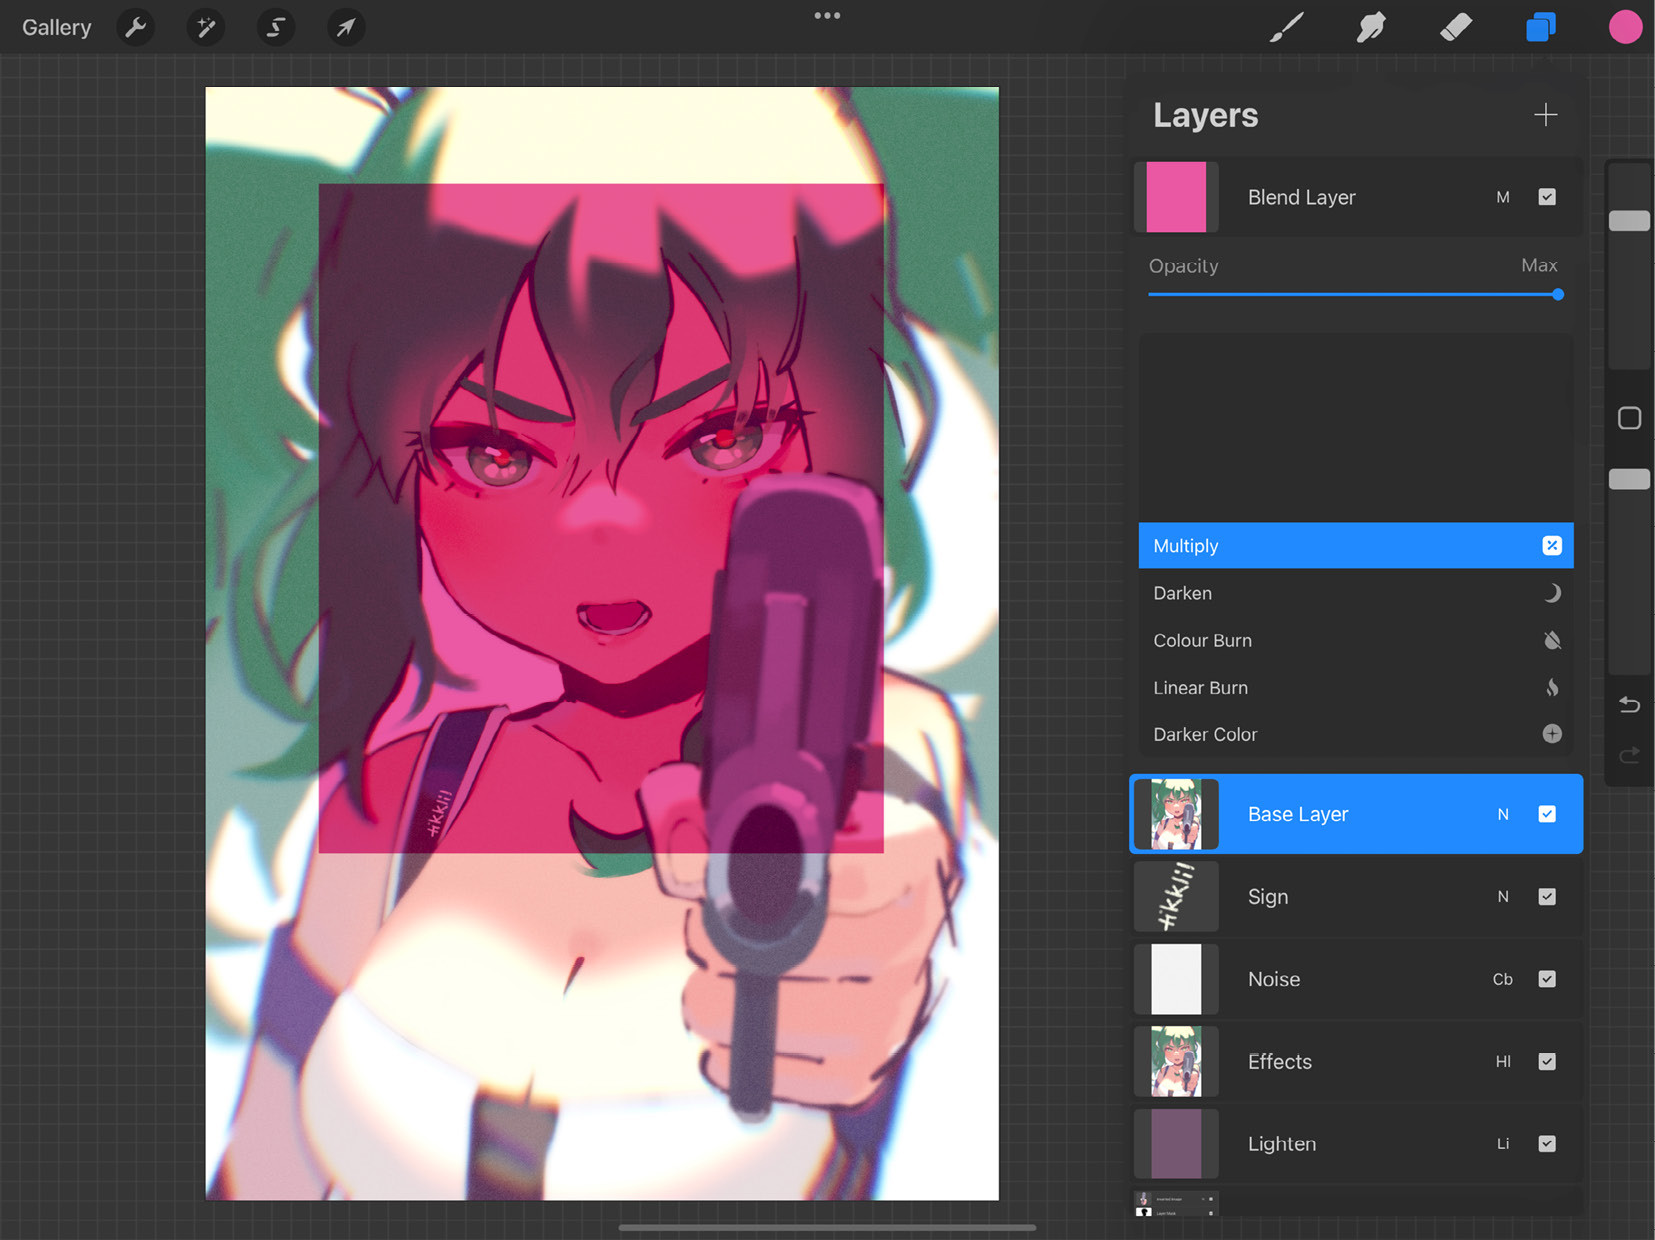
Figure 7.23: Multiply mode
Darken
Darken compares the color of the blend layer and the base layer and selects the darker of the two. As a result, all the pixels on the base layer that are lighter than the blend layer will appear to be the color of the blend layer:
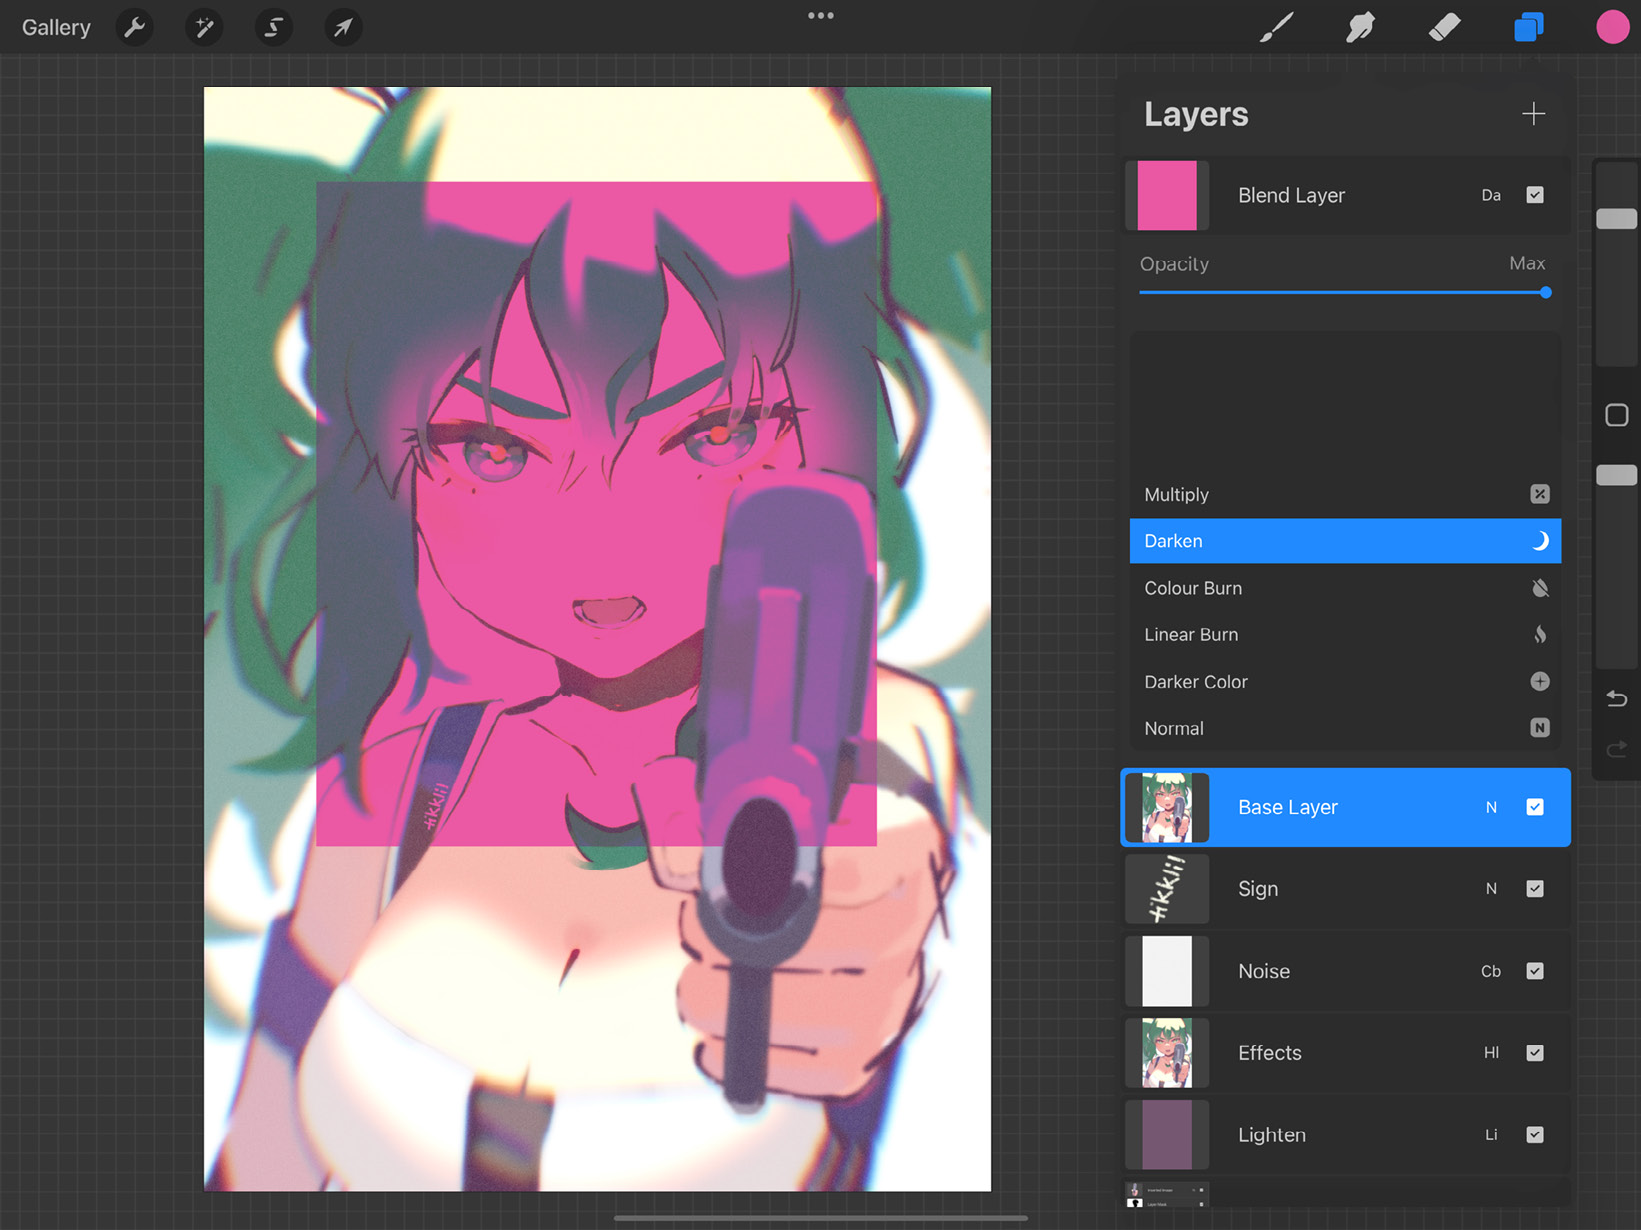
Figure 7.24: Darken mode
Color Burn
Color Burn also darkens the base layer like Multiply, but its effects are designed to produce a more traditional burn effect used in photography. Usually, the results are darker than Multiply:
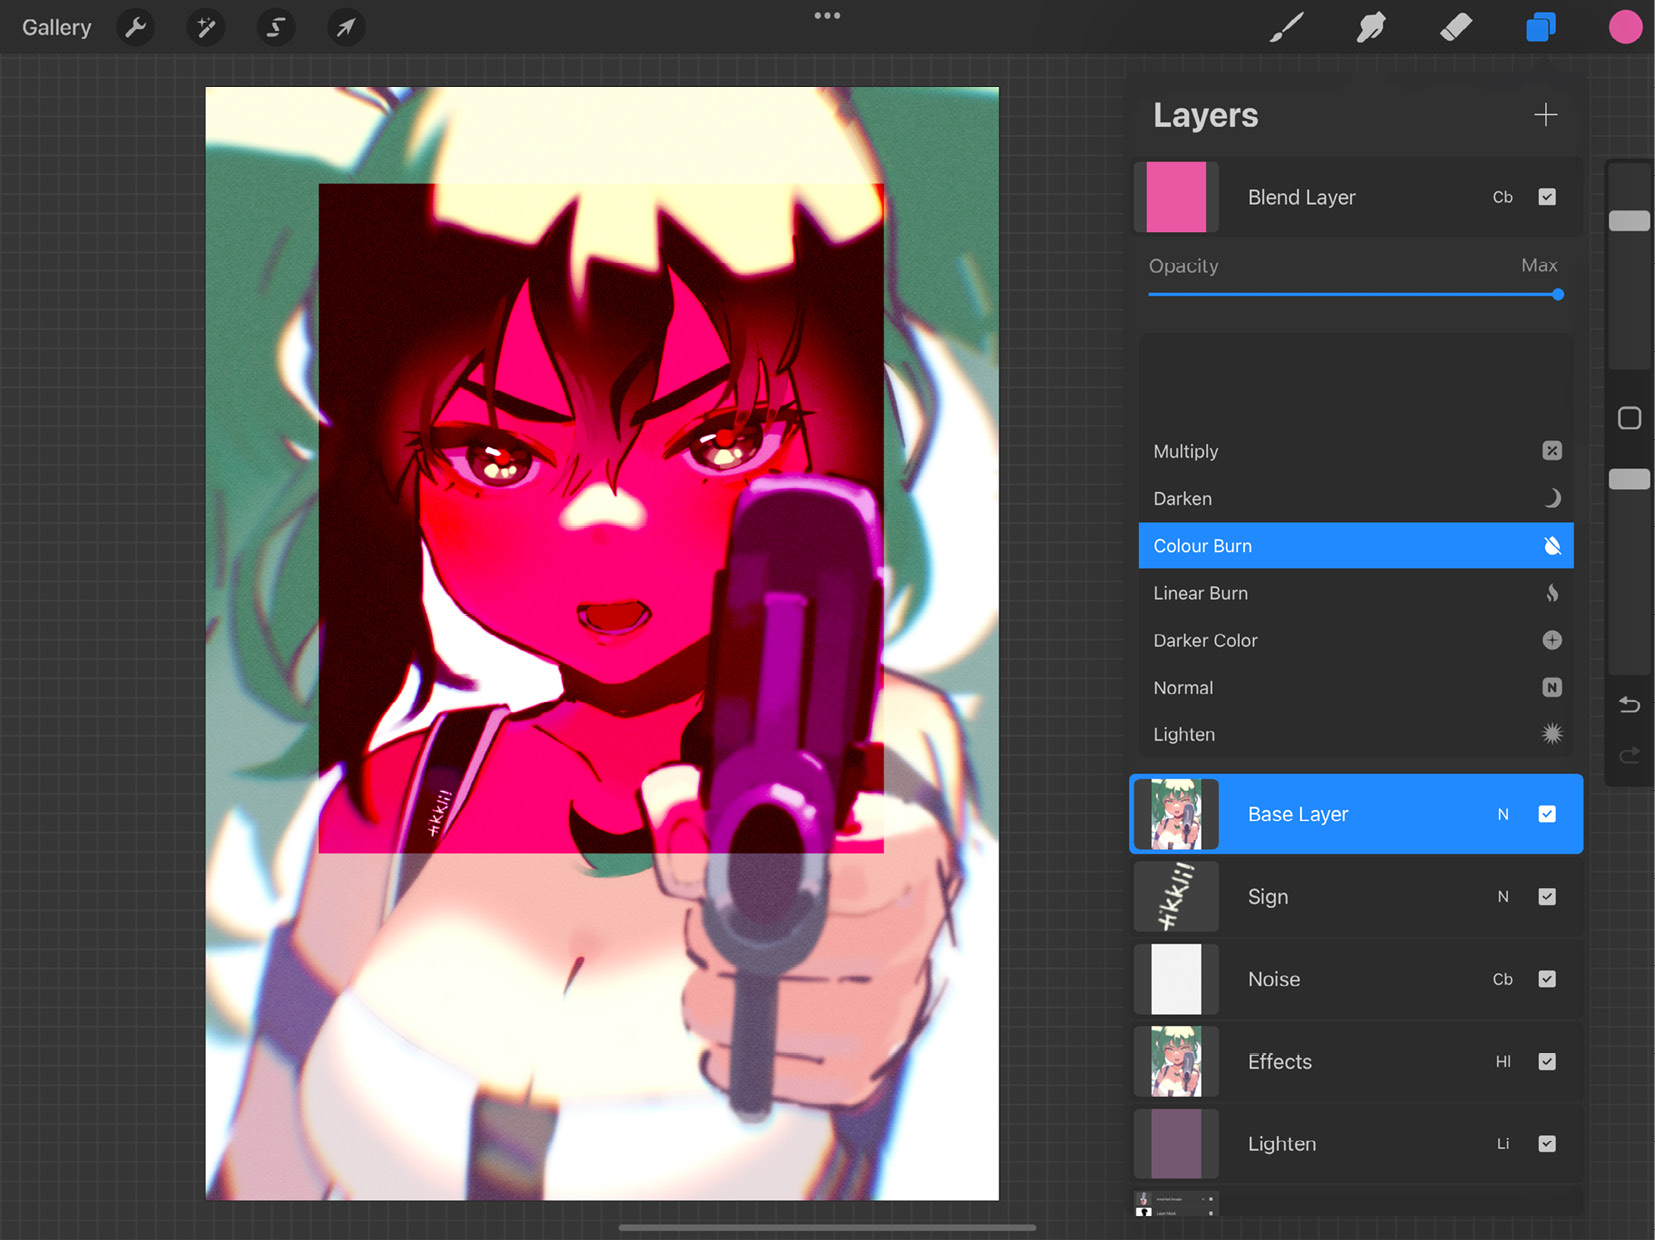
Figure 7.25: Color Burn mode
Linear Burn
Linear Burn burns the base layer according to the value of the blend layer. It produces lower saturation results than Color Burn, but generally darker results than Multiply:
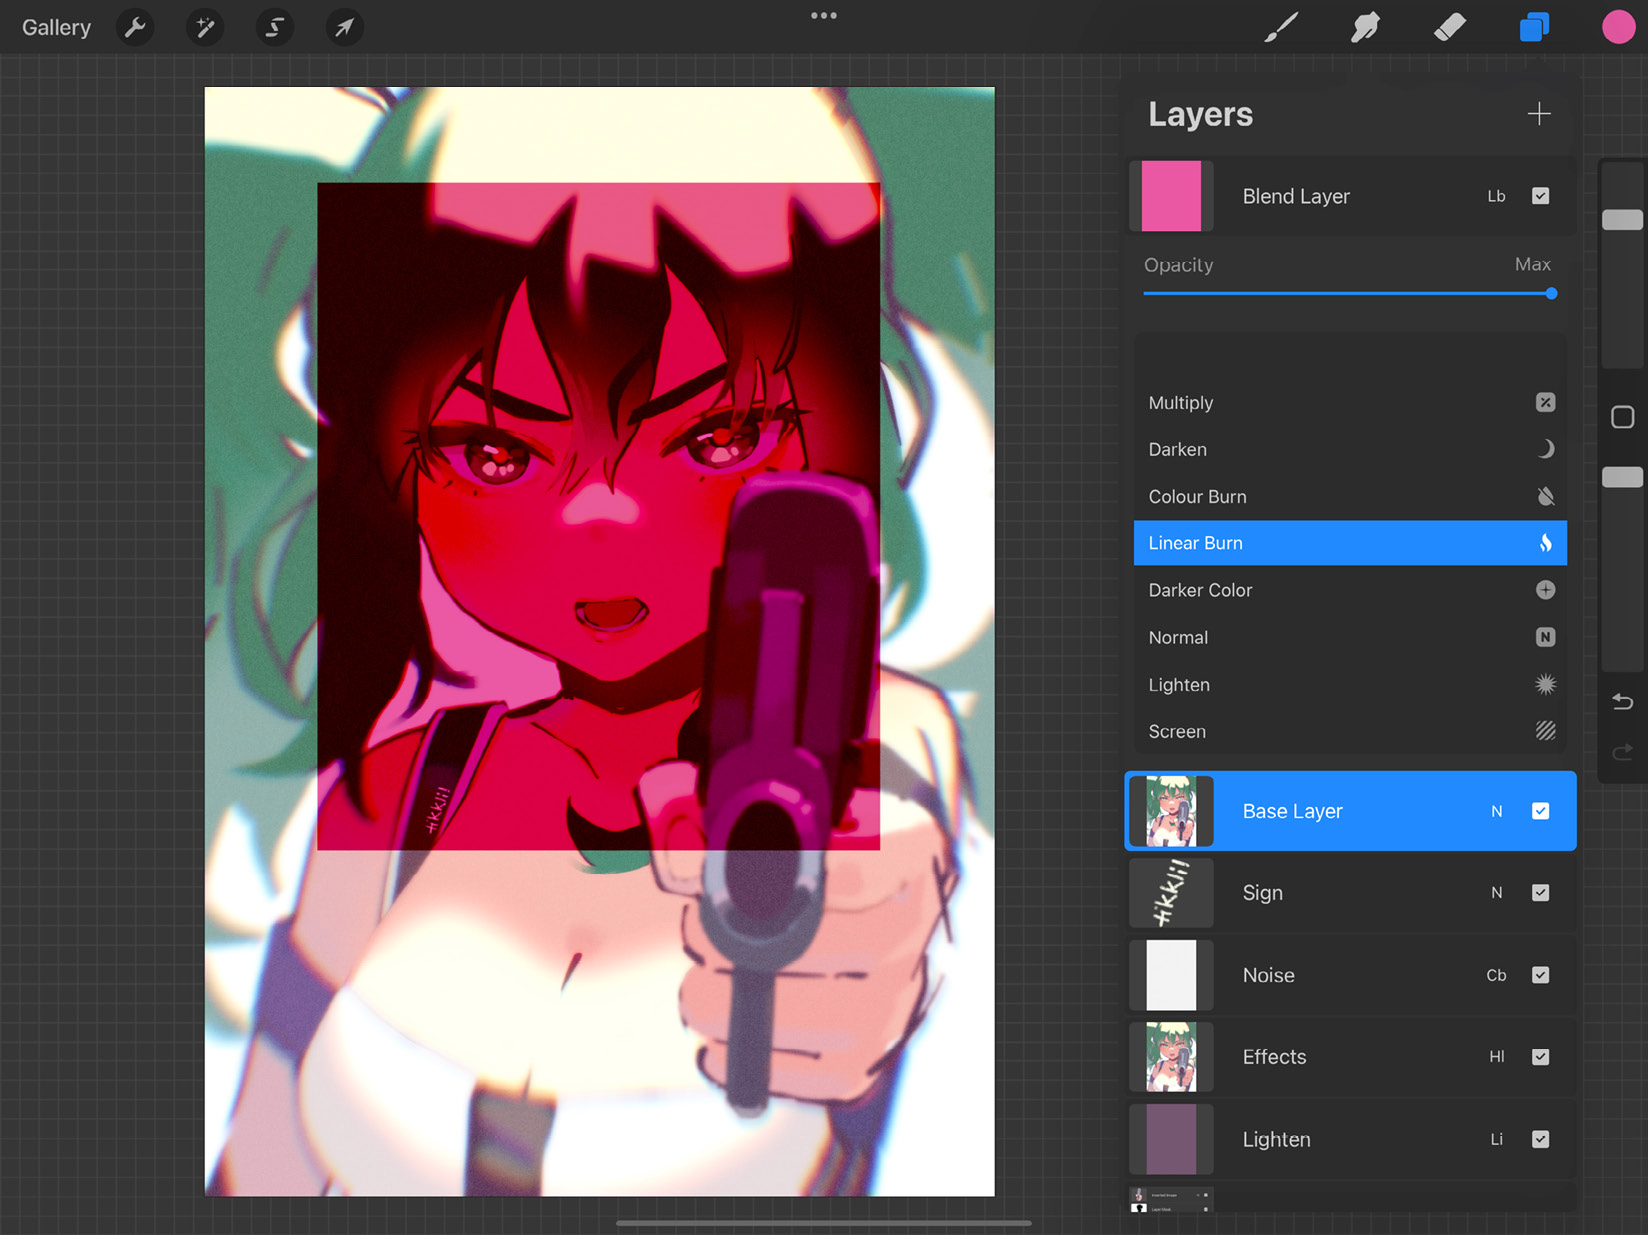
Figure 7.26: Linear Burn mode
Darker Color
Darker Color functions in a way similar to Darken. However, instead of considering each RGB channel individually, it considers a composite of all channels, so it produces a more “averaged” result overall:
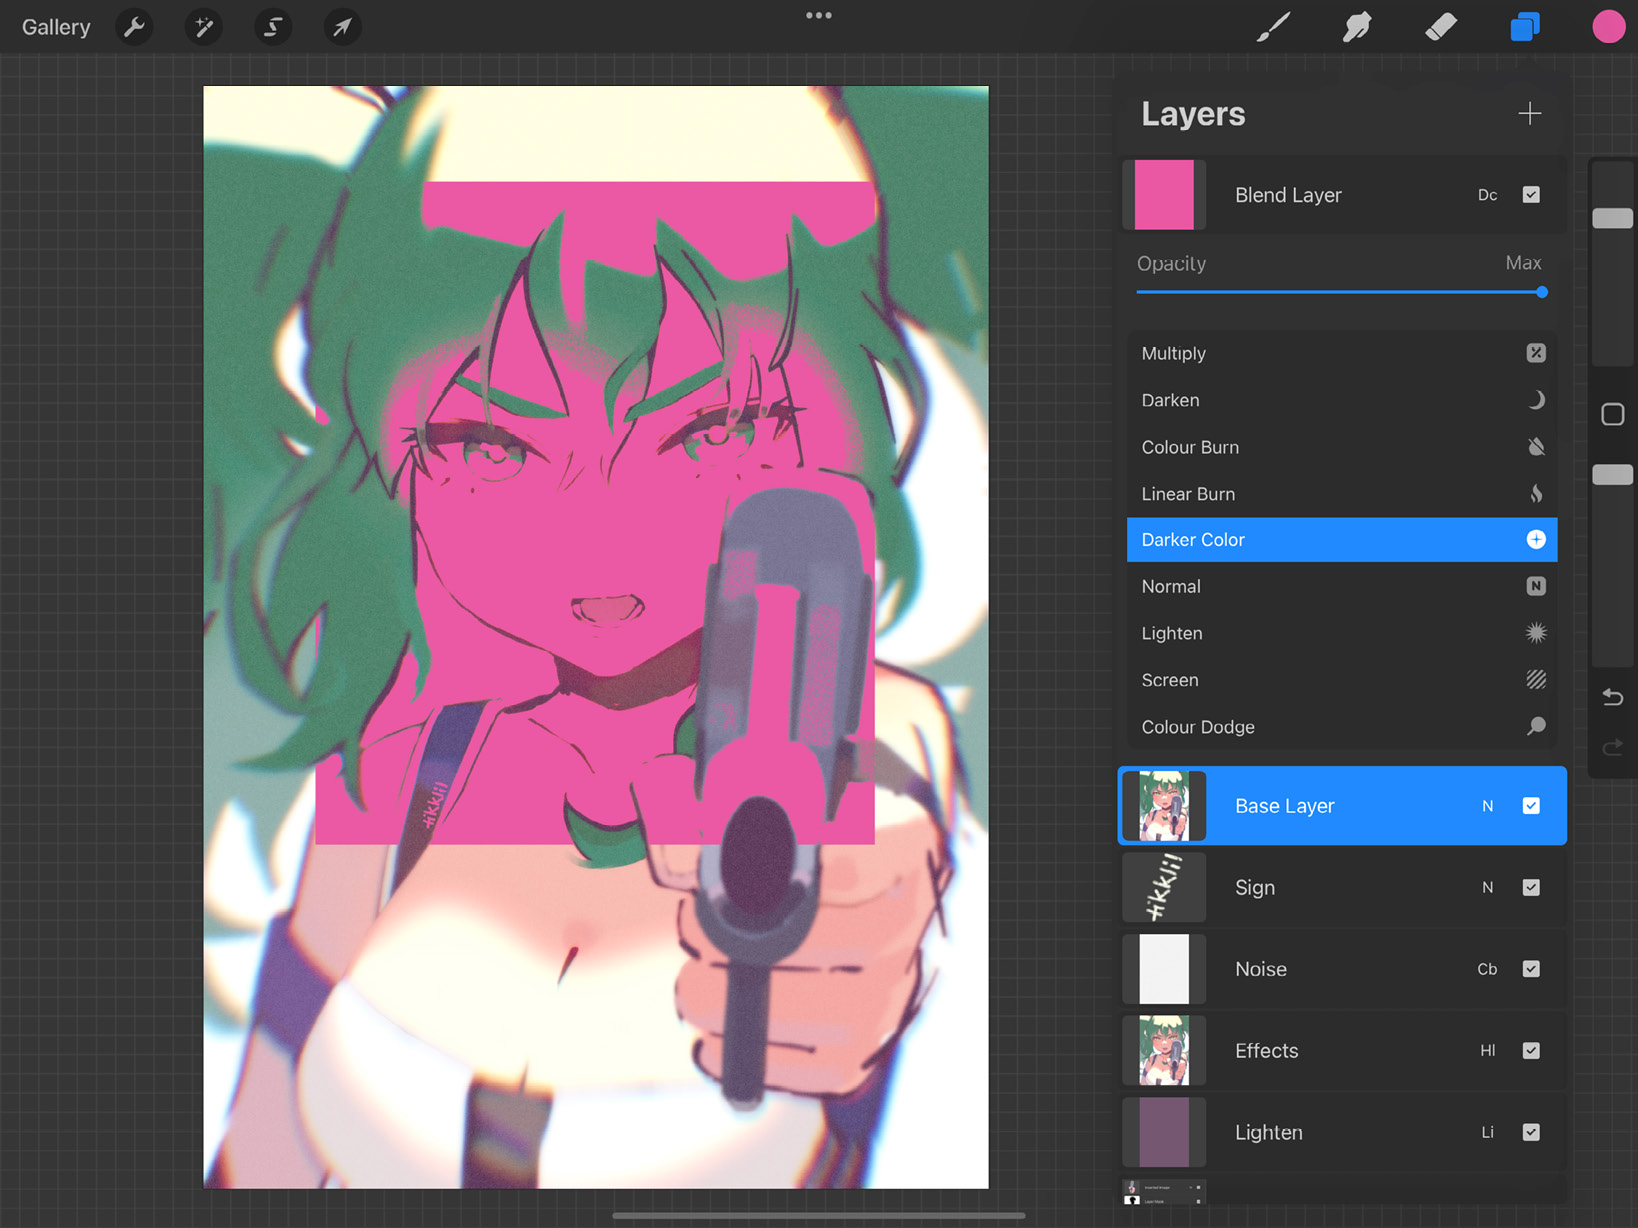
Figure 7.27: Darker Color mode
Lighten
Lighten is the opposite of Darken. It compares the color of the blend and base layers and selects the lighter of the two. As a result, all the pixels on the base layer that are darker than the blend layer will appear to be the color of the blend layer:
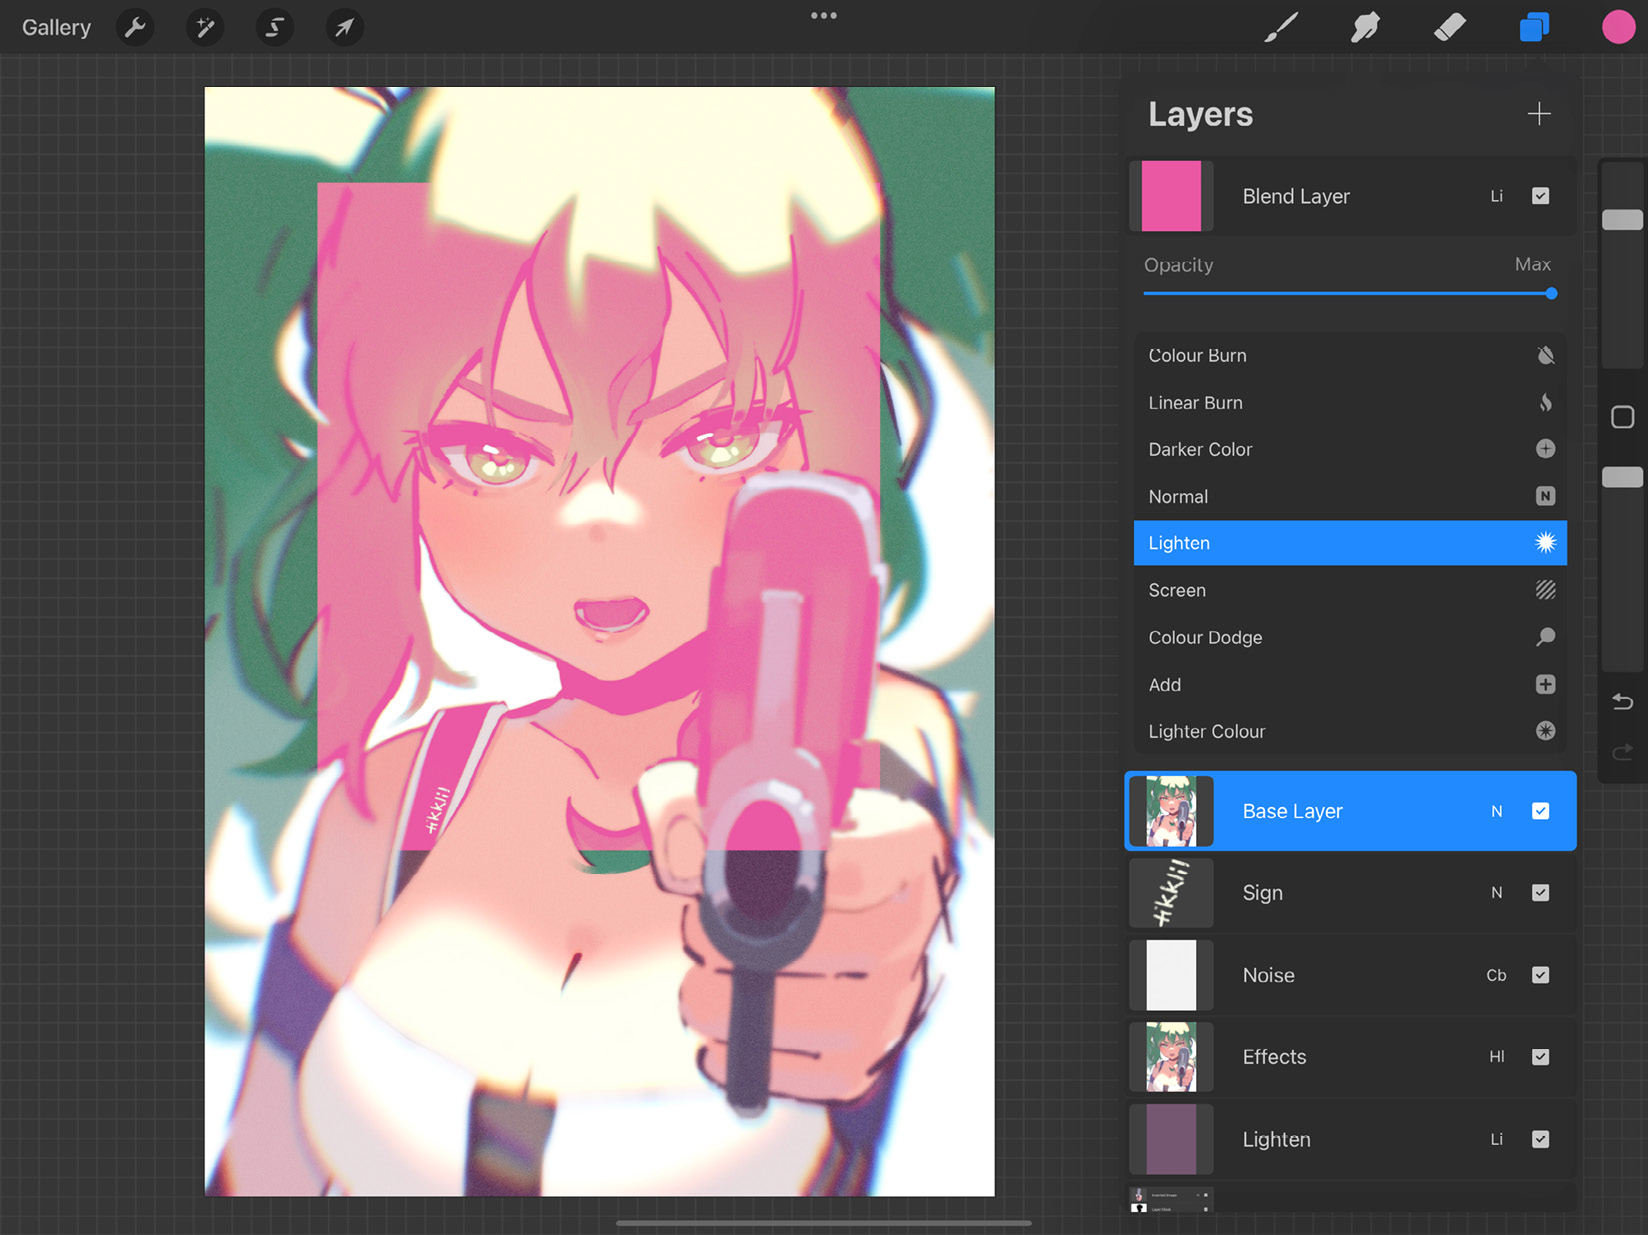
Figure 7.28: Lighten mode
Screen
The Screen mode lightens the luminosity of the base depending on both the base and blend colors. It’s a great option to use for lightening and drawing highlights:
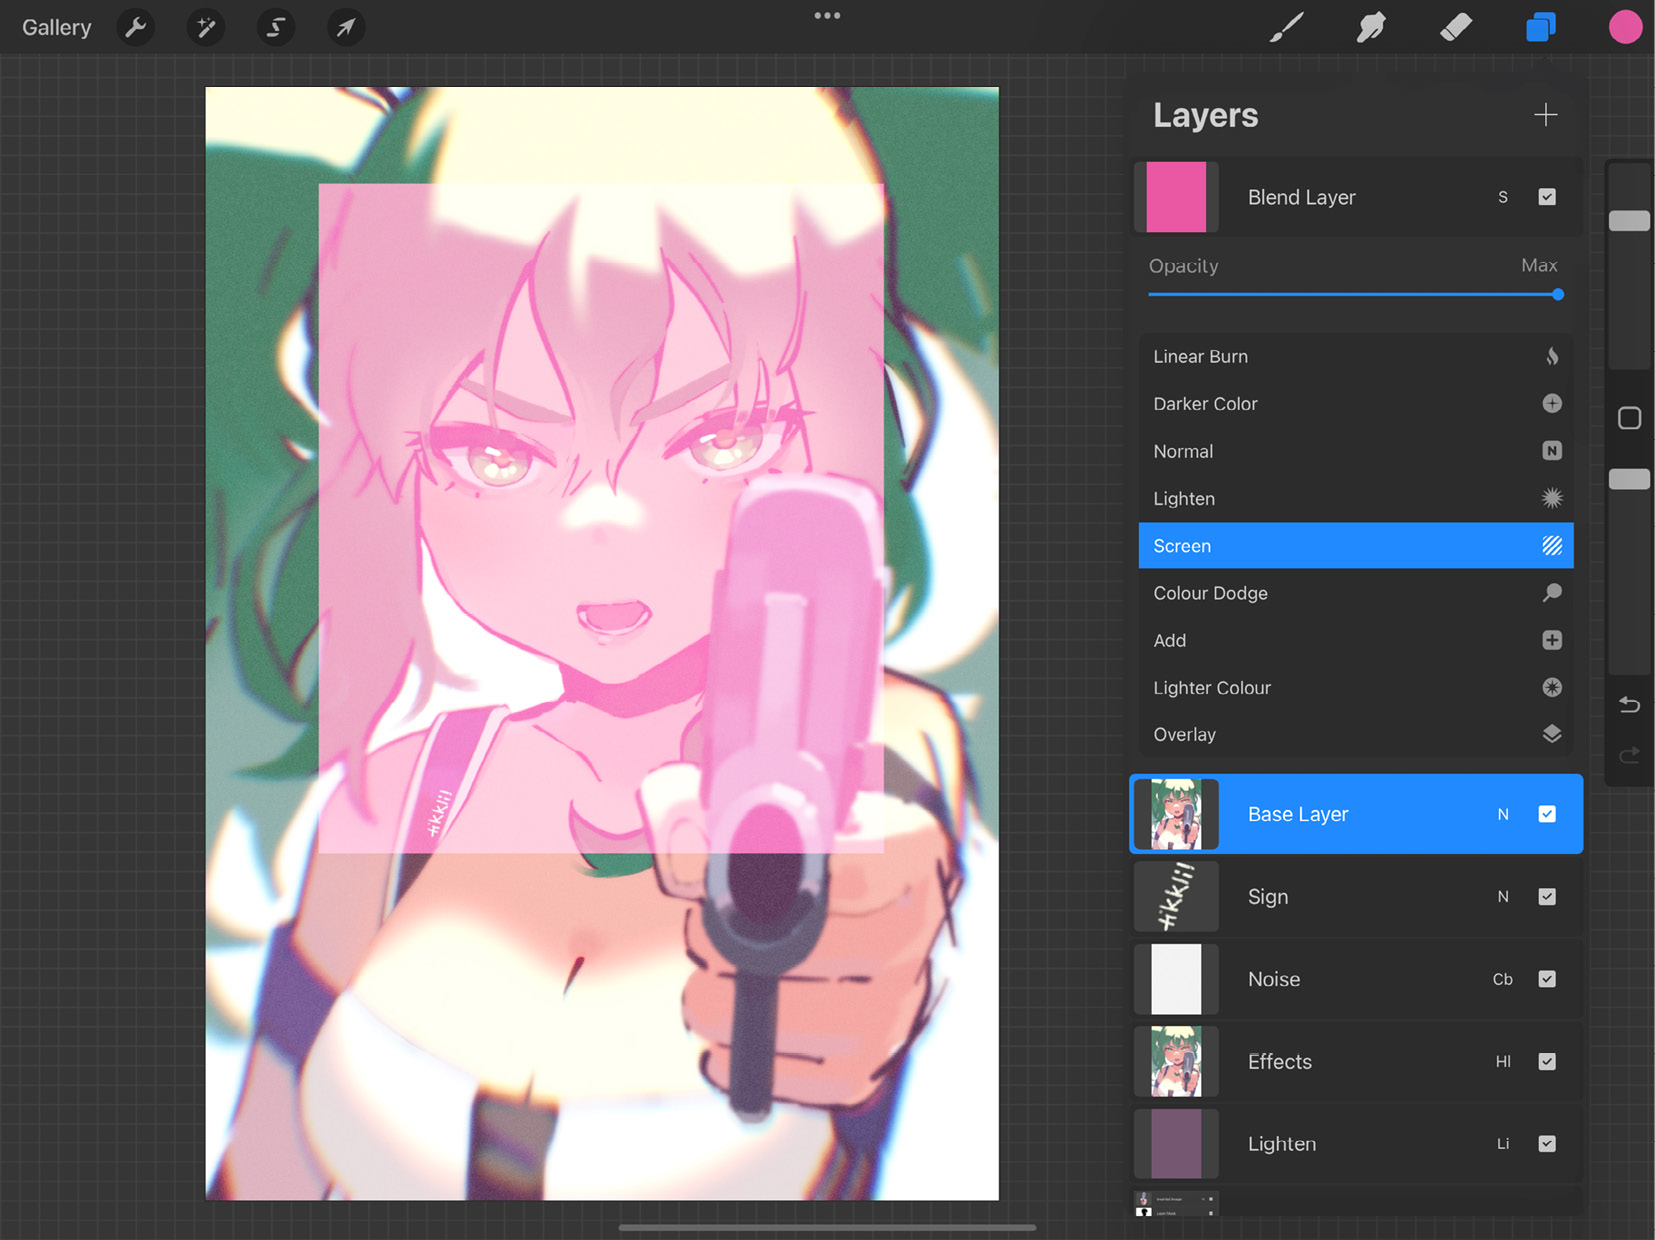
Figure 7.29: Screen mode
Color Dodge
Color Dodge also lightens the base layer like Screen, but its effects are designed to produce a more traditional dodge effect used in photography. Usually, the results are brighter than Screen:
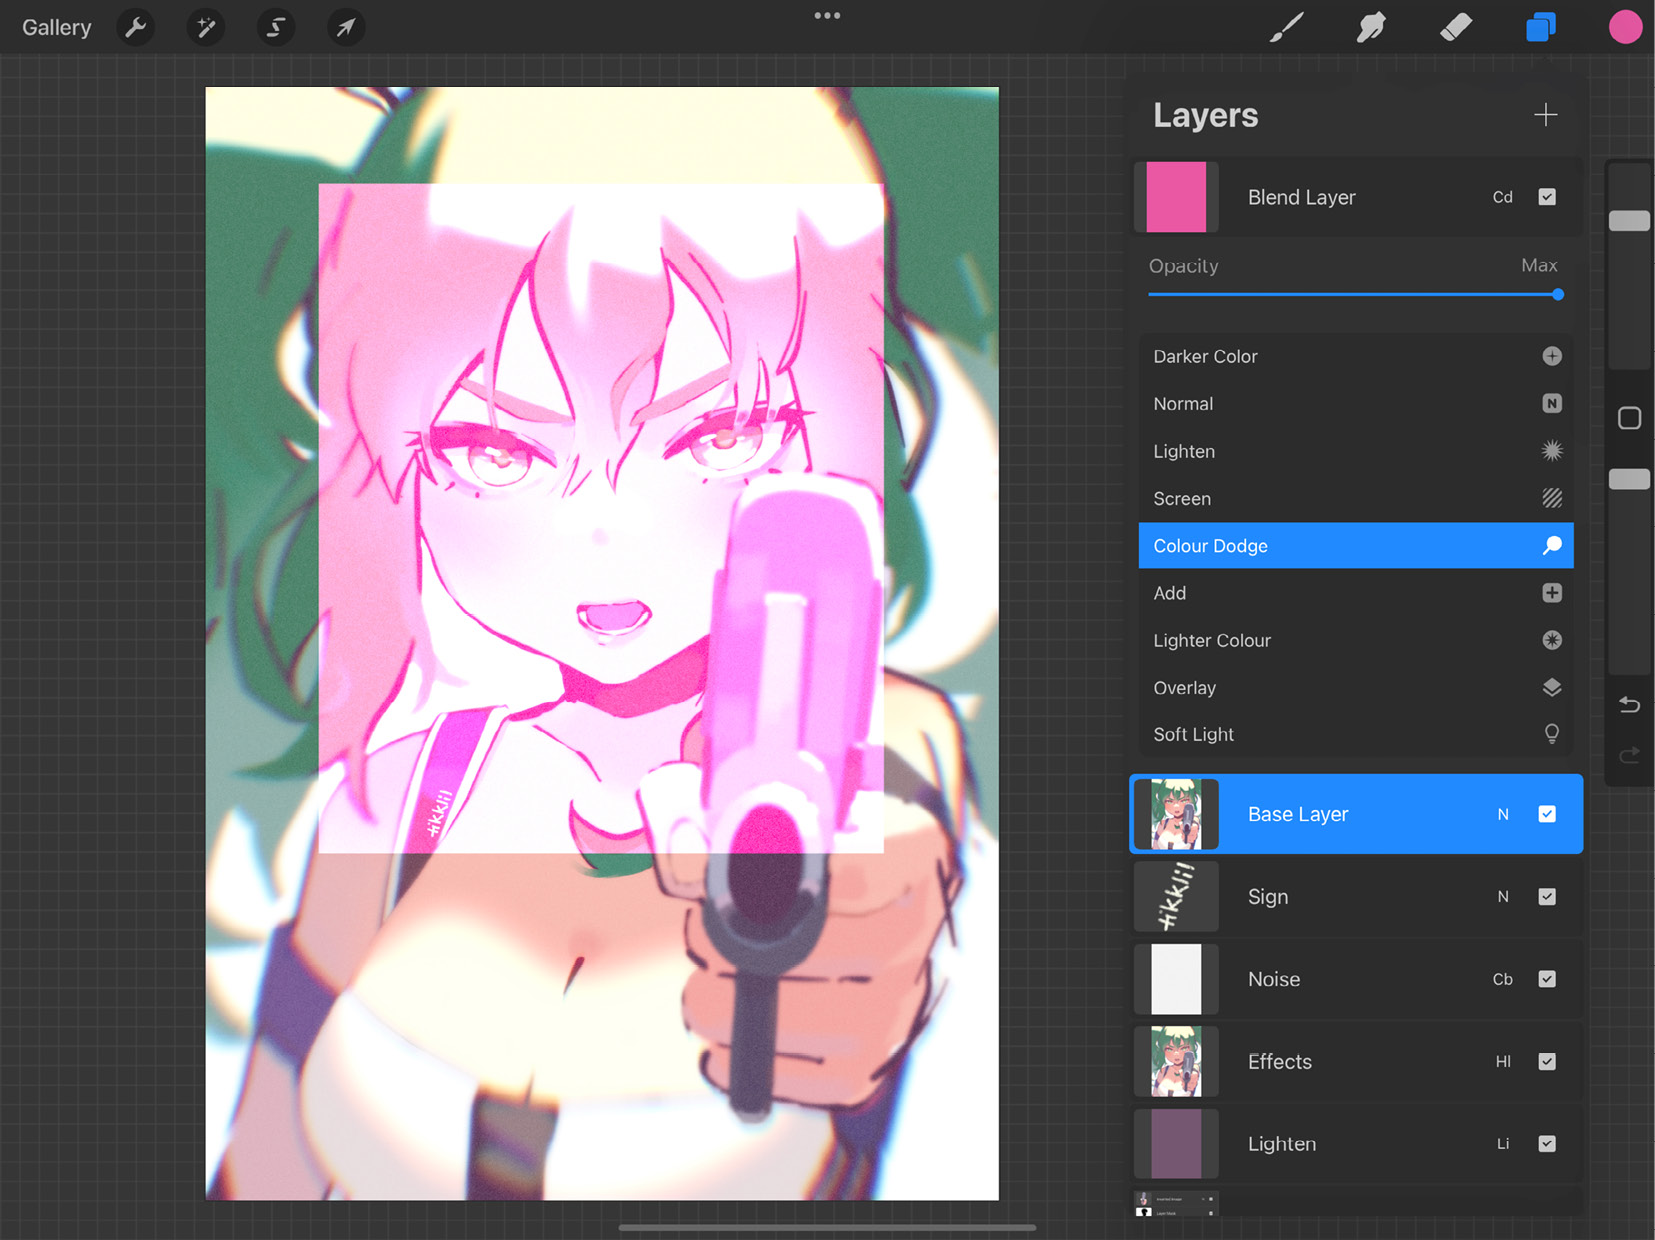
Figure 7.30: Color Dodge mode
Add
Add produces the strongest brightening effect out of all lightening blend modes:
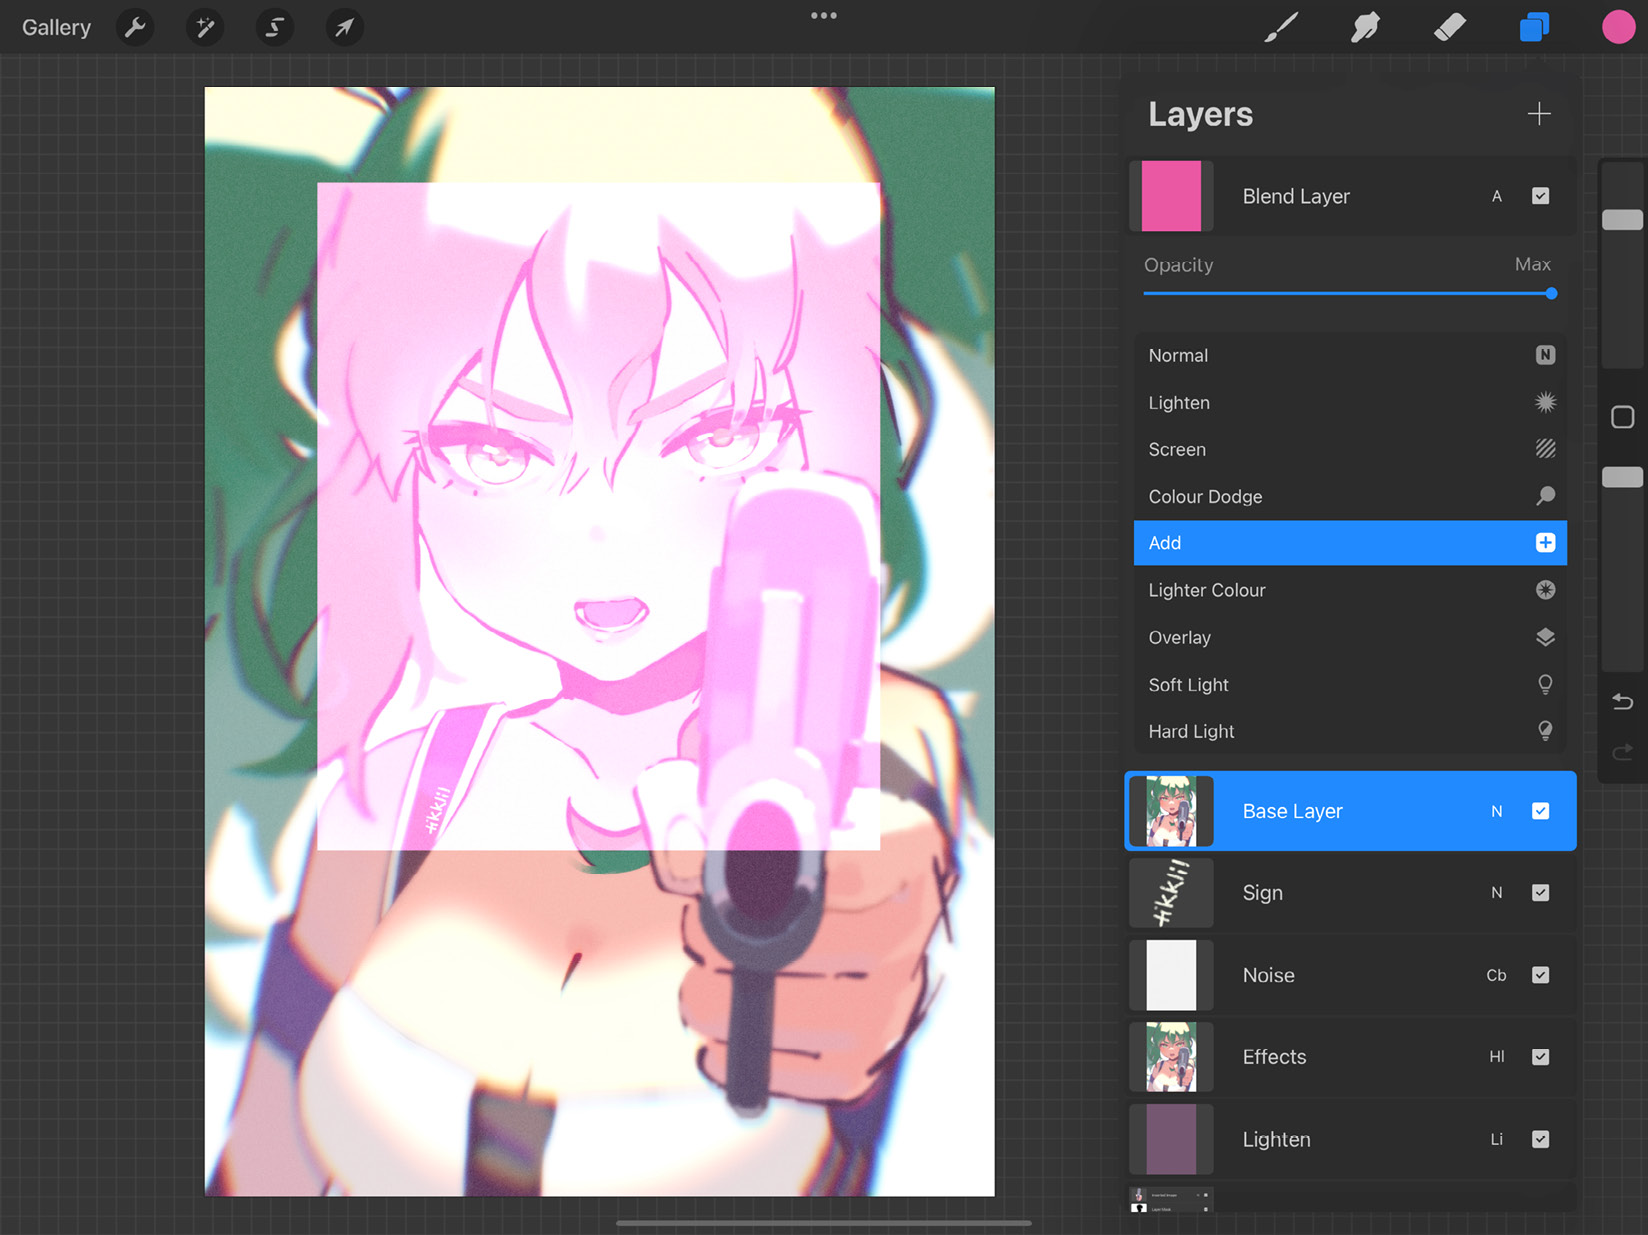
Figure 7.31: Add mode
Lighter Color
Lighter Color functions in a way similar to Lighten. However, instead of considering each RGB channel individually, it considers a composite of all channels, so it produces a more “averaged” result overall:
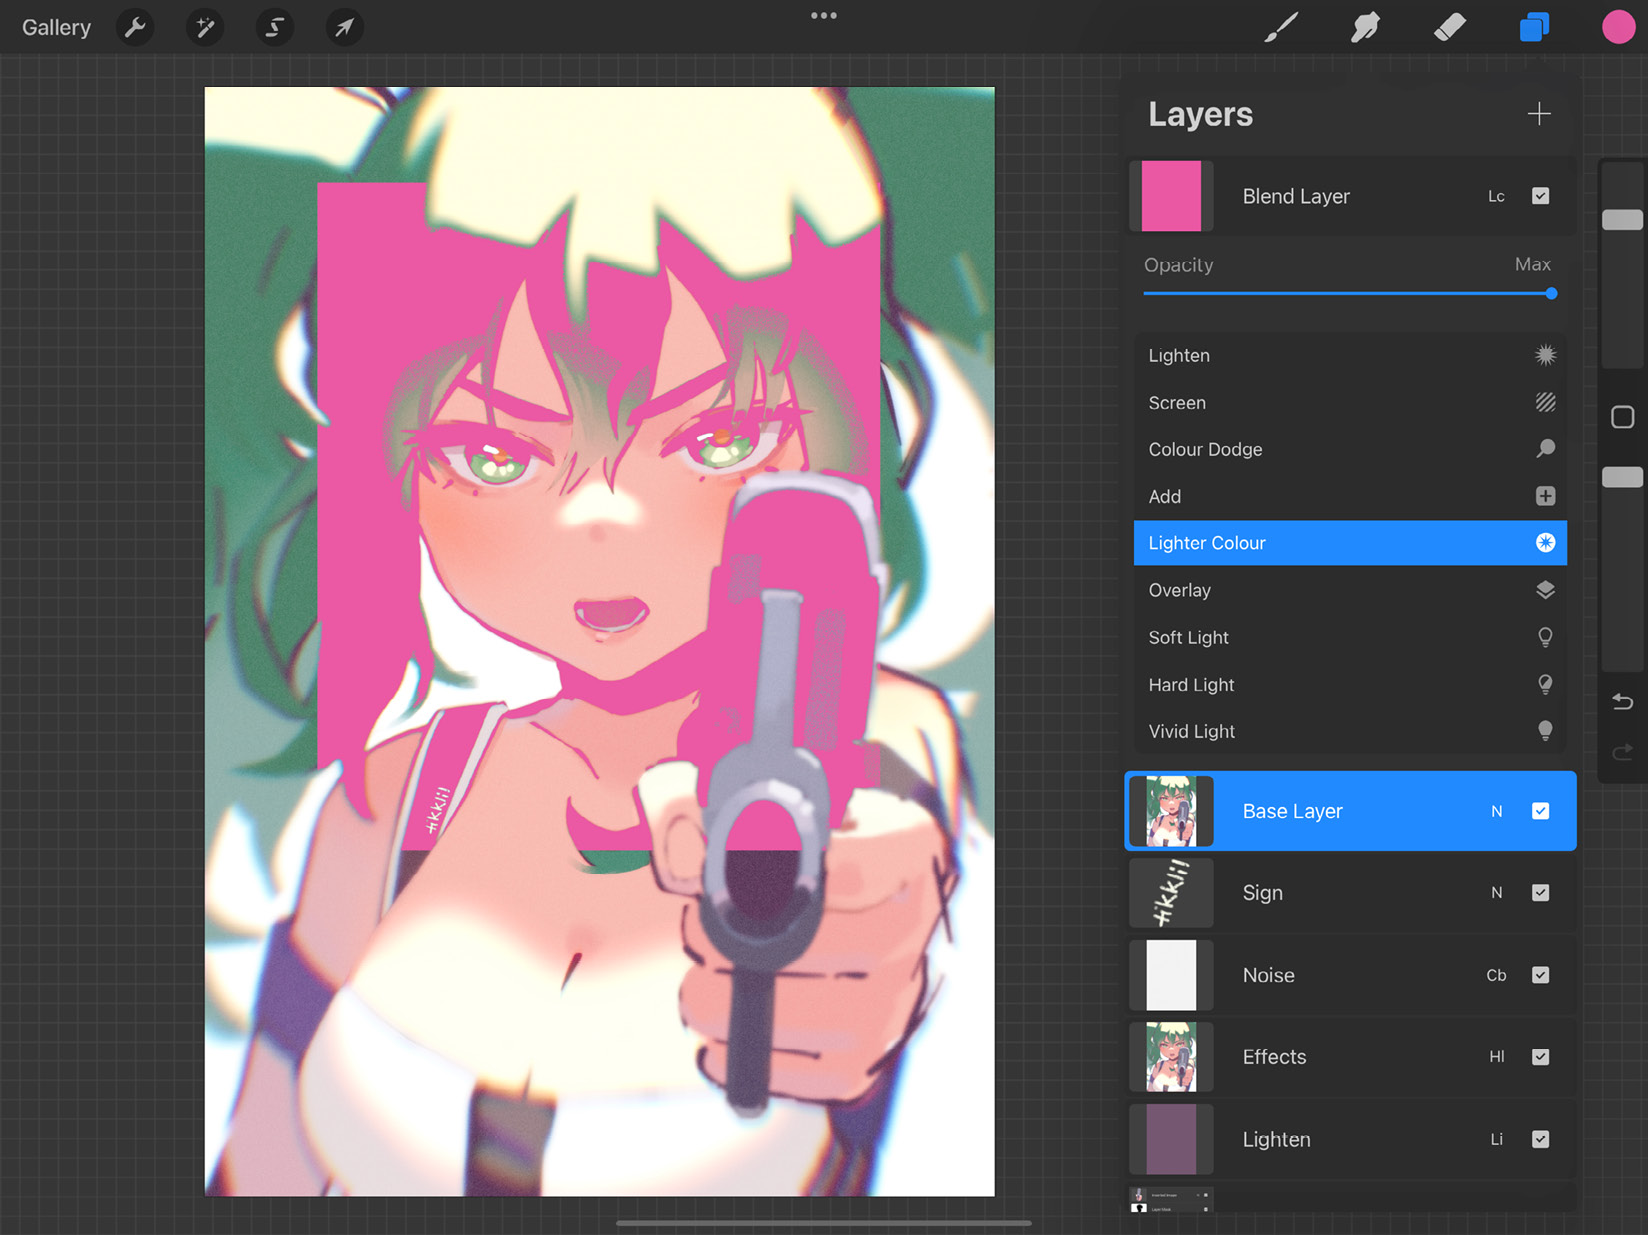
Figure 7.32: Lighter Color mode
Overlay
Overlay performs both lightening and darkening depending on the base layer. Lighter base colors are pushed to be lighter, while darker base colors are darkened further. In a way, it works like Multiply and Screen combined:
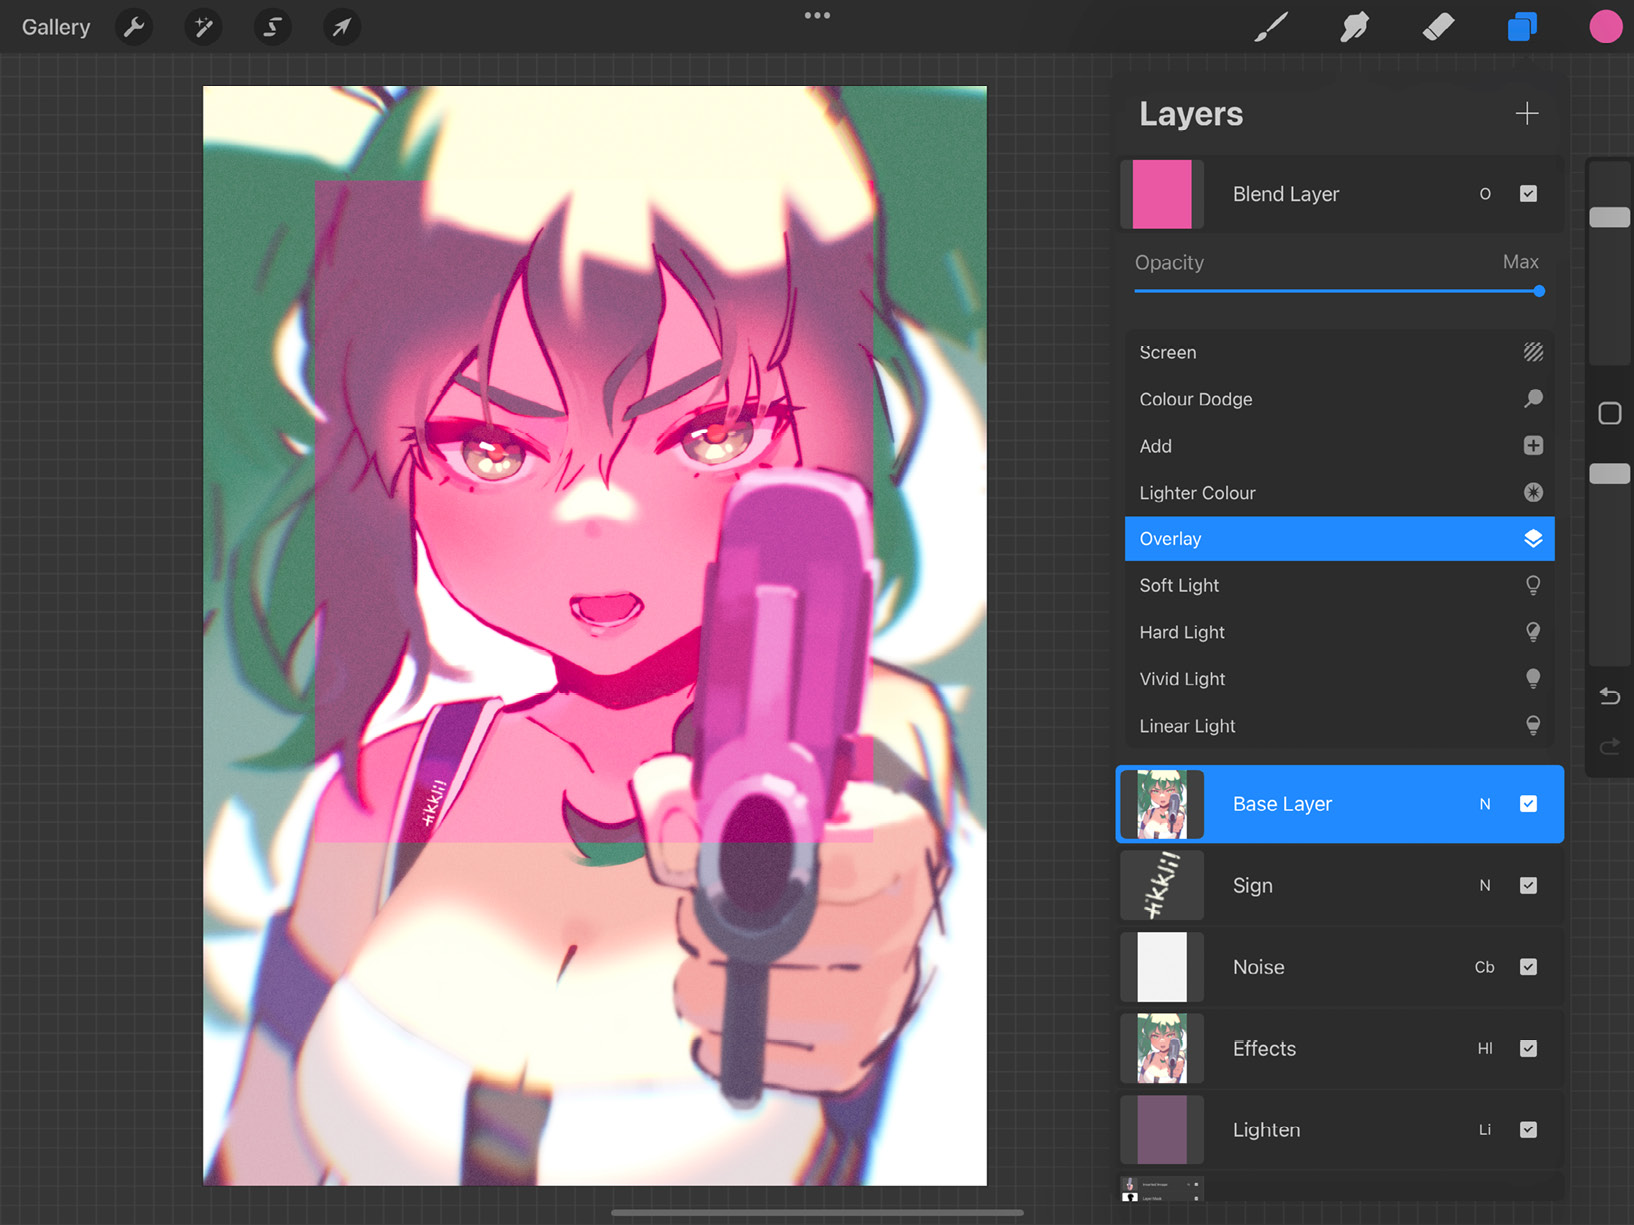
Figure 7.33: Overlay mode
Soft Light
Soft Light works like Overlay, but it applies subtler effects without pushing the contrast as much:
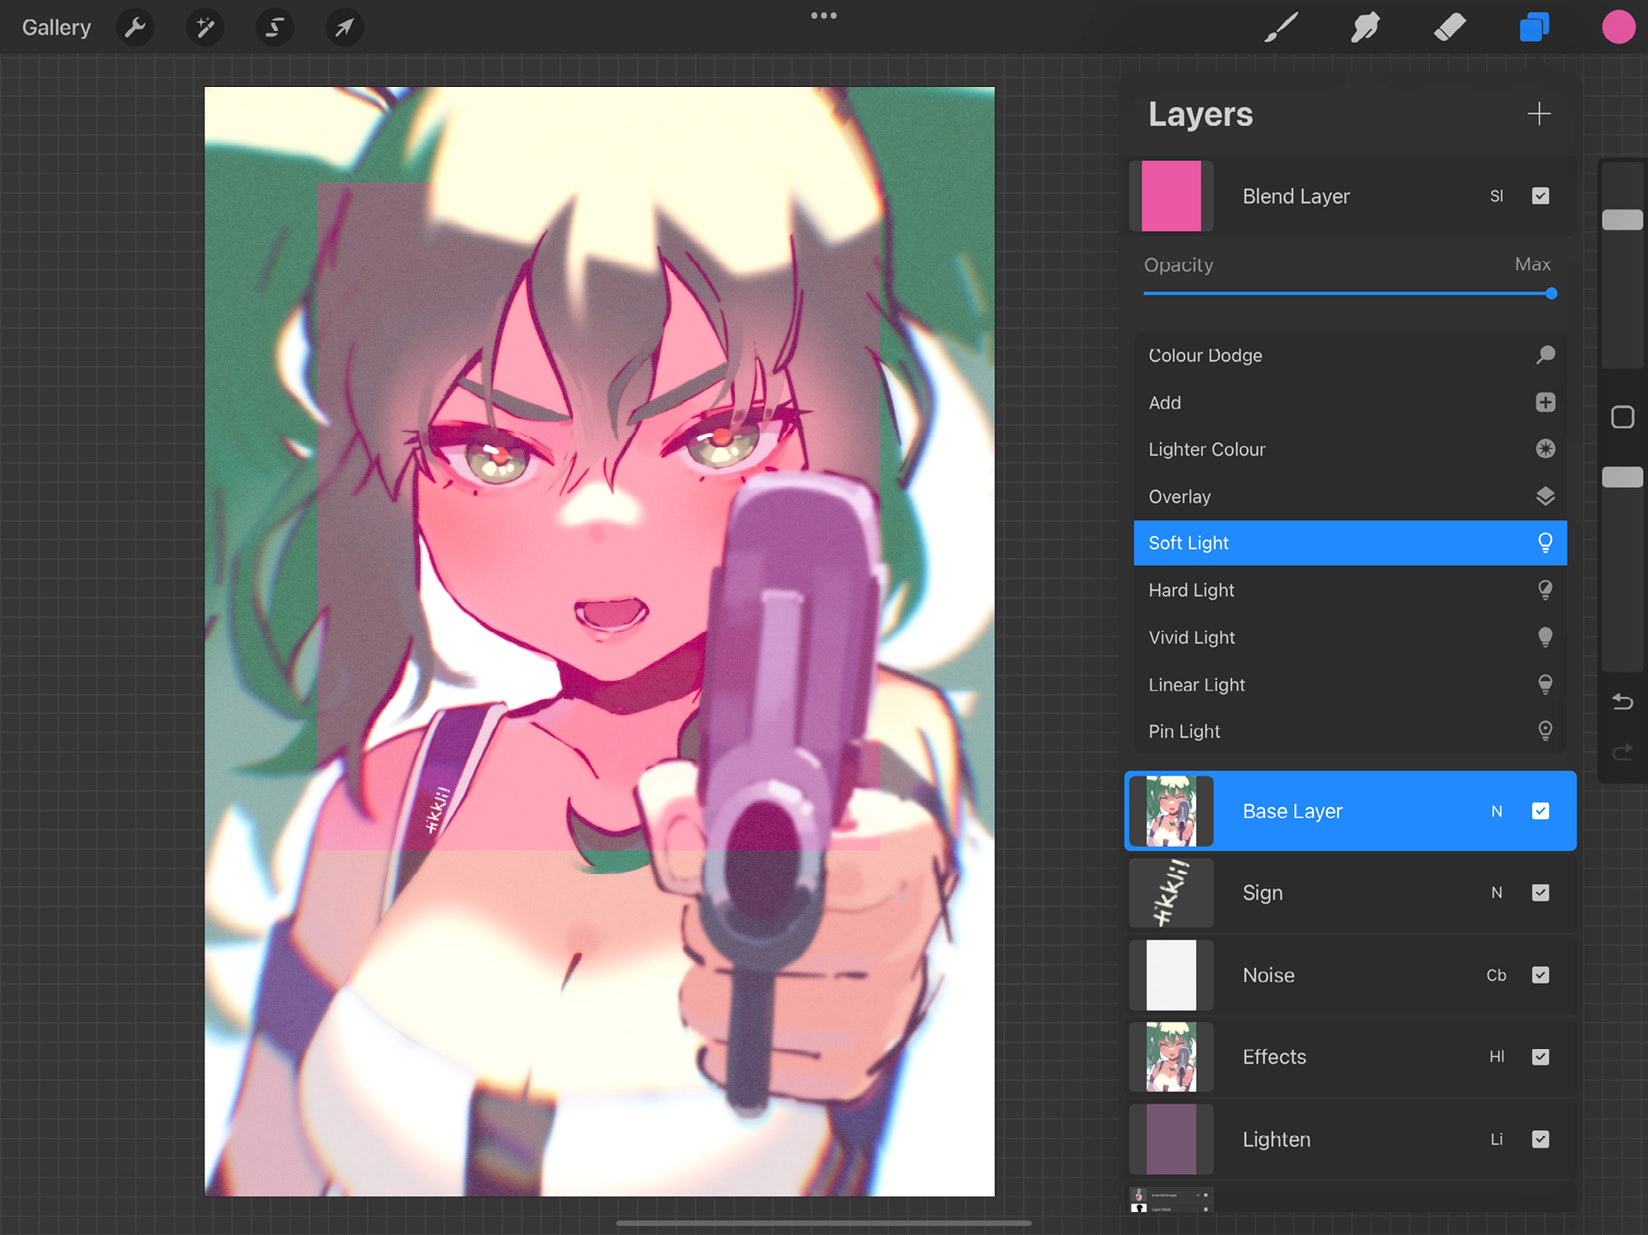
Figure 7.34: Soft Light mode
Hard Light
Hard Light produces similar effects as Overlay. It applies Multiply and Screen together, depending on the brightness of the blend layer, and has an intense effect:
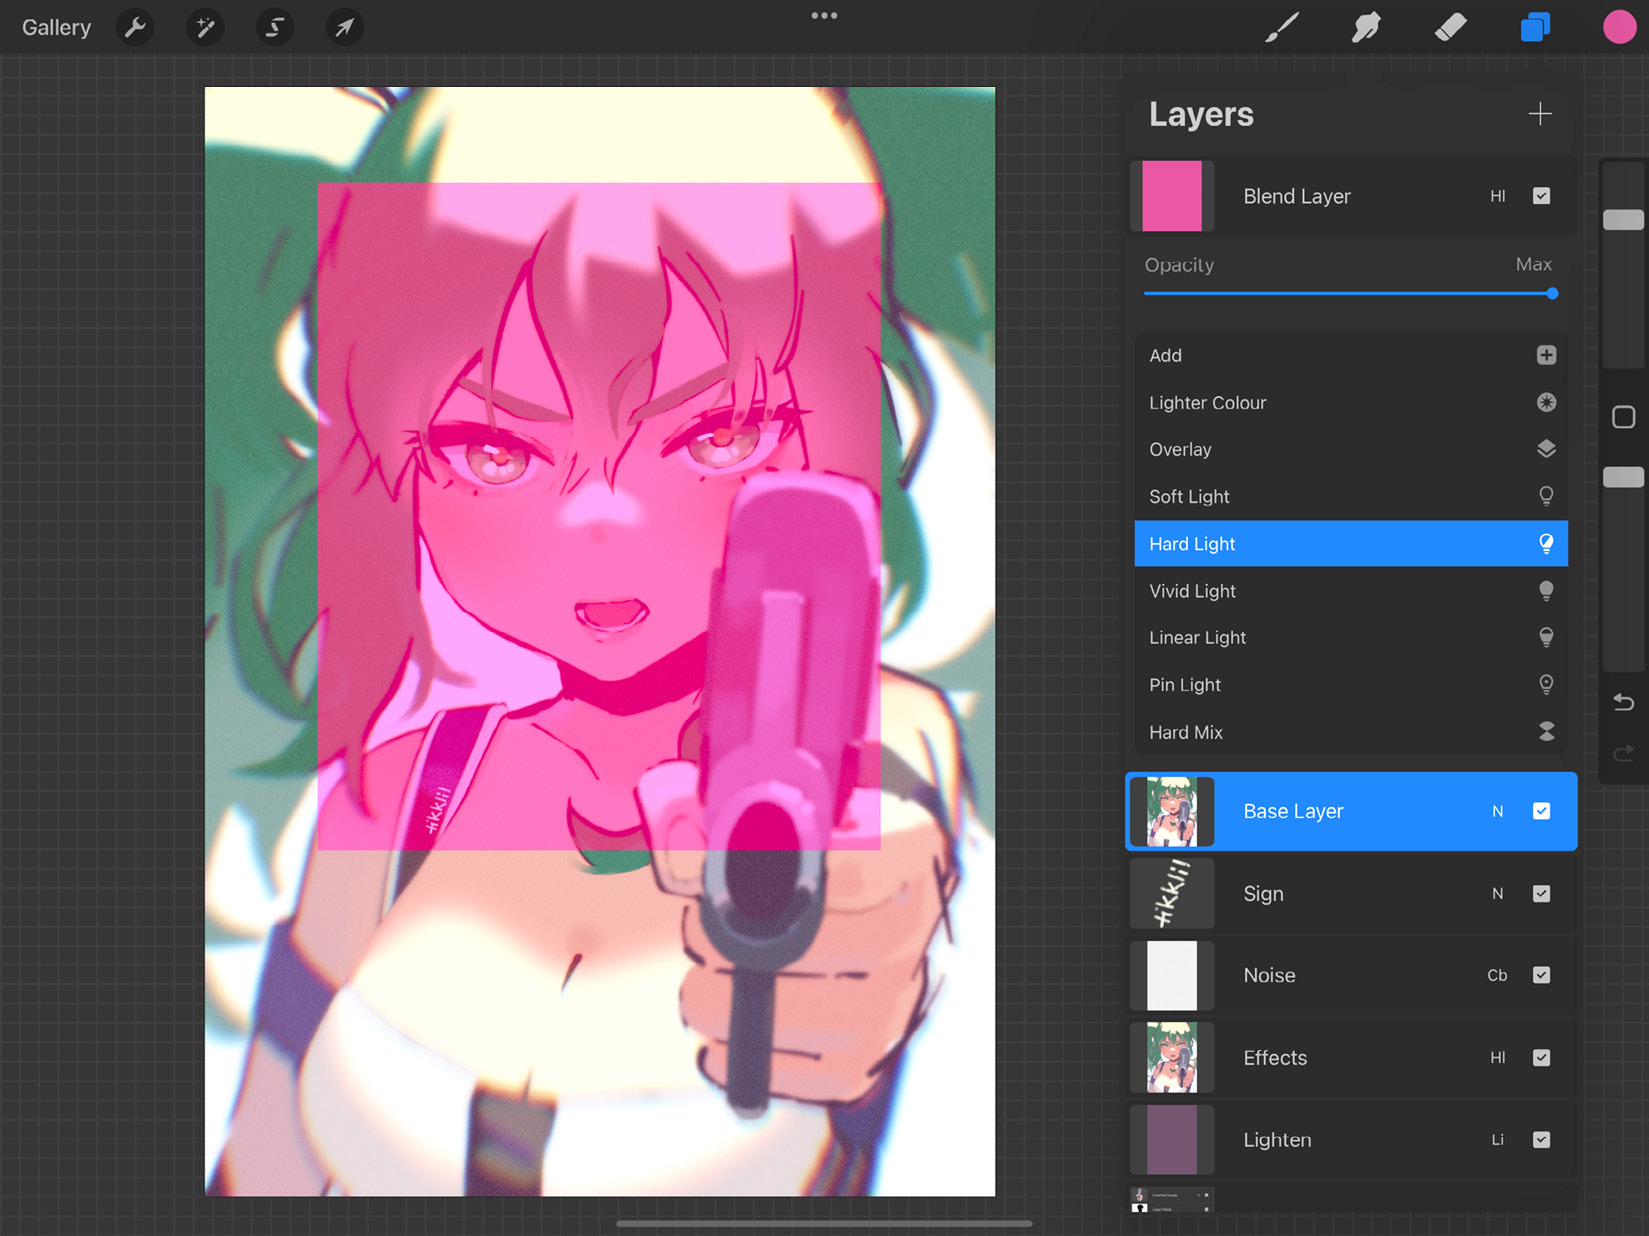
Figure 7.35: Hard Light mode
Vivid Light
Vivid Light works by darkening any color that is darker than 50% gray and lightening any color lighter than 50% gray. It may produce intense results at 100% opacity:
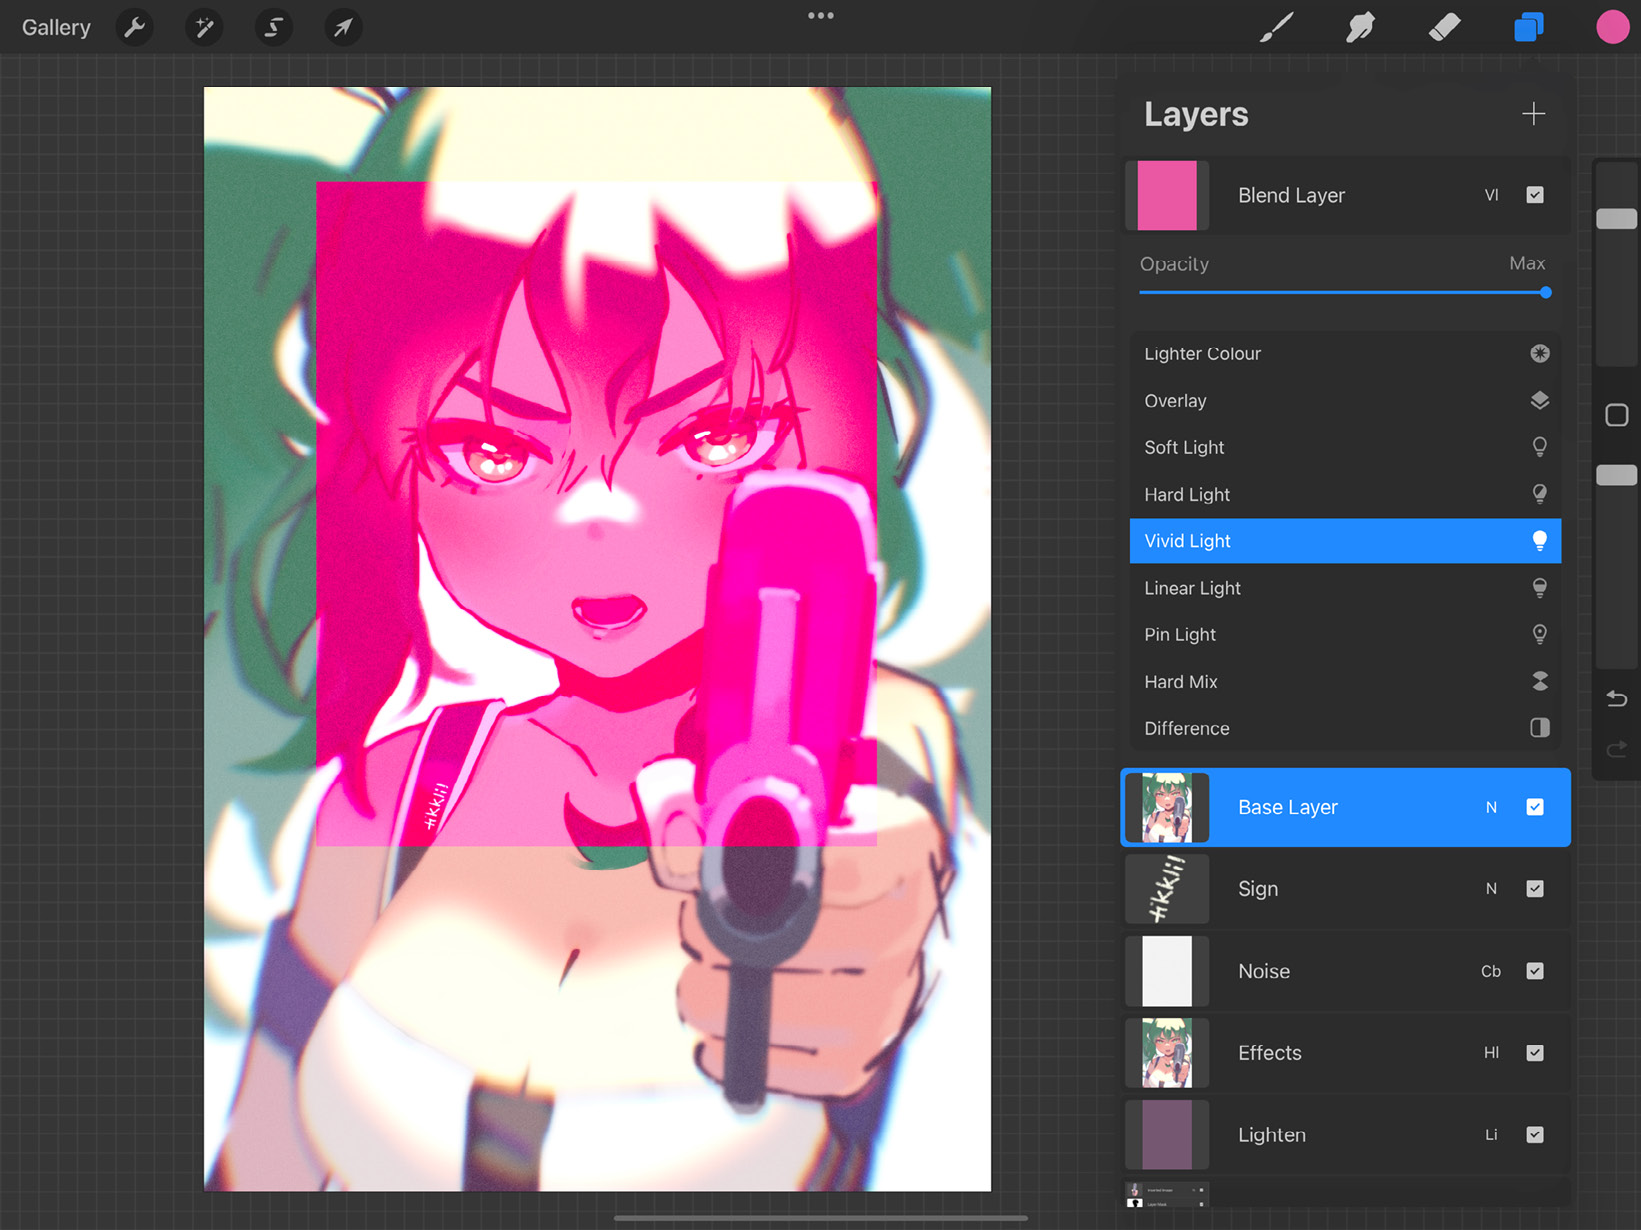
Figure 7.36: Vivid Light mode
Linear Light
Linear Light combines the Dodge and Burn effects. It applies Dodge to lighter colors and Burn to darker colors:
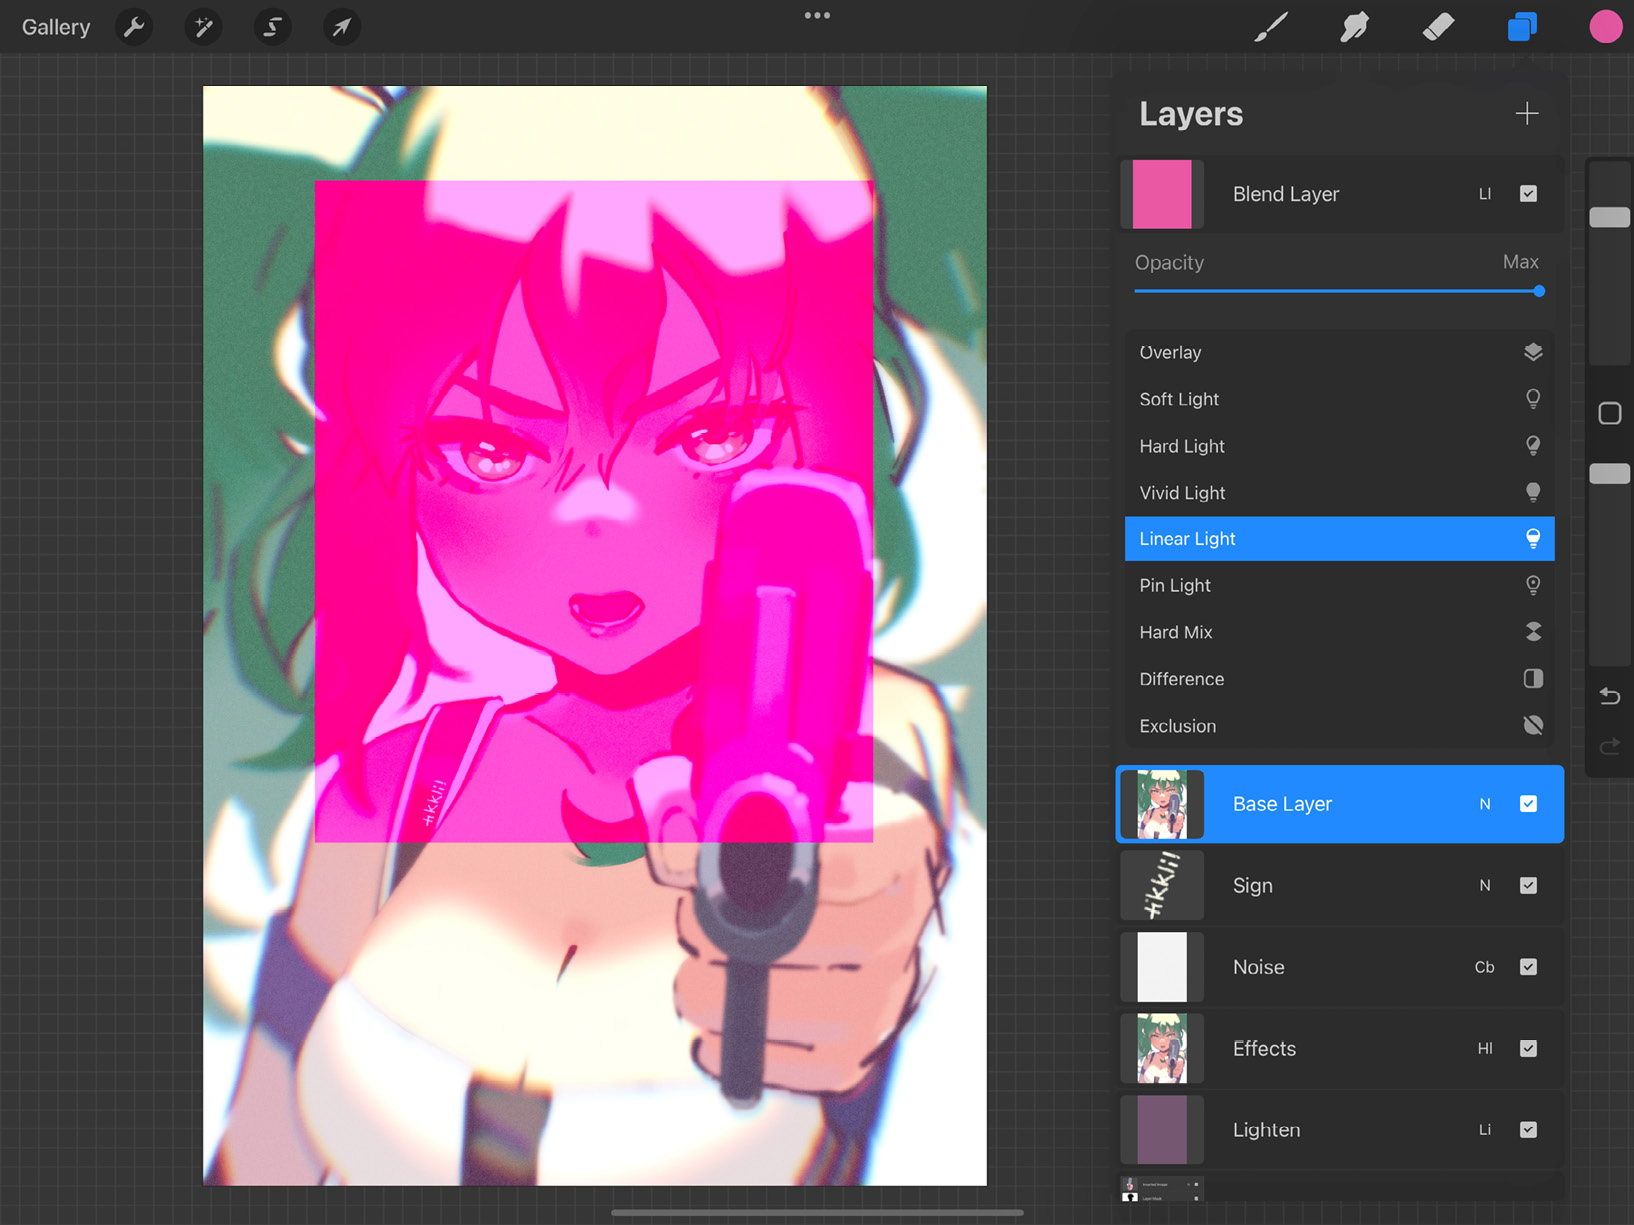
Figure 7.37: Linear Light mode
Pin Light
Pin Light performs Lighten and Darken together. This results in subdued mid-tones and an overall flattening effect:
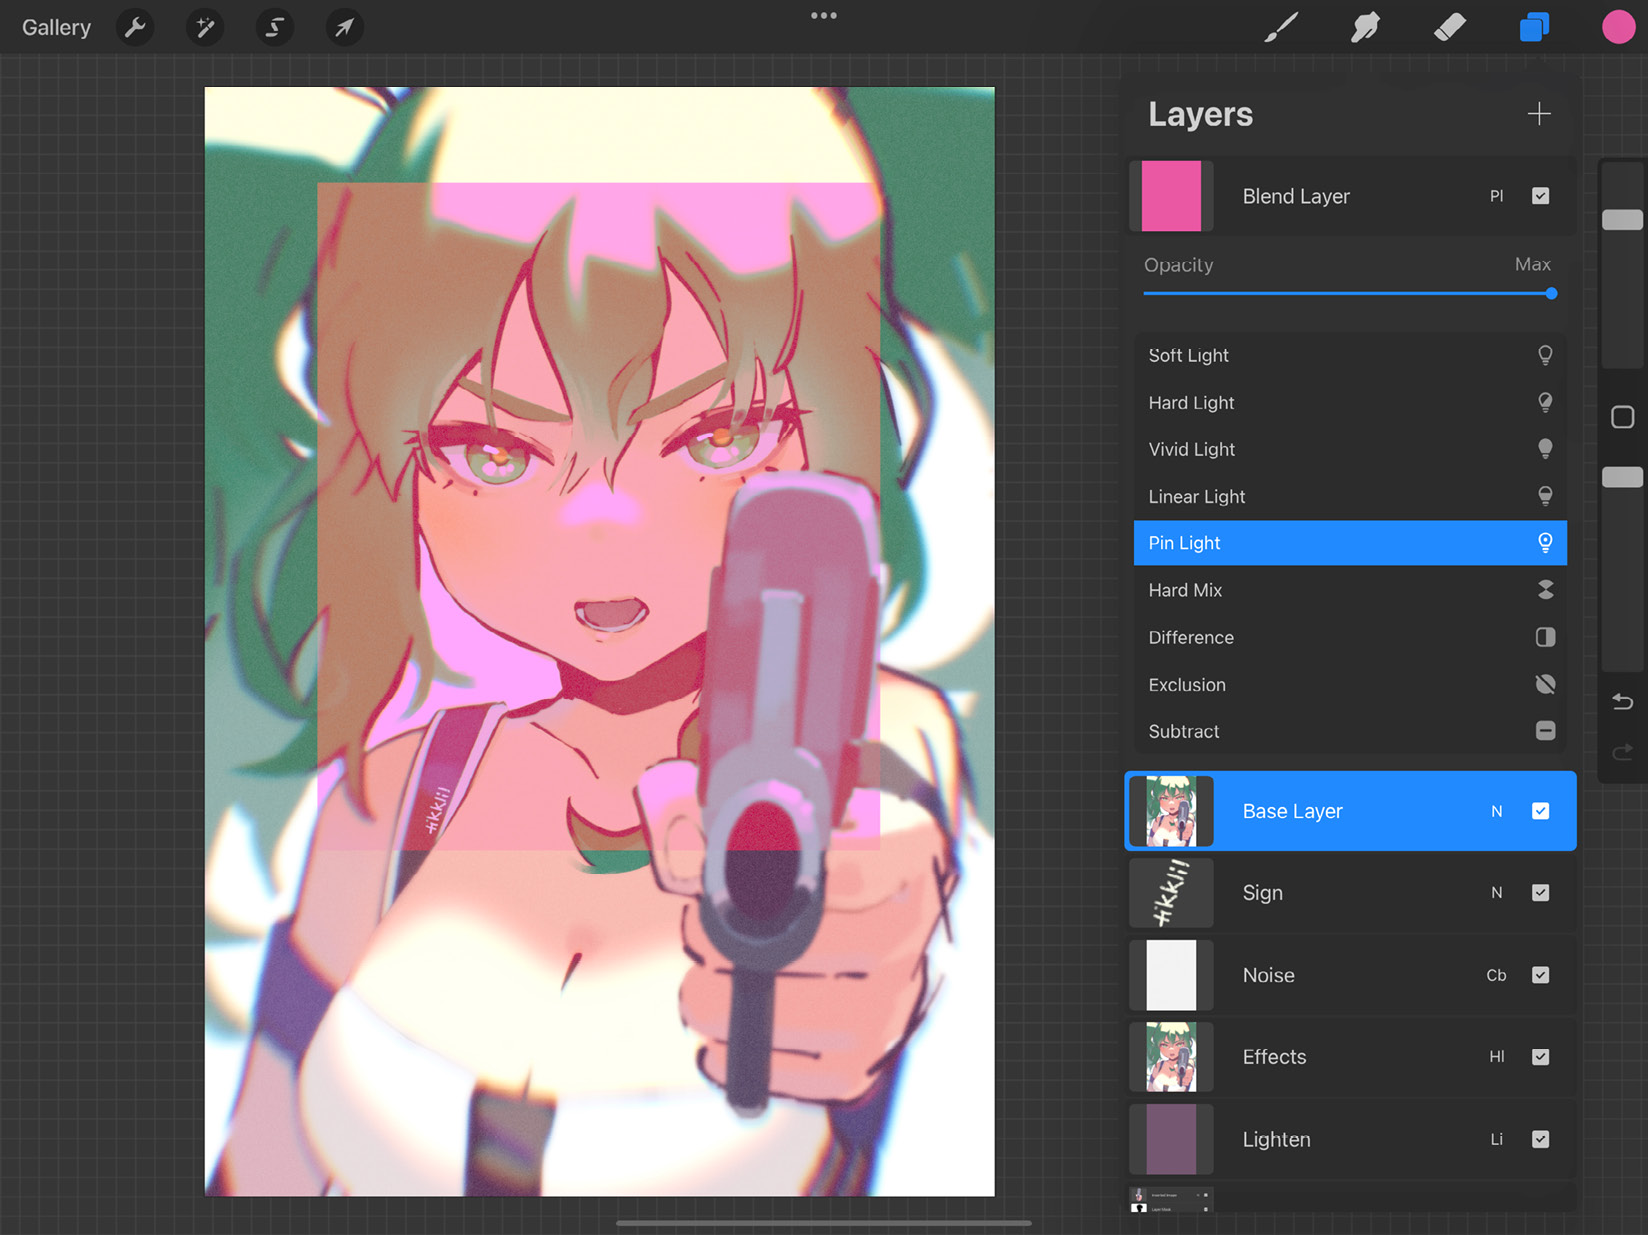
Figure 7.38: Pin Light mode
Hard Mix
Hard Mix has an extreme flattening effect. The image looks “posterized” since the result consists of only black, white, and the six primary colors (red, green, blue, cyan, magenta, and yellow). Which of these primary colors will be produced depends on the hue of the blend layer:
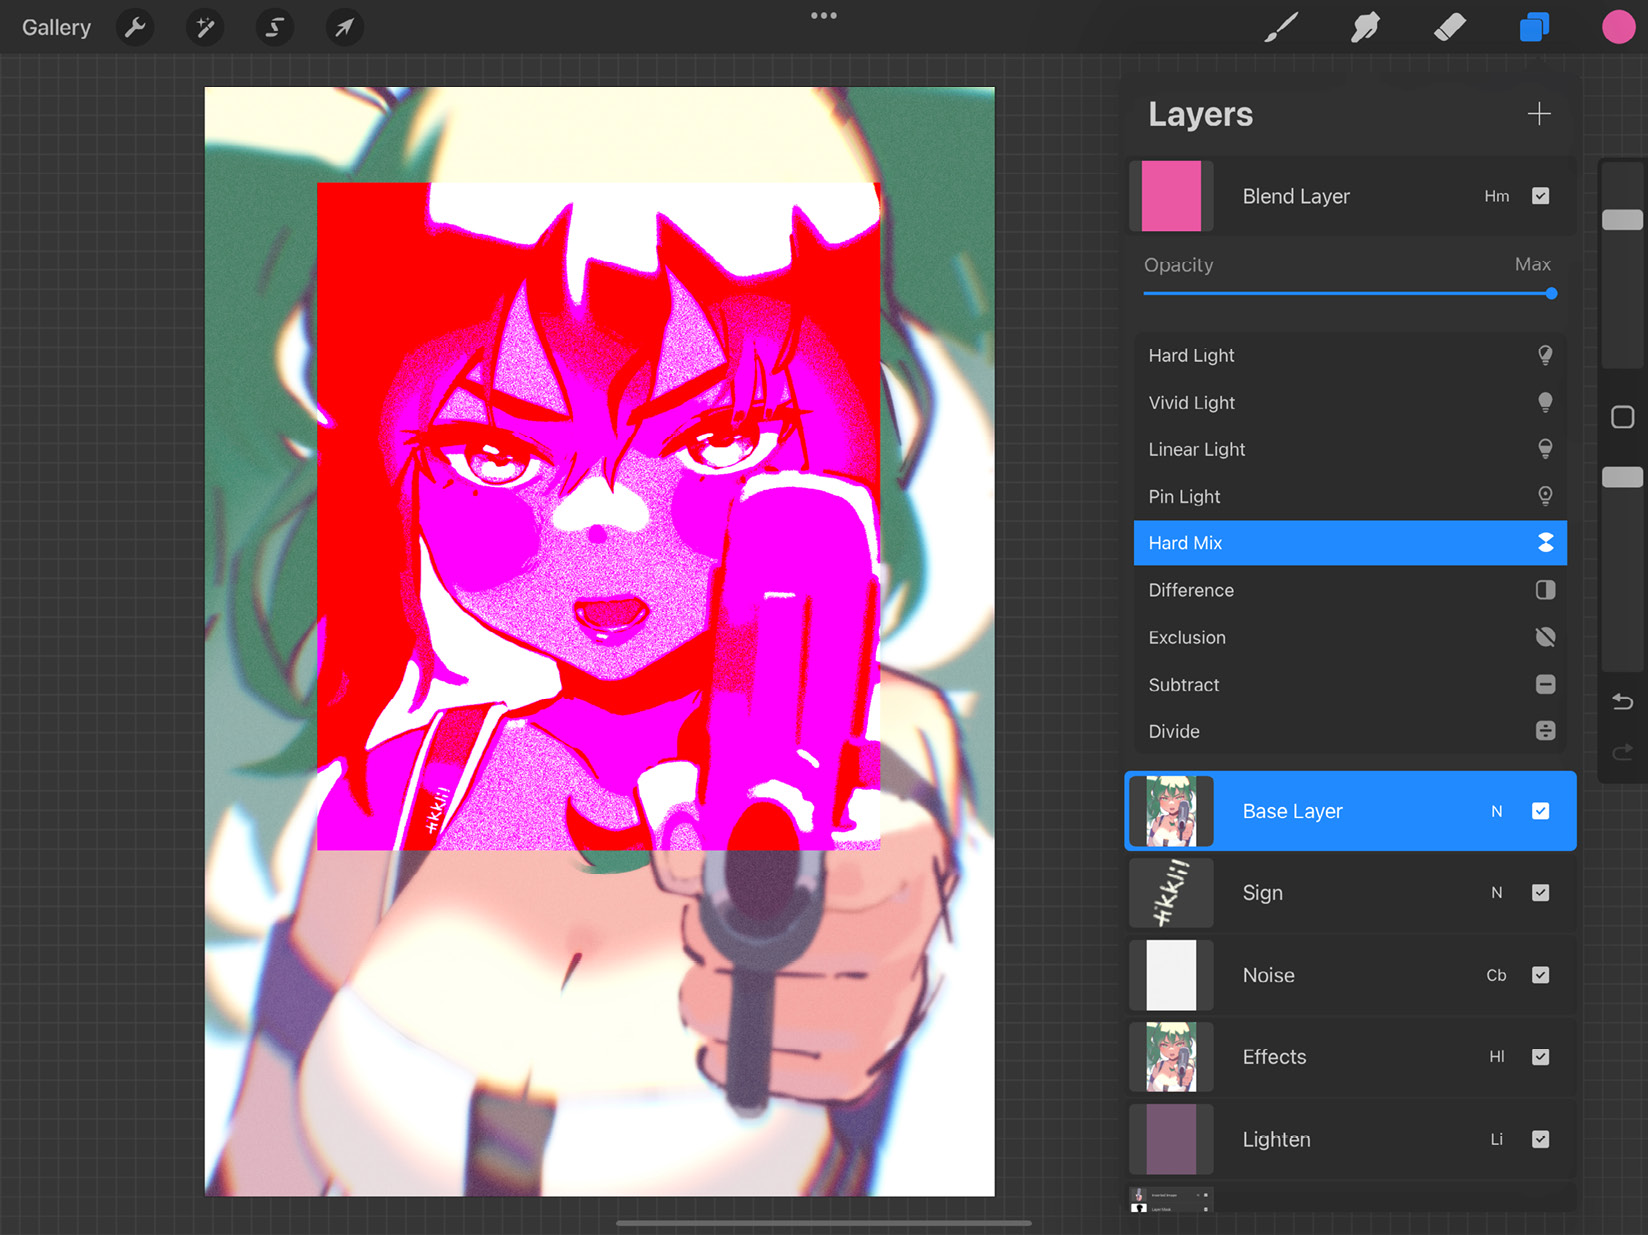
Figure 7.39: Hard Mix mode
Difference
Difference works based on the difference between the base and blend layers to create the resulting effect. White on the base layer inverts the blend color, while black produces no change. Dark grays on the base layer produce slight darkening:
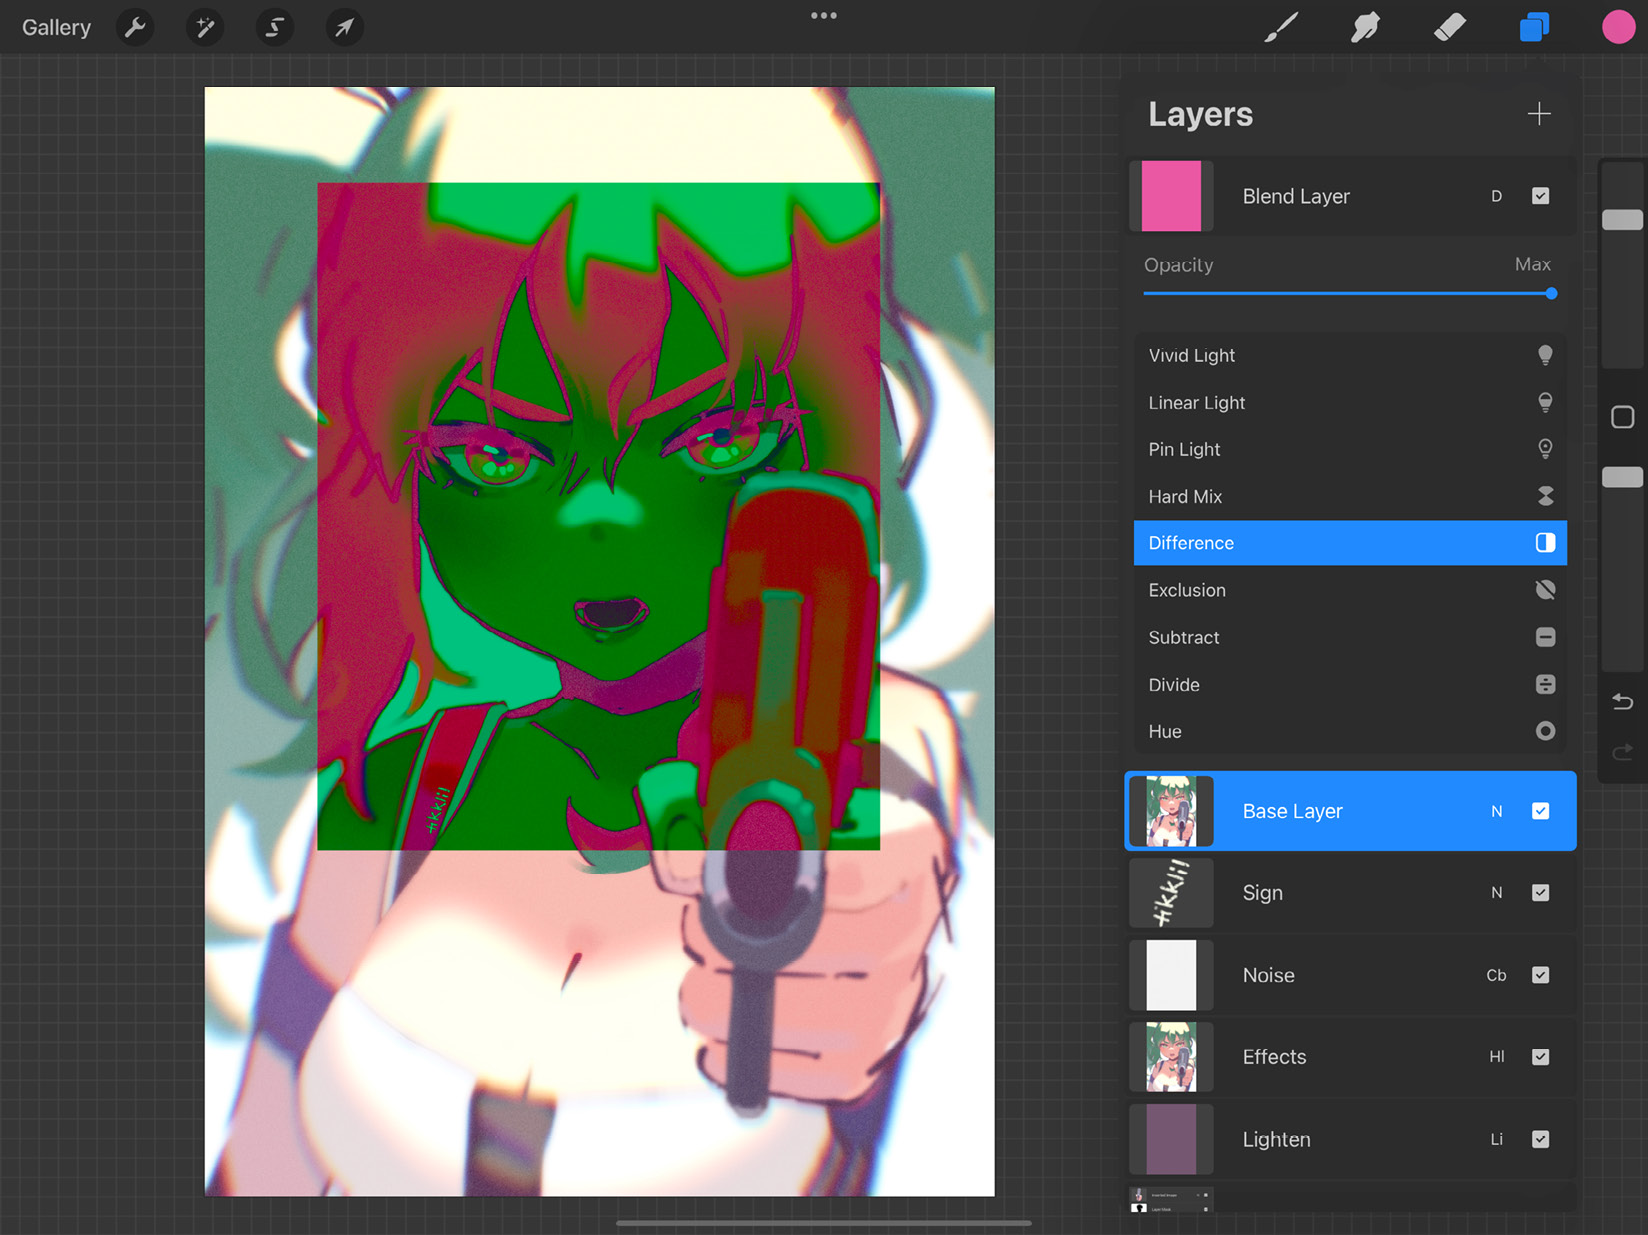
Figure 7.40: Difference mode
Exclusion
Exclusion works the same way as Difference when it comes to white and black, but it produces no change with dark grays:
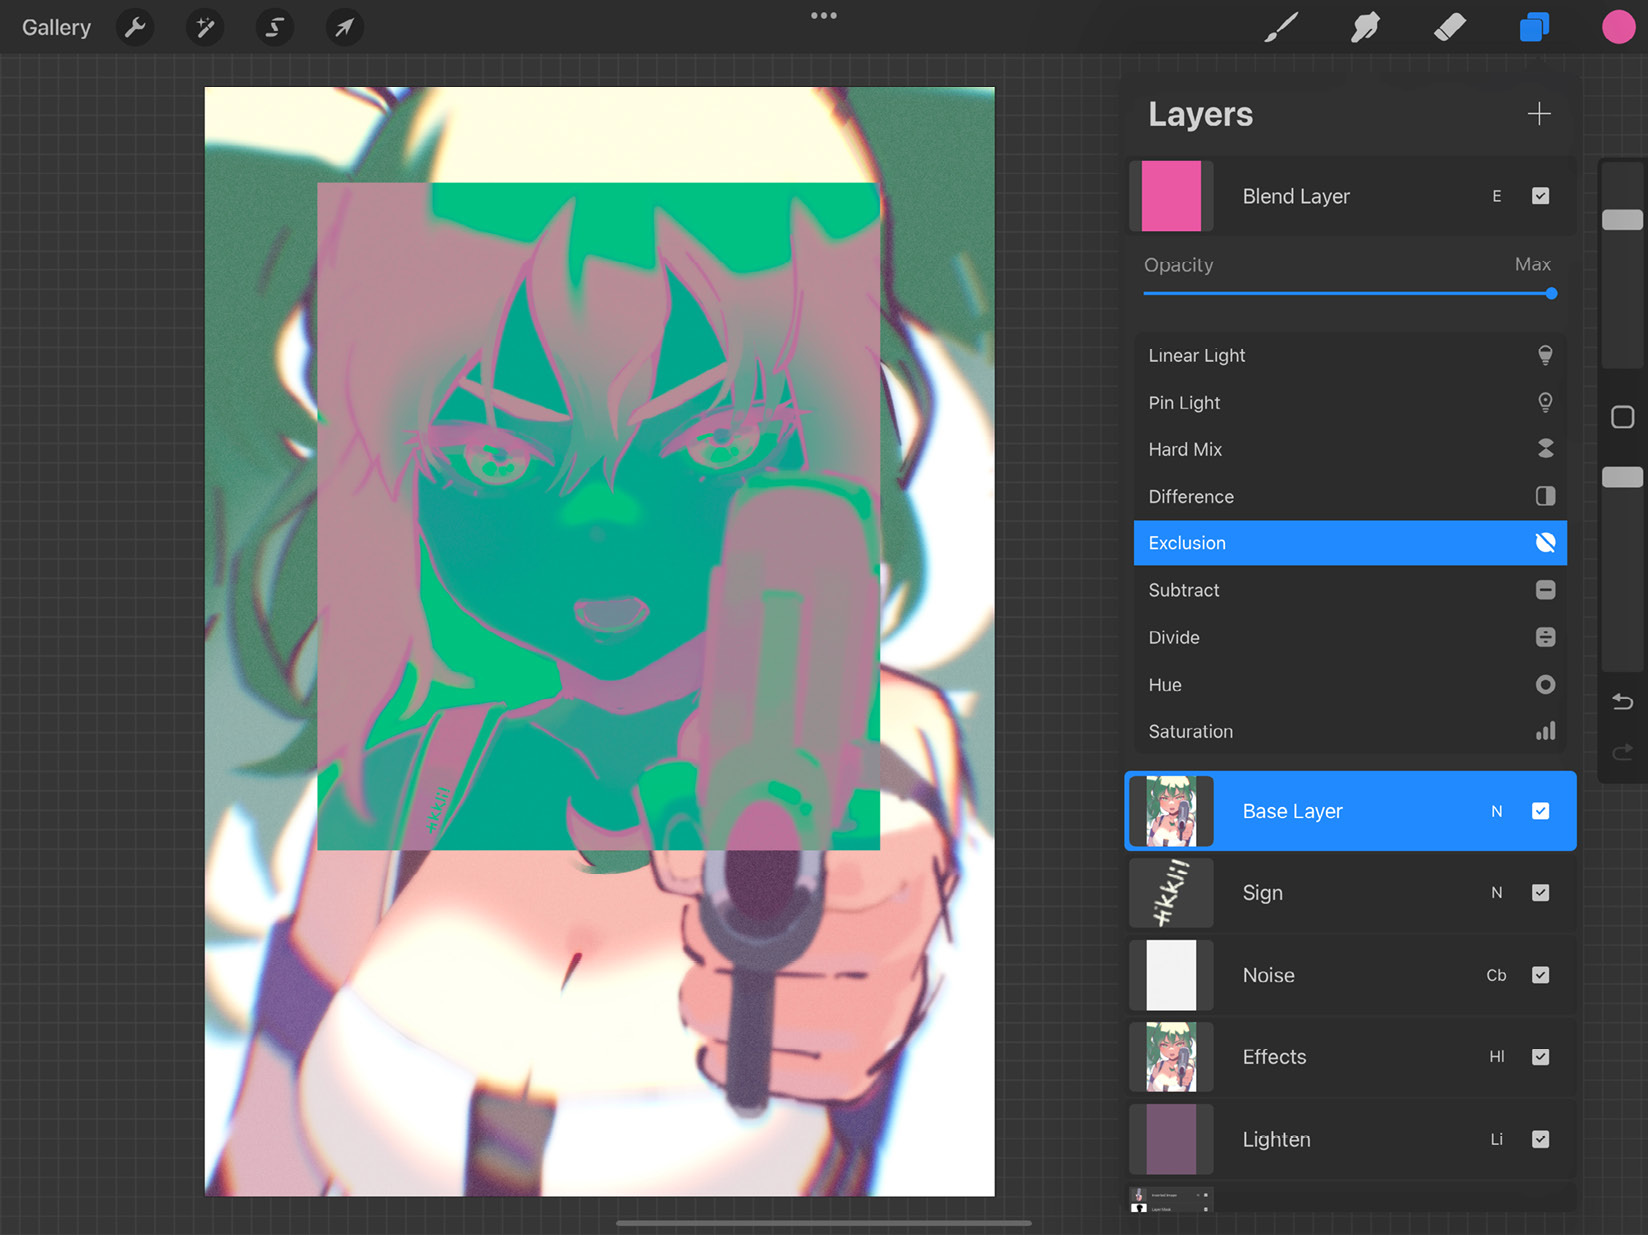
Figure 7.41: Exclusion mode
Subtract
Subtract produces a strong darkening effect by subtracting brightness. While this makes little difference to already dark areas, light areas show significant darkening:
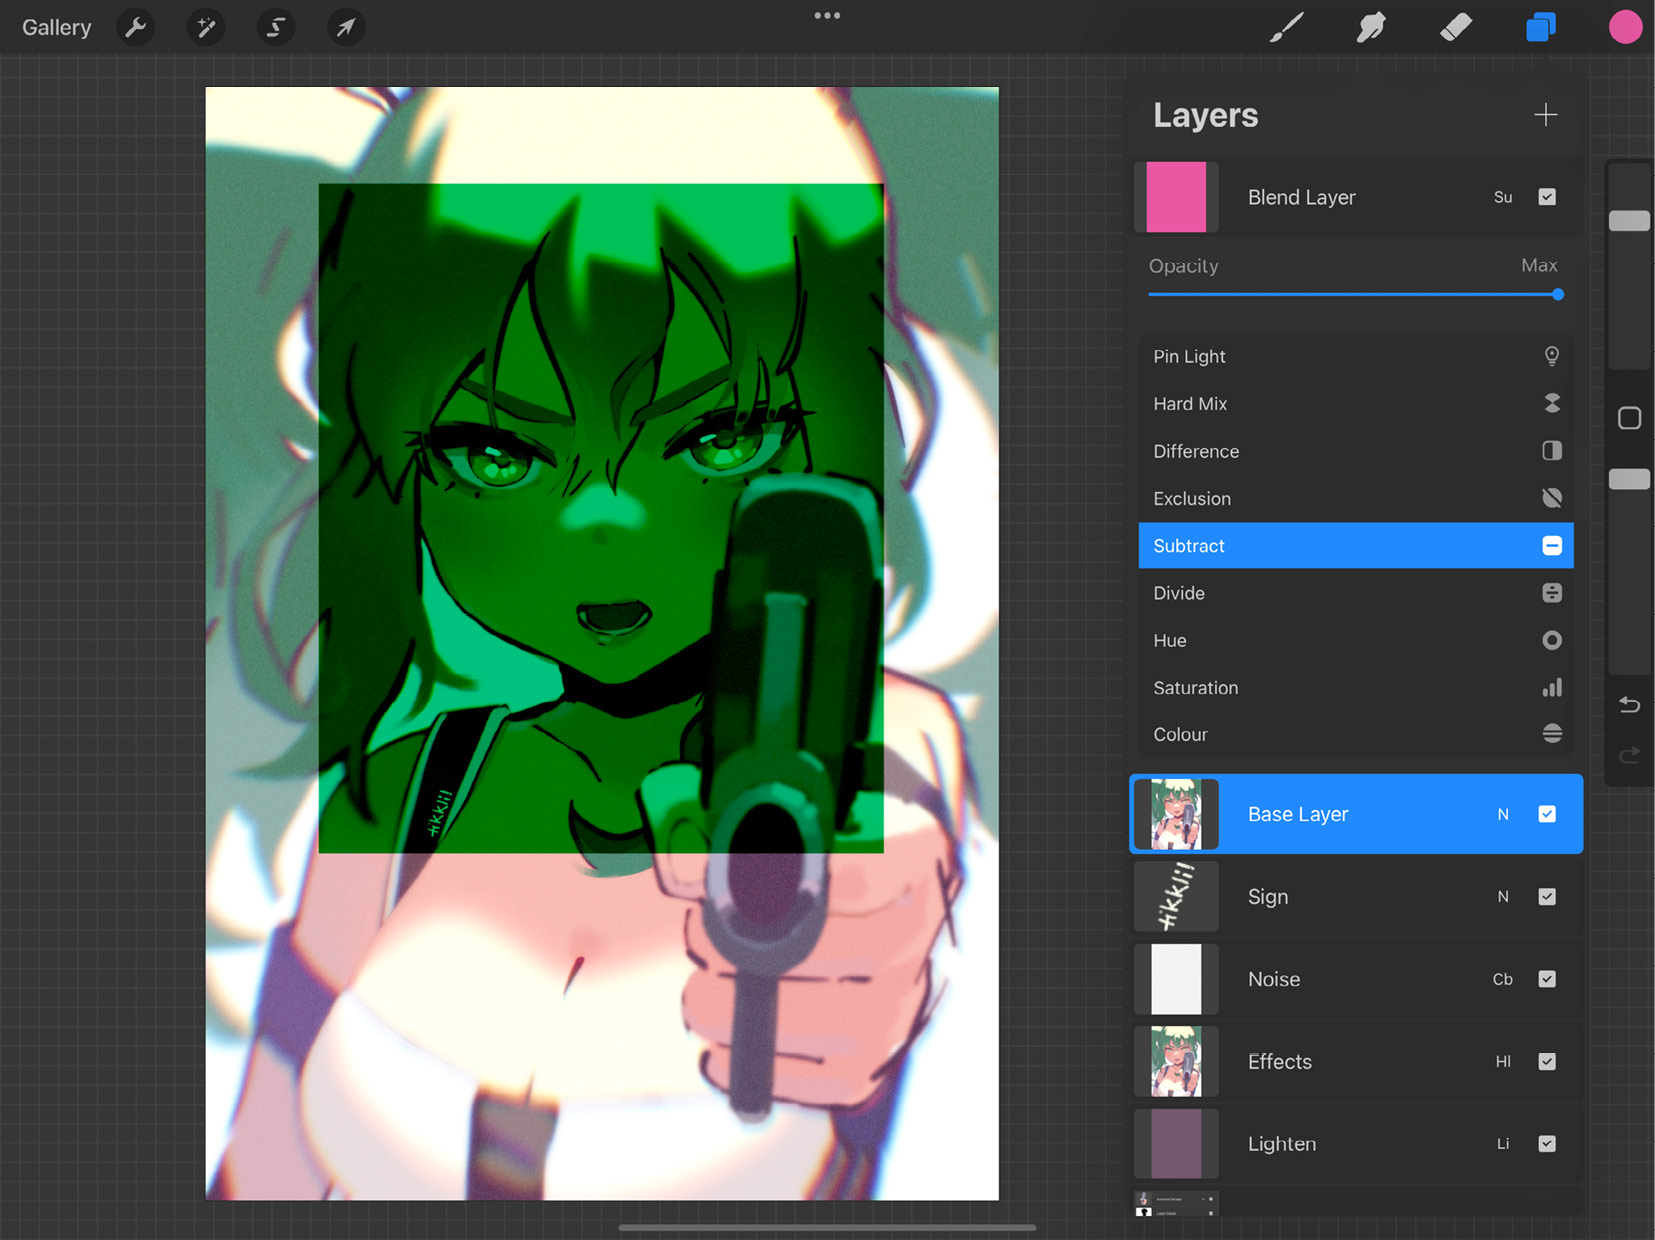
Figure 7.42: Subtract mode
Divide
Divide is the opposite of Subtract. Darker colors show significant lightening, while there’s not much effect on already light areas:
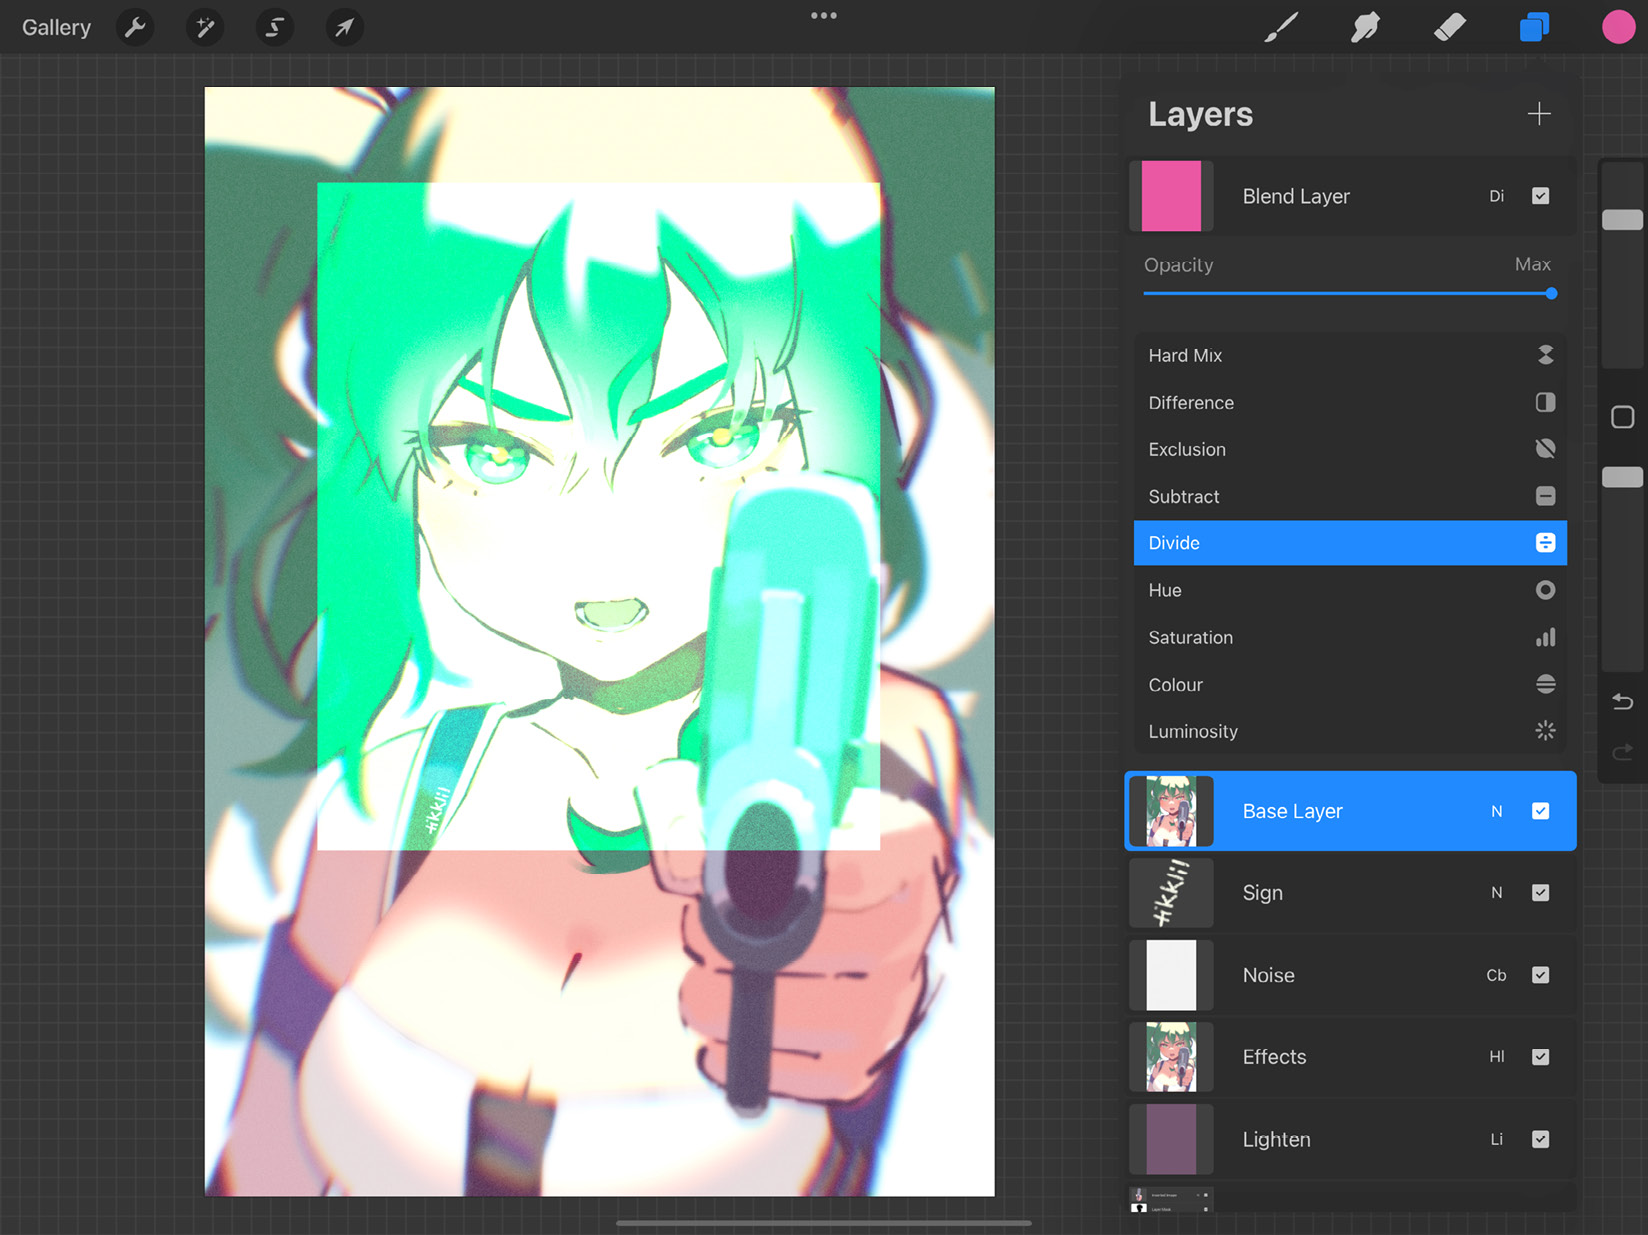
Figure 7.43: Divide mode
Hue
Hue preserves the saturation and lightness of the base layer while imparting the hue of the blend layer to it. This produces a “monochrome” effect:
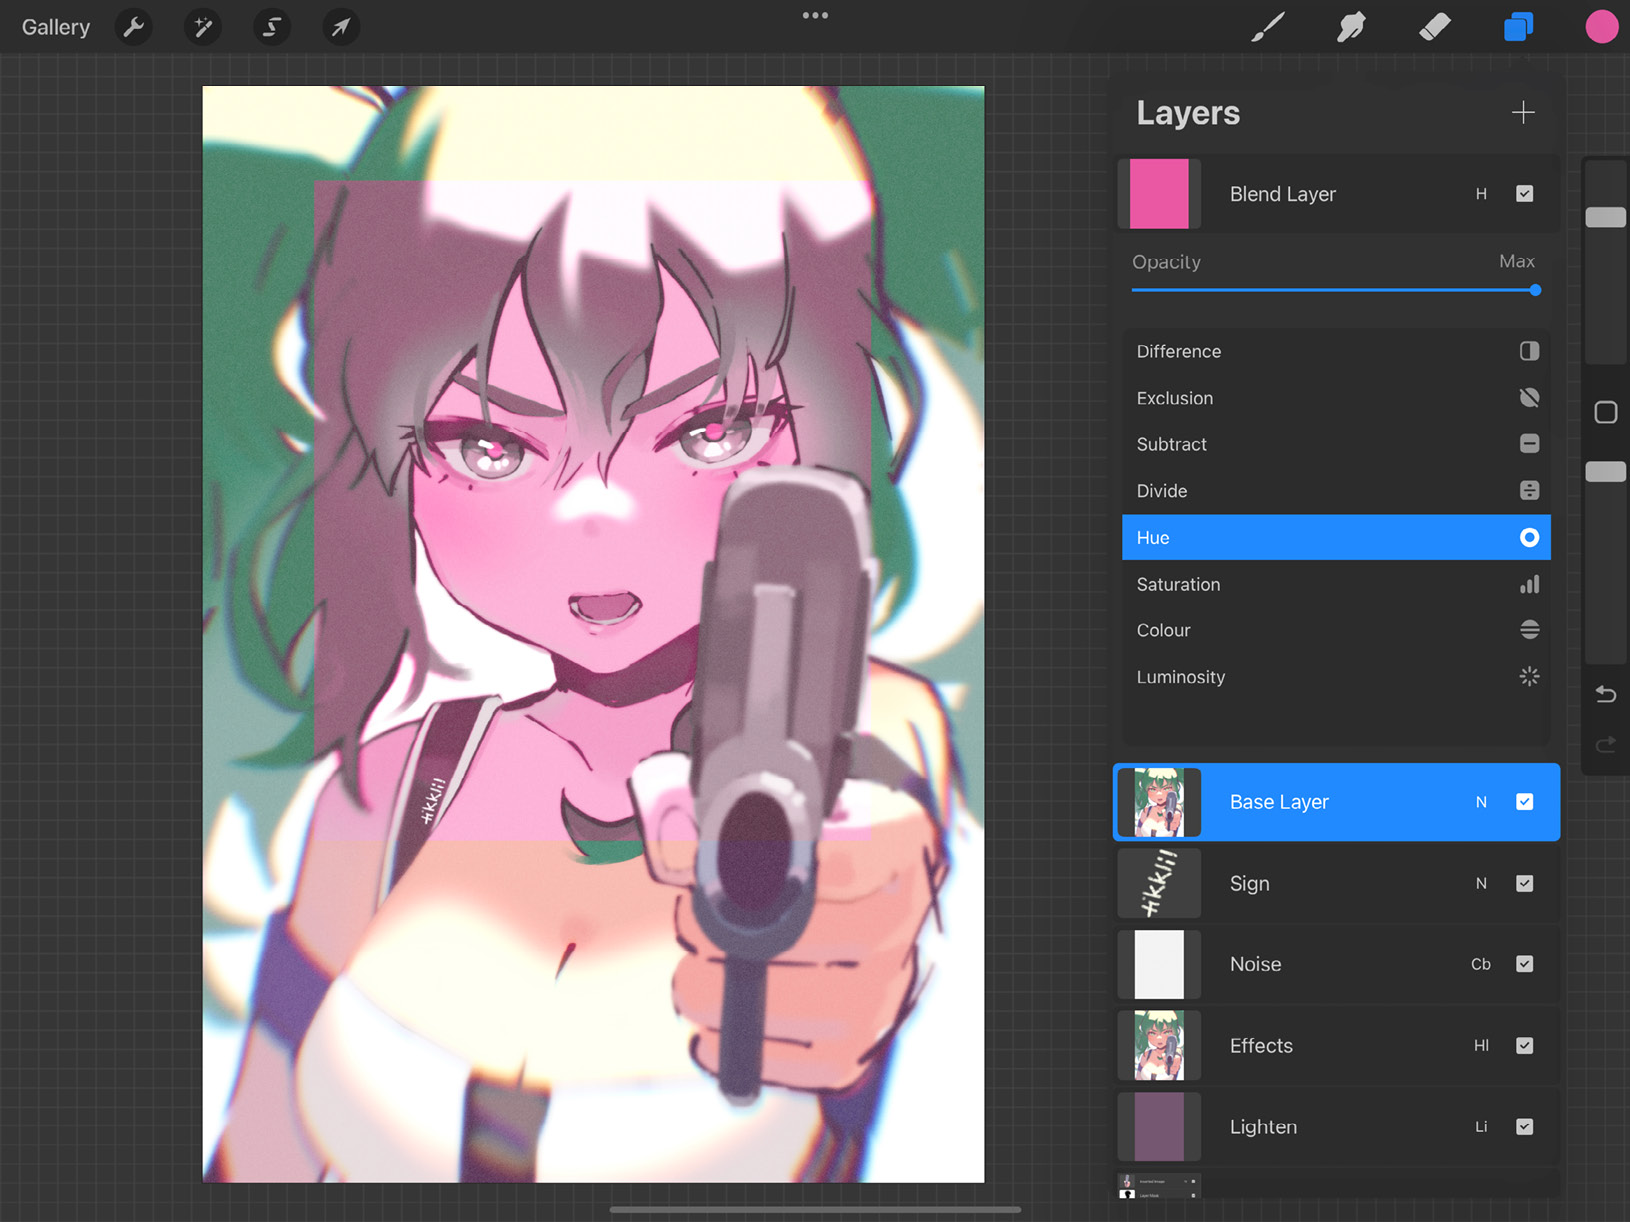
Figure 7.44: Hue mode
Saturation
Saturation preserves the hue and lightness of the base layer while imparting the saturation of the blend layer to it. When the blend layer is black, white, or gray, it gives rise to a grayscale image:
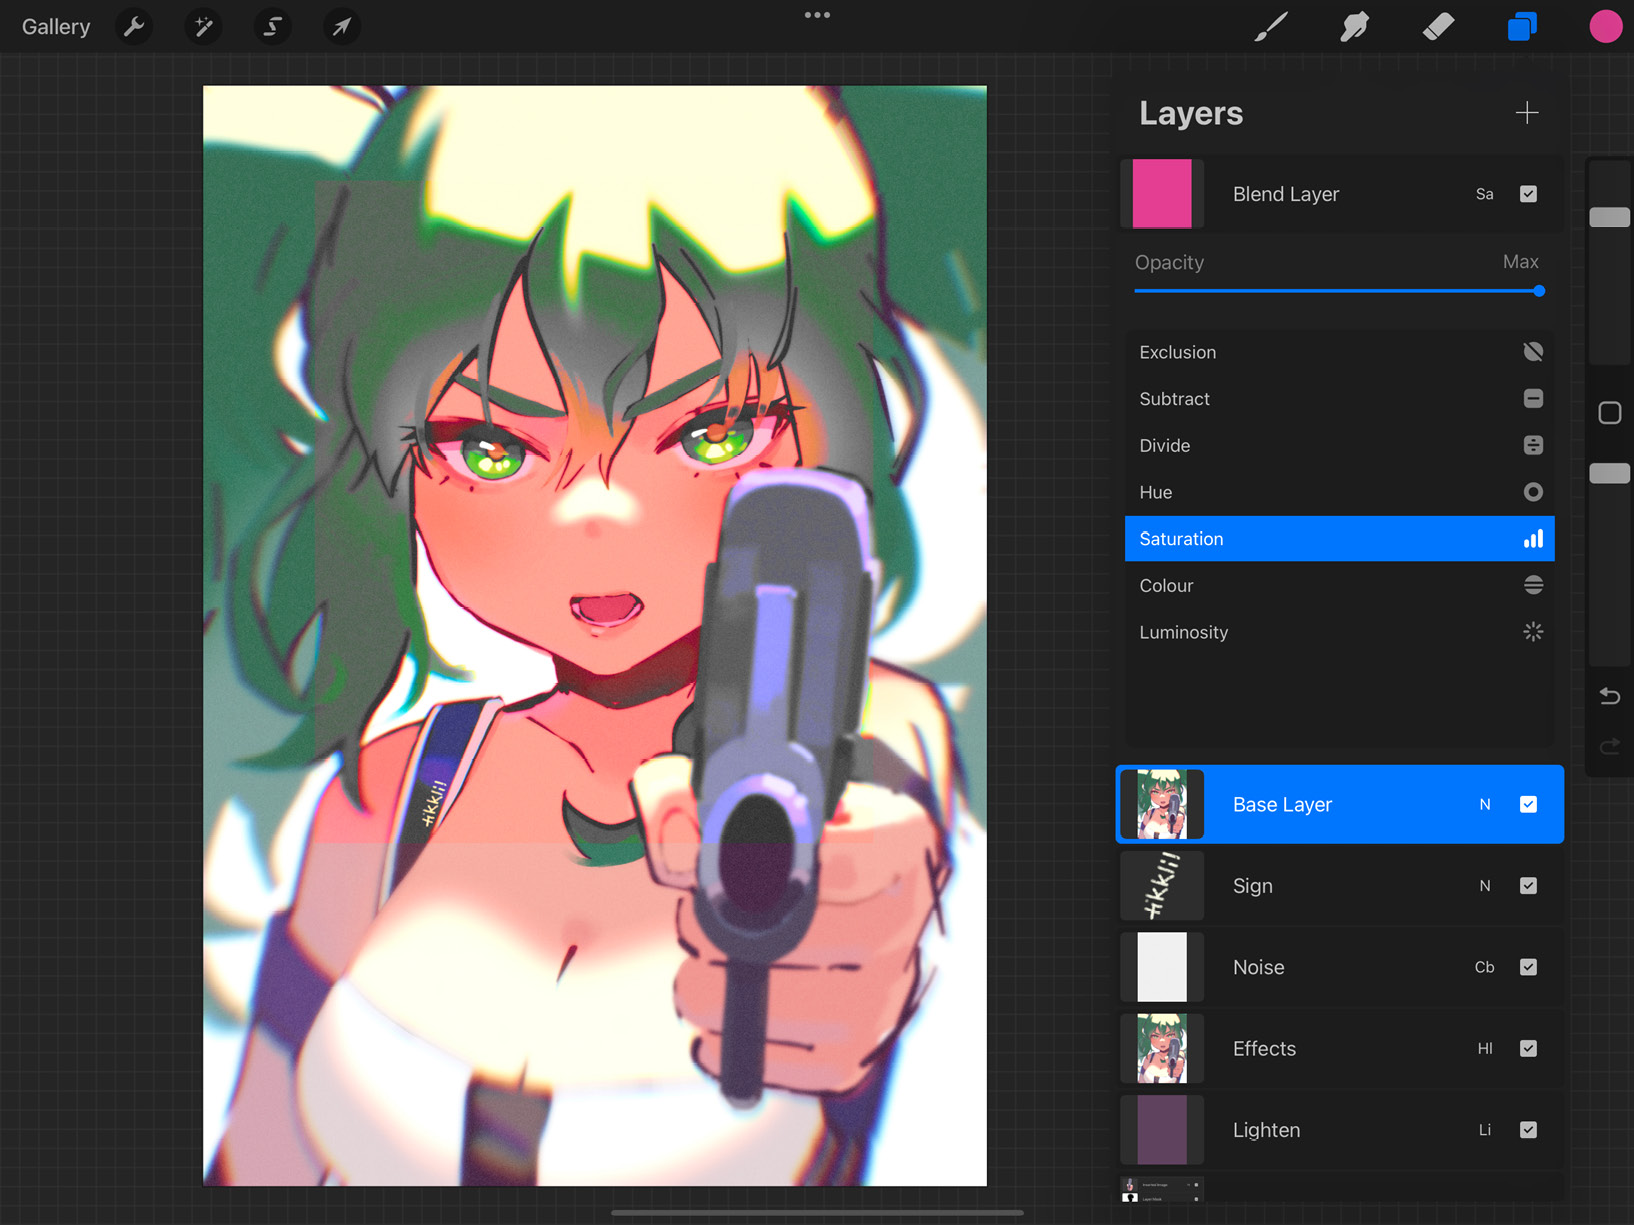
Figure 7.45: Saturation mode
Notice how this particular magenta doesn’t produce a noticeable change when applied over this particular painting. This is because the painting is already at a similar saturation level as the magenta.
Color
Color preserves the lightness of the base layer while imparting the hue and saturation of the blend layer to it. This usually produces a more vivid monochrome effect than Hue, which doesn’t take saturation into account:
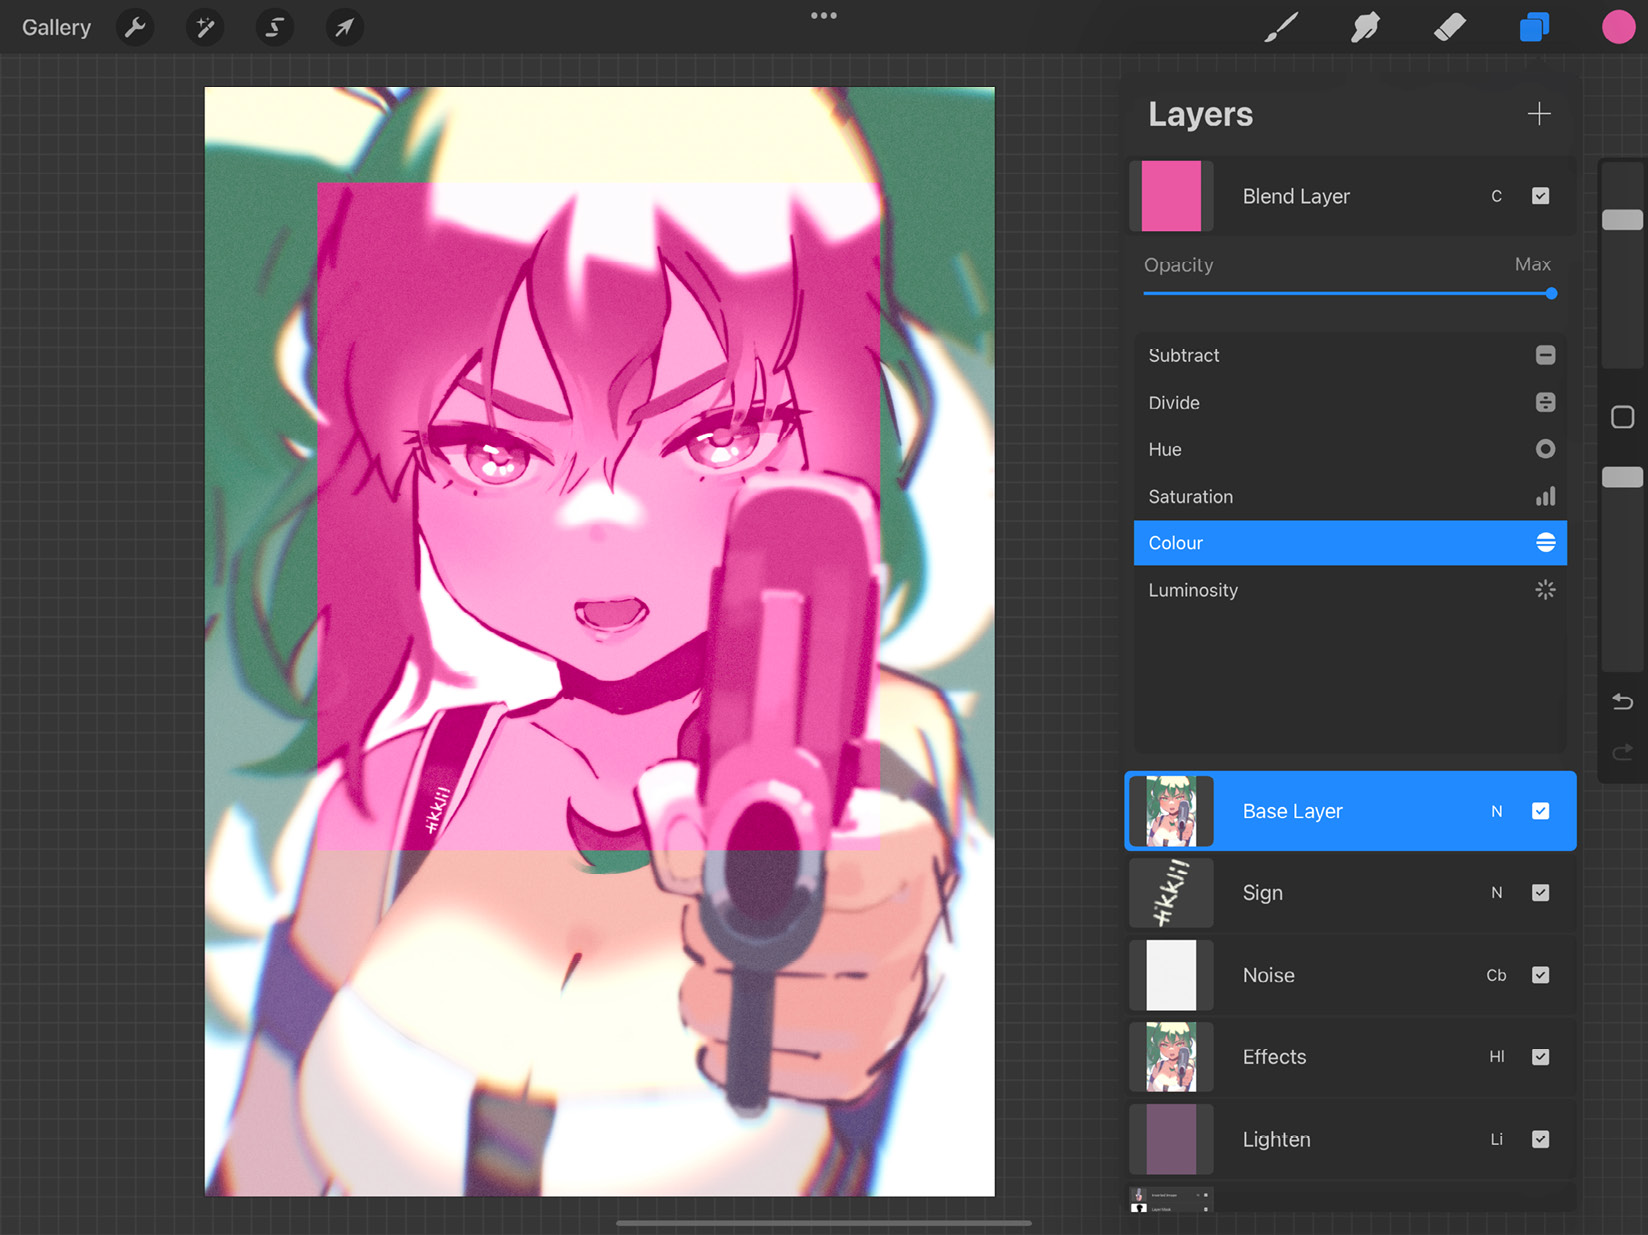
Figure 7.46: Color mode
Luminosity
Luminosity preserves the hue and saturation of the base layer while imparting the lightness of the blend layer to it. This produces an image that is uniformly light or dark but only with color variation:
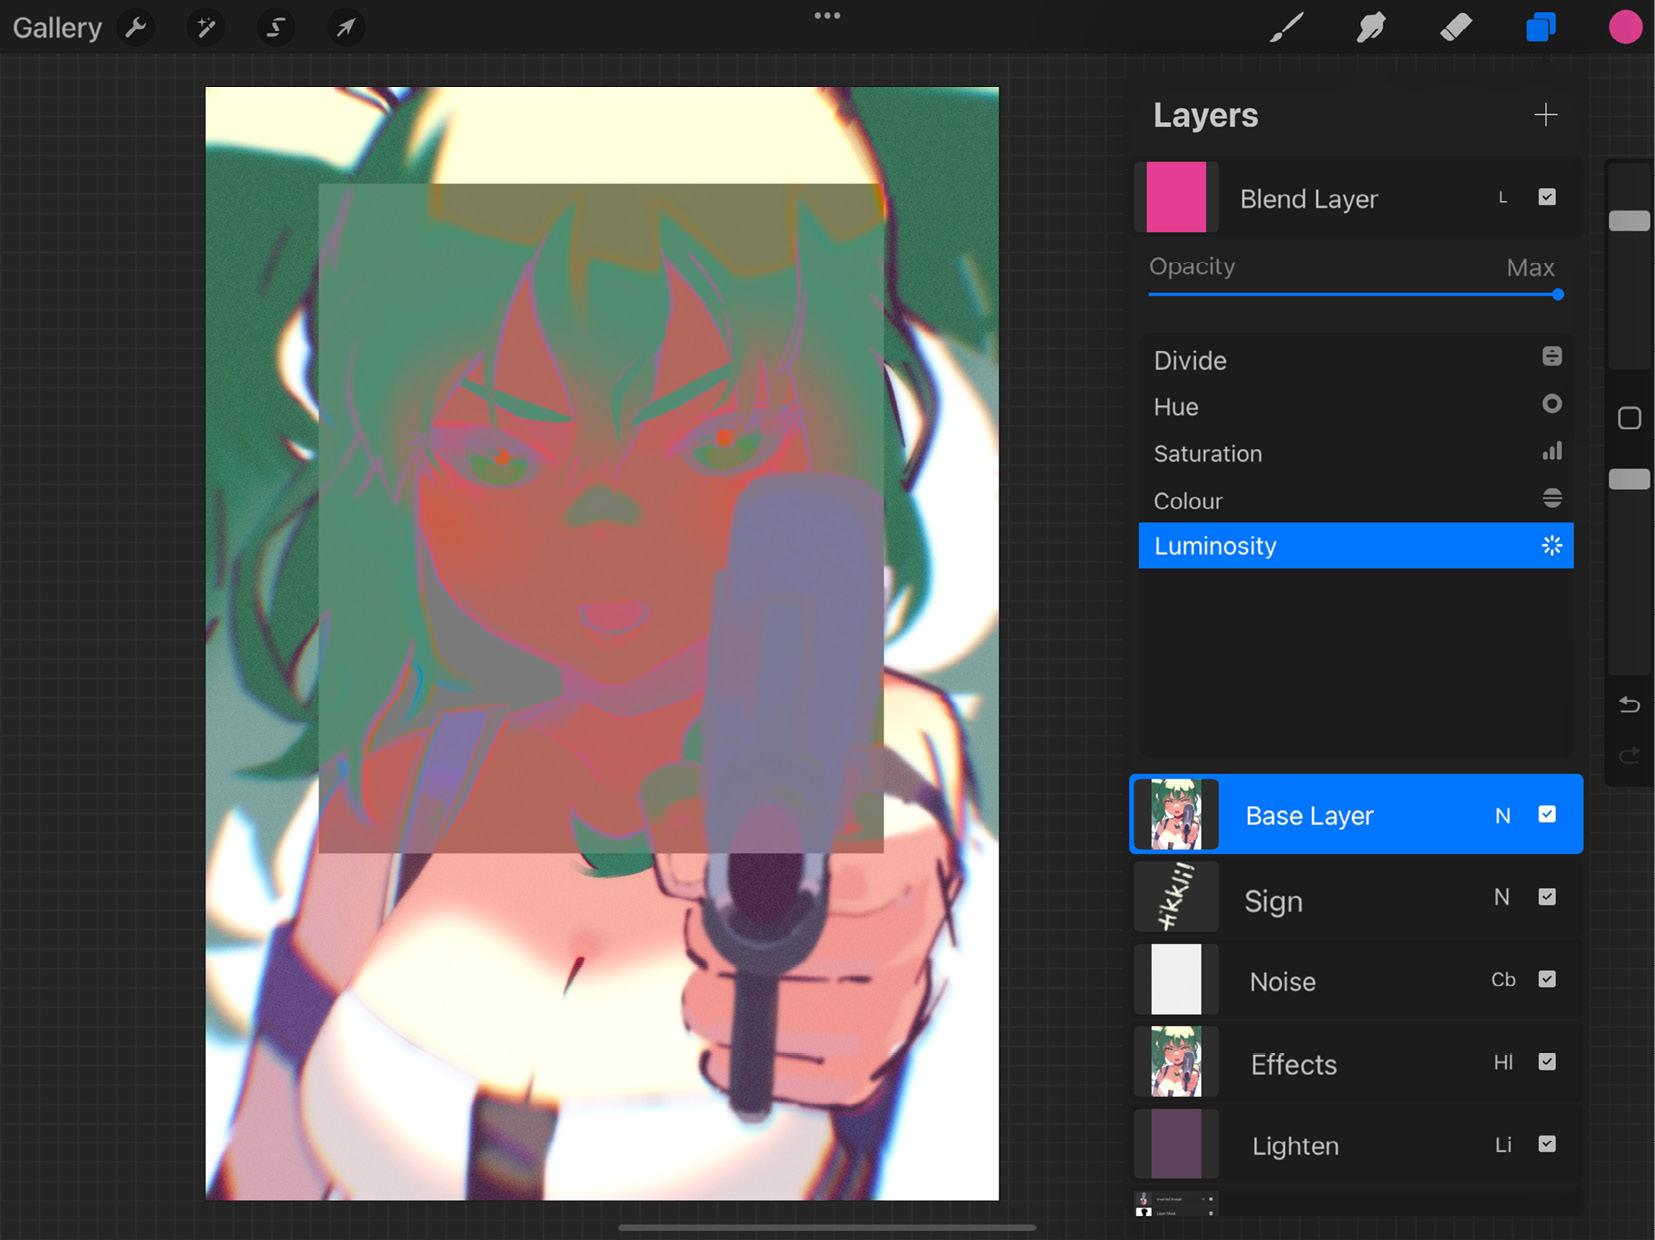
Figure 7.47: Luminosity mode
Blend modes require practice and experience to get used to, so reading their descriptions alone may not be enough to master them. Several of these blend modes produce drastically different results depending on the attributes of the image you’re working with, such as lightness and color. Experiment in your own time to become more comfortable using them. Refer to Chapter 16, Rendering Objects Using Blend Modes, for a more hands-on explanation of this topic.
Next, we will learn how to share or export individual layers conveniently.
Sharing layers
When we talk about exporting artwork, we usually think of the composite image consisting of all the visible layers. However, there are many ways to export individual layers, a few selected layers, or take separate layers into account while exporting. There are two ways to do this, as we will discuss in the following sections.
Drag and drop export
This feature allows you to drag and drop a selected layer(s) directly into any compatible destination without having to close your canvas. This method works while exporting to another Procreate canvas, Files, Photos, iCloud, and so forth.
This can be done using the following steps:
- Activate Split View. To learn about how Split View works, refer to Chapter 1, The Gallery: Organizing Your Files. Make sure you have both Procreate and your export location open in the two windows.
- From the Layers panel, press and hold a layer to pick it up, and then drag it over to the destination screen.
- Release the layer to instantly export it as an image of the same dimensions as your parent canvas, as shown here:
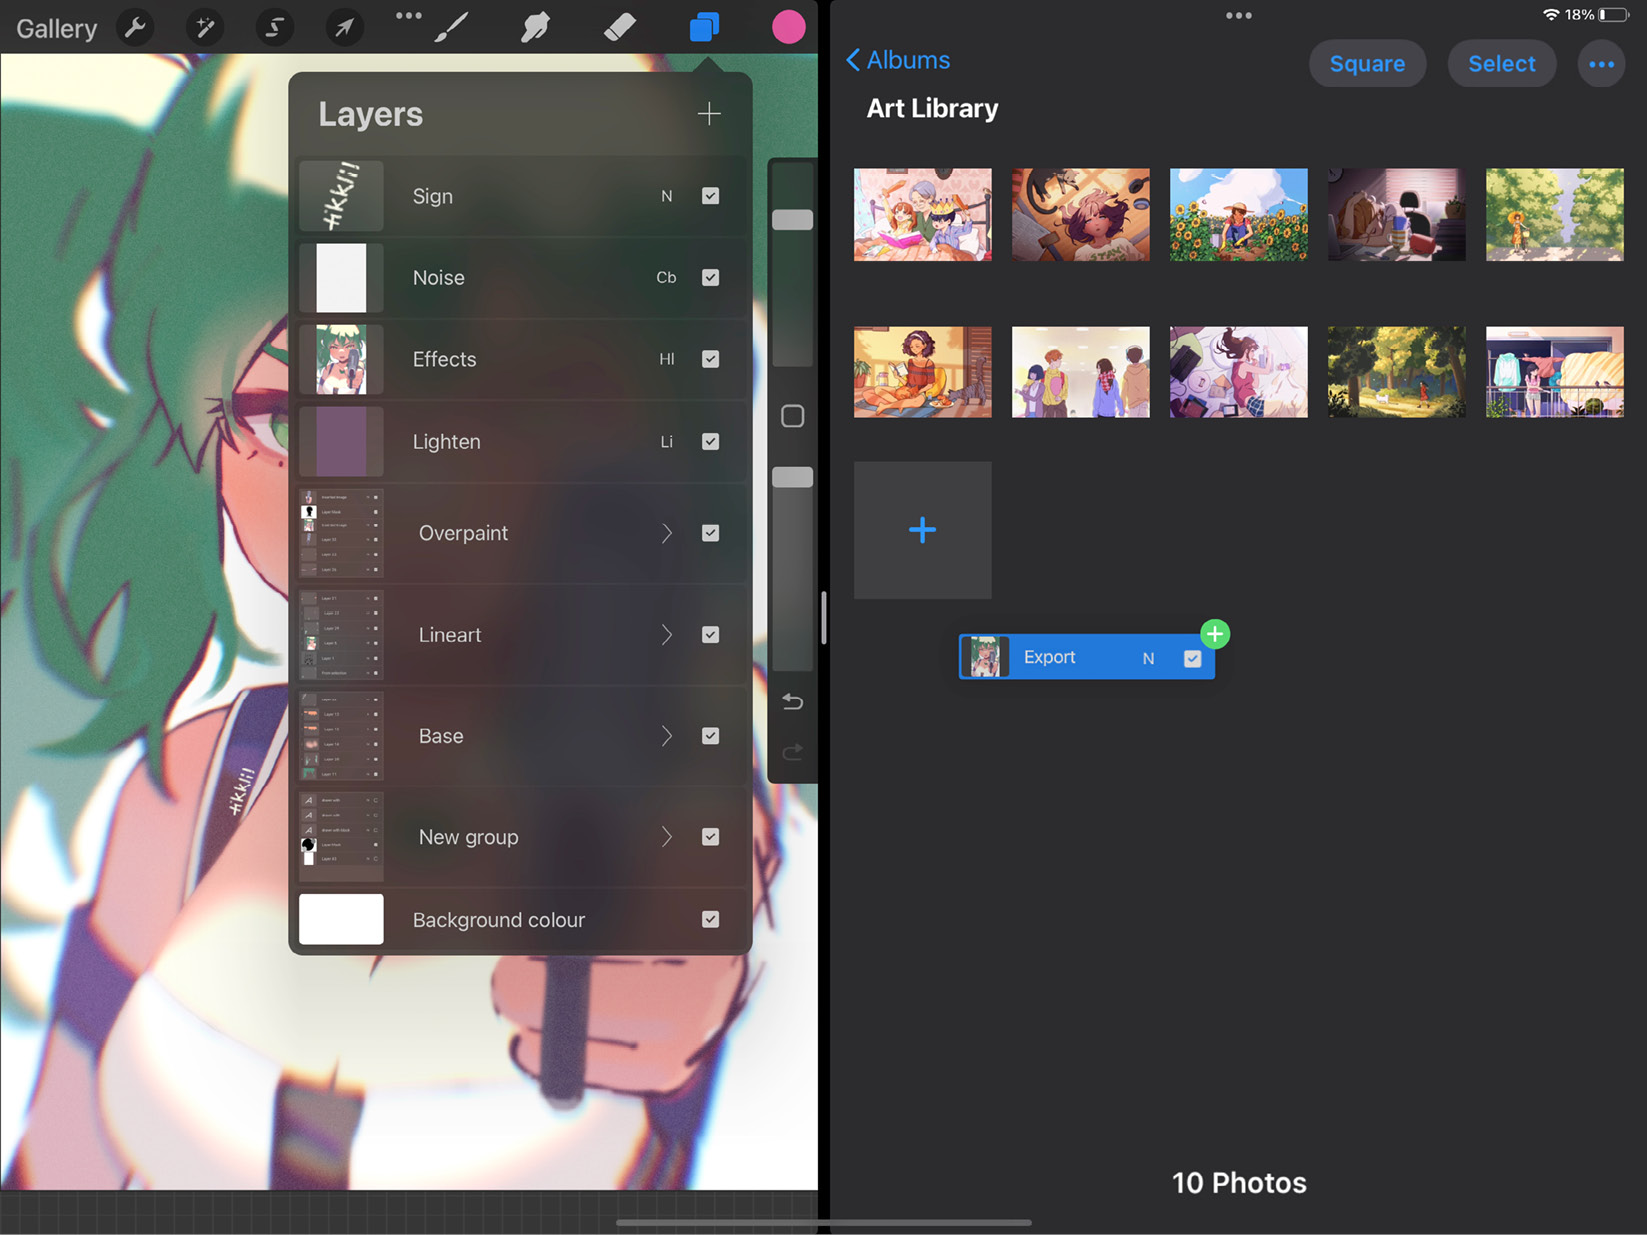
Figure 7.48: Drag and drop to export a layer
- To export multiple layers, pick up one layer, then select the rest with your other hand, and then drag and drop the stack as usual.
Share Layers menu
Share Layers treats the visible layers of your canvas as separate images while exporting. The following are the options available under it:
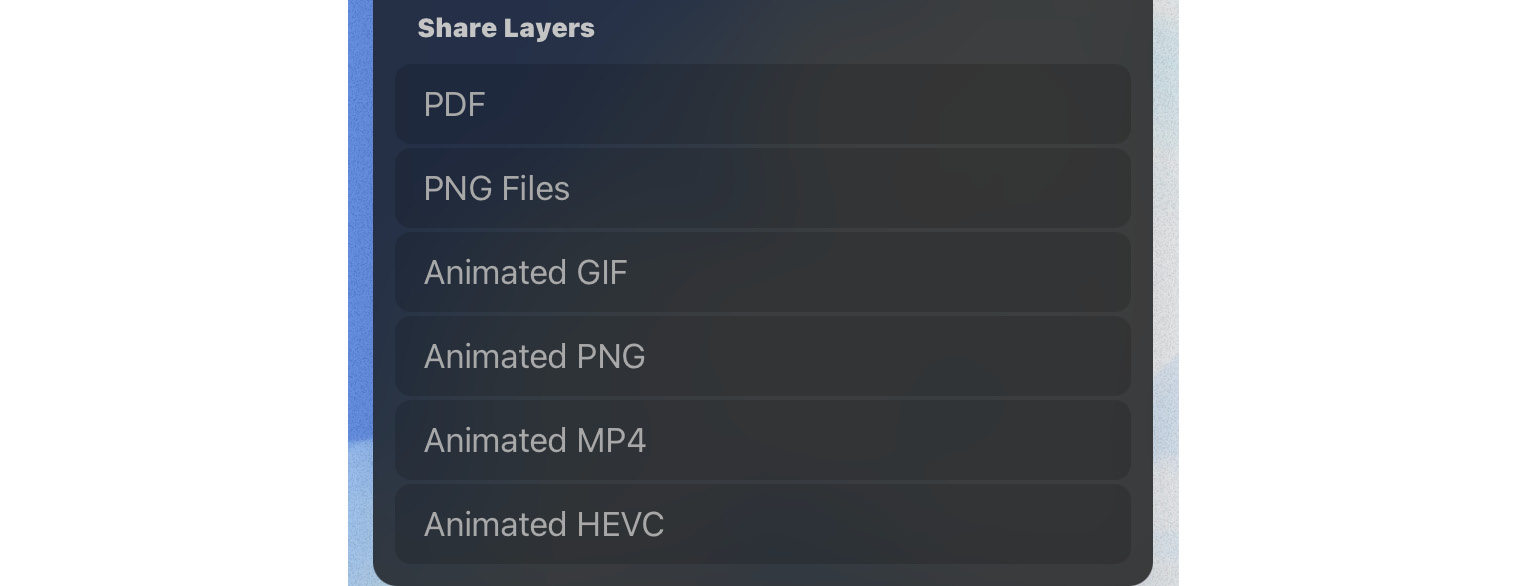
Figure 7.49: The Share Layers menu
Each of these options handles layers differently. Let’s look at them one by one:
- PDF: The PDF option exports every visible layer as a separate page of a multi-page PDF file.
- PNG Files: This option exports all your visible layers as separate transparent PNG files.
- Animated GIF/PNG/MP4/HEVC: These last four options (Animated GIF, Animated PNG, Animated MP4, and Animated HEVC) are used to export animations from Procreate. These export types treat each ungrouped layer and layer group as a separate frame of animation and then export the animated result in the chosen format. Learn more about animation in Chapter 12, Animating on Procreate.
We have now covered all the features of layers in detail. Let’s summarize our knowledge.
Summary
Layers form the framework of any Procreate document. In this chapter, we learned about the Layers panel and the interface associated with layers. We covered the different ways in which layers are organized, including how to select, group, move, and transfer layers, as well as the Lock, Duplicate, and Delete functions.
Next, we explained how two layers can be blended to produce different results using the diverse range of blend modes. Finally, we learned how to export individual layers or layer information in a single export as a multi-page PDF, PNG files, or animation.
In the next chapter, we will look into another robust and essential feature of Procreate—the Brush Studio.