
6
Developing Solutions That Use Azure Blob Storage
In this chapter, we are going to focus on a specific type of storage hosted in Azure to persist unstructured and semi-structured data called Azure Blob Storage. For a better understanding of the role of blob storage in a modern cloud application, you need to be aware of the general features of an Azure storage account, features such as tables, queues, files, and blobs.
Azure Blob Storage is the main part of an Azure storage account and is designed to persist and synchronize the state of processes in your solution. Internally in Azure, it is also extensively used. For example, Azure virtual machines persist files in Azure Blob Storage, content delivery networks can load static content from Azure Blob Storage, Azure App Services store log files in blobs, and Azure SQL Database keeps backups in Azure Blob Storage.
Later in the chapter, we will familiarize ourselves with the programmatic way to communicate with Azure Blob Storage to persist files with different formats such as JSON objects, PDFs, images, videos, and other binary files. You will learn how to create an account and upload or download files into it. You will also learn about high availability, performance, tiers, and price modes, and get hands-on experience in developing applications for Azure Blob Storage.
This chapter covers the following topics:
- Exploring Azure Blob Storage
- Manipulation with blobs and containers
- Managing metadata and security settings for storage accounts
Technical requirements
The code files for this chapter can be downloaded from https://github.com/PacktPublishing/Developing-Solutions-for-Microsoft-Azure-AZ-204-Exam-Guide/tree/main/Chapter06.
Code in Action videos for this chapter: https://bit.ly/3dtxhU8
Exploring Azure Blob Storage
Azure Blob Storage is the most important part of the Azure storage account and one of the oldest existing Azure services. Back in the day when the Azure classic services were released to customers, only a couple of services existed: VMs and storage to persist VM disks. Originally, Azure Storage was set up to persist large files, that were gigabytes in size, and provide random access to them. Now, most VM disks have already moved to managed disks but a storage account is still used to persist files – for example, backups, logs, and performance metrics. Modern Azure storage accounts are designed for persisting semi-structured data in tables and JSON files in blobs. Blobs are also good for persisting binary or unstructured data such as media, documents, or encrypted content. Azure storage accounts provide enormous resiliency, high availability, and strong security. Moreover, they are quite easy to connect and operate from code. You’ll probably have a hard time finding a modern cloud solution that does not use Azure Blob Storage. So, why is this service so popular? Let’s take a look.
Provisioning an Azure storage account
There are several ways that we can store things in Azure. We can create things called storage accounts and inside of a storage account, we can put files and binary large objects (or blobs). You can create different storage accounts for different purposes – you could put certain types of things in one storage account and other things in other storage accounts. You can use some level of organization to create a storage account, or rather, establish certain rules around how you create a storage account.
Azure storage accounts provide Web API access to files stored in data centers. When you provision blob storage, you need to choose the region where the files will be located. Let us imagine that your application is set up to broadcast recorded TV shows. Most of your customers are on the east coast of the US, so you can provision storage accounts in the East US data center and your users will have low-latency access to the files from the east coast of the US. What would you do if customers from the west coast or the central US would like to watch these shows? They must wait longer. Fortunately, we can provision geo-redundant storage accounts located in two regions and synchronize them. This helps to minimize latency.
The structure of Azure Blob Storage
Before we move on to the important aspects of availability and performance, let us look at the structure of Azure Blob Storage. When you start provisioning any storage in Azure, a storage account needs to be created first. The name must be DNS-unique and provided only in lowercase letters and numbers. Then, you need to create a container (or folder) for your files. Remember that Azure Blob Storage does not support container (folder) nesting and does not provide a hierarchical structure. Meanwhile, you are still able to use virtual folders in the path when you upload files to better organize the files in the container. The last step is to upload your files to the container to receive the URL with the filename to access the file if the container provides public access. The following schema represents the Azure storage account structure:

Figure 6.1 – The Azure storage account structure
From a security standpoint, the container you create to store uploaded blobs can be configured with a private access level (no anonymous access), so only users or apps with admin keys can get access to files. Alternatively, you can allow public access to blobs by configuring a container with a blob access level (with anonymous read access to the precise blob only) or with a container access level (with anonymous read access to all the blobs in the container). The public access models are useful if you are just storing image files referenced from your web portal. To access private files, you are required to obtain admin keys. Two admin access keys are generated per storage account and can be used for administrative operations including provisioning containers, uploading files, and cleaning up content. These keys should not be used by applications and applications should access the Azure storage account by using a shared access signature (SAS), as will be discussed in Chapter 7, Implementing User Authentication and Authorization. Another way of accessing the Azure storage account is through role-based access control (RBAC), as will be discussed in Chapter 8, Implementing Secure Cloud Solutions. For example, if you have read data access to a storage account, then you can read the blobs within that storage account.
High availability and durability
How safe is your data? Azure Blob storage provides 99.99999999% (11 nines) of durability achieved by three copies of your data being stored on different hardware and sometimes in different physical buildings. So, if one of the copies is lost because of a hardware failure, Azure always has a copy of your data and can restore it.
From an availability standpoint, Azure Storage provides several levels of redundancy in the primary region’s Locally-Redundant Storage (LRS) and Zone-Redundant Storage (ZRS). Zone redundancy always keeps a copy of your data in different buildings and each building will have a separate source of power and internet, so your data is well protected. Moreover, Azure can offer redundancy in a second region where another three copies of your data can be stored. For a second region, you can use only paired data centers – for example, East US-West US. You can choose Geo-Redundant Storage (GRS) and its twin, Geo-Zone-Redundant Storage (GZRS). You can also choose Read-Access Geo-Redundant Storage (RA-GRS) if you need read access to the copy in the second region. This flexible schema will protect your application from data loss, should a data center experience an outage – access will automatically be routed to the second geo-redundant copy. It is useful in the case of accessing TV shows from the opposite coast of the US as previously discussed. Unfortunately, the geo-redundant options are more expensive than local redundancy from a cost standpoint.
Performance levels
Azure storage accounts provide two levels of performance: Standard (v2) and Premium. The premium level has many limitations and is expensive. For example, if you want to use the Azure Queue Storage or Table Storage service, you have to use the Standard level. The Premium level should be selected if storage performance is a key parameter. Premium storage provides an extra performance level. It can only be created with a single data center based on high-performance solid-state drives (SSD).
Pricing models
When you provision storage accounts, the pricing model depends on redundancy parameters (for example, LRS, ZRS, and GRS) and performance tiers (Premium and Standard). It also depends on the capacity of data you are going to store and the number of transactions you use for data operations. In terms of data movement operations, leaving the data center also incurs an extra charge. In other words, you can upload files from on-premises for free but you must pay to download files. Moving files between data centers, including geo-redundant synchronizations, will also incur a charge because the data always lives in one of the data centers. Be aware of this when you choose your storage architecture. Please also refer to the Azure Pricing Calculator for further details.
Storage access tiers
You can also achieve some cost savings if you select the appropriate access tier for your files (Hot, Cool, or Archive). For example, log files are accessed often and can generate a lot of read-write transactions. For this type of file, it is better to select the Hot tier. The Hot tier has the highest cost for storage and the lowest cost for transactions. On other occasions, your image files can go days without being accessed. You can move them to the Cool tier (cold storage) to minimize the capacity cost but transactions will be more expensive. Remember to keep your files in the Cool storage tier for at least 30 days. Rarely accessed data should be stored in the Archive tier, which is the cheapest tier for capacity. Unfortunately, the transaction cost on the tier is quite high and you must keep files at least 180 days before deletion. Moreover, you might have to wait to download files from the Archive tier longer than usual because files are physically persisted on magnetic tape. You can find more details about cost optimization using access tiers at the end of this chapter.
Blob types
Choosing the Standard or Premium tier controls performance at the account level and some adjustments can also be applied on the blob level. Blob types, when used appropriately, can improve performance for specific scenarios.
The blob storage service offers three types of blobs: block blobs, append blobs, and page blobs. When you create a blob, you specify the blob type and it cannot be changed after creation. Each blob type is designed to handle specific types of objects in storage and provide the best access speed based on usage patterns:
- Block blobs let you upload blobs efficiently by composing blocks of data. Each block is identified individually and you can create or modify a block blob by updating a set of blocks by their IDs. A block blob can include up to 50,000 different-size blocks up to a maximum of 400 MB. Meanwhile, the maximum size of a block blob is limited to 4.75 TB. Block blobs are the default blob type and can be applied for storing images, documents, and configuration files. Moreover, only block blobs have the option to configure the blob access tier.
- Page blobs are designed for improving random access and are ideal for storing virtual hard disks. Each blob is a combination of 512-byte pages optimized for random read and write operations. When writing to a page blob, it can overwrite just one page and commit writes immediately, so it suits making frequent updates to virtual hard disks. The maximum size for a page blob is about 8 TB.
- Append blobs are optimized for append operations such as adding a new line in the logs. The type comprises blocks, and when it modifies an append blob, blocks are added to the end of the blob only through the append block operation. The maximum size of the append blob is about 195 GB. This type of blob is ideal for tracing and logging workloads.
Leveraging the Azure CLI to provision an Azure storage account
By now, you already know enough to build your Azure storage from the Azure portal or by using CLI commands. The code at the following URL will provision storage accounts and create a container with public access. We’ll also retrieve admin keys for your storage account and upload image files to the container. Finally, you can retrieve the link to get public access to the file. Please copy your account name and the connection string provided in the output for the next demos. Alternatively, you can also complete all these tasks from the Azure portal:
https://github.com/PacktPublishing/Developing-Solutions-for-Microsoft-Azure-AZ-204-Exam-Guide/blob/main/Chapter06/1-provision/demo.azcli
Data protection
When you have built your storage account, check out the additional features available from the portal:
- Point-in-time restore is used to restore one or more containers to an earlier state. If the point-in-time restore feature is enabled, then the versioning, change feed, and blob soft delete features must also be enabled to keep track of the changes.
- Soft delete for blobs and containers enables you to recover blobs that were previously marked for deletion, including blobs that were overwritten, for seven days by default.
- Versioning for blobs and feeds allows the use of versioning to automatically maintain previous versions of your blobs for recovery and restoration.
Static websites
You can enable your storage account to host HTML pages and static content. Web pages can include static images, styles, and client-side scripting – for example, JavaScript. When you enable this feature, the storage account will create a $web container where you can upload the static content and pages. Furthermore, you can provide the name of the default page (for example, index.html) and the name of the page for the file-not-found error. Server-side code such as .NET is not supported.
When you enable the setting, the URL for your static website will be available for requests for HTTP and HTTPS. If you create a geo-replicated account, you also receive the secondary endpoint.
In the following script, you will create another account in another data center for a static website in addition to the account you built before. Then, by executing the commands at the following URL, you can enable a static website and upload pages. Finally, you can test how the website works:
https://github.com/PacktPublishing/Developing-Solutions-for-Microsoft-Azure-AZ-204-Exam-Guide/blob/main/Chapter06/2-static-web/demo.azcli
After completing all the commands from the script, you will notice that the home page of the site has a missing image. That will be fixed by the next script by syncing your first and second accounts. The script should be executed on local bash because it references the files in the folder. When you complete script execution, please copy and save the account name from the output for further reference.
You are already experienced with the main Azure Blob Storage services. You can provision a blob, upload files by using the Azure CLI, and establish a static website with your Azure storage account. You have also learned how to choose the optimal performance and access levels and select the appropriate availability level. You should now also be familiar with the security and data protection features. Now, you know a lot about Azure storage accounts, but it is not enough to leverage accounts from code. Let’s look at how we can implement main operations with blobs and containers, which you have already learned about in theory.
Manipulation with blobs and containers
When we develop a solution to work with Azure Blob Storage, we mainly focus on uploading, downloading, and searching through blobs and their content. To complete these operations, you can execute the Azure CLI and PowerShell commands. You can also leverage direct REST calls. Those options are available but require tons of development time to code the operations you need. The better option is included in your project’s SDKs available for C#, Python, Java, Node.js, and many other popular languages. The SDKs have already been tested and provide easy-to-adopt algorithms to implement main blob operations.
With SDKs, you can easily implement the container operations listed as follows:
- Creating and deleting a container
- Managing public access (at private, blob, and container access level)
- Managing container metadata (setting and reading attributes)
- Leasing a container (establishing and managing leases)
- Listing blobs (getting the list of the filenames in the container)
- Restoring a container (with the required soft delete settings enabled)
The SDKs can also help you to implement the following blob operations:
- Uploading and downloading blobs
- Deleting and undeleting blobs
- Replacing blobs
- Leasing blobs (establishing and managing leases)
- Copying or cloning blobs (including moving blobs between Azure data centers)
- Managing the metadata and tags of blobs
- Snapshotting blobs (creating a copy of a blob with the current state)
- Changing the blob tier
- Finding blobs by tags
When you leverage SDKs for implementing operations from code, there are several tools, services, and extensions to help you manage your storage account and monitor the changes you made from code:
- Azure Storage Explorer: A multi-OS Windows application that allows you to perform all the operations with an Azure storage account, including blobs and generating SAS. It is a free Microsoft tool available for download and installation. The equivalent of the explorer exists in the Azure portal and can be used through a web interface.
- Azure Tools or Azure Storage Explorer for Visual Studio Code: This allows you to access your storage account and observe containers and then upload and download files from it.
- The AzCopy tool: The console application allows you to leverage the full throughput of your internet connection by creating multiple threads for download and upload. This is an ideal tool for the manipulation of large files such as videos or hard disks.
- The Import/Export service and Data Box: This can be leveraged for the affordable physical movement of data between your on-premises storage and Azure data centers because you pay only for the shipping of the physical device.
Leveraging AzCopy for data transfer between storage accounts
In the following script, we will implement the operation of moving files between storage accounts with the AzCopy tool. You need to install the AzCopy tool locally and run the commands to transfer the logo file from the first account created previously to the second account where you built the static website. Please execute commands from the following script to be consistent with the next C# code example:
https://github.com/PacktPublishing/Developing-Solutions-for-Microsoft-Azure-AZ-204-Exam-Guide/blob/main/Chapter06/3-copy/demo.azcli
Implementing basic operations from C# code
Now, we can focus on the SDK packages available for .NET Core. The demo code at the following URL will create a container with an Azure storage account – then, it will upload and download files from the container. Please pay attention to the connection string for your storage account located at the top of the C# code file. Your connection string was retrieved from previous demo scripts. Alternatively, the connection string can be located in the Access Keys section of the Azure storage account on the Azure portal. Be aware that the connection string contains an admin key with full access to the account:
https://github.com/PacktPublishing/Developing-Solutions-for-Microsoft-Azure-AZ-204-Exam-Guide/tree/main/Chapter06/4-sdk-upload
The following table explains the classes used for accessing the Azure Blob Storage in the code example:
|
Class |
Description |
|
BlobServiceClient |
Allows you to perform some operations with the blob storage including enumerating containers. The instance of the class needs to be configured with a connection string before doing operations with containers. |
|
BlobContainerClient |
Allows you to perform all operations with containers including creating, deleting, and enumerating blobs. The instance of the class needs to be configured from the exact BlobServiceClient instance by providing a container name. |
|
BlobClient |
Allows you to perform all operations with blobs including uploading, downloading, and deleting. The instance of the class needs to be configured from the exact BlobContainerClient instance by providing a blob name. |
Table 6.1 – C# SDK classes for implementing operations with blobs
You just learned how to implement basic operations with blobs and containers from code and the Azure CLI. The next step is to maintain advanced settings to improve security and performance and reduce the cost of the solution. You will also learn how to leverage tags and metadata to quickly find the file you need to download.
Managing metadata and security settings for storage accounts
Let us return to the connection string you used from the previous code project. A connection string including an admin key should not be used for connection in the production environment. Configuring RBAC for resources also can help with accessing the Azure storage account. The safer option is generating SAS tokens and leveraging them to connect from code or scripts. Remember that an admin key provides high-level access and if revealed by hackers, may damage your data. The same can happen if you generate a SAS key with full permissions (you should follow the principle of least privilege).
To avoid a security breach of your storage account, you should not hardcode the keys in the code or store them in the configuration file. Microsoft recommends using Azure Key Vault to store connection information (such as the connection string, SAS, or admin keys). Moreover, the principle of least privilege should be applied to applications that manage storage accounts. The SAS technology will help granularly set up access to the Azure storage account and its content. The admin keys used for the management of the storage account can be rotated by manually switching your application from the primary to the secondary key and regenerating the primary key.
There is also an option to monitor key activities from selected storage accounts by configuring Azure Monitor and setting up alerts. Configuring security settings for Azure storage accounts is the responsibility of the customer. There are a few options that can help you to manage the security settings of your storage account, which we will discuss now.
Encryption
To implement encryption at rest, storage accounts are encrypted by default using Azure Storage Service Encryption (SSE). Encryption affects performance slightly but protects your data stored in the Azure Blob service. SSE is the only available and recommended option for encrypting storage accounts. However, you can decide which keys should be used for encryption: Microsoft keys or your own keys. When you configure encryption, you can choose keys managed by Microsoft, keys hosted by Azure Key Vault, or by third-party services. You also can manage the identity used by your storage account to access the key vault. Another tier of encryption can be supported at the file level. Files can be explicitly encrypted with available services such as Azure Rights Management (Azure RMS) or by leveraging SDKs.
For implementing encryption in transit, you have the option to use HTTP and HTTPS connections and only force an HTTPS connection with an Azure certificate. The HTTPS option is not applied when you use a custom domain name registered with your storage account.
Firewalls
Azure Blob Storage offers a layered security model to enable control and management of access to storage accounts from applications and Azure infrastructure and platform services. When firewall rules are configured, apps can request data over the specified set of networks or through the specified set of Azure resources. There is an option to limit access to your storage account from specified IP addresses and IP ranges.
On the Azure portal, you can configure storage accounts to allow access only from specific VNets. The allowed subnets or VNets can belong to the same subscription or different subscriptions. You can also enable a service endpoint to allow access from specific Azure services. Initially, when you deploy a storage account, the firewall rules are turned off. When you turn on the rules, it blocks all incoming requests for data by default unless the requests are sent by an allowed service or VNet. When you block requests, it includes access from other Azure services, the Azure portal, and telemetry services.
Metadata and tags
If you store a substantial number of files in a storage account, finding a specific blob is a non-trivial task. Blob index tags can simplify the process and provide the ability to manage metadata by using key-value pairs and indexed tags.
Metadata allows you to store company-specific data for your files such as department names and owner contacts. This data can be retrieved without downloading blobs programmatically, which reduces charges and improves the performance of search tasks. The metadata can be modified from the portal as well and is available for containers and blobs. Blobs do not inherit container metadata and can provide their metadata as a key-value structure. The blob context and its metadata can be indexed using Azure Cognitive Services and can be searched for using Web API requests.
Searching through blobs and their metadata requires using the indexing services explicitly provisioned in Azure. Meanwhile, searching through indexed tags of blobs is provided by the Azure Storage service. You can categorize and find objects within a single or multiple containers by making a search request and leveraging SDK objects to retrieve the corresponding blobs. If the object is modified or its index tag is modified, the object updates its index and remains searchable. The index will let your application find blobs that correspond to specific contexts – for example, orders by customer name or products related to a specific category.
Retrieving metadata by using C# code
From the code example at the following URL, you will learn how to store files in an Azure storage account with metadata and tags. You will also learn how to set up metadata and retrieve it from containers and blobs. Finally, the code demonstrates how to search through indexed tags and find the blob you need.
Note that you need to retrieve the connection string for your storage account and update it towards the top of the code. Your connection string can be retrieved from previous demos and is located in the Keys section of the account on the Azure portal. If you copy settings from the portal, you need to copy the Connection string value, not just Key value. Be aware that the string contains an admin key to allow full access to the account:
https://github.com/PacktPublishing/Developing-Solutions-for-Microsoft-Azure-AZ-204-Exam-Guide/tree/main/Chapter06/5-sdk-meta
The following table explains the classes used for accessing metadata from Azure Blob Storage in the code example:
|
Class |
Description |
|
BlobClientOptions |
Provides the client configuration options for connecting to Azure Blob Storage, including buffering, versioning, and retry attempts. This class will also help to retrieve geo-redundant secondary URLs. |
|
BlobUploadOptions |
Provides the configuration settings for blobs during the upload process. Includes settings for access tier metadata and transfer options to manage the upload process. |
Table 6.2 – C# SDK classes for manipulating blob metadata
Life cycle management and optimizing costs
From the previous chapter, you will know that objects in blob storage, specifically in standard storage, have a different level of access to be both efficient in terms of space and efficient in terms of the cost of storing massive amounts of information. In the Standard storage account, we can store our data in the Hot, Cool, or Archive access tiers. A Premium storage account has only a Hot tier available.
As a rule, hot data is frequently accessed data and is stored for the notably short period of fewer than 30 days. For this type of file, we can efficiently use the Hot tier. For the Cool tier, we are going to write the data and not read it immediately. For example, backup files would be a suitable candidate for Cool storage. Meanwhile, rarely accessed data to be stored for over six months would be good a candidate for Archive storage. Effectively, based on the frequency with which you access your data, you can define whether the item should be stored in the Hot, Cool, or Archive tier. You can modify the blob tier from a storage account on the Azure portal or, better, set up a life cycle policy to migrate files from the Hot tier to the Cool or Archive tier, and finally be deleted. This is extremely useful for logs and backup retention.
You can create life cycle policy rules to apply to the objects within your storage account and automatically move your blobs from one layer or from one type of storage to another, and then blobs can be moved according to the rules. In a Premium account, you can only delete files by setting up a life cycle policy. When you configure life cycle policy deletion, remember the requirements from the storage account to store files on the Archive tier for at least 180 days and 30 days on the Cool tier to avoid cost penalties.
You can export rules and import rules using JSON. You can build a set of rules and then access those rules from the portal. You also can apply rules programmatically by using an SDK.
In the following schema, you can see how the life cycle policy can help to migrate files from different access tiers. By creating policy rules, you can migrate blobs between the Hot, Cool, and Archive access tiers, and then delete them. From the Premium performance tier, you can only delete files because the Hot, Cool, and Archive access tiers are not available in the Premium tier:
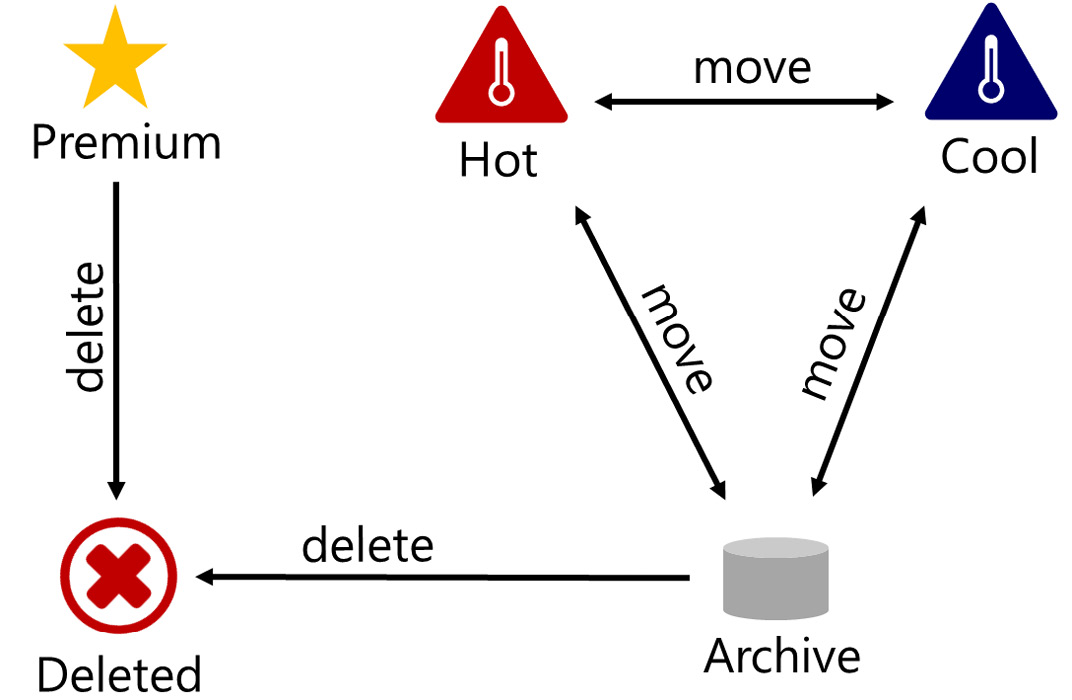
Figure 6.2 – File migration between tiers with the life cycle management policy
Cost savings
Let us look at pricing. The best tool for it is the Azure Pricing Calculator. Storage containers are commonly used resources in Azure subscriptions. Storage accounts are often deployed for logging (VMs and Azure Functions), persisting temporary data purposes (Cloud Shell), and site recovery transactions (Azure Site Recovery). After a few years of subscribing, the total charges for storage accounts can become significant, and controlling charges is important for any organization.
Charges for storage accounts can be split into three parts: capacity, transactions, and data transfer. Charges for the capacity of files, blobs, tables, queues, and other objects that you store in storage accounts can easily be calculated from Azure Monitor’s storage account metrics and can be observed on historical charts. The capacity charges for Standard storage accounts depend on the tier, with the Hot tier having the highest charge. Meanwhile, the capacity charges for Premium storage accounts are even greater than for the Hot tier of Standard storage accounts. There are a few options for saving money on capacity – for example, appropriately changing tiers for files you store and deleting files you do not need anymore. A life cycle policy will help you move files between tiers and delete them after the retention period; another useful option to save costs is reserved capacity. Reserved capacity can help you to save up to 30% if you commit to a specific amount of storage data per month. Reserved capacity works similarly to reserved instances.
The second type of charge for storage accounts is transaction charges. These relate to the charges incurred when reading and writing blob files. They are usually billed in bulk in the hundreds and depend on the access tier. Hot tier transactions are the cheapest and Archive tier transactions are the most expensive for Standard storage. You don’t have much control over transactions for storage accounts but deleting unused files will help you to decrease the number of them. You can also minimize transaction costs by reducing requests from code. For example, listing the blobs in a container will generate a transaction that can be replaced if you know the filename that you want to access.
The third type of charge for a storage account is for data transfer for files downloaded from the data center. You can upload files to the Azure Blob Storage service for free, but you must pay for any transfer from or between data centers in Azure. This cost depends on the size of the files and the region in which the requested data is downloaded. The transfer charge can be avoided by using the Import/Export service by shipping a storage disk directly to the customer from the Azure data center.
Summary
In this chapter, we explored the Azure Blob Storage service and learned about how to configure the service properly to achieve optimal performance and costs. You learned about the main features, including security, data protection, access, and the manipulation of blobs. Now that you are familiar with the provisioning process and blob manipulation operations, you can leverage Azure Blob Storage from code and persist your files in an Azure storage account to build a robust and reliable cloud solution.
Azure Storage is one of the oldest and most frequently used services for Azure deployments. It is provisioned as part of many solutions and is used for storing files of several types, including binary and semi-structured data. It supports a RESTful interface and can even host static websites or work as content storage for dynamic websites. A storage account can be provisioned with a Standard or Premium pricing tier with Hot, Cool, and Archive access tiers for files. A storage account results in charges for subscription owners based on capacity, transactions, and data transfer.
From a security standpoint, an Azure storage account allows public and private access to blobs and containers. It also allows you to filter network traffic based on firewall rules and can exclusively provide access to Azure virtual networks. Storage accounts support RBAC assignments and integration with Azure Active Directory. Meanwhile, access to blobs by an application can be provided with admin keys or SAS. A storage account can be encrypted in a data center and can be limited to access only by HTTPS.
For development projects, access to storage accounts can be configured and managed with connection strings and SDKs that are available for Python, C#, Node.js, and Java. Storage accounts can persist data and metadata with files and allow you to search through indexed tags to quickly find the exact blobs you need. Usually, developers leverage storage accounts to store images, scripts, and static data, including JSON serialized objects. The SDK classes provide a wide variety of operations for storage accounts, containers, and blob manipulation by wrapping REST requests.
Overall, Azure Blob Storage provides affordable and reliable storage for files in the cloud with up to a 99.99% (4 nines) SLA. Geo-redundant storage can protect your application from data availability loss by providing read access to copies of files in paired data centers.
In Chapter 7, Implement User Authentication and Authorization, you will learn about implementing Azure security to better secure your solution in Azure and integrating with Azure Active Directory to leverage strong authentication and authorization protocols.
Questions
- How can you increase the availability of the Azure Blob Storage service?
- What features are available to protect data from deletion?
- Can you leverage an SDK to read blob metadata without downloading the blob?
- Can we migrate blobs between access tiers automatically?
- What type of data can be persisted in blobs?
Further reading
- You can learn more about the access tiers of blobs here:
https://docs.microsoft.com/en-us/azure/storage/blobs/access-tiers-overview.
- You can find out more details about data protection algorithms, including soft delete and versioning, here:
https://docs.microsoft.com/en-us/azure/storage/blobs/data-protection-overview.
- You can find more Azure CLI commands for implementing blob operations here:
https://docs.microsoft.com/en-us/azure/storage/blobs/storage-samples-blobs-cli.
- You can learn further details about provisioning static websites with a storage account here:
https://docs.microsoft.com/en-us/azure/storage/blobs/storage-blob-static-website.
- If you are interested in configuring metadata for blobs, indexing, and searching through values, you can find the details here:
https://docs.microsoft.com/en-us/azure/search/search-blob-storage-integration.
- You can find more about how versioning is supported in a storage account here:
https://docs.microsoft.com/en-us/azure/storage/blobs/versioning-overview.
- The following article explains the best practices for using SAS: