Chapter 11: Backup and Recovery
Most people admit that backups are essential, though they also devote a very small amount of time to thinking about the topic.
The first recipe in this chapter is about understanding and controlling crash recovery. You need to understand what happens if a database server crashes so that you can understand whether you need to perform a recovery operation.
The next recipe is all about planning. That's really the best place to start before you perform backups.
The physical backup mechanisms here were initially written by Simon Riggs (one of the authors of this book) for PostgreSQL 8.0 in 2004 and have been supported by him ever since, now with increasing help from the community as its popularity grows. 2ndQuadrant and EDB have also been providing database recovery services since 2004, and regrettably, many people have needed them as a result of missing or damaged backups.
It is important to note that, in the last few years, the native streaming replication protocol has become more and more relevant in PostgreSQL. It can be used for backup purposes too – not only to take a base backup with pg_basebackup but also to stream WAL files using pg_receivewal. Given that some of the recipes in this chapter will use streaming replication, we will assume that you have a basic familiarity with it and refer you to the next chapter for more details.
As a final note, all of the examples regarding physical backup and recovery in this chapter are thoroughly explained so that you understand what is happening behind the scenes. However, unless you have very specific requirements dictating otherwise, we highly recommend that when in production, you use Barman (our open source backup and recovery tool) or a similar product that is specialized in this area. The last two recipes in this chapter will introduce Barman.
In this chapter, we will cover the following recipes:
- Understanding and controlling crash recovery
- Planning your backups
- Hot logical backup of one database
- Hot logical backup of all databases
- Backup of database object definitions
- A standalone hot physical backup
- Hot physical backup with Barman
- Recovery of all databases
- Recovery to a point in time
- Recovery of a dropped/damaged table
- Recovery of a dropped/damaged database
- Extracting a logical backup from a physical one
- Improving performance of logical backup/recovery
- Improving performance of physical backup/recovery
- Validating backups
Understanding and controlling crash recovery
Crash recovery is the PostgreSQL subsystem that saves us should the server crash or fail as part of a system crash.
It's good to understand a little about it and what we can do to control it in our favor.
How to do it…
If PostgreSQL crashes, there will be a message in the server log with the severity level set to PANIC. PostgreSQL will immediately restart and attempt to recover using the transaction log or the Write-Ahead Log (WAL).
The WAL consists of a series of files written to the pg_wal subdirectory of the PostgreSQL data directory. Each change made to the database is recorded first in WAL, hence the name write-ahead log, which is a synonym for a transaction log. Note that the former is probably more accurate, since, in the WAL, there are also changes not related to transactions. When a transaction commits, the default (and safe) behavior is to force the WAL records to disk. Should PostgreSQL crash, the WAL will be replayed, which returns the database to the point of the last committed transaction, ensuring the durability of any database changes.
Note
Database changes themselves aren't written to disk at transaction commit. On a well-tuned server, those changes are written to disk sometime later by asynchronous processes, such as the background writer or the checkpointer.
Crash recovery replays the WAL, but from what point does it start to recover? Recovery starts from points in the WAL known as checkpoints. The duration of a crash recovery depends on the number of changes in the transaction log since the last checkpoint. A checkpoint is a known safe starting point for recovery, since it guarantees that all of the previous changes to the database have already been written to disk.
A checkpoint can become a performance bottleneck on busy database servers because of the number of writes required. We will look at a number of ways to fine-tune that, but you must also understand the effect that those tuning options may have on crash recovery.
A checkpoint can be either immediate or scheduled. Immediate checkpoints are triggered by the action of a super user, such as the CHECKPOINT command, and they are performed at full speed, so an immediate checkpoint will complete as soon as possible. Scheduled checkpoints are decided automatically by PostgreSQL, and their speed is throttled to spread the load over a longer period of time and reduce the impact on other activities, such as queries or replication.
Two parameters control the occurrence of scheduled checkpoints. The first is checkpoint_timeout, which is the number of seconds until the next checkpoint. While this parameter is time-based, the second parameter, max_wal_size, influences the amount of WAL data that will be written before a checkpoint is triggered; the actual limit is computed from that parameter, taking into account the fact that WAL files can only be deleted after one checkpoint (two in older releases). A checkpoint is called whenever either of these two limits is reached.
If checkpoints are too frequent, then the amount of I/O will increase, so it's tempting to banish checkpoints as much as possible by setting the following parameters:
max_wal_size = 20GB
checkpoint_timeout = '1 day'
However, if you do this, you should give some thought to how long crash recovery will take and whether you want that; you must also consider how many changes will accumulate before the next checkpoint and, more importantly, how much I/O the checkpoint will generate due to those changes. Also, if you are using replication, then you might not care about the recovery time because if the primary crashes, you can failover to a standby without waiting for crash recovery to complete.
Also, you should make sure that the pg_wal directory is mounted on disks with enough disk space. By default, max_wal_size is set to 1 GB. The amount of disk space required by pg_wal might also be influenced by the following:
- Unexpected spikes in workload
- Failures in continuous archiving (see archive_command in the Hot physical backup and continuous archiving recipe)
- The wal_keep_segments setting (you will need at least 16 MB times wal_keep_segments of space)
In contrast to max_wal_size, with min_wal_size, you can control the minimum size allotted to WAL storage, meaning that PostgreSQL will recycle existing WAL files instead of removing them.
How it works…
Recovery continues until the end of the transaction log. WAL data is being written continually, so there is no defined endpoint; it is literally the last correct record. Each WAL record is individually CRC-checked so that we know whether a record is complete and valid before trying to process it. Each record contains a pointer to the previous record, so we can tell that the record forms a valid link in the chain of actions recorded in the WAL. As a result of that, recovery always ends with some kind of error in reading the next WAL record. That is normal and means the next record does not exist (yet).
Recovery performance can be very fast, though its speed does depend on the actions being recovered. The best way to test recovery performance is to set up a standby replication server, as described in Chapter 12, Replication and Upgrades, which is actually implemented as a variant of crash recovery.
There's more…
It's possible for a problem to be caused by replaying the transaction log so that the database server will fail to start.
Some people's response to this is to use a utility named pg_resetwal, which removes the current transaction log files and tidies up after that operation has taken place.
The pg_resetwal utility destroys data changes, which means data loss. If you do decide to run that utility, make sure that you take a backup of the pg_wal directory first. Our advice is to seek immediate assistance rather than do this. You don't know for certain that doing this will fix a problem, but once you've done it, going back will be hard.
When discussing min_wal_size, we mentioned that WAL files are recycled; what this actually means is that older WAL files are renamed so that they are ready to be reused as future WAL files. This reduces commit latency in case of heavy write workloads because creating a new file is slower than writing into an existing one.
Planning your backups
This recipe is all about thinking ahead and planning. If you're reading this recipe before you've decided to take a backup, well done!
The key thing to understand is that you should plan your recovery, not your backup. The type of backup you take influences the type of recovery that is possible, so you must give some thought to what you are trying to achieve beforehand.
If you want to plan your recovery, then you need to consider the different types of failure that can occur. What type of recovery do you wish to perform?
You need to consider the following main aspects:
- Full or partial database?
- Everything or just object definitions?
- Point-in-Time Recovery (PITR)
- Restore performance
We need to look at the characteristics of the utilities to understand what our backup and recovery options are. It's often beneficial to have multiple types of backup to cover the different possible types of failure.
Your main backup options are the following:
- Logical backup, using pg_dump
- Physical backup, which is a filesystem backup
The pg_dump utility comes in two main flavors – pg_dump and pg_dumpall. The pg_dump utility has the -F option for producing backups in various file formats. The file format is very important when it comes to restoring from backup, so you need to pay close attention to it.
As far as physical backup is concerned, in this chapter, we will focus on filesystem backup using pg_start_backup() and pg_stop_backup(). However, it is important to note that PostgreSQL has its own built-in application for physical base backups, pg_basebackup, which relies on the native streaming replication protocol. As authors, in order to distribute the content more evenly, we have decided to cover pg_basebackup and streaming replication in the next chapter, Chapter 12, Replication and Upgrades.
How to do it…
The following table shows the features that are available, depending on the backup technique selected. The details of these techniques are covered in the remaining recipes in this chapter:
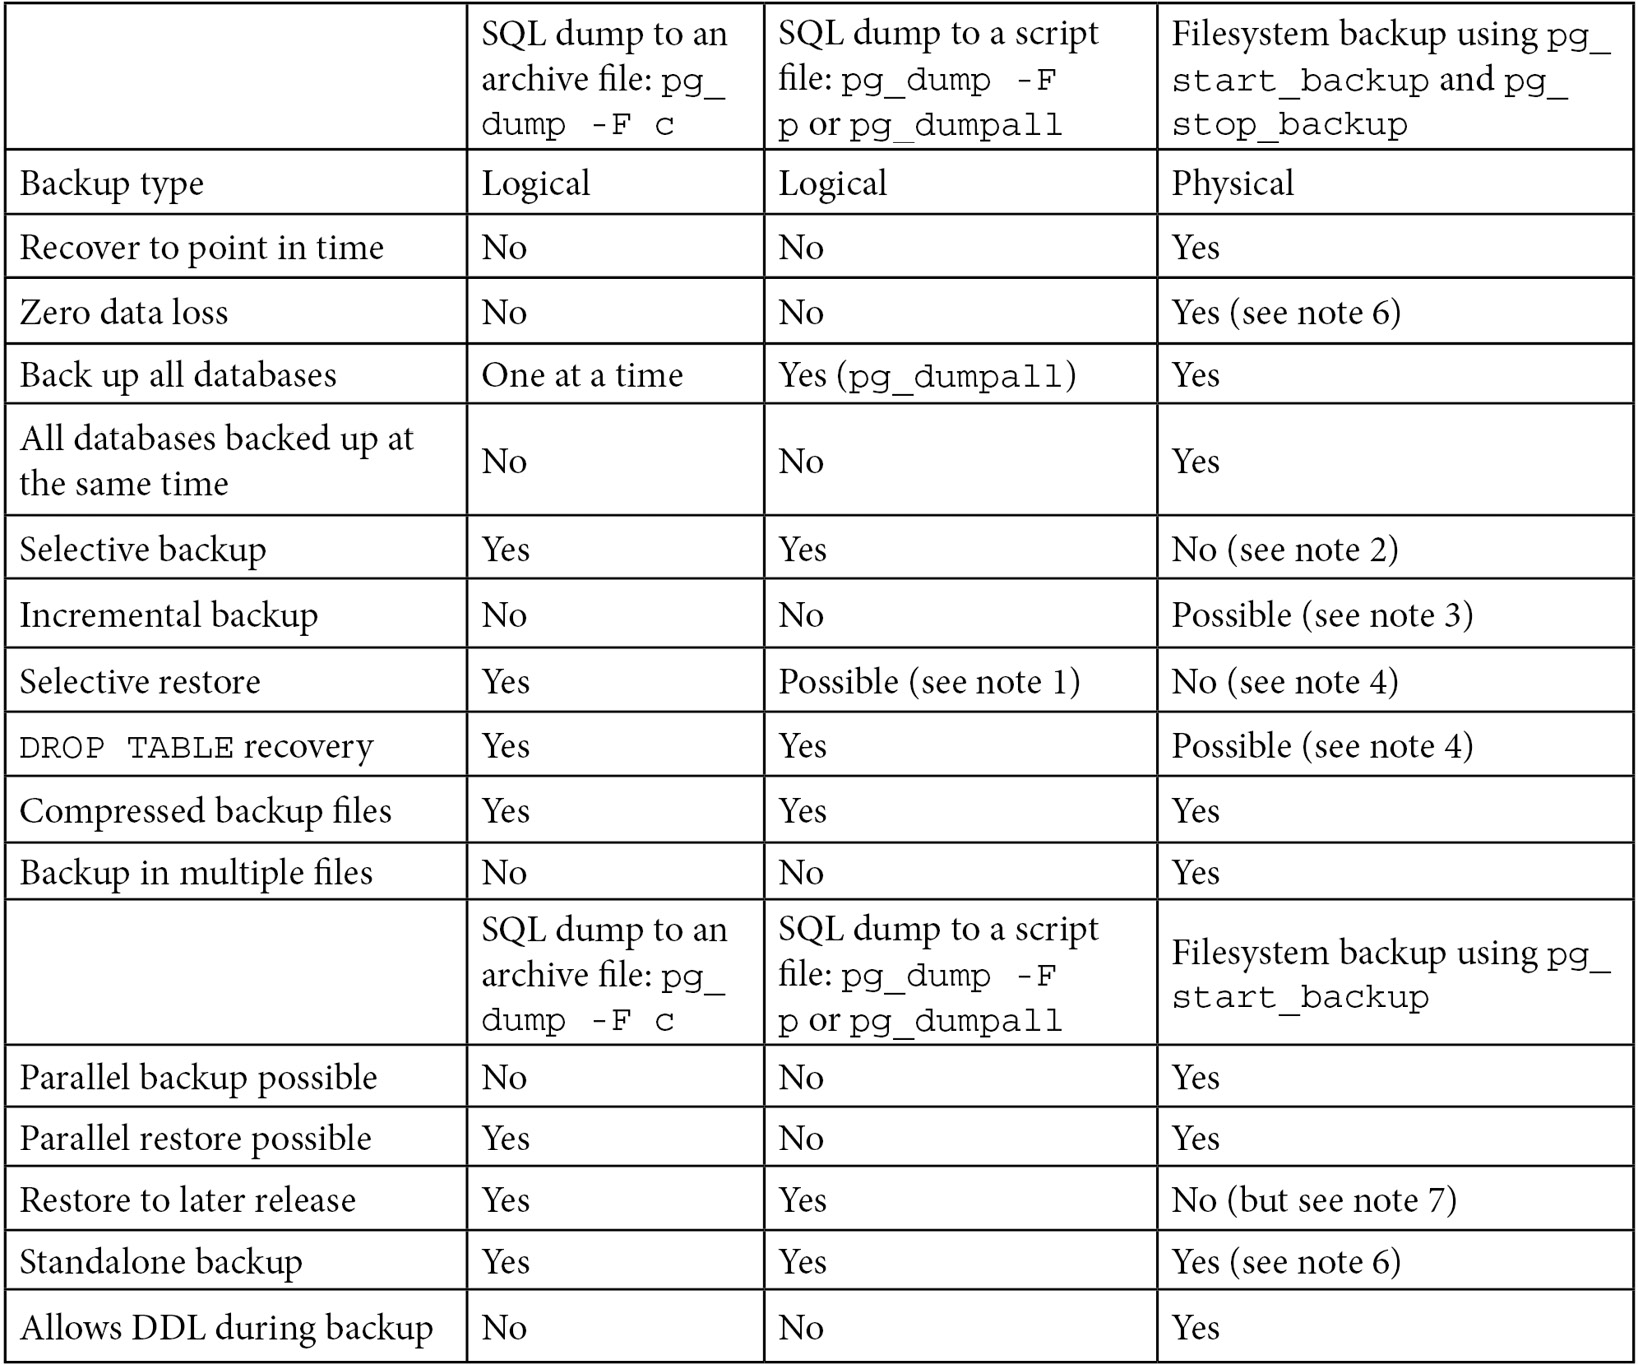
Figure 11.1 – Different backup techniques compared in terms of available features
The following notes were mentioned in the preceding table:
- If you've generated a script with pg_dump or pg_dumpall and need to restore just a single object, then you will need to go deeper. You will need to write a Perl script (or similar) to read the file and extract the parts you want. This is messy and time-consuming but probably faster than restoring the whole thing to a second server and then extracting just the parts you need with another pg_dump.
- Selective backup with a physical backup is possible but will cause problems later when you try to restore.
- See the Incremental/differential backup and restore recipe.
- Selective restore with a physical backup isn't possible with the currently supplied utilities; however, please see the Recovery of a dropped/damaged table and Extract a logical backup from a physical one recipes for partial recovery.
- See the Standalone hot physical database backup recipe.
- See the Hot physical backups with Barman recipe. Barman 2 fully supports synchronous WAL streaming, allowing you to achieve a Recovery Point Objective (RPO) equal to 0, meaning zero data loss.
- A physical backup cannot be directly restored to a different PostgreSQL major version. However, it is possible to restore it to the same PostgreSQL major version and then follow the procedure described in the Major upgrades in-place recipe, in Chapter 12, Replication and Upgrades, to upgrade restored files to a newer major version.
There's more…
Choosing physical backups is a safer approach: if you can take a logical backup, then you can also take a physical backup and then extract the same logical backup from it, while the opposite is not possible. For more details, refer to the Extract a logical backup from a physical one recipe later in this chapter.
Hot logical backups of one database
Logical backup makes a copy of the data in the database by dumping the content of each table, as well as object definitions for that same database (such as schemas, tables, indexes, views, privileges, triggers, and constraints).
How to do it…
The command to do this is simple. The following is an example of doing this when using a database called pgbench:
pg_dump -F c pgbench > dumpfile
Alternatively, you can use the following command:
pg_dump -F c -f dumpfile pgbench
Finally, note that you can also run pg_dump via the pgAdmin 4 GUI, as shown in the following screenshot:
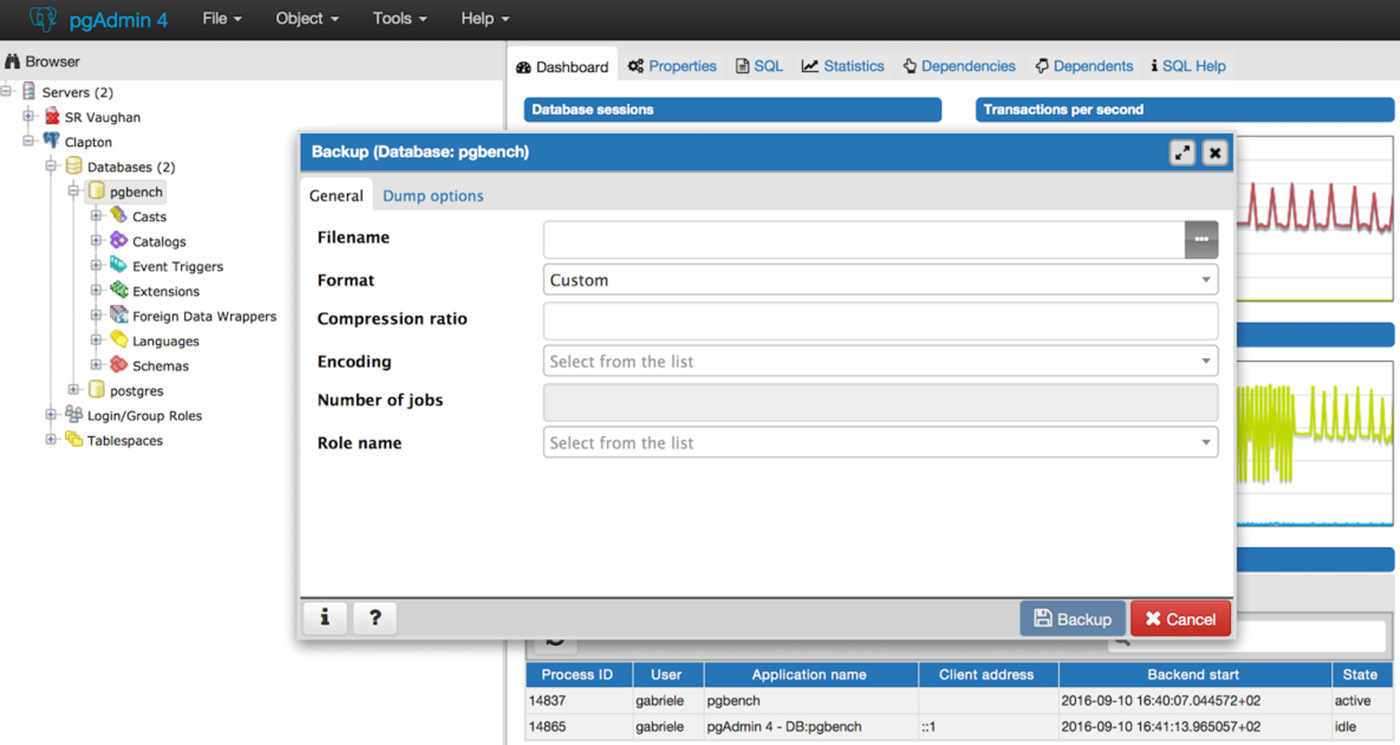
Figure 11.2 – Using the pgAdmin 4 GUI
How it works…
The pg_dump utility produces a single output file. This output file can use the split command to separate the file into multiple pieces if required.
The pg_dump archive file, also known as the custom format, is lightly compressed by default. Compression can be removed or made more aggressive.
Note
Even though, by default, pg_dump writes an SQL script directly to standard output, it is recommended to use the archive file instead by enabling the custom format through the -F c option. As we will cover later in this chapter, backing up in the form of archive files gives you more flexibility and versatility when restoring. Archive files must be used with a tool called pg_restore.
The pg_dump utility runs by executing SQL statements against the database to unload data. When PostgreSQL runs a SQL statement, we take a snapshot of transactions that are currently running, which freezes our viewpoint of the database. The pg_dump utility can take a parallel dump of a single database using the snapshot export feature.
We can't (yet) share that snapshot across sessions connected to more than one database, so we cannot run an exactly consistent pg_dump in parallel across multiple databases. The time of the snapshot is the only moment we can recover to – we can't recover to a time either before or after. Note that the snapshot time is the start of the backup, not the end.
When pg_dump runs, it holds the very lowest kind of lock on the tables being dumped. Those are designed to prevent DDL from running against the tables while the dump takes place. If a dump is run at the point at which other DDLs are already running, then the dump will sit and wait. If you want to limit the waiting time, you can do so by setting the --lock-wait-timeout option.
Since pg_dump runs SQL queries to extract data, it will have some performance impact. This must be taken into account when executing on a live server.
The pg_dump utility allows you to take a selective backup of tables. The -t option also allows you to specify views and sequences. There's no way to dump other object types individually using pg_dump. You can use some supplied functions to extract individual snippets of information from the catalog.
Note
More details on these functions are available at this URL: https://www.postgresql.org/docs/14/functions-info.html#FUNCTIONS-INFO-CATALOG-TABLE.
The pg_dump utility works against earlier releases of PostgreSQL, so it can be used to migrate data between releases.
Note
When migrating your database from an earlier version, it is generally recommended to use pg_dump of the same version of the target PostgreSQL. For example, if you are migrating a PostgreSQL 10.7 database to PostgreSQL 11, you should use pg_dump v11 to remotely connect to the 10.7 server and back up the database.
As far as extensions are concerned, pg_dump is aware of any objects (namely tables and functions) that have been installed as part of an additional package, such as PostGIS or Slony. Thanks to that, they can be recreated by issuing appropriate CREATE EXTENSION commands instead of dumping and restoring them together with the other database objects. Extension support removes such difficulties when restoring from a logical backup, maintaining the list of additional tables that have been created as part of the software installation process. Refer to the Managing installed extensions recipe in Chapter 3, Server Configuration, for more details.
There's more…
What time was pg_dump taken? The snapshot for pg_dump is taken at the beginning of a backup. The file modification time will tell you when the dump is finished. The dump is consistent at the time of the snapshot, so you may need to know that time.
If you are making a script dump, you can do a verbose dump; continuing the previous example, you just need to add -v, as follows:
pg_dump -F c -f dumpfile pgbench -v
This adds the time to the top of the script. Custom dumps store the start time as well, and that can be accessed using the following command:
pg_restore --schema-only -v dumpfile 2>/dev/null | head | grep Started
-- Started on 2018-06-03 09:05:46 BST
See also
Note that pg_dump does not dump roles (such as users and groups) and tablespaces. Those two are only dumped by pg_dumpall; see the following recipes for more detailed descriptions.
Hot logical backups of all databases
If you have more than one database in your PostgreSQL server, you may want to take a logical backup of all of the databases at the same time.
How to do it…
Our recommendation is that you repeat exactly what you do for one database to each database in your cluster. You can run individual dumps in parallel if you want to speed things up.
Once this is complete, dump the global information using the following command:
pg_dumpall -g
How it works…
To back up all databases, you may be told that you need to use the pg_dumpall utility. The following are four good reasons why you shouldn't do that:
- If you use pg_dumpall, the only output produced will be in a script file. Script files can't benefit from all the features of archive files, such as parallel and selective restore of pg_restore. By making your backup in this way, you will immediately deprive yourself of flexibility and versatility at restore time.
- The pg_dumpall utility produces dumps of each database, one after another. This means that pg_dumpall is slower than running multiple pg_dump tasks in parallel, one against each database.
- The dumps of individual databases are not consistent to a single point in time. As we pointed out in the Hot logical backups of one database recipe, if you start the dump at 4:00 and it ends at 7:00, then you cannot be sure exactly what time the dump relates to; it could be any time between 4:00 and 7:00.
- Options for pg_dumpall and pg_dump are similar in many ways. pg_dump has more options and therefore gives you more flexibility.
See also
If you are taking a logical backup of all of your databases for disaster recovery purposes, you should look at the hot physical backup options instead.
Backups of database object definitions
Sometimes, it's useful to get a dump of the object definitions that make up a database. This is useful for comparing what's in the database against the definitions in a data- or object-modeling tool. It's also useful to make sure that you can recreate objects in the correct schema, tablespace, and database with the correct ownership and permissions.
How to do it…
There are several important commands to note here.
- The basic command to dump the definitions for every database of your PostgreSQL instance is as follows:
pg_dumpall --schema-only > myscriptdump.sql
This includes all objects, including roles, tablespaces, databases, schemas, tables, indexes, triggers, constraints, views, functions, ownerships, and privileges.
- If you want to dump PostgreSQL role definitions, use the following command:
pg_dumpall --roles-only > myroles.sql
- If you want to dump PostgreSQL tablespace definitions, use the following command:
pg_dumpall --tablespaces-only > mytablespaces.sql
- If you want to dump both roles and tablespaces, use the following command:
pg_dumpall --globals-only > myglobals.sql
The output is a human-readable script file that can be re-executed to recreate each of the databases.
Note
The short form for the --globals-only option is -g, which we have already seen in a previous recipe, Hot logical backups of all databases. Similar abbreviations exist for --schema-only (-s), --tablespaces-only (-t), and --roles-only (-r).
There's more…
In PostgreSQL, the word schema is also used to organize a set of related objects of a database in a logical container, similar to a directory. It is also known as a namespace. Be careful that you don't confuse what is happening here. The --schema-only option makes a backup of the database schema – that is, the definitions of all objects in the database (and in all namespaces). To make a backup of the data and definitions in just one namespace and one database, use pg_dump with the -n option. To make a backup of only the definitions, in just one namespace and one database, use pg_dump with both -n and --schema-only together.
You can also take advantage of a previously generated archive file (see the Hot logical backups of one database recipe) and generate a script file using pg_restore, as follows:
pg_restore --schema-only mydumpfile > myscriptdump.sql
A standalone hot physical backup
Hot physical backup is an important capability for databases.
Physical backup allows us to get a completely consistent view of the changes to all databases at once. Physical backup also allows us to back up even while DDL changes are being executed on the database. Apart from resource constraints, there is no additional overhead or locking with this approach.
Physical backup procedures used to be slightly more complex than logical backup procedures, but in version 10, some defaults have been changed, making them easier; after these changes, making a backup with pg_basebackup has become very easy, even with default settings.
In this recipe, we will first describe the easiest method, which is to use the pg_basebackup utility, and then provide a lower-level equivalent process to explain physical backups in more detail and describe the changes required for additional features, such as differential backup or a parallel file copy.
Getting ready
You just need to decide upon a directory where you want to place backups and make sure it exists – for instance, /var/lib/postgresql/standalone.
How to do it…
Just log in as the postgres user and run the pg_basebackup utility, as follows:
pg_basebackup -D /var/lib/postgresql/backup/standalone -c fast -P -R
Once this command returns, the /var/lib/postgresql/backup/standalone directory will contain a PostgreSQL data directory whose contents are an exact copy of the contents of the PostgreSQL server that you have backed up.
How it works…
By default, pg_basebackup connects to the database using the same defaults as other utilities based on LibPQ, such as psql. This normally means that you don't need to specify connection information such as the database user, the hostname, and the port. But, if you are running a server that uses non-default values for those settings, then you can specify them with familiar syntax. For example, take the following options:
-h myhost -U myuser -p 5433
If you add them, then pg_basebackup will use the myhost host, the myuser user, and port 5433.
Under the hood, pg_basebackup proceeds in a way that is equivalent to the following sequence of steps:
- Create an empty directory as the target of the standalone backup:
rm -rf /var/lib/postgresql/backup/standalone
mkdir -p /var/lib/postgresql/backup/standalone/pg_wal
- Start streaming WAL into /var/lib/postgresql/backup/standalone/pg_wal with the following command:
pg_receivewal -D /var/lib/postgresql/backup/standalone/pg_wal
- Ask the server to start the backup, as follows:
psql -c "select pg_start_backup('standalone')"
This step can take a while because PostgreSQL performs a checkpoint before returning to ensure that the data files copied in the next step include all of the latest data changes. See the Understanding and controlling crash recovery recipe from earlier in this chapter for more details about checkpoints.
Depending on system configuration and workload, a checkpoint can take a long time, even several minutes. This time is part of the backup duration, which in turn affects the amount of WAL files needed for the backup; so it can be a good idea to reduce the duration of this checkpoint by issuing a CHECKPOINT command just before pg_start_backup is issued in step 3 and then by starting the backup in fast mode, as follows:
psql -c "select pg_start_backup('standalone', fast := true)"
fast mode means that the checkpoint included in pg_start_backup runs as quickly as possible, irrespective of its impact on the system; this should not be a problem because most of the shared buffers will have been written already by the CHECKPOINT command that was issued previously:
- Make a base backup – copy the data files (excluding the content of the pg_wal and pg_replslot directories) using the following commands:
tar -cvf-
--directory=$PGDATA
--exclude="pg_wal/*" --exclude="pg_replslot/*" .
| tar -xf- --directory=/var/lib/postgresql/backup/standalone
- Stop the backup, as follows:
psql -c "select pg_stop_backup(), current_timestamp"
- Stop archiving by hitting Ctrl + C in the terminal session where pg_receivewal is running.
There's more…
After the backup is finished, remember to store the contents of /var/lib/postgresql/backup/standalone somewhere safe. A safe place is definitely not on the same server.
This procedure ends with a directory populated with a copy of the database. It is imperative to remember to copy it somewhere safe. It contains everything that you need to recover.
The backup taken with this procedure only allows you to restore to a single point in time. That point is the time of the pg_stop_backup() function.
A physical backup takes a copy of all files in the database (step 4 – the base backup). That alone is not sufficient as a backup, and you need the other steps as well. A simple copy of the database produces a time-inconsistent copy of the database files. To make the backup time consistent, we need to add all of the changes that took place from the start to the end of the backup. That's why we have steps 3 and 5 to bracket our backup step.
In technical terms, steps 3 and 5 take advantage of the API that controls exclusive backups, meaning that there can only be one physical backup at a time, and it has to be performed on a master server.
PostgreSQL supports non-exclusive backups as well, allowing users to perform the pg_start_backup() and pg_stop_backup() functions on a read-only standby server. To make a backup non-exclusive, just add the exclusive := false parameter to those functions. However, note that the non-exclusive backup method is more complex and is not covered in this recipe.
The changes that are made are put in the standalone/pg_wal directory as a set of archived transaction log or WAL files by the pg_receivewal command started in step 2.
If your PGDATA does not contain configuration files, such as postgresql.conf and pg_hba.conf, you might have to manually copy them before performing a recovery. Remember that standard Debian and Ubuntu installations keep configuration files outside PGDATA, specifically under /etc/postgresql.
The important thing to understand in this recipe is that we need both the base backup and the appropriate archived WAL files to allow us to recover. Without both of these, we have nothing. Most of these steps are designed to ensure that we really will have the appropriate WAL files in all cases.
As an alternative to WAL streaming, it is possible to configure file-based WAL archiving, which works in a push mode, without requiring inbound access to the database server. However, streaming WAL archiving has the advantage of transferring WAL as soon as it is produced, without waiting for the 16 MB WAL segment to be completed, which usually results in little or no data loss, even in the event of a disaster.
We describe this procedure only for the purpose of illustrating how pg_basebackup works. If you want to copy files more efficiently, as explained in the Improving performance of backup/recovery and Incremental/differential backup and restore recipes, then you should use software that is specialized in backup and recovery, rather than writing your own scripts. In this book, we cover Barman, software written by EDB developers, which has become very popular among PostgreSQL users. It is an open source tool used in most of the remaining recipes in this book.
Hot physical backups with Barman
The main motivation to start a new open source project for disaster recovery of PostgreSQL databases was the lack (back in 2011) of a simple and standard procedure for managing backups and, most importantly, recovery. Disasters and failures in ICT will happen.
As a database administrator, your duty is to plan for backups and the recovery of PostgreSQL databases and perform regular tests in order to sweep away stress and fear, which typically follow those unexpected events. Barman, which stands for Backup and Recovery Manager, is definitely a tool that you can use for these purposes.
Barman hides most of the complexity of working with PostgreSQL backups. For more information on the underlying technologies, you can refer to other recipes in this chapter: Understanding and controlling crash recovery, Planning backups, Hot physical backup and continuous archiving, and Recovery to a point in time. It is important to be aware of how Barman works underneath if you need to address issues with installation, configuration, and recovery.
Barman is currently available only for Linux systems and is written in Python. It supports all PostgreSQL versions, starting from 8.3. Among its main features worth citing are remote backup, remote recovery, multiple server management, backup catalogs, incremental backups, retention policies, WAL streaming, compression of WAL files, parallel copy (backup and restore), backup from a standby server, and geo-redundancy.
For the sake of simplicity, in this recipe, we will assume the following architecture:
- One Linux server named db1, running your PostgreSQL production database server.
- One Linux server named backup1, running Barman for disaster recovery of your PostgreSQL database server.
- WAL streaming is configured from PostgreSQL to Barman.
- Both servers are in the same LAN and, for better business continuity objectives, the only resource they share is the network.
Later on, we will see how easy it is to add more PostgreSQL servers (such as bon) to our disaster recovery solution on backup1 with Barman.
Getting ready
Although Barman can be installed via sources or through pip – Python's main package manager – the easiest way to install Barman is by using the software package manager of your Linux distribution.
Currently, EDB maintains packages for modern RHEL, CentOS, Debian, and Ubuntu systems. If you are using a different distribution or another Unix system, you can follow the instructions written in the official documentation of Barman, available at http://docs.pgbarman.org/.
In this book, we will cover the installation of Barman 2.15 (currently the latest stable release) on CentOS 8 and Ubuntu 20.04 LTS Linux servers.
If you are using RHEL or CentOS 8 on the backup1 server, you need to install the following repositories:
- Fedora's Extra Packages Enterprise Linux (EPEL), available at http://fedoraproject.org/wiki/EPEL
- The PostgreSQL Global Development Group RPM repository, available at http://yum.postgresql.org/
Then, as root, type in the following:
yum install barman
If you are using Ubuntu on backup1, you need to install the APT PostgreSQL repository, following the instructions available at http://apt.postgresql.org/. Then, as root, type in the following:
apt-get install barman
From now on, we will assume the following:
- PostgreSQL is running on db1 and listening to the default port (5432).
- Barman is installed on backup1.
- You have created a super user called barman in your PostgreSQL server on db1 that can only connect from the backup1 server (see the Enabling access for network/remote users recipe in Chapter 1, First Steps, and the PostgreSQL super user recipe in Chapter 6, Security).
- The barman system user on backup1 can connect as the barman database user to the PostgreSQL instance on db1 without having to type in a password.
How to do it…
We will start by looking at Barman's main configuration file:
- Log in as root on backup1 and open the /etc/barman.conf file for editing. This file contains global options for Barman. Once you are familiar with the main configuration options, we recommend at least that you set the default compression method by uncommenting the following line:
compression = gzip
- Add the configuration file for the db1 server. Create the db1.conf file, containing the following lines, in the /etc/barman.d directory:
[db1]
description = "PostgreSQL database on db1"
active = off
backup_method = postgres
archiver = off
streaming_archiver = on
slot_name = "barman_backup1"
conninfo = "host=db1 dbname=postgres user=barman"
streaming_conninfo = "host=db1 dbname=postgres user=streaming_barman"
- You have just added the db1 server to the list of Postgres servers managed by Barman. The server is temporarily inactive until the configuration is completed. You can verify this by typing barman list-server, as follows:
[root@backup1]# barman list-server
db1 - PostgreSQL database on db1 (inactive)
Note
In this recipe, you will be executing commands such as barman list-server as root. However, Barman will run its own commands using the barman system user (or, more generally, by the user specified in the configuration file by the barman_user option).
- The next task is to initialize the directory layout for the db1 server through the check command:
[root@backup1]# barman check db1
Server db1 (inactive):
WAL archive: FAILED (please make sure WAL shipping is setup)
PostgreSQL: OK
superuser or standard user with backup privileges: OK
PostgreSQL streaming: OK
wal_level: OK
replication slot: FAILED (replication slot 'barman_backup1' doesn't exist. Please execute 'barman receive-wal --create-slot db1')
(...)
[root@backup1]# echo $?
0
As you can see, the returned value is 0, meaning that there is no reason to worry; the server is marked as inactive, meaning that we are still configuring it, so if there are failures, then they are expected.
In fact, you are advised to add this command to your monitoring infrastructure as, among other things, it ensures that the required libpq connection to the database server is working properly, as well as continuously archiving.
- Let's filter out OK so we display a to-do list:
[root@backup1]# barman check db1 | grep -v OK
Server db1 (inactive):
WAL archive: FAILED (please make sure WAL shipping is setup)
replication slot: FAILED (replication slot 'barman_backup1' doesn't exist. Please execute 'barman receive-wal --create-slot db1')
- Now, we can mark the server as "active" by changing the following line in /etc/barman.d/db1.conf:
active = on
- Then, we can create the replication slot, as previously suggested by Barman itself:
[root@backup1 ~]# barman receive-wal --create-slot db1
Creating physical replication slot 'barman_backup1' on server 'db1'
Replication slot 'barman_backup1' created
- At this point, we can ask PostgreSQL to switch to the next WAL file:
[root@backup1 ~]# barman switch-wal db1
The WAL file 000000010000000000000002 has been closed on server 'db1'
- Now, we run the barman check command again, and we repeat it until all the checks pass.
- Initially, the check command will raise an error like this:
WAL archive: FAILED (please make sure WAL shipping is setup)
This simply means, "I did not archive any WAL file for this server yet, so I am not sure whether you have already configured WAL archiving."
This error will cease when the first WAL file has been fully streamed, archived, and compressed, which requires a run of the CRON job installed by Barman, which is executed at the start of every minute. So, you should not have to wait more than a couple of minutes, and then this check will return 0:
[root@backup1]# barman -q check db1
[root@backup1]# echo $?
0
Everything is good! PostgreSQL on db1 is now regularly streaming WAL files to Barman on backup1.
- Once you have set up continuous archiving, in order to add disaster recovery capabilities to your database server, you need at least one full base backup. Taking a full base backup in Barman is as easy as typing barman backup db1. Barman initiates the physical backup procedure and waits for the checkpoint to happen, before copying data files from db1 to backup1 using pg_basebackup:
[root@backup1 ~]# barman backup db1
Starting backup using postgres method for server db1 in /var/lib/barman/db1/base/20211103T103940
Backup start at LSN: 0/3000060 (000000010000000000000003, 00000060)
Starting backup copy via pg_basebackup for 20211103T103940
(...)
- Note that the command ends with the following warning:
WARNING: IMPORTANT: this backup is classified as WAITING_FOR_WALS, meaning that Barman has not received yet all the required WAL files for the backup consistency.
This is a common behaviour in concurrent backup scenarios, and Barman automatically set the backup as DONE once all the required WAL files have been archived.
Hint: execute the backup command with '--wait'
You don't need to worry, because WAL files are expected to arrive soon anyway, but if you want to include the wait in the backup command, then you can add the option suggested in the warning.
- You can see that the new backup is now listed in the catalog:
[root@backup1 ~]# barman list-backup db1
db1 20211103T103940 - Wed Nov 3 10:39:42 2021 - Size: 23.5 MiB - WAL Size: 0 B
Note
It is worth noting that, during the backup procedure, your PostgreSQL server is available for both read and write operations. This is because PostgreSQL natively implements hot backup, a feature that other DBMS vendors might make you pay for.
From now on, your db1 PostgreSQL server is continuously backed up on backup1. You can now schedule weekly backups (using the barman user's cron) and manage retention policies so that you can build a catalog of backups, covering you for weeks, months, or years of data, allowing you to perform recovery operations at any point in time between the first available backup and the last successfully archived WAL file.
How it works…
Barman is a Python application that wraps PostgreSQL core technology for continuous backup and PITR. It also adds some practical functionality, focused on helping the database administrator to manage disaster recovery of one or more PostgreSQL servers.
When devising Barman, we decided to keep the design simple and not to use any daemon or client/server architecture. Maintenance operations are simply delegated to the barman cron command, which is mainly responsible for archiving WAL files (moving them from the incoming directory to the WAL file and compressing them) and managing retention policies.
If you have installed Barman through RPM or APT packages, you will notice that maintenance is run every minute through cron:
[root@backup1 ~]# cat /etc/cron.d/barman
# m h dom mon dow user command
* * * * * barman [ -x /usr/bin/barman ] && /usr/bin/barman -q cron
Barman follows the convention over configuration paradigm and uses an INI format configuration file with options operating at two different levels:
- Global options: These are options specified in the [barman] section, and are used by any Barman command and for every server. Several global options can be overridden at the server level.
- Server options: These are options specified in the [SERVER_ID] section, used by server commands. These options can be customized at the server level (including overriding general settings).
The SERVER_ID placeholder (such as db1) is fundamental, as it identifies the server in the catalog (therefore, it must be unique). Similarly, commands in Barman are of two types:
- Global commands: These are general commands, not tied with any server in particular, such as a list of the servers managed by the Barman installation (list-server) and maintenance (cron).
- Server commands: These are commands executed on a specific server, such as diagnostics (check and status), backup control (backup, list-backup, delete, and show-backup), and recovery control (recover, which is discussed in the next recipe, Recovery with Barman).
The previous sections of this recipe showed you how to add a server (db1) to a Barman installation on the backup1 server. You can easily add a second server (db2) to the Barman server on backup1. All you have to do is create the db2.conf file in the /etc/barman.d directory and repeat the steps outlined in the How it works... section, as you have done for db1.
There's more…
Every time you execute the barman backup command for a given server, you take a full base backup (a more generic term for this is a periodical full backup). Once completed, this backup can be used as a base for any recovery operation from the start time of the backup to the last available WAL file for that server (provided there is continuity among all of the WAL segments).
As we mentioned earlier, by scheduling daily or weekly automated backups, you end up having several periodic backups for a server. In Barman's jargon, this is known as the backup catalog, and it is one of our favorite features of this tool.
We already saw how to list all the available backups for a given server through the list-backup command. You might also want to get familiar with show-backup, which gives you detailed information on a specific backup regarding the server, base backup time, the WAL archive, and context within the catalog (for example, the last available backup):
[root@backup1 ~]# barman show-backup db1 20211103T103940
Rather than the full backup ID (20211103T103940), you can use a few synonyms, such as the following:
- last or latest: This refers to the latest available backup (the last in the catalog).
- first or oldest: This refers to the oldest available backup (the first in the catalog).
For the show-backup command, however, we will use a real and concrete example, taken directly from one of our customer's installations of Barman on a 16.4 TB Postgres 9.4 database:
Backup 20180930T130002:
Server Name : skynyrd
Status : DONE
PostgreSQL Version : 90409
PGDATA directory : /srv/pgdata
Base backup information:
Disk usage : 16.4 TiB (16.4 TiB with WALs)
Incremental size : 5.7 TiB (-65.08%)
Timeline : 1
Begin WAL : 000000010000358800000063
End WAL : 00000001000035A0000000A2
WAL number : 6208
WAL compression ratio: 79.15%
Begin time : 2018-09-30 13:00:04.245110+00:00
End time : 2018-10-01 13:24:47.322288+00:00
Begin Offset : 24272
End Offset : 11100576
Begin XLOG : 3588/63005ED0
End XLOG : 35A0/A2A961A0
WAL information:
No of files : 3240
Disk usage : 11.9 GiB
WAL rate : 104.33/hour
Compression ratio : 76.43%
Last available : 00000001000035AD0000004A
Catalog information:
Retention Policy : not enforced
Previous Backup : 20180923T130001
Next Backup : - (this is the latest base backup)
As you can see, Barman is a production-ready tool that can be used in large, business-critical contexts, as well as in basic Postgres installations. It provides good RPO outcomes, allowing you to limit potential data loss to a single WAL file, or even less when WAL streaming is configured.
Finally, note that Barman also supports parallel and incremental backups, through the rsync method, which can dramatically reduce disk usage as well as backup and recovery time. For further information, please refer to the Improving performance of physical backup/restore recipe later in this chapter.
Manually performing each step of this procedure is a great way to gain a clear understanding of PostgreSQL's backup and restore infrastructure. However, to reduce the chance of human error, it is good practice to use a dedicated tool rather than rely on complex activities that must be performed by a human operator, or on custom developed scripts that will not likely have the maturity of a tool that is used in production already in many installations. While our preference goes with Barman, as we are its creators and main developers, there are other third-party tools that are specialized in managing hot physical backups, such as the following:
- pgBackRest: http://www.pgbackrest.org/
- pghoard: https://github.com/ohmu/pghoard
- wal-e: https://github.com/wal-e/wal-e
- wal-g: https://github.com/wal-g/wal-g
Barman is distributed under GNU GPL v3 terms and is available for download at http://www.pgbarman.org/.
There is also a module for puppet, which is available at https://github.com/2ndquadrant-it/puppet-barman.
For further and more detailed information, refer to the following:
- The man barman command, which gives the man page for the Barman application
- The man 5 barman command, which gives the man page for the configuration file
- The barman help command, which gives a list of the available commands
- The official documentation for Barman, which is publicly available at http://docs.pgbarman.org/
- The mailing list for community support at http://www.pgbarman.org/support/
Recovery of all databases
Recovery of a complete database server, including all of its databases, is an important feature. This recipe covers how to execute a recovery in the simplest way possible.
Some complexities are discussed here, though most are covered in later recipes.
Getting ready
Find a suitable server on which to perform the restore.
Before you recover onto a live server, always make another backup. Whatever problem you thought you had can get worse if you aren't prepared.
Physical backups (including Barman ones) are more efficient than logical ones, but they are subject to additional restrictions.
To be precise, a single instance of Barman can manage backups of several servers having different versions of PostgreSQL. However, when it comes to recovery, the same requirements for the PITR technology of PostgreSQL apply – in particular, the following:
- You must recover on a server with the same hardware architecture and PostgreSQL major version.
- You will restore the entire PostgreSQL instance, with all its databases.
Actually, with backups, you don't get ready when you need to use them; you must be ready before you need them, so preparation is everything. This also means that you will have been aware of those requirements before the failure.
How to do it…
Here, we'll provide four distinct examples, depending on what type of backup was taken.
Logical – from the custom dump taken with pg_dump -F c
The procedure is as follows:
- Restoring all databases means simply restoring each individual database from each dump you took. Confirm that you have the correct backup before you restore:
pg_restore --schema-only -v dumpfile | head | grep Started
- Reload the global objects from the script file, as follows:
psql -f myglobals.sql
- Reload all databases. Create the databases using parallel tasks to speed things up. This can be executed remotely without the need to transfer dump files between systems. Note that there is a separate dumpfile for each database:
pg_restore -C -d postgres -j 4 dumpfile
Logical – from the script dump created by pg_dump -F p
As in the previous method, this can be executed remotely without needing to transfer dumpfile between systems:
- Confirm that you have the correct backup before you restore. If the following command returns nothing, then it means that the file is not timestamped, and you'll have to identify it in a different way:
head myscriptdump.sql | grep Started
- Reload globals from the script file, as follows:
psql -f myglobals.sql
- Reload all scripts, as follows:
psql -f myscriptdump.sql
Logical – from the script dump created by pg_dumpall
In order to recover a full backup generated by pg_dumpall, you need to execute the following steps on a PostgreSQL server that has just been initialized:
- Confirm that you have the correct backup before you restore. If the following command returns nothing, then it means that the file is not timestamped, and you'll have to identify it in a different way:
head myscriptdump.sql | grep Started
- Reload the script in full:
psql -f myscriptdump.sql
Physical – from a standalone backup
If you made the backup following the Standalone hot physical database backup recipe, then recovery is very easy:
- Restore the backup files in the new data directory on the target server.
- Confirm that you have the correct backup before you restore:
$ cat backup_label
START WAL LOCATION: 0/12000020 (file 000000010000000000000012)
CHECKPOINT LOCATION: 0/12000058
START TIME: 2018-06-03 19:53:23 BST
LABEL: standalone
- Verify that all file permissions and ownerships are correct and that the links are valid. This should already be the case if you are using the postgres user ID everywhere, which is recommended.
- Start the server.
This procedure is so simple because, in the Standalone hot physical database backup recipe, we gift-wrapped everything for you. That also helped you to understand that you need both a base backup and the appropriate WAL files.
Physical – with Barman
If you made your backup according to the Hot physical backups with Barman recipe, then you can restore it using the barman recover command.
In this example, we are making the following assumptions:
- We have a new server called db2 on which we want to restore the latest backup of the PostgreSQL instance running on db1.
- The barman user on the backup host can connect via SSH as the postgres user to the db2 host.
These are the steps for recovering a Barman backup of the db1 server to db2:
- Decide the location of the data directory where you want to restore PostgreSQL – for instance, /var/lib/pgsql/14/data.
- Check whether the target data directory is empty; if not, ask yourself why (for example, "Am I accidentally connected to the wrong host?"). If you don't find a good answer, stop here; otherwise, make sure that it's okay to empty it, and then do it.
- Connect as the barman user on backup1 and issue the following command:
barman recover db1 last /var/lib/pgsql/14/data
--remote-ssh-command 'ssh postgres@db2'
This command will use the latest available backup for the db1 server and prepare everything you need to restore your server in the PostgreSQL destination directory (/var/lib/pgsql/14/data), as shown in the following output:
Starting remote restore for server db1 using backup 20211103T103940
Destination directory: /var/lib/pgsql/14/data
Remote command: ssh
Copying the base backup.
Copying required WAL segments.
Generating archive status files
Identify dangerous settings in destination directory.
At this point, Barman might find something in your settings that is considered potentially dangerous. It doesn't mean that it definitely is; it just means that this setting can accidentally be used in the wrong way, so you must use your knowledge of how PostgreSQL works to decide whether there could actually be a problem.
For instance, you could get the following output:
WARNING
You are required to review the following options as potentially dangerous
postgresql.conf line 780: include_dir = 'conf.d'
In any case, the restore will finish with a message like the following:
Recovery completed (start time: 2021-11-03 14:12:29.314034, elapsed time: 1 second)
Your PostgreSQL server has been successfully prepared for recovery!
- Before you start the server, it is a good idea to inspect the content of /var/lib/pgsql/14/data; its contents should look very similar to what was in the db1 server just before you started the recovery.
- You are also strongly encouraged to review the content of the postgresql.conf file before starting the server, even though Barman takes care of disabling or removing some potentially dangerous options and detecting others (as in the example warning reported previously).
The most critical option is archive_command, which is preemptively set to false and is good for a disposable instance or when testing recovery. Barman does this because, in most cases, you don't want the instance you restored to start archiving to the original location. The goal is to make you think before you activate archiving. If you are restoring a backup because you want to create a permanent database server, then you need to consider your archiving strategies – for example, you might want to add the new database server to the Barman server by repeating the steps outlined in the previous recipe.
- When you are satisfied with your checks, you can start Postgres in /var/lib/pgsql/14/data the usual way. For example, on CentOS 8, you can execute the following command:
sudo systemctl start postgresql-14
pg_ctl start /var/lib/pgsql/14/newdata
- Look at the PostgreSQL logs to verify that you do not have any problems, and then also check ps -axf.
Now, you have a PostgreSQL instance running on db2, with a copy of all the databases that are hosted on db1 and the same contents that those databases had at the point in time when the last WAL file was closed, which is usually a few minutes in the past.
How it works…
A logical backup is taken by asking PostgreSQL to print a description of each object and its contents, in the form of a sequence of SQL commands. The restore procedure for each database consists simply of issuing those SQL commands on an empty database.
A physical backup is a copy of the files inside the data directory. The format used by PostgreSQL to store data in the filesystem allows those files to be copied even while they are being written, as long as the correct procedure is followed. The restore procedure consists of creating a new PostgreSQL instance whose data directory will initially contain a copy of those files. These procedures are implemented in pg_basebackup, as well as in third-party utilities such as Barman.
When executed with the --remote-ssh-command option, the recover command uses that command to connect to the remote server (similar to what the ssh-command configuration option does in the backup phase but in reverse – see the Hot physical backups with Barman recipe for more information) and perform the restore. Internally, Barman relies on rsync for this operation.
There's more…
You can start and stop the server once recovery has started without any problems. It will not interfere with the recovery.
You can connect to the database server while it is recovering and run queries if that is useful. This is known as hot standby mode and is discussed in Chapter 12, Replication and Upgrades.
Barman allows you to perform two types of recovery:
- Local recovery: This involves restoring a PostgreSQL instance on the same server where Barman is running.
- Remote recovery: This involves restoring a PostgreSQL instance on a different server, through the network, as we just did.
Note that the terms local and remote are relative to the host where Barman is installed, which is where you execute the barman recover command.
A common reason for performing a local recovery is to test your backup or to extract some data from the backup – for instance, to recover from user error. This is described in the Recovery to a point in time recipe later in the chapter.
If you are using tablespaces and you are unable (or unwilling) to use the exact same directory paths when restoring the backup, you can use a feature known as tablespace mapping in pg_basebackup or tablespace relocation in Barman, where you can indicate the desired path for each tablespace. For more details, please refer to the following user manuals links or barman help recover.
In this example, we only recover those transactions that have been committed inside a WAL file that is already closed. While this is the default mode of operation of barman recover, it can be changed by adding the --get-wal option, which produces two effects:
- Barman recover does not copy WAL files; instead, it configures an appropriate restore_command on the recovered instance, which will then fetch WAL files from Barman on demand.
- The restore command will also consider a partial WAL file when recovering transactions.
In that case, Barman will recover also those transactions whose commit record is in the WAL file currently being streamed. For further information, look at the Barman client utilities section of the Barman documentation at https://docs.pgbarman.org/.
Finally, another important use case for Barman is to regularly create copies of the server to be used for purposes such as development, staging, or business intelligence. These environments do not normally require extremely current data – for instance, a snapshot taken on the previous day could be enough.
This recipe has covered only a few aspects of the recovery process in Barman. For further and more detailed information, refer to the following links:
- User manuals, available here:
- Mailing lists for community support:
- for pg_basebackup
- http://www.pgbarman.org/support/
- Our blog at https://www.enterprisedb.com/blog/
Recovery to a point in time
If your database suffers a problem at 3:22 p.m. and your backup was taken at 4:00 a.m., you're probably hoping there is a way to recover the changes made between those two times. What you need is known as Point-in-Time Recovery (PITR).
Regrettably, if you've made a backup with the pg_dump utility at 4:00 a.m., then you won't be able to recover to any other time. As a result, the term PITR has become synonymous with the physical backup and restore technique in PostgreSQL.
Getting ready
If you have a backup made with pg_dump utility, then give up all hope of using that as a starting point for a PITR. It's a frequently asked question, but the answer is still no. The reason it gets asked is exactly why we are pleading with you to plan your backups ahead of time.
First, you need to decide the point in time you would like to recover to. If the answer is as late as possible, then you don't need to do a PITR at all – just recover until the end of the transaction logs.
How to do it…
How do you decide at what point to recover to? The point where we stop recovery is known as the recovery target. The most straightforward way is to indicate a timestamp, as in this example:
barman recover db1 last /var/tmp/pitr --get-wal
--target-time '2021-06-01 16:59:14.27452+01'
You will have noticed that we are recovering the backup into a path that is normally used to hold temporary files, instead of using a standard PostgreSQL data directory path. That's because the files will be restored by the barman user, as we are not using --ssh-command, and the permissions of that user do not allow writing inside a subdirectory of /var/lib/pgsql, which is accessible only to the postgres user.
Restoring this backup as a temporary directory is not necessarily wrong; in fact, it is appropriate because we are running a PITR exercise, meaning that we are creating an instance that will only live for the time required to extract the specific data we need.
For the same permission reasons, it is convenient to change the ownership of the restored backup to the postgres user, using this command:
chown -R postgres: /var/tmp/pitr
You might have to review the configuration files to change those settings that make sense only to the original database server (for instance, disable SSL in case it uses certificates that are not available on the Barman host).
After that, you can start PostgreSQL and run queries in hot standby mode, for monitoring recovery progress or extracting data, as explained in the Recovery of a dropped/damaged table recipe.
Finally, when you no longer need this instance, you should remember to stop PostgreSQL and remove the data directory.
Note
You need to be careful to specify the time zone of the target so that it matches the time zone of the server that wrote the log. This might differ from the time zone of the current server, so be sure to double-check them.
How it works…
Barman is simply using the PITR feature of PostgreSQL, which allows a user to specify a target time by setting a parameter in the postgresql.conf file, as shown in this example:
recovery_target_time = '2021-06-01 16:59:14.27452+01'
More generally, Barman supports three ways to define the recovery target:
- --target-time TARGET_TIME: The target is a timestamp.
- --target-xid TARGET_XID: The target is a transaction ID.
- --target-name TARGET_NAME: The target is a named restore point, which was created previously with the pg_create_restore_point(name) function.
When executed with one of these options, Barman will generate the appropriate PostgreSQL configuration so that the server will stop recovery at the requested point.
Barman also needs to create a recovery.signal file inside the data directory; if this file exists, PostgreSQL will start in targeted recovery mode, meaning that recovery will end when the database will have reached the state it was in at the point of time indicated by the target. PITR works by applying individual WAL records. These correspond to individual block changes, so there are many WAL records for each transaction. The final part of any successful transaction is a commit WAL record, though there are abort records as well. Each transaction completion record has a timestamp that allows us to decide whether or not to stop at that point.
There's more…
You can also define a recovery target using a transaction ID (xid), though finding out which xid to use is somewhat difficult, and you may need to refer to external records, if they exist. Using a Log Sequence Number (LSN) is also possible, and equally tricky; in both cases, you can get an idea of what transaction IDs, or LSN, to use, by inspecting the contents of a given WAL file with the pg_waldump utility, which is part of PostgreSQL.
Another practical way, which rarely applies after an unexpected disaster, is to define a recovery target with a label, formally known as a named restore point. A restore point is created with the pg_create_restore_point() function and requires super user privileges. For example, let's say you have to perform a critical update of part of the data in your database. As a precaution, before you start the update, you can execute the following query as a super user:
SELECT pg_create_restore_point('before_critical_update');
Then, you can use the before_critical_update label in the recovery_target_name option.
Finally, you can simply stop as soon as the recovery process becomes consistent by specifying recovery_target = 'immediate' in place of any other recovery target parameter.
The recovery target is specified in the server configuration and cannot change while the server is running. If you want to change the recovery target, you can shut down the server, edit the configuration, and then restart the server. However, be careful – if you change the recovery target and recovery is already past the new point, it can lead to errors. If you define a recovery_target_timestamp that has already been passed, then the recovery will stop almost immediately, though this will be after the correct stopping point. If you define recovery_target_xid or recovery_target_name parameters that have already been passed, then the recovery will just continue until the end of the logs. Restarting a recovery from the beginning using a fresh restore of the base backup is always the safest option.
Once a server completes the recovery, it will assign a new timeline. Once a server is fully available, we can write new changes to the database. Those changes might differ from the changes we made in a previous future history of the database. So, we differentiate between alternate futures using different timelines. If we need to go back and run the recovery again, we can create a new server history using the original or subsequent timelines. The best way to think about this is that it is exactly like a sci-fi novel – you can't change the past, but you can return to an earlier time and take a different action instead. However, you'll need to be careful to not get confused.
The timeline is a 32-bit integer that constitutes the first eight characters in the name of a WAL file; therefore, changing the timeline means using a new series of filenames. There are cases where this is important – for instance, if you restore a backup and start that server as a new server while the original server is still running, then it's convenient that both servers archive the WAL they produce without disturbing each other. In other words, if you made a backup, then you want to be able to restore it as many times as you want, and you don't want the restored instances overwriting some files in the original backup.
By default, when recovery reaches the target, then recovery is paused and the server can be accessed with read-only queries, exactly like a hot standby replica. You can change this behavior with the --target-action option, which by default is set to pause.
This corresponds to setting recovery_target_action in the PostgreSQL configuration, as discussed in the Delaying, pausing, and synchronizing replication recipe in Chapter 12, Replication and Upgrades.
The pg_dump utility cannot be used as a base backup for a PITR. The reason for this is that a log replay contains the physical changes to data blocks, not the logical changes based on primary keys. If you reload the pg_dump utility, the data will likely go back into different data blocks, so the changes won't correctly reference the data.
See also
PostgreSQL can pause, resume, and stop recovery dynamically while the server is up. This allows you to use the hot standby facility to locate the correct stopping point more easily. You can trick hot standby into stopping recovery, which may help. See the Delaying, pausing, and synchronizing replication recipe in Chapter 12, Replication and Upgrades, on managing hot standby. This procedure is also covered by the Barman command-line utility, as mentioned in the Hot physical backup and continuous archiving recipe.
You can use the pg_waldump utility to print the content of WAL files in a human-readable way. This can be very valuable to locate the exact transaction ID or timestamp, or when a certain change was committed – for instance, if we want to stop recovery right before that. pg_waldump is part of PostgreSQL and is described here: https://www.postgresql.org/docs/11/static/pgwaldump.html.
Recovery of a dropped/damaged table
You may drop or even damage a table in some way. Tables could be damaged for physical reasons, such as disk corruption, or they could also be damaged by running poorly specified UPDATE or DELETE commands, which update too many rows or overwrite critical data.
Recovering from this backup situation is a common request.
How to do it…
The methods to this approach differ, depending on the type of backup you have available. If you have multiple types of backup, you have a choice.
Logical – from the custom dump taken with pg_dump -F c
If you've taken a logical backup using the pg_dump utility in a custom file, then you can simply extract the table you want from the dumpfile, like so:
pg_restore -t mydroppedtable dumpfile | psql
Alternatively, you can directly connect to the database using -d. If you use this option, then you can allow multiple jobs in parallel with the -j option.
When working with just one table, as in this case, this is useful only if there are things that can be done at the same time – that is, if the table has more than one index and/or constraint. More details about parallel restore are available in the Improving performance of backup/recovery recipe later in this chapter.
Note that PostgreSQL can also use multiple jobs when creating one B-tree index. This is controlled by an entirely different set of parameters; see the Maintaining indexes recipe in Chapter 9, Regular Maintenance, for more details.
The preceding command tries to recreate the table and then load data into it. Note that the pg_restore -t option does not dump any of the indexes on the selected table. This means that we need a slightly more complex procedure than would first appear, and the procedure needs to vary, depending on whether we are repairing a damaged table or putting back a dropped table.
To repair a damaged table, we want to replace the data in the table in a single transaction. There isn't a specific option to do this, so we need to do the following:
- Dump the data of the table (the -a option) to a script file, as follows:
pg_restore -a -t mydamagedtable dumpfile > mydamagedtable.sql
- Edit a script named repair_mydamagedtable.sql with the following code:
BEGIN;
TRUNCATE mydamagedtable;
i mydamagedtable.sql
COMMIT;
- Then, run it using the following command:
psql -f repair_mydamagedtable.sql
If you've already dropped a table, then you need to perform these steps:
- Create a new database in which to work and name it restorework, as follows:
CREATE DATABASE restorework;
- Restore the complete schema (using the -s option) to the new database, like this:
pg_restore -s -d restorework dumpfile
- Now, dump only the definitions of the dropped table in a new file. It will contain CREATE TABLE, indexes, and other constraints and grants. Note that this database has no data in it, so specifying -s is optional, as follows:
pg_dump -t mydroppedtable -s restorework > mydroppedtable.sql
- Now, recreate the table on the main database:
psql -f mydroppedtable.sql
- Now, reload only the data into the maindb database:
pg_restore -t mydroppedtable -a -d maindb dumpfile
If you've got a very large table, then the fourth step can be a problem because it builds indexes as well. If you want, you can manually edit the script in two pieces – one before the load (preload) and one after the load (post-load). There are some ideas for that at the end of this recipe.
Logical – from the script dump
Once you have located the PostgreSQL server on which you will prepare and verify the data to restore (the staging server), you can proceed like so:
- Reload the script in full on the staging server, as follows:
psql -f myscriptdump.sql
- From the recovered database server, dump the table, its data, and all of the definitions of the dropped table into a new file:
pg_dump -t mydroppedtable -F c mydatabase > dumpfile
- Now, recreate the table in the original server and database, using parallel tasks to speed things up (here, we will pick two parallel jobs as an example):
pg_restore -d mydatabase -j 2 dumpfile
Note
The last step can be executed remotely without having to transfer dumpfile between systems. Just add connection parameters to pg_restore, as in the following example: pg_restore -h remotehost -U remoteuser ....
The only way to extract a single table from a script dump without doing all of the preceding steps is to write a custom script to read and extract only those parts of the file that you want. This can be complicated because you may need certain SET commands at the top of the file, the table, and data in the middle of the file, and the indexes and constraints on the table are near the end of the file. Writing a custom script can be very complex. The safer route is to follow the recipe we just described.
Physical
To recover a single table from a physical backup, you first need to recreate a PostgreSQL server from scratch, usually in a confined environment. Typically, this server is called the recovery server, if dedicated to recovery drills and procedures, or the staging server, if used for a broader set of cases, including testing. Then, you need to proceed as follows:
- Recover the database server in full, as described in the previous recipes on physical recovery, including all databases and all tables. You may wish to stop at a useful point in time, in which case you can look at the Recovery to a point in time recipe earlier in this chapter.
- From the recovered database server, dump the table, its data, and all the definitions of the dropped table into a new file, as follows:
pg_dump -t mydroppedtable -F c mydatabase > dumpfile
- Now, recreate the table in the original server and database using parallel tasks to speed things up. This can be executed remotely without needing to transfer dumpfile between systems:
pg_restore -d mydatabase -j 2 dumpfile
How it works…
Restoring a single table from a logical backup is relatively easy, as each logical object is backed up separately from the others, and its data and metadata can be filtered out.
However, a physical backup is composed of a set of binary data files in a complex storage format that can be interpreted by a PostgreSQL engine.
This means that the only way to extract individual objects from it, at present, is to restore the backup on a new instance and then make a logical dump, as explained in the previous recipe – there's no way to restore a single table from a physical backup in just a single step.
See also
The pg_dump and pg_restore utilities are able to split the dump into three parts: pre-data, data, and post-data. Both commands support a section option that's used to specify which section(s) should be dumped or reloaded.
Recovery of a dropped/damaged database
Recovering a complete database is also required sometimes. It's actually a lot easier than recovering a single table. Many users choose to place all of their tables in a single database; in that case, this recipe isn't relevant.
How to do it…
The methods differ, depending on the type of backup you have available. If you have multiple types of backup, you have a choice.
Logical – from the custom dump -F c
Recreate the database in the original server using parallel tasks to speed things along. This can be executed remotely without needing to transfer dumpfile between systems, as shown in the following example, where we use the -j option to specify four parallel processes:
pg_restore -h myhost -d postgres --create -j 4 dumpfile
Logical – from the script dump created by pg_dump
Recreate the database in the original server. This can be executed remotely without needing to transfer dump files between systems, as shown here, where we must create the empty database first:
createdb -h myhost myfreshdb
psql -h myhost -f myscriptdump.sql myfreshdb
Logical – from the script dump created by pg_dumpall
There's no easy way to extract the required tables from a script dump. You need to operate on a separate PostgreSQL server for recovery or staging purposes, and then follow these steps:
- Reload the script in full, as follows:
psql -f myscriptdump.sql
- Once the restore is complete, you can dump the tables in the database by following the Hot logical backups of one database recipe.
- Now, recreate the database on the original server, as described for logical dumps earlier in this recipe.
Physical
To recover a single database from a physical backup, you need to work on a separate PostgreSQL server (for recovery or staging purposes), and then you must follow these steps:
- Recover the database server in full, as described in the previous recipes on physical recovery, including all databases and all tables. You may wish to stop at a useful point in time, in which case you can look at the Recovery to a point in time recipe from earlier in this chapter.
- Once the restore is complete, you can dump the tables in the database by following the Hot logical backups of one database recipe.
- Now, recreate the database on the original server, as described for logical dumps earlier in this recipe.
Extracting a logical backup from a physical one
Once you have a physical backup, you can extract a logical backup from it, applying some of the recipes that we have already seen.
This recipe is quite short because it is essentially a combination of recipes that we have already described. Nevertheless, it is important because it clarifies that you don't need to worry about extracting logical backups, if you already have physical ones.
Getting ready
You just need to decide whether you want to extract a logical backup corresponding to a specific point in time or simply to the latest available snapshot.
How to do it…
First, perform a PITR, as indicated in the Recovery to a point in time recipe earlier in this chapter. If you want a logical backup corresponding to the latest available snapshot, just omit the --target-time clause. Then, follow the Hot logical backups of one database recipe to take a logical backup from the temporary instance.
Finally, remember to stop the temporary instance and delete its data files.
There's more…
You can also extract other kinds of logical backups – for example, global metadata only or a logical backup of all databases; you just need to change the second half of this recipe accordingly.
Improving performance of logical backup/recovery
Performance is often a concern in any medium-sized or large database.
Backup performance is often a delicate issue because resource usage may need to be limited to remain within certain boundaries. There may also be a restriction on the maximum runtime for the backup – for example, a backup that runs every Sunday.
Again, restore performance may be more important than backup performance, even if backup is the more obvious concern.
In this recipe, we will discuss the performance of logical backup and recovery; the physical case is quite different and is examined in the recipes after that.
Getting ready
If performance is a concern or is likely to be, then you should read the Planning backups recipe first.
How to do it…
You can use the -j option to specify the number of parallel processes that pg_dump should use to perform the database backup. This requires that you use the -F d option, which selects the "directory" format, where every table is backed up into a separate data file.
Similarly, you can use the -j option to specify the number of parallel processes that pg_restore should use to restore the backup, similarly to what pg_dump supports. There is one important difference – namely, that this is compatible with both the directory format (as in -F d) and the custom format (as in -F c).
You'll have to be careful about how you select the degree of parallelism to use. A good starting point is the number of CPUs on the server. Be very careful that you don't overflow the available memory when using parallel restore. Each job will use memory up to the value of maintenance_work_mem, so the whole restore can begin swapping when it hits larger indexes later in the restore. Plan the size of shared_buffers and maintenance_work_mem according to the number of jobs specified.
Whether you use psql or pg_restore, you can speed up the program by assigning
maintenance_work_mem = 128MB or more, either in postgresql.conf or on the user that will run the restore. If neither of those ways is easily possible, you can specify the option using the PGOPTIONS environment variable, as follows:
export PGOPTIONS ="-c work_mem = 128000"
This will then be used to set that option value for subsequent connections.
If you are running archiving or streaming replication, then transaction log writes can create a significant burden while restoring a logical backup. This can be mitigated by increasing the size of the WAL buffer and making checkpoints less frequent for the duration of the recovery operation.
Set wal_buffers between 16 MB and 64 MB, and then set max_wal_size to a large value, such as 20 GB, so that it has room to breathe.
If you aren't running archiving or streaming replication, or you've turned it off during the restore, then you'll be able to minimize the amount of transaction log writes. In that case, you may wish to use the single transaction option, as that will also help to improve performance.
Whatever you do, make sure that you run ANALYZE afterward on every object that was created. This will happen automatically if autovacuum is enabled. It often helps to disable autovacuum completely while running a large restore, so double-check that you have it switched on again after the restore. The consequence of skipping this step will be extremely poor performance when you start your application again, which can easily make everybody panic.
How it works…
Logical backup and restore involve moving data out of and into the database. That's typically going to be slower than physical backup and restore. Particularly with a restore, rebuilding indexes and constraints takes time, even when run in parallel. Plan ahead and measure the performance of your backup and restore techniques so that you have a chance when you need your database back in a hurry.
There's more…
Compressing backups are often considered as a way to reduce the size of the backup for storage. Even mild compression can use large amounts of CPU. In some cases, this might offset network transfer costs, so there isn't any hard rule as to whether compression is always good.
By default, the custom dump format for logical backups will be compressed. Even when compressed, the objects can be accessed individually if required.
Using --compress with script dumps will result in a compressed text file, just as if you had dumped the file and then compressed it. Access to individual tables is not possible.
Improving performance of physical backup/recovery
Physical backups are quite different from logical ones, and this difference extends also to the options available to make them faster.
In both cases, it is possible to use multiple parallel processes, although for quite different reasons. Physical backups are mostly constrained by network and storage bandwidth, meaning that the benefit of parallelism is limited, although not marginally. Usually, there is little benefit in using more than four parallel processes, and you can expect to reduce backup time to 40–60% of what it is with a single thread. And, in any case, the more threads you use, the more it will impact the current system.
Incremental backup and restore are currently available only for physical backups. Although, in theory, it is possible to implement incremental behavior for logical backup/restore, in practice, this feature does not exist yet. Perhaps this is because physical backups are by nature faster and lighter than logical ones and, therefore, more suitable for addressing higher demands.
Getting ready
Make sure that you understand the limitations of parallel and incremental backup and restore, which are only available for some tools and might require specific operation modes and choices.
For instance, parallel backup and restore are supported by Barman through the -j option but not by pg_basebackup, so you need to have configured Barman's rsync backup method. A similar restriction applies to incremental backup and restore.
How to do it...
In the following example, which intentionally resembles a recipe that we saw earlier, we are taking a parallel backup of the db1 server using four parallel jobs:
[root@backup1 ~]# barman -j 4 backup db1
We can restore it in parallel on the (remote) db2 server with similar syntax:
[root@backup1 ~]# barman -j 4 recover db1 last
/var/lib/pgsql/14/data
--remote-ssh-command 'ssh postgres@db2'
If we want to take an incremental backup, then we can add the reuse-backup option, as shown in this example:
[root@backup1 ~]# barman --reuse-backup=link backup db1
The process of restoring a backup is automatically incremental, provided that the rsync backup method is used; this is because Barman will copy files using rsync, whose algorithm is able to efficiently reuse existing files and transmit only the differences. If you want to force a non-incremental restore, you just need to empty the target directory before you run barman recover.
How it works…
A physical backup and restore is completely up to you. Copy those files as fast as you like and in any way you like. Put them back in the same way or a different way.
If backup_method=postgres in the Barman configuration, then pg_basebackup will be used for taking backups, and Barman will have the same restrictions: all files will be copied in full and all by the same process.
Conversely, if backup_method=rsync, then Barman will take a backup that is incremental compared to the latest existing backup for the same server and will deduplicate any file that is unchanged. This implies that the backup will take less disk space and will complete in a shorter time as well.
When restoring a backup, Barman always uses rsync, irrespective of settings. In other words, a restore is always incremental, in the sense that any files existing in the target directory are reused.
Parallel backup and restore in Barman is actually a consequence of the parallel copy feature, which is activated by the -j N switch and applies to both barman backup and barman recover. This feature is implemented by splitting the list of files in N sublists and running N rsync processes in parallel, one for each sublist.
There's more…
Remember that your backup speed may be bottlenecked by your disks or your network. Some larger systems have dedicated networks in place, solely for backups.
Compressing backups is a popular technique for reducing the size of the backup in storage. The actual extent of the reduction depends on the kind of data being backed up and is also affected by the algorithm and the options being used; in other words, there isn't a hard rule on what is the best level of compression, and you need to find your own best compromise between disk usage, backup time, and network transfer costs. Compression for WAL files from physical backups is a common practice. In Barman, you can activate it with a configuration setting, as shown in this example:
compression = gzip
Note that there are a number of possible choices other than gzip.
Physical backups can be compressed in various ways, depending on the exact backup mechanism used.
Using multiple processes is known as pipeline parallelism. If you're using a physical backup, then you can copy the data in multiple streams, which also allows you to take advantage of parallel compression/decompression.
See also
If taking a backup is an expensive operation, then a way around this is to take the backup from a replica instead, which offloads the cost of the backup operation away from the master. Look at the recipes in Chapter 12, Replication and Upgrades, to see how to set up a replica.
Validating backups
In this recipe, we will use the data checksum feature to detect data corruption caused by I/O malfunctioning in advance.
It is important to discover such problems as soon as possible. For instance, we want a chance to recover lost data from one of our older backups, or we may want to stop data errors before they spread to the rest of the database when new data depends on existing data.
Getting ready
This feature is disabled by default, since it results in some overhead; it can be enabled when the cluster is initialized by using the --data-checksums option of the initdb utility, or on an existing cluster, with pg_checksum --enable.
Also, before trying this recipe, you should be familiar with how to take backups and how to restore them afterward, which are the subjects of most of this chapter.
How to do it…
First, check whether data checksums are enabled:
postgres=# SHOW data_checksums ;
data_checksums
----------------
on
(1 row)
If not, then you need to stop the cluster and enable checksums. This will require some downtime, so you need to wait for the next maintenance window and then run the following command:
$ pg_checksum --enable
Once data checksums are enabled, if you are taking a backup with pg_basebackup, then checksums are verified while pages are read from data files. Let's look at an example:
$ pg_basebackup -D backup2
If nothing goes wrong, then the backup finishes with no output – we know already that pg_basebackup operates by default in no-news-is-good-news mode. Conversely, if a checksum fails, then the return code is non-zero, and we get a warning like the following:
WARNING: checksum verification failed in file "./base/16385/16388", block 0: calculated 246D but expected C938
pg_basebackup: checksum error occurred
In the (unlikely) case that you have a good reason for skipping this check, you can use the no-verify-checksums option.
When a physical backup is taken without pg_basebackup, there is no PostgreSQL utility that can verify checksums while the backup is being taken; the check must be carried out afterward by running the pg_verify_checksums utility against the actual files in the data directory.
Unfortunately, this utility requires the data directory to be in a clean shutdown state, which is not the case when hot physical backups are taken. Therefore, we need to restore the backup to a temporary directory and then carry out a recovery process, as described in the Recovery to a point in time recipe previously – for instance, by using the following settings in recovery.conf:
recovery_target = 'immediate'
recovery_target_action = shutdown
The immediate target means that the recovery will stop as soon as the data directory becomes consistent, and then PostgreSQL will shut down, which is the specified target action.
Once we have a clean data directory, we just run pg_verify_checksums against the temporary directory, as follows:
$ pg_verify_checksums -D tempdir1
Should any checksum fail, you will see output like the following:
pg_verify_checksums: checksum verification failed in file "tempdir1/base/16385/16388", block 0: calculated checksum 246D but block contains C938
Checksum scan completed
Data checksum version: 1
Files scanned: 1226
Blocks scanned: 3852
Bad checksums: 1
How it works…
When the data checksum feature is enabled, each page header includes a 16-bit checksum of its contents and block number, which is updated when the page is flushed to disk.
If enabled, data checksums are verified every time a block is read from disk to shared buffers, as well as when pg_basebackup is used to perform a backup.
Since the checksum is computed and added to the block when flushing to disk, a failure must be caused by a change inside the block that occurred while the block was not cached in the shared buffers; conversely, a change occurring while the block was cached in the shared buffers will be overwritten at the next flush.
There's more…
In our example, we have shown a case where the checksum fails. The checksum mismatch will also be detected when a query causes PostgreSQL to attempt reading that block into the shared buffers.
In that case, the query will fail with an error, which is good because it protects the user from inadvertently using corrupt data:
postgres=# SELECT * FROM t;
WARNING: page verification failed, calculated checksum 42501 but expected 37058
ERROR: invalid page in block 0 of relation base/16385/16388
If we want to intentionally load corrupt data – for example, to attempt some repair activities – we can temporarily disable the checksum, as in the following example:
postgres=# SET ignore_checksum_failure = on;
postgres=# SELECT * FROM t;
WARNING: page verification failed, calculated checksum 42501 but expected 37058
x
----
88
(1 row)
We can see that the warning is still displayed, but we can proceed to read the data.
If the data corruption results in an invalid page format, the user will get the same error, irrespective of the value of ignore_checksum_failure. This is intentional: this parameter eliminates the risk of undetected failures. In other words, a page with an invalid format does not need checksums to be detected, nor can it be read or amended within SQL queries.
As you would expect, only a super user can change the ignore_checksum_failure parameter.