Chapter 4: Server Control
The recipes in this chapter will show you how to control the database server directly. Database servers in the cloud do not give access to the privileges that are required to perform many of the actions listed in this chapter, but there are things worth considering if you want to understand what is happening within.
This chapter covers the following recipes:
- Overview of controlling the database server
- Starting the database server manually
- Stopping the server safely and quickly
- Stopping the server in an emergency
- Reloading the server configuration files
- Restarting the server quickly
- Preventing new connections
- Restricting users to only one session each
- Pushing users off the system
- Deciding on a design for multitenancy
- Using multiple schemas
- Giving users their own private databases
- Running multiple servers on one system
- Setting up a connection pool
- Accessing multiple servers using the same host and port
Overview of controlling the database server
PostgreSQL consists of a set of server processes, the group leader of which is named the postmaster, though that name is not visible as a process title in later versions. Starting the server is the act of creating these processes, and stopping the server is the act of terminating those processes.
Each postmaster listens for client connection requests on a defined port number. Multiple concurrently running postmasters cannot share that port number. The port number is often used to uniquely identify a particular postmaster and hence also the database server that it leads.
When we start a database server, we refer to a data directory, which contains the heart and soul – or at least the data – of our database. Subsidiary tablespaces may contain some data outside the main data directory, so the data directory is just the main central location and not the only place where data for that database server is held. Each running server has, at a minimum, one data directory; one data directory can have, at most, one running server (or instance).
To perform any action on a database server, we must know the data directory for that server. The basic actions we can perform on the database server are starting and stopping. We can also perform a restart, though that is just a stop followed by a start. In addition, we can reload the server, which means that we can reread the server's configuration files.
We should also mention a few other points.
The default port number for PostgreSQL is 5432. This has been registered with the Internet Assigned Numbers Authority (IANA), so it should already be reserved for PostgreSQL's use in most places. Because each PostgreSQL server requires a distinct port number, the normal convention is to use subsequent numbers for any additional server – for example, 5433 and 5434. Subsequent port numbers may not be as easily recognized by the network infrastructure, which may, in some cases, make life more difficult for you in large enterprises, especially in more security-conscious ones.
Port number 6432 has been registered with IANA for PgBouncer, the connection pooler that we will describe in the Setting up a connection pool recipe. This only happened recently, and many installations are using non-standard port numbers such as 6543 because they were deployed earlier.
A database server is also sometimes referred to as a database cluster. I don't recommend this term for normal usage as it makes people think about multiple nodes and not one database server on one system.
Starting the database server manually
Typically, the PostgreSQL server will start automatically when the system boots. You may opt to stop and start the server manually, or you may need to start it or shut it down for various operational reasons.
Getting ready
First, you need to understand the difference between the service and the server. The word server refers to the database server and its processes. The word service refers to the operating system wrapper that the server gets called by. The server works in essentially the same way on every platform, whereas each operating system and distribution has its own concept of a service.
Moreover, the way services are managed has changed recently: for instance, at the time of writing, most Linux distributions have adopted the systemd service manager. This means that you need to know which distribution and release you are using to find the correct variant of this recipe.
With systemd, a PostgreSQL server process is represented by a service unit, which is managed via the systemctl command. The systemd command syntax is the same on all distributions, but the name of the service unit isn't. For example, it will have to be adjusted depending on your distribution.
In other cases, you need to type the actual data directory path as part of the command line to start the server. More information on how to find out what is in the data directory path can be found in the Locating the database server files recipe of Chapter 2, Exploring the Database.
How to do it…
On each platform, there is a specific command to start the server.
If you are using a modern Linux distribution, then you are probably using systemd. In this case, PostgreSQL can be started with the following command:
sudo systemctl start SERVICEUNIT
This must be issued with operating system superuser privileges, after replacing SERVICEUNIT with the appropriate systemd service unit name.
The systemctl command must always be issued with operating system superuser privileges. Remember that, throughout this book, we will always prepend systemctl invocations with sudo.
There are a couple of things to keep in mind:
- This will only work if the user executing the command has been previously granted the appropriate sudo privileges by the system administrator.
- If the command is executed from a superuser account, then the sudo keyword is unnecessary, although not harmful.
As we mentioned previously, the service unit name depends on what distribution you are using, as follows:
- On Ubuntu and Debian, the service unit's name this as follows:
postgresql@RELEASE-CLUSTERNAME
- For each database server instance, there is another service unit called postgresql, which can be used to manage all the database servers at once. Therefore, you can issue the following command:
sudo systemctl start postgresql
- To start all the available instances, and to start only the default version 14 instance, use the following command:
sudo systemctl start postgresql@14-main
- Default Red Hat/Fedora packages call the service unit simply postgresql, so the syntax is as follows:
sudo systemctl start postgresql
- Red Hat/Fedora packages from the PostgreSQL Yum repository create a service unit called postgresql--RELEASE, so we can start version 14 as follows:
sudo systemctl start postgresql-14
As we noted previously, systemctl is part of systemd, which is only available on Linux and is normally used by most of the recent distributions.
The following commands can be used where systemd is not available.
On Debian and Ubuntu releases, you must invoke the PostgreSQL-specific pg_ctlcluster utility, as follows:
pg_ctlcluster 14 main start
This command will also work when systemd is available; it will just redirect the start request to systemctl and print a message on the screen so that the next time, you will remember to use systemctl directly.
For Red Hat/Fedora, you can use the following command:
service postgresql start
For Windows, the command is as follows:
net start postgres
For Red Hat/Fedora, you can also use the following command:
pg_ctl -D $PGDATA start
Here, PGDATA is set to the data directory path.
This command works on most distributions, including macOS, Solaris, and FreeBSD, although bear the following points in mind:
- It is recommended that you use, whenever possible, the distribution-specific syntax we described previously.
- You may have to specify the full path to the pg_ctl executable if it's not in your path already. This is normally the case with multi-version directory schemes such as Debian/Ubuntu, where distribution-specific scripts pick the appropriate executable for your version.
How it works…
On Ubuntu/Debian, the pg_ctlcluster wrapper is a convenient utility that allows multiple servers to coexist more easily, which is especially good when you have servers with different versions. This was invented by Debian and is not found on other PostgreSQL distributions. This capability is very useful and is transposed on systemd, as shown in the examples using @ in the name of the service unit, where @ denotes the usage of a service file template.
Another interesting systemd feature is the capability to enable/ disable a service unit to specify whether it will be started automatically on the next boot, with syntax such as the following:
sudo systemctl enable postgresql@14-main
This can be very useful for setting the appropriate behavior based on the purpose of each instance.
A similar feature is implemented on Ubuntu and Debian via the start.conf file, which is located next to the other configuration files (that is, in the same directory). Apart from the informational comments, it contains only a single word. These words have the following meanings:
- auto: The server will be started automatically on boot. This is the default when you're creating a new server. It is suitable for frequently used servers, such as those powering live services or those being used for everyday development activities.
- manual: The server will not be started automatically on boot, but it can be started with pg_ctlcluster. This is suitable for custom servers that are seldom used.
- disabled: The server is not supposed to be started. This setting only acts as protection from starting the server accidentally. The pg_ctlcluster wrapper won't let you start it, but a skilled user can easily bypass this protection.
If you need to reserve a port for a server that's not managed by pg_ctlcluster, such as when you're compiling directly from the source code, then you can create a cluster with start.conf set to disabled and then use its port. Any new servers will be assigned different ports.
Stopping the server safely and quickly
There are several modes you can use to stop the server, depending on the level of urgency. We'll compare the effects in each mode.
How to do it…
There are two variants: with and without systemd. This is similar to the previous recipe, Starting the database server manually, which we'll refer to for further information. For example, what is the exact name of the systemd service unit for a given database server on a given GNU/Linux distribution?
When using systemd, you can stop PostgreSQL using fast mode by issuing the following after replacing SERVICEUNIT with the appropriate systemd service unit name:
sudo systemctl stop SERVICEUNIT
If systemd is not available and you are using Debian or Ubuntu, the command is as follows, which applies to the default version 14 instance:
pg_ctlcluster 14 main stop -m fast
Fast mode is the default since PostgreSQL 9.5; the previous default was to use smart mode, meaning wait for all users to finish before we exit. This can take a very long time, and all while new connections are refused.
On other Linux/Unix distributions, you can issue a database server stop command using fast mode, as follows:
pg_ctl -D datadir -m fast stop
How it works…
When you do a fast stop, all the users have their transactions aborted and all the connections are disconnected. This is not very polite to users, but it still treats the server and its data with care, which is good.
PostgreSQL is similar to other database systems in that it creates a shutdown checkpoint before it closes. This means that the startup that follows will be quick and clean. The more work the checkpoint has to do, the longer it will take to shut down.
One difference between PostgreSQL and some other RDBMSs, such as Oracle, DB2, and SQL Server, is that the transaction rollback is very quick. On those other systems, if you shut down the server in a mode that rolls back transactions, it can cause the shutdown to take a while, possibly a very long time. This difference is for internal reasons and isn't in any way unsafe. Debian and Ubuntu's pg_ctlcluster supports the --force option, which is nice because it attempts a fast shutdown first; if that fails, it performs an immediate shutdown. After that, it kills the postmaster.
See also
The technology that provides immediate rollback for PostgreSQL is called Multiversion Concurrency Control (MVCC). More information on this is provided in the Identifying and fixing bloated tables and indexes recipe in Chapter 9, Regular Maintenance.
Stopping the server in an emergency
If nothing else is working, we may need to stop the server quickly, without caring about disconnecting the clients gently.
Break the glass in case of emergency!
How to do it…
Follow these steps to stop the server:
- The basic command to perform an emergency stop on the server is as follows:
pg_ctl -D datadir stop -m immediate
- On Debian/Ubuntu, you can also use the following command:
pg_ctlcluster 14 main stop -m immediate
As we mentioned in the previous recipe, this is just a wrapper around pg_ctl. From this example, we can see that it can pass through the -m immediate option.
In the previous recipe, we saw examples where the systemctl command was used to stop a server safely; however, this command cannot be used to perform an emergency stop.
How it works…
When you do an immediate stop, all the users have their transactions aborted and all their connections are disconnected. There is no clean shutdown, nor is there politeness of any kind.
An immediate mode stop is similar to a database crash. Some cached files will need to be rebuilt, and the database itself will need to undergo crash recovery when it comes back up.
Note that for DBAs with Oracle experience, the immediate mode is the same thing as a shutdown abort. The PostgreSQL immediate mode stop is not the same thing as shutdown immediate on Oracle.
Reloading the server configuration files
Some PostgreSQL configuration parameters can only be changed by reloading the entire configuration files. Note that in some cloud-based database services, this occurs automatically when parameters are changed, so this is not relevant.
How to do it…
There are two variants of this recipe, depending on whether you are using systemd. This is similar to the previous recipes in this chapter, especially the Starting the database server manually recipe. More details are provided there, such as the exact names of the systemd service units, depending on which database server you want to reload, and which GNU/Linux distribution you are working on.
With systemd, configuration files can be reloaded with the following syntax:
sudo systemctl reload SERVICEUNIT
Here, SERVICEUNIT must be replaced with the exact name of the systemd service unit for the server(s) that you want to reload.
Otherwise, on each platform, there is a specific command you can use to reload the server without using systemd. These commands are as follows:
- On Ubuntu and Debian, you can issue the following command:
pg_ctlcluster 14 main reload
- On older versions of Red Hat/Fedora, you must use the following command:
service postgresql reload
- You can also use the following command:
pg_ctl -D /var/lib/pgsql/data reload
This also works on macOS, Solaris, and FreeBSD, where you must replace /var/lib/pgsql/data with your actual data directory if it's different.
On all platforms, you can also reload the configuration files while still connected to PostgreSQL. If you are a superuser, or the privilege for this function has been granted to you, this can be done with the following command:
postgres=# SELECT pg_reload_conf();
The output is rather short:
pg_reload_conf
----------------
t
This function is also often executed from an admin tool, such as pgAdmin.
If you do this, you should realize that it's possible to implement a new authentication rule that is violated by the current session. It won't force you to disconnect, but when you do disconnect, you may not be able to reconnect.
Any error in a configuration file will be reported in the message log, so we recommend that you look there immediately after reloading. You will quickly notice (and fix!) syntax errors in the parameter file because they prevent any logins from occurring before reloading. Other errors, such as typos in parameter names, or wrong units, will only be reported in the log; moreover, only some non-syntax errors will prevent you from reloading the whole file, so it's best to always check the log.
How it works…
To reload the configuration files, we must send the SIGHUP signal to the postmaster, which then passes them to all the connected backends. That's why some people call reloading the server sigh-up-ing.
If you look at the pg_settings catalog table, you'll see that there is a column named context. Each setting has a time and a place where it can be changed. Some parameters can only be reset by a server reload, so the value of context for those parameters will be sighup. Here are a few of the parameters you may want to change during server operation (there are others, however):
postgres=# SELECT name, setting, unit
,(source = 'default') as is_default
FROM pg_settings
WHERE context = 'sighup'
AND (name like '%delay' or name like '%timeout')
AND setting != '0';
name | setting | unit | is_default
------------------------------+---------+------+------------
authentication_timeout | 60 | s | t
autovacuum_vacuum_cost_delay | 20 | ms | t
bgwriter_delay | 200 | ms | f
checkpoint_timeout | 300 | s | f
max_standby_archive_delay | 30000 | ms | t
max_standby_streaming_delay | 30000 | ms | t
wal_receiver_timeout | 60000 | ms | t
wal_sender_timeout | 60000 | ms | t
wal_writer_delay | 200 | ms | t
(9 rows)
There's more…
Since reloading the configuration file is achieved by sending the SIGHUP signal, we can only reload the configuration file for a single backend using the kill command. As you may expect, you may get some strange results from doing this, so don't try this at home.
First, find the PID of the backend using pg_stat_activity. Then, from the operating system prompt, issue the following command:
kill -SIGHUP pid
Alternatively, we can do both at once, as shown in the following command:
kill -SIGHUP
&& psql -t -c "select pid from pg_stat_activity limit 1";
This is only useful with a sensible WHERE clause.
Restarting the server quickly
Some of the database server parameters require you to stop and start the server again fully. Doing this as quickly as possible can be very important in some cases. The best time to do this is usually a quiet time, with lots of planning, testing, and forethought. Sometimes, not everything goes according to plan.
How to do it…
Many of the recipes in this chapter are presented in two forms: one with systemd and one without. This may look repetitive or boring, but it's unavoidable because introducing a new system does not automatically eliminate all existing alternatives or migrate old installations to new ones.
As we mentioned previously, you can find further systemd details, including details on service unit names, in the previous recipe, Starting the database server manually.
A PostgreSQL server that's managed by systemd can be restarted in fast mode by issuing the following command:
sudo systemctl restart SERVICEUNIT
As we mentioned previously, change SERVICEUNIT to the appropriate service unit name – for example, postgresql@14-main for a PostgreSQL 10 cluster running in Debian or Ubuntu.
If systemd is not available, then you can use the following syntax:
pg_ctlcluster 14 main restart -m fast
The basic command to restart the server is as follows:
pg_ctl -D datadir restart -m fast
A restart is just a stop that's followed by a start, so it sounds very simple. In many cases, it will be simple, but there are times when you'll need to restart the server while it is fairly busy. That's when we need to start performing some tricks to make that restart happen quicker.
First, the stop that's performed needs to be a fast stop. If we do a default or a smart stop, then the server will just wait for everyone to finish. If we do an immediate stop, then the server will crash, and we will need to crash-recover the data, which will be slower overall.
The running database server has a cache full of data blocks, many of which are dirty. PostgreSQL is similar to other database systems in that it creates a shutdown checkpoint before it closes. This means that the startup that follows will be quick and clean. The more work the checkpoint has to do, the longer it will take to shut down.
The actual shutdown will happen much quicker if we issue a normal checkpoint first, as the shutdown checkpoint will have much less work to do. So, flush all the dirty shared buffers to disk with the following command, issued by a database superuser:
psql -c "CHECKPOINT"
The next consideration is that once we restart, the database cache will be empty again and will need to refresh itself. The larger the database cache, the longer it will take for the cache to get warm again, and 30 to 60 minutes is not uncommon before returning to full speed. So, what was a simple restart can have a large business impact if handled badly.
There's more…
There is an extension called pgfincore that implements a set of functions to manage PostgreSQL data pages in the operating system's file cache. One possible use is to preload some tables so that PostgreSQL will load them quicker when requested. The general idea is that you can provide more detailed information for the operating system cache so that it can behave more efficiently.
Some distributions include a prebuilt pgfincore package, which makes installation easier.
There is also a contrib module called pg_prewarm, which addresses a similar problem. While there is some overlap with pgfincore, the feature sets are not the same; for instance, pgfincore can operate on files that aren't in the shared buffer cache, and it can also preload full relations with only a few system calls while taking the existing cache into account; on the other hand, pg_prewarm can operate on the PostgreSQL shared buffer cache, and it also works on Windows.
Preventing new connections
In certain emergencies, you may need to lock down the server completely, or just prevent specific users from accessing the database. It's hard to foresee all the situations where you may need to do this, so we will present a range of options.
How to do it…
Connections can be prevented in several ways, as follows:
- Pause and resume the session pool. See the Setting up a connection pool recipe, later in this chapter, on controlling connection pools.
- Stop the server! See the Stopping the server safely and quickly and the Stopping the server in an emergency recipes, though this is not recommended.
- Restrict the connections for a specific database to zero by setting the connection limit to 0:
ALTER DATABASE foo_db CONNECTION LIMIT 0;
This will limit normal users from connecting to that database, though it will still allow superuser connections.
- Restrict the connections for a specific user to zero by setting the connection limit to zero (see the Restricting users to only one session each recipe):
ALTER USER foo CONNECTION LIMIT 0;
This will prevent normal users from connecting to that database, but it will still allow connections if the user is a superuser, so luckily, you cannot shut yourself out accidentally.
- Change the Host-Based Authentication (HBA) file to refuse all incoming connections and then reload the server:
- Create a new file called pg_hba_lockdown.conf and add the following two lines to it. This puts rules in place that will completely lock down the server, including superusers. Note that this is a serious and drastic action:
# TYPE DATABASE USER ADDRESS METHOD
local all all reject
host all all 0.0.0.0/0 reject
If you still want superuser access, then try something such as the following:
# TYPE DATABASE USER ADDRESS METHOD
local all postgres peer
local all all reject
host all all 0.0.0.0/0 reject
This will prevent connections to the database by any user except the postgres operating system user ID, which connects locally to any database. Be careful not to confuse the second and third columns – the second column is the database, while the third column is the username. It's worth keeping the header line just for that reason. The peer method should be replaced with other authentication methods if a more complex configuration is in use.
- Copy the existing pg_hba.conf file to pg_hba_access.conf so that it can be replaced later if required.
- Copy pg_hba_lockdown.conf to pg_hba.conf.
- Reload the server by following the recipe earlier in this chapter.
How it works…
The pg_hba.conf file is where we specify the host-based authentication rules. We do not specify the authentications themselves; we just specify which authentication mechanisms will be used. This is the top-level set of rules for PostgreSQL authentication. These rules are specified in a file and applied by the postmaster process when connections are attempted. To prevent denial-of-service attacks, the HBA rules never involve database access, so we do not know whether a user is a superuser. As a result, you can lock out all users, but note that you can always re-enable access by editing the file and reloading it.
Restricting users to only one session each
If resources need to be closely controlled, you may wish to restrict users so that they can only connect to the server once, at most. The same technique can be used to prevent connections entirely for that user.
How to do it…
We can restrict users to only one connection using the following command:
postgres=# ALTER ROLE fred CONNECTION LIMIT 1;
ALTER ROLE
This will then cause any additional connections to receive the following error message:
FATAL: too many connections for role "fred"
You can eliminate this restriction by setting the value to -1.
It's possible to set the limit to zero or any positive integer. You can set this to a number other than max_connections, though it is up to you to make sense of that if you do.
Setting the value to zero will completely restrict normal connections. Note that even if you set the connection limit to zero for superusers, they will still be able to connect.
How it works…
The connection limit is applied during the session connection. Raising this limit will never affect any connected users. Lowering the limit doesn't have any effect either unless they try to disconnect and reconnect.
So, if you lower the limit, you should immediately check whether there are more sessions connected than the new limit you just set. Otherwise, you may come across some surprises if there is a crash:
postgres=> SELECT rolconnlimit
FROM pg_roles
WHERE rolname = 'fred';
rolconnlimit
--------------
1
(1 row)
postgres=> SELECT count(*)
FROM pg_stat_activity
WHERE usename = 'fred';
count
-------
2
(1 row)
If you have more connected sessions than the new limit, you can ask users to politely disconnect, or you can apply the next recipe, Pushing users off the system.
Users can't raise or lower their connection limit, just in case you are worried that they might be able to override this somehow.
Pushing users off the system
Sometimes, we may need to remove groups of users from the database server for various operational reasons. Let's learn how to do this.
How to do it…
You can terminate a user's session with the pg_terminate_backend() function, which is included with PostgreSQL. This function takes the PID, or the process ID, of the user's session on the server. This process is known as the backend, and it is a different system process from the program that runs the client.
To find the PID of a user, we can look at the pg_stat_activity view. We can use it in a query, like this:
SELECT pg_terminate_backend(pid)
FROM pg_stat_activity
WHERE ...
There are a couple of things to note if you run this query. If the WHERE clause doesn't match any sessions, then you won't get any output from the query. Similarly, if it matches multiple rows, you will get a fairly useless result – that is, a list of Boolean true values. Unless you are careful enough to exclude your session from the query, you will disconnect yourself! What's even funnier is that you'll disconnect yourself halfway through disconnecting the other users. This is because the query will run pg_terminate_backend() in the order in which sessions are returned from the outer query.
Therefore, I suggest a safer and more useful query that gives a useful response in all cases, which is as follows:
postgres=# SELECT count(pg_terminate_backend(pid))
FROM pg_stat_activity
WHERE usename NOT IN
(SELECT usename
FROM pg_user
WHERE usesuper);
count
-------
1
The preceding code assumes that superusers are performing administrative tasks.
Some other good filters are as follows:
WHERE application_name = 'myappname'
WHERE wait_event_type IS NOT NULL AND wait_event_type != 'Activity'
WHERE state = 'idle in transaction'
WHERE state = 'idle'
How it works…
The pg_terminate_backend() function sends a signal directly to the operating system process for that session.
The session may have closed by the time pg_terminate_backend() is named. As PID numbers are assigned by the operating system, you may try to terminate a given session (let's call it session A), but you terminate another session while doing so (let's call it session B).
Here is how it could happen. Suppose you take note of the PID of session A and decide to disconnect it. Before you issue pg_terminate_backend(), session A disconnects, and right after, a new session, session B, is given the same PID. So, when you terminate that PID, you hit session B instead.
On the one hand, you need to be careful. On the other hand, this case is really unlikely and is only mentioned for completeness. For this to happen, the following events must occur as well:
- One of the sessions you are trying to close must terminate independently in the very short interval between the moment pg_stat_activity is read and the moment pg_terminate_backend() is executed.
- Another session on the same database server must be started in the even shorter interval between the old session closing and the execution of pg_terminate_backend().
- The new session must get the same PID value as the old session, which is less than a 1 in 32,000 chance on a 32-bit Linux machine.
Nonetheless, probability theory is tricky, even for experts. Therefore, it's better to be aware that there is a tiny risk, especially if you use the query many times per day over a long period, in which case the probability of getting caught at least once builds up.
It's also possible that new sessions could start after we get the list of active sessions. There's no way to prevent this other than by following the Preventing new connections recipe.
Finally, remember that superusers can terminate any session, while a non-superuser can only terminate a session that belongs to the same user.
Deciding on a design for multitenancy
There are many reasons why we may want to split groups of tables or applications: security, resource control, convenience, and so on. Whatever the reason, we often need to separate groups of tables (I avoid saying the word database, just to avoid various kinds of confusion).
This topic is frequently referred to as multitenancy, though this is not a fully accepted term yet.
The purpose of this recipe is to discuss the options we have so that we can move on to other, more detailed recipes.
How to do it…
If you want to run multiple physical databases on one server, then you have four main options, which are as follows:
- Option 0 (default): Run separate PostgreSQL instances in separate virtual machines on the same physical server. This is the default option in cloud systems such as EDB BigAnimal, as well as in on-premise deployments such as VMware or Kubernetes-based services.
- Option 1: Run multiple sets of tables in different schemas in one database of a PostgreSQL instance (covered in the Using multiple schemas recipe).
- Option 2: Run multiple databases in the same PostgreSQL instance (covered in the Giving users their own private databases recipe).
- Option 3: Run multiple PostgreSQL instances on the same virtual/physical system (covered in the Running multiple servers on one system recipe).
- Option 4: Place all the data in one schema and one database but use row-level security (RLS) to ensure that users only have access to some subset of the data. This provides security but not resource control or convenience.
Option 0 can be applied using virtualization technology, which is outside the scope of this book. Having said that, this is the "default" mode.
Which is best? Well, that's certainly a question many people ask, and something where many views exist. The answer lies in looking at the specific requirements, which are as follows:
- If our goal is to separate physical resources, then option 0 works best, though option 3 is also viable. Separate database servers can easily be assigned different disks, individual memory allocations can be assigned, and we can take the servers up or down without impacting the others.
- If our goal is security, then option 2 is sufficient.
- If our goal is merely to separate the tables for administrative clarity, then option 1 or option 2 can be useful.
Option 2 allows complete separation for security purposes. However, this does prevent someone with privileges on both groups of tables from performing a join between those tables. So, if there is a possibility of future cross-analytics, it might be worth considering option 1. However, it may also be argued that such analytics should be carried out on a separate data warehouse, not by co-locating production systems.
Option 3 has difficulty in many of the PostgreSQL distributions: the default installation uses a single location for the database, making it a little harder to configure that option. Ubuntu/Debian handles this aspect particularly well, making it more attractive in that environment.
Option 4 is covered in the Granting user access to specific rows recipe.
How it works…
I've seen people who use PostgreSQL with thousands of databases, but it is my opinion that the majority of people use only one database, such as postgres (or at least, only a few databases). I've also seen people with a great many schemas.
One thing you will find is that almost all admin GUI tools become significantly less useful if there are hundreds or thousands of items to display. In most cases, administration tools use a tree view, which doesn't cope gracefully with a large number of items.
Using multiple schemas
We can separate groups of tables into namespaces, referred to as schemas by PostgreSQL. In many ways, they can be thought of as being similar to directories, though that is not a precise description, and schemas are not arranged in a hierarchy.
Getting ready
Make sure you've read the Deciding on a design for multitenancy recipe so that you're certain that this is the route you wish to take. Other options exist, and they may be preferable in some cases.
How to do it…
Follow these steps:
- Schemas can easily be created using the following commands:
CREATE SCHEMA finance;
CREATE SCHEMA sales;
- Then, we can create objects directly within those schemas using fully qualified names, like this:
CREATE TABLE finance.month_end_snapshot (.....)
The default schema where an object is created is known as current_schema. We can find out what our current schema is by using the following query:
postgres=# select current_schema;
This returns an output similar to the following:
current_schema
----------------
public
(1 row)
- When we access database objects, we use the user-settable search_path parameter to identify the schemas to search for. current_schema is the first schema in the search_path parameter. There is no separate parameter for current_schema.
So, if we only want to let a specific user look at certain sets of tables, we can modify their search_path parameter. This parameter can be set for each user so that the value will be set when they connect. The SQL queries for this would be something like this:
ALTER ROLE fiona SET search_path = 'finance';
ALTER ROLE sally SET search_path = 'sales';
The public schema is not mentioned on search_path, so it will not be searched. All the tables that are created by fiona will go into the finance schema by default, whereas all the tables that are created by sally will go into the sales schema by default.
- The users for finance and sales will be able to see that the other schema exists and change search_path to use it, but we will be able to GRANT or REVOKE privileges so that they can neither create objects nor read data in other people's schemas:
REVOKE ALL ON SCHEMA finance FROM public;
GRANT ALL ON SCHEMA finance TO fiona;
REVOKE ALL ON SCHEMA sales FROM public;
GRANT ALL ON SCHEMA sales TO sally;
An alternate technique is to grant user create privileges to only one schema but grant usage rights to all other schemas. We can set up this arrangement like this:
REVOKE ALL ON SCHEMA finance FROM public;
GRANT USAGE ON SCHEMA finance TO fiona;
GRANT CREATE ON SCHEMA finance TO fiona;
REVOKE ALL ON SCHEMA sales FROM public;
GRANT USAGE ON SCHEMA sales TO sally;
GRANT CREATE ON SCHEMA sales TO sally;
GRANT USAGE ON SCHEMA sales TO fiona;
GRANT USAGE ON SCHEMA finance TO sally
- Note that you need to grant the privileges for usage on the schema, as well as specific rights on the objects in the schema. So, you will also need to issue specific grants for objects, as shown here:
GRANT SELECT ON month_end_snapshot TO public;
You can also set default privileges so that they are picked up when objects are created by using the following command:
ALTER DEFAULT PRIVILEGES FOR USER fiona IN SCHEMA finance
GRANT SELECT ON TABLES TO PUBLIC;
How it works…
Earlier, I mentioned that schemas work like directories, or at least a little.
The PostgreSQL concept of search_path is similar to the concept of a PATH environment variable.
The PostgreSQL concept of the current schema is similar to the concept of the current working directory. There is no cd command to change the directory. The current working directory is changed by altering search_path.
A few other differences exist; for example, PostgreSQL schemas are not arranged in a hierarchy like filesystem directories are.
Many people create a user with the same name as the schema to make this work in a way similar to other RDBMSs, such as Oracle.
Both the finance and sales schemas exist within the same PostgreSQL database, and they run on the same database server. They use a common buffer pool, and many global settings tie the two schemas fairly close together.
Giving users their own private databases
Separating data and users is a key part of administration. There will always be a need to give users a private, secure, or simply risk-free area (sandbox) to use the database. Here's how.
Getting ready
Again, make sure you've read the Deciding on a design for multitenancy recipe so that you're certain this is the route you wish to take. Other options exist, and they may be preferable in some cases.
How to do it…
Follow these steps to create a database with restricted access for a specific user:
- We can create a database for a specific user with some ease. From the command line, as a superuser, we can do the following:
postgres=# create user fred;
CREATE ROLE
postgres=# create database fred owner fred;
CREATE DATABASE
- As database owners, users have login privileges, so they can connect to any database by default. There is a command named ALTER DEFAULT PRIVILEGES for this; however, this does not currently apply to databases, tablespaces, or languages. The ALTER DEFAULT PRIVILEGES command also only currently applies to roles (that is, users) that already exist.
So, we need to revoke the privilege to connect to our new database from everybody except the designated user. There isn't a REVOKE ... FROM PUBLIC EXCEPT command. Therefore, we need to revoke everything and then just re-grant everything we need, all in one transaction, as shown in the following code:
postgres=# BEGIN;
BEGIN
postgres=# REVOKE connect ON DATABASE fred FROM public;
REVOKE
postgres=# GRANT connect ON DATABASE fred TO fred;
GRANT
postgres=# COMMIT;
COMMIT
postgres=# create user bob;
CREATE ROLE
- Then, try to connect as bob to the fred database:
os $ psql -U bob fred
psql: FATAL: permission denied for database "fred"
DETAIL: User does not have CONNECT privilege.
This is exactly what we wanted.
How it works…
If you didn't catch it before, PostgreSQL allows transactional DDL in most places, so either the REVOKE and GRANT commands in the preceding section work or neither works. This means that the fred user never loses the ability to connect to the database. Note that CREATE DATABASE cannot be performed as part of a transaction, though nothing serious happens as a result.
There's more…
Superusers can still connect to the new database, and there is no way to prevent them from doing so. No other users can see the tables that were created in the new database, nor can they know the names of any of the objects. The new database can be seen to exist by other users, and they can also see the name of the user who owns the database.
See also
See Chapter 6, Security, for more details on these issues.
Running multiple servers on one system
Running multiple PostgreSQL servers on one physical system is possible if it is convenient for your needs.
Getting ready
Once again, make sure that you've read the Deciding on a design for multitenancy recipe so that you're certain this is the route you wish to take. Other options exist, and they may be preferable in some cases.
How to do it…
The core version of PostgreSQL easily allows multiple servers to run on the same system, but there are a few wrinkles to be aware of.
Some installer versions create a PostgreSQL data directory named data. When this happens, it gets a little difficult to have more than one data directory without using different directory structures and names.
Debian/Ubuntu packagers chose a layout specifically designed to allow multiple servers potentially running with different software release levels. You may remember this from the Locating the database server files recipe in Chapter 2, Exploring the Database.
Starting from /var/lib/postgresql, which is the home directory of the Postgres user, there is a subdirectory for each major version, such as 10 or 9.3, inside which the individual data directories are placed. When you install PostgreSQL server packages, a data directory is created with the default name of main. Configuration files are placed separately in /etc/postgresql/<version>/<name>, and log files are created in /var/log/postgresql/postgresql-<version>-<name>.log.
Thus, not all the files will be found in the data directory. As an example, let's create an additional data directory:
- We start by running the following command:
sudo -u postgres pg_createcluster 14 main2
- Then, the new database server can be started using the following command:
sudo -u postgres pg_ctlcluster 14 main2 start
This is sufficient to create and start an additional database cluster in version 14, named main2. The data and configuration files are stored inside the /var/lib/postgresql/14/main2/ and /etc/postgresql/14/main2/ directories, respectively, giving the new database the next unused port number, such as 5433, if this is the second PostgreSQL server on that machine.
Local access to multiple PostgreSQL servers has been simplified as well. PostgreSQL client programs, such as psql, are wrapped by a special script that takes the cluster name as an additional parameter and automatically uses the corresponding port number. Hence, you don't need the following command:
psql --port 5433 -h /var/run/postgresql ...
Instead, you can refer to the database server by name, as shown here:
psql --cluster 14/main2 ...
This has its advantages, especially if you wish (or need) to change the port in the future. I find this extremely convenient, and it works with other utilities, such as pg_dump and pg_restore.
With Red Hat systems, you will need to run initdb directly, selecting your directories carefully:
- First, initialize your data directory with something such as the following:
sudo -u postgres initdb -D /var/lib/pgsql/datadir2
- Then, modify the port parameter in the postgresql.conf file and start using the following command:
sudo -u postgres pg_ctl -D /var/lib/pgsql/datadir2 start
This will create an additional database server at the default server version, with the files stored in /var/lib/pgsql/datadir2.
You can also set up the server with the chkconfig utility to ensure it starts on boot if your distribution supports it.
How it works…
PostgreSQL servers are controlled using pg_ctl. Everything else is a wrapper of some kind around this utility. The only constraints of running multiple versions of PostgreSQL come from file locations and naming conventions, assuming (of course) that you have enough resources, such as disk space and memory. Everything else is straightforward. Having said that, the Debian/Ubuntu design is currently the only design that makes it easy to run multiple servers.
Setting up a connection pool
A connection pool is a term that's used for a collection of already-connected sessions that can be used to reduce the overhead of connection and reconnection.
There are various ways by which connection pools can be provided, depending on the software stack in use. The best option is to look at the server-side connection pool software because that works for all connection types, not just within a single software stack.
In this recipe, we're going to look at PgBouncer, which is designed as a very lightweight connection pool. Its name comes from the idea that the pool can be paused and resumed to allow the server to be restarted or bounced.
Getting ready
First of all, decide where you're going to store the PgBouncer parameter files, log files, and PID files. PgBouncer can manage more than one database server's connections at the same time, though that probably isn't wise for simple architectures. If you keep the PgBouncer files associated with the database server, then it should be easy to manage.
How to do it…
Follow these steps to configure PgBouncer:
- Create a pgbouncer.ini file, as follows:
;
; pgbouncer configuration example
;
[databases]
postgres = port=5432 dbname=postgres
[pgbouncer]
listen_addr = 127.0.0.1
listen_port = 6432
admin_users = postgres
;stats_users = monitoring userid
auth_type = scram-sha-256
; put these files somewhere sensible:
auth_file = users.txt
logfile = pgbouncer.log
pidfile = pgbouncer.pid
server_reset_query = DISCARD ALL;
; default values
pool_mode = session
default_pool_size = 20
log_pooler_errors = 0
- Create a users.txt file. This must contain the minimum users mentioned in admin_users and stats_users. Its format is very simple – it's a collection of lines with a username and a password. Consider the following as an example:
"postgres" ""
- PgBouncer also supports SCRAM authentication. If the pgbouncer to server connection requires SCRAM authentication, then you must also connect from the client to pgbouncer using SCRAM authentication. To use that effectively, you need to copy the SCRAM secrets from the database server into the users.txt file.
- You may wish to create the users.txt file by directly copying the details from the server. This can be done by using the following psql script (this is the same one that is used for md5 authentication, back when that was recommended):
postgres=> o users.txt
postgres=>
postgres=> SELECT '"'||rolname||'" "'||rolpassword||'"'
postgres-> FROM pg_authid;
postgres=> q
- Launch pgbouncer:
pgbouncer -d pgbouncer.ini
- Test the connection; it should respond to reload:
psql -p 6432 -h 127.0.0.1 -U postgres pgbouncer -c "reload"
- Finally, verify that PgBouncer's max_client_conn parameter does not exceed the max_connections parameter on PostgreSQL.
How it works…
PgBouncer is a great piece of software. Its feature set is carefully defined to ensure that it is simple, robust, and very quick. PgBouncer is not multithreaded, so it runs in a single process and, thus, on a single CPU. It is very efficient, but very large data transfers will take more time and reduce concurrency, so create those data dumps using a direct connection.
PgBouncer provides connection pooling. If you set pool_mode = transaction, then PgBouncer will also provide connection concentration. This allows hundreds or even thousands of incoming connections to be managed, while only a few server connections are made.
As new connections, transactions, or statements arrive, the pool will increase in size up to the user-defined maximum values. Those connections will stay around until the server_idle_timeout value before the pool releases them.
PgBouncer also releases sessions every server_lifetime. This allows the server to free backends in rotation to avoid issues with very long-lived session connections.
The query that creates users.txt only includes database users that have a password. All other users will have a null rolpassword field, so the whole string evaluates to NULL, and the line is omitted from the password file. This is intentional; users without a password represent a security risk unless they are closely guarded. An example of this is the postgres system user connecting from the same machine, which bypasses PgBouncer, and is used only for maintenance by responsible and trusted people.
It is possible to use an HBA file with the same syntax as pg_hba.conf. This allows for more flexibility when enabling TLS encryption (which includes SSL) for connections to remote servers while using the more efficient peer authentication for local servers.
There's more…
Instead of retrieving passwords from the userlist.txt file, PgBouncer can retrieve them directly from PostgreSQL, using the optional auth_user and auth_query parameters. If auth_user is set, PgBouncer will connect to the database using that user and run auth_query every time it needs to retrieve the password of some user trying to log in. The default value of auth_query is as follows:
SELECT usename, passwd FROM pg_shadow WHERE usename=$1
This default is just a minimal functioning example, which illustrates the idea of auth_query; however, it requires giving PgBouncer superuser access to PostgreSQL. Hence, it is good practice to use the more sophisticated approach of creating a SECURITY DEFINER function that can retrieve the username and password, possibly making some checks on the username to allow only applicative connections. This is a good restriction because database administration connections should not go through a connection pooler.
It's also possible to connect to PgBouncer itself to issue commands. This can be done interactively, as if you were entering psql, or using single commands or scripts.
To shut down PgBouncer, we can just type SHUTDOWN or enter a single command, as follows:
psql -p 6432 pgbouncer -c "SHUTDOWN"
You can also use the RELOAD command to make PgBouncer reload (which means reread) the parameter files, as we did to test that everything is working.
If you are doing a switchover, you can use the WAIT_CLOSE command, followed by RELOAD or RECONNECT, to wait until the respective configuration change has been fully activated.
If you are using pool_mode = transaction or pool_mode = statement, then you can use the PAUSE command. This waits for the current transaction to complete before holding further work on that session. Thus, it allows you to perform DDL more easily or restart the server.
PgBouncer also allows you to use SUSPEND mode, which waits for all server-side buffers to flush.
The PAUSE or SUSPEND modes should eventually be followed by RESUME when the work is done.
In addition to the PgBouncer control commands, there are many varieties of SHOW commands, as shown here:
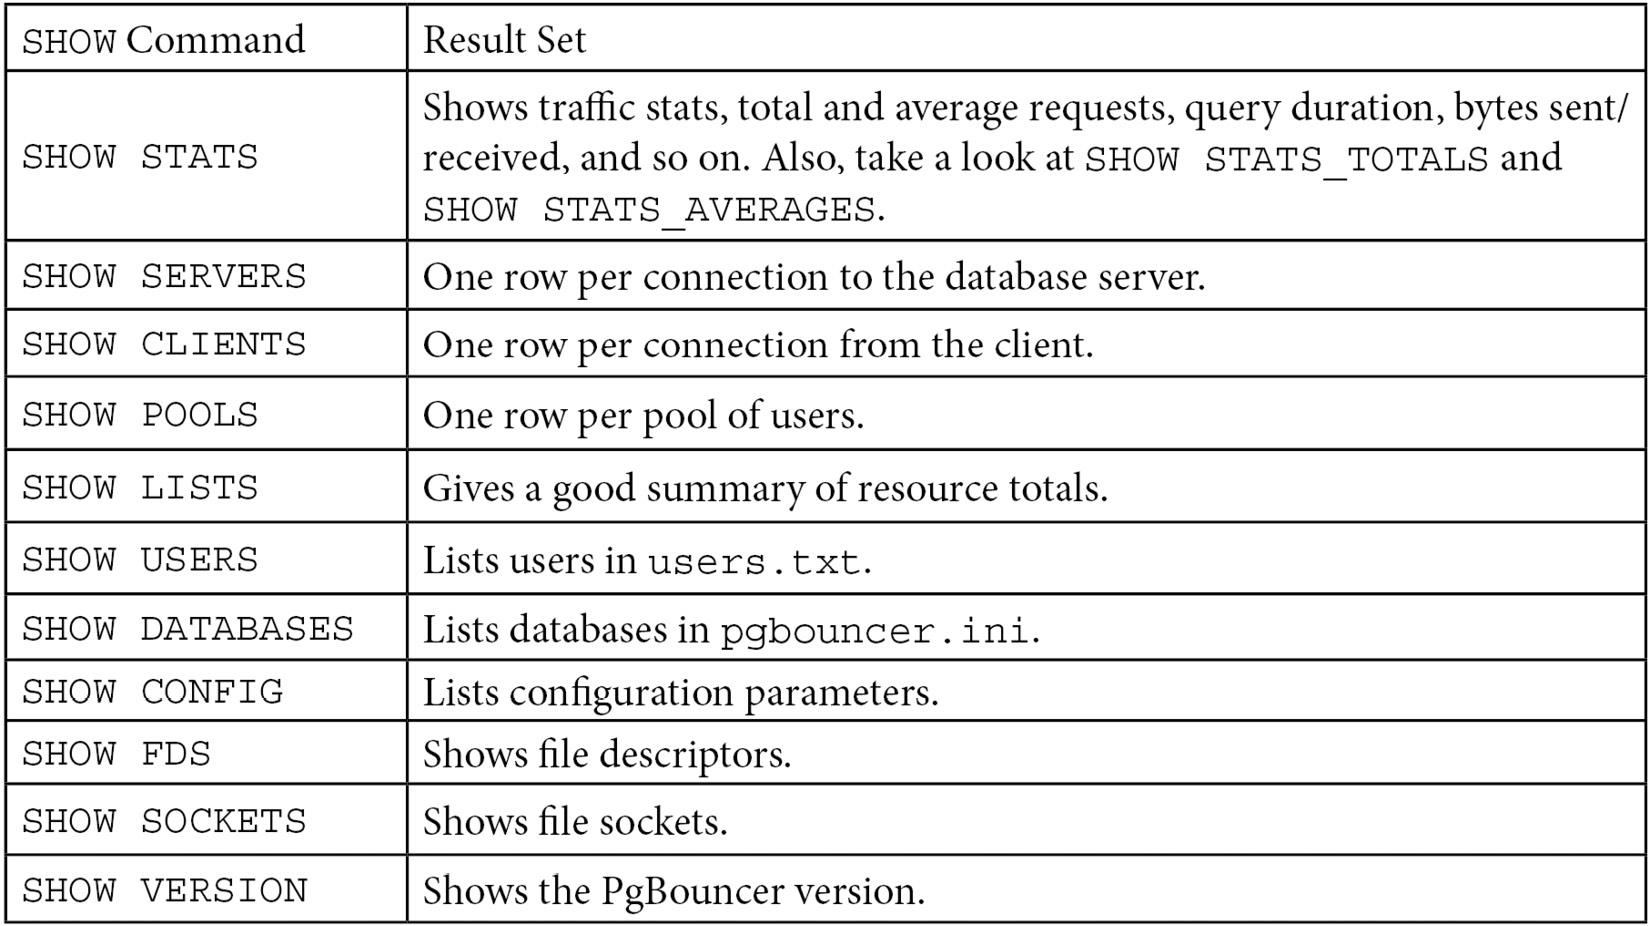
Figure 4.1 – PgBouncer SHOW commands
Accessing multiple servers using the same host and port
We will now show you one simple, yet important, application of the previous recipe, Setting up a connection pool. In that recipe, you learned how to reuse connections with PgBouncer, and thus reduce the cost of disconnecting and reconnecting.
Here, we will demonstrate another way to use PgBouncer – one instance can connect to databases hosted by different database servers at the same time. These databases can be on separate hosts and can even have different major versions of PostgreSQL!
Getting ready
Suppose we have three database servers, each one hosting one database. All you need to know beforehand is the connection string for each database server.
More complex arrangements are possible, but those are left to you as an exercise.
Before you try this recipe, you should have already gone through the previous recipe. These two recipes have many steps in common, but we've kept them separate because they have different goals.
How to do it…
Each database is identified by its connection string. PgBouncer will read this information from its configuration file. Follow these steps:
- All you need to do is set up PgBouncer, as you did in the previous recipe, by replacing the databases section of pgbouncer.ini with the following:
[databases]
myfirstdb = port=5432 host=localhost
anotherdb = port=5437 host=localhost
sparedb = port=5435 host=localhost
- Once you have started PgBouncer, you can connect to the first database:
$ psql -p 6432 -h 127.0.0.1 -U postgres myfirstdb
psql (14.1)
Type "help" for help.
myfirstdb=# show port;
port
------
5432
(1 row)
myfirstdb=# show server_version;
server_version
----------------
14.1
(1 row)
- Now, you can connect to the anotherdb database as if it were on the same server:
myfirstdb=# c anotherdb
psql (14.1, server 9.5.15)
You are now connected to database "anotherdb" as user "postgres".
- The server's greeting message suggests that we have landed on a different server, so we must check the port and the version (wow! This server needs an upgrade soon!):
anotherdb=# show port;
port
------
5437
(1 row)
anotherdb=# show server_version;
server_version
----------------
9.5.15
(1 row)
There's more…
The Listing databases on this database server recipe in Chapter 2, Exploring the Database, shows you how to list the available databases on the current database server, using either the l meta-command or a couple of equivalent variations. Unfortunately, this doesn't work when you're using PgBouncer, for the very good reason that the current database server cannot know the answer.
We need to ask PgBouncer instead, which we can do using the SHOW command when connected to the pgbouncer special administrative database:
myfirstdb=# c pgbouncer
psql (14.1, server 1.8.1/bouncer)
You are now connected to database "pgbouncer" as user "postgres".
pgbouncer=# show databases;
name | host | port | database | force_user | pool_size | reserve_pool
-----------+-----------+------+-----------+------------+-----------+---------
anotherdb | localhost | 5437 | anotherdb | | 20 | 0
myfirstdb | localhost | 5432 | myfirstdb | | 20 | 0
pgbouncer | | 6432 | pgbouncer | pgbouncer | 2 | 0
sparedb | localhost | 5435 | sparedb | | 20 | 0
(4 rows)