Chapter 6: Security
This chapter will present a few common recipes for securing your database server. Taken together, these will cover the main areas around security in PostgreSQL that you should be concerned with. The last recipe will cover some cloud-specific topics.
This chapter covers the following recipes:
- Overview of PostgreSQL security
- The PostgreSQL superuser
- Revoking user access to a table
- Granting user access to a table
- Granting user access to specific columns
- Granting user access to specific rows
- Creating a new user
- Temporarily preventing a user from connecting
- Removing a user without dropping their data
- Checking whether all users have a secure password
- Giving limited superuser powers to specific users
- Auditing database access
- Always knowing which user is logged in
- Integrating with Lightweight Directory Access Protocol (LDAP)
- Connecting using encryption SSL GSS API)
- Using SSL certificates to authenticate
- Mapping external usernames to database roles
- Using column-level encryption
- Setting up cloud security using predefined roles
Overview of PostgreSQL security
Security is a huge area of related methods and technologies, so we will take a practical approach, covering the most common issues related to database security.
First, we set up access rules in the database server. PostgreSQL allows you to control access based upon the host that is trying to connect, using the pg_hba.conf file. You can specify SSL/GSSAPI connections if needed or skip that if the network is secure. Passwords are encrypted using SCRAM-SHA-256, but many other authentication methods are available.
Next, set up the role and privileges for accessing your data. Modern databases should be configured using the principle of least privilege (POLP). Data access is managed by a privilege system, where users are granted different privileges for different tables or other database objects, such as schemas or functions. Thus, some records or tables can only be seen by certain users, and even those tables that are visible to everyone can have restrictions in terms of who can insert new data or change existing data.
It is good practice not to grant privileges directly to users, but to instead use an intermediate role to collect a set of privileges. This is easier to audit and is more extensible. Then, instead of granting all the same privileges to the actual user, the entire role is granted to users needing these privileges. For example, a clerk role may have the right to both insert data and update existing data in the user_account table but may have the right to only insert data in the transaction_history table.
Fine-grained control over access can be managed using the Row-Level Security (RLS) feature, which allows a defined policy on selected tables.
Another aspect of database security concerns the management of this access to the database: making sure that only the right people can access the database; that one user can't see what other users are doing (unless they are an administrator or auditor); and deciding whether users can or cannot pass on the roles granted to them.
You should consider auditing the actions of administrators using pgaudit, though there is also audit functionality within EDB Postgres Advanced Server.
Some aspects of security are also covered in Chapter 7, Database Administration, and Chapter 8, Monitoring and Diagnosis, of this book, PostgreSQL Administration Cookbook.
Typical user roles
The minimal production database setup contains at least two types of users—namely, administrators and end users—where administrators can do many things and end users can only do very little, usually just modifying the data in only a few tables and reading from a few more.
It is not a good idea to let ordinary users create or change database object definitions, meaning that they should not have the CREATE privilege on any schema, including PUBLIC.
There can be more roles for different types of end users, such as analysts, who can only select from a single table or view, or some maintenance script users who see no data at all and just have the ability to execute a few functions.
Alternatively, there can also be a manager role, which can grant and revoke roles for other users but is not supposed to do anything else.
The PostgreSQL superuser
A PostgreSQL superuser is a user that bypasses all permission checks, except the right to log in. Superuser is a dangerous privilege and should not be used carelessly, and many cloud databases do not allow this level of privilege to be granted at all. It is normal to place strict controls on users of this type. If you are using PostgreSQL in a cloud service, then please read the Setting up cloud security using predefined roles recipe instead.
In this recipe, you will learn how to grant the right to a user to become a superuser.
How to do it…
Follow the next steps to add or remove superuser privileges for any user.
- A user becomes a superuser when they are created with the SUPERUSER attribute set:
CREATE USER username SUPERUSER;
- A user can be deprived of their superuser status by removing the SUPERUSER attribute using this command:
ALTER USER username NOSUPERUSER;
- A user can be restored to superuser status later using the following command:
ALTER USER username SUPERUSER;
- When neither SUPERUSER nor NOSUPERUSER is given in the CREATE USER command, then the default is to create a user who is not a superuser.
How it works…
The rights to some operations in PostgreSQL are not available by default and need to be granted specifically to users. They must be performed by a special user who has this special attribute set. The preceding commands set and reset this attribute for the user.
There's more…
The PostgreSQL system comes set up with at least one superuser. Most commonly, this superuser is named postgres, but occasionally, it adopts the same name as the system user who owns the database directory and with whose rights the PostgreSQL server runs.
Other superuser-like attributes
In addition to SUPERUSER, there are two lesser attributes—CREATEDB and CREATEUSER—that give the user only some of the power reserved for superusers: namely, creating new databases and users. See the Giving limited superuser powers to specific users recipe for more information on this.
See also
Also, check out the Always knowing which user is logged in recipe in this chapter.
Revoking user access to a table
This recipe answers the question How do I make sure that user X cannot access table Y?
Getting ready
The current user must either be a superuser, the owner of the table, or a user with a GRANT option for the table.
Also, bear in mind that you can't revoke rights from a user who is a superuser.
How to do it…
To revoke all rights on the table1 table from the user2 user, you must run the following SQL command:
REVOKE ALL ON table1 FROM user2;
However, if user2 has been granted another role that gives them some rights on table1—say, role3—this command is not enough; you must also choose one of the following options:
- Fix the user—that is, revoke role3 from user2
- Fix the role—that is, revoke privileges on table1 from role3
Both choices are imperfect because of their side effects. The former will revoke all of the privileges associated with role3, not just the privileges concerning table1; the latter will revoke the privileges on table1 from all other users that have been granted role3, not just from user2.
It is normally better to avoid damaging other legitimate users, so we opt for the first solution. We'll now look at a working example.
Using psql, display a list of roles that have been granted at least one privilege on table1 by issuing z table1. For instance, you can obtain the following output (an extra column about column privileges has been removed from the right-hand side because it was not relevant here):
Access privileges
Schema | Name | Type | Access privileges | ...
--------+--------+-------+---------------------------+ ...
public | table1 | table | postgres=arwdDxt/postgres+| ...
| | | role3=r/postgres +| ...
| | | role5=a/postgres | ...
(1 row)
Then, we check whether user2 is a member of any of those roles by typing du user2:
List of roles
Role name | Attributes | Member of
-----------+------------+---------------
user2 | | {role3, role4}
In the previous step, we notice that role3 had been granted the SELECT privilege (r for read) by the postgres user, so we must revoke it, as follows:
REVOKE role3 FROM user2;
We must also inspect role4. Even if it doesn't have privileges on table1, in theory, it could be a member of one of the three roles that have privileges on that table. We issue du role4 and get the following output:
List of roles
Role name | Attributes | Member of
-----------+--------------+-----------
role4 | Cannot login | {role5}
Our suspicion was well-founded: user2 can get the INSERT privilege (a for append) on table1, first via role4 and then via role5. So, we must break this two-step chain, as follows:
REVOKE role4 FROM user2;
This example may seem too unlikely to be true. We unexpectedly gain access to the table via a chain of two different role memberships, which was made possible by the fact that a non-login role, such as role4, was made a member of another non-login role—that is, role5. In most real-world cases, superusers will know whether such chains exist at all, so there will be no surprises; however, the goal of this recipe is to make sure that the user cannot access the table, meaning we cannot exclude less-likely options. See also the later recipe, Auditing database access.
How it works…
The z command, as well as its synonym, dp, displays all privileges granted on tables, views, and sequences. If the Access privileges column is empty, it means we use default privileges—that is, all privileges are given to the owner (and the superusers, as always).
The du command shows you the attributes and roles that have been granted to roles.
Both commands accept an optional name or pattern to restrict the display.
There's more…
Here, we'll cover some good practices on user and role management.
Database creation scripts
For production systems, it is usually a good idea to always include GRANT and REVOKE statements in the database creation script so that you can be sure that only the right set of users has access to the table. If this is done manually, it is easy to forget. Also, in this way, you can be sure that the same roles are used in development and testing environments so that there are no surprises at deployment time.
Here is an extract from the database creation script:
CREATE TABLE table1(
...
);
GRANT SELECT ON table1 TO webreaders;
GRANT SELECT, INSERT, UPDATE, DELETE ON table1 TO editors;
GRANT ALL ON table1 TO admins;
Default search path
It is always good practice to use a fully qualified name when revoking or granting rights; otherwise, you may be inadvertently working with the wrong table.
To see the effective search path for the current database, run the following code:
pguser=# show search_path ;
search_path
----------------
"$user",public
(1 row)
To see which table will be affected if you omit the schema name, run the following code in psql:
pguser=# d x
Table "public.x"
Column | Type | Modifiers
--------+------+-----------
The public.x table name in the response contains the full name, including the schema.
Securing views
It is a common technique to use a view to disclose only some parts of a secret table; however, a clever attacker can use access to the view to display the rest of the table using log messages. For instance, consider the following example:
CREATE VIEW for_the_public AS
SELECT * FROM reserved_data WHERE importance < 10;
GRANT SELECT ON for_the_public TO PUBLIC;
A malicious user could define the following function:
CREATE FUNCTION f(text)
RETURNS boolean
COST 0.00000001
LANGUAGE plpgsql AS $$
BEGIN
RAISE INFO '$1: %', $1;
RETURN true;
END;
$$;
They could use it to filter rows from the view:
SELECT * FROM for_the_public x WHERE f(x :: text);
The PostgreSQL optimizer will then internally rearrange the query, expanding the definition of the view and then combining the two filter conditions into a single WHERE clause. The trick here is that the function has been told to be very cheap using the COST keyword, so the optimizer will choose to evaluate that condition first. In other words, the function will access all of the rows in the table, as you will realize when you see the corresponding INFO lines on the console if you run the code yourself.
This security leak can be prevented using the security_barrier attribute:
ALTER VIEW for_the_public SET (security_barrier = on);
This means that the conditions that define the view will always be computed first, irrespective of cost considerations.
The performance impact of this fix can be mitigated by the LEAKPROOF attribute for functions. In short, a function that cannot leak information other than its output value can be marked as LEAKPROOF by a superuser so that the planner will know it's secure enough to compute the function before the other view conditions.
Granting user access to a table
A user needs to have access to a table in order to perform any actions on it.
Getting ready
Make sure that you have the appropriate roles defined and that privileges are revoked from the PUBLIC role:
CREATE GROUP webreaders;
CREATE USER tim;
CREATE USER bob;
REVOKE ALL ON SCHEMA someschema FROM PUBLIC;
How to do it…
We had to grant access to the schema in order to allow access to the table. This suggests that access to a given schema can be used as a fast and extreme way of preventing any access to any object in that schema. Otherwise, if you want to allow some access, you must use specific GRANT and REVOKE statements, as needed:
GRANT USAGE ON SCHEMA someschema TO webreaders;
It is often desirable to give a group of users similar permissions to a group of database objects. To do this, you first assign all the permissions to a proxy role (also known as a permission group), and then assign the group to selected users, as follows:
GRANT SELECT ON someschema.pages TO webreaders;
GRANT INSERT ON someschema.viewlog TO webreaders;
GRANT webreaders TO tim, bob;
Now, both tim and bob have the SELECT privilege on the pages table and INSERT on the viewlog table. You can also add privileges to the group role after assigning it to users. Consider the following command:
GRANT INSERT, UPDATE, DELETE ON someschema.comments TO webreaders;
After running this command, both bob and tim have all of the aforementioned privileges on the comments table.
This assumes that both the bob and tim roles were created with the INHERIT default setting. Otherwise, they do not automatically inherit the rights of roles but need to explicitly set their role to the granted user to make use of the privileges granted to that role.
We can grant privileges on all objects of a certain kind in a specific schema, as follows:
GRANT SELECT ON ALL TABLES IN SCHEMA someschema TO bob;
You still need to grant the privileges on the schema itself in a separate GRANT statement.
How it works...
The preceding sequence of commands first grants access to a schema for a group role, then gives appropriate viewing (SELECT) and modifying (INSERT) rights on certain tables to the role, and finally grants membership in that role to two database users.
There's more…
There is no requirement in PostgreSQL to have some privileges in order to have others. This means that you may well have write-only tables where you are allowed to insert but you can't select. This can be used to implement a mail-queue-like functionality, where several users post messages to one user but can't see what other users have posted.
Alternatively, you could set up a situation where you can write a record, but you can't change or delete it. This is useful for auditing log-type tables, where all changes are recorded but cannot be tampered with.
Granting user access to specific columns
A user can be given access to only some table columns.
Getting ready
We will continue the example from the previous recipe, so we assume that there is already a schema called someschema and a role called somerole with USAGE privileges on it. We create a new table on which we will grant column-level privileges:
CREATE TABLE someschema.sometable2(col1 int, col2 text);
How to do it…
We want to grant somerole the ability to view existing data and insert new data; we also want to provide the ability to amend existing data, limited to the col2 column only. We use the following self-evident statements:
GRANT SELECT, INSERT ON someschema.sometable2
TO somerole;
GRANT UPDATE (col2) ON someschema.sometable2
TO somerole;
We can then test whether this has worked successfully, as follows:
- Let's assume the identity of the somerole role and test these privileges with the following commands:
SET ROLE TO somerole;
INSERT INTO someschema.sometable2 VALUES (1, 'One');
SELECT * FROM someschema.sometable2 WHERE col1 = 1;
- As expected, we are able to insert a new row and view its contents. Let's now check our ability to update individual columns. We start with the second column, which we have authorized:
UPDATE someschema.sometable2 SET col2 = 'The number one';
This command returns the familiar output:
UPDATE 1
- This means that we were able to successfully update that column in one row. Now, we try to update the first column:
UPDATE someschema.sometable2 SET col1 = 2;
This time, we get the following error message:
ERROR: permission denied for relation sometable2
This confirms that, as planned, we only authorized updates to the second column.
How it works…
The GRANT command has been extended to allow for specifying a list of columns, meaning that the privilege is granted on that list of columns, rather than on the whole table.
There's more…
Consider a table, t, with c1, c2, and c3 columns; there are two different ways of authorizing the user (u) to perform the following query:
SELECT * FROM t;
The first is by granting a table-level privilege, as follows:
GRANT SELECT ON TABLE t TO u;
The alternative way is by granting column-level privileges, as follows:
GRANT SELECT (c1,c2,c3) ON TABLE t TO u;
Despite these two methods having overlapping effects, table-level privileges are distinct from column-level privileges, which is correct since the meaning of each is different. Granting privileges on a table means giving them to all columns present and future, while column-level privileges require the explicit indication of columns and, therefore, don't extend automatically to new columns.
The way privileges work in PostgreSQL means that a given role will be allowed to perform a given action if it matches one of its privileges. This creates some ambiguity in overlapping areas. For example, consider the following command sequence:
GRANT SELECT ON someschema.sometable2 TO somerole;
REVOKE SELECT (col1) ON someschema.sometable2 FROM
somerole;
The outcome, somehow surprisingly, will be that somerole is allowed to view all of the columns of that table using the table-level privilege granted by the first command. The second command was ineffective because it tried to revoke a column-level privilege (SELECT on col1) that was never granted in the first place.
Granting user access to specific rows
PostgreSQL supports granting privileges on a subset of rows in a table using RLS.
Getting ready
Just as we did for the previous recipe, we assume that there is already a schema called someschema and a role called somerole with USAGE privileges on it. We create a new table to experiment with row-level privileges:
CREATE TABLE someschema.sometable3(col1 int, col2 text);
RLS must also be enabled on that table:
ALTER TABLE someschema.sometable3 ENABLE ROW LEVEL SECURITY;
How to do it…
First, we grant somerole the privilege to view the contents of the table, as we did in the previous recipe:
GRANT SELECT ON someschema.sometable3 TO somerole;
Let's assume that the contents of the table are as shown by the following command:
SELECT * FROM someschema.sometable3;
col1 | col2
------+-----------
1 | One
-1 | Minus one
(2 rows)
In order to grant the ability to access some rows only, we create a policy specifying what is allowed and on which rows. For instance, this way, we can enforce the condition that somerole is only allowed to select rows with positive values of col1:
CREATE POLICY example1 ON someschema.sometable3
FOR SELECT
TO somerole
USING (col1 > 0);
The effect of this command is that the rows that do not satisfy the policy are silently skipped, as shown when somerole issues the following command:
SELECT * FROM someschema.sometable3;
col1 | col2
------+-----------
1 | One
(1 row)
What if we want to introduce a policy on the INSERT clause? The preceding policy shows how the USING clause specifies which rows are affected. There is also a WITH CHECK clause that can be used to specify which inserts are accepted. More generally, the USING clause applies to pre-existing rows, while WITH CHECK applies to rows that are generated by the statement being analyzed. So, the former works with SELECT, UPDATE, and DELETE, while the latter works with INSERT and UPDATE.
Coming back to our example, we may want to allow inserts only where col1 is positive:
CREATE POLICY example2 ON someschema.sometable3
FOR INSERT
TO somerole
WITH CHECK (col1 > 0);
We must also remember to allow INSERT commands on the table, as we did before with SELECT:
GRANT INSERT ON someschema.sometable3 TO somerole;
SELECT * FROM someschema.sometable3;
col1 | col2
------+-----------
1 | One
(1 row)
Now, we are able to insert a new row and to see it afterward:
INSERT INTO someschema.sometable3 VALUES (2, 'Two');
SELECT * FROM someschema.sometable3;
col1 | col2
------+-----------
1 | One
2 | Two
(2 rows)
How it works…
RLS policies are created and dropped on a given table using the CREATE POLICY syntax. The RLS policy itself must also be enabled explicitly on the given table because it is disabled by default.
In the previous example, we needed to grant privileges on the table or on the columns, in addition to creating an RLS policy. This is because RLS is not one more privilege to be added to the other; rather, it works as an additional check. In this sense, it is convenient that it is off by default, as we have to create policies only on the tables where our access logic depends on the row contents.
There's more...
RLS can lead to very complex configurations for a variety of reasons, as in the following instances:
- An UPDATE policy can specify both the rows on which we act and which changes can be accepted.
- UPDATE and DELETE policies, in some cases, require visibility as granted by an appropriate SELECT policy.
- UPDATE policies are also applied to INSERT ... ON CONFLICT DO UPDATE.
We recommend reading the finer details at the following URL: https://www.postgresql.org/docs/current/static/ddl-rowsecurity.html
Creating a new user
In this recipe, we will show you two ways of creating a new database user—one with a dedicated command-line utility and another using SQL commands.
Getting ready
To create new users, you must either be a superuser or have the CREATEROLE or CREATEROLE privilege.
How to do it...
From the command line, you can run the createuser command:
pguser@hvost:~$ createuser bob
If you add the --interactive command-line option, you activate the interactive mode, which means you will be asked some questions, as follows:
pguser@hvost:~$ createuser --interactive alice
Shall the new role be a superuser? (y/n) n
Shall the new role be allowed to create databases? (y/n) y
Shall the new role be allowed to create more new roles? (y/n) n
Without --interactive, the preceding questions get no as the default answer; you can change that with the -s, -d, and -r command-line options.
In interactive mode, questions are asked only if they make sense. One example is when the user is a superuser; no other questions are asked because a superuser is not subject to privilege checks. Another example is when one of the preceding options is used to specify a non-default setting; the corresponding question will not be asked.
How it works…
The createuser program is just a shallow wrapper around the executing SQL against the database cluster. It connects to the postgres database and then executes SQL commands for user creation. To create the same users through SQL, you can issue the following commands:
CREATE USER bob;
CREATE USER alice CREATEDB;
There's more…
You can check the attributes of a given user in psql, as follows:
pguser=# du alice
This gives you the following output:
List of roles
Role name | Attributes | Member of
-----------+------------+-----------
alice | Create DB | {}
The CREATE USER and CREATE GROUP commands are actually variations of CREATE ROLE. The CREATE USER username; statement is equivalent to CREATE ROLE username LOGIN;, and the CREATE GROUP groupname; statement is equivalent to CREATE ROLE groupname NOLOGIN;.
Temporarily preventing a user from connecting
Sometimes, you need to temporarily revoke a user's connection rights without actually deleting the user or changing the user's password. This recipe presents ways of doing this.
Getting ready
To modify other users, you must either be a superuser or have the CREATEROLE privilege (in the latter case, only non-superuser roles can be altered).
How to do it…
Follow these steps to temporarily prevent and reissue the logging-in capability to a user:
- To temporarily prevent the user from logging in, run this command:
pguser=# alter user bob nologin;
ALTER ROLE
- To let the user connect again, run the following command:
pguser=# alter user bob login;
ALTER ROLE
How it works...
This sets a flag in the system catalog, telling PostgreSQL not to let the user log in. It does not kick out already connected users.
There's more…
Here are some additional remarks.
Limiting the number of concurrent connections by a user
The same result can be achieved by setting the connection limit for that user to 0:
pguser=# alter user bob connection limit 0;
ALTER ROLE
To allow 10 concurrent connections for the bob user, run this command:
pguser=# alter user bob connection limit 10;
ALTER ROLE
To allow an unlimited number of connections for this user, run the following command:
pguser=# alter user bob connection limit -1;
ALTER ROLE
Allowing unlimited connections to PostgreSQL concurrently could allow a denial-of-service (DoS) attack by exhausting connection resources; also, a system could fail or degrade by an overload of legitimate users. To reduce these risks, you may wish to limit the number of concurrent sessions per user.
Forcing NOLOGIN users to disconnect
In order to make sure that all users whose login privileges have been revoked are disconnected right away, run the following SQL statement as a superuser:
SELECT pg_terminate_backend(pid)
FROM pg_stat_activity a
JOIN pg_roles r ON a.usename = r.rolname AND NOT rolcanlogin;
This disconnects all users who are no longer allowed to connect by terminating the backends opened by these users.
Removing a user without dropping their data
When trying to drop a user who owns some tables or other database objects, you get the following error, and the user is not dropped:
testdb=# drop user bob;
ERROR: role "bob" cannot be dropped because some objects depend on it
DETAIL: owner of table bobstable
owner of sequence bobstable_id_seq
This recipe presents two solutions to this problem.
Getting ready
To modify users, you must either be a superuser or have the CREATEROLE privilege.
How to do it…
The easiest solution to this problem is to refrain from dropping the user and use the trick from the Temporarily preventing a user from connecting recipe to prevent the user from connecting:
pguser=# alter user bob nologin;
ALTER ROLE
This has the added benefit of the original owner of the table being available later, if needed, for auditing or debugging purposes (Why is this table here? Who created it?).
Then, you can assign the rights of the deleted user to a new user, using the following code:
pguser=# GRANT bob TO bobs_replacement;
GRANT
How it works…
As noted previously, a user is implemented as a role with the login attribute set. This recipe works by removing that attribute from the user, which is then kept just as a role.
If you really need to get rid of a user, you have to assign all ownership to another user. To do so, run the following query, which is a PostgreSQL extension to standard SQL:
REASSIGN OWNED BY bob TO bobs_replacement;
It does exactly what it says: it assigns ownership of all database objects currently owned by the bob role to the bobs_replacement role.
However, you need to have privileges on both the old and the new roles to do that, and you need to do it in all databases where bob owns any objects, as the REASSIGN OWNED command works only on the current database.
After this, you can delete the original user, bob.
Checking whether all users have a secure password
By default, as of PostgreSQL 14, passwords are encrypted using the SCRAM-SHA-256 login method for users, which was added in PostgreSQL 10. Any servers upgrading from earlier versions should upgrade from MD5 to SCRAM-SHA-256 password encryption since the MD5 authentication method is considered insecure for many applications.
For client applications connecting from trusted private networks, either real or a virtual private network (VPN), you may use host-based access, provided you know that the machine on which the application is running is not used by some non-trusted individuals. For remote access over public networks, it may be a better idea to use SSL client certificates. See the later recipe, Using SSL certificates to authenticate, for more on this.
How to do it…
To see which users don't yet have SCRAM-encrypted passwords, use this query:
test2=# select usename,passwd from pg_shadow where passwd
not like 'SCRAM%' or passwd is null;
usename | passwd
----------+--------------
tim | weakpassword
asterisk | md5chicken
(2 rows)
How it works…
The password_encryption parameter decides how the ALTER USER statement will encrypt the password. This should be set globally in the postgresql.conf file or by using ALTER SYSTEM. As of PostgreSQL 14, the default value is scram-sha-256.
Having the passwords encrypted in the database is just half of the equation. The bigger problem is making sure that users actually use passwords that are hard to guess. Passwords such as password, secret, or test are out of the question, and most common words are not good passwords either.
As of PostgreSQL14, passwords can be of arbitrary length. However, on PgBouncer, there is a limit of 996 characters, so that is the reasonable limit. Note that usernames can be—at most—63 characters.
If you don't trust your users to select strong passwords, you can write a wrapper application that checks the password strength and make them use that when changing passwords. A contrib module lets you do this for a limited set of cases (the password is sent from client to server in plain text). Visit http://www.postgresql.org/docs/current/static/passwordcheck.html for more information on this.
Giving limited superuser powers to specific users
The superuser role has some privileges that can also be granted to non-superuser roles separately.
To give the bob role the ability to create new databases, run this:
ALTER ROLE BOB WITH CREATEDB;
To give the bob role the ability to create new users, run the following command:
ALTER ROLE BOB WITH CREATEROLE;
Note that the PostgreSQL documentation warns against doing the preceding action:
"Be careful with the CREATEROLE privilege. There is no concept of inheritance for the privileges of a CREATEROLE-role. That means that even if a role does not have a certain privilege but is allowed to create other roles, it can easily create another role with different privileges than its own (except for creating roles with superuser privileges). For example, if the role "user" has the CREATEROLE privilege but not the CREATEDB privilege, nonetheless it can create a new role with the CREATEDB privilege. Therefore, regard roles that have the CREATEROLE privilege as almost-superuser-roles."
(https://www.postgresql.org/docs/current/sql-createrole.html)
It is also possible to give ordinary users more fine-grained and controlled access to an action reserved for superusers using security definer functions. The same trick can also be used to pass partial privileges between different users.
Getting ready
First, you must have access to the database as a superuser in order to delegate powers. Here, we assume we are using a default superuser named postgres.
We will demonstrate two ways to make some superuser-only functionality available to a selected ordinary user.
How to do it…
An ordinary user cannot tell PostgreSQL to copy table data from a file. Only a superuser can do that, as follows:
pguser@hvost:~$ psql -U postgres
test2
...
test2=# create table lines(line text);
CREATE TABLE
test2=# copy lines from '/home/bob/names.txt';
COPY 37
test2=# SET ROLE to bob;
SET
test2=> copy lines from '/home/bob/names.txt';
ERROR: must be superuser to COPY to or from a file
HINT: Anyone can COPY to stdout or from stdin. psql's copy command also works for anyone.
To let bob copy directly from the file, the superuser can write a special wrapper function for bob, as follows:
create or replace function copy_from(tablename text, filepath text)
returns void
security definer
as
$$
declare
begin
execute 'copy ' || quote_ident(tablename)
|| ' from ' || quote_literal(filepath) ;
end;
$$ language plpgsql;
It is usually a good idea to restrict the use of such a function to the intended user only:
revoke all on function copy_from( text, text) from public;
grant execute on function copy_from( text, text) to bob;
You may also want to verify that bob imports files only from his home directory.
Unfortunately, this solution is not completely secure against superuser privilege escalation by a malicious attacker. This is because the execution of the COPY command inside the function will also cause the execution, as the postgres user, of all side effects, such as the execution of any INSERT trigger, the computation of any CHECK constraint, the computation of any functional index, and more.
In other words, if the user wants to execute a given function as the superuser, it's enough to put that function inside any of the preceding functions.
There are a few workarounds for this security hole, none of which is optimal.
You can require that the table has no triggers and CHECK constraints and functional indexes.
Instead of running COPY on the given table, create a new table with the same structure using the CREATE newtable(LIKE oldtable) syntax. Run COPY against the new table, drop the old table, and give the new table the same name as the old one.
How it works…
When a function defined with security definer is called, PostgreSQL changes the session's rights to those of the user who defined the function while that function is being executed.
So, when bob executes the copy_from(tablename, filepath) function, bob is effectively promoted to a superuser when the function is running.
This behavior is similar to the setuid flag in Unix systems, where you can have a program that can be run by anybody (with execute access) as the owner of that program. It also carries similar risks.
There's more…
There are other operations that are reserved for PostgreSQL superusers, such as setting certain parameters.
Writing a debugging_info function for developers
Several of the parameters controlling logging are reserved for superusers.
If you want to allow some of your developers to set logging, you can write a function for them to do exactly that:
create or replace function debugging_info_on()
returns void
security definer
as
$$
begin
set client_min_messages to 'DEBUG1';
set log_min_messages to 'DEBUG1';
set log_error_verbosity to 'VERBOSE';
set log_min_duration_statement to 0;
end;
$$ language plpgsql;
revoke all on function debugging_info_on() from public;
grant execute on function debugging_info_on() to bob;
You may also want to have a function go back to the default logging state by assigning DEFAULT to all of the variables involved:
create or replace function debugging_info_reset()
returns void
security definer
as
$$
begin
set client_min_messages to DEFAULT;
set log_min_messages to DEFAULT;
set log_error_verbosity to DEFAULT;
set log_min_duration_statement to DEFAULT;
end;
$$ language plpgsql;
There's no need for GRANT and REVOKE statements here, as setting them back to the default does not pose a security risk. Instead of SET xxx to DEFAULT, you can also use a shorter version of the same command—namely, RESET xxx.
Alternatively, you can simply end your session, as the parameters are valid only for the current session.
Auditing database access
Auditing database access is a much bigger topic than you might expect because it can cover a whole range of requirements.
Getting ready
First, decide which of these you want and look at the appropriate subsection:
- Which privileges can be executed? (Auditing access)
- Which SQL statements were executed? (Auditing SQL)
- Which tables were accessed? (Auditing table access)
- Which data rows were changed? (Auditing data changes)
- Which data rows were viewed? (Not described here—usually too much data)
Auditing just SQL produces the lowest volume of audit log information, especially if you choose to log only data definition language (DDL). Higher levels accumulate more information very rapidly, so you may quickly decide not to do this in practice. Read each section to understand the benefits and trade-offs.
Auditing access
Reviewing which users have access to which information is important. There are a few ways of doing this:
- Write scripts that access the database catalog tables. Access control list (ACL) information is not held in one place, so you have lots of places to look at:
cookbook=# select relname, attname
from pg_attribute join pg_class c on attrelid = c.oid
where attname like '%acl%' and relkind = 'r';
relname | attname
-------------------------+-----------------
pg_proc | proacl
pg_type | typacl
pg_attribute | attacl
pg_class | relacl
pg_language | lanacl
pg_largeobject_metadata | lomacl
pg_namespace | nspacl
pg_database | datacl
pg_tablespace | spcacl
pg_foreign_data_wrapper | fdwacl
pg_foreign_server | srvacl
pg_default_acl | defaclrole
pg_default_acl | defaclnamespace
pg_default_acl | defaclobjtype
pg_default_acl | defaclacl
(15 rows)
- Write scripts that test access conforms to a specific definition. This can be achieved by writing tests using the database information functions provided by PostgreSQL—for example, has_table_privilege(), has_column_privilege(), and so on.
Auditing SQL
There are a few ways to capture SQL statements:
- Using the PostgreSQL log_statement parameter—a fairly crude approach
- Using the pgaudit extension's pgaudit.log parameter
- Using EDB Postgres' audit facility
The log_statement parameter can be set to one of the following options:
- ALL: Logs all SQL statements executed at the top level
- MOD: Logs all SQL statements for INSERT, UPDATE, DELETE, and TRUNCATE
- ddl: Logs all SQL statements for DDL commands
- NONE: No statements logged
For example, to log all DDL commands, edit your postgresql.conf file to set the following:
log_statement = 'ddl'
log_statement SQL statements are explicitly given in top-level commands. It is still possible to perform SQL without it being logged by this setting if you use any of the Python Languages (PLs), either through DO statements or by calling a function that includes SQL statements.
Was the change committed? It is possible to have some statements recorded in the log file but for these not to be visible in the database structure. Most DDL commands in PostgreSQL can be rolled back, so what is in the log is just a list of commands executed by PostgreSQL—not what was actually committed. The log file is not transactional, and it keeps commands that were rolled back. It is possible to display the transaction identifier (TID) on each log line by including %x in the log_line_prefix setting, though that has some difficulties in terms of usage.
Who made the changes? To be able to know which database user made the DDL changes, you have to make sure that this information is logged as well. In order to do so, you may have to change the log_line_prefix parameter to include the %u format string.
A recommended minimal log_line_prefix format string for auditing DDL is %t %u %d, which tells PostgreSQL to log the timestamp, database user, and database name at the start of every log line.
The pgaudit extension provides two levels of audit logging: session and object levels. The session level has been designed to solve some of the problems of log_statement. pgaudit will log all access, even if it is not executed as a top-level statement, and it will log all dynamic SQL. pgaudit.log can be set to include zero or more of the following settings:
- READ: SELECT and COPY
- WRITE: INSERT, UPDATE, DELETE, TRUNCATE, and COPY
- FUNCTION: Function calls and DO blocks
- ROLE: GRANT, REVOKE, CREATE/ALTER/DROP ROLE
- DDL: All DDL not already included in the ROLE category
- MISC: Miscellaneous—DISCARD, FETCH, CHECKPOINT, VACUUM, and so on
For example, to log all DDL commands, edit your postgresql.conf file to set the following:
pgaudit.log = 'role, ddl'
You should set these parameters to reduce the overhead of logging:
pgaudit.log_catalog = off
pgaudit.log_relation = off
pgaudit.log_statement_once = on
The pgaudit extension was originally written by Simon Riggs and Abhijit Menon-Sen of 2ndQuadrant as part of the Advanced Analytics for Extremely Large European Databases (AXLE) project for the European Union (EU). The next version was designed by Simon Riggs and David Steele to provide object-level logging. The original version was deprecated and is no longer available. The new version is fully supported and has been adopted by the United States Department of Defense (US DoD) as the tool of choice for PostgreSQL audit logging.
pgaudit is available in binary form via postgresql.org repositories.
Auditing table access
pgaudit can log access to each table. So, if an SQL table touches three tables, then it can generate three log records, one for each table. This is important because otherwise, you might have to try to parse the SQL to find out which tables it touched, which would be difficult without access to the schema and the search_path settings.
To make it easier to access the audit log per table, adjust these settings:
pgaudit.log_relation = on
pgaudit.log_statement_once = off
If you want even finer-grained auditing, pgaudit allows you to control which tables are audited. The user cannot tell which tables are logged and which are not, so it is possible for investigators to quietly enhance the level of logging once they are alerted to a suspect or a potential attack.
First, set the role that will be used by the auditor:
pgaudit.role = 'investigator'
Then, you can define logging through the privilege system, as in the following command:
GRANT INSERT, UPDATE, DELETE on <vulnerable_table> TO investigator;
Remove it again when no longer required.
Privileges may be set at the individual column level to protect personally identifiable information (PII).
Managing the audit log
Both log_statement and pgaudit output audit log records to the server log. This is the most flexible approach since the log can be routed in various ways to ensure it is safe and separate from normal log entries.
If you allow the log entries to go the normal server log, you can find all occurrences of the CREATE, ALTER, and DROP commands in the log:
postgres@hvost:~$ egrep -i "create|alter|drop"
/var/log/postgresql/postgresql-14-main.log
If log rotation is in effect, you may need to use grep on older logs as well.
If the available logs are too new and you haven't saved the older logs in some other place, you are out of luck.
The default settings in the postgresql.conf file for log rotation look like this:
log_filename = 'postgresql-%Y-%m-%d_%H%M%S.log'
log_rotation_age = 1d
log_rotation_size = 10MB
Log rotation can also be implemented with third-party utilities. For instance, the default behavior on Debian and Ubuntu distributions is to use the logrotate utility to compress or delete old log files, according to the rules specified in the /etc/logrotate.d/postgresql-common file.
To make sure you have the full history of DDL commands, you may want to set up a cron job that saves the DDL statements extracted from the main PostgreSQL log to a separate DDL audit log. You would still want to verify that the logs are not rotating too fast for this to catch all DDL statements.
If you use syslog, you can then route audit messages using various operating system (OS) utilities.
Alternatively, you can use the pgaudit analyze extension to load data back into a special audit log database. Various other options exist.
Auditing data changes
This section of the recipe provides different ways of collecting changes to data contained in the tables for auditing purposes.
First, you must make the following decisions:
- Do you need to audit all changes or only some?
- What information about the changes do you need to collect? Only the fact that the data has changed?
- When recording the new value of a field or tuple, do you also need to record the old value?
- Is it enough to record which user made the change, or do you also need to record the Internet Protocol (IP) address and other connection information?
- How secure (tamper-proof) must the auditing information be? For example, does it need to be kept separately, away from the database being audited?
Changes can be collected using triggers that collect new (and, if needed, old) values from tuples and save them to auditing table(s). Triggers can be added to whichever tables need to be tracked.
The audit_trigger extension provides a handy universal audit trigger, so you do not need to write your own. It logs both old and new values of rows in any table, serialized as hstore data type values. The latest version and its documentation are both available at https://github.com/2ndQuadrant/audit-trigger.
The extension creates a schema called audit into which all of the other components of the audit trigger code are placed, after which we can enable auditing on specific tables.
As an example, we create standard pgbench tables by running the pgbench utility:
pgbench -i
Next, we connect to PostgreSQL as a superuser, and issue the following SQL to enable auditing on the pgbench_account table:
SELECT audit.audit_table('pgbench_accounts');
Now, we perform some write activity to see how it is audited. The easiest choice is to run the pgbench utility again, this time to perform some transactions, as follows:
pgbench -t 1000
We expect the audit trigger to have logged the actions on pgbench_accounts, as we have enabled auditing on it. In order to verify this, we connect again with psql and issue the following SQL:
cookbook=# SELECT count(*) FROM audit.logged_actions;
count
-------
1000
(1 row)
This confirms that we have indeed logged 1,000 actions. Let's inspect the information that is logged by reading one row of the logged_actions table. First, we enable expanded mode, as the query produces a large number of columns:
cookbook=# x on
Then, we issue the following command:
cookbook=# SELECT * FROM audit.logged_actions LIMIT 1;
-[ RECORD 1 ]-----+---------------------------------------------------
event_id | 1
schema_name | public
table_name | pgbench_accounts
relid | 246511
session_user_name | gianni
action_tstamp_tx | 2017-01-18 19:48:05.626299+01
action_tstamp_stm | 2017-01-18 19:48:05.626446+01
action_tstamp_clk | 2017-01-18 19:48:05.628488+01
transaction_id | 182578
application_name | pgbench
client_addr |
client_port |
client_query | UPDATE pgbench_accounts SET abalance = abalance + -758 WHERE aid = 86061;
action | U
row_data | "aid"=>"86061", "bid"=>"1", "filler"=>" ", "abalance"=>"0"
changed_fields | "abalance"=>"-758"
statement_only | f
Always knowing which user is logged in
In the preceding recipes, we just logged the value of the user variable in the current PostgreSQL session to log the current user role.
This does not always mean that this particular user was the user that was actually authenticated at the start of the session. For example, a superuser can execute the SET ROLE TO ... command to set its current role to any other user or role in the system. As you might expect, non-superusers can only assume roles that they own.
It is possible to differentiate between the logged-in role and the assumed role using the current_user and session_user session variables:
postgres=# select current_user, session_user;
current_user | session_user
-------------+--------------
postgres | postgres
postgres=# set role to bob;
SET
postgres=> select current_user, session_user;
current_user | session_user
-------------+--------------
bob | postgres
Sometimes, it is desirable to let each user log in with their own username and just assume the role needed on a case-by-case basis.
Getting ready
Prepare the required group roles for different tasks and access levels by granting the necessary privileges and options.
How to do it…
Follow these steps:
postgres=# create user alice noinherit;
CREATE ROLE
postgres=# create user bob noinherit;
CREATE ROLE
- Then, create roles for each group of privileges that you need to assign:
postgres=# create group sales;
CREATE ROLE
postgres=# create group marketing;
CREATE ROLE
postgres=# grant postgres to marketing;
GRANT ROLE
- Now, grant each user the roles they may need:
postgres=# grant sales to alice;
GRANT ROLE
postgres=# grant marketing to alice;
GRANT ROLE
postgres=# grant sales to bob;
GRANT ROLE
After you do this, the alice and bob users have no rights after login, but they can assume the sales role by executing SET ROLE TO sales, and alice can additionally assume the superuser role.
How it works…
If a role or user is created with the NOINHERIT option, this user will not automatically get the rights that have been granted to the other roles that have been granted to them. To claim these rights from a specific role, they have to set their role to one of those other roles.
In some sense, this works a bit like the su (set user) command in Unix and Linux systems—that is, you (may) have the right to become that user, but you do not automatically have the rights of the aforementioned user.
This setup can be used to get better audit information, as it lets you know who the actual user was. If you just allow each user to log in as the role needed for a task, there is no good way to know later which of the users was really logged in as clerk1 when a USD $100,000 transfer was made.
There's more…
The SET ROLE command works both ways—that is, you can both gain and lose privileges. A superuser can set their role to any user defined in the system. To get back to your original login role, just use RESET ROLE.
Not inheriting user attributes
Not all rights come to users via GRANT commands. Some important rights are given via user attributes (SUPERUSER, CREATEDB, and CREATEROLE), and these are never inherited.
If your user has been granted a superuser role and you want to use the superuser powers of this granted role, you have to use SET ROLE To mysuperuserrole before anything that requires the superuser attribute to be set.
In other words, the user attributes always behave as if the user had been a NOINHERIT user.
Integrating with LDAP
This recipe shows you how to set up your PostgreSQL system so that it uses the LDAP for authentication.
Getting ready
Ensure that the usernames in the database and your LDAP server match, as this method works for user authentication checks of users who are already defined in the database.
How to do it…
In the pg_hba.conf PostgreSQL authentication file, we define some address ranges to use LDAP as an authentication method, and we configure the LDAP server for this address range:
host all all 10.10.0.1/16 ldap
ldapserver=ldap.our.net ldapprefix="cn=" ldapsuffix=",
dc=our,dc=net"
How it works…
This setup makes the PostgreSQL server check passwords from the configured LDAP server.
User rights are not queried from the LDAP server but have to be defined inside the database using the ALTER USER, GRANT, and REVOKE commands.
There's more…
We have shown you how PostgreSQL can use an LDAP server for password authentication. It is also possible to use some more information from the LDAP server, as shown in the next two examples.
Setting up the client to use LDAP
If you are using the pg_service.conf file to define your database access parameters, you may define some to be queried from the LDAP server by including a line similar to the following in your pg_service.conf file:
ldap://ldap.mycompany.com/dc=mycompany,dc=com?uniqueMember?one?(cn=mydb)
Replacement for the User Name Map feature
Although we cannot use the User Name Map feature with LDAP, we can achieve a similar effect on the LDAP side. Use ldapsearchattribute and the search and bind mode to retrieve the PostgreSQL role name from the LDAP server.
See also
- For server setup, including the search and bind mode, visit http://www.postgresql.org/docs/current/static/auth-methods.html#AUTH-LDAP.
- For client setup, visit http://www.postgresql.org/docs/current/static/libpq-ldap.html.
Connecting using encryption (SSL/GSSAPI)
Here, we will demonstrate how to enable PostgreSQL to use SSL for the protection of database connections by encrypting all of the data passed over that connection. Using SSL makes it much harder to sniff the database traffic, including usernames, passwords, and other sensitive data. Otherwise, everything that is passed unencrypted between a client and the database can be observed by someone listening to a network somewhere between them. An alternative to using SSL is running the connection over a VPN.
Using SSL makes the data transfer on the encrypted connection a little slower, so you may not want to use it if you are sure that your network is safe. The performance impact can be quite large if you are creating lots of short connections, as setting up an SSL connection is quite central-processing unit (CPU)-heavy. In this case, you may want to run a local connection-pooling solution, such as PgBouncer, to which the client connects without encryption, and then configure PgBouncer for server connections using SSL. Older versions of PgBouncer did not support SSL; the solution was to channel server connections through stunnel, as described in the PgBouncer FAQs at https://pgbouncer.github.io/faq.html.
Getting ready
Get, or generate, an SSL server key and certificate pair for the server, and store these in the data directory of the current database instance as server.key and server.crt files.
On some platforms, this is unnecessary; the key and certificate pair may already be generated by the packager. For example, in Ubuntu, PostgreSQL is set up to support SSL connections by default.
How to do it…
Set ssl = on in postgresql.conf and restart the database, if not already set.
How it works…
If ssl = on is set, then PostgreSQL listens to both plain and SSL connections on the same port (5432, by default) and determines the type of connection from the first byte of a new connection. Then, it proceeds to set up an SSL connection if an incoming request asks for it.
PostgreSQL 13+ now defaults to use ssl_min_protocol_version = TLSv1.2, though valid values are TLSv1.3, TLSv1.2, TLSv1.1, TLSv1. SSL2 and SSL3 are now always disabled.
There's more…
You can leave the choice of whether or not to use SSL up to the client, or you can force SSL usage from the server side.
To let the client choose, use a line of the following form in the pg_hba.conf file:
host database user IP-address/IP-mask auth-method
If you want to allow only SSL clients, use the hostssl keyword instead of host. If connecting using GSSAPI, you would use hostgssenc rather than hostssl, shown previously. Details of connecting with GSSAPI are not otherwise covered in this recipe.
The contents of pg_hba.conf can be seen using the pg_hba_file_rules view, so you can run queries to check that you have configured it correctly and it is actually working!
Entries in pg_hba.conf can now span multiple lines, by specifying a backslash at the end of the line.
The following fragment of pg_hba.conf enables both non-SSL and SSL connections from the 192.168.1.0/24 local subnet, but requires SSL from everybody accessing the database from other networks:
host all all 192.168.1.0/24 scram-sha-256
hostssl all all 0.0.0.0/0 scram-sha-256
Getting the SSL key and certificate
For web servers, you must usually get your SSL certificate from a recognized Certificate Authority (CA), as most browsers complain if the certificate is not issued by a known CA. They warn the user of the most common security risks and require confirmation before connecting to a server with a certificate issued by an unknown CA.
For your database server, it is usually sufficient to generate a certificate yourself using OpenSSL. The following commands generate a self-signed certificate for your server:
openssl genrsa 2048 > server.key
openssl req -new -x509 -key server.key -out server.crt
Read more on X.509 keys and certificates by visiting OpenSSL's HOWTO pages at https://github.com/openssl/openssl/tree/master/doc/HOWTO.
Setting up a client to use SSL
The behavior of the client application regarding SSL is controlled by a PGSSLMODE environment variable. This can have the following values, as defined in the official PostgreSQL documentation:
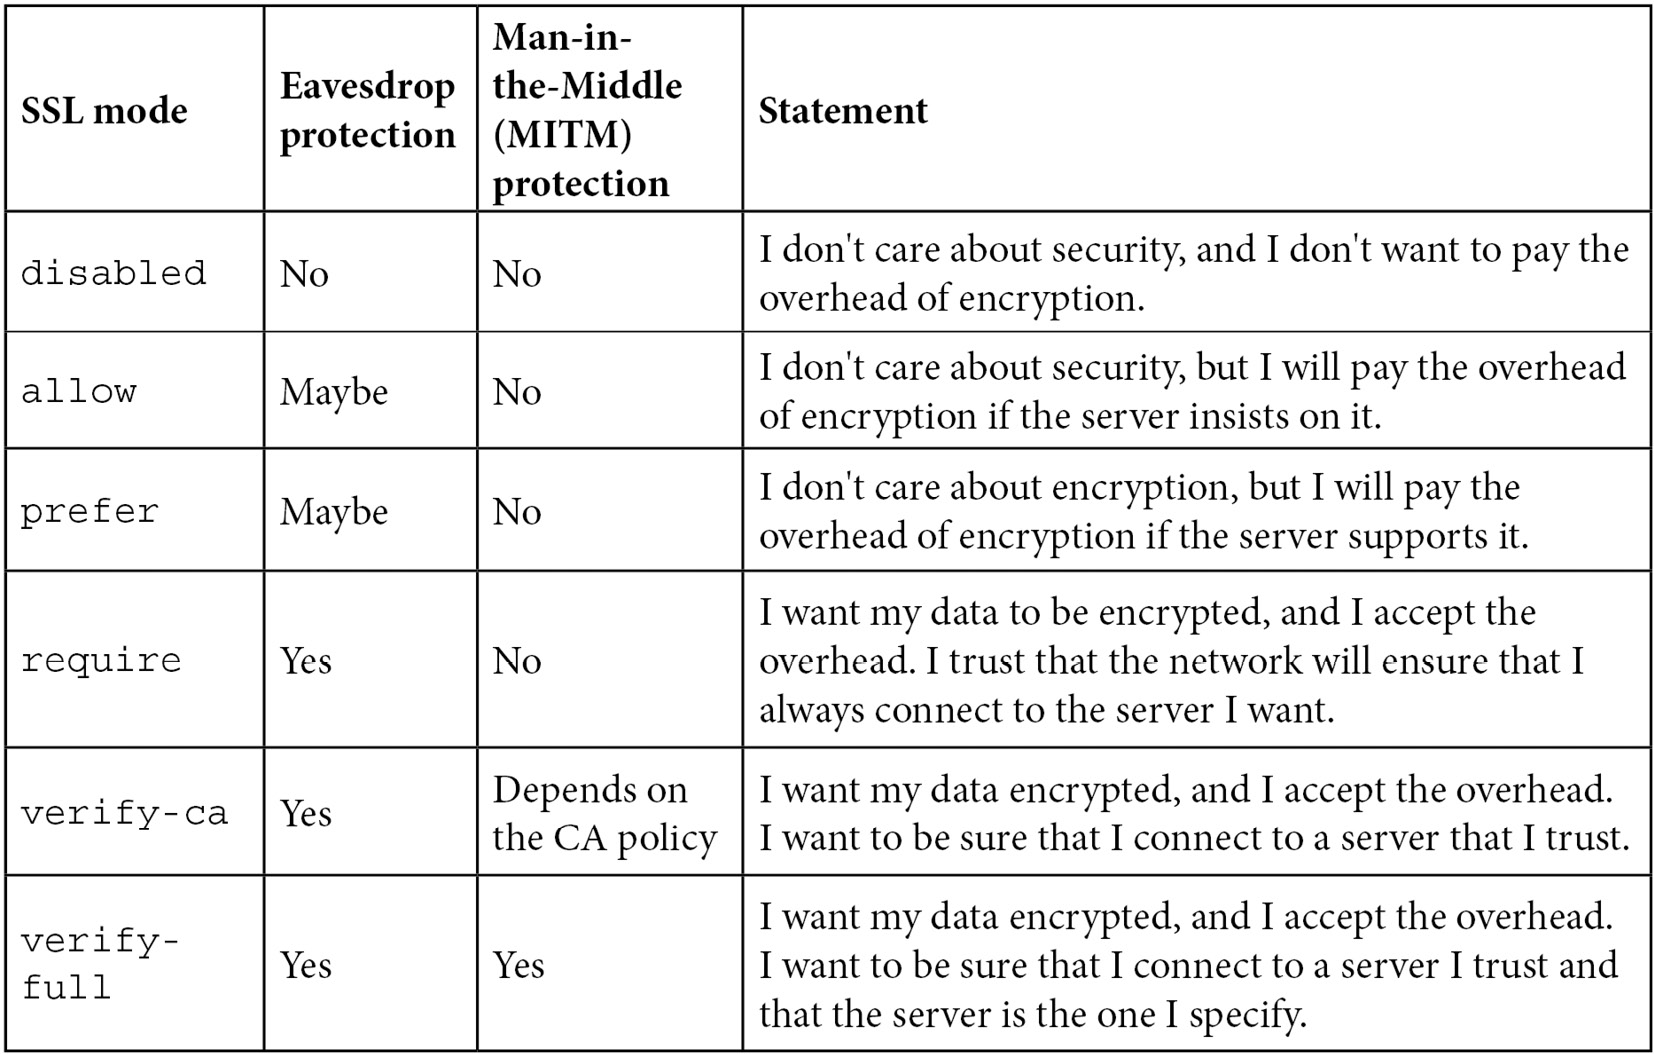
Figure 6.1 – Explanation of ssl_mode
A MITM attack refers to when someone poses as your server, perhaps by manipulating Domain Name System (DNS) records or IP routing tables, but actually just observes and forwards the traffic.
For this to be possible with an SSL connection, this person needs to have obtained a certificate that your client considers valid.
Checking server authenticity
The last two SSL modes allow you to be reasonably sure that you are actually talking to your server by checking the SSL certificate presented by the server.
In order to enable this useful security feature, the following files must be available on the client side. On Unix systems, they are located in the client home directory, in a subdirectory named ~/.postgresql. On Windows, they are in %APPDATA%postgresql:

Figure 6.2 – Certificate files
Only the root.crt file is required for the client to authenticate the server certificate. It can contain multiple root certificates against which the server certificate is compared.
Using SSL certificates to authenticate
This recipe shows you how to set up your PostgreSQL system so that it requires clients to present a valid X.509 certificate before allowing them to connect.
This can be used as an additional security layer, using double authentication, where the client must both have a valid certificate to set up the SSL connection and know the database user's password. It can also be used as the sole authentication method, where the PostgreSQL server will first verify the client connection using the certificate presented by the client, and then retrieve the username from the same certificate.
Getting ready
Get, or generate, a root certificate and a client certificate to be used by the connecting client.
How to do it…
For testing purposes, or for setting up a single trusted user, you can use a self-signed certificate:
openssl genrsa 2048 > client.key
openssl req -new -x509 -key server.key -out client.crt
In the server, set up a line in the pg_hba.conf file with the hostssl method and the clientcert option set to 1:
hostssl all all 0.0.0.0/0 scram-sha-256 clientcert=1
Put the client root certificate in the root.crt file in the server data directory ($PGDATA/root.crt). This file may contain multiple trusted root certificates.
If you are using a central CA, you probably also have a certificate revocation list, which should be put in a root.crl file and regularly updated.
In the client, put the client's private key and certificate in ~/.postgresql/postgresql.key and ~/.postgresql/postgresql.crt. Make sure that the private key file is not world-readable or group-readable by running the following command:
chmod 0600 ~/.postgresql/postgresql.key
In a Windows client, the corresponding files are %APPDATA%postgresqlpostgresql.key and %APPDATA%postgresqlpostgresql.crt. No permission check is done, as the location is considered secure.
If the client certificate is not signed by the root CA but by an intermediate CA, then all of the intermediate CA certificates up to the root certificate must be placed in the postgresql.crt file as well.
How it works…
If the clientcert=1 option is set for a hostssl row in pg_hba.conf, then PostgreSQL accepts only connection requests accompanied by a valid certificate.
The validity of the certificate is checked against certificates present in the root.crt file in the server data directory.
If there is a root.crl file, then the presented certificate is searched for in this file and, if found, is rejected.
After the client certificate is validated and the SSL connection is established, the server proceeds to validate the actual connecting user using whichever authentication method is specified in the corresponding hostssl line.
In the following example, clients from a special address can connect as any user when using an SSL certificate, and they must specify a SCRAM-SHA-256 password for non-SSL connections. Clients from all other addresses must present a certificate and use SCRAM-SHA-256 password authentication:
host all all 10.10.10.10/32 scram-sha-256
hostssl all all 10.10.10.10/32 trust clientcert=1
hostssl all all all scram-sha-256 clientcert=1
There's more…
In this section, we provide some additional content, describing an important optimization for an SSL-only database server, plus two extensions of the basic SSL configuration.
Avoiding duplicate SSL connection attempts
In the Setting up a client to use SSL section of the previous Connecting using encryption (SSL/GSSAPI) recipe, we saw how the client's SSL behavior is affected by environment variables. Depending on how the SSLMODE environment variable is set on the client (either via compile-time settings, the PGSSLMODE environment variable, or the sslmode connection parameter), the client may attempt to connect without SSL first, and then attempt an SSL connection only after the server rejects the non-SSL connection. This duplicates a connection attempt every time a client accesses an SSL-only server.
To make sure that the client tries to establish an SSL connection on the first attempt, SSLMODE must be set to prefer or higher.
Using multiple client certificates
You may sometimes need different certificates to connect to different PostgreSQL servers.
The location of the certificate and key files in postgresql.crt and postgresql.key in the table from the Checking server authenticity section (Figure 6.2) is just the default and can be overridden by specifying alternative file paths using the sslcert and sslkey connection parameters or the PGSSLCERT and PGSSLKEY environment variables.
Using the client certificate to select a database user
It is possible to use the client certificate for two purposes at once: proving that the connecting client is a valid one and selecting a database user to be used for the connection.
To do this, set the authentication method to cert in the hostssl line:
hostssl all all 0.0.0.0/0 cert
As you can see, the clientcert=1 option used with hostssl to require client certificates is no longer required, as it is implied by the cert method itself.
When using the cert authentication method, a valid client certificate is required, and the cn (short for Common Name) attribute of the certificate will be compared to the requested database username. The login will be allowed only if they match.
It is possible to use a User Name Map to map common names in the certificates to database usernames by specifying the map option:
hostssl all all 0.0.0.0/0 cert map=x509cnmap
Here, x509cnmap is the name that we have arbitrarily chosen for our mapping. More details on User Name Maps are provided in the Mapping external usernames to database roles recipe.
See also
To understand more about SSL in general, and the OpenSSL library used by PostgreSQL in particular, visit http://www.openssl.org or get a good book about SSL.
To get started with the generation of simple SSL keys and certificates, see https://github.com/openssl/openssl/blob/master/doc/HOWTO/certificates.txt.
Mapping external usernames to database roles
In some cases, the authentication username is different from the PostgreSQL username. For instance, this can happen when using an external system for authentication, such as certificate authentication (as described in the previous recipe), or any other external or single sign-on (SSO) system authentication method from http://www.postgresql.org/docs/current/static/auth-methods.html (GSSAPI, Security Support Provider Interface (SSPI), Kerberos, Radius, or Privileged Access Management (PAM)). You may just need to enable an externally authenticated user to connect as multiple database users. In such cases, you can specify rules to map the external username to the appropriate database role.
Getting ready
Prepare a list of usernames from the external authentication system and decide which database users they are allowed to connect as—that is, which external users map to which database users.
How to do it…
Create a pg_ident.conf file in the usual place (PGDATA), with lines in the following format:
map-name system-username database-username
This should be read as "system-username is allowed to connect as database-username," rather than "every time system-username connects, they will be forced to use database-username."
Here, map-name is the value of the map option from the corresponding line in pg_hba.conf, system-username is the username that the external system authenticated the connection as, and database-username is the database user this system user is allowed to connect as. The same system user may be allowed to connect as multiple database users, so this is not a 1:1 mapping, but rather a list of allowed database users for each system user.
If system-username starts with a slash (/), then the rest of it is treated as a regular expression (regex) rather than a directly matching string, and it is possible to use the 1 string in database-username to refer to the part captured by the parentheses in the regex. For example, consider the following lines:
salesmap /^(.*)@sales.comp.com$ 1
salesmap /^(.*)@sales.comp.com$ sales
salesmap [email protected] auditor
These will allow any user authenticated with a @sales.comp.com email address to connect both as a database user equal to the name before the @ sign in their email address and as the sales user. They will additionally allow [email protected] to connect as the auditor user. Then, edit the pg_hba.conf line to specify the map=salesmap option.
How it works…
After authenticating the connection using an external authentication system, PostgreSQL will usually proceed to check that the externally authenticated username matches the database username that the user wishes to connect as and rejects the connection if these two do not match.
If there is a map= parameter specified for the current line in pg_hba.conf, then the system will scan the map line by line and will let the client proceed with connecting if a match is found.
There's more…
By default, the map file is called pg_ident.conf (because it was first used for the ident authentication method).
Nowadays, it is possible to change the name of this file via the ident_file configuration parameter in postgresql.conf. It can also be located outside the PGDATA directory by setting ident_file to a full path.
A relative path can also be used, but since it is relative to where the postgres process is started, this is usually not a good idea.
Using column-level encryption
The user can encrypt data in the database so that it is not visible to the hosting provider. In general, this means that the data cannot then be used for searching or indexing, unless you use homomorphic encryption.
The strictest form of encryption would be client-side encryption so that all the database knows about is a blob of data, which would then normally be stored in a bytea database column, but could be others.
Data can also be encrypted server-side before it is returned to the user using the pgcrypto contrib package provided as an extension with PostgreSQL.
Getting ready
Make sure you (and/or your database server) are in a country where encryption is legal—in some countries, it is either banned completely or a license is required.
In order to create and manage Pretty Good Privacy (PGP) keys, you also need the well-known GnuPG command-line utility, which is available on practically all distributions.
pgcrypto is part of the contrib collection. Starting from version 10, on Debian and Ubuntu, it is part of the main postgresql-NN server package.
Install it on the database in which you want to use it, following the Adding an external module to PostgreSQL recipe from Chapter 3, Server Configuration.
You also need to have PGP keys set up:
pguser@laptop:~$ gpg --gen-key
Answer some questions here (the defaults are OK unless you are an expert), select the key type as DSA and Elgamal, and enter an empty password.
Now, export the keys:
pguser@laptop:~$ gpg -a --export "PostgreSQL User (test key for PG Cookbook) <[email protected]>" > public.key
pguser@laptop:~$ gpg -a --export-secret-keys "PostgreSQL User (test key for PG Cookbook) <[email protected]>" > secret.key
Make sure only you and the postgres database user have access to the secret key:
pguser@laptop:~$ sudo chgrp postgres secret.key
pguser@laptop:~$ chmod 440 secret.key
pguser@laptop:~$ ls -l *.key
-rw-r--r-- 1 pguser pguser 1718 2016-03-26 13:53 public.key
-r--r----- 1 pguser postgres 1818 2016-03-26 13:54 secret.key
Last but not least, make a copy of the public and the secret key; if you lose them, you'll lose the ability to encrypt/decrypt.
How to do it…
To ensure that secret keys are never visible in database logs, write a wrapper function to get the keys from the file. You need to do it in an untrusted embedded language, such as PL/Python as only untrusted languages can access the filesystem. You need to be a PostgreSQL superuser in order to create functions in untrusted languages. It's not difficult to write a PostgreSQL function that reads a text file. For convenience, here is an example that requires PL/PythonU:
create or replace function get_my_public_key() returns text as $$
return open('/home/pguser/public.key').read()
$$
language plpythonu;
revoke all on function get_my_public_key() from public;
create or replace function get_my_secret_key() returns text as $$
return open('/home/pguser/secret.key').read()
$$
language plpythonu;
revoke all on function get_my_secret_key() from public;
This can also be fully implemented in PL/pgSQL using the built-in pg_read_file (filename) PostgreSQL system function, and you don't have to bother with PL/PythonU at all. However, to use this function, you must place the files in the data directory as required by that function for added security so that the database superuser cannot access the rest of the filesystem directly. However, using that file needs superuser privileges, until granted via role or accessed using security definer functions.
If you don't want other database users to be able to see the keys, you also need to write wrapper functions for encryption and decryption and then give access to these wrapper functions to end users.
The encryption function could look like this:
create or replace function encrypt_using_my_public_key(
cleartext text,
ciphertext out bytea
)
AS $$
DECLARE
pubkey_bin bytea;
BEGIN
-- text version of public key needs to be passed through function dearmor() to get to raw key
pubkey_bin := dearmor(get_my_public_key());
ciphertext := pgp_pub_encrypt(cleartext, pubkey_bin);
END;
$$ language plpgsql security definer;
revoke all on function encrypt_using_my_public_key(text) from public;
grant execute on function encrypt_using_my_public_key(text) to bob;
The decryption function could look like this:
create or replace function decrypt_using_my_secret_key(
ciphertext bytea,
cleartext out text
)
AS $$
DECLARE
secret_key_bin bytea;
BEGIN
-- text version of secret key needs to be passed through function dearmor() to get to raw binary key
secret_key_bin := dearmor(get_my_secret_key());
cleartext := pgp_pub_decrypt(ciphertext, secret_key_bin);
END;
$$ language plpgsql security definer;
revoke all on function decrypt_using_my_secret_key(bytea) from public;
grant execute on function decrypt_using_my_secret_key(bytea) to bob;
Finally, we test the encryption:
test2=# select encrypt_using_my_public_key('X marks the spot!');
This function returns a bytea (that is, raw binary) result that looks something like this:
encrypt_using_my_public_key |
301301N�03223o2152125203252;�20�07376-z233211H...
To see that it actually works, you must go both ways:
test2=# select decrypt_using_my_secret_key(encrypt_using_my_public_key('X marks the spot!'));
decrypt_using_my_secret_key
-----------------------------
X marks the spot!
(1 row)
Yes—we got back our initial string!
How it works…
What we have done here is this:
- Hidden the keys from non-superuser database users
- Provided wrappers for authorized users to use encryption and decryption functionalities
To ensure that your sensitive data is not stolen while in transit between the client and the database server, make sure you connect to PostgreSQL either using an SSL-encrypted connection or from localhost.
You also have to trust your server administrators and all of the other users with superuser privileges to be sure that your encrypted data is safe. And, of course, you must trust the safety of the entire environment; PostgreSQL can decrypt the data, so any other user or software that has access to the same files can do the same.
There's more…
A higher level of security is possible, with more complex procedures and architecture, as shown in the next sections. We also mention a limited pgcrypto version that does not use OpenSSL.
For really sensitive data
For some data, you wouldn't want to risk keeping the decryption password on the same machine as the encrypted data.
In those cases, you can use public-key cryptography, also known as asymmetric cryptography, and carry out only the encryption part on the database server. This also means that you only have the encryption key on the database host and not the key needed for decryption. Alternatively, you can deploy a separate, extra-secure encryption server in your server infrastructure that provides just the encrypting and decrypting functionality as a remote call.
This solution is secure because, in asymmetric cryptography, the private (that is, decryption) key cannot be derived from the corresponding public (that is, encryption) key, hence the names public and private, which denote the appropriate dissemination policies.
If you wish to prove the identity of the author of a file, the correct method is to use a digital signature, which is an entirely different application of cryptography. Note that this is not currently supported by pgcrypto, so you must implement your own methods as C functions or in a procedural language capable of using cryptographic libraries.
For really, really, really sensitive data
For even more sensitive data, you may never want the data to leave the client computer unencrypted; therefore, you need to encrypt the data before sending it to the database. In that case, PostgreSQL receives already encrypted data and never sees the unencrypted version. This also means that the only useful indexes you can have are for use in WHERE encrypted_column = encrypted_data and for ensuring uniqueness.
Even these forms can be used only if the encryption algorithm always produces the same ciphertext (output) for the same plaintext (input), which is true only for weaker encryption algorithms. For example, it would be easy to determine the age or sex of a person if the same value were always encrypted into the same ciphertext. To avoid this vulnerability, strong encryption algorithms are able to produce a different ciphertext for the same value.
The versions of pgcrypto are usually compiled to use the OpenSSL library (http://www.openssl.org). If for some reason you don't have OpenSSL, or just don't want to use it, it is possible to compile pgcrypto without it, with a smaller number of supported encryption algorithms and a slightly reduced performance.
See also
- The page on pgcrypto in the PostgreSQL online documentation, available at http://www.postgresql.org/docs/current/static/pgcrypto.html
- The OpenSSL web page, accessed at http://www.openssl.org/
- The GNU Privacy Handbook at http://www.gnupg.org/gph/en/manual.html
Setting up cloud security using predefined roles
Many databases as a service (DBaaS)/database clouds restrict the use of superusers, with good reason. Administrators in a database cloud need to use an intermediate level of authority.
For example, in the EDB BigAnimal cloud service, a user called edb_admin holds most privileges, including CREATEROLE and CREATEDB. BigAnimal runs within your own account on cloud platforms, so the service provides data isolation, which in turn makes it easier and safer to administer than other clouds.
In prior releases of PostgreSQL, many functions were superuser-only, but these functions and views are now just superuser-by-default.
Rather than have administrators work out for themselves how to set up admin privileges, PostgreSQL now provides predefined roles, previously known as default roles, that can be thought of as useful groupings of privileges to grant to different types of administrators.
Getting ready
Set up a cloud account (for example, using BigAnimal) that supports PostgreSQL 14: https://www.biganimal.com
How to do it…
The edb_admin user can be used to create two new "group" roles:
- ops_dba—This will monitor and control PostgreSQL, but without being able to see any of the data in the database, so may not be counted as a data processor under the General Data Protection Regulation (GDPR).
- app_dba—This will supervise the data in PostgreSQL, allowing the authority to correct data quality issues and add new and remove old data, which would be a data processor under GDPR.
These two roles can be configured like this:
CREATE ROLE ops_dba LOGIN;
CREATE ROLE app_dba LOGIN;
GRANT pg_monitor, pg_signal_backend TO ops_dba;
GRANT pg_read_all_data, pg_write_all_data TO app_dba;
We can then assign individual users to each group role:
GRANT app_dba TO donald;
Don't put your company name in the usernames. This gets especially confusing if you need to grant access to someone from a service company contracted to assist in managing the database.
How it works…
PostgreSQL has the following predefined roles:
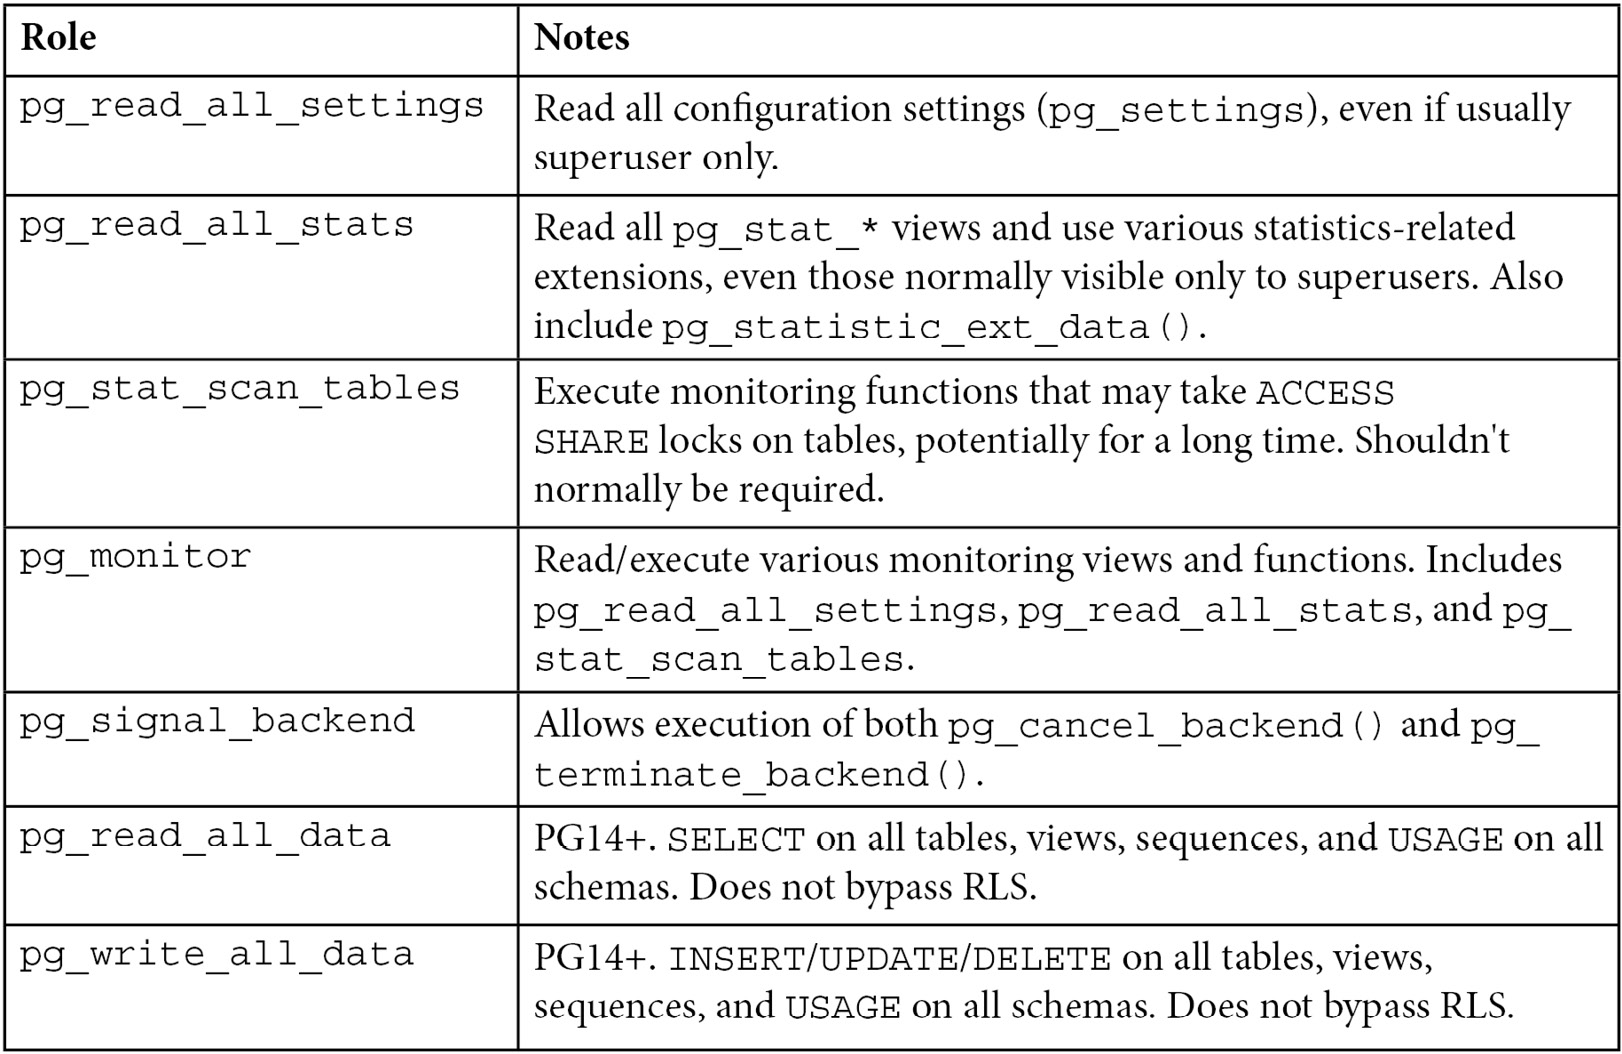
Figure 6.3 – Main predefined roles
There are also three roles that should not often be granted to users. The pg_read_server_files, pg_write_server_files, and pg_execute_server_program roles are intended to allow administrators to have trusted, but non-superuser roles that are able to access files and run programs on the same database server on which the user database runs as. As these roles are able to access any file on the server filesystem, they bypass all database-level permission checks when accessing files directly, and they could be used to gain superuser-level access; therefore, great care should be taken when granting these roles to users.
Some other aspects of security in BigAnimal come preconfigured:
- Data encryption: All data in BigAnimal is encrypted in motion and at rest. Network traffic is encrypted using Transport Layer Security (TLS) v1.2 or greater, where applicable. Data at rest is encrypted using the Advanced Encryption Standard (AES) with 256-bit keys. Data encryption keys are envelope-encrypted, and the wrapped data encryption keys are securely stored in a key management system (KMS).
- Portal audit logging: Activities in the cloud user portal, such as those related to user roles, organization updates, and cluster creation and deletion, are tracked and viewed in the activity log. Command-line interface (CLI) actions are also logged.
- Database logging and auditing: Functionality to track and analyze database activities is enabled automatically. For PostgreSQL, the PostgreSQL Audit Extension (pgaudit) is enabled for you when deploying a Postgres cluster. For EDB Postgres Advanced Server, the EDB Audit Extension (edbaudit) is enabled for you. All DDL is logged.
There's more…
Some PostgreSQL privileges can only be granted directly by superusers, which may need special actions in a cloud-based service. These exceptions are shown here for completeness.
For replication management functions (described here: https://www.postgresql.org/docs/devel/functions-admin.html#FUNCTIONS-REPLICATION), slot functions are available to users with the REPLICATION privilege—for example, streaming_replica.
Replication origins functions are available by default to superusers and could be granted to other users.
Execute privileges could be granted on this, to allow you to plan for point-in-time recovery (PITR):
- pg_create_restore_point()
Execute privileges could be granted on these functions, but backup is already provided by the cloud service:
- pg_start_backup()
- pg_stop_backup()
Execute privileges could be granted by superusers on these functions, but would likely interfere with the orchestration of HA features, so would be dangerous:
- pg_switch_wal()
- pg_promote()
- pg_wal_replay_pause()
- pg_wal_replay_resume()
Generic file access functions are insecure and should not typically be granted: https://www.postgresql.org/docs/devel/functions-admin.html#FUNCTIONS-ADMIN-GENFILE.