Chapter 7: Database Administration
In Chapter 5, Tables and Data, we looked at the contents of tables and various complexities. Now, we'll turn our attention to larger administration tasks that we need to perform from time to time, such as creating things, moving things around, storing things neatly, and removing them when they're no longer required.
The most sensible way to perform major administrative tasks is to write a script to do what you think is required. This allows you to run the script on a system test server, and then run it again on the production server once you're happy with it. Manically typing commands against production database servers isn't wise. Worse, using an admin tool can lead to serious issues if that tool doesn't show you the SQL you're about to execute. If you haven't dropped your first live table yet, don't worry; there is still time. Perhaps you might want to read Chapter 11, Backup and Recovery, first, eh? Back it up using scripts.
Scripts are great because you can automate common tasks, and there's no need to sit there with a mouse, working your way through hundreds of changes. If you're drawn to the discussion about the command line versus GUI, then my thoughts and reasons are completely orthogonal to that. I want to encourage you to avoid errors and save time by executing small administration programs or scripts repetitively and automatically. If it were safe or easy to record a macro using mouse movements in a script, then that would be an option, but it's not. The only viable way to write a repeatable script is by writing SQL commands in a text file.
Which scripting tool you should use is a more interesting debate. We will consider psql here because it's a great scripting tool and if you've got PostgreSQL, then you've certainly got it, without needing to install additional software. We will also discuss GUI tools and explain how and when they are relevant.
Let's move on to the recipes! First, we'll start by looking at some scripting techniques that are valuable in PostgreSQL.
In this chapter, we will cover the following recipes:
- Writing a script that either succeeds entirely or fails entirely
- Writing a psql script that exits on the first error
- Using psql variables
- Placing query output into psql variables
- Writing a conditional psql script
- Investigating a psql error
- Setting the psql prompt with useful information
- Using pgAdmin for DBA tasks
- Scheduling jobs for regular background execution
- Performing actions on many tables
- Adding/removing columns on a table
- Changing the data type of a column
- Changing the definition of an enum data type
- Adding a constraint concurrently
- Adding/removing schemas
- Moving objects between schemas
- Adding/removing tablespaces
- Moving objects between tablespaces
- Accessing objects in other PostgreSQL databases
- Accessing objects in other foreign databases
- Making views updatable
- Using materialized views
- Using GENERATED data columns
- Using data compression
Writing a script that either succeeds entirely or fails entirely
Database administration often involves applying a coordinated set of changes to the database. One of PostgreSQL's greatest strengths is its transaction system, wherein almost all actions can be executed inside a transaction. This allows us to build a script with many actions that will either all succeed or all fail. This means that if any of these actions fail, then all the other actions in the script are rolled back and never become visible to any other user, which can be critically important in a production system. This property is referred to as atomicity in the sense that the script is intended as a single unit that cannot be split. This is the meaning of the A in the ACID properties of database transactions.
Transactions apply to Data Definition Language (DDL), which refers to the set of SQL commands that are used to define, modify, and delete database objects. The term DDL goes back many years, but it persists because that subset is a useful short name for the commands that most administrators need to execute: CREATE, ALTER, DROP, and so on.
Note
Although most commands in PostgreSQL are transactional, there are a few that cannot be. One example is sequence allocation. It cannot be transactional because when a new sequence number is allocated, the effect of having consumed that number must become visible immediately, without waiting for that transaction to be committed. Otherwise, the same number will be given to another transaction. Other examples include CREATE INDEX CONCURRENTLY and CREATE DATABASE.
How to do it…
The basic way to ensure that all the commands are successful or that none are is to wrap our script into a transaction, as follows:
BEGIN;
command 1;
command 2;
command 3;
COMMIT;
Writing a transaction control command involves editing the script, which you may not want to do or even have access to. There are, however, other ways to do this.
Using psql, you can do this by simply using the -1 or --single-transaction command-line options, as follows:
bash $ psql -1 -f myscript.sql
bash $ psql --single-transaction -f myscript.sql
The -1 option is short, but I recommend using --single-transaction as it's much clearer regarding which option is being selected.
How it works…
The entire script will fail if, at any point, one of the commands gives an error (or higher) message. Almost all of the SQL that's used to define objects (DDL) provides a way to avoid throwing errors. More precisely, commands that begin with the DROP keyword have an IF EXISTS option. This allows you to execute the DROP commands, regardless of whether or not the object already exists.
Thus, by the end of the command, that object will not exist:
DROP VIEW IF EXISTS cust_view;
Similarly, most commands that begin with the CREATE keyword have the optional OR REPLACE suffix. This allows the CREATE statement to overwrite the definition if one already exists, or add the new object if it doesn't exist yet, like this:
CREATE OR REPLACE VIEW cust_view AS SELECT * FROM cust;
In cases where both the DROP IF EXISTS and CREATE OR REPLACE options exist, you may think that CREATE OR REPLACE is usually sufficient. However, if you change the output definition of a function or a view, then using OR REPLACE is not sufficient. In that case, you must use DROP and recreate it, as shown in the following example:
postgres=# CREATE OR REPLACE VIEW cust_view AS
SELECT col as title1 FROM cust;
CREATE VIEW
postgres=# CREATE OR REPLACE VIEW cust_view
AS SELECT col as title2 FROM cust;
ERROR: cannot change name of view column "title1" to "title2"
Also, note that CREATE INDEX does not have an OR REPLACE option. If you run it twice, you'll get two indexes on your table, unless you specifically name the index. There is a DROP INDEX IF EXISTS option, but it may take a long time to drop and recreate an index. An index exists just for optimization, and it does not change the actual result of any query, so this different behavior is very convenient. This is also reflected in the fact that the SQL standard doesn't mention indexes at all, even though they exist in practically all database systems, because they do not affect the logical layer.
PostgreSQL does not support nested transaction control commands, which can lead to unexpected behavior. For instance, consider the following code, which has been written in a nested transaction style:
postgres=# BEGIN;
BEGIN
postgres=# CREATE TABLE a(x int);
CREATE TABLE
postgres=# BEGIN;
WARNING: there is already a transaction in progress
BEGIN
postgres=# CREATE TABLE b(x int);
CREATE TABLE
postgres=# COMMIT;
COMMIT
postgres=# ROLLBACK;
NOTICE: there is no transaction in progress
ROLLBACK
The hypothetical author of such code probably meant to create table a first, and then create table b. Then, they changed their mind and rolled back both the inner transaction and the outer transaction. However, what PostgreSQL does is discard the second BEGIN statement so that the COMMIT statement is matched with the first BEGIN statement, and what looks like an inner transaction is part of the top-level transaction. Hence, right after the COMMIT statement, we are outside a transaction block, so the next statement is assigned a separate transaction. When ROLLBACK is issued as the next statement, PostgreSQL notices that the transaction is empty.
The danger in this particular example is that the user inadvertently committed a transaction, thus waiving the right to roll it back; however, note that a careful user would have noticed this warning and paused to think before going ahead.
From this example, you have learned a valuable lesson: if you have used transaction control commands in your script, then wrapping them again in a higher-level script or command can cause problems of the worst kind, such as committing stuff that you wanted to roll back. This is important enough to deserve a boxed warning.
Note
PostgreSQL accepts nested transactional control commands but does not act on them. After the first commit, the commands will be assumed to be transactions in their own right and will persist, should the script fail. Be careful!
There's more…
These commands cannot be included in a script that uses transactions in the way we just described because they execute multiple database transactions and cannot be used in a transaction block:
- CREATE DATABASE/DROP DATABASE
- CREATE TABLESPACE/DROP TABLESPACE
- CREATE INDEX CONCURRENTLY
- VACUUM
- REINDEX DATABASE/REINDEX SYSTEM
- CLUSTER
None of these actions need to be run manually regularly within complex programs, so this shouldn't be a problem for you.
Also, note that these commands do not substantially alter the logical content of a database; that is, they don't create new user tables or alter any rows, so there's less need to use them inside complex transactions.
While PostgreSQL does not support nested transaction commands, it supports the notion of SAVEPOINT, which can be used to achieve the same behavior. Suppose we wanted to implement the following pseudocode:
(begin transaction T1)
(statement 1)
(begin transaction T2)
(statement 2)
(commit transaction T2)
(statement 3)
(commit transaction t1)
The effect we seek has the following properties:
- If statements 1 and 3 succeed, and statement 2 fails, then statements 1 and 3 will be committed.
- If all three statements succeed, then they will all be committed.
- Otherwise, no statement will be committed.
These properties also hold with the following PostgreSQL commands:
BEGIN;
(statement 1)
SAVEPOINT T2;
(statement 2)
RELEASE SAVEPOINT T2; /* we assume that statement 2 does not fail */
(statement 3)
COMMIT;
This form, as noted in the preceding code, applies only if statement 2 does not fail. If it fails, we must replace RELEASE SAVEPOINT with ROLLBACK TO SAVEPOINT, or we will get an error. This is a slight difference between top-level transaction commands; a COMMIT statement is silently converted into a ROLLBACK when the transaction is in a failed state.
Writing a psql script that exits on the first error
The default mode for the psql script tool is to continue processing when it finds an error. This sounds silly, but it exists for historical compatibility only. There are some easy and permanent ways to avoid this, so let's look at them.
Getting ready
Let's start with a simple script, with a command we know will fail:
$ $EDITOR test.sql
mistake1;
mistake2;
mistake3;
Execute the following script using psql to see what the results look like:
$ psql -f test.sql
psql:test.sql:1: ERROR: syntax error at or near "mistake1"
LINE 1: mistake1;
^
psql:test.sql:2: ERROR: syntax error at or near "mistake2"
LINE 1: mistake2;
^
psql:test.sql:3: ERROR: syntax error at or near "mistake3"
LINE 1: mistake3;
^
How to do it…
Let's perform the following steps:
- To exit the script on the first error, we can use the following command:
$ psql -f test.sql -v ON_ERROR_STOP=on
psql:test.sql:1: ERROR: syntax error at or near "mistake1"
LINE 1: mistake1;
^
- Alternatively, we can edit the test.sql file with the initial line that's shown here:
$ vim test.sql
set ON_ERROR_STOP on
mistake1;
mistake2;
mistake3;
- Note that the following command will not work because we have missed the crucial ON value:
$ psql -f test.sql -v ON_ERROR_STOP
How it works…
The ON_ERROR_STOP variable is a psql special variable that controls the behavior of psql as it executes in script mode. When this variable is set, a SQL error will generate an OS return code 3, whereas other OS-related errors will return code 1.
There's more…
When you run psql, a startup file will be executed, sometimes called a profile file. You can place your psql commands in that startup file to customize your environment. Adding ON_ERROR_STOP to your profile will ensure that this setting is applied to all psql sessions:
$ $EDITOR ~/.psqlrc
set ON_ERROR_STOP
You can forcibly override this and request psql to execute without a startup file using -X. This is probably the safest thing to do for the batch execution of scripts so that they always work in the same way, irrespective of the local settings.
ON_ERROR_STOP is one of some special variables that affects the way psql behaves. The full list is available at the following URL: https://www.postgresql.org/docs/current/static/app-psql.html#APP-PSQL-VARIABLES.
Using psql variables
In the previous recipe, you learned how to use the ON_ERROR_STOP variable. Here, we will show you how to work with any variable, including user-defined ones.
Getting ready
As an example, we will create a script that takes a table name as a parameter. We will keep it simple because we just want to show how variables work.
For instance, we might want to add a text column to a table and then set it to a given value. So, we must write the following lines in a file called vartest.sql:
ALTER TABLE mytable ADD COLUMN mycol text;
UPDATE mytable SET mycol = 'myval';
The script can be run as follows:
psql -f vartest.sql
How to do it…
We change vartest.sql as follows:
set tabname mytable
set colname mycol
set colval 'myval'
ALTER TABLE :tabname ADD COLUMN :colname text;
UPDATE :tabname SET :colname = :'colval';
How it works…
What do these changes mean? We have defined three variables, setting them to the table name, column name, and column value. Then, we replaced the mentions of those specific values with the name of the variable preceded by a colon, which in psql means replace with the value of this variable. In the case of colval, we have also surrounded the variable name with single quotes, meaning treat the value as a string.
If we want vartest.sql to add a different column, we just have to make one change to the top of the script, where all the variables are conveniently set. Then, the new column name will be used.
There's more…
This was just one way to define variables. Another is to indicate them in the command line when running the script:
psql -v tabname=mytab2 -f vartest.sql
Variables can also be set interactively. The following line will prompt the user, and then set the variable to whatever is typed before hitting Enter:
prompt 'Insert the table name: ' tabname
In the next recipe, we will learn how to set variables using a SQL query.
Placing query output into psql variables
It is also possible to store some values that have been produced by a query into variables – for instance, to reuse them later in other queries.
In this recipe, we will demonstrate this approach with a concrete example.
Getting ready
In the Controlling automatic database maintenance recipe of Chapter 9, Regular Maintenance, we will describe VACUUM, showing that it runs regularly on each table based on the number of rows that might need vacuuming (dead rows). The VACUUM command will run if that number exceeds a given threshold, which by default is just above 20% of the row count.
In this recipe, we will create a script that picks the table with the largest number of dead rows and runs VACUUM on it, assuming you have some tables already in existence.
How to do it…
The script is as follows:
SELECT schemaname
, relname
, n_dead_tup
, n_live_tup
FROM pg_stat_user_tables
ORDER BY n_dead_tup DESC
LIMIT 1
gset
qecho Running VACUUM on table :"relname" in schema :"schemaname"
qecho Rows before: :n_dead_tup dead, :n_live_tup live
VACUUM ANALYZE :schemaname.:relname;
qecho Waiting 1 second...
SELECT pg_sleep(1);
SELECT n_dead_tup AS n_dead_tup_now
, n_live_tup AS n_live_tup_now
FROM pg_stat_user_tables
WHERE schemaname = :'schemaname'
AND relname = :'relname'
gset
qecho Rows after: :n_dead_tup_now dead, :n_live_tup_now live
How it works…
You may have noticed that the first query does not end with a semicolon, as usual. This is because we end it with gset instead, which means to run the query and assign each returned value to a variable that has the same name as the output column.
This command expects the query to return exactly one row, as you might expect it to, and if not, it does not set any variable.
The script waits 1 second before reading the updated number of dead and live rows. The reason for the wait is that such statistics are updated after the end of the transaction that makes the changes, which sends a signal to the statistics collector, which then does the update. There's no guarantee that the stats will be updated in 1 second, though in most cases they will be.
There's more…
See the next recipe on how to improve the script with iterations so that it vacuums more than one table.
Writing a conditional psql script
psql supports the conditional if, elif, else, and endif meta-commands. In this recipe, we will demonstrate some of them.
Getting ready
We want to improve the vartest.sql script so that it runs VACUUM if there are dead rows in that table.
How to do it…
We can add conditional commands to vartest.sql, resulting in the following script:
set needs_vacuum false
SELECT schemaname
, relname
, n_dead_tup
, n_live_tup
, n_dead_tup > 0 AS needs_vacuum
FROM pg_stat_user_tables
ORDER BY n_dead_tup DESC
LIMIT 1
gset
if :needs_vacuum
qecho Running VACUUM on table :"relname" in schema :"schemaname"
qecho Rows before: :n_dead_tup dead, :n_live_tup live
VACUUM ANALYZE :schemaname.:relname;
qecho Waiting 1 second...
SELECT pg_sleep(1);
SELECT n_dead_tup AS n_dead_tup_now
, n_live_tup AS n_live_tup_now
FROM pg_stat_user_tables
WHERE schemaname = :'schemaname' AND relname = :'relname'
gset
qecho Rows after: :n_dead_tup_now dead, :n_live_tup_now live
else
qecho Skipping VACUUM on table :"relname" in schema :"schemaname"
endif
How it works…
We have added an extra column, needs_vacuum, to the first query, resulting in one more variable that we can use to make the VACUUM part conditional.
There's more…
Conditional statements are usually part of flow-control statements, which also include iterations.
While iterating is not directly supported by psql, a similar effect can be achieved in other ways.
For instance, a script called file.sql (for instance) can be iterated by adding some lines at the end, as shown in the following fragment:
SELECT /* add a termination condition as appropriate */ AS do_loop
gset
if do_loop
ir file.sql
endif
Instead of iterating, you can follow the approach described later in this chapter in the Performing actions on many tables recipe.
Investigating a psql error
Error messages can sometimes be cryptic, and you may be left wondering, why did this error happen at all?
For this purpose, psql recognizes two variables – VERBOSITY and CONTEXT; valid values are terse, default, or verbose for the former and never, errors, or always for the latter. A more verbose error message will hopefully specify extra details, and the context information will be included. Here is an example to show the difference:
postgres=# set VERBOSITY terse
postgres=# set CONTEXT never
postgres=# select * from missingtable;
ERROR: relation "missingtable" does not exist at character 15
This is quite a simple error, so we don't need the extra details, but it is nevertheless useful for illustrating the extra detail you get when raising verbosity and enabling context information:
postgres=# set VERBOSITY verbose
postgres=# set CONTEXT errors
postgres=# select * from missingtable;
ERROR: 42P01: relation "missingtable" does not exist
LINE 1: select * from missingtable;
^
LOCATION: parserOpenTable, parse_relation.c:1159
Now, you get SQL error code 42P01, which you can look up in the PostgreSQL manual. You will even find a reference to the file and the line in the PostgreSQL source code where this error has been raised so that you can investigate it (the beauty of open source!).
However, there is a problem with having to enable verbosity in advance: you need to do so before running the command. If all the errors were reproducible, this would not be a huge inconvenience. But in certain cases, you may hit a transient error, such as a serialization failure, which is difficult to detect itself, and it could sometimes happen that you struggle to reproduce the error, let alone analyze it.
The errverbose meta-command in psql was introduced to avoid these problems.
Getting ready
There isn't much to do, as the point of the errverbose meta-command is to capture information about the error without requiring any prior activity.
How to do it…
Follow these steps to understand the usage of the errverbose meta-command:
- Suppose you hit an error, as shown in the following query, and verbose reporting was not enabled:
postgres=# create table wrongname();
ERROR: relation "wrongname" already exists
- The extra detail that is not displayed is remembered by psql, so you can view it as follows:
postgres=# errverbose
ERROR: 42P07: relation "wrongname" already exists
LOCATION: heap_create_with_catalog, heap.c:1067
There's more…
The error and source codes for this recipe can be found at the following links:
- The list of PostgreSQL error codes is available at the following URL: https://www.postgresql.org/docs/current/static/errcodes-appendix.html.
- The PostgreSQL source code can be downloaded from or inspected at the following URL https://git.postgresql.org/.
Setting the psql prompt with useful information
When you're connecting to multiple systems, it can be useful to configure your psql prompt so that it tells you what you are connected to.
To do this, we will edit the psql profile file so that we can execute commands when we first start psql. In the profile file, we will set values for two special variables, called PROMPT1 and PROMPT2, that control the command-line prompt.
Getting ready
Identify and edit the ~/.psqlrc file that will be executed when you start psql.
How to do it…
My psql prompt looks like this:
Figure 7.1 – The psql prompt set by ~./psqlrc
As you can see, it has a banner that highlights my employer's company name – I have this set for when we do demos. You can skip that part, or you can create some word art, being careful with backslashes since they are escape characters:
echo '________ _____ _______'
echo '| ______) ___ \ | ___ '
echo '| |___ | | \ \| |__) )'
echo '| ___) | | | | __ ('
echo '| |_____| |__/ /| |__) )'
echo '|_______)_____/ |______/'
echo ''
echo 'EnterpriseDB https://www.enterprisedb.com/'
echo ''
select current_setting('cluster_name') as nodename,
case current_setting('cluster_name') when '' then 'true' else 'false' end as nodename_unset
gset
if :nodename_unset
set nodename unknown
endif
set PROMPT1 '[%:nodename:] %n@%/ %x %R%# '
set PROMPT2 '[%:nodename:] %n@%/ %x %R%# '
iming
How it works…
The last part of the file runs a SQL query to retrieve the value of the cluster_name parameter. This is usually set to something sensible, but if not, it will return the word true in the nodename variable. I then use a if conditional to check if nodename is set correctly. If not, it uses the unknown string.
The prompts are set from multiple variables and fields:
Nodename as set above
%n current session username
%/ current databasename
%x transaction status - mostly blank, * if transaction block, ! if aborted, ? if disconnected
%R multi-line status - mostly =, shows if in a continuation/quote/double-quote/comment
%# set to # if user is a superuser, else set to >
Lastly, I turn on timing automatically for all future SQL commands.
Using pgAdmin for DBA tasks
In this recipe, we will show you how to use pgAdmin for some administration tasks in your database. PgAdmin is one of the two graphical interfaces that we introduced in the Using graphical administration tools recipe in Chapter 1, First Steps.
Getting ready
You should have already installed pgAdmin as part of the Using graphical administration tools recipe of Chapter 1, First Steps, which includes website pointers. If you haven't done so, please read it now.
Remember to install pgAdmin 4, which is the last generation of the software; the previous one, pgAdmin 3, is no longer supported and hasn't been for a few years, so it will give various errors on PostgreSQL 10 and above.
How to do it…
The first task of a DBA is to get access to the database and get a first glance at its contents. In that respect, we have already learned how to create a connection, access the dashboard, and display some database statistics. We also mentioned the Grant Wizard and the graphical Explain tool:
- The list of schemas in a given database can be obtained by opening a database and selecting Schemas:
Figure 7.2 – The pgAdmin 4 dashboard
- If you right-click on an individual schema, you will see several possible actions that you can perform. For instance, you can take a backup of that schema only:
Figure 7.3 – pgAdmin 4 context-sensitive menus
- Clicking the left button on the mouse will drill down inside the schema and show you several object types. You will probably want to start from Tables:
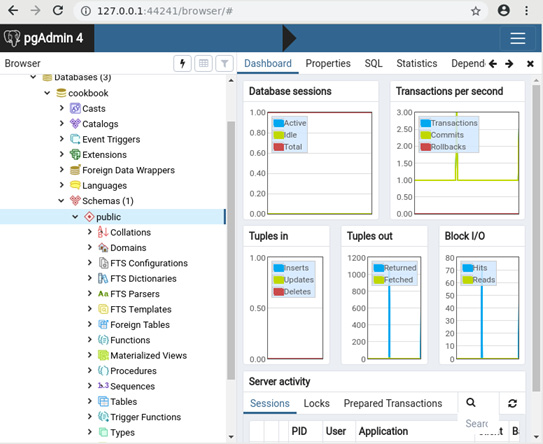
Figure 7.4 – pgAdmin 4 tree view of schema contents
- A PostgreSQL table supports a wide range of operations. For instance, you can count the number of rows:
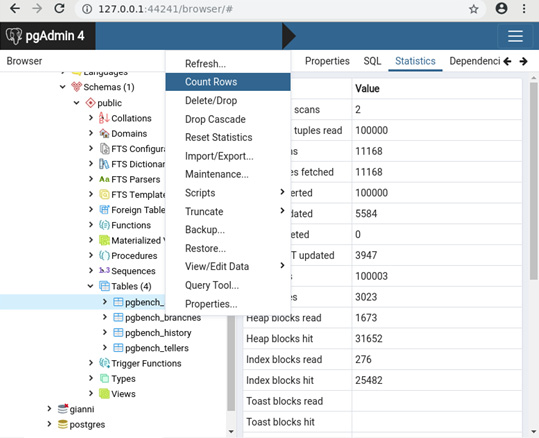
Figure 7.5 – pgAdmin 4 table-context menu
Note that this is just an example of a pgAdmin feature; we are not suggesting that counting table rows is the best way to gather information on your database. See the How many rows are there in a table? recipe of Chapter 2, Exploring the Database, for a discussion on this topic.
How it works...
PostgreSQL is a complex database system, with many features and even more actions, so we can't discuss them all; we will just mention three table actions of interest here:
- The Maintenance... entry opens a dialog box that includes actions such as VACUUM and ANALYZE, which will be discussed in various recipes in Chapter 9, Regular Maintenance.
- The Import/Export… entry leads to a dialog box where you can export and import data using the COPY command, which includes CSV format, as demonstrated in Chapter 5, Tables and Data.
- With View/Edit Data, you can edit the contents of the table as you would do in a spreadsheet. This is slightly different than the CSV import/export feature because you edit the data directly inside the database without having to export it to another tool.
Finally, we would also like to mention these other three options as well:
- Each server (for example, connection) offers the option to Backup Globals, meaning roles (users/groups) and tablespaces.
- The Maintenance... entry inside Indexes, which itself is a sub-entry of Tables, allows you to REINDEX or CLUSTER a given index.
- You can create SQL scripts to perform some of the specific actions, such as if you want to execute a procedure or write an INSERT query on a given table.
There's more…
As you can see, the general idea of pgAdmin is that right-clicking on an object or a group of objects opens a menu presenting several actions for that particular object or group.
Browsing the available actions is a very good way to become more familiar with what PostgreSQL can do, although not all the actions that are available in PostgreSQL can be researched through pgAdmin's interface.
Scheduling jobs for regular background execution
Normal user tasks cause the user to wait while the task executes. Frequently, there is a requirement to run tasks or "jobs" in the background without the user present, which is referred to as a Job Scheduler component. You can use cron, but some users look for an in-database solution.
pgAgent is our recommended job scheduler for Postgres, which is supplied as part of the pgAdmin package, but a separate component. pgAgent can be operated from the pgAdmin GUI or using a simple command-line API. pgAgent keeps a history of job executions so that you can see what is happening and what is not happening.
Getting ready
If you want to manage a new database from an existing Pgagent installation, then you don't need to prepare anything. If you want to set up a new pgagent database, execute the following command:
CREATE EXTENSION pgagent;
pgAgent is an external program, not a binary plugin, so you do not need to modify the shared_preload_libraries parameter – allowing it to work easily with all cloud databases.
Further information is available at https://www.pgadmin.org/docs/pgadmin4/latest/pgagent_install.html.
How to do it…
Each job has a name, can be configured to have one or more job steps, and can be configured to have multiple schedules that specify when it will run – but most jobs just have one step and one schedule. If more than one job step exists, they are executed serially in alphanumeric order.
Jobs are scheduled using UTC.
Each job that's executed keeps a log that can be inspected to see what has run. Jobs can be enabled/disabled and schedules can have defined start/end dates to allow you to switch from one schedule to another at a planned point in time.
You can do this using the GUI, as described in the PgAdmin docs: https://www.pgadmin.org/docs/pgadmin4/latest/pgagent_jobs.html.
But since I encourage scripting, you can add a simple job like this:
SELECT pgagent.add_job('reindex weekly', '30 1 * * 7',
'REINDEX DATABASE postgres');
Here, we have used code from https://github.com/simonriggs/pgagent_add_job/.
This will create a job that runs at 01:30 A.M. every Sunday and re-indexes the local database.
The parameters here are as follows:
- Jobname
- Jobschedule
- SQL
Jobschedule uses the same syntax as the cron(1) command in Linux:
- Minutes (0-59)
- Hours (0-23)
- Day of Month (1-31)
- Month of Year (1-12, 1=January)
- Day of Week (1-7, 1=Monday)
You can test a job in pgAdmin by right-clicking and then selecting Run now.
Once the jobs have been executed, you will see the result in the pgagent.pga_joblog and pgagent.pga_jobsteplog tables.
How it works…
pgAgent is an external program that connects to the database server that stores its metadata inside the database.
pgAgent polls the database each minute to see what jobs need to be started. pgAgent will run multiple jobs in parallel when needed, each with a different thread. If a job is still running when its next scheduled time arrives, the next job will wait for the first to finish and then start immediately afterward.
pgAgent can be used to manage multiple databases or just the local database, as you choose. pgAgent can be configured for high availability using two agents accessing the same database server(s). Locking prevents the same job from being executed by multiple hosts.
There's more…
SQL jobs that have been executed will use the connection string supplied with that job, which requires you to provision how passwords or certificates are set up. Batch jobs use the operating system user for the pgagent program.
Security will always be an important consideration, so we strongly recommend limiting how many users can add/remove jobs. This will probably be a small list of maintenance activities that are agreed upon in advance for each application, rather than a long list of jobs with many users adding/removing jobs.
You can separate who adds/removes jobs and who can check they have run correctly. This can be accomplished with two roles, as shown in the following code block:
CREATE ROLE pgggent_admin;
GRANT ALL ON pgagent to pgagent_admin;
CREATE ROLE pgagent_operator;
GRANT SELECT ON
pgagent.pga_joblog,
pgagent.pga_jobsteplog
TO pgagent_operator;
If you want to prevent pgAgent from using duplicate job names, you may wish to add the following code:
CREATE UNIQUE INDEX ON pgagent.pga_job (jobname);
Performing actions on many tables
As a database administrator, you will often need to apply multiple commands as part of the same overall task. This task could be one of the following:
- Performing many different actions on multiple tables
- Performing the same action on multiple tables
- Performing the same action on multiple tables in parallel
- Performing different actions, one on each table, in parallel
The first is a general case where you need to make a set of coordinated changes. The solution is to write a script, as we've already discussed. We can also call this static scripting because you write the script manually and then execute it.
The second type of task can be achieved very simply with dynamic scripts, where we write a script that writes another script. This technique is the main topic of this recipe.
Performing actions in parallel sounds cool, and it would be useful if it were easy. In some ways, it is, but trying to run multiple tasks concurrently and trap and understand all the errors is much harder. And if you're thinking it won't matter if you don't check for errors, think again. If you run tasks in parallel, then you cannot run them inside the same transaction, so you need error handling in case one part fails.
Don't worry! Running in parallel is usually not as bad as it may seem after reading the previous paragraph, and we'll explain it after looking at a few basic examples.
Getting ready
Let's create a basic schema to run some examples on:
postgres=# create schema test;
CREATE SCHEMA
postgres=# create table test.a (col1 INTEGER);
CREATE TABLE
postgres=# create table test.b (col1 INTEGER);
CREATE TABLE
postgres=# create table test.c (col1 INTEGER);
CREATE TABLE
How to do it…
Our task is to run a SQL statement using this form, with X as the table name, against each of our three test tables:
ALTER TABLE X
ADD COLUMN last_update_timestamp TIMESTAMP WITH TIME ZONE DEFAULT current_timestamp;
The steps are as follows:
- Our starting point is a script that lists the tables that we want to perform tasks against – something like the following:
postgres=# SELECT n.nspname, c.relname
FROM pg_class c
JOIN pg_namespace n
ON c.relnamespace = n.oid
WHERE n.nspname = 'test'
AND c.relkind = 'r';
- This displays the list of tables that we will act upon (so that you can check it):
relname
---------
a
b
c
(3 rows)
- We can then use the preceding SQL to generate the text for a SQL script, substituting the schema name and table name in the SQL text:
postgres=# SELECT format('ALTER TABLE %I.%I ADD COLUMN last_update_timestamp TIMESTAMP WITH TIME ZONE DEFAULT current_timestamp;'
, n.nspname, c.relname )
FROM pg_class c
JOIN pg_namespace n
ON c.relnamespace = n.oid
WHERE n.nspname = 'test'
AND c.relkind = 'r';
- Finally, we can run the script and watch the results (success!):
postgres=# gexec
ALTER TABLE
ALTER TABLE
ALTER TABLE
How it works…
Overall, this is just an example of dynamic scripting, and it has been used by DBAs for many decades, even before PostgreSQL was born.
The gexec command means to execute the results of the query, so be very careful that you test your query before you run it in production.
The format function takes a template string as its first argument and replaces all occurrences of %I with the values supplied as additional arguments (in our case, the values of n.nspname and r.relname).
%I treats the value as a SQL identifier, adding double quotes as appropriate. This is extremely important if some joker or attacker creates a table like this:
postgres=# create table test."; DROP TABLE customer;" (col1 INTEGER);
If the script used just %s rather than %I, then the script will generate this SQL, which will result in you dropping the customer table if it exists. So, for security purposes, you should use %I:
ALTER TABLE test.a ADD COLUMN last_update_timestamp TIMESTAMP WITH TIME ZONE DEFAULT current_timestamp;
ALTER TABLE test.; drop table customer; ADD COLUMN last_update_timestamp TIMESTAMP WITH TIME ZONE DEFAULT current_timestamp;
ALTER TABLE test.b ADD COLUMN last_update_timestamp TIMESTAMP WITH TIME ZONE DEFAULT current_timestamp;
ALTER TABLE test.c ADD COLUMN last_update_timestamp TIMESTAMP WITH TIME ZONE DEFAULT current_timestamp;
Dynamic scripting can also be called a quick and dirty approach. The previous scripts didn't filter out views and other objects in the test schema, so you'll need to add that yourself, or not, as required.
There is another way of doing this as well:
DO $$
DECLARE t record;
BEGIN
FOR t IN SELECT c.*, n.nspname
FROM pg_class c JOIN pg_namespace n
ON c.relnamespace = n.oid
WHERE n.nspname = 'test'
AND c.relkind = 'r' /* ; not needed */
LOOP
EXECUTE format(
'ALTER TABLE %I.%I
ADD COLUMN last_update_timestamp
TIMESTAMP WITH TIME ZONE'
, t.nspname, t.relname);
END LOOP;
END $$;
I don't prefer using this method because it executes the SQL directly and doesn't allow you to review it before, or keep the script afterward.
The preceding syntax with DO is called an anonymous code block because it's like a function without a name.
There's more…
Earlier, I said I'd explain how to run multiple tasks in parallel. Some practical approaches to this are possible, with a bit of discussion.
Making tasks run in parallel can be thought of as subdividing the main task so that we run x2, x4, x8, and other subscripts, rather than one large script.
First, you should note that error-checking gets worse when you spawn more parallel tasks, whereas performance improves the most for the first few subdivisions. Also, we're often constrained by CPU, RAM, or I/O resources for intensive tasks. This means that splitting the main task into two to four parallel subtasks isn't practical without some kind of tool to help us manage them.
There are two approaches here, depending on the two types of tasks:
- A task consists of many smaller tasks, all roughly of the same size.
- A task consists of many smaller tasks, and the execution times vary according to the size and complexity of the database object.
If we have lots of smaller tasks, then we can simply run our scripts multiple times using a simple round-robin split so that each subscript runs a part of all the subtasks. Here is how to do it: each row in pg_class has a hidden column called oid, whose value is a 32-bit number that's allocated from an internal counter on table creation. Therefore, about half of the tables will have even values of oid, and we can achieve an even split by adding the following clauses:
- Script 1: Add WHERE c.oid % 2 = 0
- Script 2: Add WHERE c.oid % 2 = 1
Here, we added a column to many tables. In the previous example, we were adding the column with no specified default; so, the new column will have a NULL value, and as a result, it will run very quickly with ALTER TABLE, even on large tables. If we change the ALTER TABLE statement to specify a default, then we should choose a non-volatile expression for the default value; otherwise, PostgreSQL will need to rewrite the entire table. So, the runtime will vary according to the table's size (approximately, and also according to the number and type of indexes).
Now that our subtasks vary at runtime according to their size, we need to be more careful when splitting the subtasks so that we end up with multiple scripts that will run for about the same time.
If we already know that we have just a few big tables, it's easy to split them manually into scripts.
If the database contains many large tables, then we can sort SQL statements by table size and then distribute them using round-robin distribution into multiple subscripts that will have approximately the same runtime. The following is an example of this technique, which assumes you have multiple large tables in a schema called test:
First, create a table with all the SQL you would like to run:
CREATE TABLE run_sql AS
SELECT format('ALTER TABLE %I.%I ADD COLUMN
last_update_timestamp TIMESTAMP WITH TIME ZONE
DEFAULT now();' , n.nspname, c.relname) as sql,
row_number() OVER (ORDER BY pg_relation_size(c.oid))
FROM pg_class c
JOIN pg_namespace n
ON c.relnamespace = n.oid
WHERE n.nspname = 'test'
AND c.relkind = 'r';
Then, create a file called exec-script.sql and place the following code in it:
SELECT sql FROM run_sql
WHERE row_number % 2 = :i
ORDER BY row_number DESC
gexec
Then, we run the script twice, as follows:
$ psql -v i=0 -f make-script.sql &
$ psql -v i=1 -f make-script.sql &
Note how we used the psql parameters – via the -v command-line option – to select different rows using the same script.
Also, note how we used the row_number() window function to sort the data by size. Then, we split the data into pieces using the following line:
WHERE row_number % N = i;
Here, N is the total number of scripts we're producing, and i ranges between 0 and N minus 1 (we are using modulo arithmetic to distribute the subtasks).
Adding/removing columns on a table
As designs change, we may want to add or remove columns from our data tables. These are common operations in development, though they need more careful planning on a running production database server as they take full locks and may run for long periods.
How to do it…
You can add a new column to a table using the following command:
ALTER TABLE mytable
ADD COLUMN last_update_timestamp TIMESTAMP WITHOUT TIME ZONE;
You can drop the same column using the following command:
ALTER TABLE mytable
DROP COLUMN last_update_timestamp;
You can combine multiple operations when using ALTER TABLE, which then applies the changes in a sequence. This allows you to perform a useful trick, which is to add a column unconditionally using IF EXISTS, which is useful because ADD COLUMN does not allow IF NOT EXISTS:
ALTER TABLE mytable
DROP COLUMN IF EXISTS last_update_timestamp,ADD COLUMN last_update_timestamp TIMESTAMP WITHOUT TIME ZONE;
Note that this will have almost the same effect as the following command:
UPDATE mytable SET last_update_timestamp = NULL;
However, ALTER TABLE runs much faster. This is very cool if you want to perform an update, but it's not much fun if you want to keep the data in the existing column.
How it works…
The ALTER TABLE statement, which is used to add or drop a column, takes a full table lock (at the AccessExclusiveLock lock level) so that it can prevent all other actions on the table. So, we want it to be as fast as possible.
The DROP COLUMN command doesn't remove the column from each row of the table; it just marks the column as dropped. This makes DROP COLUMN a very fast operation.
The ADD COLUMN command is also very fast if we are adding a column with a non-volatile default value, such as a NULL value or a constant. A non-volatile expression always returns the same value when it's computed multiple times within the same SQL statement; this means that PostgreSQL can compute the default value once and write it into the table metadata. Conversely, if the default is a volatile expression, then it is not guaranteed to evaluate the same result for each of the existing rows; therefore, PostgreSQL needs to rewrite every row of the table, which can be quite slow.
If we rewrite the table, then the dropped columns are removed. If not, they may stay there for some time. Subsequent INSERT and UPDATE operations will ignore the dropped column(s). Updates will reduce the size of the stored rows if they were not null already. So, in theory, you just have to wait, and the database will eventually reclaim the space. In practice, this only works if all the rows in the table are updated within a given period. Many tables contain historical data, so space may not be reclaimed at all without additional actions.
To reclaim space from dropped columns, the PostgreSQL manual recommends changing the data type of a column to the same type, which forces everything to be rewritten. I don't recommend this because it will completely lock the table for a long period, at least on larger databases. If you're looking for alternatives, then VACUUM will not rewrite the table, though a VACUUM FULL or a CLUSTER statement will. Be careful in those cases as well, because they also hold a full table lock.
There's more…
Indexes that depend on a dropped column are automatically dropped as well. This is what you would expect if all the columns in the index are dropped, but it can be surprising if some columns in the index are not dropped. All other objects that depend on the column(s), such as foreign keys from other tables, will cause the ALTER TABLE statement to be rejected. You can override this and drop everything in sight using the CASCADE option, as follows:
ALTER TABLE x
DROP COLUMN last_update_timestamp
CASCADE;
Adding a column with a non-null default value can be done with ALTER TABLE … ADD COLUMN … DEFAULT …, as we have just shown, but this holds an AccessExclusive lock for the duration of the command, which can take a long time if DEFAULT is a volatile expression, as 100% of the rows must be rewritten.
The script that we introduced in the Using psql variables recipe in this chapter is an example of how to do the same without holding an AccessExclusive lock for a long time. This lighter solution has only one other tiny difference: it doesn't use a single transaction, which would be pointless since it would hold the lock until the end.
If any row is inserted by another session between ALTER TABLE and UPDATE and that row has a NULL value for the new column, then that value will be updated together with all the rows that existed before ALTER TABLE, which is OK in most cases, though not in all, depending on the data model of the application.
A proper solution would involve using two sessions to ensure that no such writes can happen in-between, with a procedure that can be sketched as follows:
- Open two sessions and note their PIDs.
- In session 1, BEGIN a transaction, and then take an ACCESS EXCLUSIVE lock on the table, which will be granted.
- Immediately after, but in session 2, BEGIN a transaction, then take a SHARE lock on the table, which will hang waiting for session 1.
- In a third session, display the ordered wait queue for locks on session 1, as follows:
SELECT *
FROM pg_stat_activity
WHERE pg_blocking_pids(pid) @> array[pid1]
ORDER BY state_change;
Here, pid1 is the PID of session 1. Check that PID2 is the second one in the list; if not, this means that Step 3 was not fast enough, so ROLLBACK both sessions and repeat from Step 1.
- In session 1, use ALTER TABLE and then COMMIT.
- In session 2 (which will be unblocked by the previous step, and will therefore acquire the SHARE lock straight away), use UPDATE and then COMMIT.
Changing the data type of a column
Thankfully, changing column data types is not an everyday task, but when we need to do it, we must understand the behavior to ensure we can execute the change without any problem.
Getting ready
Let's start with a simple example of a table, with just one row, as follows:
CREATE TABLE birthday
( name TEXT
, dob INTEGER);
INSERT INTO birthday VALUES ('simon', 690926);
postgres=# select * from birthday;
This gives us the following output:
name | dob
-------+--------
simon | 690926
(1 row)
How to do it…
Let's say we want to change the dob column to another data type. Let's try this with a simple example first, as follows:
postgres=# ALTER TABLE birthday
postgres-# ALTER COLUMN dob SET DATA TYPE text;
ALTER TABLE
This works fine. Let's just change that back to the integer type so that we can try something more complex, such as a date data type:
postgres=# ALTER TABLE birthday
postgres-# ALTER COLUMN dob SET DATA TYPE integer;
ERROR: column "dob" cannot be cast automatically to type integer
HINT: You might need to specify "USING dob::integer"
Oh! What went wrong? Let's try using an explicit conversion with the USING clause, as follows:
postgres=# ALTER TABLE birthday
ALTER COLUMN dob SET DATA TYPE integer
USING dob::integer;
ALTER TABLE
This works as expected. Now, let's try moving to a date type:
postgres=# ALTER TABLE birthday
ALTER COLUMN dob SET DATA TYPE date
USING date(to_date(dob::text, 'YYMMDD') -
(CASE WHEN dob/10000 BETWEEN 16 AND 69 THEN interval '100
years'
ELSE interval '0' END));
Now, it gives us what we were hoping to see:
postgres=# select * from birthday;
name | dob
-------+------------
simon | 26/09/1969
(1 row)
With PostgreSQL, you can also set or drop default expressions, irrespective of whether the NOT NULL constraints are applied:
ALTER TABLE foo
ALTER COLUMN col DROP DEFAULT;
ALTER TABLE foo
ALTER COLUMN col SET DEFAULT 'expression';
ALTER TABLE foo
ALTER COLUMN col SET NOT NULL;
ALTER TABLE foo
ALTER COLUMN col DROP NOT NULL;
How it works…
Moving from the integer type to the date type uses a complex USING expression. Let's break this down step by step so that we can see why, as follows:
postgres=# ALTER TABLE birthday
ALTER COLUMN dob SET DATA TYPE date
USING date(to_date(dob::text, 'YYMMDD') -
(CASE WHEN dob/10000 > extract('year' from current_date)%100
THEN interval '100 years'
ELSE interval '0' END));
First, PostgreSQL does not allow a conversion directly from integer to date. We need to convert it into text and then into date. The dob::text statement means cast to text.
Once we have text, we can use the to_date() function to move to a date type.
This is not enough; our starting data was 690926, which we presume is a date in the YYMMDD format. PostgreSQL docs say "In to_date, if the year format specification is less than four digits, such as YYY, and the supplied year is less than four digits, the year will be adjusted to be nearest to the year 2020; for example, 95 becomes 1995." So, we must add an adjustment factor as well since dates before 1970 will be presumed to be in the future.
It is very strongly recommended that you test this conversion by performing a SELECT first. Converting data types, especially to/from dates, always causes some problems, so don't try to do this quickly. Always take a backup of the data first.
There's more…
The USING clause can also be used to handle complex expressions involving other columns. This could be used for data transformations, which might be useful for DBAs in some circumstances, such as migrating to a new database design on a production database server. Let's put everything together in a full, working example. We will start with the following table, which has to be transformed:
postgres=# select * from cust;
customerid | firstname | lastname | age
------------+-----------+----------+-----
1 | Philip | Marlowe | 38
2 | Richard | Hannay | 42
3 | Holly | Martins | 25
4 | Harry | Palmer | 36
(4 rows)
We want to transform it into a table design like the following:
postgres=# select * from cust;
customerid | custname | age
------------+----------------+-----
1 | Philip Marlowe | 38
2 | Richard Hannay | 42
3 | Holly Martins | 25
4 | Harry Palmer | 36
(4 rows)
We can decide to do this using these simple steps:
ALTER TABLE cust ADD COLUMN custname text NOT NULL DEFAULT '';
UPDATE cust SET custname = firstname || ' ' || lastname;
ALTER TABLE cust DROP COLUMN firstname;
ALTER TABLE cust DROP COLUMN lastname;
We can also use the SQL commands directly or run them using a tool such as pgAdmin. Following those steps may cause problems, as the changes aren't within a transaction, meaning that other users can see the changes when they are only half-finished. Hence, it would be better to do this in a single transaction using BEGIN and COMMIT. Also, those four changes require us to make two passes over the table.
However, we can perform the entire transformation in one pass by using multiple clauses on the ALTER TABLE command. So, instead, we can do the following:
BEGIN;
ALTER TABLE cust
ALTER COLUMN firstname SET DATA TYPE text
USING firstname || ' ' || lastname,
ALTER COLUMN firstname SET NOT NULL,
ALTER COLUMN firstname SET DEFAULT '',
DROP COLUMN lastname;
ALTER TABLE cust RENAME firstname TO custname;
COMMIT;
Some type changes can be performed without actually rewriting rows – for example, if you are casting data from varchar to text, or from NUMERIC(10,2) to NUMERIC(18,2), or simply to NUMERIC. Moreover, foreign key constraints will recognize type changes of this kind on the source table, so it will skip the constraint check whenever it is safe.
Note that moving from VARCHAR(128) to VARCHAR(256) is safe, whereas reducing the max length – say, VARCHAR(256) to VARCHAR(128), is not.
If you are changing from TIMESTAMP to TIMESTAMPTZ, then this is safe if your session timezone is UTC. This is a new optimization in Postgres 14.
Changing the definition of an enum data type
PostgreSQL comes with several data types, but users can create custom types to faithfully represent any value. Data type management is mostly, but not exclusively, a developer's job, and data type design goes beyond the scope of this book. This is a quick recipe that only covers the simpler problem of the need to apply a specific change to an existing data type.
Getting ready
Enumerative data types are defined like this:
CREATE TYPE satellites_uranus AS ENUM ('titania','oberon');
The other popular case is composite data types, which are created as follows:
CREATE TYPE node AS
( node_name text,
connstr text,
standbys text[]);
How to do it…
If you made misspelled some enumerative values, and you realize it too late, you can fix it like so:
ALTER TYPE satellites_uranus RENAME VALUE 'titania' TO 'Titania';
ALTER TYPE satellites_uranus RENAME VALUE 'oberon' TO 'Oberon';
This is very useful if the application expects – and uses – the right names.
A more complicated case is when you are upgrading your database schema to a new version, say because you want to consider some facts that were not available during the initial design, and you need extra values for the enumerative type that we defined in the preceding code. You want to put the new values in a certain position to preserve the correct ordering. For that, you can use the ALTER TYPE syntax, as follows:
ALTER TYPE satellites_uranus ADD VALUE 'Ariel' BEFORE 'Titania';
ALTER TYPE satellites_uranus ADD VALUE 'Umbriel' AFTER 'Ariel';
Composite data types can be changed with similar commands. Attributes can be renamed, as shown in the following example:
ALTER TYPE node
RENAME ATTRIBUTE replicas TO standbys;
And new attributes can be added as follows:
ALTER TYPE node
DROP ATTRIBUTE standbys,
ADD ATTRIBUTE async_standbys text[],
ADD ATTRIBUTE sync_standbys text[];
This form supports a list of changes, perhaps because composite types are more complex than a list of enumerative values, and can therefore require complicated modifications.
How it works…
Each time you create a table, a composite type is automatically created with the same attribute names, types, and positions. Each ALTER TABLE command that changes the table column definitions will silently issue a corresponding ALTER TYPE statement to keep the type in agreement with its table definition.
Enumerative values in PostgreSQL are stored in tables as numbers, which are transparently mapped to strings via the pg_enum catalog table. To be able to insert a new value between two existing ones, enumerative values are indexed by real numbers, which allow decimal points and have the same size in bytes as integer numbers. The motive is to use numeric ordering to encode the order of values that was specified by the user.
In the satellites_uranus example, the first two values were Titania and Oberon, which initially got indexed by the real numbers 1 and 2:
postgres=# select * from pg_enum where enumtypid = regtype 'satellites_uranus';
enumtypid | enumsortorder | enumlabel
-----------+---------------+-----------
38112 | 1 | Titania
38112 | 2 | Oberon
(2 rows)
When we add a third value before Titania (that is, 1), the number 0 is taken, as you would probably expect:
postgres=# ALTER TYPE satellites_uranus ADD VALUE 'Ariel' BEFORE 'Titania';
ALTER TYPE
postgres=# select * from pg_enum where enumtypid = regtype 'satellites_uranus';
enumtypid | enumsortorder | enumlabel
-----------+---------------+-----------
38112 | 1 | Titania
38112 | 2 | Oberon
38112 | 0 | Ariel
(3 rows)
And, finally, when adding a fourth value between Ariel (0) and Titania (1), PostgreSQL can pick the real value, 0.5:
postgres=# ALTER TYPE satellites_uranus ADD VALUE 'Umbriel' AFTER 'Ariel';
ALTER TYPE
postgres=# select * from pg_enum where enumtypid = regtype 'satellites_uranus';
enumtypid | enumsortorder | enumlabel
-----------+---------------+-----------
38112 | 1 | Titania
38112 | 2 | Oberon
38112 | 0 | Ariel
38112 | 0.5 | Umbriel
(4 rows)
To test the resulting order, we can build a test table that contains all the possible values, and then sort it:
postgres=# CREATE TABLE test(x satellites_uranus);
CREATE TABLE
postgres=# INSERT INTO test VALUES ('Ariel'), ('Oberon'), ('Titania'), ('Umbriel');
INSERT 0 4
postgres=# SELECT * FROM test ORDER BY x;
x
---------
Ariel
Umbriel
Titania
Oberon
(4 rows)
There's more…
When an attribute is removed from a composite data type, the corresponding values will instantly disappear from all the values of that same type that are stored in any database table. What happens is that these values are still inside the tables, but they have become invisible because their attribute is now marked as deleted, and the space they occupy will only be reclaimed when the content of the composite type is parsed again. This can be forced with a query such as the following:
UPDATE mycluster SET cnode = cnode :: text :: node;
Here, mycluster is a table that has a cnode column of the node type. This query converts the values into the text type, displaying only current attribute values, and then back into node. You may have noticed that this behavior is very similar to the example of the dropped column in the previous recipe.
Adding a constraint concurrently
A table constraint is a guarantee that must be satisfied by all of the rows in the table. Therefore, adding a constraint to a table is a two-phase procedure – first, the constraint is created, and second, the existing rows are validated. Both happen in the same transaction, and the table will be locked according to the type of constraint for the whole duration.
For example, if we add a Foreign Key to a table, we will lock the table to prevent all write transactions against it. This validation could run for an hour in some cases and prevent writes for all that time.
This recipe demonstrates another case – that it is possible to split those two phases into multiple transactions since this allows validation to occur with a lower lock level than what's required to add the constraint, reducing the effect of locking on the table.
First, we create the constraint and mark it as NOT VALID to make it clear that it does not exclude violations, unlike ordinary constraints. Then, we VALIDATE all the rows by checking them against the constraint. At this point, the NOT VALID mark will be removed from the constraint.
Using the same example we used previously, if we add a NOT VALID Foreign Key to a table, we will lock the table to prevent all write transactions against it for a short period. Then, we VALIDATE all the rows, which run for 1 hour while holding a lock that does not prevent writes.
It is possible to validate the constraint at a later time, for example, when you're allowed by workload or business continuity requirements, which might be a long delay, or in some cases, never.
Getting ready
We'll start this recipe by creating two tables with deliberately inconsistent data so that any attempt to check the existing rows will result in an error message:
postgres=# CREATE TABLE ft(fk int PRIMARY KEY, fs text);
CREATE TABLE
postgres=# CREATE TABLE pt(pk int, ftval int);
CREATE TABLE
postgres=# INSERT INTO ft (fk, fs) VALUES (1,'one'), (2,'two');
INSERT 0 2
postgres=# INSERT INTO pt (pk, ftval) VALUES (1, 1), (2, 2), (3, 3);
INSERT 0 3
How to do it…
If we attempt to create an ordinary foreign key, we will get an error since the number 3 does not appear in the ft table:
postgres=# ALTER TABLE pt ADD CONSTRAINT pt_ft_fkey FOREIGN KEY (ftval) REFERENCES ft (fk);
ERROR: insert or update on table "pt" violates foreign key constraint pt_ft_fkey"
DETAIL: Key (pk)=(3) is not present in table "ft".
However, the same constraint can be successfully created as NOT VALID:
postgres=# ALTER TABLE pt ADD CONSTRAINT pt_ft_fkey FOREIGN KEY (ftval) REFERENCES ft(fk) NOT VALID;
ALTER TABLE
postgres=# d pt
Table "public.pt"
Column | Type | Modifiers
--------+---------+-----------
pk | integer |
ftval | text |
Foreign-key constraints:
"pt_ft_fkey" FOREIGN KEY (ftval) REFERENCES ft(fk) NOT VALID
Note
The invalid state of the foreign key is visible in psql.
This violation is detected when we try to transform the NOT VALID constraint into a valid one:
postgres=# ALTER TABLE pt VALIDATE CONSTRAINT pt_ft_fkey;
ERROR: insert or update on table "pt" violates foreign key constraint pt_ft_fkey"
DETAIL: Key (ftval)=(3) is not present in table "ft".
Validation becomes possible after removing the inconsistency, and the foreign key is upgraded to be fully validated:
postgres=# DELETE FROM pt WHERE pk = 3;
DELETE 1
postgres=#
ALTER TABLE
postgres=# d pt
Table "public.pt"
Column | Type | Modifiers
--------+---------+-----------
pk | integer |
ftval | text |
Foreign-key constraints:
"pt_ft_fkey" FOREIGN KEY (ftval) REFERENCES ft (fk)
How it works…
ALTER TABLE ... ADD CONSTRAINT FOREIGN KEY.. NOT VALID uses ShareRowExclusiveLock, which blocks writes, and VACUUM, yet allows reads on the table to continue. ADD CONSTRAINT CHECK can also be added using the NOT VALID option, but as of Postgres 14, it still takes a full AccessExclusiveLock when it executes, which means it blocks all access to the table, including reads.
The ALTER TABLE ... VALIDATE CONSTRAINT command executes using ShareUpdateExclusiveLock, which allows both reads and writes on the table, yet blocks DDL and VACUUM while it scans the table.
PostgreSQL takes SQL locks according to the ISO standard; that is, locks are taken during the transaction and then released when it ends. This means that algorithms like this one, where there is a short activity requiring stronger locks, followed by a longer activity that needs only lower strength locks, cannot be implemented within a single transaction.
There's more…
If you want to add ALTER TABLE ... SET NOT NULL concurrently, then you need to do that as a three-step process:
- The first step is as follows:
ALTER TABLE pt ADD CONSTRAINT ftval_not_null
CHECK (ftval IS NOT NULL) NOT VALID;
- The second step is as follows:
ALTER TABLE pt VALIDATE CONSTRAINT ftval_not_null;
- The third step is as follows:
ALTER TABLE pt ALTER COLUMN ftval SET NOT NULL;
The last step is optimized in Postgres 14+ so that it avoids needing to validate the NOT NULL requirement because of the existence of a constraint that proves it is already true.
Adding/removing schemas
Separating groups of objects is a good way of improving administrative efficiency. You need to know how to create new schemas and remove schemas that are no longer required.
How to do it…
To add a new schema, issue this command:
CREATE SCHEMA sharedschema;
If you want that schema to be owned by a particular user, then you can add the following option:
CREATE SCHEMA sharedschema AUTHORIZATION scarlett;
If you want to create a new schema that has the same name as an existing user so that the user becomes the owner, then try this:
CREATE SCHEMA AUTHORIZATION scarlett;
In many database systems, the schema name is the same as that of the owning user. PostgreSQL allows schemas that are owned by one user to have objects owned by another user within them. This can be especially confusing when you have a schema that has the same name as the owning user. To avoid this, you should have two types of schema: schemas that are named the same as the owning user should be limited to only objects owned by that user. Other general schemas can have shared ownership.
To remove a schema named str, we can issue the following command:
DROP SCHEMA str;
If you want to ensure that the schema exists in all cases, you can issue the following command:
CREATE SCHEMA IF NOT EXISTS str;
You need to be careful here because the outcome of the preceding command depends on the previous state of the database. As an example, try issuing the following command:
CREATE TABLE str.tb (x int);
This will generate an error if the str schema contained that table before CREATE SCHEMA IF NOT EXISTS was run. Otherwise, no namespace error will occur.
Irrespective of your PostgreSQL version, there isn't a CREATE OR REPLACE SCHEMA command, so when you want to create a schema, regardless of whether it already exists, you can do the following:
DROP SCHEMA IF EXISTS newschema;
CREATE SCHEMA newschema;
The DROP SCHEMA command won't work unless the schema is empty or unless you use the nuclear option:
DROP SCHEMA IF EXISTS newschema CASCADE;
The nuclear option kills all known germs and all your database objects (even the good objects).
There's more…
In the SQL standard, you can also create a schema and the objects it contains in one SQL statement. PostgreSQL accepts the following syntax if you need it:
CREATE SCHEMA foo
CREATE TABLE account
(id INTEGER NOT NULL PRIMARY KEY
,balance NUMERIC(50,2))
CREATE VIEW accountsample AS
SELECT *
FROM account
WHERE random() < 0.1;
Mostly, I find this limiting. This syntax exists to allow us to create two or more objects at the same time. This can be achieved more easily using PostgreSQL's ability to allow transactional DDL, which was discussed in the Writing a script that either succeeds entirely or fails entirely recipe.
Using schema-level privileges
Privileges can be granted for objects in a schema using the GRANT command, as follows:
GRANT SELECT ON ALL TABLES IN SCHEMA sharedschema TO PUBLIC;
However, this will only affect tables that already exist. Tables that are created in the future will inherit privileges defined by the ALTER DEFAULT PRIVILEGES command, as follows:
ALTER DEFAULT PRIVILEGES IN SCHEMA sharedschema
GRANT SELECT ON TABLES TO PUBLIC;
Moving objects between schemas
Once you've created schemas for administration purposes, you'll want to move existing objects to keep things tidy.
How to do it…
To move one table from its current schema to a new schema, use the following command:
ALTER TABLE cust
SET SCHEMA anotherschema;
If you want to move all objects, you can consider renaming the schema itself by using the following query:
ALTER SCHEMA existingschema RENAME TO anotherschema;
This only works if another schema with that name does not exist. Otherwise, you'll need to run ALTER TABLE for each table you want to move. You can follow the Performing actions on many tables recipe, earlier in this chapter, to achieve that.
Views, sequences, functions, aggregates, and domains can also be moved by ALTER commands with SET SCHEMA options.
How it works…
When you move tables to a new schema, all the indexes, triggers, and rules that have been defined on those tables will also be moved to the new schema. If you've used a SERIAL data type and an implicit sequence has been created, then that also moves to the new schema. Schemas are purely an administrative concept and they do not affect the location of the table's data files. Tablespaces don't work this way, as we will see in later recipes.
Databases, users/roles, languages, and conversions don't exist in a schema. Schemas exist in a particular database. Schemas don't exist within schemas; they are not arranged in a tree or hierarchy. More details can be found in the Using multiple schemas recipe of Chapter 4, Server Control.
There's more…
Casts don't exist in schemas, though the data types and functions they reference do exist. These things are not typically something we want to move around, anyway. This is just a note if you're wondering how things work.
Adding/removing tablespaces
Tablespaces allow us to store PostgreSQL data across different devices. We may want to do that for performance or administrative ease, or our database may have run out of disk space.
Getting ready
Before we can create a useful tablespace, we need the underlying devices in a production-ready form. Think carefully about the speed, volume, and robustness of the disks you are about to use. Make sure that they have been configured correctly. Those decisions will affect your life for the next few months and years!
Disk performance is a subtle issue that most people think can be decided in a few seconds. We recommend reading Chapter 10, Performance and Concurrency, of this book, as well as additional books on the same topic, to learn more.
Once you've done all of that, you can create a directory for your tablespace. The directory must be as follows:
- Empty
- Owned by the PostgreSQL-owning user ID
- Specified with an absolute pathname
On Linux and Unix systems, you shouldn't use a mount point directly. Create a subdirectory and use that instead. This simplifies ownership and avoids some filesystem-specific issues, such as getting lost+found directories.
The directory also needs to follow sensible naming conventions so that we can identify which tablespace goes with which server. Do not be tempted to use something simple, such as data, because it will make later administration more difficult. Be especially careful that test or development servers do not and cannot get confused with production systems.
How to do it…
Once you've created your directory, adding the tablespace is simple:
CREATE TABLESPACE new_tablespace
LOCATION '/usr/local/pgsql/new_tablespace';
The command to remove the tablespace is also simple and is as follows:
DROP TABLESPACE new_tablespace;
Every tablespace has a location assigned to it, except for the pg_global and pg_default default tablespaces, which are for shared system catalogs and all other objects, respectively. They don't have a separate location because they live in a subdirectory of the data directory.
A tablespace can only be dropped when it is empty, so how do you know when a tablespace is empty?
Tablespaces can contain both permanent and temporary objects. Permanent data objects are tables, indexes, and TOAST objects. We don't need to worry too much about TOAST objects because they are created and always live in the same tablespace as their main table, and you cannot manipulate their privileges or ownership.
Indexes can exist in separate tablespaces as a performance option, though that requires explicit specification in the CREATE INDEX statement. The default is to create indexes in the same tablespace as the table that they belong to.
Temporary objects may also exist in a tablespace. These exist when users have explicitly created temporary tables or there may be implicitly created data files when large queries overflow their work_mem settings. These files are created according to the setting of the temp_tablespaces parameter. This might cause an issue because you can't tell what the setting of temp_tablespaces is for each user. Users can change their setting of temp_tablespaces from the default value specified in the postgresql.conf file to something else.
We can identify the tablespace of each user object using the following query:
SELECT spcname
,relname
,CASE WHEN relpersistence = 't' THEN 'temp '
WHEN relpersistence = 'u' THEN 'unlogged '
ELSE '' END ||
CASE
WHEN relkind = 'r' THEN 'table'
WHEN relkind = 'p' THEN 'partitioned table'
WHEN relkind = 'f' THEN 'foreign table'
WHEN relkind = 't' THEN 'TOAST table'
WHEN relkind = 'v' THEN 'view'
WHEN relkind = 'm' THEN 'materialized view'
WHEN relkind = 'S' THEN 'sequence'
WHEN relkind = 'c' THEN 'type'
ELSE 'index' END as objtype
FROM pg_class c join pg_tablespace ts
ON (CASE WHEN c.reltablespace = 0 THEN
(SELECT dattablespace FROM pg_database
WHERE datname = current_database())
ELSE c.reltablespace END) = ts.oid
WHERE relname NOT LIKE 'pg_toast%'
AND relnamespace NOT IN
(SELECT oid FROM pg_namespace
WHERE nspname IN ('pg_catalog', 'information_schema'))
;
This displays output such as the following:
spcname | relname | objtype
------------------+-----------+------------
new_tablespace | x | table
new_tablespace | y | table
new_tablespace | z | temp table
new_tablespace | y_val_idx | index
You may also want to look at the spcowner, relowner, relacl, and spcacl columns to determine who owns what and what they're allowed to do. The relacl and spcacl columns refer to the Access Control List (ACL) that details the privileges available on those objects. The spcowner and relowner columns record the owners of the tablespace and tables/indexes, respectively.
How it works…
A tablespace is just a directory where we store PostgreSQL data files. We use symbolic links from the data directory to the tablespace.
We exclude TOAST tables because they are always in the same tablespace as their parent tables, but remember that TOAST tables are always in a separate schema. You can exclude TOAST tables using the relkind column, but that would still include the indexes on the TOAST tables. TOAST tables and TOAST indexes both start with pg_toast, so we can exclude those easily from our queries.
The preceding query needs to be complex because the pg_class entry for an object will show reltablespace = 0 when an object is created in the database's default tablespace. So, if you directly join pg_class and pg_tablespace, you end up losing rows.
Note that we can see that a temporary object exists and that we can also see the tablespace that it has created, even though we cannot refer to a temporary object in another user's session.
There's more…
Some more notes on best practices follow.
A tablespace can contain objects from multiple databases, so it's possible to be in a position where there no objects are visible in the current database. The tablespace just refuses to go away, giving us the following error:
ERROR: tablespace "old_tablespace" is not empty
You are strongly advised to make a separate tablespace for each database to avoid confusion. This can be especially confusing if you have the same schema names and table names in separate databases.
How do you avoid this? If you just created a new tablespace directory, you may want to create subdirectories within that for each database that needs space, and then change the subdirectories to tablespaces instead.
You may also wish to consider giving each tablespace a specific owner by using the following query:
ALTER TABLESPACE new_tablespace OWNER TO eliza;
This may help smooth administration.
You may also wish to set default tablespaces for a user so that tables are automatically created by issuing the following query:
ALTER USER eliza SET default_tablespace = 'new_tablespace';
Putting pg_wal on a separate device
You may seek advice about placing the pg_wal directory on a separate device for performance reasons. This sounds very similar to tablespaces, though there is no explicit command to do this once you have a running database, and files in pg_wal are frequently written. So, you must perform the steps outlined in the following example:
- Stop the database server:
[postgres@myhost ~]$ pg_ctl stop
- Move pg_wal to a location that's supported by a different disk device:
[postgres@myhost ~]$ mv $PGDATA/pg_wal /mnt/newdisk/
- Create a symbolic link from the old location to the new location:
[postgres@myhost ~]$ ln -s /mnt/newdisk/pg_wal $PGDATA/pg_wal
- Restart the database server:
[postgres@myhost ~]$ pg_ctl start
- Verify that everything is working by committing any transaction (preferably, a transaction that does not damage the existing workload):
[postgres@myhost ~]$ psql -c 'CREATE TABLE all is ok()'
Tablespace-level tuning
Since each tablespace has different I/O characteristics, we may wish to alter the planner cost parameters for each tablespace. These can be set with the following command:
ALTER TABLESPACE new_tablespace SET
(seq_page_cost = 0.05, random_page_cost = 0.1);
In this example, the settings are roughly appropriate for an SSD drive, and it assumes that the drive is 40 times faster than an HDD for random reads and 20 times faster for sequential reads.
The values that have been provided need more discussion than we have time for here; these are only examples to demonstrate how to change the settings.
Moving objects between tablespaces
At some point, you may need to move data between tablespaces.
Getting ready
First, create your tablespaces. Once the old and new tablespaces exist, we can issue the commands to move the objects inside them.
How to do it…
Tablespaces can contain both permanent and temporary objects.
Permanent data objects include tables, indexes, and TOAST objects. We don't need to worry too much about TOAST objects because they are created in and always live in the same tablespace as their main table. So, if you alter the tablespace of a table, its TOAST objects will also move:
ALTER TABLE mytable SET TABLESPACE new_tablespace;
Indexes can exist in separate tablespaces, and moving a table leaves the indexes where they are. Don't forget to run ALTER INDEX commands as well, one for each index, as follows:
ALTER INDEX mytable_val_idx SET TABLESPACE new_tablespace;
Temporary objects cannot be explicitly moved to a new tablespace, so we need to ensure they are created somewhere else in the future. To do that, you need to do the following:
- Edit the temp_tablespaces parameter, as shown in the Updating the parameter file recipe of Chapter 3, Server Configuration.
- Reload the server configuration file to allow new configuration settings to take effect:
SELECT pg_reload_conf()
How it works…
If you want to move a table and its indexes all in one pass, you can issue all the commands in a single transaction, as follows:
BEGIN;
ALTER TABLE mytable SET TABLESPACE new_tablespace;
ALTER INDEX mytable_val1_idx SET TABLESPACE new_tablespace;
ALTER INDEX mytable_val2_idx SET TABLESPACE new_tablespace;
COMMIT;
Moving tablespaces means bulk copying data. Copying happens sequentially, block by block. This works well, but there's no way to avoid the fact that the bigger the table, the longer it will take.
The performance will be optimized if archiving or streaming replication is not active, as no WAL will be written in that case.
You should be aware that the table is fully locked (with the AccessExclusiveLock lock) while the copy is taking place, so this can cause an effective outage for your application. Be very careful!
If you want to ensure that objects are created in the right place next time you create them, then you can use the following query:
SET default_tablespace = 'new_tablespace';
You can run this automatically for all the users that connect to a database using the following query:
ALTER DATABASE mydb SET default_tablespace = 'new_tablespace';
Ensure that you do not run the following command by mistake, however:
ALTER DATABASE mydb SET TABLESPACE new_tablespace;
This moves all the objects that do not have an explicitly defined tablespace into new_tablespace. For a large database, this will take a very long time, and your database will be completely locked while it runs; this is not preferred if you do it by accident!
There's more…
If you have just discovered that indexes don't get moved when you move a table, then you may want to check whether any indexes are in tablespaces that are different than their parent tables. Run the following code to check this:
SELECT i.relname as index_name
, tsi.spcname as index_tbsp
, t.relname as table_name
, tst.spcname as table_tbsp
FROM ( pg_class t /* tables */
JOIN pg_tablespace tst
ON t.reltablespace = tst.oid
OR ( t.reltablespace = 0
AND tst.spcname = 'pg_default' )
)
JOIN pg_index pgi
ON pgi.indrelid = t.oid
JOIN ( pg_class I /* indexes */
JOIN pg_tablespace tsi
ON i.reltablespace = tsi.oid
OR ( i.reltablespace = 0
AND tsi.spcname =''pg_defaul'' )
)
ON pgi.indexrelid = i.oid
WHERE i.relname NOT LIKE''pg_toast''
AND i.reltablespace != t.reltablespace
;
If we have one table with an index in a separate tablespace, we might see this as a psql definition:
postgres=# d y
Table""public.""
Column | Type | Modifiers
--------+------+-----------
val | text |
Indexes:
""y_val_id"" btree (val), tablespace""new_tablespac""
Tablespace:""new_tablespace""
Running the previously presented query gives us the following output:
relname | spcname | relname | spcname
-----------+------------------+---------+---------------
y_val_idx | new_tablespace | y | new_tablespace2
(1 row)
In PostgreSQL 14, you can change the tablespace of an index when you run REINDEX, so this can be used to resolve these problems using commands like this:
REINDEX (TABLESPACE new, CONCURRENTLY) v_val_idx;
Accessing objects in other PostgreSQL databases
Sometimes, you may want to access data in other PostgreSQL databases. The reasons for this may be as follows:
- You have more than one database server, and you need to extract data (such as a reference) from one server and load it into the other.
- You want to access data that is in a different database on the same database server, which was split for administrative purposes.
- You want to make some changes that you do not wish to rollback in the event of an error or transaction abort. These are known as function side effects or autonomous transactions.
You may also be considering this because you are exploring the scale-out, sharding, or load balancing approaches. If so, read the last part of this recipe (the See also section) and then skip to Chapter 12, Replication and Upgrades.
Note
PostgreSQL includes two separate mechanisms for accessing external PostgreSQL databases: dblink and the PostgreSQL Foreign Data Wrapper. The latter is now more efficient, so we no longer provide examples of the older dblink .
Getting ready
First of all, let's make a distinction to prevent confusion:
- The Foreign Data Wrapper infrastructure, a mechanism that's used to manage the definition of remote connections, servers, and users, is available in all supported PostgreSQL versions. This is like the "driver manager" in JDBC/ODBC.
- The PostgreSQL Foreign Data Wrapper is a specific contrib extension that uses the Foreign Data Wrapper infrastructure to connect to remote PostgreSQL servers. This is like the driver in JDBC.
Foreign Data Wrapper extensions for other database systems will be discussed in the next recipe, Accessing objects in other foreign databases.
How to do it…
Let's use the PostgreSQL Foreign Data Wrapper:
- The first step is to install the postgres_fdw module called contrib , which is as simple as this:
postgres=# CREATE EXTENSION postgres_fdw;
- The result is as follows:
CREATE EXTENSION
- This extension automatically creates the corresponding Foreign Data Wrapper, as you can check with psql's dew meta-command:
postgres=# dew
List of foreign-data wrappers
Name | Owner | Handler | Validator
--------------+--------+----------------------+------------------------
postgres_fdw | gianni | postgres_fdw_handler | postgres_fdw_validator
(1 row)
- We can now define a server:
postgres=# CREATE SERVER otherdb
FOREIGN DATA WRAPPER postgres_fdw
OPTIONS (host 'foo', dbname 'otherdb', port '5432');
- This produces the following output:
CREATE SERVER
- Then, we can define the user mapping:
postgres=# CREATE USER MAPPING FOR PUBLIC SERVER otherdb;
- The output is as follows:
CREATE USER MAPPING
- As an example, we will access a portion of a remote table containing (integer, text) pairs:
postgres=# CREATE FOREIGN TABLE ft (
num int ,
word text )
SERVER otherdb
OPTIONS (
schema_name 'public' , table_name 't' );
The result is quite laconic:
CREATE FOREIGN TABLE
- This table can now be operated almost like any other table. Let's check whether it is empty:
postgres=# select * from ft;
- This is the output:
num | word
-----+------
(0 rows)
- We can insert rows as follows:
postgres=# insert into ft(num,word) values
(1,'One'), (2,'Two'),(3,'Three');
- This query produces the following output:
INSERT 0 3
- Then, we can verify that the aforementioned rows have been inserted:
postgres=# select * from ft;
- This is confirmed by the output:
num | word
-----+-------
1 | One
2 | Two
3 | Three
(3 rows)
Note
You don't have to manage connections or format text strings to assemble your queries. Most of the complexity is handled automatically by the Foreign Data Wrapper.
How it works…
Note that the remote connection persists even across transaction failures and other errors, so there is no need to reconnect.
The postgres_fdw extension can manage connections transparently and efficiently, so if your use case does not involve commands other than SELECT, INSERT, UPDATE, and DELETE, then you should go for it.
Remote data sources look as if they can be treated like tables, and they are represented as such by Foreign Data Wrappers. Ideally, we would like to use foreign tables interchangeably with local tables, with minimum possible performance penalties and maintenance costs, so it is important to know what optimizations work and which ones are still on the wish list.
First, here's the good news: foreign tables can have statistics collected, just like ordinary tables, and they can be used as models to create local tables:
CREATE TABLE my_local_copy (LIKE my_foreign_table);
This is not supported by dblink because it works on statements instead of managing tables. In general, there is no federated query optimizer. If we join a local table and a remote table with dblink, then data from the remote database is simply pulled through, even if it would have been quicker to send the data and then pull back matching rows. On the other hand, postgres_fdw can share information with the query planner, allowing some optimization, and more improvements are likely to come in the following years now that the infrastructure has been built.
postgres_fdw transparently pushes WHERE clauses to the remote server. Suppose you issue the following command:
SELECT * FROM ft WHERE num = 2;
Here, only the matching rows will be fetched, using any remote index if available. This is a massive advantage of working with selective queries on large tables. Note that the dblink module cannot automatically send a local WHERE clause to the remote database.
This means that, in general, setting up views of remote data this way isn't very helpful as it encourages users to think that the table location doesn't matter, whereas, from a performance perspective, it does. This isn't any different than other federated or remote access database products.
postgres_fdw can delegate even more activities to the remote node. This includes performing sorts or joins, computing aggregates by carrying out entire UPDATE or DELETE statements, and evaluating the operators or functions provided by suitable extensions.
There's more…
If you are concerned about the overhead of connection time, then you may want to consider using a session pool. This will reserve several database connections, which will allow you to reduce apparent connection time. For more information, look at the Setting up a connection pool recipe of Chapter 4, Server Control.
Another – and sometimes easier – way of accessing other databases is with a tool named PL/Proxy, which is available as a PostgreSQL extension. PL/Proxy allows you to create a local database function that is a proxy for a remote database function. PL/Proxy only works for functions, and some people regard this as a restriction in a way similar to postgres_fdw, which only operates on rows in tables. That is why these solutions complement dblink, rather than replacing it.
Creating a local proxy function is simple:
CREATE FUNCTION my_task(VOID)
RETURNS SETOF text AS $$
CONNECT 'dbname=myremoteserver';
SELECT my_task();
$$ LANGUAGE plproxy;
You need a local function, but you don't need to call a remote function; you can use SQL statements directly. The following example shows a parameterized function:
CREATE FUNCTION get_cust_email(p_username text)
RETURNS SETOF text AS $$
CONNECT 'dbname=myremoteserver';
SELECT email FROM users WHERE username = p_username;
$$ LANGUAGE plproxy;
PL/Proxy is specifically designed to allow more complex architecture for sharding and load balancing. The RUN ON command allows us to dynamically specify the remote database that we will run the SQL statement on. So, the preceding example becomes as follows:
CREATE FUNCTION get_cust_email(p_username text)
RETURNS SETOF text AS $$
CLUSTER 'mycluster';
RUN ON hashtext(p_username);
SELECT email FROM users WHERE username = p_username;
$$ LANGUAGE plproxy;
You'll likely need to read Chapter 12, Replication and Upgrades, before you begin designing application architecture using these concepts.
Accessing objects in other foreign databases
In the previous recipe, you learned how to use objects from a different PostgreSQL database, either with dblink or by using the Foreign Data Wrapper infrastructure. Here, we will explore another variant of the latter – using Foreign Data Wrappers to access databases other than PostgreSQL.
There are many Foreign Data Wrappers for other database systems, all of which are maintained as extensions independently from the PostgreSQL project. The PostgreSQL Extension Network (PGXN), which we mentioned in Chapter 3, Server Configuration, is a good place to see which extensions are available.
Just note this so that you don't get confused: while you can find Foreign Data Wrappers to access several database systems, there are also other wrappers for different types of data sources, such as text files, web services, and so on. There is even postgres_fdw, a backport of the contrib module that we covered in the previous recipe, for users of older PostgreSQL versions who do not have it yet.
Note
When evaluating external extensions, I advise you to carefully examine the README file in each extension before making stable choices, as the code maturity varies a lot. Some extensions are still development experiments, while others are production-ready extensions, such as oracle_fdw.
Getting ready
For this example, we will use the Oracle Foreign Data Wrapper, oracle_fdw, whose current version is 2.4.0.
You must have obtained and installed the required Oracle software, as specified in the oracle_fdw documentation at https://github.com/laurenz/oracle_fdw/blob/ORACLE_FDW_2_4_0/README.oracle_fdw#L503.
The oracle_fdw wrapper is available in the PostgreSQL Extension Network, so you can follow the straightforward installation procedure described in the Installing modules from PGXN section of the Adding an external module to PostgreSQL recipe of Chapter 3, Server Configuration.
You must have access to an Oracle database server.
How to do it…
Follow these steps to learn how to connect to an Oracle server using oracle_fdw:
- First, we must ensure that the extension has been loaded:
CREATE EXTENSION IF NOT EXISTS oracle_fdw;
- Then, we must configure the server and the user mapping:
CREATE SERVER myserv
FOREIGN DATA WRAPPER oracle_fdw
OPTIONS (dbserver '//myhost/MYDB');
CREATE USER MAPPING FOR myuser
SERVER myserv;
- Then, we must create a PostgreSQL foreign table with the same column names as the source table in Oracle, and with compatible column types:
CREATE FOREIGN TABLE mytab(id bigint, descr text)
SERVER myserv
OPTIONS (user 'scott', password 'tiger');
- Now, we can try to write to the table:
INSERT INTO mytab VALUES (-1, 'Minus One');
- Finally, we can read the values that we have inserted:
SELECT * FROM mytab WHERE id = -1;
This should result in the following output:
id | descr
----+-----------
-1 | Minus One
(1 row)
How it works…
Our query has a WHERE condition that filters the rows we select from the foreign table. As in the postgres_fdw example from the previous recipe, Foreign Data Wrappers do something clever: the WHERE condition is pushed to the remote server, and only the matching rows are retrieved. Not all do FDWs do this, but many do (as we'll see shortly).
This is good in two ways: first, we delegate some work to another system, and second, we reduce the overall network traffic by not transferring unnecessary data.
Also, note that the WHERE condition is expressed in the PostgreSQL syntax; the Foreign Data Wrapper can translate it into whatever form is required by the remote system.
There's more…
PostgreSQL provides the infrastructure for collecting statistics on foreign tables, so the planner will be able to consider such information, provided that the feature is implemented in the specific Foreign Data Wrapper you are using. For example, statistics are supported by oracle_fdw.
The latest improvements for foreign tables include trigger support, IMPORT FOREIGN SCHEMA, and several improvements to the query planner.
Something particularly useful for database administrators is the IMPORT FOREIGN SCHEMA syntax, which can be used to create foreign tables for all the tables and views in a given remote schema with a single statement.
Among the query planner improvements, we wish to mention Join Pushdown. In a nutshell, a query that joins some foreign tables that belong to the same server can have the join performed transparently on the remote server. To avoid security issues, this can only happen if these tables are all accessed with the same role.
Open source FDWs are also available for PostgreSQL 14 for the following databases:
- MySQL (https://github.com/EnterpriseDB/mysql_fdw): Supports writable FDWs, SELECT clauses, WHERE clauses, and JOIN clause pushdowns, as well as connection pooling.
- MongoDB (https://github.com/EnterpriseDB/mongo_fdw): Supports writable FDWs and connection pooling.
- HDFS (Apache Hadoop, Apache Spark, Apache Hive) https://github.com/EnterpriseDB/hdfs_fdw.
Making views updatable
PostgreSQL supports the SQL standard CREATE VIEW command, which supports automatic UPDATE, INSERT, and DELETE commands, provided they are simple enough.
Note that certain types of updates are forbidden just because they are either impossible or impractical to derive a corresponding list of modifications on the constituent tables. We'll discuss those issues here.
Getting ready
First, you need to consider that only simple views can be made to receive insertions, updates, and deletions easily. The SQL standard differentiates between views that are simple and updatable, and more complex views that cannot be expected to be updatable.
So, before we proceed, we need to understand what a simple updatable view is and what it is not. Let's start with the cust table:
postgres=# SELECT * FROM cust;
customerid | firstname | lastname | age
------------+-----------+----------+-----
1 | Philip | Marlowe | 38
2 | Richard | Hannay | 42
3 | Holly | Martins | 25
4 | Harry | Palmer | 36
4 | Mark | Hall | 47
(5 rows)
Let's create a simply updatable view on top of it, as follows:
CREATE VIEW cust_view AS
SELECT customerid
,firstname
,lastname
,age
FROM cust;
Each row in our view corresponds to one row in a single-source table, and each column is referred to directly without any further processing, except possibly for a column rename. Thus, we expect to be able to make INSERT, UPDATE, and DELETE commands pass through our view into the base table, which is what happens in PostgreSQL.
A view will be automatically updatable if a view has just one table or updatable view in the FROM clause and does not contain functions in the SELECT, WITH, LIMIT DISTINCT, aggregation, window functions, grouping, or sorting clauses.
The following examples are three views where the INSERT, UPDATE, and DELETE commands cannot be made to flow to the base table easily, for the reasons just described:
CREATE VIEW cust_avg AS
SELECT avg(age)
FROM cust;
CREATE VIEW cust_above_avg_age AS
SELECT customerid
,substr(firstname, 1, 20) as fname
,substr(lastname, 1, 20) as lname
,age -
(SELECT avg(age)::integer
FROM cust) as years_above_avg
FROM cust
WHERE age >
(SELECT avg(age)
FROM cust);
CREATE VIEW potential_spammers AS
SELECT customerid, spam_score(firstname,lastname)
FROM cust
ORDER BY spam_score(firstname,lastname) DESC
LIMIT 100;
The first view just shows a single row with the average of a numeric column. Changing an average directly doesn't make much sense. For instance, if we want to raise the average age by 1, should we increase all numbers by 1, resulting in each row that is unusual being updated? Or should we change some rows only, by a larger amount? A user who wants to do this can update the cust table directly.
The second view shows a column called years_above_avg, which is the difference between the age of that customer and the average. Changing that column would be more complex than it seems at first glance: just consider that increasing the age by 10 would not result in increasing years_above_avg by 10, because the average will also be affected.
The third view displays a computed column that can't be updated directly – we can't change the value in the spam_score column without changing the algorithm that's implemented by the spam_score() function.
Now, we can learn how to allow any or all insertions, updates, or deletions to flow from views to base tables since we've clarified whether this makes sense conceptually.
How to do it…
There is nothing to do for simple views – PostgreSQL will propagate modifications to the underlying table automatically.
Conversely, if the view is not simple enough, but you still have a clear idea of how you would like to propagate changes to the underlying table(s), then you can allow updatable views by telling PostgreSQL how to perform Data Manipulation Language (DML) statements, which in PostgreSQL means INSERT, UPDATE, DELETE, or TRUNCATE.
PostgreSQL supports two mechanisms to achieve updatable views – namely, rewriting rules and INSTEAD OF triggers. The latter provides a mechanism to implement updatable views by creating trigger functions that execute arbitrary code every time a data-modification command is executed on the view.
The INSTEAD OF triggers are part of the SQL standard, and other database systems support them. Conversely, query rewrite rules are specific to PostgreSQL and cannot be found anywhere else in this exact form.
There is no preferable method. On one hand, rules can be more efficient than triggers, while on the other hand, they can be more difficult to understand than triggers and could result in inefficient execution if the code is badly written (although the latter is not an exclusive property of rules, unfortunately).
To explain this point concretely, we will now provide an example of using rules, and then we will re-implement the same example with triggers:
- We will start with a table of mountains and their height in meters:
CREATE TABLE mountains_m
( name text primary key
, meters int not null
);
- Then, we will create a view that adds a computed column expressing the height in feet, and that displays the data in descending height order:
CREATE VIEW mountains AS
SELECT *, ROUND(meters / 0.3048) AS feet
FROM mountains_m
ORDER BY meters DESC;
- DML automatically flows to the base table when we insert columns that are not computed:
INSERT INTO mountains(name, meters)
VALUES ('Everest', 8848);
TABLE mountains;
name | meters | feet
-------+--------+-------
Everest| 8848 | 29029
(1 row)
- However, when we try to insert data with the height specified in feet, we get the following error:
INSERT INTO mountains(name, feet)
VALUES ('K2', 28251);
ERROR: cannot insert into column "feet" of view "mountains"
DETAIL: View columns that are not columns of their base relation are not updatable.
- So, we must create a rule that replaces the insert with another query that works all the time:
CREATE RULE mountains_ins_rule AS
ON INSERT TO mountains DO INSTEAD
INSERT INTO mountains_m
VALUES (NEW.name, COALESCE (NEW.meters, NEW.feet * 0.3048));
- Now, we can insert both meters and feet:
INSERT INTO mountains(name, feet)
VALUES ('K 2', 28251);
INSERT INTO mountains(name, meters)
VALUES ('Kangchenjunga', 8586);
TABLE mountains;
name | meters | feet
--------------+--------+----
Everest | 8848 | 29029
K 2 | 8611 | 28251
Kangchenjunga | 8586 | 28169
(3 rows)
- Updates are also propagated automatically, but only to non-computed columns:
UPDATE mountains SET name = 'K2' WHERE name = 'K 2';
TABLE mountains;
name | meters | feet
--------------+--------+-------
Everest | 8848 | 29029
K2 | 8611 | 28251
Kangchenjunga | 8586 | 28169
(3 rows)
UPDATE mountains SET feet = 29064 WHERE name = 'K2';
ERROR: cannot update column "feet" of view "mountains"
DETAIL: View columns that are not columns of their base relation are not updatable.
- If we add another rule that replaces updates with a query that covers all cases, then the last update will succeed and produce the desired effect:
CREATE RULE mountains_upd_rule AS
ON UPDATE TO mountains DO INSTEAD
UPDATE mountains_m
SET name = NEW.name, meters =
CASE
WHEN NEW.meters != OLD.meters
THEN NEW.meters
WHEN NEW.feet != OLD.feet
THEN NEW.feet * 0.3048
ELSE OLD.meters
END
WHERE name = OLD.name;
UPDATE mountains SET feet = 29064 WHERE name = 'K2';
TABLE mountains;
name | meters | feet
--------------+--------+-------
K2 | 8859 | 29065
Everest | 8848 | 29029
Kangchenjunga | 8586 | 28169
(3 rows)
- The query that's used in this rule also covers the simpler case of a non-computed column:
UPDATE mountains SET meters = 8611 WHERE name = 'K2';
TABLE mountains;
name | meters | feet
--------------+--------+-------
Everest | 8848 | 29029
K2 | 8611 | 28251
Kangchenjunga | 8586 | 28169
(3 rows)
- The same effect can be achieved by adding the following trigger, which replaces the earlier two rules:
CREATE FUNCTION mountains_tf()
RETURNS TRIGGER
LANGUAGE plpgsql
AS $$
BEGIN
IF TG_OP = 'INSERT' THEN
INSERT INTO mountains_m VALUES (NEW.name,
CASE
WHEN NEW.meters IS NULL
THEN NEW.feet * 0.3048
ELSE NEW.meters
END );
ELSIF TG_OP = 'UPDATE' THEN
UPDATE mountains_m
SET name = NEW.name, meters =
CASE
WHEN NEW.meters != OLD.meters
THEN NEW.meters
WHEN NEW.feet != OLD.feet
THEN NEW.feet * 0.3048
ELSE OLD.meters
END
WHERE name = OLD.name;
END IF;
RETURN NEW;
END;
$$;
CREATE TRIGGER mountains_tg
INSTEAD OF INSERT OR UPDATE ON mountains
FOR EACH ROW
EXECUTE PROCEDURE mountains_tf();
How it works…
In this rule-based example, we used the COALESCE function, which returns the first argument, if it's not null, or the second one otherwise. When the original INSERT statement does not specify a value in meters, then it uses the value in feet divided by 0.3048.
The second rule sets the value in meters to different expressions – if the value in meters was updated, we use the new one; if the value in feet was updated, we use the new value in feet divided by 0.3048; and otherwise, we use the old value in meters (that is, we don't change it).
The logic that's implemented in the trigger function is similar to the previous one; note that we use the TG_OP automatic variable to handle INSERT and UPDATE separately.
We've just scratched the surface of what you can achieve with rules, though I find them too complex for widespread use.
You can do a lot of things with rules, but you need to be careful with them. There are some other important points that I should mention about rules before you dive in and start using them everywhere.
Rules are applied by PostgreSQL once the SQL has been received by the server and parsed for syntax errors, but before the planner tries to optimize the SQL statement.
In the rules in the preceding recipe, we referenced the values of the old or the new row, just as we do within trigger functions, using the old and new keywords. Similarly, there are only new values in an INSERT command and only old values in a DELETE command.
One of the major downsides of using rules is that we cannot bulk load data into the table using the COPY command. Also, we cannot transform a stream of inserts into a single COPY command, nor can we perform a COPY operation against the view. Bulk loading requires direct access to the table.
Suppose we have a table and a view, such as the following:
CREATE TABLE cust
(customerid BIGINT NOT NULL PRIMARY KEY
,firstname TEXT
,lastname TEXT
,age INTEGER);
CREATE VIEW cust_minor AS
SELECT customerid
,firstname
,lastname
,age
FROM cust
WHERE age < 18;
Then, we have some more difficulties. If we wish to update this view, then you might read the manual and understand that we can use a conditional rule by adding a WHERE clause to match the WHERE clause in the view, as follows:
CREATE RULE cust_minor_update AS
ON update TO cust_minor
WHERE new.age < 18
DO INSTEAD
UPDATE cust SET
firstname = new.firstname
,lastname = new.lastname
,age = new.age
WHERE customerid = old.customerid;
This fails, however, as you can see if you try to update cust_minor. The fix is to add two rules – one as an unconditional rule that does nothing (literally) and needs to exist for internal reasons, and another to do the work we want:
CREATE RULE cust_minor_update_dummy AS ON
update TO cust_minor
DO INSTEAD NOTHING;
CREATE RULE cust_minor_update_conditional AS
ON update TO cust_minor
WHERE new.age < 18
DO INSTEAD
UPDATE cust SET firstname = new.firstname
,lastname = new.lastname
,age = new.age
WHERE customerid = old.customerid;
There's more…
There is yet another question that's posed by updatable views.
As an example, we shall use the cust_minor view we just defined, which does not allow you to perform insertions or updates so that the affected rows fall out of the view itself. For instance, consider this query:
UPDATE cust_minor SET age = 19 WHERE customerid = 123;
The preceding query will not affect any row because of the WHERE age < 18 conditions in the rule definition.
The CREATE VIEW statement has a WITH CHECK OPTION clause; if specified, any update that excludes any row from the view will fail.
If a view includes some updatable columns, along with other non-updatable columns (for example expressions, literals, and so on), then updates are allowed if they only change the updatable columns.
Finally, let's show that views are just (empty) tables with a SELECT rule. Let's start by creating an empty table, as follows:
CREATE TABLE cust_view AS SELECT * FROM cust WHERE false;
The SELECT rule only works if it is named _RETURN and the table is empty:
postgres # CREATE RULE "_RETURN" AS
ON SELECT TO cust_view
DO INSTEAD
SELECT * FROM cust;
CREATE RULE
postgres=# d cust_view
Huh? So, what is it if it's not a table?
postgres # DROP TABLE cust_view;
ERROR: "cust_view" is not a table
HINT: Use DROP VIEW to remove a view
postgres # DROP VIEW cust_view;
DROP VIEW
Yes, we created a table and then added a rule to it. This turned the table into a view.
Using materialized views
Every time we select rows from a view, we select from the result of the underlying query. If that query is slow and we need to use it more than once, then it makes sense to run the query once, save its output as a table, and then select the rows from the latter.
This procedure has been available for a long time, and there is a dedicated syntax for it, called CREATE MATERIALIZED VIEW, that we will describe in this recipe.
Getting ready
Let's create two randomly populated tables, of which one is large:
CREATE TABLE dish
( dish_id SERIAL PRIMARY KEY
, dish_description text
);
CREATE TABLE eater
( eater_id SERIAL
, eating_date date
, dish_id int REFERENCES dish (dish_id)
);
INSERT INTO dish (dish_description)
VALUES ('Lentils'), ('Mango'), ('Plantain'), ('Rice'), ('Tea');
INSERT INTO eater(eating_date, dish_id)
SELECT floor(abs(sin(n)) * 365) :: int + date '2014-01-01'
, ceil(abs(sin(n :: float * n))*5) :: int
FROM generate_series(1,500000) AS rand(n);
Notice that the data is not truly random. It is generated by a deterministic procedure, so you can get the same result if you copy the preceding code.
How to do it…
Let's get started:
- First, create the following view:
CREATE VIEW v_dish AS
SELECT dish_description, count(*)
FROM dish JOIN eater USING (dish_id)
GROUP BY dish_description
ORDER BY 1;
- Then, we'll query it:
SELECT * FROM v_dish;
- We will obtain the following output:
dish_description | count
------------------+--------
Lentils | 64236
Mango | 66512
Plantain | 74058
Rice | 90222
Tea | 204972
(5 rows)
- With a very similar syntax, we will create a materialized view with the same underlying query:
CREATE MATERIALIZED VIEW m_dish AS
SELECT dish_description, count(*)
FROM dish JOIN eater USING (dish_id)
GROUP BY dish_description
ORDER BY 1;
The corresponding query yields the same output that it did previously:
SELECT * FROM m_dish;
The materialized version is much faster than the non-materialized version. On my laptop, their execution times are 0.2 milliseconds versus 300 milliseconds.
How it works…
Creating a non-materialized view is the same as creating an empty table with a SELECT rule, as we discovered in the previous recipe. No data is extracted until the view is used.
When creating a materialized view, the default is to run the query immediately and then store its results, as we do for table content.
In short, creating a materialized view is slow, but using it is fast. This is the opposite of standard views, which are created instantly and recomputed at every use.
There's more…
The output of a materialized view is physically stored like a regular table, and the analogy doesn't stop here – you can also create indexes to speed up queries.
A materialized view will not automatically change when its constituent tables change. For that to happen, you must issue the following command:
REFRESH MATERIALIZED VIEW m_dish;
This replaces all the contents of the view with newly computed ones.
It is possible to quickly create an empty materialized view and populate it later. Just add WITH NO DATA to the end of the CREATE MATERIALIZED VIEW statement. The view cannot be used before it's populated, which you can do with REFRESH MATERIALIZED VIEW, as you just saw.
A materialized view cannot be read while it is being refreshed. For that, you need to use the CONCURRENTLY clause at the expense of a somewhat slower refresh.
As you can see, currently, there is only a partial advantage in using materialized views, compared to previous solutions such as this:
CREATE UNLOGGED TABLE m_dish AS SELECT * FROM v_dish;
However, when using a declarative language, such as SQL, the same syntax may automatically result in a more efficient algorithm in the case of future improvements to PostgreSQL. For instance, one day, PostgreSQL will be able to perform a faster refresh by simply replacing those rows that changed, instead of recomputing the entire content.
Using GENERATED data columns
You are probably used to the idea that a column can have a default value that's been set by a function; this is how we use sequences to set column values in tables. The SQL Standard provides a new syntax for this, which is referred to as GENERATED … AS IDENTITY. PostgreSQL supports this, but we won't discuss that here.
We can also use views to dynamically calculate new columns as if the data had been stored. PostgreSQL 12+ allows the user to specify that columns can be generated and stored in the table automatically, which is easier and faster than writing a trigger to do this. This is a very important performance and usability feature since we can store data that may take significant time to calculate, so this is much better than just using views. We refer to this feature as GENERATED ALWAYS, which also follows the SQL Standard syntax.
How to do it…
Let's start with an example table:
CREATE TABLE example
( id SERIAL PRIMARY KEY
, descr TEXT
);
ALTER TABLE example
ADD COLUMN id2 integer GENERATED ALWAYS AS (id+1) STORED;
Note that adding a GENERATED column will always rewrite the table since existing rows need to have a value set for the new column (the ALWAYS keyword in the command means always!).
So, make sure you plan and decide what values you want to generate.
How it works…
The GENERATED value is calculated once on INSERT and then stored. After that, the value is just read from the data block each time it is accessed.
After that, the column can't be updated, so you will get an ERROR message:
ERROR: column "foo" can only be updated to DEFAULT
DETAIL: Column "foo" is a generated column.
So, the value stays just as the table owner intended.
Rows with GENERATED data can be deleted normally.
There's more…
Stored expressions must be IMMUTABLE, meaning they depend solely on the values of other data columns in the same row. This means that adding columns like this seems useful but will just end with an ERROR:
ALTER TABLE example
ADD COLUMN last_access_time timestamp
GENERATED ALWAYS AS (current_timestamp) STORED
,ADD COLUMN last_access_user text
GENERATED ALWAYS AS (current_user) STORED;
ERROR: generation expression is not immutable
So, if you always want to add dynamically generated values, this still needs to be done using triggers.
Another point that may be confusing is that the SQL syntax for INSERT does allow for a clause called OVERRIDING SYSTEM VALUE, but this only applies to GENERATED … AS IDENTITY columns.
Using data compression
As data volumes expand, we often think about whether there are ways to compress data to save space. There are many patents awarded in data compression, so the development of open source solutions has been slower than normal. PostgreSQL 14 contains some exciting innovations.
Getting ready
Make sure you're running Postgres 14+.
Various types of data compression are available for PostgreSQL:
- Automatic compression of long data values (TOAST)
- Extensions that offer compressed data types (for example, for JSON)
- Compression of WAL files
- Dump file compression
- Base backup compression
- SSL compression (this is considered insecure, so it's only used on private networks)
- GiST and SP-GiST index compression
- Btree index compression (also known as deduplication)
Only the first three types of compression will be discussed here, but we focus mainly on the parameters that allow us to control how long data values are automatically compressed.
PostgreSQL will try to compress and/or move longer column values out into an external TOAST table. This is automatic and works optimally for a range of different types of data, but there are a few things we can try to improve that.
How to do it…
Changing to the new compression algorithm is the easiest and most beneficial change. The default for columns with no explicit setting is taken from the value of the default_toast_compression parameter. This only applies to newly inserted data.
If we take an existing table, we can set the compression method explicitly, like this:
CREATE TABLE example
( id SERIAL PRIMARY KEY
, descr TEXT
);
ALTER TABLE example
ALTER COLUMN descr SET COMPRESSION lz4;
Note that you need to do this separately for each toastable column. A small problem with this is that not all the columns allow this change, so if you try this on an invalid column data type or integer, then you'll get this ERROR, so don't try and just update every column without checking the data type first. Set the compression option for TEXT, JSONB, XML, BYTEA, or GIS data:
ALTER TABLE example
ALTER COLUMN id SET COMPRESSION lz4;
ERROR: column data type integer does not support compression
Setting a new compression method doesn't rewrite the rows into the new compression method, which is good because that would run for a long time. If you want a rewrite to take place and are happy to lock the table while it runs for a long time, just change a column's data type to the same type, a trick we described earlier.
If you're creating a new database, you just need to set this in postgresql.conf once you've created it:
default_toast_compression = lz4
Since many upgrades use logical replication, we can just set this parameter once and let the rewrite happen automatically during the upgrade process.
How it works…
Above a certain row length, PostgreSQL will attempt to compress and/or move column values out into an external TOAST table. This is done separately for each row, so you will find shorter data columns untouched while longer values from been compressed and/or "toasted." Note that we are using "toast" as both a verb and a noun, describing whether the value has been moved into the toast table.
We can make three different tweaks to this mechanism:
- Change the compression algorithm, which is new in PostgreSQL 14, as we discussed previously.
- Alter the threshold row length at which we consider whether to toast, compress, or do neither.
- Specify whether we don't want to attempt compression and toasting, for special cases.
We can alter the toast threshold using toast_tuple_target, which is set separately for each table using the ALTER TABLE statement. The default value is 2,040 for an 8 KB block size, though this can be set to anything from 128 bytes to 8,160 bytes. By default, if the total row length is longer than this threshold, then Postgres will attempt to compress and/or toast columns, one at a time, with the longest first until the row is less than this value or it cannot do anything more. This behavior is modified by storage options that can be set for each column. So, what happens on any row depends on the data in all of the columns for that specific row.
PostgreSQL has four different STORAGE options, all of which can be set for each column separately:
- PLAIN: Inline, uncompressed; for example, the default for INTEGER
- EXTENDED: External, compressed; for example, the default for TEXT
- EXTERNAL: External, uncompressed; for example, already compressed data (images and so on)
- MAIN: Inline, compressed; for example, medium length TEXT, JSONB, XML, and so on
If you declare a column as using STORAGE MAIN, then Postgres will only toast the column value if there is no other way to do this; this column will be at the back of the queue to be toasted. So, if you have some JSONB data that is typically only a few KB, then it might be good to define that column as MAIN to reduce the access time to that data.
If the data has already been compressed, then set it to be EXTERNAL so that Postgres will not attempt to compress it.
There's more…
An extension called ZSON allows JSONB data to be compressed. This can be used to reduce the size of JSONB data by anything from 0 – 50%, depending on your data.
Postgres can also be configured to use compression for the WAL transaction log:
wal_compression = off (default) | on