Chapter 18: Authentication and Authorization on Kubernetes
In software systems, authentication and authorization play a significant role in providing security. These terms may seem similar but they are very different security processes that work together to provide identity and access management. In short, authentication determines whether a given user of a system is indeed who they claim to be – the easiest way to visualize this is using a username and password to complete an authentication process. Authorization, on the other hand, determines what the user can and cannot do or access in the system. This also means that in secure systems, authentication is the first step and authorization must always follow authentication. One of the approaches of modeling authorization in systems is using role-based access control (RBAC), where you organize access control and management with roles and privileges. Roles can be assigned to users in the system, which gives them certain privileges and access. In this way, you can achieve very fine-grained access management that can be used to enforce the principle of least privilege.
Kubernetes, as a mature and widely adopted container orchestration system, is no exception – it has been designed with security as a first-class citizen. Authentication and authorization in Kubernetes are extensible and can fulfill the needs of enterprise systems.
For authentication, you can use one of the built-in strategies, such as X509 client certificates or OpenID Connect tokens, which are considered industry standards. If there is a need for less common authentication providers such as LDAP, you can use an authenticating proxy or authentication webhook. We will discuss this in the first section of the chapter and extend this knowledge by demonstrating how you can integrate Azure Kubernetes Service (AKS) with Azure Active Directory (AAD) for authentication, and even use Azure RBAC for providing authorization in AKS.
For authorization, Kubernetes comes with a built-in RBAC mechanism that allows you to configure fine-grained sets of permissions and assign them to users, groups, and ServiceAccounts (subjects). In this way, as a cluster administrator, you can control how cluster users (internal and external) interact with the Kubernetes API server, which API resources they can access, and which actions (verbs) they can perform. We will discuss the details in the second section of this chapter.
In this chapter, we will cover the following topics:
- Authentication and user management
- Authentication – AKS and AAD integration
- Authorization – introduction to RBAC
Technical requirements
For this chapter, you will need the following:
- A Kubernetes cluster to be deployed. We recommend using a multi-node, cloud-based Kubernetes cluster. To be able to follow the section regarding AKS and, AAD you need to have a managed AKS cluster deployed and the Azure CLI installed.
- The Kubernetes CLI (kubectl) installed on your local machine and configured to manage your Kubernetes cluster.
Basic Kubernetes cluster deployment (local and cloud-based) and kubectl installation were covered in Chapter 3, Installing Your First Kubernetes Cluster.
The following chapters can give you an overview of how to deploy a fully functional Kubernetes cluster on different cloud platforms:
- Chapter 14, Kubernetes Clusters on Google Kubernetes Engine
- Chapter 15, Launching a Kubernetes Cluster on Amazon Web Services with the Amazon Elastic Kubernetes Service
- Chapter 16, Kubernetes Clusters on Microsoft Azure with the Azure Kubernetes Service.
You can download the latest code samples for this chapter from the official GitHub repository: .
Authentication and user management
The Kubernetes API server provides RESTful endpoints for managing Kubernetes cluster and acts as the frontend to the shared state of the cluster. All users and all internal components interact with the cluster via the Kubernetes API server. Requests to the API are always one of the following:
- Associated with an external, normal user or a ServiceAccount defined in the Kubernetes cluster
- Treated as anonymous requests if the cluster has been configured to allow anonymous requests
This is determined in the authentication process – the entire HTTP request is used as input to the process, but usually only request hearers or the client certificate is analyzed. Authentication is carried out by authentication modules that depend on the cluster configuration. Your cluster may have multiple authentication modules enabled and then each of them is executed in sequence until one succeeds. If the request fails to authenticate, the API server will either respond with an HTTP status code of 401 (unauthorized) or, if anonymous requests are enabled, treat it as anonymous.
Tip
Anonymous requests are essentially mapped to a special username called system:anonymous and a group called system:unauthenticated. This means that you can organize your authorization to resources for such requests, just as you can for other users or ServiceAccounts.
Since all operations inside and outside the cluster must go through the Kubernetes API server, this means that all of them must go through the authentication process. This includes the operations of internal cluster components and Pods, which query the API server. For you, as an external user of the cluster, any requests that you make using kubectl commands or directly to the Kubernetes API server will also go through the authentication process:
- Normal users: Such users are managed externally, independent from the Kubernetes cluster. Currently, Kubernetes does not provide any objects to represent such users. The external management of users may be as simple (but not recommended) as static user-password files passed to the API server using the token-auth-file argument during startup. In real production scenarios, you should use cloud services such as AAD or AWS Identity and Access Management to manage the users and integrate with your Kubernetes cluster using OpenID Connect (https://openid.net/connect/) tokens to seamlessly authenticate. Note that normal user accounts are global and do not have cluster namespaces.
- Service accounts: These are managed by Kubernetes cluster and modeled as ServiceAccount objects. You can create and manage service accounts just like any other resource in Kubernetes; for example, using kubectl and YAML manifest files. This type of account is intended for processes in cluster components or running in Pods. The credentials for ServiceAccounts are stored as Secrets in the cluster that are mounted into Pods so that the container process can use them to talk to the Kubernetes API server. When a process authenticates using a ServiceAccount token, it is seen as a user called system:serviceaccount:<namespace>:<serviceAccountName>. Note that ServiceAccounts are namespaced.
As you can see, user management in Kubernetes is a mixture of different approaches that should fit all the needs of different organizations. The key takeaway here is that after the authentication process, the request will be either rejected (optionally treated as anonymous) or will be treated as coming from a particular user. The username attribute may be provided by the external user management system, as in the case of normal users, or it will be system:serviceaccount:<namespace>:<serviceAccountName> for ServiceAccounts. Additionally, the request will have more attributes associated with it, such as User ID (UID), groups, and extra fields. This information is used for authorization processes based on RBAC, which we will explain in the next section.
Now, let's look at the authentication methods that you can use with Kubernetes.
Static token files
This method is the most basic one that Kubernetes offers for managing normal users. The approach somewhat resembles the /etc/shadow and /etc/passwd files, which were used in the early days of Unix systems. Note, however, that it is not recommended and is considered unsecure for production clusters.
In this method, you define a .csv file where each line has the following format:
token,user,uid,"group1,group2,group3"
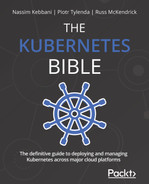
Then, you pass the file when starting the Kubernetes API server process using the token-auth-file parameter. To authenticate against the API server, you need to use a standard HTTP bearer authentication scheme for your requests. This means that your requests will need to use an additional header that's in the following form:
Authorization: Bearer <token>
Based on this request information, the Kubernetes API server will match the token against the static token file and assign user attributes based on the matched record.
When using kubectl, you must modify your kubeconfig. You can do this using the kubectl command:
$ kubectl config set-credentials <contextUser> --token=<token>
After that, you need to create and use context with this user for your requests using the kubectl config use-context command.
Important note
In Kubernetes versions prior to 1.19, there was a similar authentication method that allowed us to use an HTTP basic authentication scheme and a file passed by the basic-auth-file parameter to the API server. This method is no longer supported due to security reasons.
The following diagram visualizes the principles behind this method of authentication:
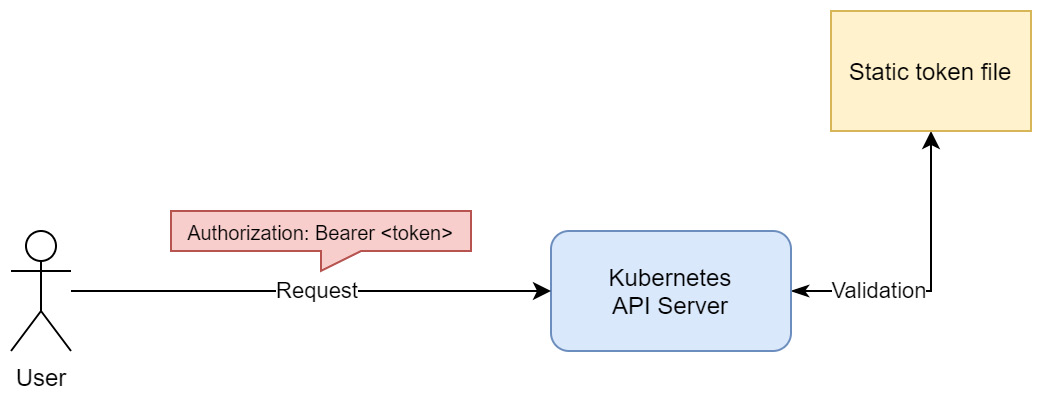
Figure 18.1 – Static token file authentication in Kubernetes
We can now summarize the advantages and disadvantages of using static token file method for authentication.
The advantages are as follows:
- Easy to configure
- Easy to understand
The disadvantages are as follows:
- Unsecure; exposing a token file compromises all cluster users.
- Requires that we manually manage users.
- Adding new users or removing existing ones requires that we restart the Kubernetes API server.
- Rotating any tokens requires that we restart the Kubernetes API server.
In short, this method is good for development environments and learning the principles behind authentication in Kubernetes, but it is not recommended for production use cases. Next, we will take a look at authenticating users using ServiceAccount tokens.
ServiceAccount tokens
As we mentioned in the introduction to this section, ServiceAccounts are meant for in-cluster identities for processes running in Pod containers or for cluster components. However, they can be used for authenticating external requests as well.
ServiceAccounts are Kubernetes objects and can be managed like any other resource in the cluster; that is, by using kubectl or raw HTTP requests to the API server. The tokens for ServiceAccounts are JSON Web Tokens (JWTs) and are stored as Kubernetes Secret objects. Secrets were covered in Chapter 6, Configuring Your Pods Using ConfigMaps and Secrets. Usually, when defining a Pod, you will specify what ServiceAccount should be used for processes running in the containers. You can do this using .spec.serviceAccountName in the Pod specification. The JWT token will be injected into the container; then, the process inside can use it in the HTTP bearer authentication scheme to authenticate to the Kubernetes API server. This is only necessary if it interacts with the API server in any way, for example, if it needs to discover other Pods in the cluster. We have summarized this authentication method in the following diagram:
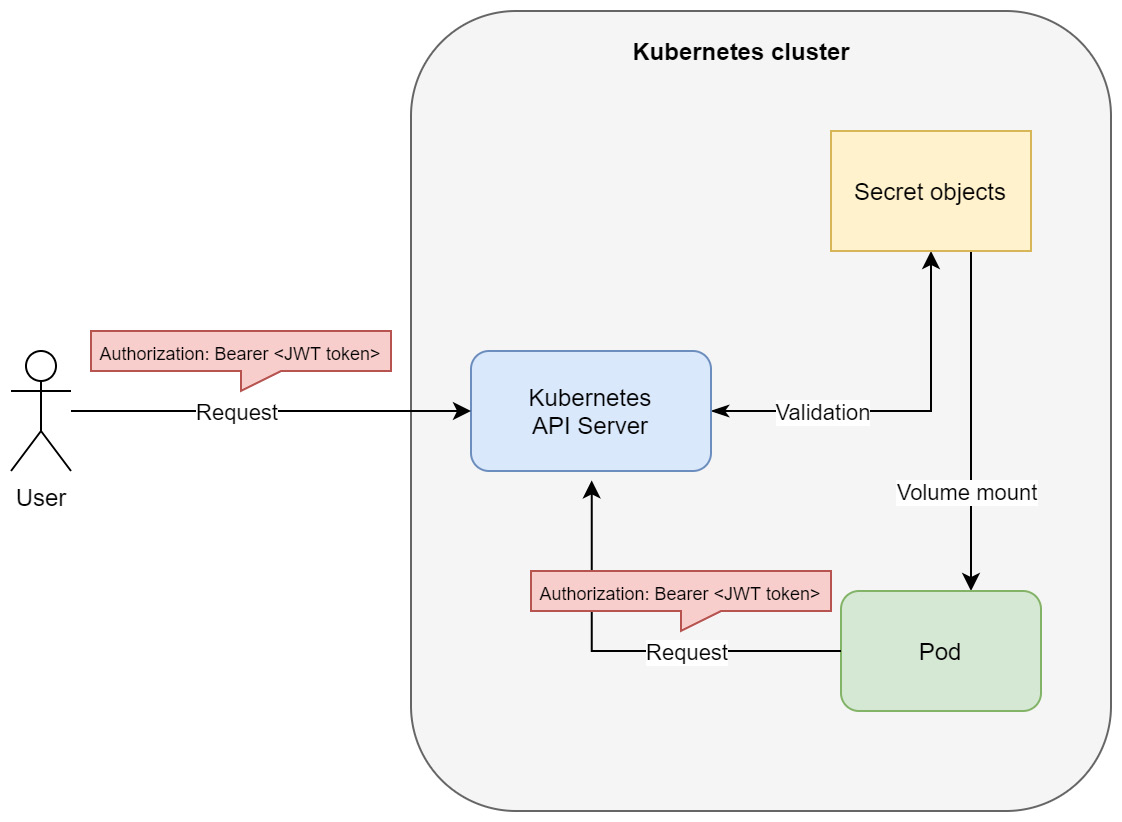
Figure 18.2 – ServiceAccount authentication in Kubernetes
This also shows why ServiceAccount tokens can be used for external requests – the API server does not care about the origin of the request; all it is interested in is the bearer token that comes with the request header. Again, you can use this token in kubectl or in raw HTTP requests to the API server. Please note that this is generally not a recommended way to use ServiceAccounts, but it can be used in some scenarios, especially when you are unable to use an external authentication provider for normal users.
We will now demonstrate how you can create and manage ServiceAccounts and how you can use JWT tokens to authenticate when using kubectl. This will also give a sneak peek into RBAC, which we are going to look at in more detail in the next section. Please follow the following steps:
- Create a YAML manifest for a new ServiceAccount named example-account. We will configure RBAC for this account so that it can only read Pods in the default namespace. The example-account-serviceaccount.yaml YAML manifest file has the following contents:
apiVersion: v1
kind: ServiceAccount
metadata:
name: example-account
namespace: default
Note that applying the preceding manifest has the same effect as the imperative kubectl create serviceaccount example-account command.
- Create a YAML manifest for a Role object named pod-reader in the default namespace. This role will allow you to get, watch, and list Pods in this namespace. The pod-reader-role.yaml YAML manifest file has the following contents:
apiVersion: rbac.authorization.k8s.io/v1
kind: Role
metadata:
namespace: default
name: pod-reader
rules:
- apiGroups: [""]
resources: ["pods"]
verbs: ["get", "watch", "list"]
- Create a YAML manifest for RoleBinding named reads-pods. This is what associates the role that we created with our example-account ServiceAccount – the account will now have the privilege of read-only access to Pods, and nothing more. The read-pods-rolebinding.yaml YAML manifest file has the following contents:
apiVersion: rbac.authorization.k8s.io/v1
kind: RoleBinding
metadata:
name: read-pods
namespace: default
subjects:
- kind: ServiceAccount
name: example-account
namespace: default
roleRef:
kind: Role
name: pod-reader
apiGroup: rbac.authorization.k8s.io
- Now, we can apply all the manifest files to the cluster at once using the kubectl apply command:
$ kubectl apply -f ./
serviceaccount/example-account created
role.rbac.authorization.k8s.io/pod-reader created
rolebinding.rbac.authorization.k8s.io/read-pods created
- We need to retrieve the JWT for the service account. To do that, use the following command, which retrieves it from the associated Secret object and decodes it from Base64 encoding:
$ kubectl -n default get secret $(kubectl -n default get sa/example-account -o jsonpath="{.secrets[0].name}") -o go-template="{{.data.token | base64decode}}"
- Copy the token; we will need it for further operations. If you are interested, you can inspect the contents of the JWT using https://jwt.io/:
Figure 18.3 – Inspecting a JWT for ServiceAccount
As you can see, the JWT maps to the example-account ServiceAccount. Additionally, you can identify that the actual username (marked as subject in the payload) it will be mapped to in Kubernetes is system:serviceaccount:default:example-account, as we explained previously.
- With this JWT, we can set up kubectl to test it. First, you need to create a user in your kubeconfig using the following command:
$ kubectl config set-credentials example-account—token=<jwtToken>
- Create a new context that uses this user. You also need to know the cluster name that you are connecting to right now – you can check it using the kubectl config view command. Use the following command to create a new context named example-account-context:
$ kubectl config set-context example-account-context—user=example-account—cluster=<clusterName>
- You may want to check the name of the context that you are currently using by using the kubectl config current-context command. This will make it easier to go back to your old cluster admin context. Switch to the new context using the following command:
$ kubectl config use-context example-account-context
Switched to context "example-account-context".
- We are now ready to verify that our authentication works and that the RBAC roles allow read-only access to Pods in the default namespace. First, try getting Pods:
$ kubectl get pods
NAME READY STATUS RESTARTS AGE
alertmanager-prometheus-stack-test-kube-alertmanager-0 2/2 Running 0 47h
elasticsearch-master-0 1/1 Running 0 47h
...
- This has worked as expected! Now, try getting Pods from the kube-system namespace:
$ kubectl get pods -n kube-system
Error from server (Forbidden): pods is forbidden: User "system:serviceaccount:default:example-account" cannot list resource "pods" in API group "" in the namespace "kube-system"
- We have authenticated correctly, but the action was forbidden by RBAC authorization, which is what we expected. Lastly, let's try getting Service objects:
$ kubectl get svc
Error from server (Forbidden): services is forbidden: User "system:serviceaccount:default:example-account" cannot list resource "services" in API group "" in the namespace "default"
As you can see, we have successfully used our ServiceAccount JWT as a bearer token for authentication and we have verified that our privileges work correctly. You can now switch back to your old kubectl context using the kubectl config use-context command.
Tip
The preceding procedure of configuring the kubectl context with a bearer token can be used for the static token file authentication method as well.
Let's summarize what are the advantages and disadvantages of using ServiceAccount tokens for authentication are.
The advantages are as follows:
- Easy to configure and use, similar to static token files.
- Entirely managed by the Kubernetes cluster, so there's no need for external authentication providers.
- ServiceAccounts are namespaced.
The disadvantages are as follows:
- ServiceAccounts are intended for processes running in Pod containers to give them identity and let them use Kubernetes RBAC.
- Any Pod that has access to reading Secrets can discover all tokens for ServiceAccounts! This is an important security implication, especially if you are thinking about having high-privilege service accounts in your cluster. This would also violate the principle of least privilege.
- Rotation of ServiceAccount tokens is cumbersome and there is no automated way to do this out of the box. This makes any mitigations to security incidents much harder.
- ServiceAccount tokens do not expire, which is another security concern. There is a design proposal to make this possible, though; you can read more here: https://github.com/kubernetes/community/blob/master/contributors/design-proposals/auth/bound-service-account-tokens.md.
In general, using ServiceAccount tokens for external authentication is good for development and test scenarios when you cannot integrate with external authentication providers. But for production clusters, it is not the best option, mainly due to security concerns. Now, let's take a look at using X.509 client certificates.
X.509 client certificates
Using X.509 client certificates is one of the industry standards for authentication processes. There is one important catch, however – you need to have good means of managing certificate signing, revoking, and rotation – otherwise, you may hit very similar security issues as with using ServiceAccount tokens. You can learn more about X.509 certificates and the processes around them here: https://www.ssl.com/faqs/what-is-an-x-509-certificate/.
This method works in Kubernetes as follows:
- The Kubernetes API server is started with the client-ca-file argument. This provides certificate authority (CA) information to be used to validate client certificates presented to the API server.
- Users that want to authenticate against the API server need to request an X.509 client certificate from the CA. This should be a secure and audited process. The subject common name (the CN attribute in the subject) of the certificate is used as the username attribute when authentication is successful. Note that as of Kubernetes 1.19, you can use the Certificates API to manage signing requests. More information is available in the official documentation: https://kubernetes.io/docs/reference/access-authn-authz/certificate-signing-requests/.
- The user must present the client certificate during authentication to the API server, which validates the certificate against the CA. Based on that, the request goes through the authentication process successfully or is rejected.
While using the kubectl commands, you can configure this method of authentication for your user using the kubectl config set-credentials command. We have summarized this process in the following diagram:
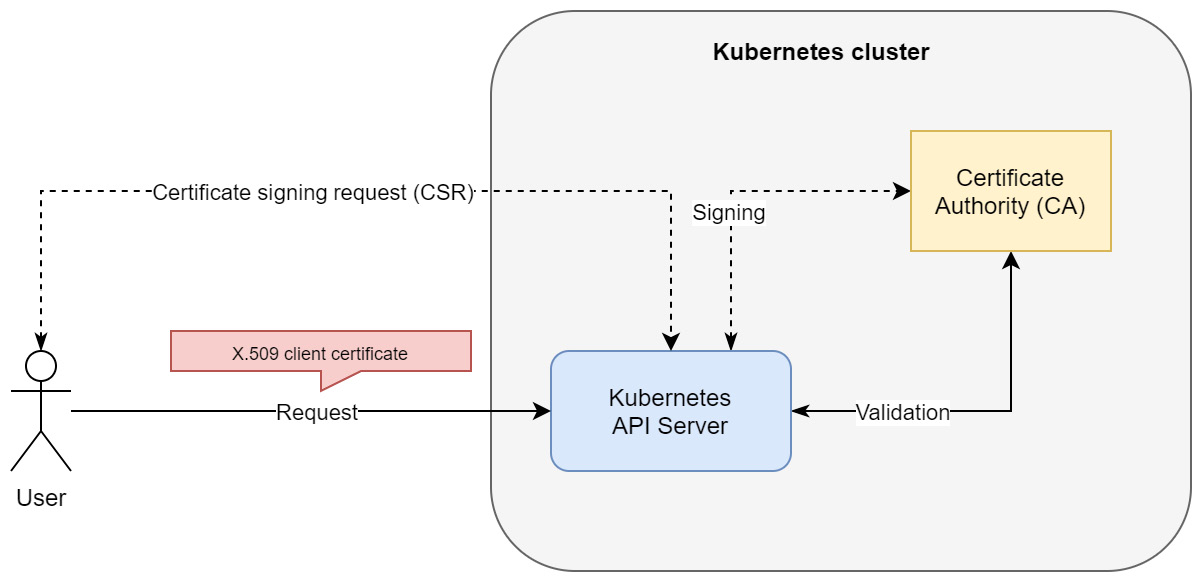
Figure 18.4 – X.509 client certificate authentication in Kubernetes
Please note that this visualizes the case when initial CSR by the user is handled by the Certificate API in a Kubernetes cluster. This does not need to be the case as CA may be external to the cluster, and the Kubernetes API server can rely on a copy of the CA .pem file.
We can summarize the advantages of this method as follows:
- It's a much more secure process than using ServiceAccount tokens or static token files.
- Being unable to store certificates in the cluster means that it is not possible to compromise all certificates, as was the case of using ServiceAccount tokens. X.509 client certificates can be used for high-privileged user accounts.
- X.509 client certificates can be revoked on demand. This is very important in case of security incidents.
The disadvantages of X.509 client certificate authentication are as follows:
- Certificates have an expiry date, which means they cannot be valid indefinitely. For simple use cases in development, this is a disadvantage. From a security perspective, in production clusters, this is a huge advantage.
- Monitoring certificate expiration, revocation, and rotation must be handled. This should be an automated process so that we can quickly react in the case of security incidents.
- The built-in Certificate API has limited functionality.
- Using client certificates in the browser for authentication is troublesome, for example, when you would like to authenticate to Kubernetes Dashboard.
The key takeaway is that using X.509 client certificates is secure but requires sophisticated certificate management so that we have all the benefits. Now, we will take a look at OpenID Connect tokens, which is the recommended method for cloud environments.
OpenID Connect tokens
Using OpenID Connect (OIDC), you can achieve a single sign-on (SSO) experience for your Kubernetes cluster (and possibly other resources in your organization). OIDC is an authentication layer that's created on top of OAuth 2.0, which allows third-party applications to verify the identity of the end user and obtain basic user profile information. OIDC uses JWTs, which you can obtain using flows that conform to the OAuth 2.0 specifications. The most significant issue with using OIDC for authenticating in Kubernetes is the limited availability of OpenID providers. But if you are deploying in a cloud environment, all tier 1 cloud service providers such as Microsoft Azure, Amazon Web Services, and Google Cloud Platform have their versions of OpenID providers. The beauty of managed Kubernetes cluster deployments in the cloud, such as, AKS Amazon EKS, and Google Kubernetes Engine, is that they provide integration with their native OpenID provider out of the box or by a simple flip of a configuration switch. In other words, you do not need to worry about reconfiguring the Kubernetes API server and making it work with your chosen OpenID provider – you get it alongside the managed solution. In the last section of this chapter, we will demonstrate how you can do that for AKS throughout.
If you are interested in learning more about the OpenID Connect protocol, you can refer to the official web page: https://openid.net/connect/. For more details and more specific flows, such as in the context of AAD please take a look here: https://docs.microsoft.com/en-us/azure/active-directory/develop/v2-protocols-oidc. In the following diagram, you can see the basics of the OIDC authentication flow on Kubernetes:
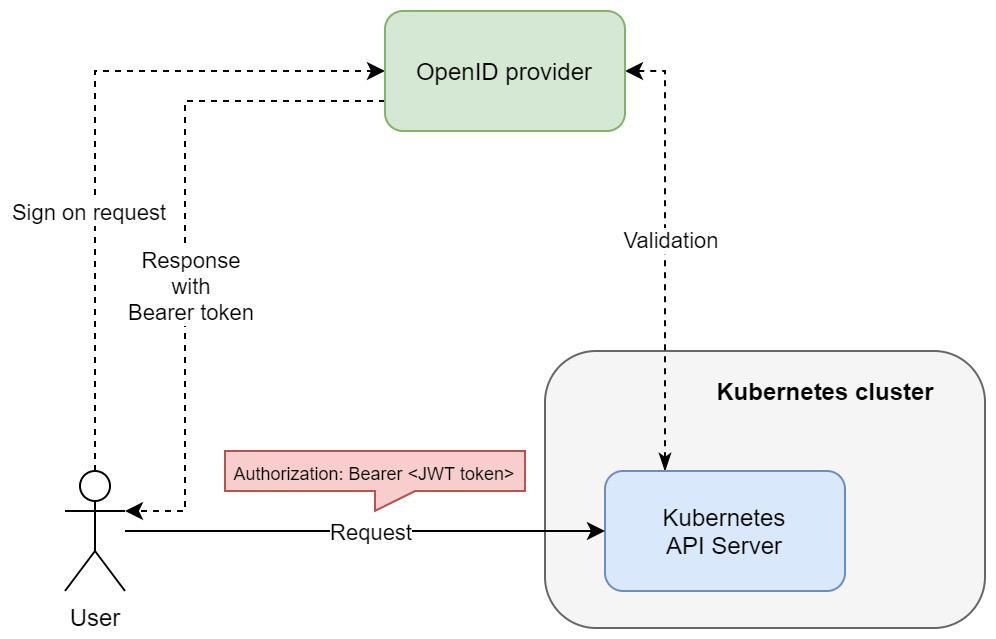
Figure 18.5 – OpenID Connect authentication in Kubernetes
The most important thing is that the OpenID provider is responsible for the SSO experience and managing the bearer tokens. Additionally, the Kubernetes API server must validate the bearer token that's received against the OpenID provider.
Using OIDC has the following advantages:
- You get SSO experience, which you can use with other services in your organization.
- Tier 1 cloud service providers have their own OpenID providers that easily integrate with their managed Kubernetes offerings.
- It can be also used with other OpenID providers and non-cloud deployments – this requires a bit more configuration though.
- It's a secure and scalable solution.
The disadvantages of this approach can be summarized as follows:
- Kubernetes has no web interface where you can trigger the authentication process. This means that you need to get the credentials by manually requesting them from the identity provider. In managed cloud Kubernetes offerings, this is often solved by additional simple tooling to generate kubeconfig with credentials.
- Tokens cannot be revoked, so they are set to expire in a short time. This requires the tokens to be frequently renewed.
The key takeaway about OIDC is that this is your best bet when configuring authentication for Kubernetes, especially if you are deploying production clusters in the cloud. Lastly, let's take a quick look at the other available authentication methods.
Other methods
Kubernetes offers a few other authentication methods that you can use. They are mainly intended for advanced use cases, such as integrating with LDAP or Kerberos. The first one is authenticating proxy.
When you use authenticating proxy in front of the Kubernetes API server, you can configure the API server to use certain HTTP headers to extract authentication user information from them. In other words, your authenticating proxy is doing the job of authenticating the user and passing down this information alongside the request in the form of additional headers.
You can find more information in the official documentation: https://kubernetes.io/docs/reference/access-authn-authz/authentication/#authenticating-proxy.
Another approach is known as webhook token authentication, where the Kubernetes API server uses an external service to verify the bearer tokens. The external service receives the information in the form of a TokenReview object from the API server via an HTTP POST request, performs verification, and sends back a TokenReview object with additional information about the result.
You can find more information in the official documentation: https://kubernetes.io/docs/reference/access-authn-authz/authentication/#webhook-token-authentication.
In general, you only need these two methods in special cases where you want to integrate with existing identity providers in your organization that are not supported by Kubernetes out of the box.
In the next section, we will look at RBAC.
Authorization and introduction to RBAC
While authentication is about determining whether a given user of a system is indeed who they claim to be, authorization determines what the user can and cannot do or access. As such, authorization usually complements authentication – these two processes are used together to provide security for the system. Authentication is the first step in determining the identity of the user, whereas authorization is the next step when verifying if the user can perform the action they want to.
In the Kubernetes API server, authenticating a request results in a set of additional request attributes such as user, group, API request verb, or HTTP request verb. These are then passed further to authorization modules that, based on these attributes, answer whether the user is allowed to do the action or not. If the request is denied by any of the modules, the user will be presented with an HTTP status code of 403 (Forbidden).
Tip
This is an important difference between HTTP status codes. If you receive 401 (Unauthorized), this means that you have been not recognized by the system; for example, you have provided incorrect credentials or the user does not exist. If you receive 403 (Forbidden), this means that authentication has been successful, you have been recognized, but you are not allowed to do the action you requested. This is useful when debugging issues regarding access to a Kubernetes cluster.
Kubernetes has a few authorization modes available that can be enabled by using the authorization-mode argument when starting the Kubernetes API server:
- RBAC: Allows you to organize access control and management with roles and privileges. RBAC is one of the industry standards for access management, also outside of Kubernetes. Roles can be assigned to users in the system, which gives them certain privileges and access. In this way, you can achieve very fine-grained access management that can be used to enforce the principle of least privilege. For example, you can define a role in the system that allows you to access certain files on a network share. Then, you can assign such roles to individual users on groups in the system to allow them to access these files. This can be done by associating the user with a role – in Kubernetes, you model this using the RoleBinding and ClusterRoleBinding objects. In this way, multiple users can be assigned a role and a single user can have multiple roles assigned. Please note that in Kubernetes, RBAC is permissive, which means that there are no deny rules. Everything is denied by default, and you have to define allow rules instead.
- Attribute-Based Access Control (ABAC): This is part of the access control paradigm, used not only in Kubernetes, which uses policies based on the attributes of the user, resource, and environment. This is a very fine-grained access control approach – you can, for example, define that the user can access a given file, but only if the user has clearance to access confidential data (user attribute), the owner of the file is Mike (resource attribute), and the user tries to access the file from an internal network (environment attribute). So, policies are sets of attributes that must be present together for the action to be performed. In Kubernetes, this is modeled using Policy objects. For example, you can define that the authenticated user, mike, can read any Pods in the default Namespace. If you want to give the same access to user bob, then you need to create a new Policy for user bob.
- Node: A special-purpose authorization mode used for authorizing API requests made by kubelet in the cluster.
- Webhook: This mode is similar to webhooks for authentication. You can define an external service that needs to handle HTTP POST requests with an SubjectAccessReview object that's sent by the Kubernetes API server. This service must process the request and determine if the request should be allowed or denied. The response from the service should contain SubjectAccessReview, along with information, whether the subject is allowed the access. Based on that, the Kubernetes API server will either proceed with the request or reject it with an HTTP status code of 403. This approach is useful when you are integrating with existing access control solutions in the organization.
Currently, RBAC is considered an industry standard in Kubernetes due to its flexibility and ease of management. For this reason, RBAC is the only authentication mode we are going to describe in more detail.
RBAC mode in Kubernetes
Using RBAC in Kubernetes involves two types of API resources that belong to the rbac.authorization.k8s.io API group:
- Role and ClusterRole: They define a set of permissions. Each rule in Role says which verb(s) are allowed for which API resource(s). The only difference between Role and ClusterRole is that Role is namespace-scoped, whereas ClusterRole is global.
- RoleBinding and ClusterRoleBinding: They associate users or a set of users (alternatively, groups or ServiceAccounts) with a given Role. Similarly, RoleBinding is namespace-scoped, while ClusterRoleBinding is cluster-wide. Please note that ClusterRoleBinding works with ClusterRole, but RoleBinding works with both ClusterRole and Role.
All these Kubernetes objects can be managed using kubectl and YAML manifests, just as you do with Pods, Services, and so on.
We will now demonstrate this in practice. In the previous section, we showed a basic RBAC configuration for a service account that was being used for authentication using kubectl. The example that we are going to use here will be a bit different and will involve creating a Pod that runs under a dedicated service account and periodically queries the Kubernetes API server for a list of Pods. In general, having dedicated service accounts for running your Pods is a good practice and makes it possible to ensure the principle of least privilege. For example, if your Pod needs to get the list of Pods in the cluster but does not need to create a new Pod, the ServiceAccount for this Pod should have a role assigned that allows you to list read-only Pods, nothing more. Please follow these steps to configure this example:
- Begin by creating a dedicated ServiceAccount named pod-logger. Create a YAML manifest named pod-logger-serviceaccount.yaml:
apiVersion: v1
kind: ServiceAccount
metadata:
name: pod-logger
namespace: default
- Apply the manifest to the cluster using the following command:
$ kubectl apply -f ./pod-logger-serviceaccount.yaml
- Create a role named pod-reader. This role will only allow the get, watch, and list verbs on pods resources in the Kubernetes RESTful API. In other words, this translates into an /api/v1/namespaces/default/pods endpoint in the API. Note that apiGroups specified as "" mean the core API group. The structure of the pod-reader-role.yaml YAML manifest file is as follows:
apiVersion: rbac.authorization.k8s.io/v1
kind: Role
metadata:
namespace: default
name: pod-reader
rules:
- apiGroups: [""]
resources: ["pods"]
verbs: ["get", "watch", "list"]
- Apply the manifest to the cluster using the following command:
$ kubectl apply -f ./pod-reader-role.yaml
- Now, we would normally create a RoleBinding object to associate the service account with the role. But to make this demonstration more interesting, we willcreate a Pod that's running under the pod-logger service account. This will essentially make the Pod unable to query the API for Pods because it will be unauthorized (remember that everything is denied by default in RBAC). Create a YAML manifest named pod-logger-static-pod.yaml for a static Pod called pod-logger-static, running without any additional controllers:
apiVersion: v1
kind: Pod
metadata:
name: pod-logger-static
spec:
serviceAccountName: pod-logger
containers:
- name: logger
image: radial/busyboxplus:curl
command:
- /bin/sh
- -c
- |
SERVICEACCOUNT=/var/run/secrets/kubernetes.io/serviceaccount
TOKEN=$(cat ${SERVICEACCOUNT}/token)
while true
do
echo "Querying Kubernetes API Server for Pods in default namespace..."
curl—cacert $SERVICEACCOUNT/ca.crt—header "Authorization: Bearer $TOKEN" -X GET https://kubernetes/api/v1/namespaces/default/pods
sleep 10
done
Here, the most important fields are .spec.serviceAccountName, which specifies the service account that the Pod should run under, and command in the container definition, which we have overridden to periodically query the Kubernetes API. Assigning the pod-logger service account, as explained in the previous section, will result in a Secret with a bearer JWT for this account to be mounted in the container filesystem under /var/run/secrets/kubernetes.io/serviceaccount/token. The overridden commands run an infinite loop in a Bourne shell in 10-second intervals. In each iteration, we query the Kubernetes API endpoint (https://kubernetes/api/v1/namespaces/default/pods) for Pods in the default namespace with the HTTP GET method using the curl command. To properly authenticate, we need to pass the contents of /var/run/secrets/kubernetes.io/serviceaccount/token as a bearer token in the Authorization header for the request. Additionally, we need to pass a CA certificate path to verify the remote server using the cacert argument. The certificate is injected into /var/run/secrets/kubernetes.io/serviceaccount/ca.crt by the Kubernetes runtime.
- When you create this Pod and inspect its logs, you should expect to see just a bunch of messages with an HTTP status code of 403 (Forbidden). This is because the ServiceAccount does not have a RoleBinding type that associates it with the pod-reader Role yet. First, apply the manifest to the cluster:
$ kubectl apply -f ./pod-logger-static-pod.yaml
- Start following the logs of the pod-logger-static Pod using the following command:
$ kubectl logs pod-logger-static -f
Querying Kubernetes API Server for Pods in default namespace...
...
{
"kind": "Status",
"apiVersion": "v1",
"metadata": {
},
"status": "Failure",
"message": "pods is forbidden: User "system:serviceaccount:default:pod-logger" cannot list resource "pods" in API group "" in the namespace "default"",
"reason": "Forbidden",
"details": {
"kind": "pods"
},
"code": 403
}
- In a new console window, we will create and apply a RoleBinding that associates the ServiceAccount with the pod-reader Role. Create a YAML manifest named read-pods-rolebinding.yaml that contains the following contents:
apiVersion: rbac.authorization.k8s.io/v1
kind: RoleBinding
metadata:
name: read-pods
namespace: default
subjects:
- kind: ServiceAccount
name: pod-logger
namespace: default
roleRef:
kind: Role
name: pod-reader
apiGroup: rbac.authorization.k8s.io
There are three key components in the RoleBinding manifest: name, which is used to identify the user, subjects, which reference the users, groups, or service accounts, and roleRef, which references the role.
- Apply the manifest file using the following command:
$ kubectl apply -f ./read-pods-rolebinding.yaml
- In the previous console window, which still follows the logs of the Pod, you will see that the Pod was able to successfully retrieve the list of Pods in the cluster. In other words, the request was successfully authorized:
$ kubectl logs pod-logger-static -f
...
Querying Kubernetes API Server for Pods in default namespace...
...
{
"kind": "PodList",
"apiVersion": "v1",
"metadata": {
"selfLink": "/api/v1/namespaces/default/pods",
"resourceVersion": "4052324"
},
"items": [
{
"metadata": {
"name": "alertmanager-prometheus-stack-test-kube-alertmanager-0",
"generateName": "alertmanager-prometheus-stack-test-kube-alertmanager-",
"namespace": "default",
...
- Lastly, you can delete the RoleBinding type using the following command:
$ kubectl delete rolebinding read-pods
- Now, if you inspect the logs of the Pod again, you will see that the requests are denied with an HTTP status code of 403 again.
Congratulations! You have successfully used RBAC in Kubernetes to be able to read the Pods in the cluster for a Pod running under ServiceAccount. Next, we will take a look at how to practically integrate AKS with AAD for authentication and authorization.
Azure Kubernetes Service and Azure Active Directory integration
Tier 1 cloud service providers such as Microsoft Azure, Google Cloud Platform, and Amazon Web Services have their own managed Kubernetes cluster offerings. We covered the Kubernetes deployments for these three cloud platforms in the previous chapters. What is important here is that managed Kubernetes clusters come with a lot of additional integrations with other cloud services. In this section, we will show you how to use AAD integrations for AKS to provide authentication using OpenID Connect and authorization using Azure RBAC. This approach unifies user management and access control across Azure resources, AKS, and Kubernetes resources.
Important note
At the time of writing, integration with AAD for authentication in AKS is in general availability and may be enabled on demand. Azure RBAC for Kubernetes authorization is currently in preview and can be enabled only when creating a new cluster. It will be possible to enable it on demand when the feature reaches general availability. For this reason, we will demonstrate these two features by deploying a new cluster from scratch.
Let's begin this demonstration by taking care of the prerequisites.
Prerequisites
First, we need to ensure that the prerequisites have been installed and enabled (these steps must be fulfilled when the feature is still in preview; otherwise, a standard Azure CLI installation should be sufficient):
- Using the Azure CLI, register the EnableAzureRBACPreview feature flag using the az feature register command:
$ az feature register—namespace "Microsoft.ContainerService"—name "EnableAzureRBACPreview"
- Wait for the flag to be registered; this can take a few minutes. You can query the status using the following command:
$ az feature list -o table | grep EnableAzureRBACPreview
Microsoft.ContainerService/EnableAzureRBACPreview Registered
- When the status turns into Registered, perform a registration refresh of the Microsoft.ContainerService resource provider:
$ az provider register—namespace Microsoft.ContainerService
- Install the aks-preview CLI extension and update it to the latest version (0.4.55 or higher, if required):
$ az extension add—name aks-preview
$ az extension update—name aks-preview
With all the prerequisites ready, we can deploy the managed AKS cluster with AAD integration and Azure RBAC integration.
Deploying a managed AKS cluster with AAD and Azure RBAC integration
To deploy the cluster, follow these steps:
- If you haven't created a resource group named k8sforbeginners-rg yet, you need to create it using the following command:
$ az group create—name k8sforbeginners-rg—location eastus
- Start provisioning a cluster named k8sforbeginners-aks-aad with the AAD and Azure RBAC integration features:
$ az aks create—resource-group k8sforbeginners-rg—name k8sforbeginners-aks-aad—node-count 2 --enable-aad—enable-azure-rbac
- This will take a few minutes. In the end, you should see that the following section is present in the response body:
"aadProfile": {
"adminGroupObjectIds": null,
"clientAppId": null,
"enableAzureRbac": true,
"managed": true,
"serverAppId": null,
"serverAppSecret": null,
"tenantId": ...
},
We now have a managed AKS cluster with AAD and Azure RBAC integration ready. Next, we are going to access the cluster using kubectl to verify the AAD integration.
Accessing the AKS cluster with AAD integration enabled
In the previous sections, we explained what the available authentication modes in Kubernetes are. One of them is OpenID Connect integration, which is an identity layer built on top of the OAuth 2.0 protocol to provide single sign-on (SSO) capabilities. AKS cluster with AAD integration internally relies on this authentication mode. The most important benefit of such an integration is that you can manage users and groups in AAD, just like with any Azure service. Your AKS cluster will seamlessly use AAD to authenticate normal users! This means you can build RBAC policies on top of that.
To access the newly deployed AKS cluster with kubectl, please follow these steps:
- The AAD user that you use for the Azure CLI needs to have the Azure Kubernetes Service Cluster User role (https://docs.microsoft.com/en-us/azure/role-based-access-control/built-in-roles#azure-kubernetes-service-cluster-user-role). Of course, if you are the owner of the subscription, this is enough.
- Execute the following Azure CLI command, which will generate kubeconfig for accessing the cluster. If you are presented with any SSO instructions, please follow them:
$ az aks get-credentials—resource-group k8sforbeginners-rg—name k8sforbeginners-aks-aad
- Now, attempt to get Pods in the cluster:
$ kubectl get pods
To sign in, use a web browser to open the page https://microsoft.com/devicelogin and enter the code ... to authenticate.
- You need to complete the SSO process using the provided code. Eventually, you will see the following in your browser (provided that you have the correct AAD role assigned):
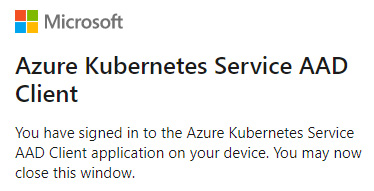
Figure 18.6 – Signing into AKS integrated with AAD
- However, you will be presented with, maybe surprisingly, a message stating that listing Pods is forbidden:
$ kubectl get pods
...
Error from server (Forbidden): pods is forbidden: User "9b3fde3b-4059-40fa-9e93-4147cc93164d" cannot list resource "pods" in API group "" in the namespace "default": User does not have access to the resource in Azure. Update role assignment to allow access.
This is expected. The message is coming from the Kubernetes API server authorization module, which means that authentication using AAD SSO was successful! The reason that we have been forbidden access is that we are also using Azure RBAC integration and by default, our user does not have any Kubernetes Roles assigned. Take note of the AAD user principal ID (in this example, 9b3fde3b-4059-40fa-9e93-4147cc93164d) as it will be needed in the next steps. Alternatively, you can use the az ad signed-in-user show command and check objectId.
Tip
AAD offers various solutions for managing access to resources. You can read the following documentation if you are interested in providing conditional access and just in time (JIT) access to an AKS cluster: https://docs.microsoft.com/en-us/azure/aks/managed-aad#use-conditional-access-with-azure-ad-and-aks, https://docs.microsoft.com/en-us/azure/aks/managed-aad#configure-just-in-time-cluster-access-with-azure-ad-and-aks. JIT access is the most secure way to allow elevated access to the cluster for a limited time and with full auditing capabilities. This is regarded as an industry standard for securely managing production clusters.
Now, let's learn how to work with Azure RBAC integration for AKS.
Using Azure RBAC for an AKS cluster
To make it possible for our AAD user to list and manage the Pods in the cluster, we will do two things. First, we are going to use the built-in Azure Kubernetes Service RBAC Admin role in Azure RBAC, which is essentially a superuser administration role that allows you to perform any action on any resource. This role should rarely be used as it violates the principle of least privilege. If you are going to use such a highly privileged role for production systems, you need to consider using JIT cluster access. The alternative way of going about this would be to create AAD custom roles, where you can create your own role that allows you to manage Pods in the default namespace. Such a role is defined in Azure RBAC, but because we have Azure RBAC integration turned on for an AKS cluster, this will be effective for Kubernetes resources.
To use the built-in Azure Kubernetes Service RBAC Admin role, follow these steps:
- Get the resource ID of your AKS cluster using the following command and store it in the AKS_ID environment variable:
$ AKS_ID=$(az aks show—resource-group k8sforbeginners-rg—name k8sforbeginners-aks-aad—query id -o tsv)
$ echo $AKS_ID
/subscriptions/.../resourcegroups/k8sforbeginners-rg/providers/Microsoft.ContainerService/managedClusters/k8sforbeginners-aks-aad
- Using your user principal ID from the previous steps (in our case, 9b3fde3b-4059-40fa-9e93-4147cc93164d), create an Azure RBAC role assignment for your user and the Azure Kubernetes Service RBAC Admin role:
$ az role assignment create—role "Azure Kubernetes Service RBAC Admin"—assignee 9b3fde3b-4059-40fa-9e93-4147cc93164d—scope $AKS_ID
- After a while, attempt to get the Pods from all the namespaces using the kubectl command:
$ kubectl get pods -A
NAMESPACE NAME READY STATUS RESTARTS AGE
kube-system coredns-748cdb7bf4-kjbxb 1/1 Running 0 58m
kube-system coredns-748cdb7bf4-ww4gg 1/1 Running 0 60m
...
- Since we want to demonstrate using an Azure RBAC custom role, delete the role assignment. First, you need to get the ID of the assignment and then pass it to the second command, like so:
$ az role assignment list—scope $AKS_ID—query [].id -o tsv
/subscriptions/.../resourcegroups/k8sforbeginners-rg/providers/Microsoft.ContainerService/managedClusters/k8sforbeginners-aks-aad/providers/Microsoft.Authorization/roleAssignments/9d67b507-7f87-44dc-a3f1-7fd053b308f6
$ az role assignment delete—ids /subscriptions/cc9a8166-829e-401e-a004-76d1e3733b8e/resourcegroups/k8sforbeginners-rg/providers/Microsoft.ContainerService/managedClusters/k8sforbeginners-aks-aad/providers/Microsoft.Authorization/roleAssignments/9d67b507-7f87-44dc-a3f1-7fd053b308f6
- Lastly, you can verify that kubectl get pods returns forbidden again.
The alternative solution would be to create an Azure RBAC custom role that allows you to manage Pods. You can check the full list of available actions for roles in the official documentation: https://docs.microsoft.com/en-us/azure/role-based-access-control/resource-provider-operations#microsoftcontainerservice. We are interested in the following actions:
- Microsoft.ContainerService/managedClusters/pods/read
- Microsoft.ContainerService/managedClusters/pods/write
- Microsoft.ContainerService/managedClusters/pods/delete
To create the custom role and assign it to your AAD user, follow these steps:
- Determine your subscription ID using the az account show command. The subscription ID will be present under the id property in the output.
- Create an aks-pod-writer.json file that contains a role definition that allows you to read, write, and delete Pods in the AKS cluster. Replace <subscriptionId> with your subscription ID:
{
"Name": "AKS Pods Writer",
"Description": "Allows read-write management of Pods in cluster/namespace.",
"Actions": [],
"NotActions": [],
"DataActions": [
"Microsoft.ContainerService/managedClusters/pods/read",
"Microsoft.ContainerService/managedClusters/pods/write",
"Microsoft.ContainerService/managedClusters/pods/delete"
],
"NotDataActions": [],
"assignableScopes": [
"/subscriptions/<subscriptionId>"
]
}
- Use the following command to create a custom role definition:
$ az role definition create—role-definition @aks-pod-writer.json
- Now, you can assign the new role to your user (in our example, 9b3fde3b-4059-40fa-9e93-4147cc93164d):
$ az role assignment create—role "AKS Pods Writer"—assignee 9b3fde3b-4059-40fa-9e93-4147cc93164d—scope $AKS_ID
- After a while, you can check the Pods in the cluster using the kubectl get pods -A command. Note that the new role assignments can take up to 5 minutes to propagate:
$ kubectl get pods -A
NAMESPACE NAME READY STATUS RESTARTS AGE
kube-system coredns-748cdb7bf4-kjbxb 1/1 Running 0 89m
kube-system coredns-748cdb7bf4-ww4gg 1/1 Running 0 90m
- Now, try to list all the deployments in the cluster – you will get a Forbidden result, as expected:
$ kubectl get deploy -A
Error from server (Forbidden): deployments.apps is forbidden: User "9b3fde3b-4059-40fa-9e93-4147cc93164d" cannot list resource "deployments" in API group "apps" at the cluster scope: User does not have access to the resource in Azure. Update role assignment to allow access.
- Lastly, we need to verify whether we can create Pods. Run a simple static Pod with the busybox container image:
$ kubectl run -i—tty busybox—image=busybox:1.28 --rm—restart=Never—sh
If you don't see a command prompt, try pressing enter.
/ #
As you can see, we have successfully used Azure RBAC roles to manage authorization in an AKS cluster. What's more, we haven't manually managed the Role and RoleBinding objects in the Kubernetes cluster itself. Please note that most of the actions that we have executed in the Azure CLI can be also done in the Azure portal.
Important note
If you do not need the AKS resources, remember to clean them up to avoid any unnecessary costs.
Congratulations! You have successfully deployed a managed AKS cluster with AAD and Azure RBAC integration. Now, let's summarize what you have learned in this chapter.
Summary
This chapter covered authentication and authorization in Kubernetes. First, we provided an overview of the available authentication methods in Kubernetes and explained how you can use ServiceAccount tokens for external user authentication. Next, we focused on RBAC in Kubernetes. You learned how to use Roles, ClusterRoles, RoleBindings, and ClusterRoleBindings to manage authorization in your cluster. We demonstrated a practical use case of RBAC for ServiceAccounts by creating a Pod that can list Pods in the cluster using the Kubernetes API (respecting the principle of least privilege). Finally, we provided an overview of how easily you can integrate your AKS with AAD for single sign-on authentication and Azure RBAC for authorization.
In the next chapter, we are going to dive deep into advanced techniques for scheduling Pods.
Further reading
For more information regarding authorization and authentication in Kubernetes, please refer to the following PacktPub books:
- The Complete Kubernetes Guide, by Jonathan Baier, Gigi Sayfan, Jesse White (https://www.packtpub.com/virtualization-and-cloud/complete-kubernetes-guide)
- Getting Started with Kubernetes – Third Edition, by Jonathan Baier, Jesse White (https://www.packtpub.com/virtualization-and-cloud/getting-started-kubernetes-third-edition)
- Kubernetes for Developers, by Joseph Heck (https://www.packtpub.com/virtualization-and-cloud/kubernetes-developers)
You can also refer to the official documentation:
- The Kubernetes documentation (https://kubernetes.io/docs/home/), which is always the most up-to-date source of knowledge about Kubernetes in general.
- AKS authentication and authorization best practices are available in the official Microsoft documentation: https://docs.microsoft.com/en-us/azure/aks/operator-best-practices-identity.
- Details about Azure RBAC for Kubernetes are documented at https://docs.microsoft.com/en-us/azure/aks/manage-azure-rbac.
- More advanced use cases for Azure RBAC for Kubernetes are covered in this guide: https://docs.microsoft.com/en-us/azure/aks/azure-ad-rbac.