
Now that we have an out-of-the-box development environment, let's first configure it. Because we use Microsoft Dynamics CRM 2011 as an xRM platform, we just focus on those settings that are used by our ACM system.
Note
The term "xRM" stands for "Anything Relationship Management", and is used to refer to custom solutions that build on top of the Microsoft Dynamics CRM platform.
So Microsoft Dynamics CRM is not just managing the "customers"; it can be customized to manage "anything" that fits for the business requirement.
Navigate to Settings | System | Administration.
The System Settings module allows the configuration of global application settings such as general settings, calendar, formats, auditing, email, marketing, customization, Outlook, reporting, and goal settings. You can easily find and configure these in System Settings.
ACM has a requirement that:
- All usernames are set up with First Name and Last Name.
- Current Format is set to English: United States.
- Auditing is enabled for common entities.
- The tracking token prefix is set to: ACM.
- All other out-of-the-box settings are maintained.
Microsoft Dynamics CRM 2011 provides a rich framework on which the business application can be built. It has the notion of "solution" by providing full support to create, install, upgrade, and delete business applications that run on the CRM framework.
The solution concept is new to Microsoft Dynamics CRM 2011. A solution is a container of components designed to provide specific business functionality. The valid components that can be included in the solution are data model, modification to the CRM user interface, web resources such as images, HTML pages, JavaScript libraries, processes, plug-in code, and translations. Each solution has a publisher associated to it. A solution publisher represents the "author" who writes/provides this solution.
Solutions can be packaged as "managed" or as "unmanaged". All solutions are initially created as unmanaged solutions. When you create a "New" solution in CRM, this creates a container to hold references to the components in the system. Multiple unmanaged solutions can have references to the same component, however any changes performed on the component will be visible to all unmanaged solutions. Exporting any solution that contains the component will export all of the changes performed on the system. Importing an unmanaged solution always overwrites the components that it touches.
Managed solutions were designed for the final distribution of components. After initial development is done and the solution is ready to deploy to the production environment, you need to export it as managed. If a managed solution is imported into a different organization, the definition of the solution is locked and you may not add or remove any of the components within the solution. Managed solutions can be uninstalled and this will not affect your base system.
We will cover Solution and Publisher in detail later in Chapter 10, Creating Eye Candy Effects with Particle Systems.
In this project, we are going to create an unmanaged solution during our development. Once we complete the development, we will package it and export it as a managed solution for our production deployment.
To create a new publisher in CRM 2011, follow these steps:
- Navigate to Settings | Customizations | Publishers.
- Click on New to create a new publisher.
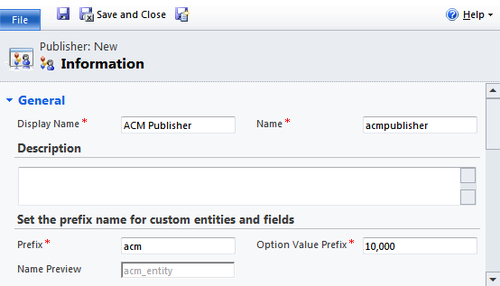
- Populate the Display Name and Prefix fields by filling in the publisher form with the following information:
Display name
ACM publisher
Name:
acmpublisher
Prefix:
acm
Option Value Prefix:
10,000
The following screenshot shows the ACM Publisher form:
- Click on Save and Close.
To create a new solution in CRM 2011, follow these steps:
- Navigate to Settings | Solutions.
- Click on New to create a new solution.
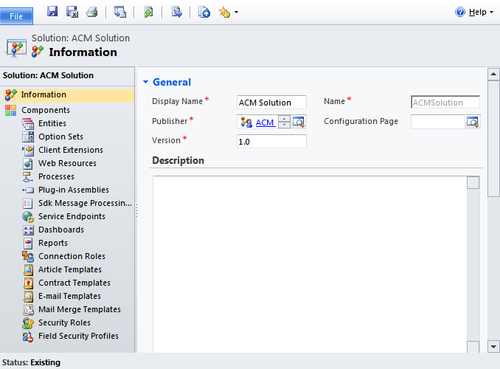
- Populate the Display Name, Publisher, and Version fields by filling in the solution form with the following information:
Display name
ACM solution
Name:
ACMSolution
Publisher:
ACM
Version:
1.0
The following screenshot shows the ACM Solution form:
- Click on Save and Close.
Let's customize the ACM solution. Since we have created a solution for our project, the next step is to create the entities. In the ACM solution, we will have three custom entities (Airport, Flight Route, and Flight), one custom activity (Compensation), and one system entity (Crew Member [contact]).
So let's go ahead and create the custom entities first.
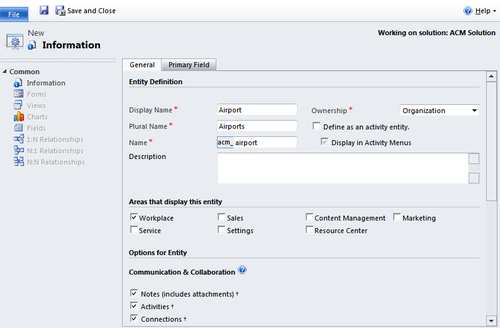
Go to Settings | Solutions, and double-click to open the ACM solution. In the solution components list, select the Entities node and then click on New. Fill in the Airport information, and then click the Save button on the toolbar:
The following table lists the entities that need to be defined, and their settings.
|
Entity |
Customization |
|---|---|
|
Definition |
Entity Definition:
Areas that display this entity:
Options for Entity:
|
|
Forms |
Main |
|
Views |
Active Airport (Default Public View) and other Views |
|
Charts |
- |
|
Custom Relationships |
1:N—Flight Route (custom label: Route From and Route To); Relationship Behavior: Referential |
In the Airport entity, click on the Forms link in the left-hand navigation panel, and then double-click to open the Main form:
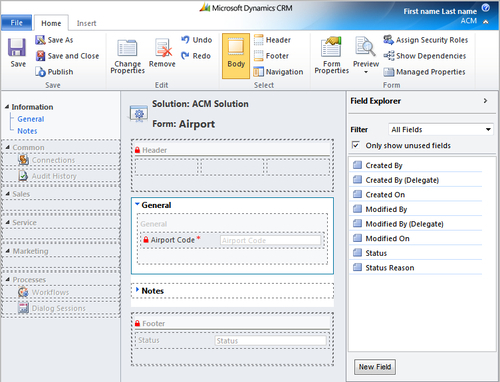
- We need to change the field layout from two columns to one column: Double-click on the Airport Code field, go to the Formatting tab, select One Column, and then click OK to save the changes and go back to the Form Editor.
- Next we need to insert some new fields (attribute) on the form: In CRM 2011, you can create attributes from the Form Editor: click the Body button on the ribbon, and the Field Explorer appears in the right-hand pane. You can create attributes by clicking the New Field button in the Explorer.
- Follow the table to add new fields: Click the New Field button in the Field Explorer, and add Airport Name, Time Zone, Country, City, and Per Diem. After these fields have been created, drag them to the General tab on the Form Editor. And then click the Save button to save changes.
Back in the Form Editor, click on the Insert tab on the ribbon, and then click on IFRAME (see below: IFRAME_map).
*All fields (except Notes and IFRAME) are Business Required, Searchable, and Auditing enabled.
|
Field |
Type |
Description |
Options | |
|---|---|---|---|---|
|
General |
Airport Code |
Single Line of Text |
Airport code |
Max length: 100 |
|
Airport Name |
Single Line of Text |
Airport name |
Max length: 100 | |
|
Time Zone |
Whole Number (Time Zone) |
Time zone |
- | |
|
Country |
Single Line of Text |
Country list (this is a demo list for the book) |
Label Value United Kingdom 1 United States 2 | |
|
City |
Single Line of Text |
Dependent picklist of 'Country' (this is a demo list for the book) |
Label Value London (UK) 1 Birmingham (UK) 2 Washington D.C (US)) 3 Seattle (US) 4 New York (US) 5 | |
|
Per Diem |
Currency |
Hourly payment of this location |
Min: 0 Max: 100 Precision: Currency Precision | |
|
Notes |
Note Text |
Notes |
- |
- |
Now that we have created the Airport main form, click the Preview button on the ribbon and select Create Form, which will show us what the form looks like.
Click the Save and Close button on the ribbon to go back to the solution panel.

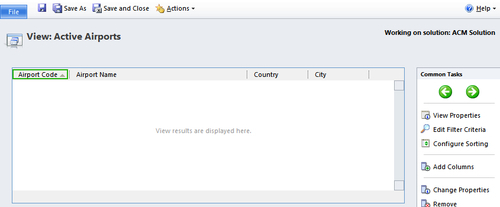
In the Airport entity, click on Views to open the view list; double-click on the Active Airport view, to open it. Click on the Created On column and click the Remove button on the right-hand Common Task panel to remove this column. Click on Add Columns to add Airport Name, Country, and City columns to the View. Double-click on the column to change the Width for each column. Use the Left and Right buttons to change the column placement.
|
Entity |
Customization |
|---|---|
|
Information |
Entity Definition:
Areas that display this entity:
Options for Entity:
|
|
Forms |
Main |
|
Views |
Active Flight Routes (Default Public View) and other Views |
|
Charts |
- |
|
Custom Relationships |
1:N—Flight; Relationship Behavior: Referential N:1—Airport; Relationship Behavior: Referential |
*All fields (except Notes) are Business Required, Searchable, and Auditing enabled.
|
Field |
Type |
Description |
Options | |
|---|---|---|---|---|
|
General |
Flight Route |
Single Line of Text |
Name of the flight route |
Max length: 100 |
|
From |
Lookup |
Unique identifier of the departure airport code |
- | |
|
To |
Lookup |
Unique identifier of the arrival airport code |
- | |
|
Miles |
Whole Number (None) |
Miles between departure and arrival airport |
Min: 0 Max: 100000 | |
|
Notes |
Note Text |
Notes |
- |
- |
Like CRM 4.0, you can create entity relationships (1:N, N:1, N:N) from the Entity Editor. Alternatively, in CRM 2011 you can also create an N:1 relationship directly from the From Editor by clicking the New Field button, then selecting Lookup type.
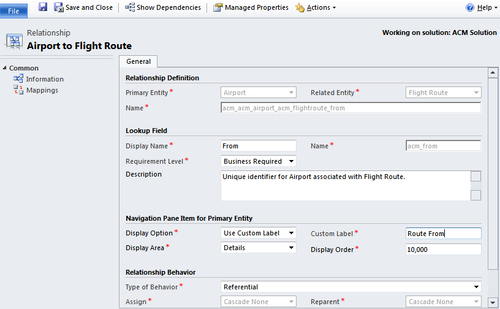
Because we will create two N:1 relationships from the Flight Route entity to the Airport entity, there will be two relationship links in the left-hand navigation panel of the Airport entity, and they will both call: Flight Route. So in this case, we need to change the name to make it different: go to the Airport entity | 1:N Relationships, and then open the Flight relationships (Primary Entity = Airport, Related Entity = Flight Route), change the Display Option to "Use Custom Label", Custom Label: "Route From" (and for the other one, where Name is "acm_acm_airport_acm_flightroute_to", change the custom label to: Route To). You may also change the Relationship Behavior here.
|
Entity |
Customization |
|---|---|
|
Information |
Entity Definition:
Areas that display this entity:
Options for Entity:
|
|
Forms |
Main |
|
Views |
Active Flights (Default Public View) and other Views |
|
Charts |
- |
|
Custom Relationships |
1:N—Compensation; Relationship Behavior: Referential N:1—Flight Route; Relationship Behavior: Referential |
*All fields (except Flight and Notes) are Business Required, Searchable, and Auditing enabled.
|
Field |
Type |
Description |
Options | |
|---|---|---|---|---|
|
General |
Flight Name |
Single Line of Text |
This filed is populated by workflow. Requirement Level: No Constraint. Layout: 3columns. Display: In the header of main form. |
Max length: 100 |
|
Flight Route |
Lookup |
Unique identifier of the of the flight route |
Flight is an instance of a Flight Route | |
|
Departure Time |
Date and Time |
Local departure date and time |
Format: Date and Time | |
|
Arrival Time |
Date and Time |
Local arrival date and time |
Format: Date and Time | |
|
Flight Time |
Whole Number (Duration) |
In flight hours |
- | |
|
Layover Time |
Whole Number (Duration) |
Off flight hours of the destination |
- | |
|
Flight Type |
Options Set |
The Red Eye/Holiday/Polar line flights will double the hourly payment. (Default value: Normal) |
Label Value Normal Flight 1 Red-Eye Flight 2 Holiday Flight 3 Polar Flight 4 | |
|
Flight Crew |
CrewConnection |
Sub-Grid |
Insert a new tab called "tab_crew" on the form; and then insert a Sub-Grid inside the tab |
Sub-Grid properties: Records: Only Related Records Entity: Connections (Connected From) Default View: Active Connections |
|
Notes |
Note Text |
Notes |
- |
- |
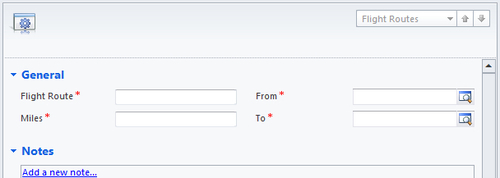
The Flight (name) will be generated by Workflow, so Flight Name = Flight Route + Departure Time.
So we can put the Flight (name) in the form header. On the Form Editor, click Header on the ribbon, then drag the Flight field onto the Header section, and then increase the width by three columns.
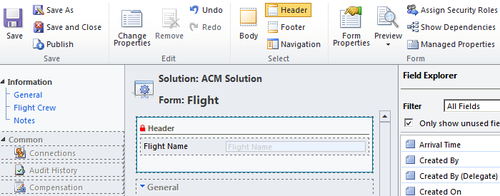
Double-click on the Flight field in the Body section, deselect the Visible by default option to make sure that the Flight field only appears in the Header.
|
Columns |
Flight, Flight Route, Departure Time, Arrival Time, Created On |

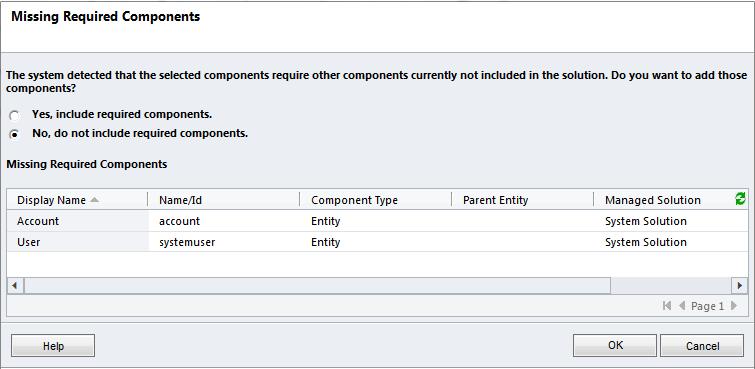
Now that we have created three custom entities, for Crew Members, we will use the system entity: contact. So go to the ACM Solution Components list, click on Entities, and then click on Add Existing | Contact. Select No, do not include required components, because we don't need those entities in the ACM solution:
When you click on the Contact entity in the ACM Solution Components, you may notice that some options are grayed out, so just leave this as it is. Some of these can be changed in SiteMap.
|
Entity |
Customization |
|---|---|
|
Information |
Entity Definition:
Areas that display this entity:
Options for Entity:
|
|
Forms |
Main |
|
Views |
Active Crew Members (Default Public View) and other Views |
|
Charts |
- |
|
Custom Relationships |
1:N - Compensation; Relationship Behavior: Referential |
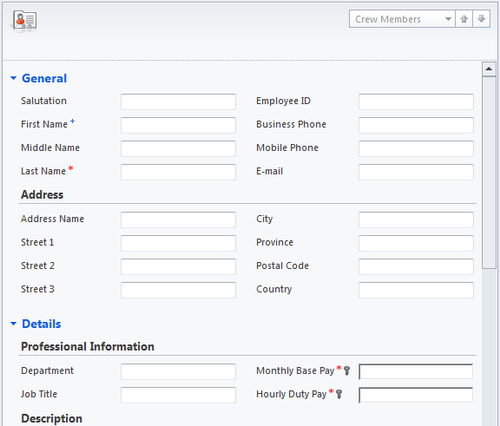
*Monthly Base Pay and Hourly Duty Pay are custom fields that are Business Required, Searchable, and Auditing enabled. All other fields are system default fields—we try to keep it really simple in this book, although in reality there will be more fields for this entity.
|
Field |
Type |
Description |
Options | |
|---|---|---|---|---|
|
General |
Salutation |
Single Line of Text |
CRM default field |
Max length: 50 |
|
First Name |
Single Line of Text |
CRM default field |
Max length: 100 | |
|
Middle Name |
Single Line of Text |
CRM default field |
Max length: 100 | |
|
Last Name |
Single Line of Text |
CRM default field |
Max length: 50 | |
|
Employee ID |
Single Line of Text |
CRM default field (Employee) |
Max length: 50 | |
|
Business Phone |
Single Line of Text |
CRM default field |
Max length: 50 | |
|
Mobile Phone |
Single Line of Text |
CRM default field |
Max length: 50 | |
|
|
|
CRM default field |
Max length: 100 | |
|
Address | ||||
|
Address Name |
Single Line of Text |
CRM default field |
Max length: 200 | |
|
Street 1 |
Single Line of Text |
CRM default field |
Max length: 50 | |
|
Street 2 |
Single Line of Text |
CRM default field |
Max length: 50 | |
|
Street 3 |
Single Line of Text |
CRM default field |
Max length: 50 | |
|
City |
Single Line of Text |
CRM default field |
Max length: 50 | |
|
Province |
Single Line of Text |
CRM default field |
Max length: 50 | |
|
Postal Code |
Single Line of Text |
CRM default field |
Max length: 20 | |
|
Country |
Single Line of Text |
CRM default field |
Max length: 50 | |
|
Detail |
Professional Information | |||
|
Department |
Single Line of Text |
CRM default field |
Max length: 100 | |
|
Job Title |
Single Line of Text |
CRM default field |
Max length: 100 | |
|
Monthly Base Pay |
Currency |
Monthly base pay (This field enables Field Security ) |
Min: 0 Max: 100,000 Precision:Currency Precision | |
|
Hourly Duty Pay |
Currency |
Hourly duty pay of the crew member (This field enables Field Security ) |
Min: 0 Max: 100 Precision:Currency Precision | |
|
Owner |
Owner |
Unique identifier of the user or team who owns the record. |
CRM default field |
Unselect the "Visible by default" option |
|
Description |
Multiple lines of Text |
CRM default field |
Max: 2000 | |
|
Notes |
Note Text |
Notes |
- |
- |
The out-of-the-box Contact entity has some default links in the entity navigation pane; we can remove these links from the entity's Form Editor:
- Under the Common node, only keep Activities, Closed Activities, Connections, Audit History, and Compensation.
- Remove everything under Sales, Service, and Marketing nodes.
- Keep the Processes node and sub items.
|
Columns |
Full Name, Department, Job Title, Business Phone |
Note
Note: Because we renamed the system entity "Contact" to "Crew Member", we need to rename it for all related Fields, Views, and Messages that contain the word "Contact". We also need to rename it in the Relationships text and the Help document if necessary.
You cannot delete System Views in a Managed solution, but you may deactivate the View by selecting View | More Actions | Deactivate.
The last major entity we will use in this book is a custom activity (new introduced in CRM 2011) entity called Compensation. Each flight will generate a compensation record for each crew member who works on this flight.
|
Entity |
Customization |
|---|---|
|
Information |
Entity Definition:
Options for Entity:
|
|
Forms |
Main |
|
Views |
All Compensations (Default Public View) and other Views |
|
Charts |
- |
|
Custom Relationships |
1:N—Compensation; Relationship Behavior: Referential N:1—Flight Route; Relationship Behavior: Referential |
*All fields in the General tab are Business Required, Searchable, and Auditing enabled.
|
Field |
Type |
Description |
Options | |
|---|---|---|---|---|
|
Header |
Compensation |
Currency |
One-Flight Compensation for the crew member (This field enables Field Security) |
Min: 0 Max: 10,000 Precision:Currency Precision |
|
General |
Subject |
Text |
The subject of the compensation |
Max length: 100 |
|
Flight |
Lookup |
Unique identifier of the of the flight |
Flight is an instance of a Flight Route | |
|
Crew Member |
Lookup |
Unique identifier of the crew member |
- | |
|
Owner |
Owner |
Unique identifier of the user or team who owns the record. |
Unselect the "Visible by default" option | |
|
Detail |
Layover Time |
Whole Number (Duration) |
Same field of the Flight entity |
Read-Only |
|
Flight Type |
Options Set |
Same field of the Flight entity |
Read-Only | |
|
Notes |
Note Text |
Notes |
- |
- |
