Microsoft Dynamics CRM 2011 Online doesn't come with the E-mail Router capability. By default it uses Microsoft Dynamics CRM for Outlook to send and receive CRM e-mails, which does work if you have the CRM for Outlook software installed and configured, and can keep Outlook open for sending and receiving CRM e-mails.
In our case, Air-X has chosen Microsoft Office 365 as their Business-IT platform. This includes a set of business productivity tools, including is Office Web Apps, Exchange Online, Lync Online, and SharePoint Online. So we can use Exchange Online plus CRM E-mail Router to support CRM e-mail messages.
Microsoft Dynamics CRM E-mail Router is a software component that creates an interface between Microsoft Dynamics CRM and Microsoft Exchange Server (2003, 2007, 2010, and Online) and an SMTP or POP3-compliant E-mail server. After the E-mail Router has been installed, it transfers e-mail messages to Microsoft Dynamics CRM, and sends outgoing e-mail messages that users created in Microsoft Dynamics CRM.
Our plan is to install the CRM E-mail Router software on a local server that has Internet access (we are not going to introduce how to set up a real server here, but will just do it on our development workspace), and configure it to communicate with CRM Online and Exchange Online.
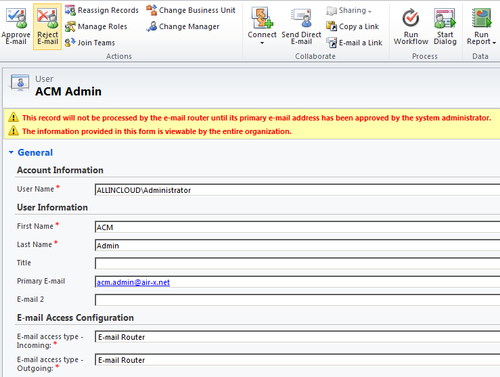
The CRM E-mail Access is configured per user. Go to ACM Settings | Administration | Users; you will see the E-mail Access Configuration window. This has the Outlook option for both incoming and outgoing e-mail messages, by default. Change both to use E-mail Router.
The Microsoft Dynamics CRM 2011 E-mail Router can be downloaded from http://www.microsoft.com/downloads/en/details.aspx?FamilyID=a995f6ad-0099-42fd-9b22-cf7b3d40a2bf .
The E-mail router supports both 32 bit and 64 bit Windows Server 2008 or Windows 7. Because our development workspace is using 64 bit Window Server 2008 R2, that's good.
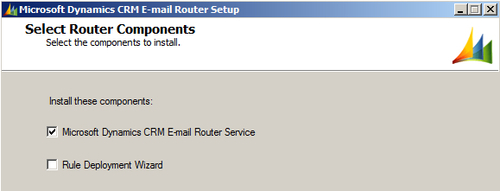
During the installation process, choose to install the service only, because we don't have the Exchange server deployed in this development workspace, so the Rule Deployment Wizard won't need it.
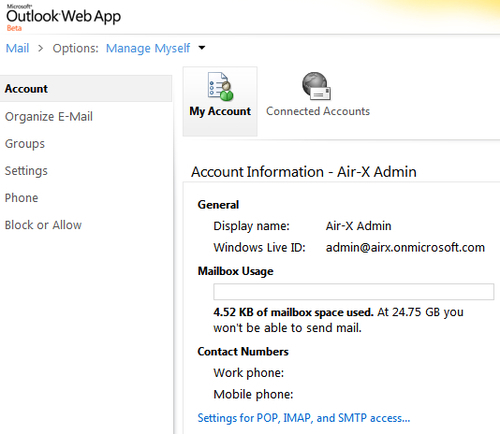
Once completed, run the Microsoft Dynamics CRM E-mail Router Configuration Manager. You will need to set up the E-mail profiles for POP and SMTP. To find out the E-mail settings of Exchange Online, log on to the Office 365 Admin Portal as the CRM Admin user via the URL https://portal.microsoftonline.com, and then click the Options link under the Outlook section. Then click the Settings for POP, IMAP, and SMTP access… link. You can then see the POP and SMTP settings, as shown in the following screenshot:
- On the Configuration Profile tab, create two profiles: one for POP and one for SMTP, using the following settings:
- Profile Name: POP
- Direction: Incoming
- E-mail Server Type: Exchange Online
- Protocol: Exchange Web Services
- Location: Use Autodiscover
- Access Credentials: Other Specified (use the Office 365 admin Sign-In E-mail and Password)
- Network Port: 995 (on the Advanced tab)
- Profile Name: SMTP
- Direction: Outgoing
- E-mail Server Type: Exchange Online
- Protocol: Exchange Web Services
- Location: Use Autodiscover
- Access Credentials: Other Specified (use the Office 365 admin Sign-In E-mail and Password)
- User Type: Administrator
- Access Type: Delegate Access
- Network Port: 587 (on the Advanced tab)
- Profile Name: POP
- After creating the two profiles, go to the Deployments tab, and specify the type, location, and access credentials of the CRM deployment.
- There are three types of CRM deployment:
- My company (On-premise)
- An online service provider (SPLA)
- Microsoft Dynamics CRM Online (CRM Online)
- For development/test proposes, you may choose the first one: My company, and then point it to the local development workspace, at:
http://CrmDiscoveryServer:<port>/<OrganizationName>. - Next, set the Access Credentials to Local System Account, and choose POP and SMTP for the incoming and outgoing profiles.
Note
On the production server, when you point it to CRM Online, the URL format would be https://dev.crm.dynamics.com/<OrganizationUniqueName>.
Note that OrganizationUniqueName isn't the OrganizationName, you can get the unique name by going to CRM Online | Settings | Customizations | Developer Resources. Then specify the CRM Online Sign-In User Name and Password of a system user. Use the same POP and SMTP profiles.
The E-mail Router should only be configured against Online, On-Premise, or SPLA. It is not designed to support both CRM On-Premise and CRM Online deployments concurrently.
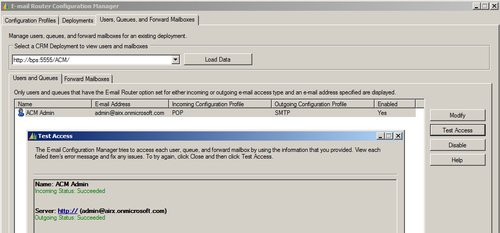
- Now go to the last tab of the E-mail Router Configuration Manager: Users, Queues, and Forward Mailboxes. Select the CRM deployment that you set up in the previous step, and then click the Load Data button. In the Users and Queues window, you will see a list of all CRM users who have selected the E-mail Router option in the E-mail Access Configuration.
- Select those user accounts, and then click the Test Access button. If you see both SMTP and POP are a success, click the Publish button to save the E-mail Router configuration settings, and then close the application. See the following screenshots.
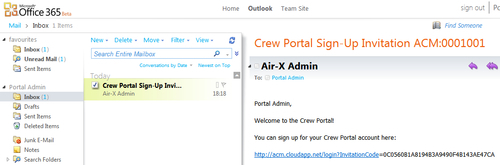
- In production, the user should get an invitation e-mail directly from CRM Online to their Exchange Online mailbox: