Now that we are comfortable navigating around the interface and have built a simple game, we can start to create more complex projects. In this chapter we are going to focus on creating art, adding animation, and implementing an audio soundscape. All three of these elements are incredibly important for the creation of a game as each of them helps the player to understand what is happening and makes the experience more immersive. How we go about building a game can be drastically affected by the types of assets we use and how they are implemented. We will start by looking at importing external images and move onto some practical examples of how to create a tileset and make an animated character. We will then move onto audio files and how to add ambience to a game. We will wrap up the chapter with a brief talk on how to make a game look more professional. Let's get started!
More often than not, when creating a game, the majority of the art assets will be created in an external program and it will need to be imported. It is true that GameMaker: Studio does have an in-built image editor that we will investigate later, but its capabilities are fairly limited. It's perfect for creating simple art, but there are many other tools that provide us with much more advanced techniques for creating complex art.
There are many popular software options you might want to consider. The most full featured option and the most expensive is Adobe Photoshop , which is the preferred option for most professional artists and can be purchased at http://www.photoshop.com/. A free alternative with many similar capabilities is GIMP, downloadable at http://www.gimp.org/. Both these packages offer a full suite of advanced tools for creating images. There are also many other simpler tools available, such as Pickle http://www.pickleeditor.com/, Spriter http://www.brashmonkey.com/, and PyxelEdit http://pyxeledit.com/, all of which are free and worth checking out.
If you just want to skip the art creation and prefer some premade pieces, there are plenty of places to download sprites. One of the most popular sites for sprites is the Spriters Resource http://spriters-resource.com/. They have assets for every type of game you can imagine. You can also check out the GameMaker forums http://gmc.yoyogames.com/. Here you will find many active people who are willing to make or share their art assets.
GameMaker: Studio is capable of importing four image types: BMP, GIF, JPG, and PNG. Each format has its own unique capability and drawback that will dictate how they should be used. The BMP format is the least used format these days because the data is not compressed. Uncompressed images are generally considered inefficient due to their large file size. GIF is the only format that can be animated, but is limited to 256 colors and a single level of transparency. This is perfect for classic 8-bit styled art where everything has a hard edge. JPG images have the smallest file size due to the lack of any transparency and their lossy compression format. This is a good choice for backgrounds and opaque sprites only. PNG image formats are the most useful because they are more efficient than BMPs, have 16 million colors and full transparency, and it is the format that GameMaker: Studio outputs as a texture page when the game is compiled.
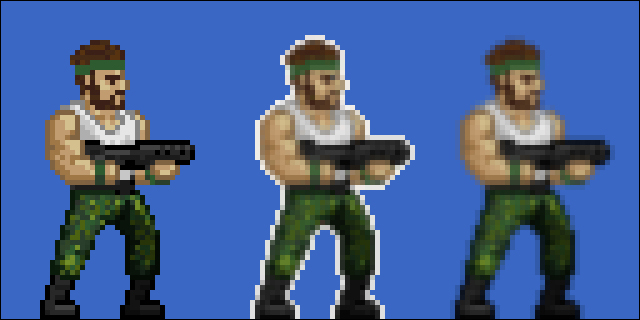
Throughout this book we will be utilizing only two of the image formats, GIF and PNG. We will be using GIF images for everything that is animated as it is the simplest way to import animation. As in the previous chapter, if we load an animated GIF image, each frame of animation will be separated in the Sprite Properties Editor. Unfortunately this means that we are limited to an 8-bit art style with our characters having hard edges due to the single level of transparency. If we want to have a smoother, cleaner look we will want to have our edges anti-aliased and that requires the use of a PNG image. Attempting to have smooth edges in a GIF image is one of the most common mistakes an artist can make. As we will see in the following screenshot, on the left-hand side we have a GIF image in the 8-bit art style with crisp hard edges and on the right-hand side a PNG image with smooth, anti-aliased edges.
In the center we have the same smooth sprite used in the PNG but saved as a GIF. Notice the edge pixels that were once slightly transparent are now a solid white outline.