Boss battles are one of the most enjoyable experiences in games. Building a good boss battle is always a challenge, but the theory behind it is quite simple. The first rule to follow is that a boss should consist of three unique stages of increasing difficulty. The second rule is that the boss should emphasize the latest skills that the user has acquired. The third and final rule is that the player should always have something to do.
Our boss battle will not be against another character, but against a fortress. The first stage will consist of three retractable Cannons that will shoot Cannonballs across the room. All three Cannons must be destroyed to move onto the second stage. Stage two will have a powerful LaserCannon that will move up and down and shoot a room wide Laser Beam that the player will need to avoid. The final stage will be to destroy the Boss Core that is protected by two Shields. The Shields will only be open for a short period of time. During the entire boss fight, there will be an indestructible Gun that will shoot bullets at the player wherever they are in the room. Each progressing stage, this Gun will fire more rapidly, making the game more challenging. Let's start building the boss!
We will start with the indestructible Gun since it will be the primary boss attack through the battle. The Gun will need to rotate so that it always points towards the player. When it shoots a Gun Bullet, the instance of the Gun Bullet will come from the tip of the Gun and move in the direction that the Gun is pointing:
- Let's start by building the Gun Bullet. Create a new Sprite,
spr_Gun_Bullet, and loadChapter 5/Sprites/Gun_Bullet.gifwith Remove Background checked. Center the Origin and click on OK. - Create a new Object,
obj_Gun_Bullet, and assignspr_Gun_Bulletas the Sprite. - We want the bullets to always appear on top of the ground and platforms. Set the Depth to -
2000. - The Gun Bullet is going to damage the player on contact, as will all the other projectiles. Once again, let's build a single system that all weapons can use. Create a new Script,
scr_Damage, with the following code:if (obj_Player.action != DAMAGE) { health -= myDamage; with (obj_Player) { y -= 1; vspeed = -MAXGRAVITY; hspeed = 8 * -facing; action = DAMAGE; isDamaged = true; } }This script is specifically for the enemy weapons. We start by checking to see if the player is not already damaged so that the player isn't punished repetitively. Then we reduce the global health by the value indicated by the variable
myDamage. By using a variable like this, we can have different weapons apply differing amounts of damage. We then affect the player directly through awithstatement. We want to launch the player into the air, but first we need to raise the player off the ground by one pixel first to ensure the ground collision code doesn't snap it back down. Next we apply a vertical velocity and a horizontal velocity in the opposite direction that they are facing for a push back effect. We set the player's action to theDAMAGEstate and indicate that damage has happened. - Create another new Script,
scr_Gun_Bullet_Create, and initialize themyDamagevariable. Then apply it to a Create event inobj_Gun_Bullet.myDamage = 5;
- Next let's create a collision script,
scr_Gun_Bullet_Collision, which calls the damage script and removes the Bullet. We did not put the destruction of the instance intoscr_Damageso that we have the option for weapons that can't be destroyed, use this script:scr_Damage(); instance_destroy();
- We can now add a Collision | obj_Player event to
obj_Gun_Bulletwith this script attached. The Gun Bullet is now complete. - We can now move onto the Gun itself. Start by creating two new Sprites,
spr_Gun_Idleandspr_Gun_Run. LoadChapter 5/Sprites/Gun_Idle.gifandChapter 5/Sprites/Gun_Run.gifto their associated sprite with Remove Background checked. - The Gun sprite has the barrel facing to the right so we need to set the origin on the left side so that it pivots properly. Set the Origin to X:
0and Y:16on both sprites and click on OK. - Create a new Object,
obj_Gun, and assignspr_Gun_Idleas the Sprite. - We will want to make sure that the Gun remains visually on top of the Boss at all times so set the Depth to
-1000. - We need to initialize some variables in a new Script,
scr_Gun_Create, which will be added toobj_Gunas a Create event:action = IDLE; facing = RIGHT; tipOfGun = sprite_width; canFire = false; delay = 90; alarm[0] = delay; myIdle = spr_Gun_Idle; myRun = spr_Gun_Run;
We will be using the animation system here, so we need to set values for the action and facing variables which are required. The following four variables relate to the shooting of the Gun. First is
tipOfGunfor where the end of the barrel is located,canFireis the trigger,delayis how long to pause between shots, and the alarm will shoot the Gun Bullet. Finally, we have two states of animation that we need to apply. We do not need to add all the other variables such asmyDamageunless the object utilizes that state. - Next we will have the Gun track the player and determine when to shoot. Create a new Script,
scr_Gun_Step, which will be placed in a Step | Step event. Here's the code we need:scr_Animation_Control(); if (image_index > image_number-1) { action = IDLE; } if (canFire) { action = RUN; alarm[1] = 5; canFire = false; } image_angle = point_direction(x, y, obj_Player.x, obj_Player.y);We start by running the animation script. We want the Gun to play the firing animation only once, so we check the currently displayed image against the last image of the sprite. Using
image_numbergives us the number of frames, but we need to subtract by one as frames of animation start at zero. If it is the last frame, then the Gun goes into theIDLEstate. Next we check to see if the Gun is to shoot. If it is, we change states to play the shooting animation, set a second alarm for 5 frames, and then turn offcanFire. Finally we track the player by rotating the sprite based on the angle between the Gun and the player. - We are using two alarms on this object. The first alarm starts the firing animation and the second creates the Gun Bullet. Let's start with the first alarm by creating a new Script,
scr_Gun_Alarm0, for an Alarm | Alarm 0 event:canFire = true;
- The second alarm has the code for firing the Gun Bullet. Create a new Script,
scr_Gun_Alarm1, that will be added as an Alarm | Alarm 1 event:myX = x + lengthdir_x(tipOfGun, image_angle); myY = y + lengthdir_y(tipOfGun, image_angle); bullet = instance_create(myX, myY, obj_Gun_Bullet); bullet.speed = 16; bullet.direction = image_angle; alarm[0] = delay;
Since we need the bullet to leave the end of the barrel of the gun we are going to need some trigonometry. We could use sine and cosine to calculate the X and Y values from the origin of the circle and radial distance, but there is a much easier way. Here we are using
lengthdir_xandlengthdir_yto do the math for us. All that it needs is the radial distance and the angle which we can then add to the local coordinates of the Gun. Once we have those variables, we can create the bullet in the proper position, set its speed, and direction. Finally we reset the first alarm so that the Gun will fire again. - We are ready to test the Gun. Open BossArena and place an instance of the Gun on the far right side of the room. Once we are done testing we will be removing the gun from the room, so exact placement doesn't matter at this time.
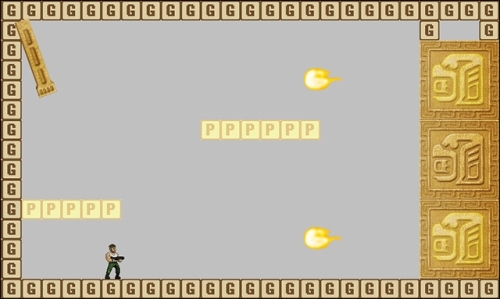
- Run the Game. The Gun should follow the player wherever they are in the room and fire Gun Bullets every three seconds. If the player is hit by a Gun Bullet, they will be launched into the air and pushed back with the damage animation playing as seen in the previous screenshot.
- There is one issue, however, with the player's damage state; the player can still move and shoot. This isn't much of a deterrent to being shot, so let's fix this. Create a new Script,
scr_Player_Damage, with the following code:if (isOnGround) { isDamaged = false; } else { scr_Gravity(); }We check to see if the player is on the ground or not as that will deactivate the damage state. If the player is in the air, we apply gravity and that is it.
- Now we need to call this script. Reopen
scr_Player_Stepand add a conditional statement for whether the player is damaged or not. Here is the entire script with the new code in bold:if (isDamaged) { scr_Player_Damage(); } else { if (isOnGround) { scr_Player_GroundControls(); } else { scr_Player_AirControls(); } scr_Player_Attack(); } scr_Animation_Control();
We check to see if the player is in damage mode, and if it is, we run the damage script. Otherwise, we function as normal with all the control systems in the
elsestatement. The animation script is always called regardless of damage. - Run the game. Now when the player is hit, the impact is really noticeable.
The first stage weapon is a Cannon that hides itself for protection and only exposes itself to shoot. We will have three Cannons stacked on top of each other to make the player have to jump onto platforms. To destroy the Cannons the player will need to shoot each Cannon while it is exposed:
- Starting with the Cannonball, create a new Sprite,
spr_Cannonball, and loadChapter 5/Sprites/Cannonball.gifwith Remove Background checked. - Set the Origin to X:
12, Y:32and click on OK. - Create a new Object,
obj_Cannonball, and assignspr_Cannonballas the Sprite. - Set the Depth to
-900so that it will appear in front of most objects. - To use the damage system, we need to set the proper variables in the Create event with a new script,
scr_Cannonball_Create:myDamage = 10; hspeed = -24;
This weapon is powerful and will cause 10 points of damage. We also set the horizontal velocity so that it quickly moves across the room.
- We are not going to destroy the Cannonball if it contacts the player, so all we need to do is apply
scr_Damageto a Collision | obj_Player event. The Cannonball is now ready to be shot. - The Cannon is going to need five sprites,
spr_Cannon_IdleDown,spr_Cannon_IdleUp,spr_Cannon_RunDown,spr_Cannon_RunUp, andspr_Cannon_Damage. Load the associated files from theChapter 5/Sprites/folder without checking Remove Background. - Create a new Object,
obj_Cannon, and assignspr_Cannon_IdleDownas the Sprite. - Set the Depth to
-1000so that the Cannon will be in front of the rest of the Boss parts. - As always, let's create a new Script,
scr_Cannon_Create, to initialize all the variables in the Create event:myHealth = 20; action = IDLEDOWN; facing = RIGHT; canFire = false; myIdleUp = spr_Cannon_IdleUp; myIdleDown = spr_Cannon_IdleDown; myRunUp = spr_Cannon_RunUp; myRunDown = spr_Cannon_RunDown; myDamage = spr_Cannon_Damage;
The Cannon will take several hits before it is destroyed, so we have a
myHealthvariable to track the damage. We then set the action state by facing to the right, as we are not flipping the sprite, and establish a shooting variable. We then have all the animation states we need for the Cannon to work. - Next we can create a new Script,
scr_Cannon_Step, for a Step | Step event with the functionality for switching states and firing the Cannonballs:scr_Animation_Control(); if (image_index > image_number-1) { if (action == RUNUP) { action = IDLEUP;} else if (action == RUNDOWN) { action = IDLEDOWN;} } if (canFire) { action = RUNUP; alarm[0] = 60; canFire = false; } if (myHealth <= 0) { instance_destroy(); }Similar to the Gun, we start with calling the animation system script. We then check if the Cannon is on the last frame of the animation. Here we have two different idle states depending on whether the Cannon is exposed or not. We check to see which state we are in and set the appropriate idle state. Next we check if the Cannon should shoot, and if it should, we expose the Cannon and set an alarm to create the Cannonball in two seconds. Finally, we do a health check and if the Cannon is out of life, it removes itself from the game.
- Create a new Script,
scr_Cannon_Alarm0, and add it to an Alarm | Alarm 0 event with the following code:instance_create(x, y, obj_Cannonball); action = RUNDOWN;
Here we just create a Cannonball and then set the animation to retract the Cannon.
- The last thing we need to do with the Cannon is have it take damage. Create a new Script,
scr_Cannon_Collision, and apply it to a Collision | obj_Bullet event with the following code:if (action == IDLEUP) { myHealth -= 10; action = DAMAGE; with (other) {instance_destroy();} }We start by making sure that damage will only be applied if the Cannon is exposed. If it is, then we take 10 points of its health, change to the damage animation, and remove the bullet. The Cannon is now complete.
- Before we try to test the Cannon out, we are going to start constructing the Boss. The Cannon doesn't run on its own, but is controlled by the Boss. Create a new Object called
obj_Boss. There is no sprite to assign as the Boss is comprised of other objects. - Create a new Script,
scr_Boss_Create, to initialize variables in the Create event:isPhase_01 = true; isPhase_02 = false; isPhase_03 = false; isBossDefeated = false; boss_X = 672; gun = instance_create(32, 32, obj_Gun); cannonA = instance_create(boss_X, 64, obj_Cannon); cannonB = instance_create(boss_X, 192, obj_Cannon); cannonC = instance_create(boss_X, 320, obj_Cannon);
We start by establishing variables for the three phases and whether the boss has been defeated. We then create a variable for the X location of the boss with the indestructible Gun located in the upper left corner of the room and a tower of Cannons right where the Boss is. We establish variables for each weapon so that the Boss can control them.
- We want the Cannons to shoot in a sequence rather than all together. To do this we are going to use a Time Line. Create a new Time Line and name it
tm_Boss_Phase01. - Add a Moment and set Indicate the moment to
180. This will start six seconds into the battle. - Create a new Script,
scr_Phase01_180, and fire the middle Cannon. Apply this script to the Time Line:if (instance_exists(cannonB)) { cannonB.canFire = true;}Since the player can destroy the Cannons, we need to check to see if the Cannon is still in existence. If it is, we set the Cannon's
canFirevariable to true and the Cannon code will handle the rest. - Add another Moment at
360. - Create a Script,
scr_Phase01_360, and activate the other two Cannons:if (instance_exists(cannonA)) { cannonA.canFire = true; } if (instance_exists(cannonC)) { cannonC.canFire = true; }We need to check both Cannons individually so that if one is destroyed, the other will still shoot.
- Reopen
scr_Boss_Createand start a looping Time Line after the last line of code:timeline_index = tm_Boss_Phase01; timeline_running = true; timeline_loop = true;
- Reopen
BossArenaand make sure you remove the instance of the Gun if it is still in the room. - Place an instance of
obj_Bosson the right side of the map, though the actual location does not matter. - None of the parts of the Boss have the Solid attribute, which means the player can run through them. To fix that, create a barrier wall in front of the Boss with instances of
obj_Groundas seen in the following screenshot:
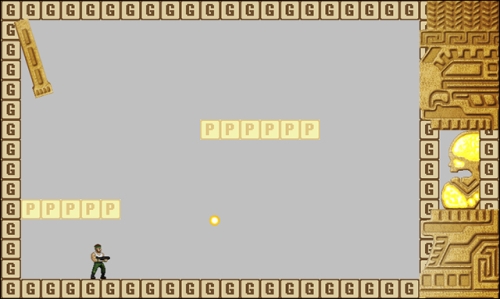
- Run the game. At the start we should see three Cannons stacked on top of each other and the indestructible Gun. The Gun should aim at the player and shoot a Gun Bullet every few seconds. Six seconds into the game we should see the middle Cannon power up and shortly afterwards shoot a Cannonball. Six seconds after that, the upper and lower Cannons should do the same. If the player is hit by an enemy projectile they will be knocked back. The player's bullets will pass by the Cannons unless they have been exposed, in which case the Cannon will go into its damage state and the bullet disappears. If any Cannon is hit two separate times it will blink out of existence. The first phase is now complete and should look like the following screenshot:
Once the player destroys all the Cannons, the second phase will begin. Here we will have a giant LaserCannon that moves constantly up and down. Every few seconds it will fire a large Laser Beam that will stretch across the entire room. The player can damage the LaserCannon at all times, though it will have much more health:
- First we will create the Laser Beam. Create a new Sprite,
spr_LaserBeam, and loadChapter 5/Sprites/LaserBeam.gifwithout checking Remove Background. The sprite may appear small, being only eight pixels wide, but we will stretch this sprite across the screen so it could work in any room. - We need the origin to be on the right side so that it lines up with the LaserCannon barrel properly. Set the Origin to X:
8and Y:32. - Create a new Object,
obj_LaserBeam, applyspr_LaserBeamas the Sprite and set the Depth to-600. - Create a new Script,
scr_LaserBeam_Create, to initialize variables in a Create event:myDamage = 20; myLaserCannon = 0; image_xscale = room_width / 8;
The amount of damage from this weapon is much higher than the other weapons, which is fitting for the second phase. We also have a
myLaserCannonvariable that will be used to keep the Laser Beam aligned with the LaserCannon as it moves. The value has been set to zero, though this will become the ID of the LaserCannon that spawns it, which we will get to in a moment. Finally, we stretch the sprite across the room. The variableimage_xscaleis a multiplier, which is why we are dividing the room width by eight, the width of the sprite. - Next we will use a Step | End Step event with a new Script,
scr_LaserBeam_EndStep, to make the beam move with the LaserCannon.x = myLaserCannon.x; y = myLaserCannon.y;
We move the X and Y coordinates with the LaserCannon that creates the Laser Beam. We are placing this into the End Step event because the LaserCannon will move on a Step event and this will ensure that it is always in the correct position.
- All that is left is for
scr_Damageto be added to a Collision | obj_Player event. The Laser Beam is now complete. - Moving onto the LaserCannon, we will need to create three sprites:
spr_LaserCannon_Idle,spr_LaserCannon_Run, andspr_LaserCannon_Damage. Load the associated files from theChapter 5/Sprites/folder all of which need to have Remove Background checked. - Set the Origin of all three sprites to X:
16and Y:56. This will help place the Laser Beam where we want it to be. - Create a new Object,
obj_LaserCannon, and assignspr_LaserCannon _Idleas the Sprite. - Set the Depth to
-700so that the LaserCannon is behind the Cannons and Gun, but in front of the Laser Beam. - For initializing variables in the Create event, create a new Script,
scr_Laser_Create, with the following code:myHealth = 50; mySpeed = 2; myBuffer = 64; action = IDLE; facing = RIGHT; canFire = false; myIdle = spr_LaserCannon _Idle; myRun = spr_LaserCannon _Run; myDamage = spr_LaserCannon _Damage;
We first set all the standard variables for the LaserCannon's health, current state, facing direction, and that it isn't shooting. We then set all the animation system variables for the three states that the LaserCannon has.
- Next is building the functionality of the laser. Create a new Script,
scr_LaserCannon_Step, and add it to a Step | Step event with the following code:scr_Animation_Control(); if (image_index > image_number-1) { action = IDLE; } if (canFire) { action = RUN; alarm[0] = 5; canFire = false; } if (myHealth <= 0) { instance_destroy(); }This should be starting to look quite familiar. We start by running the animation system script. We then check to see if the last frame of animation has played, and if so, set the LaserCannon to its idle state. Next, if the LaserCannon is to shoot, we change states and set a short alarm so that the Laser Beam is created after the shooting animation has played. Finally, we do a health check and remove the LaserCannon if it is out of health.
We aren't done with this script yet. We still need to add in the movement. When the LaserCannon is first created, it will not be moving. We don't want it to start moving until the second phase has started. After that point we want the LaserCannon to take care of the vertical motion.
- To make the LaserCannon move up and down, all we need to do is send it in the opposite direction when it passes an end point. Add this code immediately after the last line of code in
scr_LaserCannon_Step:if (y < myBuffer) { vspeed = mySpeed; } if (y > room_height - myBuffer) { vspeed = -mySpeed; } - We are going to have the LaserCannon move the entire height of the room. If the Y coordinate is less than 64 pixels from the top, we send it downwards. If it is greater than 64 pixels from the bottom of the room, we send it upwards. We will start the movement in the Boss script in a while.
- Let's get the LaserCannon shooting a Laser Beam! The Laser Beam will be created in an Alarm | Alarm 0 event with a new Script,
scr_LaserCannon_Alarm0, attached with the Laser Beam creation code:beam = instance_create(x, y, obj_LaserBeam); beam.myLaserCannon = self.id;
We create an instance of the beam right at the tip of the LaserCannon and then we set the Laser Beam's
myLaserCannonvariable to be the unique ID of the LaserCannon that created it. The benefit of doing this means that we could have more than one LaserCannon in the room if we wanted. - The last element we need to construct is the damage state. Create a new Script,
scr_LaserCannon_Collision, and place it into a Collision | obj_Bullet event:if (obj_Boss.isPhase_02) { myHealth -= 5; action = DAMAGE; with (other) { instance_destroy(); } }Since we don't want the player to be able to destroy the LaserCannon before the second phase, we check what phase the Boss is currently in, to determine if damage should be applied or not. If the Boss is in the second phase, we reduce the LaserCannon's health, change it to the damage state and remove the Bullet. The LaserCannon is now complete and ready to be implemented into the Boss.
- The first thing we need to do is add an instance of the LaserCannon. Reopen
scr_Boss_Createand insert this code before the Time Line is run:laser = instance_create(boss_X, 352, obj_LaserCannon);
- Next we will build the functionality of the LaserCannon by creating a new Time Line and naming it
tm_Boss_Phase02. - To shoot the Laser Beam, add a Moment and set Indicate the moment to
210. - Create a new Script,
scr_Phase02_210, and assign it with the code to activate the LaserCannon:laser.canFire = true;
- We want to have full control over the duration of the LaserCannon, so we will use the Time Line to remove the Laser Beam. Add a Moment at
270. This will give us a Laser Beam that lasts two seconds. - Create a new Script,
scr_Phase02_270, and remove the Laser Beam.with (laser.beam) { instance_destroy(); }When the LaserCannon shoots, it creates the
beamvariable which we can now use to remove it. - All that is left is to have the Boss change from the first phase to the second phase. For this we will need to add a Step | Step event to
obj_Bosswith a new Script,scr_Boss_Step, assigned with the following code:if (!instance_exists(obj_Cannon) && !isPhase_02) { laser.vspeed = laser.mySpeed; timeline_index = tm_Boss_Phase02; timeline_position = 0; gun.delay = 45; isPhase_02 = true; }We start by checking if there are any instances of the Cannon remaining in the world and if they have all been destroyed, we check to see if the second phase has started. Upon the second phase starting, we set the LaserCannon into motion downwards and switch the Time Line to the new phase and reset the Time Line to the beginning. We are also going to make the challenge a bit more difficult by decreasing the delay between shots from the Gun. We end this code by changing
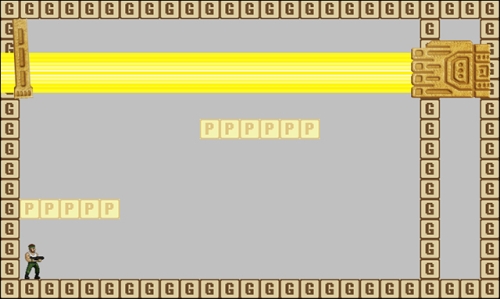
isPhase_02to true so that this is only executed once. - Run the game. The gameplay starts out the same as before, but after the three Cannons have been destroyed, we should see the LaserCannon starts to move up and down and fire a Laser Beam every seven seconds. The LaserCannon can be hit at any time and will take several hits before being destroyed. The indestructible Gun should still function as before, but shoot twice as often. The second phase is now complete and should look like the following screenshot:
For the final stage we are not going to add another weapon, but instead we will create a destructible Boss Core that is protected by two Shields. The Shields will open every few seconds to expose the Boss Core. We will also change the Gun to shoot in quick bursts:
- We will start with the Boss Core. We need to create two new Sprites,
spr_BossCore_Idleandspr_BossCore_Damage. With Remove Background checked, loadChapter 5/Sprites/BossCore_Idle.gifandChapter 5/Sprites/BossCore_Damage.gifto the appropriate sprite. - Set the Origin of both sprites to X:
-32and Y:64so that it will be properly located behind the Shields. - Create a new Object,
obj_BossCore, and assignspr_BossCore_Idleas the Sprite. - The Boss Core is a simple object that only requires some animation states and health. Create a new Script,
scr_BossCore_Create, and initialize the required variables as follows. Remember to assign this to a Create event:myHealth = 100; action = IDLE; facing = RIGHT; myIdle = spr_BossCore_Idle; myDamage = spr_BossCore_Damage;
- We need a Step | Step event to control the animation states and deal with the health, so create another new Script,
scr_BossCore_Stepwith the following code:scr_Animation_Control(); if (action == DAMAGE) { if (image_index > image_number-1) { action = IDLE; } } if (myHealth <= 0) { instance_destroy(); } - All the Boss Core now needs is a Collision | obj_Bullet event to deal with damage. Create a new Script,
scr_BossCore_Collision, and write the following code:if (obj_Boss.isPhase_03 && action == IDLE) { myHealth -= 2; action = DAMAGE; with (other) { instance_destroy(); } }We first check to see if the Boss is in the final phase and that the Boss Core is in its idle state. If it is, we reduce the health and switch over to the damage animation. We also make sure that the Bullet is removed. The Boss Core is now complete and we can move onto the Shields.
- We will have two Shields, one that lifts up and the other that will drop down. Let's bring in the two sprites that we will need. Create two new Sprites,
spr_Shield_Upperandspr_Shield_Lower. LoadChapter 5/Sprites/Shield_Upper.gifandChapter 5/Sprites/Shield_Lower.gifto the associated sprite. Remember to check Remove Background. - Set the Origin of
spr_Shield_Upperto X:0and Y:269so that the origin is on the bottom of the image. We don't need to change the Origin ofspr_Shield_Lower. - Create two new Objects,
obj_Shield_Upperandobj_Shield_Lower, and assign the appropriate sprites. - On both the Shields, set the Depth to
-500so that they are in front of the Boss Core but behind all the other parts of the Boss. - We will build the upper Shield first and we need to initialize some variables in a new Script,
scr_ShieldUpper_Create, applied to a Create event inobj_Shield_Upper:isShielding = true; openPosition = y-64; mySpeed = 2;
The first variable will activate whether the Shield is up or down. The second variable sets the value for how high to lift the Shield; in this case it will move up 64 pixels. Finally we set a variable for the movement speed.
- The lower Shield is almost exactly the same except that it moves in the opposite direction. Once again, create a new Script,
scr_ShieldLower_Create, and apply it to the Create event ofobj_Shield_Lower:isShielding = true; openPosition = y+64; mySpeed = 2;
- Next we will add a Step | Step event to
obj_Shield_Upper, with a new Script,scr_ShieldUpper_Step, attached with the following code to control the shield's movement:if (isShielding && y < ystart) { y += mySpeed; } if (!isShielding && y > openPosition) { y -= mySpeed; }We start by checking if the Shield is supposed to be down and whether it is all the way down or not. If it isn't all the way down, we move the Shield a bit down. The second
ifstatement does the opposite, checking to see if the Shield is supposed to be up and whether it is all the way up. If not, we lift the Shield up a bit. - Once again, the lower Shield is almost exactly the same. Create a new Script,
scr_ShieldLower_Step, attached to a Step | Step event inobj_Shield_Lower:if (isShielding && y > ystart) { y -= 2; } if (!isShielding && y < openPosition) { y += 2; } - The last element we need to deal with is a Collision | obj_Bullet event, which both the Shields can use. Create a new Script,
scr_Shield_Collision, with the following code:if (obj_Boss.isPhase_03) { with (other) { instance_destroy(); } }The Shields will never take damage, but they should only detect collision during the final phase.
- Now that all the objects have been prepared, it is time to implement them into the Boss. Reopen
scr_Boss_Createand insert the following code after the last weapon:core = instance_create(boss_X, 272, obj_BossCore); shieldUpper = instance_create(boss_X, 272, obj_Shield_Upper); shieldLower = instance_create(boss_X, 272, obj_Shield_Lower);
We create the Boss Core and the Shields all at the same location.
- Next we will create a Timeline,
tm_Boss_Phase03, to deal with the Shields and Gun functionality. - Add a Moment at
120, and then create a new Script,scr_Phase03_120, with the following code:shieldUpper.isShielding = false; shieldLower.isShielding = false; gun.delay = 10;
Here we are setting the Shields to open and increasing the shooting rate of the Gun.
- Add a Moment at
180and create a new Script,scr_Phase03_180. All we are going to do here is turn off the Gun's alarm so that there is a brief respite in the shooting. This is achieved by setting the delay to -1.gun.delay = -1;
- Add another Moment at
300, and create a new Script,scr_Phase03_300. Now we reactivate the Gun's alarm.gun.delay = 10;
- Finally we add a Moment at
360with another new Script,scr_Phase03_360, where we lower the Shields and return the Gun to a regular shooting rate:shieldUpper.isShielding = true; shieldLower.isShielding = true; gun.delay = 45;
- Now we need to add in the switch from the second phase to the final phase. Reopen
scr_Boss_Stepand add the following code at the end:if (!instance_exists(obj_LaserCannon) && !isPhase_03) { timeline_index = tm_Boss_Phase03; timeline_position = 0; isPhase_03 = true; }We check whether the LaserCannon has been destroyed and if we are supposed to be in the final phase or not. If we are, all we need to do is switch the
timeline, set it to the beginning, and set it to the final phase. - All we need now is a win condition which we will add to the same script. At the end of
scr_Boss_Stepwrite the last conditional statement:if (!instance_exists(obj_BossCore) && !isBossDefeated) { timeline_running = false; with (gun) { instance_destroy(); } isBossDefeated = true; }We check to see if the Boss Core has been destroyed and if the win condition has been called. If the Boss has been defeated, we stop the Timeline and declare the defeat.
- Run the game. It will take some time, but the first two phases should be the same as before and once the LaserCannon has been destroyed, the final phase activates. The Shields should open and the Gun shoots a burst of bullets. There then should be a quiet moment where the player can attack the Boss Core. A few seconds later the Gun should start firing and the Shields will close. This will repeat until the player defeats the Boss. This phase should look like the following screenshot: