
While all the animations in this book will be using GIF images for the sake of expediency, it would be remiss if we did not cover how to import a sprite sheet. A sprite sheet is generally a PNG file with all the frames of animation of an object, such as a character, placed evenly in a grid. We can then quickly cut out each frame of animation in GameMaker to build the individual sprites we need. Let's try this out!
- Let's start by opening a New Project called
Chapter_02. - Create a new Sprite and name it
spr_PlayerSpriteSheet. - Click on the Edit Sprite button to open the Sprite Editor.
- Under File, select Create from Strip, and then open
Chapter 2/Sprites/PlayerSpriteSheet.pngwith nothing selected in the Image Information section. This will open the Loading a strip image editor. - The sprite sheet we just loaded consists of a six frame run cycle. Since we want all the frames, we need to set number of images to
6. - The layout of the sprite sheet has two rows of three images. Set images per row to
3. - Since each image is 64 x 64 pixels in size we need to set image width and image height to
64. The other options for offsets and separation are not necessary for such a small sprite sheet, but they would come in handy if we had a complete set of animations for this character. The setting should look like the following image: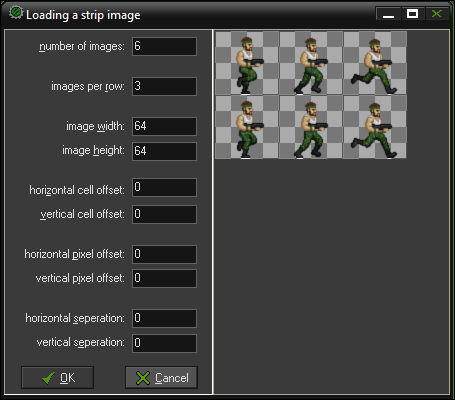
- Click on OK. We now have an animated sprite with smooth edges!
- We are finished with this sprite. Now click the check mark of the Sprite Editor and the Sprite Properties editor and click on the OK button to close it down.
..................Content has been hidden....................
You can't read the all page of ebook, please click here login for view all page.