
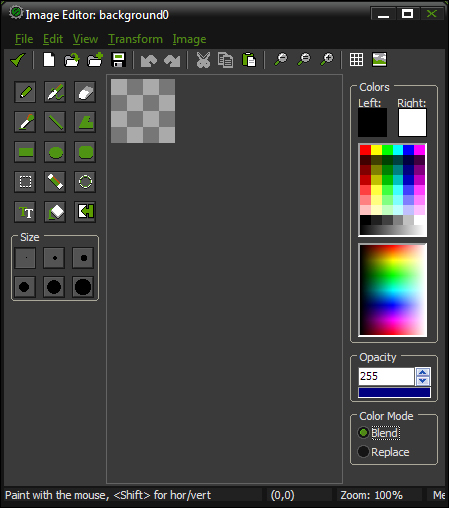
One of the big benefits of developing with GameMaker: Studio is that it has an in-built Image Editor for creating sprites and backgrounds. This editor may appear to be very basic but there are a lot of excellent tools available to use. There are a variety of different drawing tools including the standard tools such as pencil, eraser, and fill. One very useful and unique feature in the editor is the ability to paint with both mouse buttons. The Colors | Left and Colors | Right color options, as seen in the following image, indicate the color that will be used depending on whether the left or right mouse button is being used. We can also adjust a wide range of things through the Transform and Image menus. The Transform menu contains the ability to affect the size and placement of the pixels in the image. The Image menu contains the image alteration tools such as the ability to change the color, blur the image, and add glows.
Rather than talking about the image editor, let's build some art assets in it. We will start by creating a tileset and then move onto an animated character, both of which can be used later in Chapter 4, The Adventure Begins. If you would rather work in an external editor, feel free to still follow along as the general theory of creating these assets is somewhat universal.
A tileset is a special type of background asset that allows games to have an immense amount of variation in the environment without using a lot of computer memory. It is important to keep the file size and memory usage small, especially for HTML5 games. The browser needs to download all these assets because we have no idea how powerful a computer the user has.
Creating natural looking tilesets is all about tricking the eye. Our eyes are very good at spotting patterns; they recognize differences in shape, contrast, and color, when there is repetition. Knowing that our brains are hardwired this way allows us to use this to our advantage. We can break up patterns by using odd shapes, minimizing contrast, and using similar colors in our artwork.
We are going to create a tileset for one of the most common surfaces seen in games: a stone floor. Now this may seem easy, but it is amazing how often this is done incorrectly.
- Create a new background resource and name it
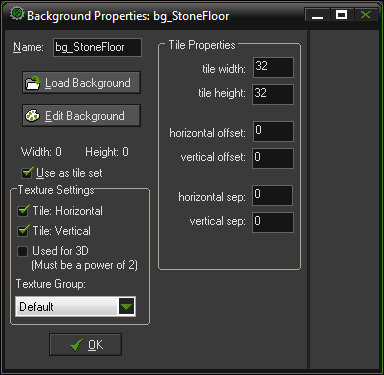
bg_StoneFloor. - Since we want this to be a tileset, make sure you check the box for Use as tile set. This will display the Tile Properties which allows you to set the tile width and height, offsets, and separation.
- Set the tile width and tile height to
32as seen in the preceding image. We are now ready to start building tiles. - Click the Edit Background button. This will open up the Image Editor.
- We are going to start by creating the master tile from which all other tiles will be based. In the Image Editor, Select File | New and set the Width and Height to
32.
- Select the Fill an Area tool and apply a light gray color to the entire sprite. This is the base and we will change the colors later.
Before starting to paint in a bunch of stones, we need to first think about the potential issues and the best solution for solving them. The most common problem people have creating a tileset is that they start by trying to create the final product instead of building up to it. This includes choosing the colors and adding details before ensuring that it can, in fact, tile properly.
When looking at tiling textures, we need to ensure that we try our best to break the grid. The entire world is going to be based on small, 32 x 32 pixel tiles, but we don't want the viewer to notice this. Our goal then, is to use irregular shapes and attempt to avoid horizontal and vertical alignment.

- Select the Draw on the Image tool and a dark gray color.
- To make life a bit easier we can zoom in on the image. This can be done with the magnifying glass or with the middle mouse scroll button.
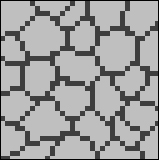
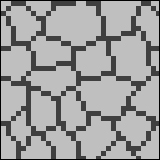
- Draw the outlines of small rocks, but do remember to keep a bit of variety in the size and shape. Also, don't forget to keep the diagonal lines to a width of just one pixel! Once you have done this, it should look similar to the preceding example screenshot.
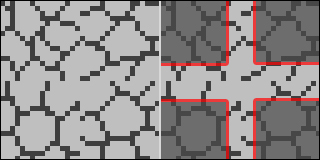
- From the Image Editor menu, select Transform | Shift. This will open the Shift the Image dialog box that allows you to move pixels horizontally or vertically.
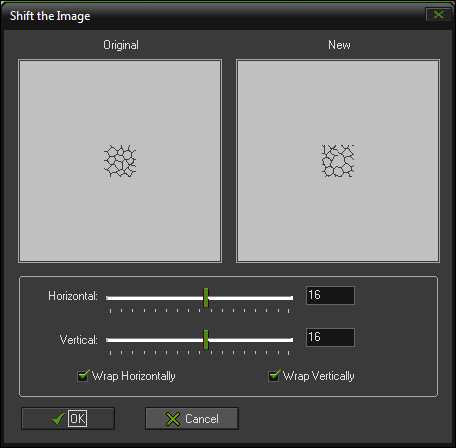
- Set the Horizontal and Vertical values to
16and check the Wrap Horizontally and Wrap Vertically boxes. This will move the image 16 pixels down and to the right (half the tile size), and wrap the remaining pixels as can be seen in the preceding screenshot. - Click on OK.
By shifting the pixels we can now see how the edges would have tiled. You probably notice that it doesn't work perfectly. In the following example screenshot, you can see that there are several lines that just end without creating whole stones. You may also not like the size of certain stones or see lines that are too thick. The goal here is to fix this up and repeat the process until everything lines up as you like.
- Draw the lines and cover over the old ones where necessary to fix any stones that appeared to be incorrect.
- Re-apply the Transform | Shift tool with the same settings. If you see errors, fix them and repeat until you are happy.
Once we are satisfied with the tile pattern and that it repeats correctly along the edges, we are ready to add color. In general, it is best not to use a fully desaturated gray color scheme to represent stone, as most stones have some color. When selecting colors, the goal is to avoid using just a single color with light/dark variations, but rather choose a range of similar colors. To do this, start by selecting a neutral base color like beige. From there, each additional color should have a slight change in hue, saturation, and luminance. For example, the second color could be slightly redder, a bit less vibrant, and darker than the first beige.
- Select a light brown color and use the Fill an Area tool to fill in a few of the stones.
- Repeat this process with the other brown variants until there are no gray colored stones remaining.
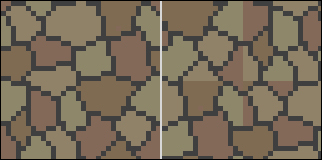
- Once all the stones have been filled, we need to make sure it still tiles. Use Transform | Shift to see if the colors line up correctly. If there are any issues (as seen in the preceding screenshot) just adjust the colors until you are happy again.
The final step for our base tile is to change the dark gray lines into a dark brown. Now you are probably thinking that this is going to be incredibly tedious, but luckily, the image editor has a tool to make this easy.
- Select a dark brown color with the left mouse button. This color should appear under Color | Left.

- Select the Change all Pixels with the Same Color tool, as seen previously, and left click on one of the dark gray pixels. The stone outline should all be the dark brown color now, as we will see in the following screenshot:
Excellent work! We now have a base tile to build all our other tiles from. The next step is to add border tiles so that there is an edge for separating different materials. If we are going to have a square room, we will need a total of nine tiles: the base tile and the eight tiles representing border edges and corners. Let's add some more space to our canvas and fill it up with our tiles.
- Select Transform | Resize Canvas.
- Increase the New Size | Width and New Size | Height by
300percent or96pixels. Then under Position click on the center square so that the canvas expands all around the tile we created. The settings can be seen in the following screenshot.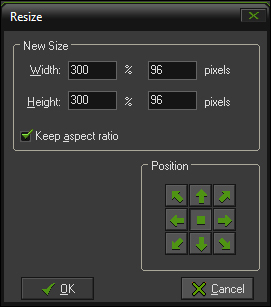
- You will want to make sure that you line everything up correctly, so turn on the grid. Select View | Toggle Grid or click on the Toggle Grid icon.
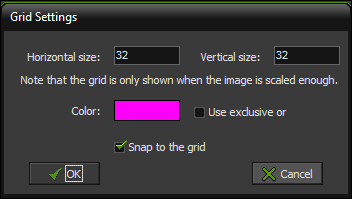
- At this point you probably can't see any grid. This is because the default grid is set to 1 x 1 pixel. Select View | Grid Options to open the Grid Settings. Change the Horizontal size and Vertical size to
32and check Snap to the grid. Feel free to change the Color, as we did in the previous screenshot, if you want. Then click on OK.
- Using the Selecting a Region tool, drag to select the entire base tile.
- Copy (Ctrl + C) and Paste (Ctrl + V) the tile and then drag it into one of the available spaces. Repeat this step until all nine spots have a base tile in them as seen in the following screenshot:

- Go back to the View | Grid Options and turn off Snap to the grid. Otherwise you will get very frustrated trying to draw the borders!

- We want a border of eight pixels in thickness. Using the same colors as the stones, use the Draw a Line tool to create a border around the outer perimeter of the tileset as seen previously.
Fantastic work! We now have a basic tileset, so let's test it out.
- If you don't already have one, create a new room.
- In the Room Properties editor, select the tiles tab.
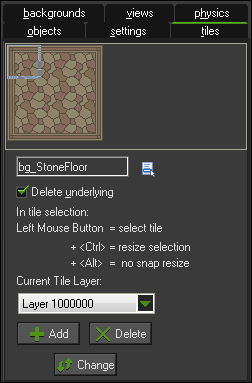
- If it isn't already selected, set the background image to
bg_StoneFloor. - To select a tile, just left click on the one you want to use in the preview area as seen in the preceding screenshot.
It is possible to have multiple layers of tiles which can be very useful when you want to place odd shaped tiles (a tree, a signpost) without having to create new ones for each surface type (stone floor, grass). It is also useful for compiling several tiles to create a more natural surface, such as the stone floor with a dirt tiles set on top.
- We are going to keep this simple so let's leave the Current Tile Layer at
1000000. - In the room, use left click to place an individual tile or hold Shift to paint tiles in the room. Try to layout the tiles as if there were multiple rooms with hallways, much like the following screenshot.
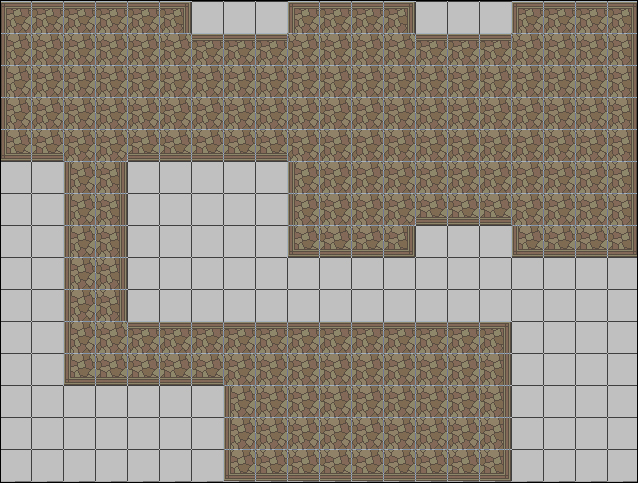
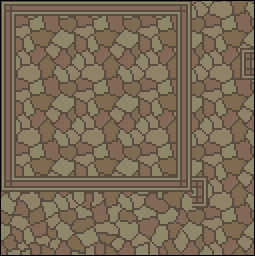
It looks fairly decent, but there are some noticeable issues, specifically that the inner corners do not have the borders on them. You may also feel that the tiles repeat a little too much with an area this large. Since we are going to create more tiles for the first problem, we might as well add a few for the second!
- Reopen the
bg_StoneFloorif it isn't still open and select Transform | Resize Canvas. - Increase the size by
133percent or to128pixels. Under Position click on the upper left arrow, then click on OK. It should now look like the following screenshot.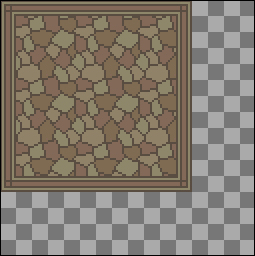
- Select View | Toggle Grid so that we can see the grid. We need to copy the original base tile, which we can find in row two and column two.
- Using the Selecting a Region tool, select the pixels from the original base tile.
- Copy and paste this tile into each empty cell on the outer edge of the image.
- We need to create four corner pieces to fix our room layout. For this we will use the four tiles along the right-hand side edge that we just placed. Use the Draw on the Image tool to draw the corner trim and repeat this for all four corner tiles.
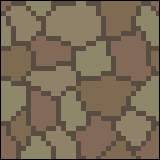
We have three remaining tiles along the bottom which we will use as alternates to the base tile. As long as we don't affect a one pixel border around the outer edge, we can change the inside as much as we want and it will still tile properly.
- Change the shape and alternate the colors of a few of the stones in the inner area of each of the three remaining tiles. The tileset, as seen in the following screenshot, is now complete!
- Finally, go back to the room and place down the corner tiles where necessary and lay down a random variation of the alternate tiles.
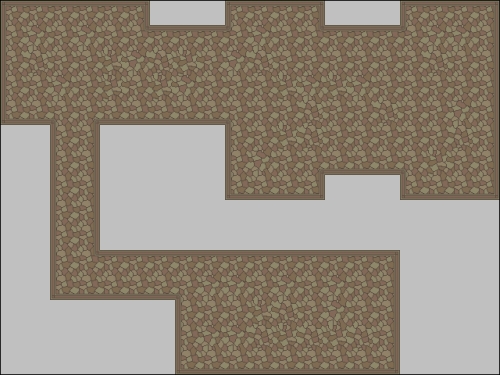
As you can see, with a small 128 x 128 texture we can easily fill a large area while providing the illusion of randomness. To add more variation, we could easily create palette swap versions, where we can adjust the hue and saturation. So we could have, for example, a blue-gray tileset. With more practice we can start adding details such as shadows to add more perspective to the world. For all your future tilesets, just remember to use non-uniform shapes, minimize the contrast, and vary the colors only slightly. More importantly, always ensure that the base tile repeats correctly before building the edges and alternates!