
An adventure game would be quite boring if everything took place in one incredibly large room. Not only is it not very efficient, but the world will also lack the feeling of exploration. Switching from one room to another is easy to do, but it does pose a problem.
The first issue is retaining the player stats, such as health, from one room to the next. One solution to this is to activate persistence on the player. Persistence means that we only need to place a single instance of an object in a room, and from that point onwards it will remain in the game world.
The second issue is where to place the player in a room with multiple entry points. If the player isn't persistent, we can place the player in the room, but it would always start in the same spot. If the player is persistent, then when they change rooms they will remain at the exact same coordinates they were at in the previous room. This means we are going to need to relocate the player to a position of our choice in each room.
This could end up being a lot of work if your game is going to have a lot of rooms. There is a simple way to solve this by creating self-aware teleporters and the use of room creation code.
Let's start by building a few rooms, starting with a title screen.
- Create a new Room and in the Settings, name it
TitleScreen. - Create a new Background,
bg_Title, and loadChapter 4/Backgrounds/Title.pngwith Remove Background left unchecked. - In the Backgrounds tab of
TitleScreen, applybg_Titleas Background 0 and check Visible at Start. - Create another Room and name it
C04_R01. The names here represent the chapter and the room, as in Chapter 4, Room 1. - Set Width and Height to
1024. This will allow us to have lots of space to explore. - We don't want to see everything in the room all at once, therefore we need to constrain the view. Click on the Views tab and check the box for Enable the Use of Views. Select View 0 and check the box for Visible when room starts. This will activate the camera system for the room.
- We will also want the view to focus on the player and move with it. Still in the Views tab, select
obj_Playerunder Object following and set Vbor: and Hbor: to200. This will make the camera follow the player and leave a buffer of 200 pixels around the edges of the view. Look at the following screenshot to ensure you have everything set up correctly: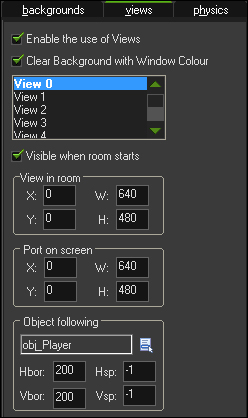
- Create two more rooms
C04_R02, andC04_R03with the same settings we just used withC04_R01. - In the Resource tree, reorder the room by dragging
Sandboxdown to the bottom andTitleScreento the very top. It should look like the following screenshot:
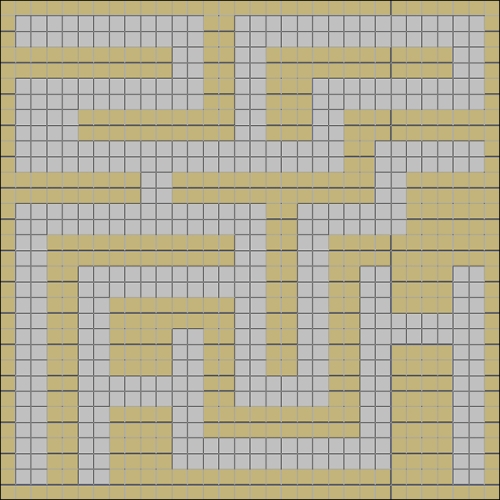
- Finally with all three rooms, create a labyrinth using the wall objects. The design isn't important at the moment; just make sure that the player would be able to get from one side to the other. An example of what it could look like can be seen in the following screenshot:
In order to change rooms we are going to create reusable Portals. Each portal actually consists of two separate objects, a Start object and an Exit object. The Start object will represent the landing pad for where the player should be placed when they enter a room. The Exit object is the teleporter that changes what room the player is in. We will utilize four unique portals which will allow us to have one door on each side of the map if we want.
- For the room teleportation system to work we are going to need to use some global variables, which need to be initialized at the start of the game. Create a new Script,
scr_Globals_StartGame, with the following code:global.portalA = 0; global.portalB = 0; global.portalC = 0; global.portalD = 0; global.lastRoom = C04_R01;
We create global variables for the four portals and give them a zero value to start. We also keep track of the last room we were in, so that we know what portal we need to go to in the new room.
- Create a new Object,
obj_Globals, add a Game Start event, and attach this script. This object does not need a sprite, as it is a data object only. - Place a single instance of
obj_GlobalsintoTitleScreen. - We need to be able to enter the game from the title screen, so let's create a quick fix by adding a Draw event and creating a new Script,
scr_Globals_Draw, and with this code add the following:draw_set_color(c_white); draw_set_halign(fa_center); draw_text(room_width/2, 360, "Press ANY key"); if (keyboard_check_pressed(vk_anykey)) { room_goto_next(); }Here we are just writing some white, centered text letting the player know how they can start the game. We use the special variable
vk_anykeyto see if the keyboard has been pressed, and if it has, we go to the next room as ordered in the Resource tree. - Let's make some portals! Create a new Sprite,
spr_Portal_A_Start, loadChapter 4/Sprites/Portal_A_Start.png, and uncheck Remove Background. Center the origin and then click on OK. - Create a new Object,
obj_Portal_A_Start, set the Sprite tospr_Portal_A_Start. This is the landing pad that we will move the player to when they enter into a room. It does not need any code, so click on OK. - Create a new Sprite,
spr_Portal_A_Exit, and loadChapter 4/Sprites/Portal_A_Exit.png, with Remove Background unchecked and the origin centered. - Create a new Object,
obj_Portal_A_Exit, and set the Sprite accordingly. This is the actual teleporter and we will change rooms upon collision with the player. - For an
obj_Playerevent, create a new Script,scr_Portal_A_Exit_Collision, and write the following code:global.lastRoom = room; room_goto(global.portalA);
Before we can teleport we need to set the last room to the room the player is currently in. To do this we use the built-in variable
room, which stores the index number of the room the game is currently displaying. After that we go to the room that this portal's global variable indicates we should go to. - Repeat steps 5 to 9 for portals B, C, and D making sure to change all the appropriate values to reflect the proper portal name.
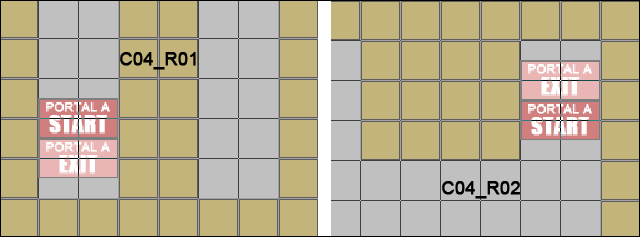
The portals are complete and we can add them into the rooms. It is not necessary to utilize all four portals in every room; you just need a minimum of one Start and one Exit. When placing these objects in the room, it is important that there be only one of the same type of portal used. The Start portal should always be placed in the playable area and ensure that the Exit can only be accessed from one direction. You should also make sure that if one room has PORTAL A at the bottom, the room it is to enter should have the PORTAL A on top, as can be seen in the following screenshot. This will help the player understand where they are in the world.
Now comes the interesting part. We need to change the global portal values in each room and we don't want to have a massive script that checks all rooms to see what is happening. Instead, we can use Creation Code in the rooms themselves to change these values upon the player entering. Let's try this out by making Portal A in C04_R01 go to C04_R02 and vice-versa.
- In the
C04_R01Settings tab, click on Creation Code to open a code editor and write the following code:global.portalA = C04_R02; global.portalB = 0; global.portalC = 0; global.portalD = 0;
We set PORTAL A to be the second room. All the other portals are not being used, so we set the variables to zero. Every room needs to have all of these variables set to some value, either a specific room or zero, otherwise it can cause errors.
- In the
C04_R02Settings tab, click on Creation Code to open a code editor and write the following code:global.portalA = C04_R01; global.portalB = 0; global.portalC = 0; global.portalD = 0;
Now we have set PORTAL A to the first room, which makes sense. If we go through that portal, we should be able to go back through it. Feel free to change these settings to apply to all the portals you want.
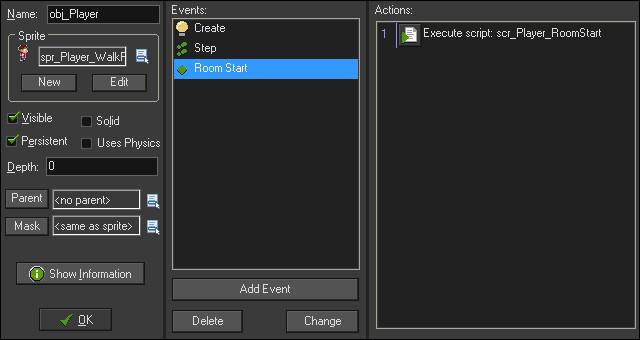
The rooms have all been built and are ready to go. All that is left for us is to have the player move from room to room. Let's start by making the player persistent, so that we only need one in the game.
- Open
obj_Playerand check Persistent. - Next, we need to relocate the player to the proper portal. We will create a new Script,
scr_Player_RoomStart, with this code on a Room Start event forobj_Player.if (global.lastRoom == global.portalA) { obj_Player.x = obj_Portal_A_Start.x; obj_Player.y = obj_Portal_A_Start.y; } else if (global.lastRoom == global.portalB) { obj_Player.x = obj_Portal_B_Start.x; obj_Player.y = obj_Portal_B_Start.y; } else if (global.lastRoom == global.portalC) { obj_Player.x = obj_Portal_C_Start.x; obj_Player.y = obj_Portal_C_Start.y; } else if (global.lastRoom == global.portalD) { obj_Player.x = obj_Portal_D_Start.x; obj_Player.y = obj_Portal_D_Start.y; }When the player enters a room we check to see which portal is associated with the room the player just exited from. We then move the player to the appropriate landing pad. To make sure the player is built correctly, its properties should look like the following screenshot:
- Place an instance of the player into
C04_R01. Do not put the player into any other room or you will end up with multiple instances of the player in the game. - Run the game. We should be able to move around the first room and go through PORTAL A, which will take us to the PORTAL A landing pad in the second room. With this system, a game could have hundreds of rooms and there only ever needs to be four portals to manage.