So far we have built a fun little toy, but it is not yet a game. We have no win or lose condition, no challenge, and no reward. We need to give the player something to do and challenge themselves with. We will start by implementing the win condition; remove all Pillars from a preset Zone. We will create some levels with a variety of Towers and Zones to clear. We will also create an Equipment Menu, so that the player can select what items they want to use and place them in the world.
The win condition for this game is to clear all Pillars and Debris from a specific Zone. The player will only be able to activate the equipment once and will have a small amount of time to clear the Zone. If they clear it, they win and move on. If it isn't cleared, they lose and they try again.
- We will start by making a parent Zone that will have all the code, but is never actually placed into the world. Create a new Object,
obj_Zone_Parent. There is no sprite to attach. - Create a new Script,
scr_Zone_Create, and add it to a Create event.image_speed = 0; isTouching = true;
We start by stopping the animation of the assigned sprite. All the Zones will consist of sprites with two frames of animation. The first frame will indicate collision and the second frame is the all clear signal. We also have a variable that we will use to identify if a Pillar or Debris is in contact with the Zone.
- The Zone will need to constantly update whether it is clear of collision or not. Create a new Script,
scr_Zone_Step, and attach it to a Step event with the following code:if (collision_rectangle(bbox_left, bbox_top, bbox_right , bbox_bottom, obj_Pillar_Parent, false, false)) { image_index = 0; isTouching = true; } else { image_index = 1; isTouching = false; }Here we are using a function,
collision_rectangle, to determine whether the Pillar parent is currently in contact with the Zone. We cannot use a collision event to check for contact, as we need to watch for the lack of collision to happen. We are using the bounding box parameters of the Sprite to determine the size of the collision area. This will allow us to have multiple Zone sprites with a variety of sizes without any additional code. If there is collision, we switch to the first frame of the animation and indicate that collision is currently happening. Otherwise, we switch to the second frame of animation and indicate that the Zone is currently free of collision. - Now that we have the parent Zone built, we can build the child Zones, which will be placed into the world. Create a new Sprite,
spr_Zone_01, and loadChapter 6/Sprites/Zone_01.gifwith Remove Background checked. Leave the origin at X:0Y:0, so that collision will work correctly. Click on OK. - Create a new Object,
obj_Zone_01, and applyspr_Zone_01as its Sprite. - We want the Zone to always be drawn behind the towers, so set Depth to
100. - Set Parent to
obj_Zone_Parentand click on OK. - We have supplied a few more sprites in
Chapter 6for variety. Repeat steps 4 to 6 with the appropriate naming conventions for the additional zones. - Open
Sandboxand place an instance ofobj_Zone_01, so that it covers some of the Glass Pillars only, as seen in the following screenshot: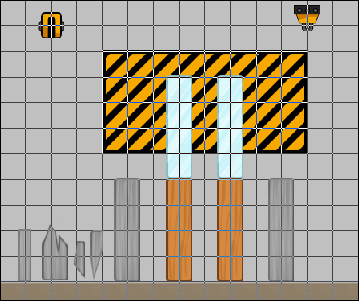
- Run the game and activate the equipment. You should see the Zone remain red for as long as there are Pillars or Debris within it. Once it is clear, it will turn light blue, indicating that it is clear of collision.
- Next, we need to create an Overlord to check for the win condition. Create a new Object and name it
obj_Overlord. - Create a new Script,
scr_Overlord_Create, and attach it to a Create event, so that we can initialize some variables.isTriggered = false; isVictory = false;
We have two variables that we will be using. We will use
isTriggeredto check if the equipment has been activated or not. TheisVictoryvariable will determine whether the win condition has occurred. - We are going to take the activation away from the individual pieces of equipment and place it into the Overlord. Reopen
obj_TNT,obj_Anchor, andobj_CraneBase, and remove the Space event under Key Press. - Create a new Script,
scr_Overlord_Step, and add it to a Step event inobj_Overlord.if (isTriggered) { if (instance_exists(obj_TNT)) { with(obj_TNT) { scr_TNT_Activate(); } } if (instance_exists(obj_Anchor)) { with(obj_Anchor) { scr_Anchor_Activate(); } } if (instance_exists(obj_CraneBase)) { with(obj_CraneBase) { scr_CraneBase_Activate(); } } alarm[0] = 8 * room_speed; isTriggered = false; }This code will only execute if the variable
isTriggeredistrue. If it is, we check to see if there are any instances of the TNT in existence. If there are instances, we use awithstatement to run the activation script for each instance. We do the same for the Anchor and Crane Base. We also add an alarm set for eight seconds, which is when we will check for the win condition. Finally, we setisTriggeredback tofalseso that this runs for the second time. - Let's activate the equipment. Create a new Script,
scr_Overlord_KeyPress, and add it to a Space event under Key Press.isTriggered = true;
- At some point we may want to have more than one Zone in a level that needs to be cleared. This poses a bit of a problem, in that we need to ensure that all Zones are clear while not knowing in what order we are going to check each Zone. What we need to do is have any Zone that has collision. Stop the checking process and set the win condition to
false. Create a new Script,scr_WinCondition, with the following code:with (obj_Zone_Parent) { if (isTouching) { return false; } } return true;By using a
withstatement to checkobj_Zone_Parent, we are able to look for all instances of that object and all of its children. We are going to usereturnstatements here to help us exit the script. When a return is executed, the script will immediately stop and any code after it will not be run. If any instance has collision we returnfalse; otherwise, if no instances have collision, we returntrue. - We can now use
scr_WinConditionin our alarm event. Create a new Script,scr_Overlord_Alarm0, and add it to an Alarm 0 event.isVictory = scr_WinCondition(); if (isVictory) { if (room_exists(room_next(room))) { room_goto_next(); } } else { room_restart(); }We start by capturing the returned
booleanfromscr_WinConditionin theisVictoryvariable. If it istrue, we check to see if there is a room after the current room we are in. The order of rooms is determined by where they are placed in the Resource tree, with the next room being the one below it in the Resource tree. If there is a room, we go to it. If the win condition isfalse, we restart the room. - Reopen
Sandboxand place a single instance ofobj_Overlordanywhere in the room. - We can't test the win condition with only one room, so let's duplicate the
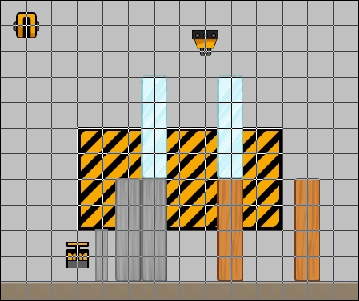
Sandboxand name itSandbox_02. - Rearrange the Pillars and equipment in the room so that you can tell that it is not the same room as Sandbox. Also move the Zone closer to the ground so that it guarantees the win condition will not happen, as shown in the following screenshot:
- Run the game and press space. In the first room we should see some destruction clear the Zone and after a few moments, the room will switch over to
Sandbox_02. When the equipment is activated this time, there will be some destruction, but there will still be Pillars and Debris in the Zone. After a few moments, this room will restart. The win condition works!
While we now have a win condition, there still isn't anything for the player to do. We are going to fix that by adding an Equipment Menu. This menu will be placed along the bottom of the gameplay screen and have selectable icons for the TNT, Wrecking Ball, and Magnetic Crane. When an icon is clicked it will create a placeable ghost version of the appropriate piece of equipment. To place the equipment, the player just needs to click somewhere in the world and the ghost will become the real item.
- To build the Equipment Menu we are going to need several sprites. Create new sprites and load the appropriate files from
Chapter 6/Sprites/for the following sprites with Remove Background unchecked. Leave the origin at X: 0 and Y:0.spr_Menu_BGspr_Menu_TNTspr_Menu_WreckingBallspr_Menu_MagneticCrane
- Create a new Object and name it
obj_Menu. We will not apply a Sprite to this object. - We only need to initialize one variable to indicate when the menu is active. Create a new Script,
scr_Menu_Create, and apply it to a Create event.isActive = false;
- In this game we are going to require rooms of varying sizes, so that we can have tall or wide towers. This means that the menu will need to adapt to fit properly. This could be very frustrating except for the fact that we are going to set screen size to 640 x 480 at all times. If we use GameMaker's Draw GUI event, it ignores the world positioning and uses the coordinates based on the window size. Create a new script,
scr_Menu_DrawGUI, and apply it to a Draw GUI event.draw_sprite(spr_Menu_BG, 0, 0, 400); menuItem_Zone = 32; menuItems_Y = 440; menuItem1_X = 40; draw_sprite(spr_Menu_TNT, 0, menuItem1_X, menuItems_Y); menuItem2_X = 104; draw_sprite(spr_Menu_WreckingBall, 0, menuItem2_X, menuItems_Y); menuItem3_X = 168; draw_sprite(spr_Menu_MagneticCrane, 0, menuItem3_X, menuItems_Y);
As we know that every room is going to be displayed at a resolution of 640 x 480, we start by drawing the background sprite at the bottom of the screen. We are going to use a variable,
menuItem_Zone, to help with the mouse coordinates over the sprites. We will need to know exactly where the icon is placed when we code in the future, so we make variables for each menu item's coordinates and then draw the Sprite on the screen. - Reopen
Sandboxand change the Settings of the room to Width:800, Height:600. - Under the Views tab, check the boxes for Enable the use of Views and Visible When Room Starts.
- Change the View In Room to W:
800H:600. Do not change the values for Port on Screen. By doing this, we will be able to see the entire room and it will be displayed at the standard 640 x 480 resolution. - Now place a single instance of
obj_Menuanywhere in the room. - Run the game. You should see the menu with the three icons at the bottom of the screen as shown in the following screenshot:

- To make the menu functional we need to first create all the ghost objects. We do not need to bring in any new sprites, as we will use the existing sprites for each piece of equipment. Let's start by creating a new Object,
obj_Ghost_TNT, and applyingspr_TNTas the Sprite. - Create a new Script,
scr_Ghost_TNT_Create, and apply it to a Create event with the following code:image_alpha = 0.5; myTool = obj_TNT;
In order to differentiate the Ghost TNT from the real TNT, we start by setting the transparency to 50 percent. We are going to use some common scripts for all ghosts, so we will need a variable to indicate what this Ghost represents.
- Next, we need to be able to move this object with the mouse around the room for placement. To do this we are going to write a Script that can be used by all ghosts. Create a new Script,
scr_Ghost_Stepand apply it to a Step event.x = mouse_x; y = mouse_y;
- Create another new Script,
scr_Ghost_Released, and add it to a Left Released event under Mouse.winHeight = window_get_height(); winMouse = window_mouse_get_y(); if (!place_meeting(x, y, obj_Pillar_Parent) && winMouse < winHeight - 64) { instance_create(x, y, myTool); obj_Menu.isActive = false; instance_destroy(); }We don't want to be able to place the item down on top of the menu, or on top of other instances we are trying to destroy. To make this happen we first need to grab the height of the display area and the position of the mouse within the display. It is important to note that we cannot use the standard
mouseYvariable as it relates to the position within the world because we need to know its position on screen. We check to see if there is a lack of collision at the current location in the room with any Pillar, and that the mouse on screen is 64 pixels above the bottom, which ensures that it is above the menu. If this is all true, we create an instance of whatever item is to be placed, tell the Menu that it is no longer active and remove the Ghost from the world. We are now done with the Ghost TNT. - Up next is the Ghost Wrecking Ball. Create a new Object,
obj_Ghost_WreckingBalland assignspr_Anchoras its Sprite. - We have some common scripts, so let's apply them quickly. Add a Step event, apply
scr_Ghost_Step, and add a Left Released event under Mouse withscr_Ghost_Releasedattached. - Create a new Script,
scr_Ghost_WreckingBall_Create, and add it to a Create event. All we need here is to initialize what item it will create when placed.myTool = obj_Anchor;
- We can't build this exactly the same as the TNT, as the Wrecking Ball is comprised of several parts. For this Ghost we will need a Draw event and a new Script,
scr_Ghost_WreckingBall_Drawwith the following code:draw_set_alpha(0.5); draw_sprite(spr_Anchor, 0, x, y) for (i = 1; i < 10; i++) { draw_sprite(spr_ChainLink, 0, x + i * 16, y) } draw_sprite(spr_WreckingBall, 0, x + (9 * 16 + 24), y); draw_set_alpha(1);We start by setting the instance to half transparent so that it looks like a Ghost. We then draw the Anchor, run a
forloop to draw the Chain, and then the Wrecking Ball is drawn at the end of the Chain. Finally, we need to reset the transparency back to full at the end of this code. It is critical that we do this, as Draw events affect everything that is drawn on screen. If we did not reset it, every object in the world would have half transparency. - Now for the Ghost Magnetic Crane. Create a new Object,
obj_Ghost_MagneticCrane, and applyspr_CraneBaseas the Sprite. - The same as for the other Ghosts, add a Step event and a Left Released event under Mouse and apply the appropriate scripts.
- Create a new Script,
scr_Ghost_MagneticCrane_Create, and initialize the necessary variable.myTool = obj_CraneBase;
- Now draw the pieces. Create another Script,
scr_Ghost_MagneticCrane_Draw, and add it as a Draw event.draw_set_alpha(0.5); draw_sprite(spr_CraneBase, 0, x, y) draw_set_color(c_dkgray); draw_line_width(x, y, x, y + 144, 8); draw_sprite(spr_Magnet, 0, x, y + 160); draw_set_alpha(1);
In a similar manner as the Ghost Wrecking Ball, we start by setting the transparency to 50 percent. We then draw the crane base, draw a thick gray line and the magnet at the same position they would be when placed. We then set the transparency back to full.
- The Ghosts are now all complete; we just need to spawn them. Reopen
scr_Menu_DrawGUIand add the following code at the end:if (!isActive) { win_X = window_mouse_get_x(); win_Y = window_mouse_get_y(); if ((win_Y > menuItems_Y - menuItem_Zone && win_Y < menuItems_Y + menuItem_Zone)) { if ((win_X > menuItem1_X - menuItem_Zone && win_X < menuItem1_X + menuItem_Zone)) { draw_sprite(spr_Menu_TNT, 1, menuItem1_X, menuItems_Y); if (mouse_check_button_pressed(mb_left)) { instance_create(menuItem1_X, menuItems_Y, obj_Ghost_TNT); isActive = true; } } if ((win_X > menuItem2_X - menuItem_Zone && win_X < menuItem2_X + menuItem_Zone)) { draw_sprite(spr_Menu_WreckingBall, 1, menuItem2_X, menuItems_Y); if (mouse_check_button_pressed(mb_left)) { instance_create(menuItem1_X, menuItems_Y, obj_Ghost_WreckingBall); isActive = true; } } if ((win_X > menuItem3_X - menuItem_Zone && win_X < menuItem3_X + menuItem_Zone)) { draw_sprite(spr_Menu_MagneticCrane, 1, menuItem3_X, menuItems_Y); if (mouse_check_button_pressed(mb_left)) { instance_create(menuItem1_X, menuItems_Y, obj_Ghost_MagneticCrane); isActive = true; } } } }We start by checking if the menu is active or not. If a menu item is selected and hasn't been placed, the menu will be considered active. If we are able to select a menu item, we grab the mouse location on screen. We check the mouse location on screen, first with the Y coordinate and the Zone offsets to see if the mouse is on top of the Menu, then with the X coordinate and the Zone of each item. If the mouse is over the top of one of the icons, we redraw the sprite on the second frame of animation to indicate the hover state. We then check to see if the left mouse button has been pressed, and if it has, we spawn the appropriate Ghost item and the menu is now active. Now we can spawn TNT, Wrecking Balls, and Magnetic Cranes.
- Run the game. We already have the menu on screen, but now when you hover over the icons, they should be highlighted. When you click on an icon, it creates the appropriate Ghost item, which will move with the mouse. When you click in the playable area, an instance of the item will be created and can be used.
We now have a working game and all that is left is to create some levels to play. We will build a few levels with a variety of different towers and room sizes to make sure all our code is working properly.
- Create a new Room and in the settings tab, name it
Level_01.Makesure this is moved to the top of the Rooms section of the Resource tree. - Open the physics tab, check the box for Room is Physics World and set the Gravity to X:
0Y:20. - In the objects tab, select
obj_Groundand place instances 64 pixels from the bottom and across the width of the room. The menu will take up the bottom 64 pixels, so we don't need to put any Ground down there. - Add single instances of
obj_Overlordandobj_Menuin the area below the Ground instances. While technically they can go anywhere in the room, this will just keep things a bit more organized.As this is the first level, let's make it easy for the player and only use Glass Pillars. Up to this point in the book, we have only been placing objects as they were created. When placing the Pillars, we can easily rotate them and place them in the world. To rotate an instance in the Room Properties editor, first place the instance in the room normally, and while it is still selected, change the Rotation value in the objects tab. There are options for scaling an instance, but we cannot use these in a physics simulation, as it does not affect the Fixture size.
- Using only
obj_Pillar_Glassandobj_Pillar_Glass_Small, construct a simple two story tower as seen in the following screenshot: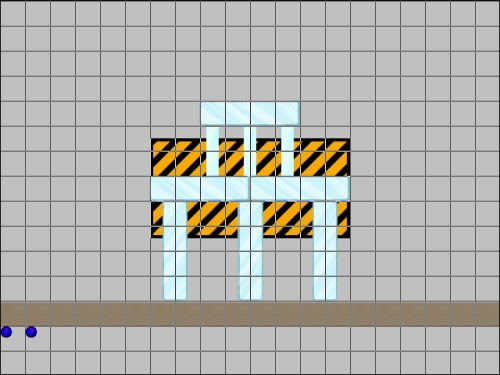
- Finally, place a single instance of
obj_Zone_01behind the tower and roughly in the center vertically. This room is now complete. - Let's build the final room meant for much later in the game, but this time much larger and with multiple zones. Create a new Room and in the settings name it
Level_12, and change the Width to1280and Height to960. - In the Resource tree, move this room so that it is immediately after
Level_01. - This room is now twice as big as
Level_01, but we want to display it on screen at the same size. In the views tab, check the boxes for Enable the use of Views and Visible When Room Starts. - Change the View In Room to W:
1280H:960. Do not change the values for Port on Screen. Again, by doing this we will be able to see the entire room at the standard 640 x 480 resolution. - In the physics tab, check the box for Room is Physics World and set the Gravity to X:
0Y:20. - We will start by laying the ground down with
obj_Ground. As the room is twice as large, our numbers need to double as well. The menu will display with a height of 64 pixels of screen resolution in this room, which means the Ground should be 128 pixels from the bottom. - Place single instances of
obj_Overlordandobj_Menuin the area below the Ground instances. - As this level is meant to be a later level in the game, we can use all small and regular size pillars of all types. Build a couple of towers with varying heights and building materials.
- Add an instance of
obj_Zone_01behind each of the towers. An example of what the level could look like can be seen in the following screenshot: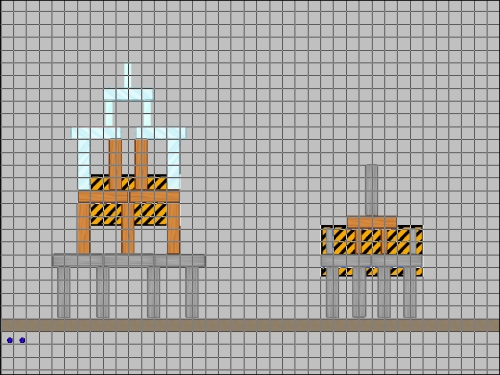
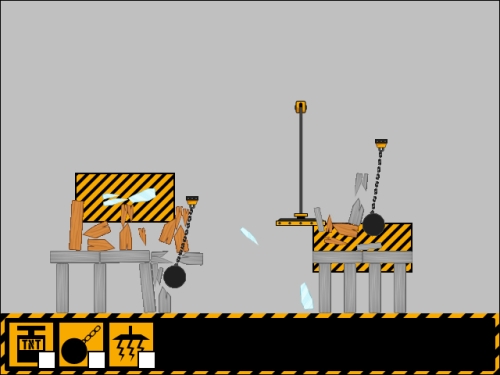
- Run the game. The first level should only need a few, well placed pieces of TNT to successfully destroy it. The next level should be much more difficult to complete, and requires all three types of equipment. The challenge now is to see how few pieces of equipment are needed to destroy everything. Have fun smashing things up as shown in the following screenshot: