
We have everything we need to build towers, but this game is all about demolition. The player would become bored if all they had was TNT to destroy the towers. We are going to utilize some more physics functions and create some new equipment: a Wrecking Ball and a Magnetic Crane.
Let's start with the Wrecking Ball as we have already built a large portion of it. We will utilize the Chain and Anchor and add a Ball to it.
- Create a new Sprite,
spr_WreckingBall, and loadChapter 6/Sprites/WreckingBall.pngwith Remove Background checked. Center the origin and click on OK. - Create a new Object,
obj_WreckingBall, and apply thespr_WreckingBallas its Sprite. - We will want the Wrecking Ball to always be drawn in front of the chain that holds it. Set Depth to
-100. - Check the box for Uses Physics. We do not need to change Collision Shape, as the Wrecking Ball is a circle.
- We want this Wrecking Ball to be very powerful, so set Density to
50. - As it is such a heavy object and hanging from a chain, it should not be able to spin very much. To slow the rotation, set the AngularDamping to
5. - All other physics values for this object should be set to
0. - We are done building the Wrecking Ball, so now we need to add it to the Anchor and Chain. Reopen
scr_Anchor_Createand add the following code at the end of the script:ball = instance_create(chain[9].x +24, y, obj_WreckingBall); physics_joint_revolute_create(chain[9], ball , chain[9].x, chain[9].y, -30, 30, true, 0, 0, false, false);
Here we are creating a Wrecking Ball at the end of the Chain, with a 24 pixel offset so it is positioned correctly. We then add a Revolute Joint between the last link in the Chain and the Wrecking Ball with a rotational limit of 30 degrees in either direction.
- Next, we need to add the collision. We are not going to place the collision on the Wrecking Ball, as the existing scripts are going to look for variables that the Wrecking Ball will not have. Instead, we will start by reopening
obj_Pillar_Parentand adding anobj_WreckingBallevent, and attachingscr_Pillar_Destroy. As all Pillars and Debris are parented to the object, they will all respond to this event. - While this last step will work fine, it also means the large Pillars will be destroyed on contact as well. We want the large Pillars to always break apart first. We can still do this by reopening the three Pillars,
obj_Pillar_Glass,obj_Pillar_Wood, andobj_Pillar_Steel, and add anobj_WreckingBallevent withscr_Pillar_BreakApartattached. If a parent object and one of its children both have the same type of event, be it collision, step, or whatever, the child's event will be executed and the parent's event will be ignored. - Let's test this out. Reopen
Sandboxand place an instance ofobj_Anchorin the room, just off to the right of the existing Pillars. We can also remove the TNT as we do not need it for this test. The setup should look like the following screenshot: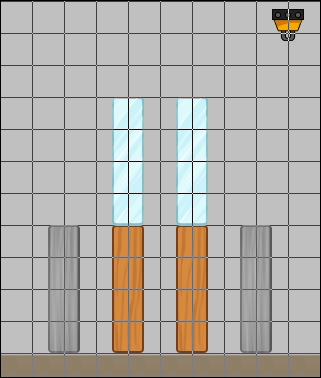
- Run the game. We should see the Wrecking Ball swing down attached to the Chain and Anchor. When the Wrecking Ball collides with the Steel Pillar, the Pillar breaks apart, as do many of the other Pillars. Everything works correctly, but there is a bit of an issue. The Wrecking Ball falls immediately, when it should wait to be triggered. Let's fix all that.
- In order for us to stop the Wrecking Ball from moving immediately, we need to deactivate from the World Physics. This is simply done by setting the
phy_activevariable to false for each instance we want to stop. Reopenscr_Anchor_Createand apply this change for the Wrecking Ball and every Chain. The entire script can be seen in the following code:for (i = 1; i < 10; i++) { chain[i] = instance_create(x+(i * 16), y, obj_ChainLink); chain[i].phy_active = false; } physics_joint_revolute_create(self, chain[1], self.x, self.y, 0, 0, false, 0, 0, false, false); for (i = 1; i < 9; i++) { physics_joint_revolute_create(chain[i], chain[i+1], chain[i].x, chain[i].y, -20, 20, true, 0, 0, false, false); } ball = instance_create(chain[9].x +24, y, obj_WreckingBall); ball.phy_active = false; physics_joint_revolute_create(chain[9], ball , chain[9].x, chain[9].y, -30, 30, true, 0, 0, false, false); - The Wrecking Ball and Chain will no longer move at the start, but we still need to be able to trigger it at some point. Create a new Script,
scr_Anchor_Activate, and for testing purposes, attach it to a Space event under Key Press.for (i = 1; i < 10; i++) { chain[i].phy_active = true; } ball.phy_active = true;When this script is run, a simple
forloop activates every Chain, and then the Wrecking Ball. - Run the game. The Wrecking Ball should be extended out to the right and static. When we hit the space key, the Wrecking Ball and Chain should become active and swing down, colliding into the tower. The collision itself is much higher on the tower, as the Chain is now fairly rigid with only a little elasticity. It looks like we are done!
Our third piece of demolition equipment will be a Magnetic Crane. This Crane will drop down and pick up any small Pillar and Debris made from Steel. It will then raise itself back up with whatever it has collected.
- We will start by building the Magnet itself. Create a new Sprite,
spr_Magnet, and loadChapter 6/Sprites/Magnet.pngwith Remove Background checked. Center the origin, and click on OK. - Create a new Object,
obj_Magnet, and assignspr_Magnetas the Sprite. - Check the box for Uses Physics and set Collision Shape to Box.
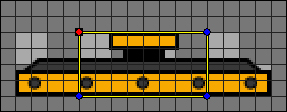
- We will want to make the collision area smaller, so that when it picks up objects, the effect appears more believable. Click on Modify Collision Shape and pull the sides in so that it looks like the following screenshot:
- The Magnet needs to be quite heavy so that the other objects can't push it around. Set Density to
50. - Set all the other properties to
0, as we don't want them affecting the magnet's movement. - As our intention is for the magnet to only pick up the small objects made of Steel, we should change how the Steel Debris is parented. Currently, it is parented to
obj_Pillar_Parentfor collision purposes. We still need to be able to have that ability, but we want magnetic attraction to be unique to a few objects. To do this, we can parent the Debris to any object that hasobj_Pillar_Parentas its parent. Let's set the Parent for all Steel Debris toobj_Pillar_Steel_Small. - We also need to add a variable to everything made of steel so that we know if it has been collected or not. Reopen
scr_Pillar_Steel_Createand add the following line of code at the end of the script:isCollected = false;
- Now we can make the script for the magnetic attraction. Create a new Script,
scr_Magnet_Step, and attach it to a Step event inobj_Magnet.if (phy_active) { if (instance_exists(obj_Pillar_Steel_Small)) { with (obj_Pillar_Steel_Small) { if (!isCollected) { myMagnet = instance_nearest(x,y,obj_Magnet) myDist = point_distance(phy_position_x, phy_position_y, myMagnet.x, myMagnet.y); myDir = point_direction(phy_position_x, phy_position_y, myMagnet.x, myMagnet.y); if (myDist < 200 && myDir > 60 && myDir < 120) { physics_apply_impulse(x, y, 0, -2000) } } } } }We start by seeing whether the magnet is active and can begin collecting scrap metal. Next, we check if there are any small Steel Pillars, or anything parented to it, in the world. If there are instances in existence, we apply code directly to them through a
withstatement. If the instance has not been collected, we find the nearest Magnet, see how far away it is, and in what direction. When checking for the X and Y coordinates of an object in a physics game, we need to use thephy_position_xandphy_position_yvalues to accurately know where they are in the world space. Next, we see if the instance is within the magnetic range, and whether it is underneath the Magnet. If it is, we apply a strong impulse upwards, which will make it move towards the Magnet. - Once a small Steel Pillar or Debris comes in contact with the Magnet, we want to consider it collected and to always move with it. To do this, we will dynamically create a joint to any instance that collides with the Magnet. Create a new Script,
scr_Magnet_Collsion, and attach it to anobj_Pillar_Steel_Smallevent inobj_Magnet.physics_joint_prismatic_create(id, other, x, y, 0, 1, 0, 0, true, 0, 0, false, false); other.isCollected = true;
Here we are making a Prismatic Joint with the magnet and the instance that collides with it. The first two parameters are the two instances that are to be joined, followed by where in the world they are connected. The fifth and sixth parameters are the direction it can move in, and in this case it is vertical only. The next three are the limits of the movement. We don't want it to move, so we set the min/max values to zero. The limits do need to be enabled, otherwise they won't lift with the Magnet. The following three are for whether there is a motor to move this joint. The final parameter is for collision with the objects which we want to avoid. Once the joint has been created, we then set the collected variable to
false. - Next, we need to make a base for the Crane, which will function similar to the Anchor. Create a new Sprite,
spr_CraneBase, and loadChapter 6/Sprites/CraneBase.pngwith Remove Background checked. Center the origin and click on OK. - Create a new Object,
obj_CraneBase, and applyspr_CraneBaseas the Sprite. - Check the box for Uses Physics and set Collision Shape to Box.
- This object is meant to be static in the physics world, so we need to set the Density to
0. All other properties can be left at their default values. - We will want the crane base to spawn the magnet and set the joint up. Create a new Script,
scr_CraneBase_Create, and attach it to a Create event.magnet = instance_create(x, y+160, obj_Magnet); magnet.phy_active = false; crane = physics_joint_prismatic_create(id, magnet, x, y, 0, 1, -128, 128, true, 100000, 20000, true, false);
We are creating the Magnet well below the crane base and have deactivated it from the physics world. We then apply a Prismatic Joint between the two instances. This time we are allowing for 128 pixels of movement in a vertical direction. We are also running a motor, so that the Magnet can move up and down on its own. The maximum force the motor can apply is
100000and we have the motor dropping the Magnet at a motor speed of20000. As you can see, the values we are using are extremely high and the reason for this is to make sure that the heavy magnet can lift plenty of Steel Debris. - As with the Wrecking Ball, we need to activate the crane base. Create a new Script,
scr_CraneBase_Activate, and for testing purposes, attach it to the Space event under Key Press.magnet.phy_active = true; alarm[0] = 5 * room_speed;
We want the magnet to drop down first, so we make it active in the physics world. We are using an alarm set for five seconds, which will raise the Magnet back up.
- Create a new Script,
scr_CraneBase_Alarm0and attach it to an Alarm 0 event.physics_joint_set_value(crane, phy_joint_motor_speed, -20000);
We are setting the value for the motor speed to go up at a value of
-20000. Again, we are using a very large number to ensure it goes back up with the additional weight of the Pillar Debris. - The last thing we need to do for the Crane is to add a cable between the crane base and the magnet. For this we will simply draw a line between the two. Create a new Script,
scr_CraneBase_Draw, and apply it to a Draw event.draw_self(); draw_set_color(c_dkgray); draw_line_width(x, y, magnet.x, magnet.y-16, 8);
Whenever a Draw event is used, it overrides the drawing of the default Sprite for the object. Therefore, we use
draw_selfto correct that override. Next we set a color to use, here we are using a default dark gray color, and then we draw an 8 pixel wide line between the crane base and the top of the magnet. - All we need to do now is to add an instance of crane base to
Sandbox. Place the instance off to the left-hand side of the existing Pillars. Also add a few instances of Debris and the small Steel Pillar as can be seen in the following screenshot: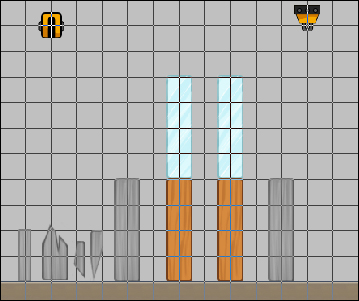
- Run the game. The Magnet should be sitting in the air and we should notice the Debris shaking a bit as if there is some magnetic attraction occurring. When we hit space, the Magnet should drop down and collect a few pieces of Debris. After a few seconds, the Magnet will raise back up, taking the collected Debris with it. Also notice that none of the other Debris or Pillars are affected by the Magnet.