In this chapter, we will create a fun little action adventure game that will build upon our foundational knowledge. We will start with an animated player character that can navigate the world and has a short range melee attack. The game world will consist of multiple rooms, and the player will be able to move from one room to another while keeping all their stats. We will place all the code for the player controls and deal with wall collision in a single script to create a more efficient project.
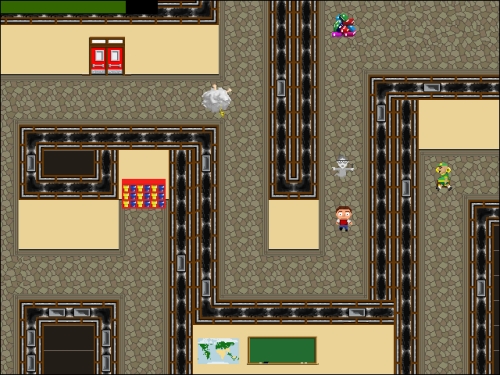
As can be seen in the next screenshot, the theme of this game is the horrors of high school, and there will be three enemies in the world with basic artificial intelligence: a Ghost Librarian, a Brawl, and a Coach. The Ghost Librarian will appear if the player approaches its resting place and will chase the player until it gets too far away, and then return to where it came from. The Brawl will wander through the room on a path, and if it spots the player, it will increase in size and velocity. The Coach is the protector of trophies and will navigate the world on its own. If it sees the player it will pursue while avoiding walls and other Coaches, and if it is close enough it will melee attack the player.
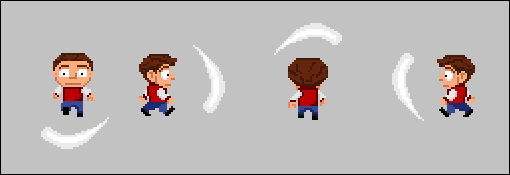
So far, the player objects we have created have been very basic. In Chapter 1, Getting to Know the Studio with Your First Game, the player had no animation. In Chapter 3, Shoot 'em Up: Creating a Side-scrolling Shooter, the ship had animation, but always faced to the right. In this chapter, we are going to have a character that can move in four directions and have an animated sprite for each direction. We will also implement a melee attack that can be used in the direction the character is facing.
There are four separate sprites necessary for the player character's walk cycle. We will walk through the first one and then you can create the other three.
- Let's start by creating a new project called
Chapter_04. - Create a Sprite and name it
spr_Player_WalkRight. - Load
Chapter 4/Sprites/ Player_WalkRight.gifwith Remove Background checked. - Set Origin to Center.
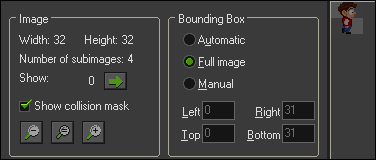
- Click on Modify Mask to open the Mask Properties editor, and select the radio button of Full image under Bounding Box. The will set the collision box to be the entire sprite as shown in the following screenshot:
- Click on OK. Repeat this process to load
spr_Player_WalkLeft,spr_Player_WalkUp, andspr_Player_WalkDown. - Create an Object,
obj_Player, and assignspr_Player_WalkRightas the Sprite. It actually doesn't matter which of the player sprites we set here, as we will be using code to change what sprite is being displayed. - We need to set up some initial variables, so create a new Script,
scr_Player_Create, and write the following code:mySpeed = 4; myDirection = 0; isAttacking = false; isWalking = false; health = 100; image_speed = 0.5;
The first two variables are placeholders for the speed and direction of the player. This will be useful as we can affect these values without affecting the object's local
mySpeedandmyDirectionvariables for things, such as a knockback effect in which the object would be facing one direction while moving in the other. The variableisAttackingwill be used to indicate when we have initiated combat, andisWalkingwill indicate when the player is moving. Next, we have the global variablehealth, which is set to 100 percent. Finally, we set the animation speed at 50 percent, so that the walk cycle plays properly. - Now we can go onto the player movement. Instead of having multiple scripts for each key, we are going to simplify the code by placing all the controls into a single script. Create a new Script,
scr_Player_Step, and we will start with the following code:isWalking = false; if (keyboard_check(vk_right) && place_free(x + mySpeed, y)) { x += mySpeed; myDirection = 0; sprite_index = spr_Player_WalkRight; isWalking = true; }We start by setting
isWalkingtofalse, so that it becomes the default state of what the player is doing. After that we are checking whether the keyboard has the right arrow key (vk_right), currently pressed down, and we check whether there is a solid object to the right of the current position. Theplace_freefunction will return whether the specified point is collision free. If the player is able to move and the key is pressed, we then move to the right and set the direction to zero to indicate right. We change the sprite to the right facing walk cycle, and then we changeisWalkingtotrue, which will overwrite the first line of code where we set it tofalse. - Repeat this code for each of the remaining three directions and adjust accordingly. Each one should look at what key is being held, and see if there is any collision ahead from that position.
- We have one more thing to do before the movement controls are complete. If the player is not moving, we want the animation to stop and start playing again once it starts moving. At the end of the script, add the following code:
if (isWalking == true) { image_speed = 0.5; } else { image_speed = 0; }We created the variable
isWalkingto switch between a walking and stopped state. If the player is moving, the sprite will animate. If the player isn't moving, we stop the animation as well.The code should look like the following when it is complete:
isWalking = false; if (keyboard_check(vk_right) && place_free(x + mySpeed, y)) { x += mySpeed; myDirection = 0; sprite_index = spr_Player_WalkRight; isWalking = true; } if (keyboard_check(vk_up) && place_free(x, y - mySpeed)) { y -= mySpeed; myDirection = 90; sprite_index = spr_Player_WalkUp; isWalking = true; } if (keyboard_check(vk_left) && place_free(x - mySpeed, y)) { x -= mySpeed; myDirection = 180; sprite_index = spr_Player_WalkLeft; isWalking = true; } if (keyboard_check(vk_down) && place_free(x, y + mySpeed)) { y += mySpeed; myDirection = 270; sprite_index = spr_Player_WalkDown; isWalking = true; } if (isWalking == true) { image_speed = 0.5; } else { image_speed = 0; } - Apply these scripts to the appropriate events, a Create event for
scr_Player_Create, and a Step event forscr_Player_Step.The player is ready to move and animate properly, but we won't be able to fully test out the code without adding in some solid obstacles. Let's make a wall.
- Create a new Sprite,
spr_Wall, loadChapter 4/Sprites/Wall.png, and uncheck Remove Background. We are using a PNG file, as this wall is slightly transparent which will be useful later when we decorate the room. - Create a new Object,
obj_Wall, and set the sprite tospr_Wall. - Check the box for Solid. The wall is now identified as being a collidable object.
- Create a new Room and name it
Sandbox. We will use this room for testing out features. - Place a single instance of
obj_Playersomewhere in the center of the room. - Place instances of
obj_Wallaround the perimeter of the room, and add a few extra sections as can be seen in the following screenshot: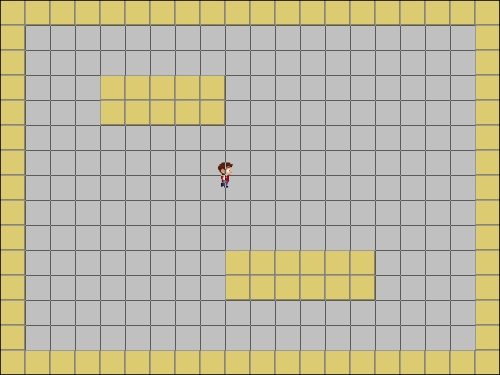
- Run the game. The player at this point should be able to move around the room freely in the open areas, and stop when they collide with a wall.
Now that we have the player movement functioning we can move onto the attack. The attack we are creating needs to only affect objects in front of the player character. To achieve this we will create a melee attack object that will spawn on command and remove itself from the game on its own.
- Create a Sprite,
spr_Player_Attack, and loadChapter 4/Sprites/Player_Attack.gifwith Remove Background checked. This is an animated Sprite that will represent a swinging melee attack. - We want the collision area to affect the entire height of the sprite, but not the entire width. Click on Modify Mask and in the Mask Properties editor, select the radio button for Manual under Bounding Box.
- Adjust the Bounding Box values for Left:
0, Right:24, Top:0and Bottom:4. The end result should look like the following screenshot. Click on OK.
- We want this object to always spawn in front of the player. One of the easiest ways to ensure this is to have this object rotate along with the player. To achieve this, set Origin to X:
-16Y:24. Setting the X coordinate off to the left means that this object will have a 16 pixel offset when spawned. We can then rotate the attack to match the player's direction. - Create an Object,
obj_Player_Attack, and assignspr_Player Attackas its Sprite. - Set Depth to
-100. Depth determines whether an instance of an object is drawn on-screen behind or above another object. Setting it to a negative value means that it will draw on top of any object with a higher depth value. Setting the value to-100allows us to have other objects with depths between the default0and-99without needing to worry about readjusting things later. - Create a new Script,
scr_Player_Attack_Createwith the following code:image_angle = obj_Player.myDirection; image_speed = 0.3; alarm[0] = 6; obj_Player.isAttacking = true;
Here is where we rotate the image to face the same direction as the player, which with the offset origin we set means it will be in front of the player. We also slow the animation speed down and set an alarm for six frames. This alarm will remove the attack object when it goes off. Finally we tell the player that it is attacking.
- Add a Create event in
obj_Player_Attackand attach this script. - Let's move onto the alarm script,
scr_Player_Attack_Alarm. It will not only need to remove the attack, but it also needs to let the player know that it is gone and that they can attack once again. We only need two lines of code to do all this:obj_Player.isAttacking = false; instance_destroy();
We can talk directly to the player's
isAttackingvariable and set it back tofalse. Then we destroy the instance of the melee attack. Attach this script to an Alarm 0 event. - All we need to do now is to get the player to spawn an instance of the attack. Reopen
scr_Player_Stepand at the bottom, add the following code:if (keyboard_check_pressed(ord('Z')) && isAttacking == false) { instance_create(x, y, obj_Player_Attack); }The
keyboard_check_pressedfunction only activates on the actual pressing down action of a key, as opposed to being in the down position, and in this case, we are checking for the Z key. There are no special commands for the various letters on the keyboard, so we need to use theordfunction that returns the corresponding ASCII code for the character it has been passed. We also check to see if the player is currently not attacking already. If that is all true, we spawn the attack, and that attack will change theisAttackingvariable to true, so that this only happens once. - Run the game. You should be able to tap the Z key and see the distinctive swinging motion in front of the player no matter which way the character is facing as shown in the following screenshot. The player is now ready for battle!