
Animated sprites are a sequence of static images which, when played, appear to have a movement. It lets the player know that they are running, when they are attacking with a sword, and that a button is clickable. Good games have animation on everything interactive and often on many of the background elements, so much so that you may not even notice it. It is the tiny details such as animation that really breathe life into a game.
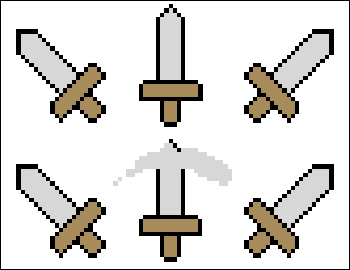
Creating animation takes time and a sharp eye, but basic animation, even of characters, can be done by everyone. There are a few important rules to follow to make animating easier. First, it is about the appearance of an action, rather than the accuracy of an action. As can be seen in the following screenshot, the first sword set swinging animation is technically accurate; the sword would be in each of these positions. However, the second set will appear more natural as it includes a blur effect that one would expect to see in a sword swing.
The second rule is maximizing the sprite space. Most games use box-based collision rather than pixel perfect collision. Therefore you want to use as much of the sprite as available for the animation you need. Often developers waste a lot of space because they are thinking in terms of the real world instead of a game world. For example, one common issue can be seen in a jump animation. In the following screenshot, the first jump animation has the character starting from the ground, jumping up into the air, falling down, and landing. The second jump animation is the same, but all the empty space has been removed. Not only is this more efficient, but it can also help to prevent collision bugs since we always know where the collision box is.

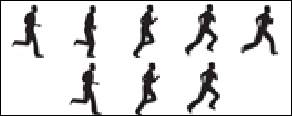
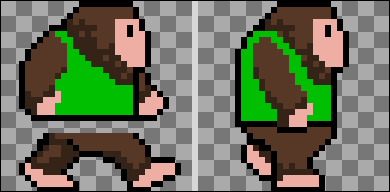
The last major rule and probably the most important is repeatability. Most of the game animation is at some point going to loop, and having a noticeable repeating sequence is going to be very jarring to the player. One common cause of these repeatability issues is having too much animation. The more frames of animation you have, the more likely that something will pop out. The key here is simplicity and removing the frames you do not need. In the following screenshot you can see two running animations, the first with five frames and the second with only three. The top one will appear a bit smoother but also a bit less repeatable due to the slight differences in the stride. The second one in the end will look better as it has fewer frames and less difference in the stride as a result.
With those three rules in mind, let's build a simple character run cycle:
- Create a new sprite and name it
spr_WalkCycle. - Click on Edit Sprite; this will open the Sprite Editor. This editor is for dealing with the all the individual images that make up an animated sprite.
- In the Sprite Editor, select File | New which will open a dialog box for the new image dimensions. Keep it at
32x32and click on OK.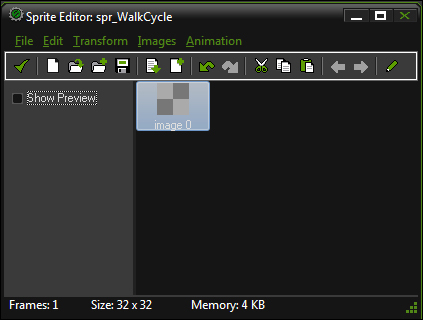
- You should now see, as in the previous screenshot, an empty image titled image 0 in the Sprite Editor. Double click on the image to open the Image Editor.
Now we need a character design. When designing your character you need to think about what the character is going to do, the world they exist in, and the collision area. In our case, the character will only walk, the world will be an outdoor adventure game, and will have a large square collision box.
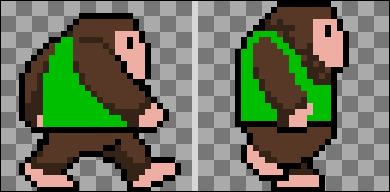
- The first frame of animation that we will create should be the character at their full extension of their walk cycle, the legs far apart, and touching the bottom of the sprite. The character will be at the lowest point of the stride on this frame, so make sure that the head is at least one pixel, preferably two, away from the top of the sprite.
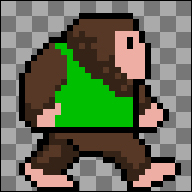
The character designed here in the preceding screenshot is an ape type creature wearing a jacket. The reason for the jacket is to make the arms more readable when they swing. We can see that this character is quite thick which makes the large collision area more believable. Finally, the back leg is a little darker as if there were a shadow. Once again, this is to help with readability.
Once we are happy with the first frame, we need to move onto the next keyframe. A keyframe is the point in an animation where the biggest amount of change happens. In this case it will be when the character is at their highest point and the arms and legs are crossing each other.
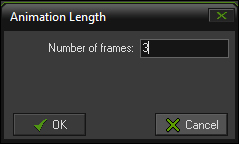
- In the Sprite Editor, select Animation | Set Length and set the Number of frames to
3, as seen in the previous screenshot. This will duplicate the first frame twice, giving us two more frames of animation. - Open image 1 and use the Selecting a Region tool to raise the upper half of the body to the top of the sprite as seen in the following screenshot. This frame will represent the highest point of the stride, where the character is on one foot with the other foot crossing over. We can also select and shift the hands and feet to quickly get them into position.
- Using the pencil and eraser tools, paint the arms and legs into the appropriate position with the leg on the ground in the front of the leg being lifted and only one arm showing. Once you are happy with what it looks like, close the image.
- Open image 2. This is the opposite motion of the first frame which makes things quite easy to change. The hands and feet are already in position, so we just need to repaint the arms and legs accordingly, as seen in the following screenshot on the left-hand side. Once this is done, close the image.
- Now we need to duplicate image 1 and place it at the end so that the walk cycle can loop. Select image 1 and copy and paste the frame. This will duplicate the frame and is labeled image 2.
- Select image 2 and click on the right facing arrow in the Sprite Editor toolbar. This will move the frame to the end of the animation. Select and open image 3 so we can repaint the legs so that the back leg is on the ground and the front leg is in the air, crossing over. Once this is done, close the editor.
- To see how the animation plays, check the Show Preview checkbox in the Sprite Editor and set the Speed to
5. See the following screenshot.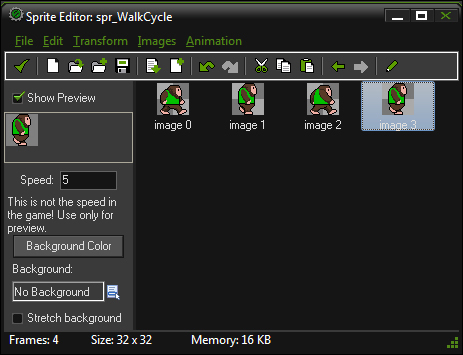
There we have it! A decent walk cycle that loops properly, if a little choppy. If we want to smoothen this animation a bit, just add a frame of animation in between the keyframes and follow the same procedure we just went through. It should end up looking something similar to the following screenshot:
