
We are going to start by building our player object. We have briefly described the design already, but we have not broken the design down into something that we can start creating. First, we should bullet point each feature and what it entails to ensure we have all the Variables and Events we will need.
- Arrow keys will move the player around the play area
- Must remain in play area
- Spacebar will fire weapon
- A single bullet fired with each button press
- Colliding with bullets or enemies causes damage
- Should be different values based on type
Let's create the player sprite and prepare it for the game:
- Create a new project and call it
Chapter_03. - Create a new Sprite and name it
spr_Player. - Click on Load Sprite and load
Chapter 3/Sprites/Player.gif, with Remove Background checked. This.artfile has a spaceship with transparency and several frames of animation.Next, we want to adjust the collision area of the spaceship. The default collision is a rectangle covering the entire area of the Sprite that has pixel data. This means that the ship will take damage even though it has not visually come into contact with anything. What we want is to have a really small collision area.
- Click on Modify Mask. This will open the Mask Properties editor as shown in the following screenshot:
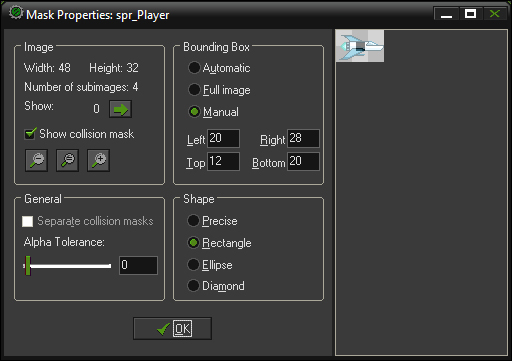
In the Mask Properties editor, we are able to control the size, shape, and placement of the collision mask, the area of a sprite where collision detection will occur. Some games require pixel perfect collision, where collision is determined on an individual pixel basis. This is the most precise collision possible, but it is also computationally expensive. The majority of games, however, can get away with a much simpler shape, such as a rectangle. This method is much more efficient, but limits the visual accuracy of the collision. The choice of which one to choose is dependent on the game's design and how much control is necessary to achieve the desired results.
- We want full control of the collision area, so set the Bounding Box to Manual and leave Shape as Rectangle.
- There are two ways to adjust the parameters of the Bounding Box. We can either enter exact positions for the corners of the box, or we can draw the box directly on the image of the Sprite. Left mouse drag a small box roughly in the center of the spaceship as shown in the previous screenshot.
- Click on OK.
We are now back in the Sprite Properties editor and we can see that Collision Checking now states that it has been Modified. The last thing we will do to this Sprite is to move the origin to the tip of the spaceship's gun. By doing this we won't have to worry about offsetting the bullets upon creation through code.
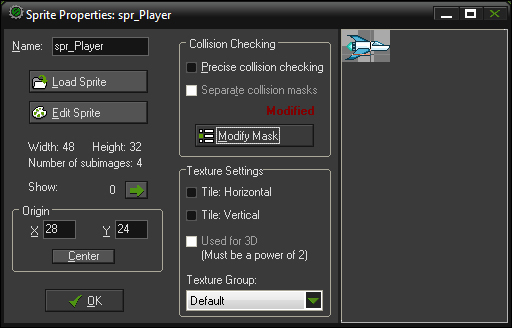
- Set Origin to X:
28, Y:24, and then click on OK.
Let's create the player object and get it moving around the world.
- Create a new Object and name it
obj_Player. - Assign
spr_Playeras its Sprite. - We need to initialize a variable for the speed we want the player to move at. This will make it easier to change the value later and have all scripts in
obj_Playerrefer to it. Create a new Script and name itscr_Player_Create.mySpeed = 8;
- In
obj_Player, add a Create event. - Drag an Execute Script icon from Control into the Actions: area, and apply the
scr_Player_Createto the script option. Click on OK. - Create a new Script and name it
scr_Player_Key_Left. This script will have the code for the left arrow key. - While we want the player to be able to move left, we also want to prevent the player from going offscreen. Write the following code into the script:
if ( x >= sprite_width )
{
    x -= mySpeed;
}
We start with a conditional
ifstatement that queries whether the player's currentxposition is greater than or equal to the width of the sprite. In this case, it would mean that the origin of the player is greater than the image's width of 48 pixels. If it is greater, we place the object eight pixels to the left of the current position.The method of movement we are using here is not movement in the traditional sense. There is no velocity being applied to the object, but rather we are teleporting the object from one position to the next. The benefit of using this method is that if the key isn't being pressed, the Object won't move. This is necessary in this game, because we cannot use a No Key event due to having to shoot weapons.
- In
obj_Player, add a Left event under Keyboard. - Drag an Execute Script icon from Control into the Actions: area, and apply the scr
_Player_Key_Leftto the Script option. Click on OK.Before we move on to all the other keys and their scripts, it is always good to check to see if the Object works as intended.
- Create a new Room.
- In the settings tab, change the name to
TheGameand Width to800. Making the Room wider will give the player more area to maneuver around and recognize enemies easier. - In the objects tab, select
obj_Playerand place a single instance near the center of the room as seen in the following screenshot: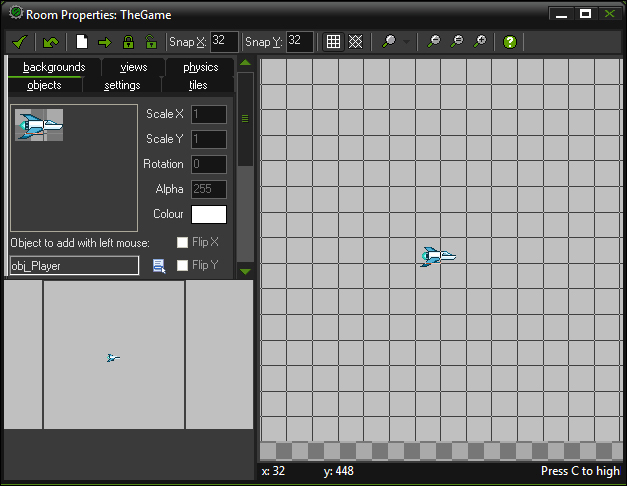
- Run the game.
If everything is set up properly, the player should move to the left only when the left arrow is pressed down and should remain in the play area. We can now move onto the other controls.
- Create a new Script and name it
scr_Player_Key_Right. This will be for the right arrow key. - The script will be similar to the left, except we need to also take into consideration the width of the room. Write the following code:
if (x <= room_width - sprite_width)
{
    x += mySpeed;
}
Here we are testing whether the player's current
xposition is less than the width of the room minus the width of the sprite. If it is less than that, we addmySpeedto the current location. This will ensure the player stays on-screen when moving to the right. - In
obj_Player, add a Right event under Keyboard. - Drag an Execute Script icon from Control into the Actions: area, and apply
scr_Player_Key_Right. Click on OK.We now have our horizontal controls and need to add the vertical movement. We will go over the code for the up key and down key scripts, but by now you should be able to implement them into the object.
- For the up arrow key, create a new Script and name it
scr_Player_Key_Up, and write the following code:if (y >= sprite_height) { y -= mySpeed; }It is similar to the horizontal code except now we are looking at the
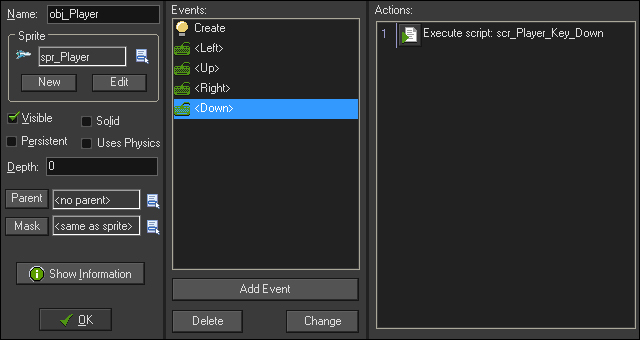
yposition and the height of the Sprite. - For the down arrow key, create a new Script and name it
scr_Player_Key_Down, and write the following code:if (y <= room_height - sprite_height) { y += mySpeed; }Again, here we are looking at the height of the room minus the height of the sprite as being the furthest point we can move downwards. The movement controls are now complete and the Object properties should look like the following screenshot:
- Run the game.
The player should be able to move around the entire screen, but never off of it. The only remaining control we have left is the button for firing the gun. However, before we can implement that we need a bullet!
Bullets are easy to make, as they generally just move along in a straight line once they have been fired.
- Create a new Sprite and name it
spr_Bullet_Player. - Click on Load Sprite and load
Chapter 3/Sprites /Bullet_Player.gif. - As we currently have the origin of the player object set to the tip of the gun, we will want Origin of the bullet to be at the front. This will help make the bullet appear to come out of the gun without having to code it directly. Set the values to X:
17, Y:4. - We can leave everything else as it is, so click on OK.
- Bullets should also make a sound when they are fired so let's bring in a sound. The first thing we need to do is to switch back to the Legacy Sound engine, so that we ensure the audio is heard in all browsers. Navigate to Resources | Change Global Game Settings and under the General tab, uncheck the box for Use New Audio Engine.
- Create a new Sound and name it
snd_Bullet_Player. - Click on Load Sound and load
Chapter 3/Sounds/Bullet_Player.wav. - Make sure Kind is set to Normal Sound. Then click on OK.
- Now it is time to make the bullet move on its own. Create a new Script and name it
scr_Bullet_Player_Create. - We want the bullet to move horizontally to the right. This is easy to do with the following code:
hspeed = 16;
sound_play(snd_Bullet_01);
Hspeed is a property representing the horizontal velocity of an object in GameMaker: Studio. We need to apply this code the moment the bullet is instantiated in the world. We also play the sound of the bullet a single time.
- Create a new Object and name it
obj_Bullet_Player, and set the Sprite tospr_Bullet_Player. - Add a Create event. The Create event is only ever executed once, upon creation.
- Apply the
scr_Bullet_Player_Createand click on OK.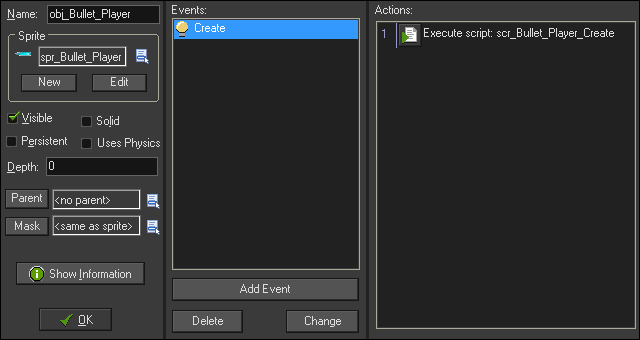
As shown in the preceding screenshot, the bullet is now complete and ready to be fired. Let's go back to the spaceship!
A bullet is only dangerous to enemies if it has been fired. The player ship will handle this code.
- Create a new Script and name it
scr_Player_KeyPress_Space. - Write the following code:
instance_create(x, y, obj_Bullet_Player);
With this code, we are simply creating an instance of a bullet where the current position of the player ship is, or more specifically, where the origin of the player ship Sprite is. This will make the bullet appear to be shot from the ship's gun.
- In
obj_Player, add a Space event from Key Press and applyscr_Player_KeyPress_Space. The Key Press event checks if the indicated key has been pushed down. This will run once and requires the key to be released before being able to run again. - Run the game.
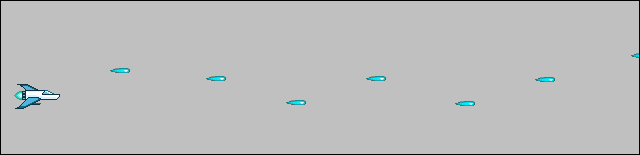
If everything is working properly, we should be able to move around the screen and fire bullets as fast as we can hit the spacebar, as shown in the following screenshot. We are almost ready to start adding in gameplay, but before we do, we have a little bit of cleanup to do.
Every time we create an instance of an object, it needs to be placed into the memory and the computer will need to keep a track of it. We have all these bullets that are going offscreen never to be seen again, but the computer sees them. This means that over time the computer could be trying to watch millions of wasted bullets, which in turn means that the game will start to slow down. As we don't want that to happen, we need to get rid of all these offscreen bullets.
- Create a new Script and name it
scr_OffScreenRemoval. This Script can be applied to any object in the game that goes offscreen and that we want to get rid of. - To remove an instance from the world, write the following code:
instance_destroy();
- In
obj_Bullet_Player, add an Outside Room event from Other and apply the script. The Outside Room event is a special event that checks if the entire sprite of an instanced object is completely outside the room.
There we go! We now have a spaceship that moves around the screen, shoots bullets, and we keep the memory usage low. Let's make some enemies!