
Now that we have a good grounding in the basics of building a game, we are ready to create more complex and more efficient projects. In this chapter we are going to develop a classic platforming game with an epic boss battle. We will focus on building systems and utilizing reusable scripts to simplify our code and save time. This will also reduce the total size of the game, making it faster to download.
The gameplay itself will consist of a player character that can run around the world, jump onto platforms, and shoot in several directions. The player will need to defeat a giant machine Boss that will have three distinct stages. In the first stage the player will need to blow up three powerful Cannons that are exposed for a short period of time. The second stage requires the destruction of a large Laser Cannon that will move up and down firing its massive Laser Beam intermittently. The final stage will have Shields that protect the Boss Core, occasionally opening to allow the player to eradicate the heart of the boss. All of this will happen while the player tries to avoid being hit by an indestructible turret.
When making a game, it is common to build each component all on its own and not to think about how it will affect the game as a whole. The developer will build a basic framework and then add features as they come along, often resorting to special conditional statements to make the code work without breaking the game. This methodology eventually will start creating bugs in the software requiring more time and effort to fix each one. The bigger the game, the more likely problems will be to arise. It can be an incredibly frustrating experience.
This is where breaking the code into individual systems can really save time and effort. Rather than rewriting elements of code over and over again for each object, we can write self-contained processes into scripts that can be shared. For this game we are going to separate out some of the more basic components, such as gravity and animation, into their own systems.
The first system we are going to build is one for dealing with gravity. While GameMaker: Studio does have a gravity property, it adds a level of complexity not needed in a platformer game. Gravity is a force that is applied to an object's speed cumulatively, which means that the longer an object is falling, that faster it will move. The issue we have is that setting gravity to zero just means it will not move faster. We need the object to come to a full stop. Therefore, we we will create our own gravity system that not only makes objects fall, but will deal with landing on the ground as well. Instead we will create our own gravity system that not only makes objects fall, but will deal with landing on the ground as well.
We are going to start by introducing constants . Constants allow us to use names to represent values that will never change. This has the double benefit of making it easier for us to read the code and help improve performance as compared to variables:
- Let's get started by creating a New Project called
Chapter_03. - Open the Resources | Define Constants editor. In the Name column write
MAXGRAVITYwith a Value of16. At this speed we can be sure that a falling object will not move so fast that it will miss the bounding box of another object in the game. From now on, whenever we seeMAXGRAVITYthe computer will see16. - Next we can create a new Script ,
scr_Gravity, and write the following code to create gravity:if (place_free( x, y + vspeed + 1)) { vspeed += 1; } else { move_contact_solid(direction, MAXGRAVITY); vspeed = 0; }First we check to see whether the area below the instance is clear of any collidable objects at the speed the instance is currently travelling. If it is clear, then we know that we are in the air and that gravity should be applied. We do this by increasing the vertical speed each step by a small amount. If there is a collidable object, then we are about to hit the ground, so we move the instance to the surface of the object in the direction the instance is travelling up to our
MAXGRAVITY, 16 pixels. At that point, the instance is on the ground so we set the vertical speed to zero. - We now have gravity working, but it will pick up too much speed if we don't limit how fast an instance can fall. Add this code to the bottom of the script:
vspeed = min(vspeed, MAXGRAVITY);
Here we are setting the
vspeedvalue to the lower value between the currentvspeedandMAXGRAVITY. If the instance is moving too fast, this code will slow it down to the maximum allowed speed. We now have a simple gravity system that all objects in the game could utilize.
The next system we will create is for animation and it will be implemented as a state machine. A state machine breaks down all the conditions of an object into distinct states. An object can only be in one stage at any one time, so the code related to it can be contained and managed more effectively.
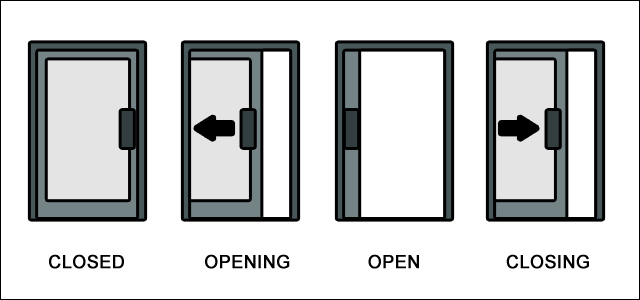
To understand this concept better, think about a door. A door has several unique states of being. The two states that probably spring to mind are that the door can be open or it can be closed. There are also two other states, opening and closing, as can be seen in the following image. If the door is opening, it is neither open nor is it closed, but rather it is in a unique state of action. This makes state machines perfect for animation. Almost every interactive object in a game is likely to have some animation or utilize several different images.
Since the player character is generally the most robust object in terms of different animations, we will start by breaking down its unique states. Our player can be either in the air or on the ground, so we will want to make sure to separate those controls. We also want the player to be able to shoot in multiple directions and take damage. All together we will have a total of eight different states:
- Idle
- Idle aiming up
- Idle aiming down
- Run
- Run aiming up
- Run aiming down
- InAir
- Damage
Let's start by defining these states as constants:
- Open the Resources | Define Constants editor and in the Name column write
IDLEwith a Value of0. - Click on Add or just press Enter to add a new row and write
IDLEUPwith a value of1. Repeat this process for all the states with increasing numbers as can be seen in the following screenshot. Then click on OK.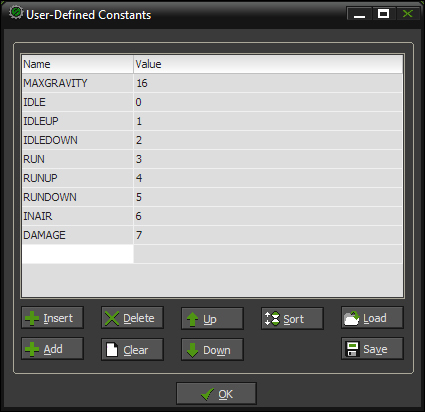
- Create a new Script and name it
scr_Animation_Control. We will start by using aswitchstatement to control the various states. We also want this script to be reusable, so we will want to use some generic variables to make the code more universal. Let's start by adding in the idle state with the following code:switch (action) { case IDLE : sprite_index = myIdle; image_speed = 0.1; break; }Here we are going to use a variable called
actionto switch states. If the action happens to beIDLE, we then change the sprite; in this case we are using another variable,myIdle, that we will define in each object which will allow us to reuse this script. We also set the animation rate which will allow us to have different playback speeds for different actions. - We will need to insert all the cases into this script with a similar setup of changing the sprite and setting the image playback speed. Here is the rest of the code for the states:
case IDLEUP : sprite_index = myIdleUp; image_speed = 0.1; break; case IDLEDOWN : sprite_index = myIdleDown; image_speed = 0.1; break; case RUN : sprite_index = myRun; image_speed = 0.5; break; case RUNUP : sprite_index = myRunUp; image_speed = 0.5; break; case RUNDOWN : sprite_index = myRunDown; image_speed = 0.5; break; case INAIR : sprite_index = myInAir; image_speed = 0.5; break; case DAMAGE : sprite_index = myDamage; image_speed = 0.5; break; - We have all the states we need, but what about dealing with the direction that the player is facing. It's a platformer so they will need to go right and left. For this we will just flip the image by scaling it inversely with the following code after the switch statement closing brace:
image_xscale = facing;
Once again we are utilizing a variable,
facing, to make the script more universal. We are now done with this script and the animation system is ready to be implemented.
The next system we are going to build is for dealing with world collision. We want to move away from using GameMaker: Studio's collision system as it requires two instances to intersect with each other. This works great for a bullet colliding with a player, but it is less effective if the player needs to sink into the ground in order to know when to stop. Instead, we want to forecast whether a collision will happen before an instance moves:
- We will start with forecasting wall collision to the left and right of the instance. Create a new Script,
scr_Collision_Forecastingand write the following code:if (place_free(x - mySpeed, y)) { canGoLeft = true; } else { canGoLeft = false; hspeed = 0; } if (place_free(x + mySpeed, y)) { canGoRight = true; } else { canGoRight = false; hspeed = 0; }We start by checking to see if the area to the left of the instance is free of collidable objects. The distance away that we are looking is determined by a variable,
mySpeed, which will allow this check to be adjustable to whatever speed the instance may be travelling at. If the area is clear we set thecanGoLeftvariable totrue, otherwise the area is blocked and we stop the horizontal speed of the instance. We then repeat this check for collision to the right. - Next we need to check for the ground collision. After the previous code we need to add:
if (!place_free(x, y+1))
{
    isOnGround = true;
    vspeed = 0;
    action = IDLE;
} else {
    isOnGround = false;
}
Here we are checking if there is a collidable object directly beneath the instance. If there is collision, we set the variable
isOnGroundtotrue, to stop the vertical speed and then change the state of the instance toIDLE. Changing the state like this will guarantee that the instance escapes from anINAIRstate.At this point we have the majority of our collision detection built, but we haven't covered all the edge cases. We are currently only checking to the left, right, and below the instance, but not on diagonals. The issue here is that it is possible for all conditions to prove true, but when the instance is moved on an angle it can result in the instance becoming stuck within a collidable object.
- Rather than building conditional checks for all angles, we will instead allow the collision to happen and then pop it back into the proper position. Add this next code at the end of the script:
if (!place_free(x, y))
{
    x = xprevious;
    y = yprevious;
    move_contact_solid(direction, MAXGRAVITY);
    vspeed = 0;
}
Here we are checking to see if the instance is currently intersecting with a collidable object. If so we set the X and Y coordinates to their position on the previous step, then snap it to the surface in the direction of the movement and set the vertical speed to zero. This will clean up the edge case scenario in a realistic manner. The whole script should look like this:
if (place_free(x - mySpeed, y))
{
    canGoLeft = true;
} else {
    canGoLeft = false;
    hspeed = 0;
}

if place_free(x + mySpeed, y)
{
    canGoRight = true;
} else {
    canGoRight = false;
    hspeed = 0;
}

if (!place_free(x, y+1))
{
    isOnGround = true;
    vspeed = 0;
    action = IDLE;
} else {
    isOnGround = false;
}

if (!place_free(x, y))
{
    x = xprevious;
    y = yprevious;
    move_contact_solid(direction, MAXGRAVITY);
    vspeed = 0;
}
As we are breaking systems down into more usable scripts we might as well put all the keyboard controls into a single script. This will simplify the code that we will be creating in the future and also allow us to easily change the controls or offer alternative controls.
Create a new Script, scr_Keyboard_Input and write the following code:
keyLeft  = keyboard_check(vk_left);
keyRight  = keyboard_check(vk_right);
keyDown  = keyboard_check(vk_down);
keyUp  = keyboard_check(vk_up);
keyJump = keyboard_check(ord('X'));
keyShoot = keyboard_check(ord('Z'));
Our code will be much easier to read with variables such as keyJump and keyShoot to represent the controls than actual key names. In order to use the letter keys on a keyboard we need the associated ASCII number. Rather than having to look up each key number we can use the ord function, which will convert a letter into the proper number.
We now have all our universal systems that we will need for this game. Next we will implement them.