The player character we are building is the most complex object we have created yet. Not only will the player run and jump, the controls themselves will be slightly different depending on whether the player is on the ground or in the air. The player will need to know what direction they are facing, what animation to be playing, whether they can shoot their weapon, and at what angle. Let's construct this, starting with importing all the sprites:
- Create a new Sprite,
spr_Player_Idle, and loadChapter 5/Sprites/Player_Idle.gifwith Remove Background checked. - Set the Origin to X:
32Y:63so that it rests in the center horizontally and rests on the bottom of the sprite vertically. - Click on Modify Mask to open the Mask Properties editor and select Bounding Box | Manual. Set the values to Left:
16, Right:48, Top:8, and Bottom:63. - Repeat this process, including the same Origin and Mask Properties for the following sprites:
spr_Player_IdleUpspr_Player_IdleDownspr_Player_Runspr_Player_RunUpspr_Player_RunDownspr_Player_InAirspr_Player_Damage
- Create an Object,
obj_Player, and assignspr_Player_Idleas the Sprite. - First we need to initialize all the variables the player character will need, starting with the ones necessary for animation. Create a new Script,
scr_Player_Create, with the following code:myIdle = spr_Player_Idle; myIdleUp = spr_Player_IdleUp; myIdleDown = spr_Player_IdleDown; myRun = spr_Player_Run; myRunUp = spr_Player_RunUp; myRunDown = spr_Player_RunDown; myInAir = spr_Player_InAir; myDamage = spr_Player_Damage;
Here we are establishing what sprites are to be used for the various states of animation. The variables we are using here must be the same as the ones we declared in
scr_Animation_Controlin order to use the animation system we created. - Next we will add the variables for the collision system, but before we do that, we should add two more constants for the facing direction. Open the Resources | Define Constants and add
RIGHTwith a value of1andLEFTwith a value of-1. These numbers will represent the scale of the drawn image, with the negative value inverting the sprite. - At the end of
scr_Player_Createadd the rest of the variables we need:mySpeed = 8; myAim = 0; facing = RIGHT; action = IDLE; isDamaged = false; canFire = true;
Here we have variables for the speed of the player, the direction the player is aiming, the direction they are facing, and the state they are in. We have also added variables for whether the player can take damage or is invulnerable, and whether they are able to shoot or not. We now have all our variables initialized.
- In
obj_Player, add a Create event and apply thescr_Player_Createscript. - We have a collision forecasting system ready to go, we just need to use it appropriately. Create a new Script,
scr_Player_BeginStep, and use it to call the forecasting script and the keyboard checks:scr_Collision_Forecasting(); scr_Keyboard_Input();
Every script you create is actually an executable function. As seen here you just need to write the name of the script and place parentheses at the end to have that code run. We will be using this method often.
- In
obj_Playeradd a Step | Begin Step event and applyscr_Player_BeginStep. The Begin Step event is the very first event in every step to be executed. The Step event follows it and End Step is the last event before the instance is drawn on screen. This allows us more control over when the code is run. - Next we need to create the controls. As we mentioned earlier, there are actually two separate control systems, one for on the ground and one for in the air. We will start with the latter as it is the simplest. Create a new Script, name it
scr_Player_AirControlswith the following code:scr_Gravity(); if (keyLeft && canGoLeft) { if (hspeed > -mySpeed) { hspeed -= 1; } facing = LEFT; myAim = 180; } if (keyRight && canGoRight) { if (hspeed < mySpeed) { hspeed += 1; } facing = RIGHT; myAim = 0; }The first thing you should notice is that we are no longer using operators such as
==in our code. These variables are all Booleans, so they can only be true or false. WritingkeyLeftis the same as writingkeyLeft == true, but is more efficient.Now, since the player is in the air, the first thing we do is apply gravity. Next we have the controls for horizontal movement. We check to see if the appropriate key is pressed and if the player is able to move in said direction. If these are true, we check the horizontal speed against the maximum speed. If the player is able to increase speed, we increment it slightly. This prevents the player from changing directions too quickly while in the air. We follow this up by setting the facing and aiming directions.
- We can now move on to the much more complicated ground controls. Create a new Script and name it
scr_Player_GroundControls. We will start by writing the idle state:if (!keyLeft && !keyRight) { if (hspeed >= 1) { hspeed -= 1; } if (hspeed <= -1) { hspeed += 1; } }We start by checking whether neither the left nor right keys are being pressed. If the keys aren't pressed and the player is moving, we check to see which way they are moving and then reduce the speed accordingly. What this really means is that the player will slide to a halt.
- The player has come to a stop, but it is not yet idling. To do this we need to determine if the player is using the up or down keys as that will affect which direction the player is aiming. Insert this next code immediately after the last line of code, but inside the last brace:
if (keyUp)
{
    action = IDLEUP;
    myAim = 45;
} else if (keyDown) {
    action = IDLEDOWN;
    myAim = 315;
} else {
    action = IDLE;
    if (facing == LEFT) { myAim = 180; }
    if (facing == RIGHT) { myAim = 0; }
}
We start by checking if the up key is pressed, and if it is, we change the action to
IDLEUPand set the aim to 45 degrees so that the player will shoot upwards. If that isn't true, we check the down key and change the action and aim if appropriate. Finally, if neither of those keys is pressed, we go into the standardIDLE. For the aim, however, we need to see which way the player is facing first. The player will properly idle from now on. - Next we can add the left and right controls. After the very last brace, write the following code:
if (keyLeft && canGoLeft)
{
    hspeed = -mySpeed;
    facing = LEFT;
    if (keyUp)
    {
        action = RUNUP;
        myAim = 150;
    } else if (keyDown) {
        action = RUNDOWN;
        myAim = 205;
    } else {
        action = RUN;
        myAim = 180;
    }
}
We check to see if the left key has been pressed and that the player is able to move left. If so, we set the horizontal speed and set the facing direction to go left. Once again, we check to see if the up or down keys are currently pressed or not and then set the action and aim to their proper values.
- Repeat the last step for the right key with the values accordingly. The player will now be able to move left and right.
- All we need now is to add in the jump. Immediately after the previous code add:
if (keyJump && isOnGround)
{
    vspeed = -MAXGRAVITY;
    action = INAIR;
}
We check to see if the jump key has been pressed and if the player is on the ground or not. If this is true, we set the vertical speed upwards to the maximum gravity and set the action to
INAIR. - The ground controls are now complete; here is what
scr_Player_GroundControlsshould look like:if (!keyLeft && !keyRight) { if (hspeed >= 1) { hspeed -= 1; } if (hspeed <= -1) { hspeed += 1; } if (keyUp) { action = IDLEUP; myAim = 45; } else if (keyDown) { action = IDLEDOWN; myAim = 315; } else { action = IDLE; if (facing == LEFT) { myAim = 180; } if (facing == RIGHT) { myAim = 0; } } } if (keyLeft && canGoLeft) { hspeed = -mySpeed; facing = LEFT; if (keyUp) { action = RUNUP; myAim = 150; } else if (keyDown) { action = RUNDOWN; myAim = 205; } else { action = RUN; myAim = 180; } } if (keyRight && canGoRight) { hspeed = mySpeed; facing = RIGHT; if (keyUp) { action = RUNUP; myAim = 30; } else if (keyDown) { action = RUNDOWN; myAim = 335; } else { action = RUN; myAim = 0; } } if (keyJump && isOnGround) { vspeed = -MAXGRAVITY; action = INAIR; } - Let's move onto the player attack. First we need to build the Bullet, so create a new Sprite,
spr_Bullet, and loadChapter 5/Sprites/Bullet.gifwith Remove Background checked. Center the Origin and then click on OK. - Create a new Object,
obj_Bullet, and applyspr_Bulletas the Sprite. - We will want the Bullet to always be in front of everything, so set the Depth to
-2000. - We are now done with the Bullet and can now write the attack code. Create a new Script,
scr_Player_Attack, and write the following:if (keyShoot && canFire) { bullet = instance_create(x + (8 * facing), y-32, obj_Bullet) bullet.speed = 16; bullet.direction = myAim; bullet.image_angle = myAim; alarm[0] = 10; canFire = false; }We start by checking to see if the attack key is pressed and whether the player is allowed to shoot. If so, we create an instance of the Bullet from the tip of the gun and capture the unique ID into a variable. The horizontal position of this Bullet uses the facing variable to offset it to the left or right. We set the speed of the Bullet and then set the direction and image rotation to where the player is aiming. We then set an alarm which will be used to reset the
canFirevariable, which we are changing tofalse. - At this point we have several scripts for movement, attacking, and animation, but none of them have been applied. To do this we need one more script,
scr_Player_Step, calling the other scripts as follows:if (isOnGround) { scr_Player_GroundControls(); } else { scr_Player_AirControls(); } scr_Player_Attack(); scr_Animation_Control();First we determine what controls we need to use by seeing if the player is on the ground or not. We then run the appropriate control script, followed by the attack script and finally the animation controls.
- In
obj_Player, add a Step | Step event and applyscr_Player_Step. - Before we test this out, we still need to reset that alarm. Create a new Script,
scr_Player_Alarm0, and setcanFiretotrue.canFire = true;
- Add an Alarm | Alarm 0 event and apply this script.
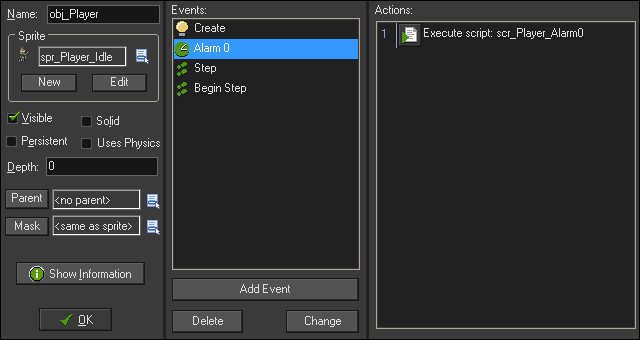
The player is ready to be tested. To ensure that you have the player set up properly, it should look like the following screenshot: