
For the rest of the book we are going to focus on creating a single game from concept to a completed, released product. We will be utilizing everything we have learned so far and will be introduced to a variety of additional features, such as GameMaker: Studio's physics and particle systems. We will build some more systems to allow character dialog and an inventory. Finally, we will look at the different ways to release the game, including onto Facebook.
In this chapter we are going to build a physics-based tower toppling game that will demonstrate GameMaker: Studio's implementation of the Box2D open source physics engine. It will feature towers made out of a variety of different materials, such as glass, wood, and steel. The goal of the game will be to clear a restricted zone by destroying these towers utilizing a variety of tools. We will create TNT that will blast outwards, a Wrecking Ball that will swing down, and a Magnet that will attract loose parts. Best of all, all the collision and movement will be done by the engine itself!
When building a physics-based game, it requires a different way of thinking about how you go about creating things. So far, we have focused on applying movement to an instance by either teleporting it via the X/Y coordinates, or by changing the speed, vspeed, and hspeed variables. When we use the physics engine, these properties are ignored. Instead, the system itself deals with movement by applying a force onto the instance. That instance will react to the force based on its own properties and will act accordingly.
Additionally, the direction of the world coordinates is not the same in physics world. Zero degrees in the GameMaker standard physics world indicates a direction of right, whereas in the Box2D physics world, zero degrees indicates up, as can be seen in the following diagram:

To fully understand how the Box2D physics engine works, we need to take a look at the following four components that it is comprised of:
- The physics world
- Fixtures
- Joints
- Forces
Much like the real world, the physics world starts with the application of gravity. The amount of gravity will determine how fast the objects will fall and how much force is necessary to counteract it. Before we can use any of the physics functions in a game, we need to activate the world physics.
- Let's start a new project called
Chapter_06. - Create a new Room, and name it
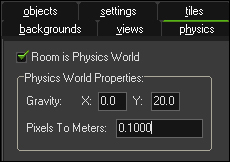
Sandbox. We will use this Room for testing purposes only. - Click on the physics tab and check Room is Physics World.
- In the Physics World Properties:, set Gravity: to X:
0.0and Y:20.0. This will set the direction and strength of the gravity in the world. If you wanted to have gravity as it is on Earth, we would set the value to Y:9.8. We are setting it to20.0, so objects appear to fall faster. - Finally, there is an option to set Pixels To Meters:. The entire physics system is based on real-world measurements, so we need to determine how many real-world meters are represented by a single pixel so that the calculations are accurate. We will leave this at the default value of 0.1 meters per pixel, or about 10 centimeters.
The world is now ready to use the physics engine! The physics settings of the room should look like the following screenshot:
In order for something to be affected by gravity and other such forces, an object requires a Fixture. A Fixture is what defines the shape and properties of a physics object. We will need to build two Objects: a Ground object that will never move, and a Steel Pillar which will react to gravity.
- We will start by creating the Ground object. Create a new Sprite,
spr_Ground, and loadChapter 6/Sprites/Ground.pngwith Remove Background unchecked. Leave Origin at X:0, Y:0, and click on OK. - Create a new Object,
obj_Ground, and assignspr_Groundas the Sprite. - In order to make this object responsive in the physics engine, we need to check Uses Physics. This will display Physics Properties as shown in the following screenshot:

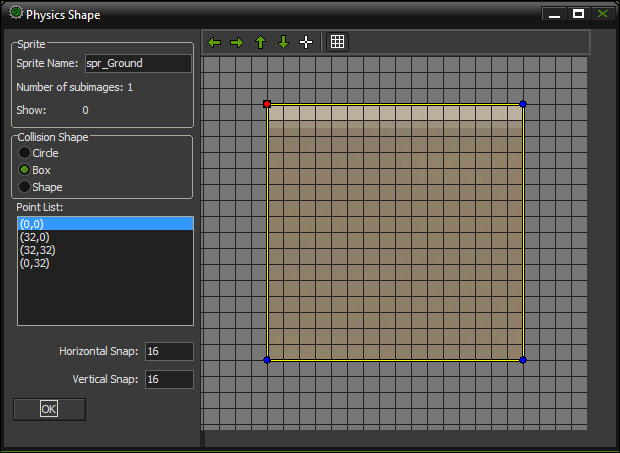
The first element we need to set up is Collision Shape. There are three options to choose from: Circle, Box, and Shape. The most common shape is Box, which just has four points and is always in a rectangular form. The Circle shape is useful for perfectly round objects as it is determined by a radius, thus not useful for round shapes like an egg. Shape is the most useful option in that you can have up to eight points of collision. One drawback for this is that all shapes must be convex, or it will not work. See the following screenshot to better understand what is acceptable:

- The Ground is a rectangular object, so in Collision Shape under Physics Properties, select Box.
- The default shape will be created with its starting point based on the origin of the Sprite, which in this case is in the upper-left corner. That means we will need to either adjust the Origin, or the Physics Shape to make it fit properly. For this object we will do the latter. Click on Modify Collision Shape to open the Physics Shape editor. Place the points so that they are correctly positioned on the sprite, as seen in the following screenshot, and then click on OK.
Now that the shape is complete, we can set the other physics properties. There are six adjustable properties available to us here:
- Density: This represents the mass of the Object per unit of volume. You can think of this as how heavy an object is compared to its overall size.
- Restitution: This represents how bouncy an object is. Higher the number, more bounce the object will have on collision. This does not mean that the shape of the object will deform. It won't as this is a rigid body physics simulation.
- Collision Group: These groups help simplify what objects can collide with each other. A positive number here will mean that all objects within that group number will always collide. A negative number means that the objects in that group number never collide with each other. If set to zero, a collision event will need to be placed into each object in order for it to collide. Using groups should be kept to a minimum, as it will dramatically increase processing time.
- Linear Damping: This represents the reduction of velocity of an object in motion. You can think of it as air friction as the object does not need to be in contact with any other object to slow down.
- Angular Damping: Much like Linear Damping, this is the reduction of rotational movement of an object.
- Friction: Friction is the force that acts opposite to a moving object during collision. This works in a similar fashion to Linear Damping in that it slows down objects. The difference is that it requires a collision to occur.
Different materials in the real world will have different values for each of these properties. There are many charts available that will show values for many types of materials, such as steel that has a density of 7,820 kilograms per cubic meter, and has a friction coefficient of 0.78 when touching other steel. Trying to think of all these values as they correspond to objects in a game can quickly become overwhelming. Luckily, games don't need to use real-world values, but instead we can use general concepts for the materials, such as steel has a high density while ice has a low density. Below is a chart with some basic concepts for how we need to treat the values for Density, Restitution, and Friction. For Linear Damping and Angular Damping it is a bit trickier, as they relate more to the shape of an object. For example, a round steel pin would have less Angular Damping than a square steel pin. All of these materials, whatever we set the values to, should always be tweaked until they feel correct for the game they are in. It is completely valid for a metal bar to have a density of three in one game and 300 in another, so long as it acts as the developer intends.
Material
Density
Restitution
Friction
Steel
High
Low
Medium
Glass
Low
Medium
Low
Wood
Medium
Medium
Medium
Rubber
Medium
High
Medium
Stone
High
Low
High
- As this Ground is intended to never move or feel the effects of gravity, we need to set Density to
0. When an object has no density it is considered to be a static object. - We don't want the Ground to be bouncy, so set Restitution to
0. - We will leave Collision Group at the default
0. - As the object isn't moving, we might as well set Linear Damping and Angular Damping to
0. - Finally, we do want objects to come quickly to a stop on the ground, so let's set Friction to
1. We are done withobj_Ground, so click on OK. - Next, we will make the Steel Pillar. Create a new Sprite,
spr_Pillar_Steel, and loadChapter 6/Sprites/Pillar_Steel.pngwith Remove Background checked. Center the origin and click on OK. - Create a new Object,
obj_Pillar_Steel, and setspr_Pillar_Steelas its Sprite. - Check the box for Uses Physics.
- In Collision Shape under Physics Properties, select Box. As we placed the origin into the center of the Sprite, the shape should be correctly conformed to the Sprite so that we do not have to modify it. However, we should always open the Physics Shape editor to ensure that it is properly located to prevent any major issues.
- We want this object to be fairly heavy, so set Density to
20. - The Steel Pillar shouldn't be very slick either, so set Friction to
2. - Set all the other properties to
0, as we do not want to slow this object or have it bounce. We have now finished setting the properties of this object. - The only thing we have left to do is to add an
obj_Groundevent. As can be seen in the next screenshot, we don't need any code, we just need a comment. Drag a Comment from the Controls tab under Actions: and writeCollide with Ground. With this little trick the Pillar will now have active collision with the Ground.
- Reopen the
Sandboxroom and place an instance ofobj_Pillar_Steelsomewhere near the top in the center horizontally. Also, place instances ofobj_Groundalong the bottom with one additional instance located right above the floor and just slightly under where the Steel Pillar will fall, as seen in the following screenshot. To move an instance freely in the Room Properties editor, hold down the Alt key while holding down the left mouse button.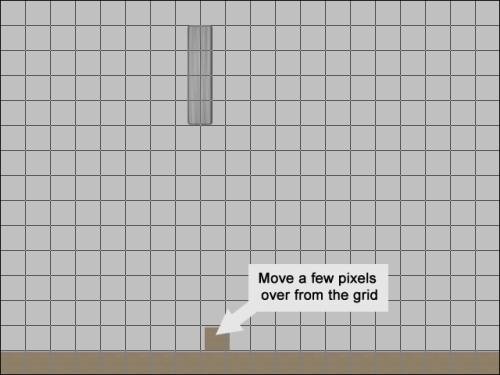
- Run the game. The Steel Pillar should fall down and collide with the little stump on the ground. It should then fall over onto its side and come to a rest.
We have just completed our first physics simulation! Let's now take a look at Joints.
There are times when we will want two or more objects to be constrained to each other, such as a chain, or a ragdoll body. In the physics engine it is achieved through the use of Joints. There are five different types of Joints that we can use:
- Distance Joints: These will keep two instances connected at a set distance apart from each other. For example, a wheelbarrow would have a Distance Joint to keep the front wheel a set distance away from the handles, no matter how it is pushed.
- Revolute Joints: These will rotate one instance around another. For example, a door hinge is a Revolute Joint that rotates a door around the door frame.
- Prismatic Joints: These will allow one instance to move in a single direction relative to another. For example, a pinball plunger would have a Prismatic Joint, as it can only pull back or push forward into the machine.
- Pulley Joints: These will allow one instance to influence another in relation to its movement. For example, a set of scales uses a Pulley Joint to weigh things. If it is heavier on one side it will go down, while the other side would go up.
- Gear Joints: These will affect the movement of one instance based on the rotation of another. For example, the spinning reel of a fishing rod is a Gear Joint; when it is rotated it will pull in the fish.
Let's take a look at how Joints work by creating a simple chain that is attached to an Anchor.
- We will start by building the anchor, which will be a stationary static object in the world. Create a new Sprite,
spr_Anchor, and loadChapter 6/Sprites/Anchor.pngwith Remove Background checked. Center the origin and click on OK. - Create a new Object,
obj_Anchor, and setspr_Anchoras the Sprite. - Check the box for Uses Physics and change the Collision Shape to Box.
- Set Density and Restitution to
0. We can leave the other properties at the default values and it should look like the following screenshot: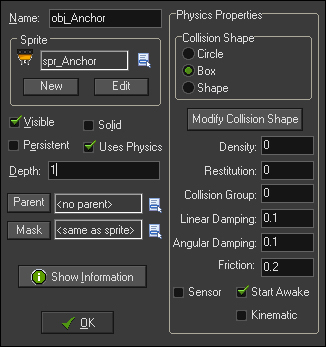
- Next, we need to create the Chain Links. Create a new Sprite,
spr_ChainLink, and loadChapter 6/Sprites/ChainLink.pngwith Remove Background checked. Center the origin and click on OK. - Create a new Object,
obj_ChainLink, and setspr_ChainLinkas the Sprite. - Check the box for Uses Physics and change the Collision Shape to Box.
- We want the Chain to be quite strong and heavy, so set Density to
50. - The Chain should not stretch and swings freely, therefore we need to set the Restitution, Linear Damping, Angular Damping, and Friction to
0. The final settings should look like the following screenshot: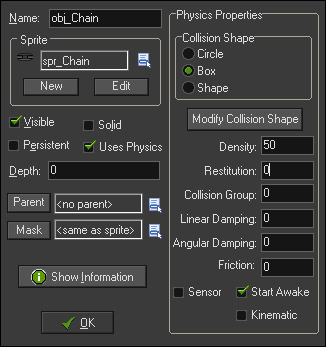
- The component parts are now complete; we will just need to build the entire Chain and attach it to the Anchor. Create a new Script,
scr_Anchor_Create, write the following code, and add this to a Create event inobj_Anchor:for (i = 1; i < 10; i++) { chain[i] = instance_create(x+ (i * 16), y, obj_ChainLink); }To build the Chain we run a loop starting to create nine links of the Chain. We start the loop at
1so that the Chain is offset correctly. We use a basic one-dimensional array to store the ID of each Chain Link, as we will need this when we add the joints. Thexoffset we have in the creation will create each link an equal distance apart horizontally. - Next, we need to apply a Revolute Joint to the first link of the Chain. After the previous code, add:
physics_joint_revolute_create(self, chain[1], self.x, self.y, 0, 0, false, 0, 0, false, false);
We start by creating a Revolute Joint from the anchor to the very first Chain Link. The rotation will occur around the Anchor's X and Y axes. The next three parameters relate to the limitations of the rotation: the minimum and maximum angles of rotation, and whether these limits are active. In this case we don't care, so we have turned off any angle limitation. The following three parameters are for whether the joint will rotate on its own or not, with values for the maximum speed, the set speed, and whether it is active. Again, we have turned it off so the Chain will just hang in the air. The last parameter is for whether the Anchor can collide with the Chain, and we do not want that to occur here.
- Now that we have the first link attached, let's join the rest of the Chain together. Still in the same script, at the end add:
for (i = 1; i < 9; i++)
{
    physics_joint_revolute_create(chain[i], chain[i+1], chain[i].x, chain[i].y, -20, 20, true, 0, 0, false, false);
}
Here we are using a loop again, so that we can go through each link and attach the one that follows. Notice that the loop stops at
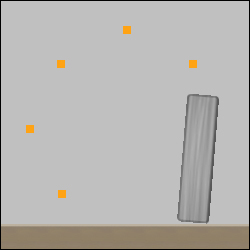
9, as we have already connected one piece of Chain. In the case of the Chain, we don't want each Link to have full freedom of rotation. We have activated the rotational limit and set it to 20 degrees in either direction. - We now have a small Chain attached to an anchor. Let's add it to the world. Reopen the
Sandboxand add a single instance ofobj_Anchornear the top of the room. - Run the game. The Anchor should remain at the top of the room with the Chain Links extending out to the right of it. The Chain will fall due to the gravity in the room, though each link will remain attached to the one above it, with the top link still attached to the Anchor. It should look something like the following screenshot:

In order to move an object in the physics world, excluding movement due to gravity, it requires that a Force be applied to it. These forces can be applied from a point in the world or locally to the instance. How the object reacts to the force depends on the properties it has. Just like the real world, the heavier the object, the more force is required to move it.
In order to take a look at Forces we are going to create TNT, which will explode, shooting out eight fragments. These fragments will be very dense and will require a lot of force to make them move.
- Let's start with the fragments first. Create a new Sprite,
spr_TNT_Fragment, and loadChapter 6/Sprites/TNT_Fragment.pngwith Remove Background unchecked. Center the origin and click on OK. - Create a new Object,
obj_TNT_Fragment, and assignspr_TNT_Fragmentas the Sprite. - Check the box for Uses Physics and change Collision Shape to Box.
- Set the Density to
10. We are making this value very high, so that when it collides with objects, such as the Steel Pillar, it will be able to move it. - Set all remaining properties to
0. - As we need several fragments to shoot out from the TNT, we need to be able to control the direction in which it is going to move. Therefore, we need to establish some variables. Create a new Script,
scr_TNT_Fragment_Create, with the following variables:mySpeedX = 0; mySpeedY = 0;
The strength and direction of a force is determined by a vector, which is why we need X and Y variables. We have set it to zero, so that it is not moving by default. Don't forget to apply this to a Create event in
obj_TNT_Fragment. - As these fragments are meant to represent an explosion, we will want to constantly apply force to them, so that they aren't overly affected by gravity. Create a new Script,
scr_TNT_Fragment_Step, and apply some force. Add this script to a Step event.physics_apply_force(x, y, mySpeedX, mySpeedY);
The function
physics_apply_forceis a world based force, with the first two parameters representing where in the world the force is coming from, and the second two parameters being the vector of force to be applied. - Currently, these fragments will never stop moving, which is a problem. We are going to want to limit how far they can move outwards. Add the following code at the end of the script:
if (point_distance(x, y, xstart, ystart) > 128)
{
    instance_destroy();
}
All we are doing here is checking to see if the Fragment has moved more than 128 pixels from where it was created. If it has, we remove it from the world.
- We want these fragments to collide with some of the other elements in the game. At the same time, we don't want them to go through anything, so we will destroy them. Create a new Script,
scr_TNT_Fragment_Collisionand remove the instances.instance_destroy();
- Add an
obj_Groundevent and add this script. This will remove the Fragment if it hits the Ground. - We want it to affect the Steel Pillar, but since we are planning on creating many more types of Pillars, let's build a parent object for the Pillars for collision detection. Create a new Object,
obj_Pillar_Parent. This is all that it needs for now, so click on OK. - Reopen
obj_Steel_Pillarand set Parent toobj_Pillar_Parent. - While we are in
obj_Steel_Pillar, we might as well have it react to other Pillars as well. Add anobj_Pillar_Parentand drag a Comment from Controls into the Actions: area, and enterCollides with Pillarsas the comment. - Go back into obj_TNT_Fragment and add an
obj_Pillar_Parentand applyscr_TNT_Fragment_Collision. We will now have collision with all Pillars! - All we need to do now is to create the TNT and have it explode. Create a new Sprite,
spr_TNT, and loadChapter 6/Sprites/TNT.pngwith Remove Background checked. Center the origin and click on OK. - Create a new Object,
obj_TNT, and applyspr_TNTas the Sprite. We will be manually placing the TNT in the game, and we don't need it to react to the world physics, so we do not need to turn on Use Physics. - Let's create a new Script,
scr_TNT_Activate, and for testing purposes, add it to a Space event under Key Press. We are going to create only a single Fragment and have it launch outwards to the right, so we can see how forces work in the world.frag_01 = instance_create(x, y, obj_TNT_Fragment); frag_01.mySpeedX = 100;
We first create a Fragment and capture its ID in a variable. We are then setting the horizontal force to be 100 units. This value seems like it should be enough force to push this object to the right.
- Let's test it out. Reopen
Sandboxand place a single instance slightly to the left of where the Steel Pillar will fall and three grid spaces above the Ground. Also, let's remove the extra instance of Ground and the Chain. The Room should look like the following screenshot:
- Run the game and press the space key to spawn a Fragment. You should see the Fragment come out moving to the right, but it is falling downwards as well. When the Fragment collides with the Steel Pillar, the Fragment disappears and nothing happens to the Steel Pillar. All of this is a result of the Fragment not having enough force.
- Let's increase the force. Reopen
scr_TNT_Activateand change the second line to:frag_01.mySpeedX = 1000;
- Run the game and press space to see how this changes things. The Fragment now appears to move only to the right, and on contact with the Steel Pillar, it makes it rock a little bit. However, no matter how many times we hit the Steel Pillar, it will never fall over. This is due to the fact that the Steel Pillar has double the density of the Fragment, and it needs significantly more force to knock it down.
- Once again, let's adjust the number by adding a zero to the end. Change the force to:
frag_01.mySpeedX = 10000;
- Run the game again and try to knock the Steel Pillar over. It should take three quick taps and it will fall over. As we can see, a small object like the Fragment is going to require a very large amount of force in order to move a large object such as the Steel Pillar.
- Now that we have one Fragment working, let's get the rest in. We need seven more fragments moving in 45 degree increments. We will also want to remove the TNT so it can only be triggered once.
frag_01 = instance_create(x, y, obj_TNT_Fragment);
frag_01.mySpeedX = 10000;
frag_02 = instance_create(x, y, obj_TNT_Fragment);
frag_02.mySpeedX = -10000;
frag_03 = instance_create(x, y, obj_TNT_Fragment);
frag_03.mySpeedY = 10000;
frag_04 = instance_create(x, y, obj_TNT_Fragment);
frag_04.mySpeedY = -10000;
frag_05 = instance_create(x, y, obj_TNT_Fragment);
frag_05.mySpeedX = 5000;
frag_05.mySpeedY = 5000;
frag_06 = instance_create(x, y, obj_TNT_Fragment);
frag_06.mySpeedX = 5000;
frag_06.mySpeedY = -5000;
frag_07 = instance_create(x, y, obj_TNT_Fragment);
frag_07.mySpeedX = -5000;
frag_07.mySpeedY = -5000;
frag_08 = instance_create(x, y, obj_TNT_Fragment);
frag_08.mySpeedX = -5000;
frag_08.mySpeedY = 5000;
instance_destroy();
As we can see, for each Fragment we apply an appropriate value for the forces in the X and Y directions. There is no need for us to pull out a calculator and some fancy equations to figure out exactly how much force is needed, especially on the angled pieces. Remember, this is a video game and we should only worry about the overall effect and experience the player has to see if the results are correct. When you run the game it should look something like the following screenshot:
At this point we have a good foundational knowledge of how the Box2D physics engine works. We have built a room with physics activated and created several objects with fixtures and physics properties. We have used joints to connect a series of instances together and we have applied forces to an object to make it move. We are now ready to start building the tower toppling game!