In the last chapter we built a tower toppling physics game where the player could use TNT, Wrecking Balls, and Magnetic Cranes to destroy towers made of Glass, Wood, and Steel Pillars. In this chapter we are going to build this game by implementing a Shop, a Score Screen, and Level Intro Dialog. We are also going to rework the HUD so that only the equipment that is available can be used to implement a countdown timer, and add buttons for restarting the level and going to the Shop. In order to accomplish all of this, we will spend some time looking at arrays and data structures for storing information and using global variables.
In the last chapter we built two rooms, Level_01 and Level_12, for testing the HUD and game difficulty. We now need to make rooms for all the levels in between those two, plus a few additional rooms for the Front End, Shop and Level Select:
- Create a new Room for each level from
Level_02toLevel_11. Set the size of the rooms as follows:Level_02–Level_04is set to Width:640and Height:480Level_05–Level_08is set to Width:960and Height:720Level_09–Level_11is set to Width:1280and Height:960
- Each room needs to have Room is Physics World checked in the Physics tab.
- Make sure that Views | Port on Screen is set to X:
0, Y:0, W:640, and H:480so that each room will display properly on screen. - We have supplied backgrounds for each level which can be found in
Chapter 7/Backgrounds/. Make sure that Remove Background is not checked. - Each level should have a unique tower built from a variety of Pillars and ideally be made more difficult than the previous level. Start by placing the ground down in the room which requires a different Y coordinate depending on the size of the Room. The Y placement is indicated as follows:
Level_02–Level_04: 384Level_05–Level_08: 576Level_09–Level_11: 784
- Populate the levels with one instance of
obj_Overlordandobj_Menueach. Each room should look something like the following screenshot: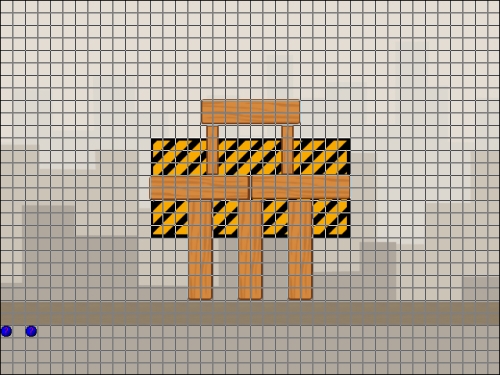
- Once the levels have been built, we can move on to the Front End. Create a new Room and in the Settings, name it
MainMenu, with a Width of640and Height of480. Move this to the top of theRoomsfolder in the Resource Tree. - Create a new Background,
bg_MainMenu, and loadChapter 7/Backgrounds/BG_MainMenu.png. Make sure that Remove Background is not checked. - In the Room Properties | Background tab, set Background 0 to
bg_MainMenu. The box for Visible when room starts should be checked. We are done with this room for now so click on OK. - We need two additional rooms for the Front End:
LevelSelectandShopwith the appropriate backgrounds applied. The position in the Resource Tree does not matter. We now have all the rooms we will need for the game.
The main menu is the very first screen the player will see and it consists of two objects: a button to start the game and a game initializing object with all the global variables:
- Let's start with an object for initializing the game. Create a new Object and name it
obj_Global. - Create a new Script called
scr_Global_GameStart. We will be adding code to this as we go along, but for now we just need to initialize the score:score = 0;
- Add an Other | Game Start event and apply
scr_Global_GameStart. Click on OK. - Reopen
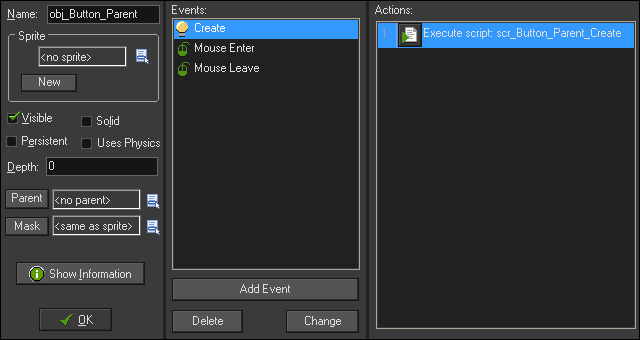
MainMenuand place a single instance ofobj_Globalsomewhere in the room. - We are going to be creating a few buttons, so let's build a parent object to run the common functionality of hover states. Create a new Object called
obj_Button_Parent. - All buttons will have multiple frames of animation to be used for the hover states, so we need to stop them from playing. Create a new Script,
scr_Button_Parent_Create, and attach this to a Create event with the following code:image_speed = 0; image_index = 0;
- Create a new Script,
scr_Button_Parent_MouseEnter, and attach it to a Mouse | Mouse Enter event with the code to change it to the second frame of animation:image_index = 1;
- We also need to reset this by creating another new Script,
scr_Button_Parent_MouseLeaveand attach it to a Mouse | Mouse Leave event:image_index = 0;
The parent object is now complete and the setting should look like the following screenshot:
- Next we can build the first real button. Create a new Sprite,
spr_Button_Start, with Remove Background turned off, and loadChapter 7/Sprites/Button_Start.gif. Center the Origin and click on OK. - Create a new Object,
obj_Button_Start, and applyspr_Button_Startas the Sprite. - Set the Parent to be
obj_Button_Parentso that the hover states will function properly. - Since each button will do something different we need to give each button its own click event. Create a new Script,
scr_Button_Start_MousePressed, and attach it to a Mouse | Left Pressed event with the following code to go to the roomLevelSelect:room_goto(LevelSelect);
- This button is now complete. Place a single instance of
obj_Button_StartintoMainMenunear the bottom of the screen at X:320and Y:416. The Room should look like the following screenshot: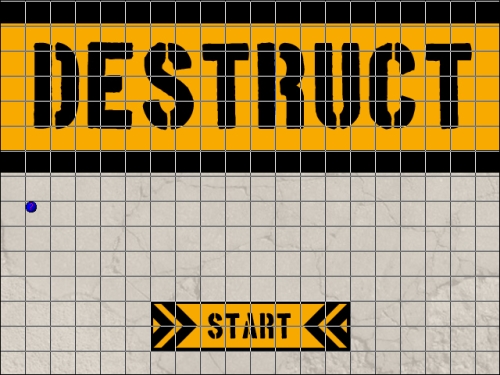
- Run the game to make sure that it starts with
MainMenuand that the Start Button functions as designed.
The next room we are going to build is LevelSelect. In this room there will be a button for going to the Shop and buttons for each level in the game, with only the first level unlocked at the start. As the player progresses, the buttons will unlock and the player will have access to all previous levels. To achieve this we will dynamically create buttons for each level in the game and use a 2D array to store all this information.
A 2D array is just like the arrays we have already used in the book. It is a single static list of data but it allows for multiple values per row, like a spreadsheet. This is a very powerful tool at our disposal as it makes it much simpler to group several different elements together:
- Create a new Script,
scr_Global_Levels, and start by initializing some global variables:globalvar level, totalLevels;
As we are always trying to simplify our code we can use an alternate method of declaring global variables with
globalvar. This declaration method functions exactly the same way asglobal, but it will allow us to writelevelinstead ofglobal.level. While this will save us plenty of keystrokes, it is up to us to remember that it is a global variable as it is not as obvious. - Next we need to create a 2D array with one column holding the level and another with whether it is locked or not. Let's just add the first level:
level[0, 0] = Level_01;
level[0, 1] = false;
To create a 2D array, you just need to place two numbers inside the brackets. The first number is for the row and the second for the column. Here we have only a single row that has two columns. The first column will hold the room name and the second column will be for whether that room is locked or not; in this case
Level_01is unlocked. - There is one drawback in using simple arrays in GameMaker: Studio that there is no function to find out the size of the array. We need to know the size of this array so that we can dynamically create all the buttons. We already created a global variable to hold the total amount of levels; we just need to manually set its value. Let's add all the levels into the array, lock them, and set the
totalLevelsvariable. Here is the complete script for all 12 levels:globalvar level, totalLevels; level[0, 0] = Level_01; level[0, 1] = false; level[1, 0] = Level_02; level[1, 1] = true; level[2, 0] = Level_03; level[2, 1] = true; level[3, 0] = Level_04; level[3, 1] = true; level[4, 0] = Level_05; level[4, 1] = true; level[5, 0] = Level_06; level[5, 1] = true; level[6, 0] = Level_07; level[6, 1] = true; level[7, 0] = Level_08; level[7, 1] = true; level[8, 0] = Level_09; level[8, 1] = true; level[9, 0] = Level_10; level[9, 1] = true; level[10, 0] = Level_11; level[10, 1] = true; level[11, 0] = Level_12; level[11, 1] = true; totalLevels = 12;
- We need to initialize this array at the start of the game. Reopen
scr_Global_GameStartand execute this script after the score variable.scr_Global_Levels();
- Let's move onto building the button for going to the Shop. Create a new Sprite,
spr_Button_Shop, and with Remove Background turned off, loadChapter 7/Sprites/Button_Shop.gif. Center the Origin and click on OK. - Create a new Object,
obj_Button_Shop, and applyspr_Button_Shopas the Sprite. - This is a standard button so set the Parent to
obj_Button_Parent. - The last thing we need to do to this object is to add a Mouse | Left Pressed event and apply a new Script,
scr_Button_Shop_MousePressedwith the code to switch rooms:room_goto(Shop);
- We will draw some text onto these buttons which means that we need to bring in some fonts. We have supplied a font called Boston Traffic in this game, which is needed to be installed on your computer. To install this font on a Windows computer, right-click on
Chapter 7/Fonts/boston.ttfand select Install. Then follow the directions when prompted. - Back in GameMaker: Studio we need to create three new fonts:
fnt_Large,fnt_Medium, andfnt_Small. All three will have a Font ofBoston Traffic. Set the Size offnt_Largeto20,fnt_Mediumto16, andfnt_Smallto10. - Next we can move onto the buttons for selecting the levels. We will be dynamically creating these buttons and drawing a number on each one of them so that we only need a single art asset. Create a new Sprite,
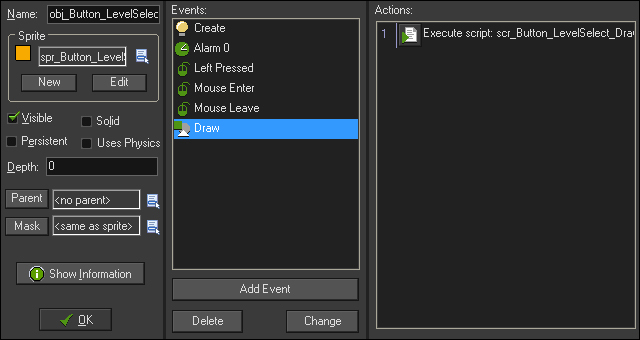
spr_Button_LevelSelect, and with Remove Background turned off, loadChapter 7/Sprites/Button_LevelSelect.gif. Center the Origin and click on OK. - Create a new Object,
obj_Button_LevelSelect, and applyspr_Button_LevelSelectas the Sprite. These buttons cannot be parented toobj_Button_Parentas they require the ability to have a locked state, which will affect the hover states. - Since this button type is unique, we need to initialize some variables. Create a new Script,
scr_Button_LevelSelect_Create, and attach it to a Create event.isLocked = true; myLevel = MainMenu; myNum = 0; image_speed = 0; alarm[0] = 1;
We start by making all buttons locked by default. We set a default room for the room it should go to when clicked, and a number that we will draw on top. Finally we stop the sprite from animating and set an alarm for one step.
- We are using an alarm so that we can ensure that the levels will properly display whether they are locked or not. Create a new Script,
scr_Button_LevelSelect_Alarm0, and attach it to an Alarm | Alarm 0 event:if (isLocked) { image_index = 2; } else { image_index = 0; }If the button is to be locked, we set the sprite to display the locked frame. Otherwise it is unlocked and we show the first frame.
- Create a new Script,
scr_Button_LevelSelect_MouseEnter, and apply it to a Mouse | Mouse Enter event:if (isLocked) { exit; } else { image_index = 1; }For the hover state of the button we first check to see if it is locked. If it is, we just exit the script immediately. If it is unlocked, we switch to the hover frame.
- This same logic needs to be applied to when the mouse leaves the button. Create another new Script,
scr_Button_LevelSelect_MouseLeave, and apply it to a Mouse | Mouse Leave event:if (isLocked) { exit; } else { image_index = 0; } - Next we will add a Mouse | Left Pressed event with a new Script,
scr_Button_LevelSelect_MousePressed, attached with code to change rooms if it is unlocked only:if (isLocked) { exit; } else { room_goto(myLevel); } - Finally, we just need a new Script,
scr_Button_LevelSelect_Drawthat we can use to draw the button with the appropriate number on top. Add this to a Draw | Draw event:draw_self(); draw_set_color(c_black); draw_set_font(fnt_Large); draw_set_halign(fa_center); draw_text(x, y-12, myNum); draw_set_font(-1);
First we need to draw the sprite that has been applied to the object itself. Next we set the drawing color to black, set the font, and center align the text. We then draw the text held in the myNum variable, dropping it down a bit on the Y axis so that it centers vertically. Since we will be drawing a lot of text in this game, we should force the font to the default font by setting it to -1 value. This will help prevent this font from affecting any other drawn font in the game:
- We are now finished with the level selection button and the properties should look like the following screenshot:
- We now have all the components we need for a level selection screen, we just need to spawn everything. For this we will create a new Object,
obj_LevelSelect_Overlord, to build the menu upon entering the room. - Add an Other | Room Start event and attach a new Script,
scr_LevelSelect_Overlord_RoomStart, with the following code:column = 0; row = 1; for ( i = 0; i < totalLevels ; i++ ) { lvl = instance_create((72 * column) + 128, 80 * row + 128, obj_Button_LevelSelect); lvl.myLevel = level[i, 0]; lvl.isLocked = level[i, 1]; lvl.myNum = (i + 1); column++; if (column > 5) { row++; column = 0; } } instance_create(320, 440, obj_Button_Shop);We start by establishing variables for the row and columns that we will need for the layout of the buttons. We then run a loop starting at zero and run it for the total amount of levels we declared in the global variable
totalLevels. Inside this loop, we first create an instance ofobj_Button_LevelSelectand offset it in both horizontal and vertical directions with an additional 128 pixels of padding for a margin between the edge of the screen and the buttons. We then change the button'smyLevelandisLockedvariables by setting it according to the values in thelevelglobal array. Next we change themyNumvariable to indicate what number will be drawn on the button. The last few lines of code are how we will limit the amount of columns and add additional rows of buttons. Every loop we increase the column count and once it passes five we reset it to zero. This will give us a row of six buttons. If we have more than six buttons, a new row will be created that can have another six buttons. This means we can add levels to the array later and they will be added into this menu automatically creating new rows for every six levels. Last but not least, we spawn an instance of the SHOP button at the bottom of the screen. - Open
LevelSelectand place a single instance ofobj_LevelSelect_Overlordsomewhere in the room. This is all we need, and to do so click on the checkmark. - Run the game. After clicking start game, you should end up in
LevelSelectand it should look like the following screenshot. Only Level 1 is accessible at this point and the button is yellow. All the other buttons are gray, indicating that they are locked. Clicking on the button for Level 1 will take you to that level and the SHOP button should take you to the Shop.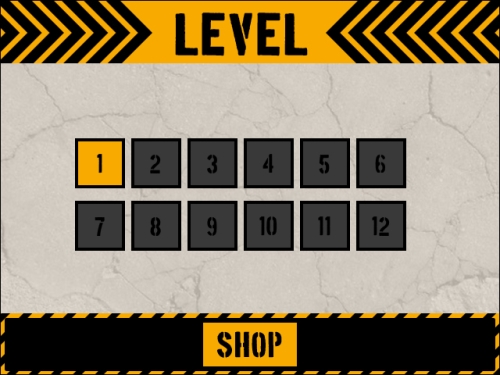
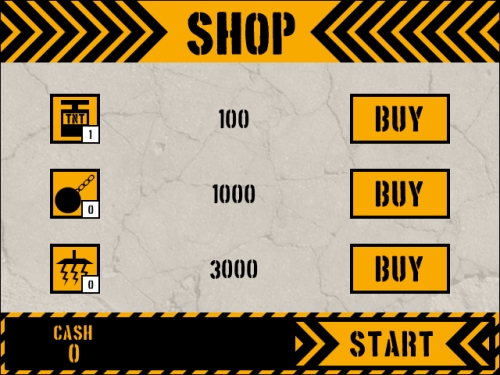
The only room we have left to build is the Shop where the player will be able to purchase equipment to be used in each level. The room will consist of icons for each piece of equipment, a listing of the price, and a button to purchase the equipment. We will also have a display showing how much cash the player currently has and this will update as they spend money:
- The first thing we need to do before we build anything is to establish some constants to make our code easier to read. Open the Resources | Define Constants editor and set values for the equipment:
TNT:0,WRECKINGBALL:1,MAGNET:2. - We will also need some constants that describe all the elements that comprise a piece of equipment. Add
SPRITE:0,OBJECT:1,AMOUNT:2, andCOST:3. When this is complete the settings in the editor should look like the following screenshot: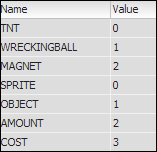
- In order to stick with the color scheme of the game we will need to create a unique yellow color that we can access globally. Create a new Script,
scr_Global_Colors, with this code:globalvar yellow; yellow = make_color_rgb(249, 170, 0);
We create a global variable for our color and then use a function that has parameters for the amount of red, green, and blue to make our special yellow color.
- Open
scr_Global_GameStartand executescr_Global_Colors().To build a proper Shop and inventory system we need more control over the data than a static array allows. We need something more malleable and searchable. This is where data structures come in. Data structures are special dynamic structures similar to arrays, but with the ability to manipulate the data with specific functions for things such as shuffling or reordering the data. GameMaker: Studio comes with six different types of data structures, each with its own set of functions and benefits:
- Stacks: This structure is last-in-first-out, meaning that each new piece of data is placed on top of the previous one and when it is read, the newest data is read first. Think of it like a stack of plates, where you are going to use the one last placed on the shelf.
- Queues: This structure is first-in-first-out, meaning that each new piece of data is placed behind the one previous to it and when read, the oldest data is read first. Think of a line at a store, where the first person in line is going to be served first.
- Lists: This structure is much more flexible. In this structure the data can be placed anywhere within the list and can be sorted, altered, and searched throughout. Think of this like a deck of cards, where they can be in any order which can be changed any time.
- Maps: This structure allows for information to be stored in linked pairs using keys and values, though it cannot be sorted and all keys must be unique. Think of a set of keys, where each key opens only the associated door.
- Priority Queues: This structure is similar to a queue, but each value is assigned a priority level. Think of this like a line at a nightclub, where VIPs have a higher priority and are let in first.
- Grids: This structure is the most robust and is similar to a 2D array. It has rows and columns, but it has many functions for sorting, searching, and manipulating the data. Think of a searchable airport departure schedule, where you can see all the planes, the companies, flight times, and so on, and sort it according to your preference.
We are going to start with a Grid data structure as we need several rows and columns of information for each item. Create a new Script,
scr_Global_Equipmentand write the following code to build the Grid:globalvar equip; equip = ds_grid_create(3,4); ds_grid_set(equip, TNT, SPRITE, spr_Menu_TNT); ds_grid_set(equip, TNT, OBJECT, obj_Ghost_TNT); ds_grid_set(equip, TNT, AMOUNT, 1); ds_grid_set(equip, TNT, COST, 100); ds_grid_set(equip, WRECKINGBALL, SPRITE, spr_Menu_WreckingBall); ds_grid_set(equip, WRECKINGBALL, OBJECT, obj_Ghost_WreckingBall); ds_grid_set(equip, WRECKINGBALL, AMOUNT, 0); ds_grid_set(equip, WRECKINGBALL, COST, 1000); ds_grid_set(equip, MAGNET, SPRITE, spr_Menu_MagneticCrane); ds_grid_set(equip, MAGNET, OBJECT, obj_Ghost_MagneticCrane); ds_grid_set(equip, MAGNET, AMOUNT, 0); ds_grid_set(equip, MAGNET, COST, 3000);
We start by declaring a global variable which we then use to hold the ID of a Grid. When creating a Grid we need to declare how many rows and columns it needs. For this game we have three rows for the pieces of equipment and each piece has four columns of data. We set the value for each Grid cell individually, so slot 0 is the sprite to use, slot 1 the object to spawn, slot 2 is for how many the player starts with, and finally, slot 3 is how much it will cost to purchase. We have done this for each piece of equipment and we (the player) will start the game with single TNT only.
- Reopen
scr_Global_GameStartand call this script. We now have all the equipment categorized and ready for the Shop. - Next we need to create an inventory for the player to track what equipment they have purchased. Since the player needs to add equipment to the inventory and will also use that equipment, we need a data structure that is easily mutable. We will use a List for this purpose. Create a new Script,
scr_Global_Inventory, and start a List:globalvar inventory; inventory = ds_list_create(); ds_list_add(inventory, TNT);
We declare a global variable and then use it to hold the ID of the List we create. At the start of the game we have already established that the player will have some TNT, so that is all we need in the inventory.
- Once again, call this script in
scr_Global_GameStart. Here is the complete code:score = 0; scr_Global_Levels(); scr_Global_Colors(); scr_Global_Equipment(); scr_Global_Inventory();
- Now that we have all the data stored, we can move on to building the item menu. The first element we need to create is a purchase button. Create a new Sprite,
spr_Button_Buy, and with Remove Background turned off, loadChapter 7/Sprites/Button_Buy.gif. Center the Origin and click on OK. - Create a new Object,
obj_Button_Buy, and assignspr_Button_Buyas the Sprite. - This is a standard button so set the Parent to
obj_Button_Parent. - Add a Mouse | Left Pressed event and apply a new Script,
scr_Button_Buy_MousePressed, with the following code:if (score > ds_grid_get(equip, myItem, COST)) { ds_grid_add(equip, myItem, AMOUNT, 1); score -= ds_grid_get(equip, myItem, COST); if (ds_list_find_index(inventory, myItem) == -1) { ds_list_add(inventory, myItem); } }In order to purchase an item, we first need to check to see if the player has enough money. For this, we compare the
scoreagainst the data held in the Grid we created. You will notice that we have a variable,myItem, that has not been initialized in the button itself. We will create that variable dynamically later, when we spawn the button. If the player can purchase the item, we increase the amount the player owns, and reduce the amount of money by the price of the item. Finally, we check to see if the player already has some of the item in their current inventory. If this is the first item of its type, we add it to the inventory List. - We are now ready to spawn everything in the room with a new Object called
obj_Shop_Overlord. - Add an Other | Room Start event and attach a new Script,
scr_Shop_Overlord_RoomStart, with the code for spawning the buttons needed in the Shop:for ( i = 0; i < ds_grid_width(equip); i++ ) { buyButton = instance_create(512, (96 * i) + 152, obj_Button_Buy); buyButton.myItem = i; } instance_create(502, 440, obj_Button_Start);We start by running a loop through each row of the equipment Grid so that we know how many buttons need to be created. We then spawn a purchase button which will be stacked vertically on screen. Next we pass the
myItemvariable that is used in the mouse pressed event. The last thing we do is create a start button in the lower right corner of the screen so that the player can go back toLevelSelectoption. - We now have all the buttons placed, but we still need to draw all the other necessary information. Create a new Script,
scr_Shop_Overlord_Draw, and add it to a Draw | Draw event:draw_set_color(c_black); draw_set_halign(fa_center); for ( i = 0; i < ds_grid_width(equip); i++ ) { draw_sprite(ds_grid_get(equip, i, SPRITE), 0, 96, (96 * i) + 152); draw_set_font(fnt_Small); draw_text(116, (96 * i) + 166, ds_grid_get(equip, i, AMOUNT)); draw_set_font(fnt_Large); draw_text(300, (96 * i) + 140, ds_grid_get(equip, i, COST)); }First we need to set the font color to black and center-align the text. We then run a loop through the equipment Grid to draw each component. We first draw the proper sprite in the correct location to line up with the buttons. Here we use a small font to draw the amount of the item the player owns in the small space in the lower right corner of the sprite. We then change to a large font and display the price of the item.
- The menu is now built but it is still missing an important piece of information; how much cash the player has. Add the following at the end of the script:
draw_set_color(yellow);
draw_set_font(fnt_Medium);
draw_text(96, 416, "Cash");
draw_set_font(fnt_Large);
draw_text(96, 440, score);
draw_set_font(-1);
We set the color to our special yellow color for the rest of this text. We set a medium font to display the word
Cashand then change to a large font for the actual amount they have. Finally, we reset the font to default. - Open up
Shopand place a single instance ofobj_Shop_Overlordobject somewhere in the room. We are done with this room so click on OK. - Run the game and go to the Shop. You won't be able to purchase anything at this point but you should see the icons, buttons, and information properly displayed. It should look like the following screenshot: