
We are going to build a few different particle effects to demonstrate the various ways effects can be implemented in a game, and to look into some of the issues that might arise. To keep things straightforward, all of the effects we create will be a part of a single, global particle system. We will use both types of emitters, and utilize both shape and sprite-based particles. We will start with a Dust Cloud that will be seen anytime a Pillar is broken or destroyed. We will then add a system to create a unique shrapnel effect for each Pillar type. Finally, we will create some fire and smoke effects for the TNT explosion to demonstrate moving emitters.
The first effect we are going to create is a simple Dust Cloud. It will burst outwards upon the destruction of each Pillar and dissolve away over time. As this effect will be used in every level of the game, we will make all of its elements global, so they only need to be declared once.
- Open the Tower Toppling project we were previously working on if it is not already open.
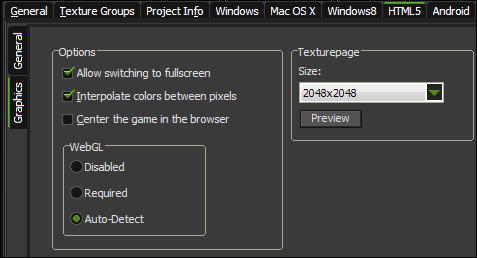
- We need to make sure that WebGL is enabled when we build the game. Navigate to Resources | Change Global Game Settings and click on the HTML5 tab.
- On the left-hand side, click on the tab for Graphics. As seen in the following screenshot, there are three options under WebGL in Options. If WebGL is Disabled, the game will not be able to use the GPU and all browsers will suffer from any potential lag. If WebGL is Required, any browser that does not have this capability will be prevented from running the game. The final option is Auto-Detect which will use WebGL if the browser supports it, but will allow all browsers to play the game no matter what. Select Auto-Detect and then click on OK.
- Now that we have WebGL activated we can build our effects. We will start by defining our particle system as a global variable by creating a new script called
scr_Global_Particles.globalvar system; system = part_system_create();
- The first effect we are going to make is the Dust Cloud which will be attached to the Pillars. For this we only need a single emitter which we will move to the appropriate position when it is needed. Create a global variable for the emitter and add it to the particle system with the following code at the end of the script:
globalvar dustEmitter;
dustEmitter = part_emitter_create(system);
- For this particle, we are going to use one of the built-in shapes,
pt_shape_explosion, which looks like a little thick cloud of dust. Add the following code to the end of the script:globalvar particle_Dust; particle_Dust = part_type_create(); part_type_shape(particle_Dust, pt_shape_explosion);
Once again we have made this a global variable, so that we have to create this Dust Cloud particle only once. We have declared only the shape attribute of this particle at this time. We will add more to this later once we can see what the effect looks like in the game.
- We need to initialize the particle system with the other global variables. Reopen
scr_Global_GameStartand call the particles script.scr_Global_Particles();
- With everything initialized, we can now create a new script,
scr_Particles_DustCloud, which we can use to set the region of the emitter and have it activate a burst of particles.part_emitter_region(system, dustEmitter, x-16, x+16, y-16, y+16, ps_shape_ellipse, ps_distr_gaussian); part_emitter_burst(system, dustEmitter, particle_Dust, 10);
We start by defining a small area for the emitter based on the position of instance that calls this script. The region itself will be circular with a Gaussian distribution so that the particles shoot out from the center. We then activate a single burst of 10 dust particles from the emitter.
- All we need to do now is execute this script from the destruction of a Pillar. Reopen
scr_Pillar_Destroyand insert the following line of code on the line before the instance is destroyed:scr_Particles_DustCloud();
- We need to add this effect to the breaking of the Pillars as well. Reopen
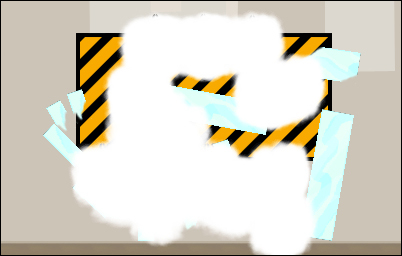
scr_Pillar_BreakApartand insert the same code in the same spot. - Save the game and then play it. When the glass Pillars are destroyed, we should see thick white clouds appearing as shown in the following screenshot:
- The particles are boring and static at this point, because we have not told the particles to do anything other than to look like the shape of a cloud. Let's fix this by adding some attributes to the particle. Reopen
scr_Global_Particlesand add the following code at the end of the script:part_type_life(particle_Dust, 15, 30); part_type_direction(particle_Dust, 0, 360, 0, 0); part_type_speed(particle_Dust, 1, 2, 0, 0); part_type_size(particle_Dust, 0.2, 0.5, 0.01, 0); part_type_alpha2(particle_Dust, 1, 0);
The first attribute we add is how long we want the particle to live for, which is a range between
15and30steps, or at the speed of our rooms, a half to a whole second. Next, we want the particles to explode outwards, so we set the angle and add some velocity. Both functions that we are using have similar parameters. The first value is the particle type for which this is to be applied. The next two parameters are the minimum and maximum values from which a number will be randomly chosen. The fourth parameter sets an incremental value every step. Finally, the last parameter is a wiggle value that will randomly be applied throughout the particle's lifetime. For the Dust Cloud, we are setting the direction to be in any angle and the speed is fairly slow, ranging only a few pixels per step. We also want to change the size of the particles and their transparency, so that the dust appears to dissipate. - Save the game and run it again. This time the effect appears much more natural, with the clouds exploding outwards, growing slightly larger, and fading out. It should look something like the next screenshot. The Dust Cloud is now complete.
The Dust Cloud effect helps the Pillar destruction appear more believable, but it lacks the bigger chunks of material one would expect to see. We want some Shrapnel of various shapes and sizes to explode outwards for each of the different types of Pillars. We will start with the Glass particles.
- Create a new Sprite,
spr_Particle_Glass, and with Remove Background checked, loadChapter 8/Sprites/Particle_Glass.gif. This sprite is not meant to be animated, though it does have several frames within it. Each frame represents a different shape of particle that will be randomly chosen when the particle is spawned. - We will want the particles to rotate as they move outwards, so we need to center the origin. Click on OK.
- Reopen
scr_Global_Particlesand initialize the Glass particle at the end of the script.globalvar particle_Glass; particle_Glass = part_type_create(); part_type_sprite(particle_Glass, spr_Particle_Glass, false, false, true);
Once we have created the global variable and the particle, we set the particle type to be a Sprite. When assigning Sprites there are a few extra parameters beyond which resources should be used. The third and fourth parameters are for whether it should be animated, and if so, should the animation stretch for the duration of the particle's life. In our case we are not using animation, so it has been set to
false. The last parameter is for whether we want it to choose a random subimage of the Sprite, which is what we do want it to do. - We also need to add some attributes to this particle for life and movement. Add the following code at the end of the script:
part_type_life(particle_Glass, 10, 20);
part_type_direction(particle_Glass, 0, 360, 0, 0);
part_type_speed(particle_Glass, 4, 6, 0, 0);
part_type_orientation(particle_Glass, 0, 360, 20, 4, false);
When compared with the Dust Cloud, this particle will have a shorter lifespan but will move at a much higher velocity. This will make this effect more intense while keeping the general area small. We have also added some rotational movement through
part_type_orientation. The particles can be set to any angle and will rotate 20 degrees per frame with a variance of up to four degrees. This will give us a nice variety in the spin of each particle. There is one additional parameter for orientation, which is whether the angle should be relative to its movement. We have set it tofalseas we just want the particles to spin freely. - To test this effect out, open up
scr_Particles_DustCloudand insert a burst emitter before the Dust Cloud is emitted, so that the Glass particles appear behind the other effect.part_emitter_burst(system, dustEmitter, particle_Glass, 8);
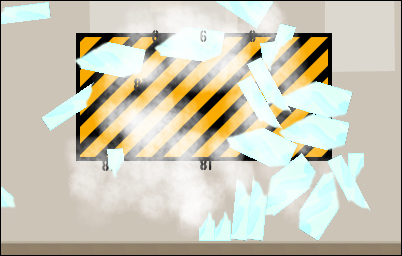
- Save the game and then play it. When the Pillars break apart, there should be shards of Glass exploding out along with the Dust Cloud. The effect should look something like the following screenshot:
- Next we need to create Shrapnel for the Wood and Steel particles. Create new Sprites for
spr_Particle_Woodandspr_Particle_Steelwith the supplied images inChapter 8/Sprites/in the same manner as we did for Glass. - As these particles are global, we cannot just swap the Sprite out dynamically. We need to create new particles for each type. In
scr_Global_Particles, add particles for both Wood and Steel with the same attributes as Glass. - Currently the effect is set to Always create Glass particles, something we do not want to do. To fix this we are going to add a variable,
myParticle, to each of the different Pillars to allow us to spawn the appropriate particle. Openscr_Pillar_Glass_Createand add the following code at the end of the script:myParticle = particle_Glass;
- Repeat the last step for Wood and Steel with the appropriate particle assigned.
- In order to have the proper particle spawn, all we need to do is reopen
scr_Particles_DustCloudand change the variableparticle_GlasstomyParticleas in the following code:part_emitter_burst(system, dustEmitter, myParticle, 8);
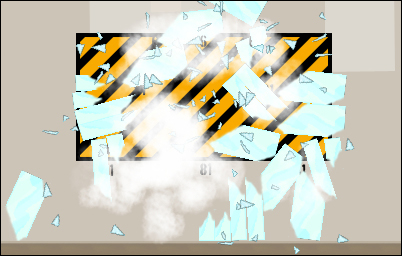
- Save the game and play the game until you can destroy all the three types of Pillars to see the effect. It should look something similar to the following screenshot, where each Pillar spawns its own Shrapnel:
When the TNT explodes, it shoots out some TNT Fragments which are currently bland looking Sprites. We want the Fragments to be on fire as they streak across the scene. We also want a cloud of smoke to rise up from the explosion to indicate that the explosion we see is actually on fire. This is going to cause some complications. In order to make something appear to be on fire, it will need to change color, say from white to yellow to orange. As we have already mentioned, due to the fact that WebGL is not supported by all browsers, we cannot utilize any of the functions that allow us to blend colors together. This means that we need to work around this issue. The solution is to use several particles instead of one.
- We will start by creating some custom colors so that we can achieve the look of fire and smoke that we want. Open
scr_Global_Colorsand add the following colors:orange = make_color_rgb(255, 72, 12); fireWhite = make_color_rgb(255, 252, 206); smokeBlack = make_color_rgb(24, 6, 0);
We already have a nice yellow color, so we add an orange, a slightly yellow tinted white, and a partially orange black color.
- In order to achieve the fake blending effect we will need to spawn one particle type, and upon its death, have it spawn the next particle type. For this to work properly, we need to construct the creation of the particles in the opposite order that they will be seen. In this case, we need to start by building the smoke particle. In
scr_Global_Particlesadd a new particle for the smoke with the following attributes:globalvar particle_Smoke; particle_Smoke = part_type_create(); part_type_shape(particle_Smoke, pt_shape_smoke); part_type_life(particle_Smoke, 30, 50); part_type_direction(particle_Smoke, 80, 100, 0, 0); part_type_speed(particle_Smoke, 2, 4, 0, 0); part_type_size(particle_Smoke, 0.6, 0.8, 0.05, 0); part_type_alpha2(particle_Smoke, 0.5, 0); part_type_color1(particle_Smoke, smokeBlack); part_type_gravity(particle_Smoke, 0.4, 90);
We start by adding the particle and using the built-in smoke shape. We want the smoke to linger for a while, so we set its life to range between a minimum of a second to almost two full seconds. We then set the direction and speed to be more or less upwards so that the smoke rises. Next, we set the size and have it grow over time. With the alpha values, we don't want the smoke to be completely opaque, so we set it to start at half transparent and fade away over time. Next, we are using
part_type_color1which allows us to tint the particle without affecting the performance very much. Finally, we apply some gravity to the particles so that any angled particles float slowly upwards. - The smoke is the final step of our effect and it will be spawned from an orange flame that precedes it.
globalvar particle_FireOrange;
particle_FireOrange = part_type_create();
part_type_shape(particle_FireOrange, pt_shape_smoke);
part_type_life(particle_FireOrange, 4, 6);
part_type_direction(particle_FireOrange, 70, 110, 0, 0);
part_type_speed(particle_FireOrange, 3, 5, 0, 0);
part_type_size(particle_FireOrange, 0.5, 0.6, 0.01, 0);
part_type_alpha2(particle_FireOrange, 0.75, 0.5);
part_type_color1(particle_FireOrange, orange);
part_type_gravity(particle_FireOrange, 0.2, 90);
part_type_death(particle_FireOrange, 1, particle_Smoke);
Once again we set up the particle using the built-in smoke shape, this time with a much shorter lifespan. The general direction is still mainly upwards, though there is more spread than the smoke. These particles are slightly smaller, tinted orange and will be partially transparent for its entire life. We have added a little bit of upward gravity, as this particle is in between fire and smoke. Finally, we are using a function that will spawn a single particle of smoke upon the death of each orange particle.
- The next particle in the chain for this effect is a yellow particle. This time we are going to use the FLARE shape, which will give a better appearance of fire. It will also be a bit smaller, live slightly longer than the orange particle, and move faster, spreading in all directions. We will not add any transparency to this particle so that it appears to burn bright.
globalvar particle_FireYellow;
particle_FireYellow = part_type_create();
part_type_shape(particle_FireYellow, pt_shape_flare);
part_type_life(particle_FireYellow, 6, 12);
part_type_direction(particle_FireYellow, 0, 360, 0, 0);
part_type_speed(particle_FireYellow, 4, 6, 0, 0);
part_type_size(particle_FireYellow, 0.4, 0.6, 0.01, 0);
part_type_color1(particle_FireYellow, yellow);
part_type_death(particle_FireYellow, 1, particle_FireOrange);
- We have only one more particle to create this effect for, which is the hottest and brightest white particle. Its construction is the same as the yellow particle, except it is smaller and faster.
globalvar particle_FireWhite;
particle_FireWhite = part_type_create();
part_type_shape(particle_FireWhite, pt_shape_flare);
part_type_life(particle_FireWhite, 2, 10);
part_type_direction(particle_FireWhite, 0, 360, 0, 0);
part_type_speed(particle_FireWhite, 6, 8, 0, 0);
part_type_size(particle_FireWhite, 0.3, 0.5, 0.01, 0);
part_type_color1(particle_FireWhite, fireWhite);
part_type_death(particle_FireWhite, 1, particle_FireYellow);
- We now have all the particles we need for this particle effect; we just need to add an emitter to spawn them. This time we are going to use a stream emitter, so that the fire continuously flows out of each Fragment. Since the Fragments are moving, we will need to have a unique emitter for each Fragment we create. This means it cannot be a global emitter, but rather a local one. Open
scr_TNT_Fragment_Createand add the following code at the end of the script:myEmitter = part_emitter_create(system); part_emitter_region(system, myEmitter, x-5, x+5, y-5, y+5, ps_shape_ellipse, ps_distr_linear); part_emitter_stream(system, myEmitter, particle_FireWhite, 5);
We create an emitter with a fairly small area for spawning with balanced distribution. At every step, the emitter will create five new Fire particles as long as the emitter exists.
- The emitter is now created at the same time as the Fragment, but we need the emitter to move along with it. Open
scr_TNT_Fragment_Stepand add the following code:part_emitter_region(system, myEmitter, x-5, x+5, y-5, y+5, ps_shape_ellipse, ps_distr_linear);
- As already mentioned we need to destroy the emitter, otherwise it will never stop streaming particles. For this we will need to open
obj_TNT_Fragmentand add adestroyevent with a new Script,scr_TNT_Fragment_Destroy, which removes the emitter attached.part_emitter_destroy(system, myEmitter);
This function will remove the emitter from the system without removing any of the particles that had been spawned.
- One last thing we need to do is to uncheck the Visible checkbox, as we don't want to see the Fragment sprite, but just the particles.
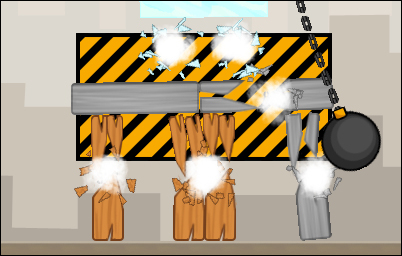
- Save the game and detonate the TNT. Instead of just seeing a few Fragments, there are now streaks of fire jetting out of the explosion that turn into dark clouds of smoke that float up. It should look something like the following screenshot:

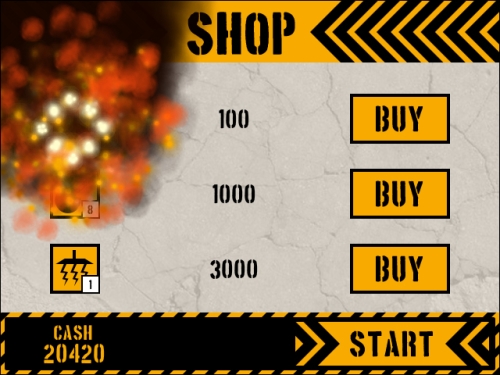
At this point, we have built a good variety of effects using various particles and emitters. The effects have added a lot of polish to the game, but there is a flaw with the particles. If the player decides to restart the room or go to the SHOP immediately after the explosion has occurred, the emitters will not be destroyed. This means that they will continue to spawn particles forever, and we will lose all references to those emitters. The game will end up looking like the following screenshot:
- The first thing we need to do is to destroy the emitters when we leave the room. Luckily, we have already written a script that does exactly this. Open
obj_TNT_Fragmentand add a Room End event and attachscr_TNT_Fragment_Destroyto it. - Even if we destroy the emitters before changing rooms, any particles remaining in the game will still appear in the next room, if only briefly. What we need to do is clear all the particles from the system. While this might sound like it could be a lot of work, it is actually quite simple. As Overlord is in every level, but not in any other room, we can use it to clean up the scene. Open
obj_Overlord, add a Room End event and attach a new Script,scr_Overlord_RoomEnd, with the following line of code:part_particles_clear(system);
This function will remove any particle that exists within the system, but will not remove the particle type from memory. It is important that we do not destroy the particle type, as we would not be able to use a particle again if its type no longer exists.
- Save the game, explode some TNT, and restart the room immediately. You should no longer see any particles in the scene.