
After all the hard work, our game is ready to be released. In this chapter we are going to upload our game to a web server, so that it can be played on the Internet by anyone. We will look at how we can allow users to log into their Facebook account, and post the score of a level to their Facebook walls. We will also integrate Flurry analytics to track useful data that will allow us to understand how and where people are playing the game. Finally, we will briefly talk about earning money from games.
In order for people to play the game, we need to get it up onto a website, preferably your own. This means we are going to need to find a place to host the website, export a final build of the game, and of course utilize an FTP program so that we can upload the game.
All throughout the book we have been testing and playing our games using GameMaker: Studio's built-in server emulator. It allows us to see how the game will perform as if it were on an actual website, but it is only accessible to the computer we are developing on. To upload the game to a website, we will need to build all the files into the proper HTML5 format.
- Open the Tower Toppling game that we have been working on, if it isn't already open.
- Before we create the final build, we should look at some of the options available. Navigate to Resources | Change Global Game Settings, and then go to the HTML5 tab.
In the General subtab there are four sections of options as can be seen in the next screenshot. Looking at HTML5 File Options, it is possible to use a custom web page file and a custom loading bar if we want a specific layout or additional content on the page. Creating these files requires knowledge of HTML and JavaScript, and a code editor that supports these languages, both of which are outside the scope of this book.

Splash screens are seen before the game is loaded and are actually embedded into the index.html code. It requires a PNG file that should be of the same size as the game area; if it is of a different size, it will be scaled to fit the proper dimensions. One drawback of using a splash screen is that the image will be drawn instead of the loading bar. As it is generally considered a best practice to always let the user know what is occurring, especially when it comes to the loading of data, we will not be adding a splash screen to this game.
When we compile the game, GameMaker: Studio will create a file named favicon.ico in the root directory with the icon set in the Global Game Settings. Users will see this icon in the browser tab along with the name of the page that the tab is showing; it is also visible when saving the page as a bookmark. The icon, a common feature of most websites, is a small image in the ICO format used for displaying a representative symbol of the website. Most image editors do not natively save out to ICO format and usually require a plugin to do so. Luckily, there are plenty of free websites that will convert any image into an icon for us. I personally prefer using http://iconverticons.com/online/ because they accept most common image formats and convert into all the major icon formats including Windows, Mac, and web icons. Once we have a proper ICO file, we can then use it in our game.
- Let's update Icon by clicking on Update and by loading
Chapter 9/Resources/Extras/GameIcon.ico. Click on OK. - The game is now ready to be exported. Navigate to File | Create Application and save the game to a new folder called
Destructin the game project directory. - Click on Save and you will see the game compile and create all the files required to run your game. In the
Destructfolder you should see two files and a folder. There is afavicon.icofile, and anindex.htmlfile which is the web page that will display the game. The folder,html5game, contains all the assets, such as all the sounds in both OGG and MP3 formats, a few PNG files starting withindex_texturethat contain all the graphics compiled into individual sprite sheets, and anindex.jsfile that contains all the game functionality. There is also aparticlesfolder that contains all the images used for the particle shapes.
The game has been built; we just need a place to put it. There are many options available on the Internet for hosting a website for the game. These can range from free web hosting to owning a personal server and everything in between. Choosing a host can be very time consuming due to all the different packages available, the varying price-points, and what our overall intentions are. Every developer will need to consider things, such as how many people are expected to play the game, will more games be added in the future, and will the site have advertising on it, and so on. A free web hosting service might suffice if the game will only be shown to family and friends, but if the goal is to earn money from the game it is better to use some form of paid service. When selecting a provider, the main features we want to look for are: how much server space, the amount of bandwidth, FTP access, and maximum file size.
Additionally, you should ensure that the site allows MP3 files to be uploaded, as many free and a few paid sites do not allow this. Popular sites, such as www.godaddy.com and www.globat.com offer plenty of server space and bandwidth for a very affordable price that will suit most developers, or at least when they first start releasing games.
In order to move onto the next step, make sure you have secured web server space and that you have FTP access to it.
To get our game onto the server we need to use an FTP client to transfer the files. There are many free downloadable FTP clients available, such as WinSCP, CuteFTP, and FileZilla. Some browsers can be used for FTP if the appropriate plugin is installed, such as FireFTP for Firefox. Some web hosting services even offer drag-and-drop FTP capabilities. For this project we will be using WinSCP which can be downloaded from http://winscp.net.
- Download the WinSCP client and install it according to the instructions. When the Initial user settings page appears, select Commander interface as shown in the following screenshot:

- Run WinSCP.
- As this is the first time we are accessing the website's FTP, we will need to click on New to create a new FTP session.
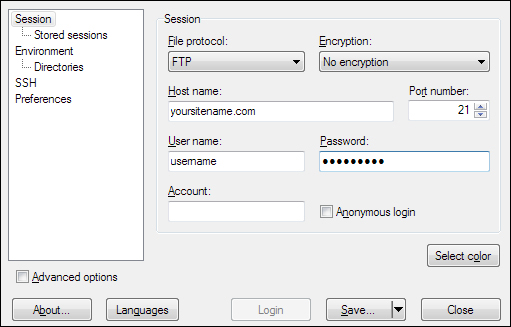
- We need to select a file protocol method by navigating to Session | File Protocol to transfer the files. The default is SFTP (Secure FTP), but many hosting sites only allow for standard FTP access, so we will go with that. Navigate to File Protocol | FTP.
- Next we need to enter the server FTP address, often your website name, plus your username and password. It should look something like the following screenshot:
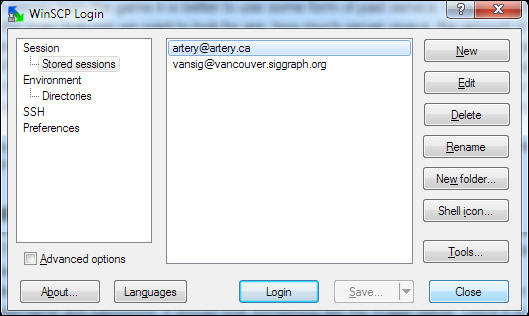
- To make it easier to access the site in the future we can save these settings, including the password. Click on Save.
- This will take us back to the login screen and we can now see the FTP connection in the Stored sessions list as shown in the next screenshot. To open a connection, we can double-click the site name, or select the site name and click on Login.
If all the information has been correctly entered, a directory window should open. As seen in the next screenshot, there are two panes with file directories. The left-hand side is the local drives of the computer and the right-hand side is the server directory. The server should be open to the root directory though it might be displayed as being in a folder called
wwworpublic_html. There likely is at least one file in the directory already,index.html, which would be the default page that is seen when people go to the domain.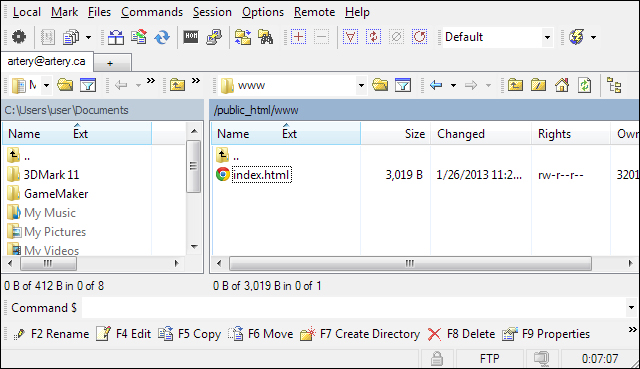
- In the left panel, locate the
Destructfolder where our game has been exported to. Drag the entire folder over to the right panel to transfer all the files to the server. - A pop-up dialog box will ask if we want to copy all the files over. Click on Copy. It may take a few moments to transfer everything over.
- The game has now been uploaded and is accessible on the Internet. To access it, just open a browser and go to the website and the
Destructsubdirectory, for example,http://www.yoursitename.com/Destruct/.