
Analytics is the process of gathering and finding patterns within a set of data. This data can be any quantifiable action, such as a mouse click, and its related elements, such as what was clicked. This information allows developers to see how users are using their product. It is incredibly useful when creating games, because there are so many things that can be tracked.
We are going to implement Flurry Analytics, one of the two systems GameMaker: Studio has built-in and is the most robust. While it is possible to track anything and everything, it is generally better to focus on things that are most relevant to the user experience. For our game we are going to track each level's score, equipment used, and times played. We will only send this data out upon the player successfully completing a level. This will allow us to see how often each level is played, what equipment is used the most, the variation in scores, how hard each level is, and where people quit the game on average.
In order to use Flurry Analytics, we need to have an account with the service, an application to send the data to, and have it activated in GameMaker: Studio. Once that has been done, a new build needs to be uploaded to the site and people need to play the game.
- First, let's sign up for Flurry analytics. Go to http://www.flurry.com/ and sign up for a free account, following the site's directions.
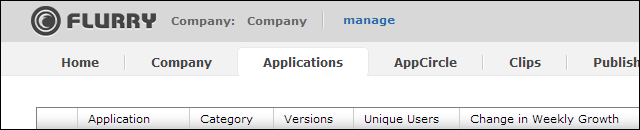
- Once the account has been set up and you have logged in, we should be on the developer home page. On the menu bar click on the Applications tab to go to the Applications page as shown in the following screenshot:
- We don't have any application at this point, so we need to add one. Click on Add a New Application.
- The next page asks for a platform to be selected. Click on the Java icon.
- Next we need to add in some basic info for the application. As seen in the next screenshot, enter the name of the game,
Destruct, and choose an appropriate category, in our case, Games - Simulation seems to fit best. Then click on Create App.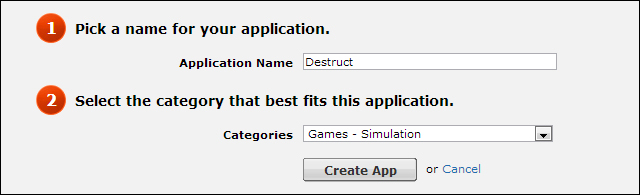
- On the next page it asks how we want to integrate the SDK with a couple of options. GameMaker: Studio already has this integrated into the software, which means we can skip this step. Click on Cancel to finish this step and return to the Home page.
- We should now see our application in Application Summary, as can be seen in the next screenshot. We need to get our application ID, so click on Destruct.

- Next, we need to navigate to Manage | App Info in the left menu to access the page with our application information. At the bottom of the list, as seen in the next screenshot, is the API Key. This key is needed to connect the game in GameMaker: Studio into this analytics app. Copy this key. We are done with this site for now.

- Reopen the project file and open Global Game Settings.
- Click on the right arrow at the top of the Global Game Settings until you see the Analytics tab as shown in the next screenshot. Click on the Analytics tab.
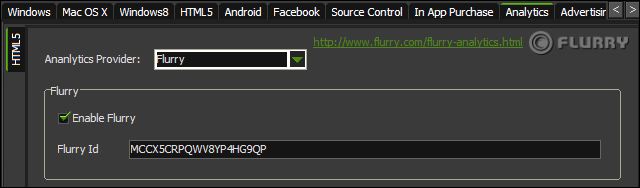
- In the HTML5 subtab, set Analytics Provider: to Flurry, check the box for Enable Flurry, and paste the API Key into Flurry Id. We now have everything set up and ready to output some data.
Now that we can send out data we just need to implement it into the existing game. We need to add some bits of code into several scripts, plus create some new ones, in order to get useful, trackable information. We want to track the level being played, usage of each piece of equipment, how many times the level has been played, and the score of the level.
- We already have constants for tracking the equipment (
TNT: 0, WRECKINGBALL: 1,MAGNET: 2) that can be reused for tracking purposes. That leaves us needing some additional constants for the level, the attempts, and the score. Navigate to Resources | Define Constants and addLEVEL: 3, ATTEMPTS: 4, LVLSCORE: 5. - We need to keep this data in a grid accessible globally. Create a new Script,
scr_Global_Analytics, and initialize values for the whole game.globalvar levelData; levelData = ds_grid_create(totalLevels, 6); for (i = 0; i < totalLevels; i++) { ds_grid_set(levelData, i, TNT, 0); ds_grid_set(levelData, i, WRECKINGBALL, 0); ds_grid_set(levelData, i, MAGNET, 0); ds_grid_set(levelData, i, LEVEL, level[i, 0]); ds_grid_set(levelData, i, ATTEMPTS, 0); ds_grid_set(levelData, i, LVLSCORE, 0); }We start by creating a global data structure that has six values for each level in the game. We run a loop to set the initial values for each piece of equipment, the level by grabbing the level name from the previously created level array, the amount of attempts, and the level score, all set to zero.
- Reopen
scr_Global_GameStartand execute this script. - Next, we need to insert some code to change these values for each level. We will start with tracking the attempts for each level. This is going to require changes to several scripts. The first one we will change is
scr_Button_LevelSelect_MousePressed, where we need to add an attempt when the player selects a level. In theelsestatement, before we change rooms, add the following code:currentLevel = ds_grid_value_x(levelData, 0, LEVEL, totalLevels-1, LEVEL, myLevel); ds_grid_add(levelData, currentLevel, ATTEMPTS, 1);
We search through the levelData grid for the room that has been selected in order to find out what row we need to change. Once we have the row, we add one attempt to that level's data.
- As we are tracking attempts, we need to insert the same code into
scr_Menu_Button_Restartjust before we restart the room. - Finally, we also need to add similar code to
scr_Menu_Button_NextLevel, except we cannot usemyLevelto find the room. Instead, we need to look ahead to the next room. Just before we change rooms, insert the following code:currentLevel = ds_grid_value_x(levelData, 0, LEVEL, totalLevels-1, LEVEL, level[i+1,0]); ds_grid_add(levelData, currentLevel, ATTEMPTS, 1);
- With the attempts now being tracked, we can move onto tracking the rest of the desired data. Create a new Script,
scr_Level_Stats, and update all the relevant stats.levelCompleted = ds_grid_value_x(levelData, 0, LEVEL, totalLevels-1, LEVEL, room) for (i = 0; i < ds_grid_width(equip); i += 1) { equipUsed = abs(ds_grid_get(obj_Menu.startEquip, i, AMOUNT) - ds_grid_get(equip, i, AMOUNT)); ds_grid_set(levelData, levelCompleted, i, equipUsed); } levelScore = obj_Menu.tempScore - obj_Menu.tempCost ds_grid_set(levelData, levelCompleted, LVLSCORE, levelScore);We start by finding the row for the level that has just been completed. We then run a loop through the equipment to see how many were used in the level, by subtracting the remaining equipment from how many the player started with. To ensure we get a positive number we use the abs function which returns an absolute value. We also grab the final score of the level and update the grid.
- We want to run this script only upon the successful completion of a level, and the easiest place to put this is into
scr_WinCondition, just before the last line of code where we return a true value.scr_Level_Stats();
The data is now properly updated each time the level is played and successfully completed. All we need to do now is send the data to Flurry. Flurry does not update in real time, but instead compiles the data several times a day. If we send bits and pieces of data individually throughout the entire play session, that data might be separated when it is compiled, resulting in anomalies. To help prevent this, we are going to send all the relevant data of every level each time we want to update. Flurry will recognize the changes and keep the data together.
- Create a new Script,
scr_Analytics_Send, and run a loop through all the level data and send it out.for (a = 0; a < totalLevels; a++) { levelName = room_get_name(ds_grid_get(levelData, a, LEVEL)); levelScore = ds_grid_get(levelData, a, LVLSCORE); levelAttempt = ds_grid_get(levelData, a, ATTEMPTS); usedTNT = ds_grid_get(levelData, a, TNT); usedWB = ds_grid_get(levelData, a, WRECKINGBALL); usedMagnet = ds_grid_get(levelData, a, MAGNET); analytics_event_ext(levelName, "Level Score", levelScore, "Attempts", levelAttempt, "TNT Used", usedTNT, "WBalls Used", usedWB, "Magnets Used", usedMagnet); }In this loop, we start by grabbing the name of the room stored in the grid and all the values for each piece of data. Using the function
analytics_event_extwe can send up to 10 different pieces of data to Flurry. The first parameter is the category of data, sent as a string, in this case we are using the name of the levels as categories. All the following parameters are key/value pairs with the name of the data we are tracking and its associated value. - We need to send an initial set of analytics upon the start of the game, so we can start with a clean slate. Reopen
scr_Global_Analyticsand send the data at the end of the script.scr_Analytics_Send();
- We also need to send the data out upon completion of the level. Reopen
scr_Level_Statsand send the data at the end of the script as well. - We are now finished implementing the analytics. All that is left is to put it up on the web. Save the game, click on Create Application, and upload the new version of the game to the server.
- Play the game several times, making sure to use differing amounts of equipment and retrying levels each time. We want to have some basic data tracked, so we can see what it all means.
We are tracking several pieces of data, and Flurry will be compiling this information into event logs. We can see when a session has occurred and what happened during that play session. While this is somewhat useful, Flurry breaks things down even further on a global scale that will show us how each level is played on average. Let's take a moment to see what Flurry provides us with. Before we get started, it is important to know that Flurry Analytics are not updated in real time, and it may take a few hours before we see any data appear.
- Log in to your Flurry account and go to your Destruct application page.
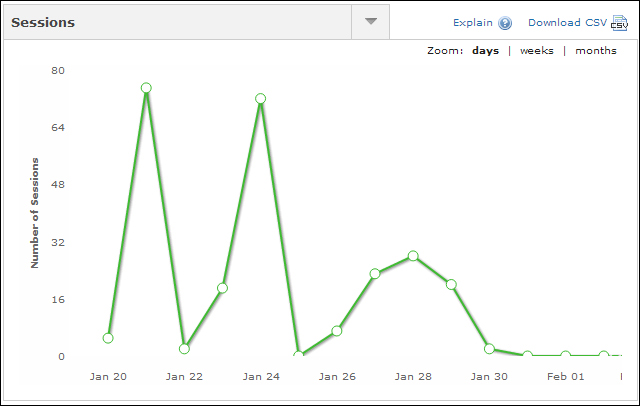
- The very first statistic you will see on the Dashboard is the Sessions graph, as shown in the next screenshot. Here we can see how many times the game was played each day. There is also information, such as average duration of each play session, where in the world people are playing the game from, and so on.
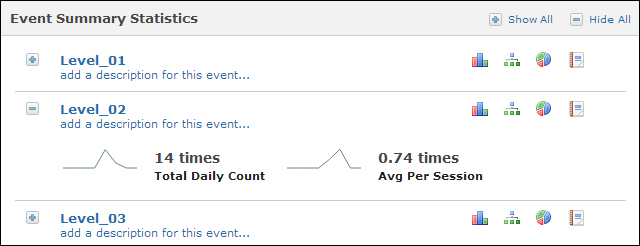
- Click on Events on the left-hand side menu. The first option is the Event Summary, as shown in the following screenshot, which displays how often the level was played and the percentage of users that have completed this level per session.
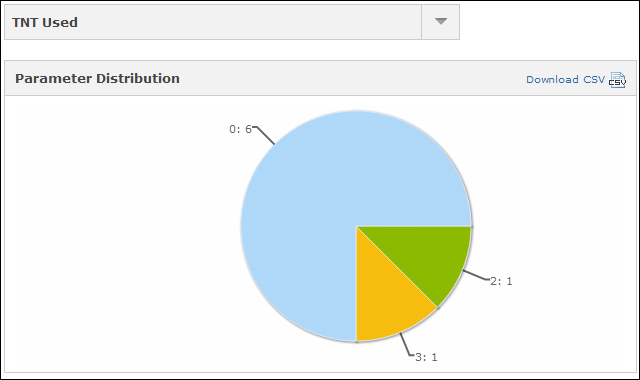
- If we click on the little pie icon of a level, we will get a breakdown of the individual event parameters. Each parameter will show the total usage of all sessions. As can be seen in the following screenshot, one player used three pieces of TNT, another needed only two, and six players did not use any TNT at all.
Having this type of information is incredibly valuable. Knowing where players stop playing the game can tell us where improvements can be made. Tracking what the player is using during the game lets us know if the game is balanced properly. The more useful data we can gather, the better we can apply the lessons learned to future games.