
Now that the keyboard is connected, let's figure out how to accept commands on Raspberry Pi. Now that you can enter commands wirelessly, the next step is to create a program that can take these commands and then have your project execute them. There are a couple of options here; you'll see examples of both. The first is to simply include the command interface in your program. Let's take an example of the program you wrote to move your wheeled robot, dcmotor.py. If you want, you can copy that program using cp dcmotor.py remote.py.
In order to add user control, you need two new programming constructs, the while loop and the if statement. Let's add them to the program and then we will learn what they do. The following is a listing of the area of code you are going to change:
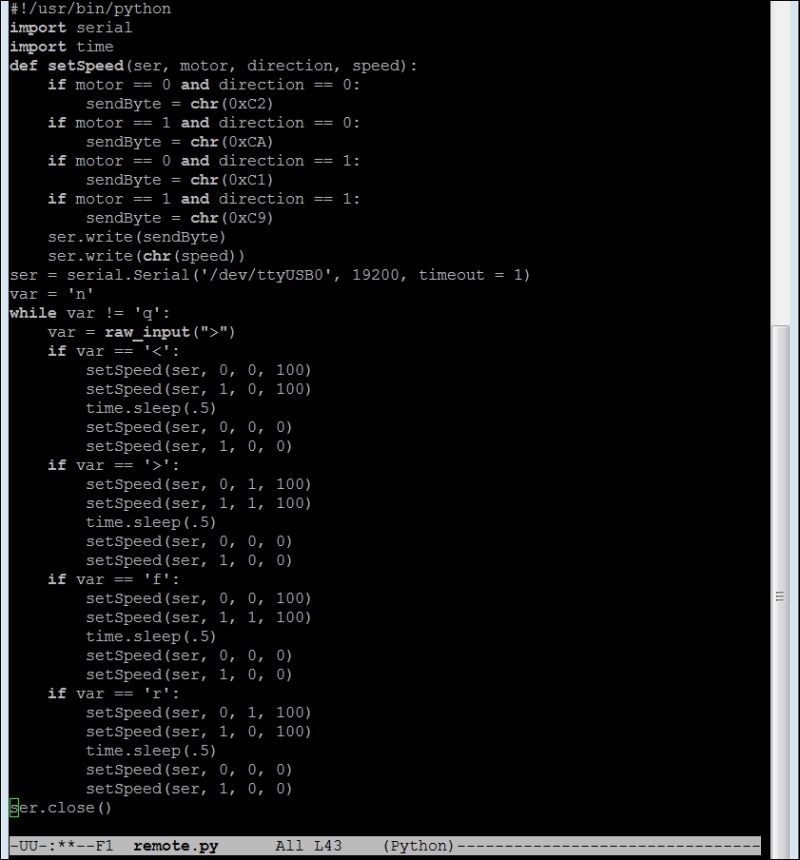
You will edit your program by making some changes. Add the code in the preceding screenshot just below the ser = serial.Serial('/dev/ttyUBS0', 19200, timeout = 1) statement. The code can be explained as follows:
- The
var = 'n'statement will define a variable namedvarand it will be of the typecharacter, which you will use in your program to get the input from the user. - The
while var != 'q':statement will place your program in a loop. This loop will keep repeating until you or the user enters the letterq. - The
var = raw_input(">")statement will get thecharactervalue from the user. The">"text is simply the character that will be displayed for the user to enter something. - The
if var == '<':statement checks the value that you get from the user. If it is a<character, the robot will turn left by running the right DC motor for half a second. You will need to determine how much time is required to run the right DC motor for a left turn. The actual time value,0.5in this case, may need to be higher or lower. - The next few lines send a
Speedcommand to the motor, wait for 0.5 seconds, and then send a command for the motor to stop. - The
if var == '>':statement checks the value that you get from the user. If it is a>character, the robot will turn left by running the left DC motor for half a second. You will need to determine how much time is required to run the left DC motor for a right turn. The actual time value,0.5in this case, may need to be higher or lower. - The next few lines send a
Speedcommand to the motor, wait for 0.5 seconds, and then send a command for the motor to stop. - The
if var == 'f':statement checks the value that you get from the user. If it is afcharacter, the robot will run forward by running the right and left DC motors for half a second. You will need to determine the speed to set each motor to follow a forward path. - The next few lines send a
Speedcommand to both motors, wait for 0.5 seconds, and then send a command for both motors to stop. - The
if var == 'r':statement checks the value that you get from the user. If it is archaracter, the robot will run backward by running the right and left DC motors for half a second. You will need to determine the speed to set each motor to follow a backward path. - The next few lines send a
Speedcommand to both motors, wait for 0.5 seconds, and then send a command for both motors to stop.
Once you have edited the program, save it and make it executable by typing chmod +x remote.py. Now you can run the program, but you must run it by typing the command using the wireless keyboard. If you are not yet directly logged into Raspberry Pi, make sure you can see the LCD screen and access it via the wireless keyboard. You can now disconnect the LAN cable; you will be able to communicate with Raspberry Pi via the wireless keyboard. The system should look like the following image:
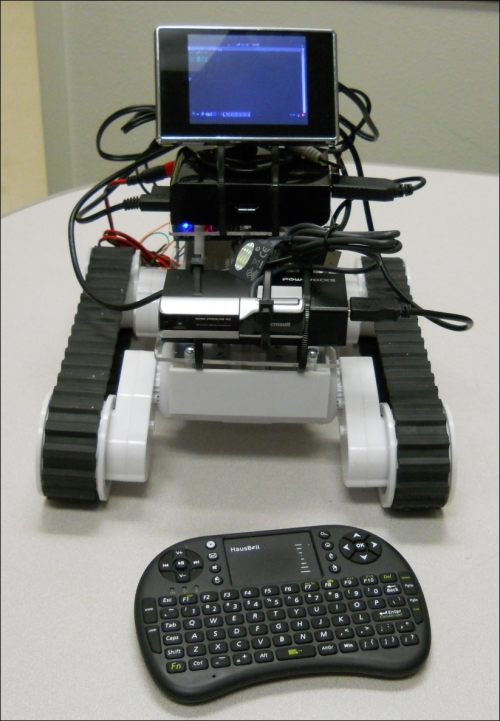
To use this system, type cd to go to the directory that holds the remote.py program. In my case, this file was in the /home/pi/track directory, so I did a cd track from my home directory. Now you can run the program by typing ./remote.py. The screen will display a prompt, and each time you type the appropriate command (<, >, f, and r) and press Enter, your robot will move. You need to be advised that the range of this technology is at best around 30 feet, so don't let your robot get too far away.
Now you can move your robot around using the wireless keyboard! You can even take your robot outside. You don't need the LAN cable to run your programs because you can run them using the LCD display and keyboard.
There is one more change you can make so that you don't have to hit the Enter key after each input character is typed. In order to make this work, you'll need to add some inclusions to your program and then add one function that can get a single character without the Enter key. The following screenshot shows the first set of changes you'll need to make:
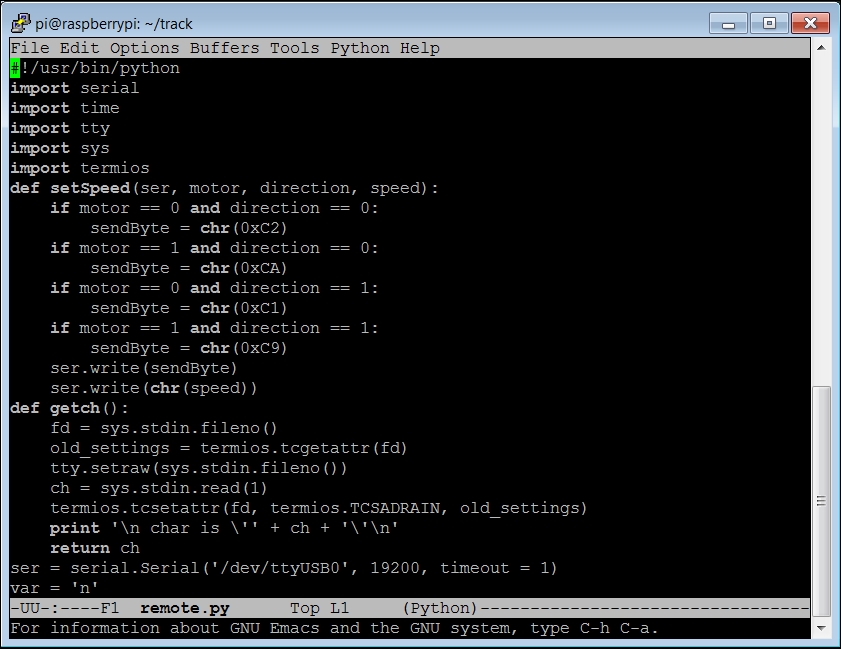
The specifics of the preceding part of the file are listed as follows:
- You'll need to add
import tty,import sys, andimport termios. All these are the libraries you'll need for your function to work. Thetermioslibrary is the general I/O library used in order to get characters from the keyboard. - The
setSpeed(ser, motor, direction, speed):function is unchanged from thedcmotor.pycode. - The
def getch():function gets a single character without requiring the Enter key after each key stroke. Theprintstatement in the function is optional; you can use it to map the different keys of the keyboard. - The next set of changes are shown in the following screenshot:
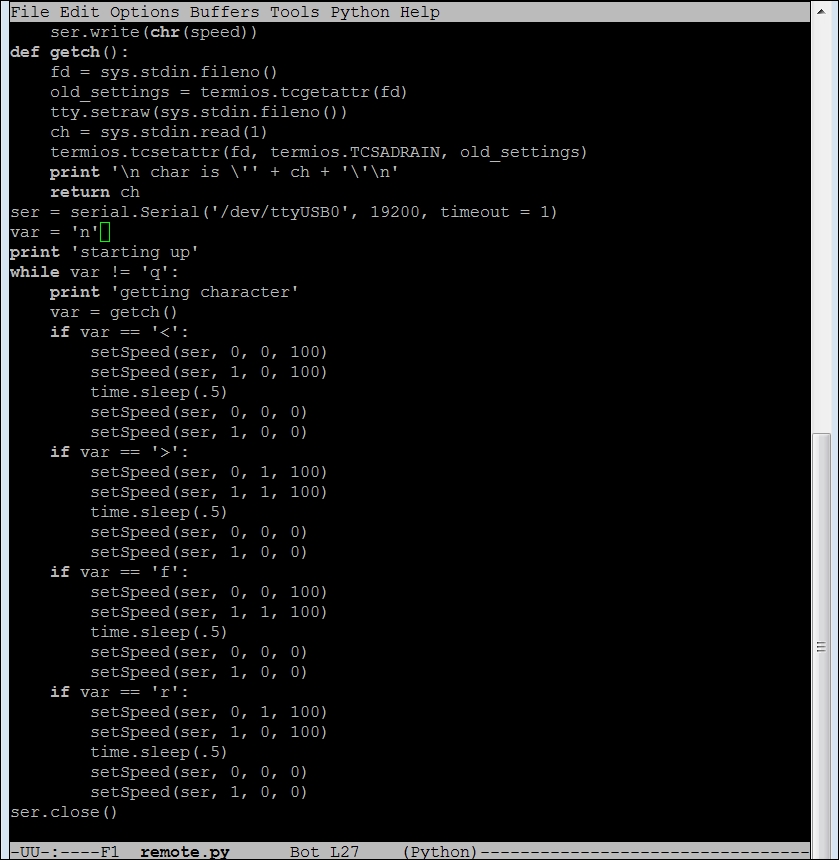
- The
var = getch()statement calls the function that returns the character, without having to type the Enter key. Now, it is important to note that the program changes the terminal settings. So, when you run your program, you can no longer stop the program by typing Ctrl + C. You'll have to typeqto restore your terminal settings.
Many users are comfortable using gaming keypads. There are several that come with a wireless connection. You could try connecting one of these to your robot if you want it to seem more like a real video game. In my system, I used the wireless keypad by HausBell and mapped the arrow keys at the top of the keyboard to tell my robot to go forward, backward, left, and right. I figured out which key strokes these translated to by simply running my program and looking at the print statement in the program. You can also add additional functionality to the program to stop the car if the program senses if it has been a long time since a key stroke has come in, in case you've lost connection to the keyboard.