
Now that you know how to enter and run a simple Python program on Raspberry Pi, let's look at some more complex programming tools. Specifically, we'll cover what to do when we want to determine what instructions to execute and show how to loop our code to do that more than once. I'll give a brief introduction on how to use libraries in the Python Version 2.7 code and how to organize statements into functions. Finally, we'll very briefly cover object-oriented code organization.
As you have seen in previous examples, your programs normally start by executing the first line of code and then continue with the next lines until your program runs out of code. This is fine; but, what if you want to decide between two different courses of action? We can do this in Python using an if statement. The following screenshot shows some example code:
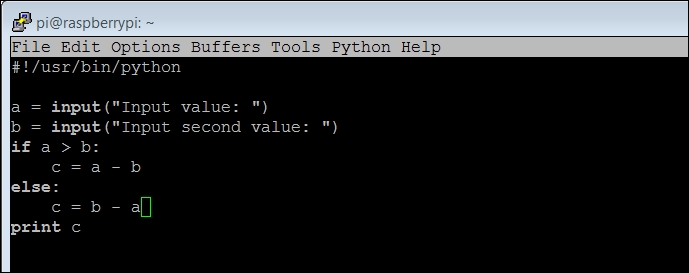
The following is the detail of the code shown in the previous screenshot, line by line:
#!/usr/bin/python– This is included so you can make your program executable.a = input("Input value: ")– One of the basic needs of a program is to get input from the user.raw_inputallows us to do that. The data will be input by the user and stored ina. The promptInput value:will be shown to the user.b = input("Input second value: ")– This data will also be input by the user and stored inb. The promptInput second value:will be shown to the user.if a > b:– This is anifstatement. The expression evaluated in this case isa > b. If it istrue, the program will execute the next statement(s) that is indented. If not, it will skip that statement(s); in this case,c = a - b.else:– Theelsestatement is an optional part of the command. If the expression in theifstatement is evaluated asfalse, the indented statement(s) will be executed; in this case,c = b - a.print c– Another basic purpose of our program is to print out results. Theprintcommand prints out the value ofc.
You can run the previous program a couple of times, checking both the true and false possibilities of the if expression as shown in the following screenshot:

Another useful construct is the while construct; it will allow us to execute a set of statements over and over until a specific condition has been met. The following screenshot shows a set of code that uses this construct:
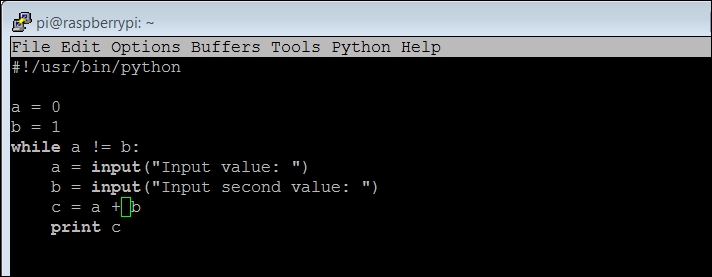
The following are the details of the code shown in the previous screenshot:
#!/usr/bin/python– This is included so you can make your program executable.a = 0– This line sets the value of variableato0. We'll need this only to make sure we execute the loop at least once.b = 1– This line sets the value of the variablebto1. We'll need this only to make sure we execute the loop at least once.while a != b:– The expressiona != b(in this case,!=means not equal to) is verified. If it istrue, the statement(s) that is indented is executed. When the statement is evaluated asfalse, the program jumps to the statements after the indented section.a = input("Input value: ")– One of the basic purposes of a program is to get input from the user.raw_inputallows us to do that. The data will be input by the user and stored ina. The promptInput value:will be shown to the user.b = input("Input second value: ")– This data will also be input by the user and stored inb. The promptInput second value:will be shown to the user.c = a + b– The variablecis loaded with the sum ofaandb.print c– Theprintcommand prints out the value ofc.
Now you can run the program. Notice that when you enter the same value for a and b, the program stops, as shown in the following screenshot:

The next concept we need to cover is how to put a set of statements into a function. We use functions to organize code, grouping sets of statements together when it makes sense that they be organized and in the same location. For example, if we have a specific calculation that we might want to perform many times, instead of copying the set of statements each time we want to perform it, we group them into a function. I'll use a fairly simple example here, but if the calculation takes a significant number of programming statements, you can see how that would make our code significantly more efficient. The following screenshot shows the code:

The following is the explanation of the code from our previous example:
#!/usr/bin/python– This is included so you can make your program executable.def sum(a, b):– This line defines a function namedsum. Thesumfunction takesaandbas arguments.c = a + b– Whenever this function is called, it will add the values in the variableato the values in variableb.return c– When the function is executed, it will return the variablecto the calling expression.if __name__=="__main__":– In this particular case, you don't want your program to start executing each statement from the top of the file; you would rather it started at a particular point. This line tells the program to begin its execution at this particular point.d = input("Input value: ")– This data will also be input by the user and stored inb. The promptInput second value:will be shown to the user.e = input("Input second value: ")– This data will also be input by the user and stored inb. The promptInput second value:will be shown to the user.f = sum(d, e)– The functionsumis called. In thesumfunction, the value in variabledis copied to the variableaand the value in the variableeis copied to the variableb. The program then goes to thesumfunction and executes it. The return value is then stored in the variablef.print f– Theprintcommand prints out the value off.
The following screenshot is the result received when you run the code:

The next topic we need to cover is how to add functionality to our programs using libraries/modules. Libraries, or modules as they are sometimes called in Python, include functionality that someone else has created and that you want to add to your code. As long as the functionality exists and your system knows about it, you can include the library in the code. So, let's modify our code again by adding the library as shown in the following screenshot:
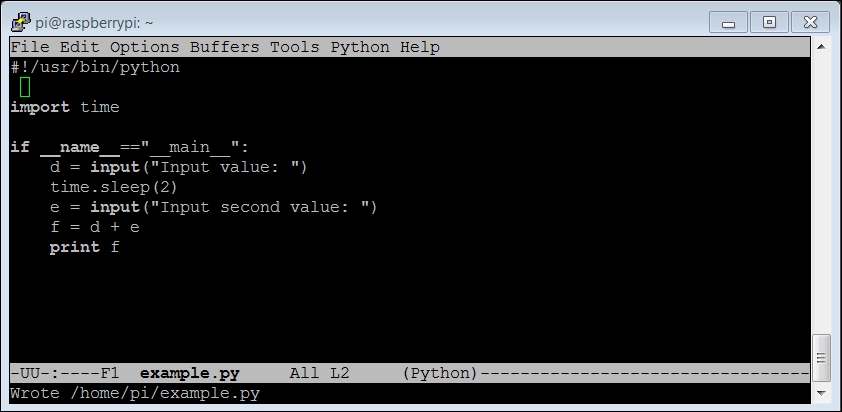
The following is the line-by-line description of the code:
#!/usr/bin/python– This is included so you can make your program executable.import time– This includes thetimelibrary. Thetimelibrary includes a function that allows you to pause for a specified number of seconds.if __name__=="__main__":– In this particular case, you don't want your program to start executing each statement from the top of the file; you would rather it started from a particular line. This line tells the program to begin its execution at this specified point.d = input("Input value: ")– This data will also be input by the user and stored inb. The promptInput second value:will be shown to the user.time.sleep(2)– This line calls thesleepfunction in thetimelibrary, which will cause a two-second delay.e = input("Input second value: ")– This data will also be input by the user and stored inb. The promptInput second value:will be shown to the user.f = d + e– Thefvariable is loaded with the valued + e.print f– Theprintcommand prints out the value off.
The following screenshot shows the result after running the previous example code:

Of course, this looks very similar to other results. But, you will notice a pause between you entering the first value and the second value appearing.
The final topic we need to cover is object-oriented organization in our code. In object-oriented code, we organize a set of related functions in an object. If, for example, we have a set of functions that are all related, we can place them in the same class and then call them by associating them with a specified class. This is a complex and difficult topic, but let me just show you a simple example in the following screenshot:

The following is an explanation of the code in the previous screenshot:
#!/usr/bin/python– This is included so you can make your program executable.class ExampleClass(object):– This defines a class namedExampleClass. This class can have any number of functions associated with it.def add(self, a, b):– This defines the functionaddas part ofExampleClass. We can have functions that have the same names as long as they belong to different classes. This function takes two arguments:aandb.c = a + b– This statement indicates the simple addition of two values.return c– This function returns the result of the addition.if __name__=="__main__":– In this particular case, you don't want your program to start executing each statement from the top of the file; you would rather it started from a specific line. This line tells the program to begin its execution at the specified point.example = ExampleClass()– This defines a variable namedexample, the type of which isExampleClass. This variable now has access to all the functions and variables associated with the classExampleClass.d = input("Input value: ")– This data will also be input by the user and stored in the variableb. The promptInput second value:will be shown to the user.e = input("Input second value: ")– This data will also be input by the user and stored inb. The promptInput second value:will be shown to the user.f = example.add(d,e)– The instance ofExampleClassis called and its functionaddis executed by sendingdandeto that function. The result is returned and stored inf.print f– Theprintcommand prints out the value of the variablef.
The result after running the previous example code is as shown in the following screenshot:

The result shown in the previous screenshot is the same as the other codes discussed earlier, and there is no functionality difference; however, object-oriented techniques have been used to keep similar functions organized together to make the code easier to maintain. This also makes it easier for others to use your code.
Now that you have a feel for the basics of Python coding, I'll introduce you very briefly to the C coding language.