
Now you can remote to your device and control it via a wireless USB device as well as a wireless LAN connection. Now, let's look at a technology that can extend the wireless connection much further. The technology is ZigBee, and it is made for longer range wireless communications.
The ZigBee standard is built upon the IEEE 802.15.4 standard: a standard that was created to allow a set of devices to communicate with each other in order to enable a low data rate coordination of multiple devices. The ZigBee part of the standard ensures interoperability between the vendors of these low-rate devices. The IEEE 802.15.4 part of the standard specifies the physical interface, and the ZigBee part of the standard defines the network and applications interface. To find out more about ZigBee, try www.zigbee.org. Since we are only interested in the physical interface working together, you can buy IEEE 802.15.4 devices. But, ZigBee devices are a bit more prevalent, are supersets of IEEE 802.15.4, and are also quite inexpensive.
The other standard that you might hear as you try to purchase or use devices like these is XBee. This is a specific company's implementation, Digi, of several different wireless standards with standard hardware modules that can connect in many different ways to different embedded systems. They make some devices that support ZigBee; the following is an image of this type of device, which supports ZigBee attached to a shield that provides a USB port:

As noted at the beginning of this chapter, you will be learning how to use this specific device. The advantage of using this device is that it is configured to make it very easy to create and manage a simple link between two XBee Series 1 devices. Make sure you have an XBee device that supports ZigBee Series 1. You'll also need to purchase a shield that provides a USB port connection to the device.
Now, let's get started with configuring your two devices to make them talk. I'll give an example here using Windows and a PC. A Linux user can do something similar but using a Linux terminal program. An excellent tutorial is available at http://web.univ-pau.fr/~cpham/WSN/XBee.html.
If you are using Windows, plug one of the devices into your personal computer. Your computer should find the latest drivers for the device. You should see your device when you click on the Devices and Printers option from the Start menu as follows:

The device is now available to communicate with via the IEEE 802.15.4 wireless interface. We could set up a full ZigBee compliant network, but we're just going to communicate from one device to another directly, so we'll just use the device as a serial port connection. Double-click on the device icon and then select the Hardware tab; you should see the following screenshot:

Note that the device is connected to the COM20 serial port. We'll use this to communicate with the device and configure it. You can use any terminal emulator program; I like to use PuTTY, which is already on my computer.
Perform the following steps to configure the device:
- Open PuTTY and select the Serial option and (in this case) the COM20 port. The following screenshot shows how to fill in the PuTTY window to configure the device:

- Configure the following parameters in terminal window (the Serial option in the Category: selection set): Baudrate,
9600; the Data bits option,8; Parity, None, and the Stop bits option,1as follows:
- Make sure you also select Force on for the Local echo option and check the Implicit CR in every LF and Implicit LF in every CR options available under the Terminal tab of the Category: selection set as follows:

- Connect to the device by clicking on Open.
- Enter the commands to the device through the terminal window, as shown in the following screenshot:

- The response
OKcomes from the device as you enter each command. Now plug the other device into the PC. Note that it might choose a differentCOMport; click on the Devices and Printers option, double-click on the device's icon, and select the Hardware tab to find theCOMport. Follow the same steps to configure the second device, except there are two changes. The following is a screenshot of the terminal window for these commands:
The devices are now ready to talk to one another. Plug one of the devices into the Raspberry Pi USB port. Using a terminal window, show the devices that are connected by typing ls /dev/tty*. It will look something like what is shown in the following screenshot:
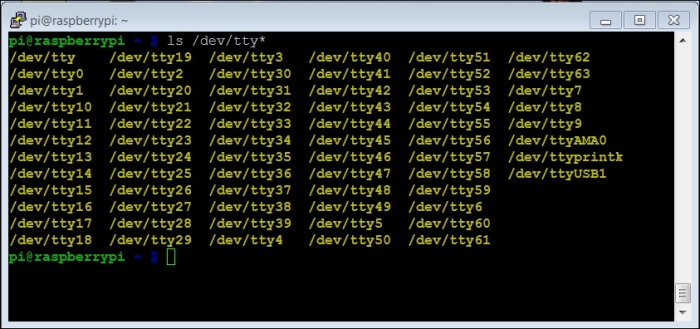
Note that the device appears at /dev/ttyUSB1. Now, you'll need to create a Python program that will read the preceding input. The following screenshot depicts a listing of such a program:

The following points explain the functionality of the code:
- The
#!/usr/bin/pythonstatement allows your program to run without invoking Python on the command line - The
import serialstatement imports theSerialport library - The
ser = serial.Serial('/dev/ttyUSB1', 9600, timeout = 1)statement opens a serial port pointing to the/dev/ttyUSB1port with abaudrate of9600and a timeout of1 - The
x = 'n'statement defines a character variable and initializes it to'n'; so, we go through the loop at least once - You will enter the
whileloop,while x != 'q':, until the user enters the characterq - The
x = ser.read(1)statement reads 1 byte from the serial port - The
print xstatement prints out the value
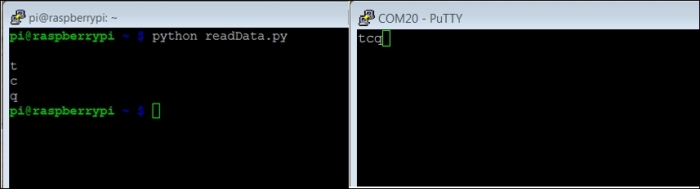
Now if you run readData.py in a terminal window and you have the PuTTY program on your personal computer connected to the other XBee module, you should see the characters, which you type on the personal computer terminal windows, come out on the terminal windows running on Raspberry Pi. The following are the two screenshots given side by side:
Connecting this functionality to your robot is very easy. Start with the remote.py program that you created earlier in the chapter. Copy this into a new program by typing cp remote.py xbee.py. Now, let's remove some of the code, parts that you don't need, and add a bit that will accept the character input from the XBee module. The following screenshot shows a listing of the code:

There are only two meaningful changes as follows:
serInput = serial.Serial('/dev/ttyUSB0', 9600, timeout = 1)– This statement sets up a serial port, getting an input from the XBee device. It is important to note that theUSB0andUSB1settings might be different in your specific configuration based on whether the XBee serial device or the motor controller serial device configures first.var = serInput.read(1)– This statement, instead of getting the input from the user via the keyboard, you will be reading the characters from the XBee device.
That's it! Now your robot should respond to commands sent from your terminal window on our personal computer. You could also create an application on your personal computer that could turn mouse movements or other inputs into the proper commands for your robot.