In the previous two chapters, we covered wheeled and tracked movements and then legged movement. Now your robot can move around. But what if we want the robot to sense the outside world so that it doesn't run into things? In this chapter, we'll discover how to add some sensors to help us avoid colliding into barriers.
Your robot will take quite a beating if it continually runs into walls or runs off the edge of a surface. Let's help your robot avoid these so that it looks intelligent.
In this chapter, we will cover the following topics:
- Gathering the hardware
- Connecting Raspberry Pi to an IR (infrared) sensor in order to detect the world
- Connecting Raspberry Pi to a USB sonar sensor in order to detect the world
- Using a servo to change the position of your sensor so that a single sensor can view a large field, eliminating the need for additional sensors
In this chapter, you'll need some sensors. I am going to show you how to interface with an infrared sensor and a sonar sensor. You'll probably want to choose one of the two. It is not an easy choice; both will do an adequate job. If you're not sure which sensor to use, I suggest you read through this chapter first and then choose the one you think will work in your specific application.
If you are going to choose the infrared sensor, I would advise you to use a set of parts that include not only the sensor but also a way to communicate with the sensor using USB. Raspberry Pi can use its GPIO pins to communicate with an infrared sensor. See http://blogs.arcsoftwareconsultancy.com/pi/2013/10/03/halloween/ and http://www.raspberrypi-spy.co.uk/2013/01/cheap-pir-sensors-and-the-raspberry-pi-part-1/ for tutorials on sensors. However, I like the ease of use and ease of connection that an USB infrared set can provide. You'll need to purchase three parts, all from www.phidgets.com. The first part is the sensor itself. This sensor is made by Sharp and it comes in several different distance specifications. The following is an image of the 20-150 cm version:

The second part that you'll need is an IR distance adapter, which can provide the signals to the sensor and condition the signals coming back from the sensor. The model number is 1101_0 - IR Distance Adapter. The following is an image of it:

The third part is an USB interface, also offered by phidgets.com. This board is really quite amazing; it takes the analog signals, turns them into digital numbers using an analog-to-digital converter, and then makes them available so that they can be read from the USB port. The model number of this part is 1011_0 - PhidgetInterfaceKit 2/2/2 and the following is an image of it:

If you are going to go with the sonar sensor, the following is an image of the USB sonar sensor I like to use in my projects:

This is the USB-ProxSonar-EZ sensor, which can be purchased directly from MaxBotix or on Amazon. There are several models, each with a different distance specification; however, they all work in the same way.
Irrespective of whether you choose an infrared sensor or a sonar sensor, you may want to detect distance in more than just one direction. You have two choices. The first choice is to simply use a number of sensors, one in each direction. But, in the Using a servo to move a single sensor section of this chapter, you will learn how to use a servo to rotate the sensor. This way, you can use a single sensor and just turn it to a new direction. To complete configuring the hardware, you'll need a servo and a way to mount it on your project. Again, I like the Hitec series of servos and this is ready-made for an HS-311 servo, which should look as shown in the following image:

Here is a way to mount the sensor on a 90-degree angle bracket. I used one from a robot kit I purchased on eBay. It can connect to the servo as shown in the following image:

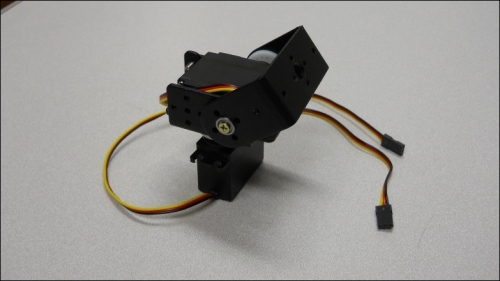
However, if you want to get really fancy, you can purchase a Pan and Tilt assembly. This contains two servos and allows you to rotate your sensor in both the vertical and horizontal axes. The assembly is available on online stores such as www.robotshop.com. You can also construct a Pan and Tilt assembly out of the components that you may have if you have purchased a legged robot kit.
The finished product with two servos looks as shown in the following image:

