
Now that you have a legged platform and a servo motor controller, you are ready to make your project walk! Before you begin, you'll need some background on servo motors. Servo motors are somewhat similar to DC motors. However, there is an important difference: while DC motors are generally designed to move in a continuous way, rotating 360 degrees at a given speed, servo motors are generally designed to move at angles within a limited set. In other words, in the DC motor world, you generally want your motors to spin at a continuous rotation speed that you control. In the servo world, you want to control the movement of your motor to a specific position. For more information on how servos work, visit http://www.seattlerobotics.org/guide/servos.html or http://www.societyofrobots.com/actuators_servos.shtml.
To make your project walk, you first need to connect the servo motor controller to the servos. There are two connections you need to make: the first is to the servo motors and the second is to the battery holder. In this section, you'll connect your servo controller to your PC or Linux machine to check to see whether or not everything is working. The steps for that are as follows:
- Connect the servos to the controller. The following is an image of your two-legged robot and the four different servo connections:

- In order to be consistent, let's connect your four servos to the connections marked 0 through 3 on the controller using the following configurations:
- 0: Left foot
- 1: Left hip
- 2: Right foot
- 3: Right hip
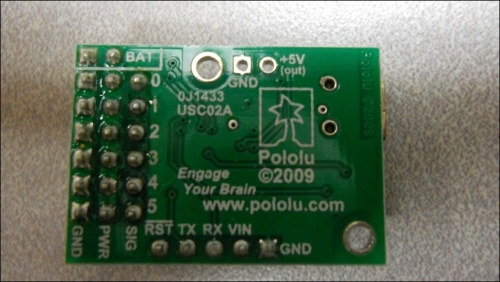
The following is an image of the back of the controller; it will show you where to connect your servos:
- Connect these servos to the servo motor controller as follows:
See the following image indicating how to connect servos to the controller:

- Now you need to connect the servo motor controller to your battery. You'll use the USB to FTDI UART cable; plug the red and black cables into the power connector on the servo controller, as shown in the following image:

Now you can connect the motor controller to your PC or Linux machine to see whether or not you can talk to it. Once the hardware is connected, you can use some of the software provided by Polulu to control the servos. It is easiest to do this using your personal computer or Linux machine. The steps to do so are as follows:
- Download the Polulu software from http://www.pololu.com/docs/0J40/3.a and install it based on the instructions on the website. Once it is installed, run the software; you should see the window shown in the following screenshot:

- You will first need to change the Serial mode configuration in Serial Settings, so select the Serial Settings tab; you should see the window shown in the following screenshot:

- Make sure that USB Chained is selected; this will allow you to connect to and control the motor controller over the USB. Now go back to the main screen by selecting the Status tab; now you can turn on the four servos. The screen should look as shown in the following screenshot:

- Now you can use the sliders to control the servos. Enable the four servos and make sure that the servo 0 moves the left foot, 1 the left hip, 2 the right foot, and 3 the right hip.
- You've checked the motor controllers and the servos and you'll now connect the motor controller to Raspberry Pi to control the servos from there. Remove the USB cable from the PC and connect it to Raspberry Pi. The entire system will look as shown in the following image:

Let's now talk to the motor controller by downloading the Linux code from Pololu at http://www.pololu.com/docs/0J40/3.b. Perhaps the best way to do this is by logging on to Raspberry Pi using vncserver and opening a VNC Viewer window on your PC. To do this, log in to your Raspberry Pi using PuTTY and then type vncserver at the prompt to make sure vncserver is running. Then, perform the following steps:
- On your PC, open the VNC Viewer application, enter your IP address, and then click on Connect. Then, enter the password that you created for the vncserver; you should see the Raspberry Pi viewer screen, which should look as shown in the following screenshot:

- Open a Firefox browser window and go to http://www.pololu.com/docs/0J40/3.b. Click on the Maestro Servo Controller Linux Software link. You will need to download the file
maestro_linux_100507.tar.gzto theDownloaddirectory. You can also use wget to get this software by typingwgethttp://www.pololu.com/file/download/maestro-linux-100507.tar.gz?file_id=0J315 in a terminal window. - Go to your
Downloaddirectory, move it to your home directory by typingmv maestro_linux_100507.tar.gz ..and then you can go back to your home directory. - Unpack the file by typing
tar –xzfv maestro_linux_011507.tar.gz. This will create a directory calledmaestro_linux. Go to that directory by typingcd maestro_linuxand then typels. You should see the output as shown in the following screenshot:
The document README.txt will give you explicit instructions on how to install the software. Unfortunately, you can't run MaestroControlCenter on your Raspberry Pi. Our version of windowing doesn't support the graphics, but you can control your servos using the UscCmd command-line application. First, type ./UscCmd --list and you should see the following screenshot:
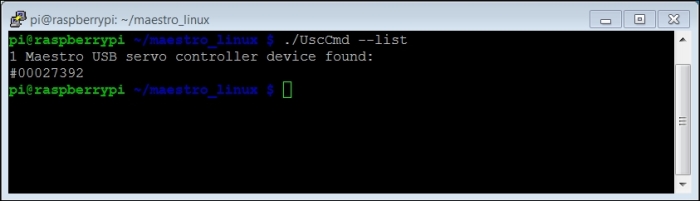
The unit sees your servo controller. If you just type ./UscCmd, you can see all the commands you could send to your controller. When you run this command, you can see the result as shown in the following screenshot:

Notice that you can send a servo a specific target angle, although if the target angle is not within range, it makes it a bit difficult to know where you are sending your servo. Try typing ./UscCmd --servo 0, 10. The servo will most likely move to its full angle position. Type ./UscCmd – servo 0, 0 and it will stop the servo from trying to move. In the next section, you'll write some software that will translate your angles to the electronic signals that will move the servos.
If you haven't run the Maestro Controller tool and set the Serial Settings setting to USB Chained, your motor controller may not respond.