
You've now built robots that can move around on a wheeled structure, robots that have legs, and robots that can sail. You can also build robots that can fly by relying on Raspberry Pi to control their flight. There are several possible ways to incorporate Raspberry Pi into a flying robotic project, but the most straightforward way is to add it to a quadcopter project.
Quadcopters are a unique subset of flying platforms that have become very popular in the last few years. They are a flying platform that utilize the same vertical lift concept as helicopters; however, they employ not one, but four motor/propeller combinations to provide an enhanced level of stability. The following is an image of such a platform:
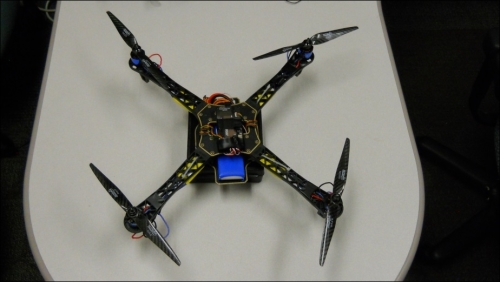
The quadcopter has two sets of counter-rotating propellers; this simply means that two of the propellers rotate one way while the other two rotate the other way to provide thrust in the same direction. This provides a platform that is inherently stable. Controlling the thrust on all four motors allows you to change the pitch, roll, and yaw of the device. The following figure may be helpful to understand the same:
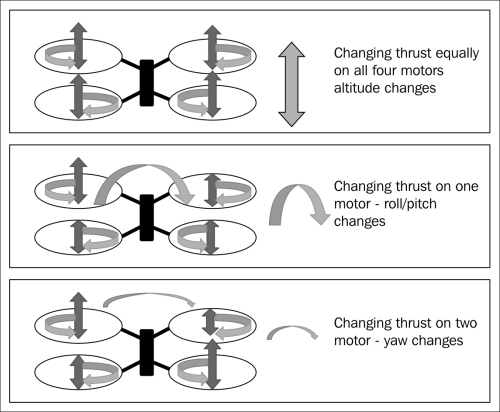
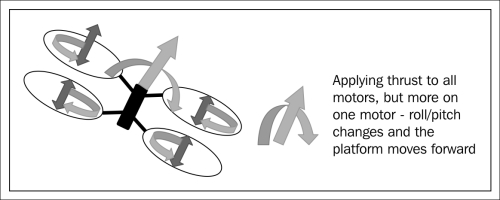
As you can see, controlling the relative speeds of the four motors allows you to control the various ways in which the device can change position. To move forward, or in any direction really, we can combine a change in the roll/pitch with a change in the thrust, so that instead of going up, the device will move forward, as shown in the following figure:
In a perfect world, you might, knowing the components you used to build your quadcopter, know exactly how much control signal to apply to get a certain change in the roll/pitch/yaw or altitude of your quadcopter. You cannot rely on a fixed set of signals as there are simply too many aspects of your device that can vary. Instead, this platform uses a series of measurements for its position, pitch/roll/yaw, and altitude, and then adjusts the control signals to the motors to achieve the desired result. We call this feedback control. The following figure denotes a feedback system:
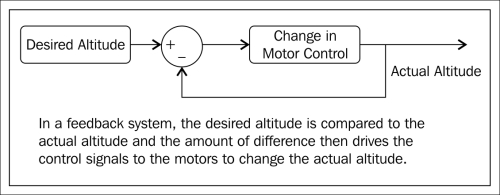
As you can see, if your quadcopter is too low, the difference between the desired altitude and the actual altitude will be positive, and the motor control will increase the voltage supplied to the motors, increasing the altitude. If the quadcopter is too high, the difference between the desired altitude and the actual altitude will be negative, and the motor control will decrease the voltage supplied to the motors, decreasing the altitude. If the desired altitude and the actual altitude are equal, then the difference between the two will be zero and the motor control will be held at its current value. Thus the system stabilizes even if the components aren't perfect or if a wind comes along and blows the quadcopter up or down.
One function of Raspberry Pi in this type of robotic project is to actually coordinate the measurement and control of the quadcopter's pitch, roll, yaw, and altitude. This can be done; however, it is a very complex task, and the details of its implementation are beyond the scope of this book. It is unclear whether Raspberry Pi has the horsepower to execute and keep up with this type of application.
However, Raspberry Pi can still be utilized in this type of robotic project by introducing another embedded processor to carry out the low-level control and using Raspberry Pi to manage high-level tasks, such as using the vision system of Raspberry Pi to identify a colored ball and then guiding the platform toward it. Or, as in the sailboat example, you can use Raspberry Pi to coordinate GPS tracking and long range communications via ZigBee or wireless LAN. I'll cover an example of this in this section.
The first thing you'll need is a quadcopter. There are three approaches to this, which are as follows:
- Purchase an already assembled quadcopter
- Purchase a kit and construct it yourself
- Buy the parts separately and construct the quadcopter
In any case, one of the easiest ways to add Raspberry Pi to your quadcopter is to choose one that uses ArduPilot as its flight control system. This system uses a flight version of Arduino to do the low-level feedback control we talked about earlier. The advantage of this system is that you can talk to the flight control system via USB.
There are a number of assembled quadcopters available that use this flight controller. One place to start is at www.ardupilot.com. This will give you some information on the flight controller, and the store has several preassembled quadcopters. If you are thinking of assembling your own quadcopter, a kit is the right approach. Try www.unmannedtechshop.co.uk/multi-rotor.html or www.buildyourowndrone.co.uk/ArduCopter-Kits-s/33.htm, as these websites not only sell assembled quadcopters, but assembling kits as well.
If you'd like to assemble your own kit, there are several good tutorials about choosing all the right parts and assembling your quadcopter. Try one of the following links:
All of these links have excellent instructions.
You may be tempted to purchase one of the very inexpensive quadcopters that are being offered on the market. For this project, you will need the following two key characteristics of the quadcopter:
- The quadcopter flight control will need a USB port so that you can connect Raspberry Pi to it
- It will need to be large enough and have enough thrust to carry the extra weight of Raspberry Pi, a battery, and perhaps a webcam or other sensing devices
No matter which path you choose, another excellent source for information is http://code.google.com/p/arducopter. This gives you some information on how ArduPilot works and also talks about Mission Planner, an open source control software that will be used to control ArduPilot on your quadcopter. This software runs on PC and communicates to the quadcopter in one of two ways, either through a USB connection directly or through a radio connection. It is the USB connection that you will use to communicate between Raspberry Pi and ArduPilot.
The first step for working in this space is to building your quadcopter and getting it to work with an RC radio. When you allow Raspberry Pi to control it later, you may still want to have the RC radio handy, just in case things don't go quite as planned.
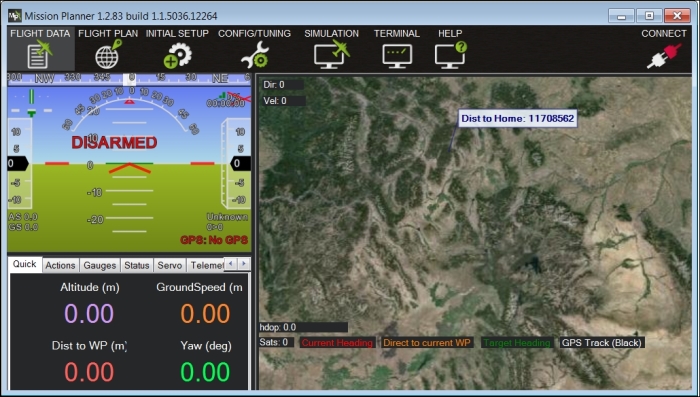
When the quadcopter is flying well, based on your ability to control it using the RC radio, you should then begin to use ArduPilot in autopilot mode. To do this, download the software from www.ardupilot.com/downloads. You can then run the software; you should see something like the following screenshot:
You can then connect ArduPilot to the software and click on the CONNECT button in the upper-right corner. You should then see something like the following screenshot:
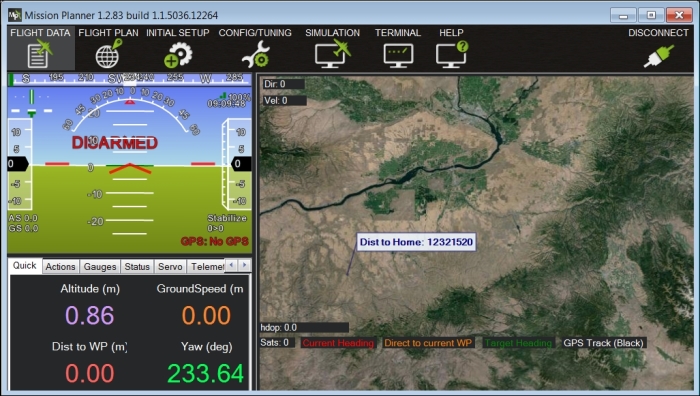
We will not walk through how to use the software to plan an automated flight path; there is plenty of documentation for that on the website, www.ardupilot.com. Note that in this configuration, you have not connected the GPS on ArduPilot.
What you want to do is hook up Raspberry Pi to ArduPilot on your quadcopter so that it can control the flight of your quadcopter just as Mission Planner does, but at a much lower and more specific level. You will use the USB interface just as Mission Planner does.
To connect the two devices, you'll need to modify the Arduino code, create some Raspberry Pi code, and then simply connect the USB interface of Raspberry Pi to ArduPilot. You can issue the yaw, pitch, and roll commands to the Arduino to guide your quadcopter to wherever you want it to go. The Arduino will take care of keeping the quadcopter stable. An excellent tutorial on how to accomplish this can be found at http://oweng.myweb.port.ac.uk/build-your-own-quadcopter-autopilot/.
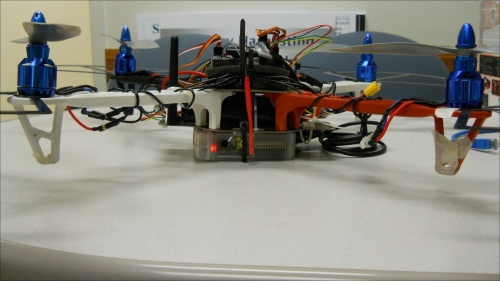
The following is an image of my configuration; I put Raspberry Pi in a plastic case and mounted the battery and Raspberry Pi below the quadcopter's main chassis:
Now that you can fly your quadcopter using Raspberry Pi, you can use the same GPS and ZigBee or wireless LAN capabilities mentioned in the last section to make your quadcopter semiautonomous.
Your quadcopter can act completely autonomously as well. Adding a 3G modem to the project allows you to track your quadcopter no matter where it might go, as long as it can receive a cell signal. The following is an image of such a modem:
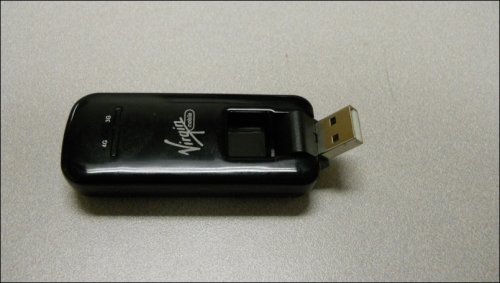
This can be purchased on Amazon or from any cellular service provider. Once you have purchased your modem, simply google instructions on how to configure it in Linux. A sample project that puts it all together can be found at http://www.skydrone.aero it is based on BeagleBone Black, a small Linux processor with similar capabilities to Raspberry Pi.
Another possibility for an aerial project is a plane based on ArduPilot and controlled by Raspberry Pi. Look at http://plane.ardupilot.com/ for information on controlling a fixed wing aircraft with ArduPilot. It would be fairly straightforward to add Raspberry Pi to this configuration.
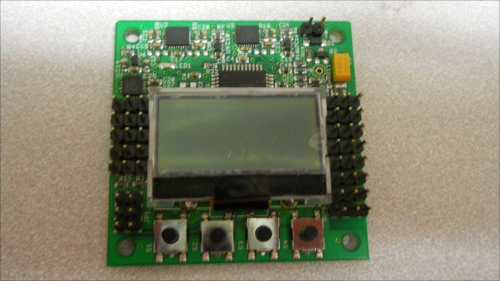
If you are a bit more confident in your aeronautic capabilities, you can also build a quadcopter using Raspberry Pi and a simpler, less expensive flight control board. The one I like to use is the Hobby King KK2.0 flight control board, shown in the following image:
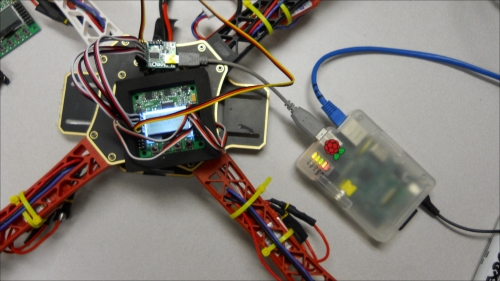
This flight control board takes its flight inputs via a set of input signals and then sends out control signals to the four motor controllers. The good thing about this controller is that it has built-in flight sensors, and so it can handle the feedback control for the motors. The inputs will come in as electric commands to turn, bank, go forward, or increase the altitude. Normally, these would come from the RC radio receiver. For this project, you can insert Raspberry Pi and the Maestro Servo Controller we covered in Chapter 6, Making the Unit Very Mobile - Controlling the Movement of a Robot with Legs. The following is an image of how you connect Raspberry Pi, the servo controller, and the flight controller:
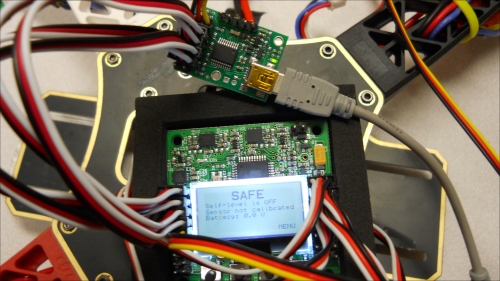
A close up of the connections between the servo controller and the flight controller board is shown in the following image. Make sure you do not connect power to the servo controller; it does not need to supply power. Just send the appropriate signals via the servo lines to the receiver input.
You can follow the standard instructions to calibrate and control your quadcopter, with Raspberry Pi creating the commands using the servo controller. It is perhaps best to first use the Pololu Maestro Control Center software to do the calibration; you can then write a program based on the control program you wrote in Chapter 8, Going Truly Mobile – The Remote Control of Your Robot, where key presses from the keyboard can be used to control the quadcopter to make it go up, down, right or left, bank, or turn. An example of this type of system, albeit using an even less expensive controller, is shown at http://www.instructables.com/id/Autonomous-Cardboard-Rasberry-Pi-Controlled-Quad/. Another example, this time with a tricopter, can be found at http://bitoniau.blogspot.com/2013/05/using-raspberry-pi-wifi-as-transmission.html.