An important part of any map is the sky. In Source, the sky is called a SkyBox, and it helps give the illusion that you're standing in a world that is bigger than what is really there. There are two types of Skyboxes available in Source: the 2D SkyBox and the 3D SkyBox. Let's have a look at them.
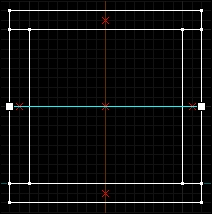
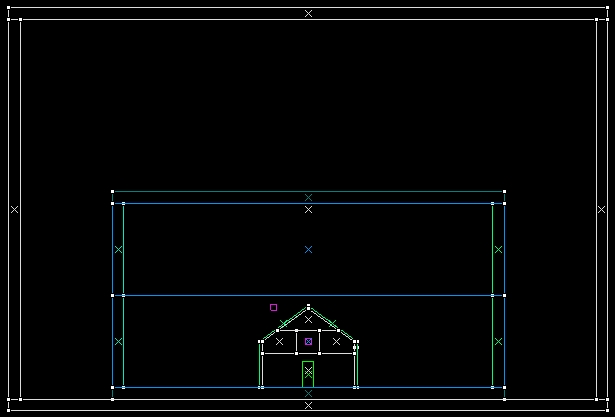
The 2D SkyBox is comprised of six images displayed on an infinitely large cube around the outside of the level. Let's set up a quick 2D SkyBox in our current map and we will see how it works. Select the four vertical walls of your giant box and using the Clipping Tool, cut them in half horizontally as shown in the following figure:
Select the ceiling and the top four sections of the walls you just clipped. We're going to apply a special texture to these brushes in order to form our SkyBox.
Select the texture tool from the tools palette, or hit Shift + A. The texture tool looks like a green, red, and blue cube.
Once the texture tool appears, hit the Browse... button to bring up the texture browser. Locate the filter entry in the bottom toolbar and type in toolsSkyBox; you'll see two textures appear. One texture is a 2D SkyBox and the other is a 3D SkyBox. Left-click on it twice or hit Enter with the 2D SkyBox texture (tools/toolsSkyBox2D) selected to set it as the current texture. When the texture browser closes, notice that the 2D Skybox texture is displayed in the texture preview pane.
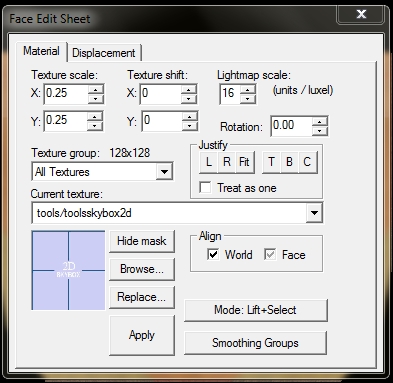
Click on the Apply button to paint our selected brushes with the 2D SkyBox texture. The SkyBox texture has a special function that other textures don't have, but it still seals our world off from the void so there is no need to place other brushes behind it. Let's do a test compile to see the results of our new 2D SkyBox. When in the game, you'll notice that there is now a cloudy sky behind our tall walls. Also, notice that the whole area looks very strange because the sky isn't projecting any light into our map. SkyBoxes have the ability to cast light but we need to add in a special light entity to make that happen.
With the Entity Tool, place a light_environment class anywhere in the map. Let's open the properties and take a look:
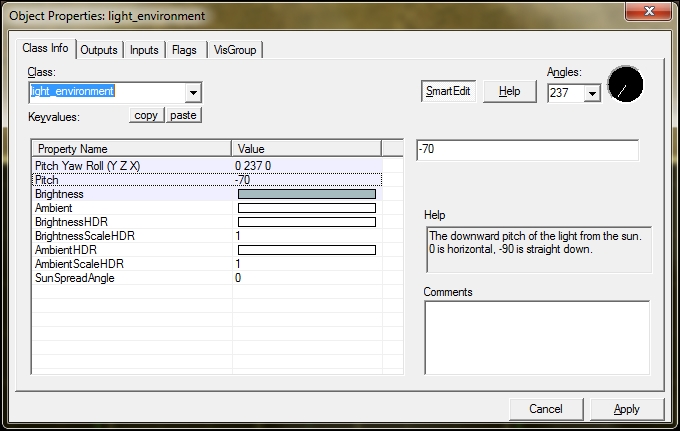
There are many properties we can edit, but right now we're only concerned about three: Pitch, Angles, and Brightness.
The Pitch property is the vertical projection of light from the SkyBox texture; -90 will project light straight down, 0 will project light horizontally, and 90 will project light straight up. Set the Pitch property to something below 0, but greater than -90; I prefer Pitch values around -70 for a nice midday effect.
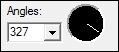
The Angles property will control which direction the light will project if you're looking down on your map. A good way to set your desired angle is to place the Object Properties window above the top 2D viewport, and set the angle by clicking inside the black circle. The white line inside the black circle will depict which direction light will shine out of the 2D SkyBox texture.
The Brightness property controls not only the brightness of our light but the color as well. Since our default SkyBox has a greyish blue hue to it, let's try to match the projected light color to the SkyBox color for a more realistic scene. You'll notice four three-digit numbers in the entry field when you select the Brightness property:
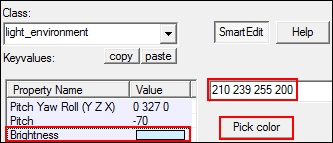
The first three numbers control the light color in RGB (Red, Green, and Blue) format. Thankfully, we don't need to know how to set a color in the RGB format and we can just click on the Pick Color button to select any color we want. The last number in the brightness value controls the actual light intensity or brightness. This last number can be left at 200 as this is a decent starting value.
Compile your map and take a look! You'll notice that the sky is projecting a light onto your map! Now what if we don't like this depressing cloudy day SkyBox? We can change it quite easily.
Open up the texture browser and type in SkyBox into the filter. The page should flood with cloudy sky pictures. You'll notice that there are groups of six images that all look similar. They all share similar names as well. The naming convention can be confusing at first glance, but it is really just the sky name with a suffix of which face it's supposed to be. So let's look at the sky texture called SkyBox/sky_day01_08_hdrlf.
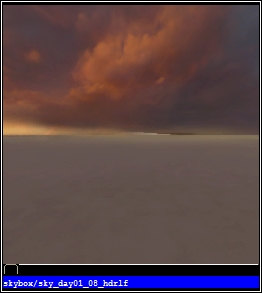
The SkyBox name is sky_day01_08_hdrlf and lf tells us that this image is being projected onto the left part of the sky. If we would like to use this sky for our map, we need to set the Skybox Texture Name property in the Map Properties. To get to the Map Properties, go to Map | Map Properties.
With our SkyBox name set, give your map another compile to see what it looks like. Feel free to change the light_environment color to reflect the new color of the SkyBox light.
The 3D SkyBox will project light into our map just like the 2D SkyBox did, but it also allows us to project objects and models into the scene. The 3D SkyBox is created around your level, shrunk to a fraction of its normal size, and then blown up and projected around your map when you run it in the game. This might sound confusing, but let's just take it one step at a time; we'll get there.
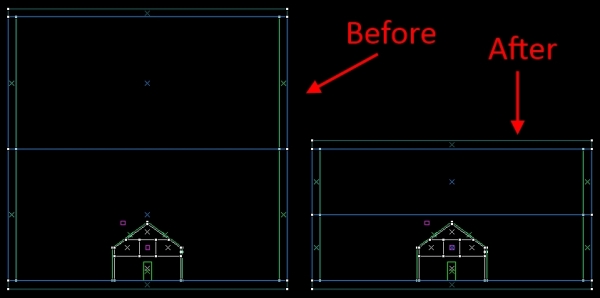
First, shrink the top and bottom sections of your vertical walls to 256 units each, and then bring the ceiling sky texture down on top of the vertical sky sections. Select everything in the current map and create a visgroup with it. Name it something useful such as house in a box. Making this part of the map into a visgroup is going to make our lives easier in a moment.
Now create a 1600 x 1600 x 1056 unit block. Center the new brush on your existing map but have the bottom of the new brush touch the bottom of the floor. Hollow the new brush out with a value of -32 so the walls grow outward and we keep our inner dimensions. We should now have a new box surrounding our old box that is surrounding a house.
Since we're making a 3D SkyBox now, we need to change the tool texture we're using. Select the newly hollowed box as well as the 2D SkyBox-textured brushes that make up the outer enclosing walls. Launch the texture application tool, browse for textures, and filter for tools/toolsSkyBox. Hit Enter to select the 3D SkyBox texture, and then hit Apply in the texture application tool to paint all the selected brushes with the toolsSkyBox texture. The tools/toolsSkyBox texture is the one we need to create 3D SkyBoxes.
Now we need to populate the 3D SkyBox with some buildings. For simplicity's sake, let's not get too detailed in the 3D SkyBox just yet. Just make some tall rectangular brushes and randomly place them around our map in between the outer SkyBox walls and the house in a box.
Place an entity called sky_camera at the map's origin (0, 0, 0).
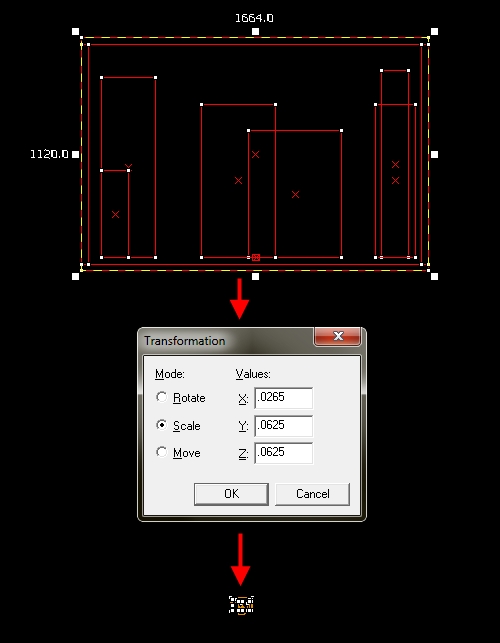
We now have all the items necessary for the SkyBox to project properly, but we're not done yet; we need to scale the SkyBox down a bit. You'll notice in the Object Properties of sky_camera, there's a property called 3D Skybox Scale. This is the number of times that the SkyBox will be blown up and projected around the map. By default, this value is at 16 and we're going to leave it at that. Now, remove visibility of the house in a box visgroup by unchecking the box next to it in the visgroup toolbar. Select everything else (in your SkyBox) and then turn it into a group with the toolbar button or by pressing Ctrl + G. This group is the SkyBox. Since our sky_camera scale is 16, we need to scale this SkyBox down by a factor of 16. A quick calculation tells us that one divided by 16 equals to 0.0625. This is the scale factor we need to apply to our SkyBox group. Select the SkyBox group and go to Tools | Transform (or hit Ctrl + M) to pull up the Transform Tool. The Transform Tool lets us precisely control the object scaling, rotation, or movement. Select the scale radio button and enter 0.0625 into each of the entry fields to scale the SkyBox evenly on all three axis. When you hit Enter, the SkyBox will now be 1/16th of its original size.
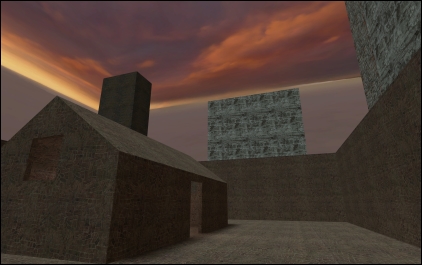
Congratulations! You have completed your first 3D SkyBox. Unhide the house in a box visgroup and place the SkyBox group far beneath the floor of the house in a box. Run a test compile and check out the results; they should look similar to the following: