
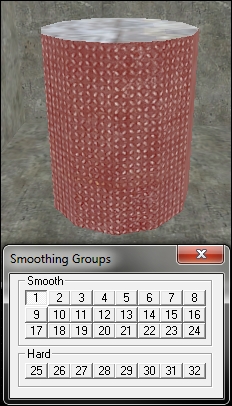
Smoothing groups are used to smoothen the transition between faces on curved brushes. In order to apply a smoothing group to a brush, you first need to open Texture Application Tool and click on the Smoothing Groups button located in the bottom-right corner. A dialog box will open displaying 24 Smooth group buttons and eight Hard group buttons, as shown in the following screenshot:
Select the desired faces to be smoothed and click on a Smooth number button to assign those faces a smoothing group. Shadows cast on the object will be blended around the brush faces based on the density of the face Lightmap Grid. Like before, the smaller the Lightmap Grid size, the more lighting detail the brush contains, and the smoother the transition between the faces will be. However, keep in mind that Lightmap Grid needs to be equal to or smaller than the width of the brush face in order to smoothen it properly. So, if you have a brush face that is 16 units wide, your Lightmap Grid can be a maximum of 16 units to achieve any smoothing effect.
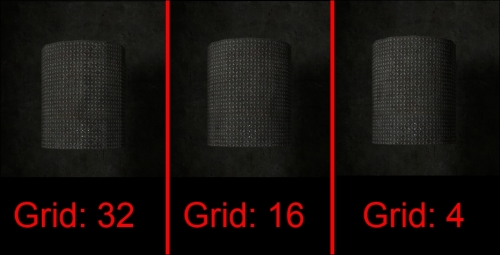
You can see that the transitions between faces on rounded surfaces get smoother when you assign smoothing groups and decrease the Lightmap Grid size! Use this to your advantage when placing pillars, columns, and rounded corners in your maps!
In the CH6_smoothing example map, you can see that each of the individual cylinders have the same smoothing group assigned to them. Since the faces between cylinders do not touch each other, it's fine to leave them as the same smoothing group. Make sure to only use one smoothing group on any specific group of touching brushes. Faces can also be assigned more than one smoothing group to blend multiple brush faces together.