
The Half-Life series of games have a strange affinity for trains. There was an entire chapter devoted to them in Half-Life. Half-Life 2 starts you out on one train, almost kills you on another, and the player is on the same train in between Half-Life 2 episodes 1 and 2. The Source SDK contains a powerful set of tools devoted to make objects move. If you want full control over that movement, you'll want to use a train. Half-Life focuses on first-person story development, but it still has moments where the view is taken over by a secondary camera. Combining trains and cameras can make for powerful storytelling cutscenes.
In this chapter, we will learn:
- Creating and controlling track trains
- Creating a security system using cameras
- Combining trains and cameras to make cut scenes
There are some exciting topics to be covered in this chapter, so let's jump in!
Track trains are brush-based entities that move forward and backward along a path . The path that track trains follow is made up of linked point-based path_track entities. Track trains come in two main varieties: player-controlled and automatic. Player controlled track trains, when used, override the player's forward and backward movement keys to control the train movement. These trains can be ridden and have the ability to switch the path they take with external triggers. Automatic track trains are controlled with external triggers and have no direct player control. An example of an automatic track train could be a platform with more than one movement direction or, as we'll soon see, an invisible box acting as a camera's target.
Func_tracktrain entities have the ability to be player controlled. These are brush-based entities that the player must be standing on in order to be controlled. There are three main parts to a player-controlled func_tracktrain:
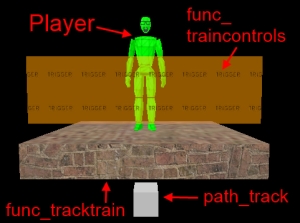
Create a brush and tie it to a func_tracktrain entity. The train brush can be of any shape or size so long as the player can stand on it. When creating the func_tracktrain entity, the front of the train must face east (facing to the right if looked at from the top 2D viewport). Name it func_tracktrain01 and set the Is Unblockable by Player flag to true so the train won't stop if it runs into the player. (This flag can cause some buggy behaviour if not checked.) When the train is spawned in the game, the train origin will be located at the start pointpath_track entity and the front of the train will be facing the second path_track entity. Change the Render Mode option to Not Rendered so the train will be invisible in the game.
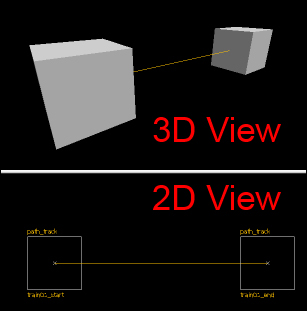
Now, let's create a path with two nodes for our train to travel between. Place two path_track point entities in the map. Name one path_tracktrain01_start and name the other train01_end. In the properties of train01_start, set the Next Stop Target field to train01_end. When the train is told to move forward, it will move in a straight line towards the train01_end entity.
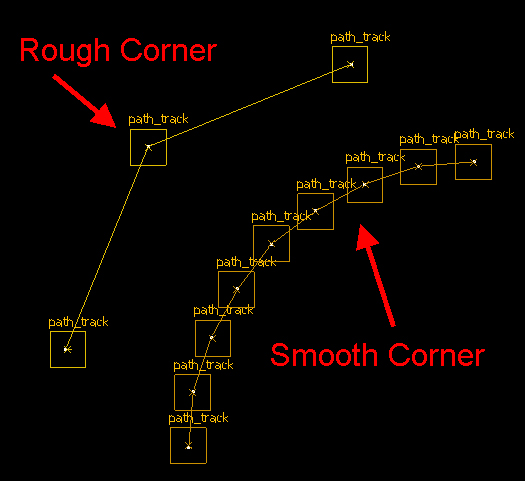
If you copy a path_track entity (by holding Shift and dragging it) that already has a name, the new path_track entity will inherit the original name but have a number appended to it. The original will have the Next Stop Target field set as the new path_track entity. The technique of holding Shift and dragging it to make a copy of path_tracks is a quick and easy way to create a path with any number of nodes. Since trains move in a straight line between path_tracks, it's easy to use this technique to create smooth corners by following the edge of a cylinder; the more sides on the cylinder, the smoother the corner will be.
When you give a path_track entity a Next Stop Target, an orange line will be drawn between the two entities to show you the path of travel as shown in the following figure:
We didn't give train01_end a Next Stop Target so when the train arrives at this path_track, the train will stop moving. If the train is told to move in reverse, it will move toward train01_start.
Open the properties of your func_tracktrain entity and set the First Stop Target field to train01_start so the train's origin will be at train01_start when the map spawns.
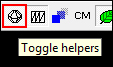
Normally, the origin of any brush-based entity is located in the centre of the brush (or group of brushes if your entity is made up of multiple brushes). You can change the location of a brush-based entity's origin by moving the white origin circle when the Toggle helpers button in the top toolbar is clicked.
In the 3D viewport, an object's origin is indicated by a purple sphere.
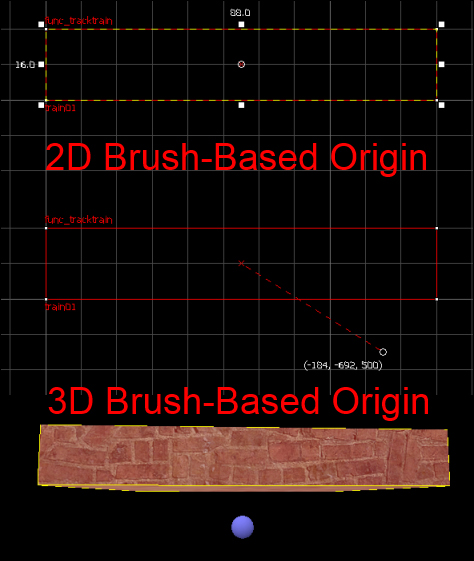
An object's origin controls many things. In the case of a track train, the origin controls the pivot, and the track train will move along its path based on its origin.
So far we have a train and a path but we do not have any means of controlling the train. We need to place the train controls now. Create a trigger brush above the func_tracktrain entity and tie it to the func_traincontrols entity. Parent it to the func_tracktrain entity (so it always moves with it) and set the train name property to the train as well (train01).
Now you can run the map to test your train. Press the use button while standing on the train to activate the controls. When the controls are activated, press the forward and backward movement keys to control the train. The maximum forward speed is specified by the Max Speed property, while the maximum reverse speed will be one quarter of the Max Speed value.
Right now, the train is boring and plain. You can create a more visually interesting train with brushes, or you can parent models to the train for added detail. In the example map (ch8_tracktrain), there is a train cart and a combine control panel parented to a func_tracktrain entity. The player still stands on the func_tracktrain entity (so the train controls will work) but it is not rendered, giving the illusion that the player is actually standing on the model.

A branch path is the secondary Next Stop Target that is enabled or disabled with an external trigger (explained later). A branch path will allow the train to go to an alternate path_track that leads to another direction. This can be useful to control which direction the train will turn at an intersection.
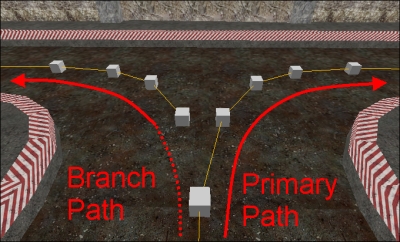
The connections between branch paths are not shown in 2D or 3D views as regular next_stop_targets are. If you have a lot of branch paths in your map, this could get quite confusing.
A player does not need to be standing on a train to control it. You can give button outputs to tell the train to startforward, startbackward, or stop, or we can mimic the func_traincontrols functionality with a gameui without a complicated array of buttons. A gameui directly reads keyboard and mouse inputs, and fires outputs based on the keys pressed.
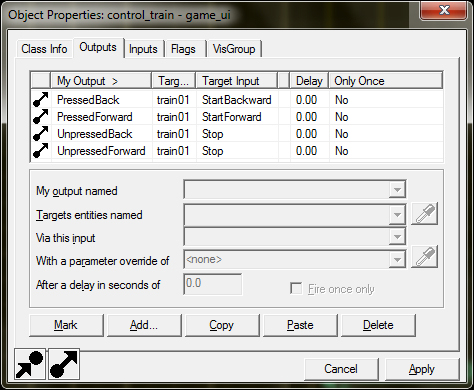
A func_button entity can activate a gameui, and then the gameui compares the forward and backward movement keys. When the forward key is pressed, the train moves forward and when it stops being pressed, the train stops. When the backward key is pressed, the train moves backwards and the train stops when the key is released. Trains aren't the only entity that can be controlled this way; experiment!
Trains are one of the more useful brush entities in the game. They can move in any direction, rotate to face the direction of movement, or simply maintain a fixed orientation. They can be player-controlled or trigger-controlled and the player can even ride on them. The next section describes cameras and we'll see how trains and cameras can be combined to create a cutscene.