
Chapter 8. Essential Lucene extensions
This chapter covers
- Highlighting hits in your search results
- Correcting the spelling of search text
- Viewing index details using Luke
- Using additional query, analyzer, and filter implementations
You’ve built an index, but can you browse or query it without writing code? Absolutely! In this chapter, we’ll show you Luke, a useful tool that does just that. Do you need analysis beyond what the built-in analyzers provide? Several specialized analyzers for many languages are available in Lucene’s contrib modules. How about providing term highlighting in search results? We’ve got two choices for that! We’ll also show you how to offer suggestions for misspelled words.
This chapter examines the essential, most commonly used Lucene extensions, most of which are housed in the contrib subdirectory within Lucene’s source code. Deliberate care was taken with the design of Lucene to keep the core source code cohesive yet extensible. We’re taking the same care in this book by keeping an intentional separation between what’s in the core of Lucene and the extensions packages that have been developed to augment it.
There are so many interesting packages that we’ve divided our coverage into two chapters. In this chapter we’ll cover the more frequently used packages, and in the next chapter we’ll describe the less popular, yet still interesting, long tail. The benchmark module is so useful we dedicate a separate appendix (C) to it.
Each package is at its own stage of development. Some packages are more mature, have stronger backward compatibility goals, have better documentation, and receive greater user and developer attention than others. Each package has its own Javadocs, at different degrees of completeness, so be sure to read them closely. Even if a given package isn’t quite a drop-in fit for your application, you can always use its source code as a starting point or for inspiration. If you make improvements, please consider donating them back! This is how contrib came into existence in the first place.
If you ever find yourself baffled by why your searches are behaving a certain way, or you’re confused about just what’s inside your index, Luke, covered next, is a real life saver.
8.1. Luke, the Lucene Index Toolbox
Andrzej Bialecki created Luke (found at http://code.google.com/p/luke), an elegant Lucene index browser. This gem provides an intimate view inside a file system-based index from an attractive desktop Java application. We highly recommend having Luke handy when you’re developing with Lucene because it allows for ad hoc querying and provides insight into the terms and structure in an index.
Luke has become a regular part of our Lucene development toolkit. Its tabbed and well-integrated UI allows for rapid browsing and experimentation. In this section we’ll take you through most of what it can do, including browsing the terms and documents in an index, viewing overall index statistics, running ad hoc searches and seeing their explanations, and reconstructing documents. Luke can also make changes to the index, such as deleting or undeleting documents, as well as unlocking and optimizing the index. This is a tool that’s targeted to developers or perhaps system administrators. And what a wonderful tool it is!
Luke is simple to use; it requires Java Runtime Environment (JRE) 1.5 or later to run. It’s a single JAR file that can be launched directly (by double-clicking from a file system browser, if your system supports that) or by running java –jar lukeall-<VERSION>.jar from the command line. The latest version at the time of this writing is 0.9.9.1; it embeds Lucene 2.9.1. A source code release is also available. The first thing Luke needs is a path to the index file, as shown in the file selection dialog box in figure 8.1.
Figure 8.1. This Luke dialog box provides interesting options for opening the index.

There are a number of interesting options you can control when opening the index. Luke’s interface is nicely interconnected so that you can jump from one view to another in the same context. The interface is divided into five tabs: Overview, Documents, Search, Files, and Plugins. The Tools menu provides options for optimizing the current index, undeleting any documents flagged for deletion, and switching the index between compound and standard format.
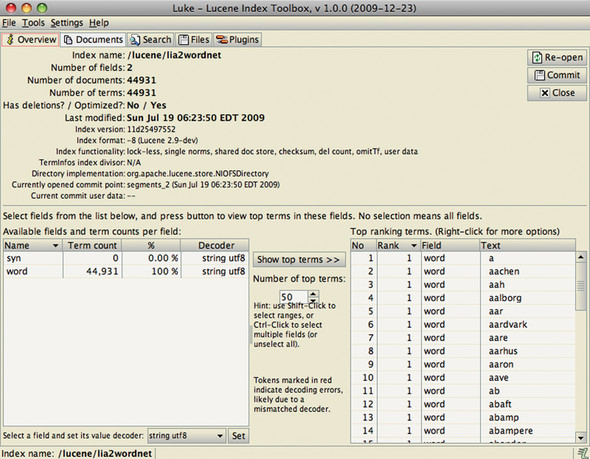
8.1.1. Overview: seeing the big picture
Luke’s Overview tab shows the major pieces of a Lucene index, including the number of fields, documents, and terms (figure 8.2). The top terms in one or more selected fields are shown in the Top Ranking Terms pane. Double-clicking a term opens the Documents tab for the selected term, where you can browse all documents containing that term. Right-clicking a term brings up a menu with three options:
- Show All Term Docs opens the Search tab for that term so all documents appear in a list.
- Browse Term Docs opens the Documents tab for the selected term.
- Copy to Clipboard copies the term to the clipboard so you can then paste it elsewhere.
Figure 8.2. Luke’s Overview tab allows you to browse fields and terms.
8.1.2. Document browsing
The Documents tab is Luke’s most sophisticated screen, where you can browse documents by document number and by term (see figure 8.3). Browsing by document number is straightforward; you can use the arrows to navigate through the documents sequentially. The table at the bottom of the screen shows all stored fields for the currently selected document.
Figure 8.3. Luke’s Documents tab shows all fields for the document you select.

Browsing by term is trickier; you can go about it several ways. Clicking First Term navigates the term selection to the first term in the index for the specified field. You can scroll through terms by clicking the Next Term button. The number of documents containing a given term is shown in parentheses. To select a specific term, type all but the last character in the text box, click Next Term, and navigate forward until you find the desired term.
Just below the term browser is the term document browser, which lets you navigate through the documents containing the term you selected. The First Doc button selects the first document that contains the selected term, and as when you’re browsing terms, Next Doc navigates forward.
The selected document, or all documents containing the selected term, can also be deleted from this screen (use caution if this is a production index, of course!).
Another feature of the Documents tab is the Copy Text to Clipboard feature. All fields shown, or the selected fields, may be copied to the clipboard.
Note
Luke can only work within the constraints of a Lucene index, and unstored fields don’t have the text available in its original form. The terms of those fields are navigable with Luke, but those fields aren’t available in the document viewer or for copying to the clipboard (our contents field in this case).
Clicking the Show All Docs button shifts the view to the Search tab with a search on the selected term so that all documents containing this term are displayed. If a field’s term vectors have been stored, the field’s Term Vector button displays a window showing terms and frequencies.
One final feature of the Documents tab is the Reconstruct & Edit button. Clicking this button opens a document editor allowing you to edit (delete and readd) the document in the index or add a new document.
Luke reconstructs fields that were tokenized but not stored by aggregating in position order all the terms that were indexed. Reconstructing a field is a potentially lossy operation, and Luke warns of this when you view a reconstructed field (for example, if stop words were removed or tokens were stemmed during the analysis process, the original value can’t be reconstructed).
8.1.3. Using QueryParser to search
We’ve already shown two ways to automatically arrive at the Search tab: choosing Show All Term Docs from the right-click menu of the Top Ranking Terms section of the Overview tab, and clicking Show All Docs from the term browser on the Documents tab.
You can also use the Search tab manually, entering QueryParser expression syntax along with your choice of Analyzer and default field. Click Search when the expression and other fields are as desired. The bottom table shows all the documents from the search hits, as shown in figure 8.4.
Figure 8.4. Searching: an easy way to experiment with QueryParser

Double-clicking a document shifts back to the Documents tab with the appropriate document preselected. It’s useful to interactively experiment with search expressions and see how QueryParser reacts to them. Luke shows all analyzers it finds in the classpath, but only analyzers with no-arg constructors may be used with Luke. Luke also provides insight into document scoring with the explanation feature.
To view score explanation, select a result and click the Explanation button; an example is shown in figure 8.5.
Figure 8.5. Lucene’s scoring explanation details how the score for a specified document was computed.

8.1.4. Files and plugins view
The files view in Luke displays the files (and their sizes) that make up the internals of a Lucene index directory. The total index size is also shown.
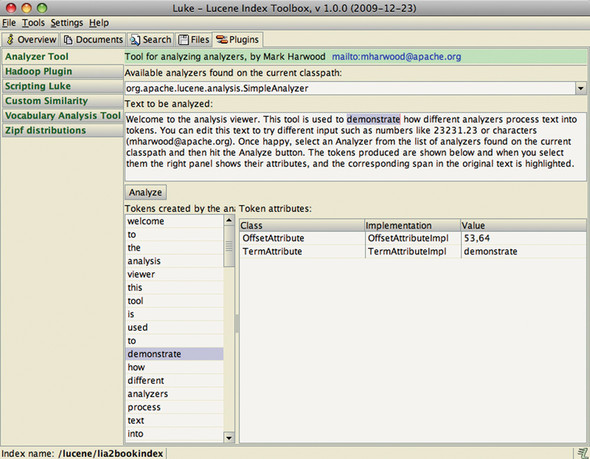
As if the features already described about Luke weren’t enough, Andrzej has gone the extra mile and added a plug-in framework so that others can add tools to Luke. Six plug-ins come built in, as shown in figure 8.6. Analyzer Tool has the same purpose as the AnalyzerDemo developed in section 4.2.4, showing the results of the analysis process on a block of text. Hadoop Plugin lets you open any Lucene index accessible via any file system supported by Hadoop. Scripting Luke lets you interactively run JavaScript code to access Luke’s internals. Custom Similarity allows you to code up your own Similarity implementation in JavaScript, to customize how Lucene scores matching documents, which is then compiled and accessible in the Search panel. Vocabulary Analysis Tool and Zipf distribution are two tools that show graphs of term statistics from the index.
Figure 8.6. Luke includes several useful built-in plug-ins.
Consult the Luke documentation and source code for information on how to develop your own plug-in. Let’s now switch to the numerous contrib options for analysis.
8.2. Analyzers, tokenizers, and TokenFilters
The more analyzers, the merrier, we always say. And the contrib modules don’t disappoint in this area: they house numerous language-specific analyzers, a few related filters and tokenizers, and the slick Snowball algorithm analyzers. The analyzers are listed in table 8.1. The prefix org.apache.lucene.analysis is omitted from the class names.
Table 8.1. Contrib analyzers
|
Analyzer |
TokenStream and TokenFilter chain |
|---|---|
| ar.ArabicAnalyzer | ArabicLetterTokenizer > LowerCaseFilter > StopFilter > ArabicNormalizationFilter > ArabicStemFilter. |
| br.BrazilianAnalyzer | StandardTokenizer > StandardFilter >StopFilter (custom stop table) > BrazilianStemFilter > LowerCaseFilter. |
| cjk.CJKAnalyzer | CJKTokenizer > StopFilter (custom English stop words ironically). Indexes Chinese text using bigrams of adjacent Chinese characters as tokens. |
| cn.ChineseAnalyzer | ChineseTokenizer > ChineseFilter. Indexes Chinese text by mapping each Chinese character to its own token. |
| cn.smart.SmartChineseAnalyzer | An alternative Chinese analyzer that attempts to segment Chinese text into words using a dictionary-based approach. |
| compound.* | Two different TokenFilters that decompose compound words you find in many Germanic languages to the word parts. There are two approaches (one using hyphenation-based grammar to detect word parts, the other using a word-based dictionary). |
| cz.CzechAnalyzer | StandardTokenizer > StandardFilter > LowerCaseFilter > StopFilter (custom stop list). |
| de.GermanAnalyzer | StandardTokenizer > StandardFilter > LowerCaseFilter > StopFilter (custom stop list) > GermanStemFilter. |
| el.GreekAnalyzer | StandardTokenizer > GreekLowerCaseFilter > StopFilter (custom stop list). |
| fa.PersianAnalyzer | ArabicLetterTokenizer > LowerCaseFilter > ArabicNormalizationFilter > PersianNormalizationFilter > StopFilter. |
| fr.FrenchAnalyzer | StandardTokenizer > StandardFilter > StopFilter (custom stop table) > FrenchStemFilter > LowerCaseFilter. |
| miscellaneous.* | Collection of miscellaneous TokenStreams and TokenFilters. |
| ngram.* | Breaks characters of a single word into a series of character ngrams. This can be useful for spell correction and live autocompletion. |
| nl.DutchAnalyzer | StandardTokenizer > StandardFilter > StopFilter (custom stop table)> DutchStemFilter. |
| ru.RussianAnalyzer | RussianLetterTokenizer > RussianLowerCaseFilter > StopFilter (custom stop list) > RussianStemFilter. |
| th.ThaiAnalyzer | StandardFilter > ThaiWordFilter > StopFilter (English stop words). |
| analysis.WikipediaTokenizer | Similar to StandardTokenizer, except it adds further specialization to process the Wikipedia-specific markup that appears in the XML export of the Wikipedia corpus. This produces additional Wikipedia-specific token types. |
| shingle.* | Tokenizers that create shingles (ngrams from multiple tokens) from another TokenStream. |
| sinks.DateRecognizerSinkTokenizer | A SinkTokenizer (see section 4.2.3) that only accepts tokens that are valid dates (using java.text.DateFormat). |
| sinks.TokenRangeSinkTokenizer | A SinkTokenizer (see section 4.2.3) that only accepts tokens within a certain range. |
| sinks.TokenTypeSinkTokenizer | A SinkTokenizer (see section 4.2.3) that only accepts tokens of a specific type as returned by Token.type(). |
| payloads.* | TokenFilters that carry over token attributes as payloads; these are described in section 6.5. |
| position.PositionFilter | Filter to set the position increment for all tokens. |
| query.QueryAutoStopWordAnalyzer | An analyzer that adds a StopFilter to any other analyzer. |
| snowball.SnowballAnalyzer | StandardTokenizer > StandardFilter > LowerCaseFilter [> StopFilter ] > SnowballFilter |
| ReverseStringFilter | Reverses the text of each token that passes through it. For example, country becomes yrtnuoc. This is useful for doing efficient leading wildcard searches. |
The language-specific analyzers vary in how they tokenize. The Brazilian and French analyzers use language-specific stemming and custom stop-word lists. The Czech analyzer uses standard tokenization, but also incorporates a custom stop-word list. The Chinese, CJK, and Smart Chinese analyzers take unique approaches; we saw the analysis of Chinese characters in section 4.8.4, illustrating how these three analyzers work.
Many of these analyzers, including the SnowballAnalyzer discussed next, let you customize the stop-word list just as the StopAnalyzer does (see section 4.3.1). Most of these analyzers do quite a bit in the filtering process. If the stemming or tokenization is all you need, borrow the relevant pieces, and construct your own custom analyzer from the parts here. Sections 4.4, 4.5, and 4.6 cover creating custom analyzers.
Most of the analyzers listed in table 8.1 don’t require further explanation here. The language-dependent analyzers are straightforward: their purpose is to customize tokenization for their target language. ReverseStringFilter reverses every token it sees. DateRecognizerSinkTokenizer, TokenRangeSinkTokenizer, and TokenTypeSinkTokenizer collect tokens fitting certain requirements. WikipediaTokenizer creates tokens from the Wikipedia XML export. The token filters under the compound package break words into their compound parts. The payloads package promotes token attribute values into payloads. We won’t cover these analyzers and tokenizers any further here; please consult their Javadocs for any interesting gotchas.
We’ll now give special attention to the snowball analyzers and shingle and ngram filters, because these analyzers and filters aren’t quite as simple.
8.2.1. SnowballAnalyzer
The SnowballAnalyzer deserves special mention because it serves as a driver of an entire family of stemmers for different languages. Stemming was introduced in section 4.6. Martin Porter, who also developed the Porter stemming algorithm, created the Snowball algorithm.[1] The Porter algorithm was designed for English only; in addition, many “purported” implementations don’t adhere to the definition faithfully.[2] To address these issues, Dr. Porter rigorously defined the Snowball system of stemming algorithms. Through these algorithmic definitions, accurate implementations can be generated. In fact, the snowball contrib module has a build process that can pull the definitions from Porter’s site and generate the Java implementation.
1 The name Snowball is a tribute to the string-manipulation language SNOBOL.
One of the test cases demonstrates the result of the English stemmer stripping off the trailing ming from stemming and the s from algorithms:
public void testEnglish() throws Exception {
  Analyzer analyzer = new SnowballAnalyzer(Version.LUCENE_30,
                                           "English");
  AnalyzerUtils.assertAnalyzesTo(analyzer,
                                 "stemming algorithms",
                                 new String[] {"stem", "algorithm"});
}
SnowballAnalyzer has two constructors; both accept the stemmer name, and one specifies a String[] stop-word list to use. Many unique stemmers exist for various languages. The non-English stemmers are Danish, Dutch, Finnish, French, German, German2, Hungarian, Italian, Kp (Kraaij-Pohlmann algorithm for Dutch), Norwegian, Portuguese, Romanian, Russian, Spanish, Swedish, and Turkish. There are a few English-specific stemmers named English, Lovins, and Porter. These exact names are the valid argument values for the name argument to the SnowballAnalyzer constructors. Here’s an example using the Spanish stemming algorithm:
public void testSpanish() throws Exception {
  Analyzer analyzer = new SnowballAnalyzer(Version.LUCENE_30,
                                           "Spanish");
  AnalyzerUtils.assertAnalyzesTo(analyzer,
                                 "algoritmos",
                                 new String[] {"algoritm"});
}
If your project demands stemming, we recommend that you give the Snowball analyzer your attention first because an expert in the stemming field developed it. And, as already mentioned but worth repeating, you may want to use the clever piece of this analyzer (the SnowballFilter) wrapped in your own custom analyzer implementation. Sections 4.4, 4.5, and 4.6 discuss writing custom analyzers in great detail.
8.2.2. Ngram filters
The ngram filters take a single token and emit a series of letter ngram tokens, which are combinations of adjacent letters as separate tokens. Listing 8.1 shows how to use these unusual filters.
Listing 8.1. Creating combinations of adjacent letters with ngram filters
public class NGramTest extends TestCase {

  private static class NGramAnalyzer extends Analyzer {
    public TokenStream tokenStream(String fieldName, Reader reader) {
      return new NGramTokenFilter(new KeywordTokenizer(reader), 2, 4);
    }
  }

  private static class FrontEdgeNGramAnalyzer extends Analyzer {
    public TokenStream tokenStream(String fieldName, Reader reader) {
      return new EdgeNGramTokenFilter(new KeywordTokenizer(reader),
                      EdgeNGramTokenFilter.Side.FRONT, 1, 4);
    }
  }

  private static class BackEdgeNGramAnalyzer extends Analyzer {
    public TokenStream tokenStream(String fieldName, Reader reader) {
      return new EdgeNGramTokenFilter(new KeywordTokenizer(reader),
                      EdgeNGramTokenFilter.Side.BACK, 1, 4);
    }
  }
  public void testNGramTokenFilter24() throws IOException {
    AnalyzerUtils.displayTokensWithPositions(new NGramAnalyzer(), "lettuce");
  }

  public void testEdgeNGramTokenFilterFront() throws IOException {
    AnalyzerUtils.displayTokensWithPositions(new FrontEdgeNGramAnalyzer(),
                                             "lettuce");
  }

  public void testEdgeNGramTokenFilterBack() throws IOException {
    AnalyzerUtils.displayTokensWithPositions(new BackEdgeNGramAnalyzer(),
                                             "lettuce");
  }
}
The testNGramTokenFilter24 method creates an NGramTokenFilter to generate all letter ngrams of length 2, 3, or 4, on the word lettuce. The resulting output looks like this:
 1: [le]
 2: [et]
 3: [tt]
 4: [tu]
 5: [uc]
 6: [ce]
 7: [let]
 8: [ett]
 9: [ttu]
10: [tuc]
11: [uce]
12: [lett]
13: [ettu]
14: [ttuc]
15: [tuce]
Note that each larger ngram series is positioned after the previous series. A more natural approach would be to have the ngram’s position set to the character position where it starts in the word, but unfortunately at this time there’s no option to do this (it’s a known limitation, though, so maybe by the time you read this it’ll be fixed).
The EdgeNGramFilter is similar, except it only generates ngrams anchored to the start or end of the word. Here’s the output of the testEdgeNGramTokenFilterFront:
1: [l]
2: [le]
3: [let]
4: [lett]
And testEdgeNGramTokenFilterBack:
1: [e]
2: [ce]
3: [uce]
4: [tuce]
Next we consider shingle filters.
8.2.3. Shingle filters
Shingles are single tokens constructed from multiple adjacent tokens. They’re similar to letter ngrams, used by the spellchecker package (section 8.5) and the ngram tokenizers (section 8.2.2) in that they make new tokens by combining multiple adjacent things. But whereas the ngram tokenizers operate on letters, shingles operate on whole words. For example, the sentence “please divide this sentence into shingles” might be tokenized into the shingles “please divide,” “divide this,” “this sentence,” “sentence into,” and “into shingles.”
Why would you ever want to do such a thing? One common reason is to speed up phrase searches, especially for phrases involving common terms. Consider a search for the exact phrase “Wizard of Oz.” Since the word of is incredibly common, including it in the phrase search will require Lucene to visit and filter out a great many occurrences that don’t match the phrase, which is costly. If, instead, you’d indexed the tokens “wizard of” and “of oz,” your phrase search would run quickly because those tokens occur far less frequently. The Nutch search engine, covered in section 4.9, creates shingles for exactly this reason. Because no stop words are discarded during indexing, shingles allows you to provide precisely correct phrase searching even for phrases containing stop words.
Another interesting use of shingles is document clustering, which lets you group similar or near-duplicate documents together. This is important for large collections of documents where duplicates may accidentally sneak in, which happens frequently when crawling for content through web servers that construct documents dynamically. Often slightly different URLs can yield the same underlying content, perhaps with a different header added in. Much like using term vectors to find similar documents (section 5.9.1), the approach is to represent each document by its salient shingles and then search for other documents that have similar shingles with similar frequency.
8.2.4. Obtaining the contrib analyzers
Depending on your needs, you may want JAR binary distributions of these analyzers or raw source code from which to borrow ideas. Section 8.7 provides details on how to access the contrib source code and build binary distributions. In the repository, the Snowball analyzer resides in contrib/snowball; the other analyzers discussed here are in contrib/analyzers. There are no external dependencies for these analyzers other than Lucene itself, so they’re easy to incorporate. A test program called TestApp is included for the Snowball project. It’s run in this manner:
> java -cp lib/lucene-snowball-3.0.1.jar org.tartarus.snowball.TestApp
Usage: TestApp <stemmer name> <input file> [-o <output file>]

> java -cp lib/lucene-snowball-3.0.1.jar org.tartarus.snowball.TestApp
    Lovins spoonful.txt
... output of stemmer applied to specified file
The Snowball TestApp bypasses SnowballAnalyzer. Only the Snowball stemmer itself is used with rudimentary text splitting at whitespace.
Next we show how to highlight matches in search results using the Highlighter package.
8.3. Highlighting query terms
The contrib highlighter module fragments and highlights text based on a Lucene query. Highlighter was originally contributed by Mark Harwood, but many others have since joined in. Giving end users some context around specific term hits from their searches is a powerful way for them to judge how relevant each hit is. Often, a brief glimpse of the surrounding context of the search terms is enough to know if that result is worth investigating further. Each hit includes some number of fragments of the matching document highlighting the terms of the query. Figure 8.7 shows an example of highlighting part of the text from chapter 3, based on a term query for term. The source code for this is shown in listing 8.2. Like spell correction, covered in section 8.5, the web search engines have established this feature as a baseline requirement that all other search engines are expected to have.
Figure 8.7. Highlighting matching query terms within text

What’s commonly referred to as highlighting in fact consists of two separate functions. First is dynamic fragmenting, which means picking a few choice sentences out of a large text that best match the search query. Some search applications skip this step and instead fall back on a static abstract or summary for each document, but that generally gives a worse user experience because it’s static. The second function is highlighting, whereby specific words in context of their surrounding text are called out, often with bolding and a colored background, so the user’s eyes can quickly jump to specific words that matched.
These two functions are fully independent. For example, you may apply highlighting to a title field without deriving fragments from it, because you always present the full title. Or, for a field that has a large amount of text, you’d first fragment it and then apply the highlighting. We’ll begin with an overview of the components used during highlighting, and then show a simple example of highlighter in action, including how to use Cascading Style Sheets (CSS) to control the client-side mechanics of highlighting. We’ll wrap up by showing you how to highlight search results.
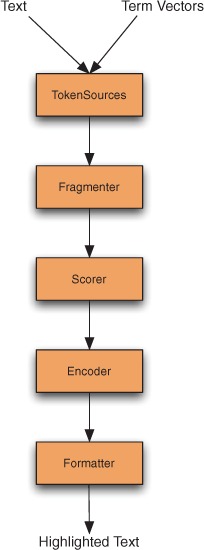
8.3.1. Highlighter components
The Highlighter code is a sophisticated and flexible utility, and is well factored to break out the separate steps necessary during fragmentation and highlighting. Figure 8.8 shows the steps used by the Highlighter class to compute the highlighted text. Let’s walk through each step.
Figure 8.8. Java classes and interfaces used by Highlighter
Tokensources
Highlighting requires two separate inputs: the actual full original text (a String) to work on, and a TokenStream derived from that text. Typically you’d store the full text as a stored field in the index, but if you have an alternate external store—for example, a database—that works fine as well. Just be sure that source can deliver the text for a page’s worth of results quickly enough.
To create the TokenStream, you could reanalyze the text, using the same analyzer you had used during indexing. Alternatively, because you presumably had already analyzed the text during indexing, you can derive the TokenStream from previously stored term vectors (see section 2.4.3), as long as you used Field. TermVector.WITH_POSITIONS_OFFSETS. The convenient TokenSources class in the Highlighter package has static convenience methods that will extract a TokenStream from an index using whichever of these sources is available. You can also create your own TokenStream separately if you’d like. Generally, term vectors will give you the fastest performance, but they do consume additional space in the index.
Highlighter relies on the start and end offset of each token from the token stream to locate the exact character slices to highlight in the original input text. So it’s crucial that your analyzer sets startOffset and endOffset on each token correctly as character offsets! If these aren’t right, you’ll see nonword pieces of text highlighted, or you may hit an InvalidTokenOffsets-Exception during highlighting. The core Lucene analyzers all set the offsets properly, so this normally isn’t a problem unless you’ve created your own analyzer. The next component, Fragmenter, breaks the original text into small pieces called fragments.
Fragmenter
Fragmenter is a Java interface in the Highlighter package whose purpose is to split the original string into separate fragments for consideration. NullFragmenter is one concrete class implementing this interface that returns the entire string as a single fragment. This is appropriate for title fields and other short text fields, where you wish to show the full text. SimpleFragmenter is another concrete class that breaks up the text into fixed-size fragments by character length, with no effort to spot sentence boundaries. You can specify how many characters per fragment (the default is 100). But this fragmenter is a little too simple: it doesn’t take into account positional constraints of the query when creating the fragments, which means for phrase queries and span queries, a matching span will easily be broken across two fragments.
Fortunately, the final fragmenter, SimpleSpanFragmenter, resolves that problem by attempting to make fragments that always include the spans matching each document. You’ll have to pass in a QueryScorer (see the next section) so it knows where the span matches are.
If you don’t set a Fragmenter on your Highlighter instance, it uses SimpleFragmenter by default. Although it doesn’t exist currently in the Highlighter package, a good implementation of Fragmenter would be one that attempts to produce fragments on sentence boundaries. Solr, covered in section 10.8, has RegexFragmenter (which fragments based on a provided regular expression) that could be used for rudimentary fragmenting by sentence.
Highlighter then takes each fragment produced by the fragmenter and passes each to the Scorer.
Scorer
The output of the Fragmenter is a series of text fragments from which Highlighter must pick the best one(s) to present. To do this, Highlighter asks the Scorer, a Java interface, to score each fragment. The Highlighter package provides two concrete implementations: QueryTermScorer, which scores each fragment based on how many terms from the provided Query appear in the fragment, and QueryScorer, which attempts to only assign scores to actual term occurrences that contributed to the match for the document. When combined with SimpleSpanFragmenter, QueryScorer is usually the best option because true matches are highlighted.
QueryTermScorer uses the terms from the query; it extracts them from primitive term, phrase, and Boolean queries and weighs them based on their corresponding boost factor. A query must be rewritten in its most primitive form for QueryTermScorer to be happy. For example, wildcard, fuzzy, prefix, and range queries rewrite themselves to a BooleanQuery of all the matching terms. Call Query. rewrite(IndexReader), which translates the query into primitive form, to rewrite a query prior to passing the Query to QueryTermScorer (unless you’re sure the query is already a primitive one).
QueryScorer extracts matching spans for the query, then uses these spans to score each fragment. Fragments that didn’t match the query, even if they contain a subset of the terms from the query, receive a score of 0.0. If you use the simpler QueryTermScorer, you’ll find that a PhraseQuery can show fragments that don’t show the entire phrase, which is terribly disconcerting and trust eroding to the end user. Note that QueryScorer is specific to each matching document (because it enumerates that document’s matching spans), so it must be instantiated for every document you need to highlight. Because of these benefits, we strongly recommend that you use QueryScorer instead of the simpler QueryTermScorer. All of the following examples use QueryScorer. The field name argument to QueryScorer specifies which field should be used for scoring the fragments; if you pass null, QueryScorer derives the field name(s) from the incoming Query.
At this point Highlighter chooses the best scoring fragments to present to the user. All that remains is to properly format them.
Encoder
The Encoder Java interface has a simple purpose: to encode the original text into the external format. There are two concrete implementations: DefaultEncoder, which is used by default in Highlighter, does nothing with the text. SimpleHTMLEncoder encodes the text as HTML, escaping any special characters such as < and > and &, and non-ASCII characters. Once the encoder is done, the final step is to format the fragments for presentation.
Formatter
The Formatter Java interface takes each fragment of text as a String, as well as the terms to be highlighted, and renders the highlighting. Highlighter provides three concrete classes to choose from. SimpleHTMLFormatter wraps a begin and end tag around each hit. The default constructor will use the <b> (bold) HTML tag. GradientFormatter uses different shades of background color to indicate how strong each hit was, using the <font> HTML tag. SpanGradientFormatter does the same thing but uses the <span> HTML tag because some browsers may not render the <font> tag correctly. You can also create your own class implementing the Formatter API.
Now that we’ve explored all the components that go into highlighting, let’s examine a complete example.
8.3.2. Standalone highlighter example
You understand the logical steps of the highlighting process, so let’s look at some concrete examples. The simplest example of Highlighter returns the best fragment, surrounding each matching term with HTML <B> tags:
String text = "The quick brown fox jumps over the lazy dog";

TermQuery query = new TermQuery(new Term("field", "fox"));

TokenStream tokenStream =
    new SimpleAnalyzer().tokenStream("field",
        new StringReader(text));

QueryScorer scorer = new QueryScorer(query, "field");
Fragmenter fragmenter = new SimpleSpanFragmenter(scorer);
Highlighter highlighter = new Highlighter(scorer);
highlighter.setTextFragmenter(fragmenter);
assertEquals("The quick brown <B>fox</B> jumps over the lazy dog",
             highlighter.getBestFragment(tokenStream, text));
The previous code produces this output:
The quick brown <B>fox</B> jumps over the lazy dog
In this simple example, our text was a fixed string and we derived a TokenStream by using SimpleAnalyzer. To successfully highlight terms, the terms in the Query need to match Tokens emitted from the TokenStream. The same text must be used to generate the TokenStream as is used for the original text to highlight.
We then create a QueryScorer to score fragments. QueryScorer requires you to wrap the TokenStream in a CachingTokenFilter because it needs to process the tokens more than once. Using the QueryScorer, we create a SimpleSpanFragmenter to break the text into fragments. In this example, the text is small, so the fragmenter is pointless: the entire text will become the one and only fragment. We could’ve used NullFragmenter instead. Finally, we create Highlighter, set our fragmenter, and then ask it for the best scoring fragment.
Next we show how to use CSS to control how highlighting is done.
8.3.3. Highlighting with CSS
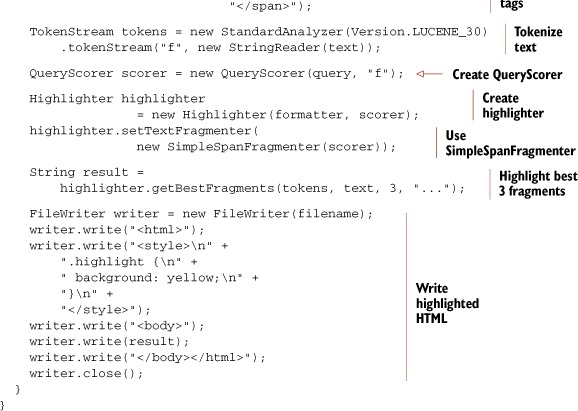
Using <B> tags to surround text that will be rendered by browsers is a reasonable default. Fancier styling should be done with CSS instead. Listing 8.2 shows our next example, HighlightIt, and was used to generate the highlighted result shown in figure 8.7. It uses custom begin and end tags to wrap highlighted terms with a <span> using the custom CSS class highlight. Using CSS attributes, the color and formatting of highlighted terms is decoupled from highlighting, permitting much more control over the end-user consumability of the interface.
Listing 8.2 also demonstrates the use of a custom Fragmenter, setting the fragment size to 70, and a custom Formatter to style highlights with CSS. Note that this is a contrived example; the content to be highlighted is a static string in the source code. In our first example, only the best fragment was returned, but Highlighter shines in returning multiple fragments. In this example we concatenate the best fragments with an ellipsis (...) separator; you could also have a String[] returned by not passing in a separator, so that your code could handle each fragment individually.
Listing 8.2. Highlighting terms using CSSs

In neither of our examples did we perform a search and highlight actual hits. The text to highlight was hard-coded. This brings up an important issue when dealing with the Highlighter: where do you get the text to highlight in a real search application? We address this in the next section.
8.3.4. Highlighting search results
Whether to store the original field text in the index is up to you (see section 2.4 for field indexing options). If the original text isn’t stored in the index (generally because of size considerations), you’ll have to retrieve the text to be highlighted from its original source. Take care to ensure that the retrieved text is always identical to the text that had been indexed. This is a great reason to simply store the text during indexing. If the original text is stored with the field, it can be retrieved directly from the document obtained from the search, as shown in listing 8.3.
Listing 8.3. Highlighting matches in search results
public void testHits() throws Exception {
  IndexSearcher searcher = new
     IndexSearcher(TestUtil.getBookIndexDirectory());
  TermQuery query = new TermQuery(new Term("title", "action"));
  TopDocs hits = searcher.search(query, 10);

  QueryScorer scorer = new QueryScorer(query, "title");
  Highlighter highlighter = new Highlighter(scorer);
  highlighter.setTextFragmenter(
                 new SimpleSpanFragmenter(scorer));

  Analyzer analyzer = new SimpleAnalyzer();

  for (ScoreDoc sd : hits.scoreDocs) {
    Document doc = searcher.doc(sd.doc);
    String title = doc.get("title");

    TokenStream stream =
     TokenSources.getAnyTokenStream(searcher.getIndexReader(),
                                                        sd.doc,
                                                        "title",
                                                        doc,
                                                        analyzer);
    String fragment =
        highlighter.getBestFragment(stream, title);

    System.out.println(fragment);
  }
}
With our sample book index, the output is
Ant in <B>Action</B>
Tapestry in <B>Action</B>
Lucene in <B>Action</B>, Second Edition
JUnit in <B>Action</B>, Second Edition
Notice that we use the convenient TokenSources.getAnyTokenStream method to derive a TokenStream from our original text. Under the hood, this method first tries to retrieve the term vectors from the index. As long as you indexed the document’s field with Field. TermVector.WITH_POSITIONS_OFFSETS, term vectors are used to reconstruct the TokenStream. Otherwise, the analyzer you pass in is used to reanalyze the text. Whether to index term vectors or reanalyze the text is an application-dependent decision: run your own tests to measure the difference in runtime and index size for each approach. In our case, we did index the title field with term vectors in the books index, so term vectors are used to create the token stream. Note that by default, Highlighter will only process the first 50 KB characters in your document text. Use the setMaxDocCharsToAnalyze API to change this, but note that performance will be slower if you increase it. Note also that if the field is multivalued, as described in section 2.4.7, the tokens for all fields are logically concatenated as if they were one field. For highlighting to work correctly for such fields, you must ensure the start and end offsets of each token, as well as the end offset for each field value, are accurately set during analysis, as described in section 4.7.1.
Now let’s visit an alternative highlighter, FastVectorHighlighter, which offers improved performance especially for larger documents.
8.4. FastVectorHighlighter
As we saw in the previous section, Highlighter is one of the most fundamental tools for users to assess whether each result is worth investigating further. Highlighter is popular and widely used by Lucene applications, but when the documents are large, Highlighter can be quite time consuming if you increase the number of characters to analyze with setMaxDocCharsToAnalyze. An alternative highlighter, FastVectorHighlighter, was first added in Lucene’s 2.9 release and offers faster performance.
As its name implies, FastVectorHighlighter is a fast highlighting tool, at the expense of more disk space consumption, because it relies on term vectors being present in the index. In contrib/benchmark (covered in appendix C), there’s an algorithm file called highlight-vs-vector-highlight.alg that lets you see the difference between two highlighters in processing time. As of version 2.9, with modern hardware, that algorithm shows that FastVectorHighlighter is about two and a half times faster than Highlighter.
The advantages of FastVectorHighlighter over Highlighter are not only speed but also functionality. First, FastVectorHighlighter can support fields that are tokenized by ngram tokenizers. Highlighter can’t support such fields very well. Second, more interesting is that FastVectorHighlighter can output the multicolored tag highlighting out of the box, as shown in figure 8.9. Third, FastVectorHighlighter can support “per phrase” tagging, rather than the “per term” tagging that Highlighter supports. For instance, if you search the phrase “lazy dog,” FastVectorHighlighter produces <b>lazy dog</b> whereas Highlighter produces <b>lazy</b> <b>dog</b>.
Figure 8.9. FastVectorHighlighter supports multicolored hit highlighting out of the box.

Let’s see how to use FastVectorHighlighter. After you run the program in listing 8.4, you should see the HTML page shown in figure 8.9.
Listing 8.4. Highlighting terms using FastVectorHighlighter
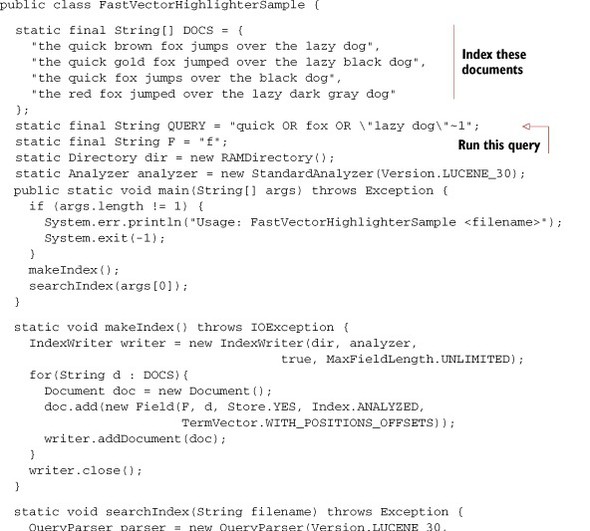

The makeIndex method adds four static documents that are held in DOCS variable into the index. Note that any fields that will be highlighted must be indexed with TermVector.WITH_POSITIONS_OFFSETS. The searchIndex method searches for quick OR fox OR "lazy dog"~1 that’s set in a constant QUERY and displays the highlighted results.
To get highlighted fragments, first you must get an instance of FastVectorHighlighter. Once you have the instance, create a FieldQuery from it. The FieldQuery will be necessary during highlighting (passed as the fieldQuery argument to getBestFragment). To get an instance of FastVectorHighlighter, you can simply use the default constructor as follows:
FastVectorHighlighter highlighter = new FastVectorHighlighter();
You can’t use the multicolored tag feature by using such highlighter, though. Because of this, we’ve provided the getHighlighter method in listing 8.4. In the method, to support the multicolored tag feature, COLORED_PRE_TAGS and COLORED_POST_TAGS constants are passed as arguments to the ScoreOrderFragmentsBuilder constructor; then the instance of the FragmentsBuilder is passed as an argument to FastVectorHighlighter.
As you’ve seen, FastVectorHighlighter has some compelling advantages over Highlighter. So should you always use FastVectorHighlighter and forget Highlighter? No, you can’t, because FastVectorHighlighter also has some disadvantages. One of them is the additional consumption of disk space because the highlighting fields must be indexed with TermVector.WITH_POSITIONS_OFFSETS. Furthermore, the default FragmentsBuilder ignores word boundaries when building fragments. You can see this limitation in figure 8.9, with the last fragment that starts with the “e” from the word the. To avoid this inconvenience, you could implement a custom FragmentsBuilder that takes the word boundaries into account. Finally, FastVectorHighlighter can only support basic queries such as TermQuery and PhraseQuery. A BooleanQuery that consists of these basic queries is also supported. Highlighter supports almost all the queries in Lucene, including WildcardQuery and SpanQuery.
Each of the highlighters has strengths and weaknesses; you’ll have to make an informed decision based on what’s important to your application and your users.
Next we’ll cover an important package that implements spell checking.
8.5. Spell checking
Spell checking is something users now take for granted in today’s search engines. Enter a misspelled word into Google and you’ll get back a helpful and nearly always accurate “Did you mean...?” with your typo corrected as a link that you can then click. Google’s spell checking is so effective that you can rely on it to correct your typos. Spell checking is such a wonderfully simple and intuitive must-have feature to the end user. But, as a developer, just how do you implement it? Fortunately, Lucene has the spellchecker contrib module, created by David Spencer, for just this purpose.
Web search engines spend a lot of energy tuning their spell-checking algorithms, and it shows. Generally you get a good experience, and this sets a high bar for how all the world’s search applications are expected to behave. Let’s walk through the typical steps during spell checking, including generating possible suggestions, selecting the best one for each misspelled word, and presenting the choice to the user. We’ll wrap up with some other possible ideas to explore. Along the way we’ll see how the spellchecker contrib module tackles each.
8.5.1. Generating a suggestions list
You might assume the first step is to decide whether or not spell checking is even necessary. But that’s hard to determine up front, and it’s usually more effective to always run through the steps and then use the score of each potential suggestion to decide whether they should be presented to the user. The first step is to generate a raw set of possible suggestions. The spellchecker module works with one term at a time, so if the query has multiple terms you’ll have to consider each separately (but see section 8.5.4 for some ideas on handling multiterm queries).
You’ll need a source dictionary of “valid” words. You can try to use a generic known accurate dictionary, but it’s difficult to find such dictionaries that will exactly match your search domain, and it’s even harder to keep such a dictionary current over time. A more powerful means of deriving a dictionary is to use your search index to gather all unique terms seen during indexing from a particular field. This is the approach used by the spellchecker module.
Given the dictionary, you must enumerate the suggestions. You could use a phonetic approach, such as the “sounds like” matching we explored in section 4.4. Another approach, which is the one used by the spellchecker module, is to use letter ngrams to identify similar words. A letter ngram is all subsequences of adjacent letters in length, varying between a minimum and a maximum size. Using this approach, the ngrams for all words in the dictionary are indexed into a separate spellchecker index. This is usually a fast operation, and so the application’s indexing process would rebuild the entire spellchecker index whenever the main index is updated.
Let’s walk through an example. Say our dictionary contains the word lettuce. Table 8.2 shows the 3grams and 4grams that are added into the spellchecker index. In this case, our “document” is the word lettuce whose indexed tokens are the generated 3grams and 4grams. Next, imagine the user searches for letuce, whose ngrams are shown in table 8.3. To find the suggestions, the ngrams for letuce are used to run a search against the spellchecker index. Because many of the ngrams are shared (let, tuc, uce, and tuce), the correct word lettuce will be returned with a high relevance score.
Table 8.2. The ngrams for the word lettuce
|
Word |
Lettuce |
|---|---|
| 3gram | let, ett, ttu, tuc, uce |
| 4gram | lett, ettu, ttuc, tuce |
Table 8.3. The ngrams for the misspelled word letuce
|
Word |
Lettuce |
|---|---|
| 3gram | let, etu, tuc, uce |
| 4gram | letu, etuc, tuce |
Fortunately, the spellchecker module handles all this ngram processing for you, under the hood (though the NGramTokenizer and EdgeNGramTokenizer, described in section 8.2.2, let you create your own ngrams if you want to take a more custom approach). Creating the spellchecker index is surprisingly simple. Listing 8.5 shows how to do it, using the terms from an existing Lucene index. Run it with ant CreateSpellCheckerIndex. This creates a spellchecker index, stored in the local directory indexes/spellchecker, by enumerating all unique terms seen in the word field of the wordnet index, by default.
It produces output like this:
Now build SpellChecker index...
took 2431 milliseconds
Listing 8.5. Creating the spellchecker index

Note that if you have an alternate source of words, or perhaps you’d like to use terms from a Lucene index but filter certain ones out, you can create your own class implementing the Dictionary interface (in the org.apache.lucene.search.spell package) and pass that to the SpellChecker instance instead. The next step is to pick the best suggestion.
8.5.2. Selecting the best suggestion
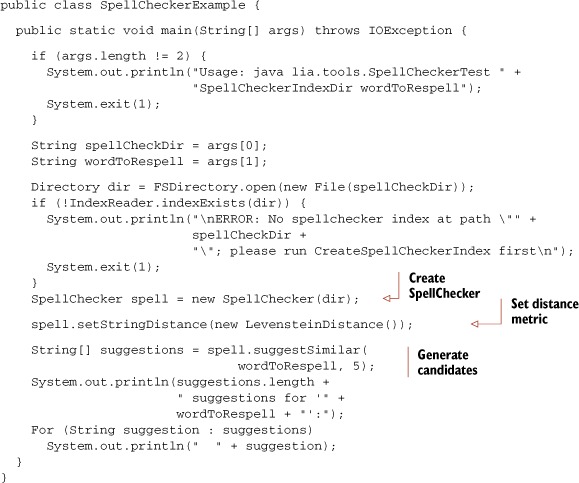
From the first step, using the letter ngram approach, we can now generate a set of suggestions for each term in the user’s query. Listing 8.6 shows how to generate respellings with spellchecker, using the spellchecker index created by listing 8.5. Run it with ant SpellCheckerExample, which by default searches for corrections of the word letuce:
5 suggestions for 'letuce':
  lettuce
  letch
  deduce
  letup
  seduce
Not bad! Lettuce was the first choice. But how do we handle the other choices?
Listing 8.6. Finding the list of candidates using the spellchecker index
Unfortunately, you don’t usually have the luxury of showing many spelling suggestions to the user. Typically you can either present no choice (if you determine all terms in the query seem properly spelled, or there were no good spelling candidates found), or a single suggestion, back to the user.
Although the ngram approach is good for enumerating potential respellings, its relevance ranking is generally not good for selecting the best one. Typically, a different distance metric is used to resort the suggestions according to how similar each is to the original term. One common metric is the Levenshtein metric, which we used in section 3.4.8 to search for similar terms using FuzzyQuery. This is the default metric used by spellchecker, and generally it works well. You can also use the JaroWinkler class to select the Jaro-Winkler distance (see http://en.wikipedia.org/wiki/Jaro-Winkler), which is provided in the spellchecker package, or you could implement your own string similarity metric. The array of suggestions returned by SpellChecker.suggestSimilar is sorted by decreasing similarity according to the distance metric, so you simply pick the first result to present as the suggested spelling.
The final step is to present the spelling option to the user.
8.5.3. Presenting the result to the user
Once you have your single best spelling candidate, you first need to decide if it’s good enough to present to the user. The SpellChecker class doesn’t return the distance between each suggestion and the original user’s term, though you could recompute that by calling the getDistance method on the StringDistance instance you’re using. SpellChecker also has an alternative suggestSimilar method that takes additional arguments in order to restrict the suggestions to those terms that are more frequent than the original term; this way, you’ll present a suggested spelling only if it occurred more frequently than the original term, which is a reasonable way to decide whether a candidate is worth presenting. It also has a setAccuracy method to set the minimum relevance of each suggestion.
Next, assuming you have a suggestion worth presenting, what exactly should your application do? One option, if you’re confident of the spelling suggestion, is to automatically respell the term. But be sure to clearly tell the user at the top of the search results that this was done, and give the user a quick link to forcefully revert to her original search. Alternatively, you could search exactly as the user requested but present a “Did you mean...” with the spelling suggestion, as Google often does. Finally, you could search for both the original query plus the respelled query, OR’d together perhaps with different boosts.
Typically a search application will choose one of these options up front. But modern web search engines seem to make this choice dynamically, per query, depending on some measure of confidence of the spelling suggestion. Go ahead and try some searches in http://www.google.com and http://www.bing.com!
8.5.4. Some ideas to improve spell checking
Implementing spell checking is challenging, and we’ve touched on a few of the issues. The spellchecker contrib module gives you a great start. But you may want to explore some of the following improvements for your application:
- If you have high search traffic, consider using the terms from your user’s queries to help rank the best suggestion. In applications whose dictionary changes quickly with time, such as a news search engine for current events, this strategy is especially compelling. This approach makes the assumption that most users know how to spell well, which so far seems to be a correct assumption!
- Instead of respelling each term separately, consider factoring in the other terms to bias the suggestions of each term. One way is to compute term co-occurrence statistics up front for every pair of terms X and Y, to measure how many documents or queries contain both terms X and Y. Then, when sorting the suggestions take these statistics into account with the other terms in the user’s query. If a user enters the misspelled query “harry poter,” you’d like to suggest “harry potter” instead of other choices like “harry poster.”
- The dictionary you use for spell checking is critical. When you use terms from an existing index, you can easily import misspellings from the content you’d indexed if the content is “dirty.” You can also accidentally import terms that you may never want to suggest, such as SKU numbers or stock ticker symbols. Try to filter such terms out, or only accept terms that occurred above a certain frequency.
- If you have high search traffic, you can train your spell checker according to how users click on the “Did you mean...” link, biasing future suggestions based on how users have accepted suggestions in the past. Use this as well to gather a test set for testing other improvements to your spell checking.
- If your search application has entitlements (restricting which content a user can see based on her entitlement), then take care to keep the spell-checker dictionary separate for different user classes. A single global dictionary can accidentally “leak” information across entitlement classes, which could cause serious problems.
- Tweak how you compute the confidence of each suggestion. The spellchecker module currently relies entirely on the StringDistance score for this, but you could imagine improving this by combining StringDistance with the frequency of this term in the index to gain a better confidence.
- One way to determine whether it’s necessary to even present corrections is to first run the user’s original search, and then if it returns 0, or very few, results, try the respelled search to see if it returns more, and use that to bias the decision.
As you’ve seen, despite seeming so simple when you use it, under the hood spell checking is quite challenging to implement. The spellchecker contrib module does much of this work for you, including creating a separate spellchecker index, enumerating candidate corrections, and ranking them by edit distance. Although it gives you a great start, we’ve left you with some suggestions on how to further improve on it.
Next we cover a slew of interesting Query implementations.
8.6. Fun and interesting Query extensions
The queries contrib module provides interesting additions to Lucene’s core queries, contributed by Mark Harwood, including MoreLikeThis, FuzzyLikeThisQuery, BoostingQuery, TermsFilter, and DuplicateFilter.
8.6.1. MoreLikeThis
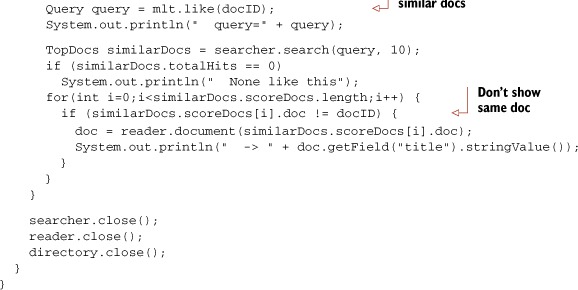
The MoreLikeThis class captures all the logic for finding similar documents to an existing document. In section 5.9.1 we saw the BooksLikeThis example to accomplish the same functionality, but MoreLikeThis is more general and will work with any Lucene index. Listing 8.7 shows how to do the same thing as BooksLikeThis using MoreLikeThis.
The approach is exactly the same: enumerate terms from the provided document and build a Query to find similar documents. MoreLikeThis is more flexible: if you give it a docID and an IndexReader instance, it will iterate through any field that’s stored or that has indexed term vectors, to locate the terms for that document. For stored fields it must reanalyze the text, so be sure to set the analyzer first if the default StandardAnalyzer isn’t appropriate. MoreLikeThis is able to find documents similar to an arbitrary String or the contents of a provided file or url as well.
Remember MoreLikeThis will usually return the same document (if your search was based on a document in the index), so be sure to filter it out in your presentation.
Listing 8.7. Using MoreLikeThis to find similar documents

8.6.2. FuzzyLikeThisQuery
FuzzyLikeThisQuery combines MoreLikeThis and FuzzyQuery. It allows you to build a query by adding arbitrary text, which is analyzed by default with StandardAnalyzer. The tokens derived from that analysis are then “fuzzed” using the same process that FuzzyQuery uses. Finally, from these terms the most differentiating terms are selected and searched on. This query can be a useful alternative when end users are unfamiliar with the standard QueryParser Boolean search syntax.
8.6.3. BoostingQuery
BoostingQuery allows you to run a primary Query but selectively demote search results matching a second Query. Use it like this:
Query balancedQuery = new BoostingQuery(positiveQuery,
                                        negativeQuery, 0.01f);
where positiveQuery is your primary query, negativeQuery matches those documents you’d like to demote, and 0.01f is the factor you’d like use when demoting. All documents matching negativeQuery alone won’t be included in the results. All documents matching positiveQuery alone will be included with their original score. All documents matching both will have their score demoted by the specified factor.
BoostingQuery is similar to creating a Boolean query with the negativeQuery added as a NOT clause, except instead of excluding outright those documents matching negativeQuery, BoostingQuery still includes those documents, just with a weaker score.
8.6.4. TermsFilter
TermsFilter is a filter that matches any arbitrary set of terms you specify. It’s like a TermRangeFilter that doesn’t require the terms to be in a contiguous sequence. You simply construct the TermsFilter, add the terms one by one you’d like to filter on by calling the addTerm method, and then use that filter when searching. An example might be a collection of primary keys from a database query result or perhaps a choice of “category” labels picked by the end user.
8.6.5. DuplicateFilter
DuplicateFilter is a Filter that removes documents that have the same value for a specific unanalyzed field. For example, say you have a field KEY, which isn’t analyzed but is indexed. Suppose a given document could be indexed multiple times in Lucene, perhaps once with only its “current version” and again with the “full revision history.” There would now be two Lucene documents, each sharing the same KEY value. You could then do something like this:
DuplicateFilter df = new DuplicateFilter("KEY");
df.setKeepMode(DuplicateFilter.KM_USE_LAST_OCCURRENCE);
TopDocs hits = searcher.search(query, df, 10);
And the filter will keep only the last document added to the index that shares the same KEY value.
8.6.6. RegexQuery
RegexQuery, which is in the contrib/regex directory, allows you to specify an arbitrary regular expression for matching terms. Any document containing a term matching that regular expression will match. It’s like WildcardQuery on steroids. Here’s a simple example:
public void testRegexQuery() throws Exception {
  Directory directory = TestUtil.getBookIndexDirectory();
  IndexSearcher searcher = new IndexSearcher(directory);
  RegexQuery q = new RegexQuery(new Term("title", ".*st.*"));
  TopDocs hits = searcher.search(q, 10);
  assertEquals(2, hits.totalHits);
  assertTrue(TestUtil.hitsIncludeTitle(searcher, hits,
                                       "Tapestry in Action"));
  assertTrue(TestUtil.hitsIncludeTitle(searcher, hits,
                  "Mindstorms: Children, Computers, And Powerful Ideas"));
  searcher.close();
  directory.close();
}
There are two books that match the cryptic regular expression .*st.*. By default RegexQuery uses Java’s built-in regular expression syntax, from java.util.regex, but you can switch to Apache Jakarta’s regular expression syntax (org.apache.regexp) by calling
RegexQuery.setRegexImplementation(new JakartaRegexpCapabilities());
The contrib/regex package also contains SpanRegexQuery, which combines RegexQuery and SpanQuery so that all matches also include the matching spans. The SpanQuery family is described section 5.5.
Let’s now see how to build contrib modules.
8.7. Building contrib modules
Most of Lucene’s contrib modules are included in the standard Lucene releases, under the contrib directory. Each package generally has its own JAR files for the classes and the Javadocs.
Still, some packages aren’t part of the build and release process. Further, there may be recent improvements not yet released that you’d like to use. To handle these cases, you’ll need to access the source code and build the packages yourself. Fortunately, this is straightforward; you can easily obtain Lucene’s source code directly (via Apache’s SVN access or from the source code release). You can then either build the JAR files and incorporate the resulting binaries into your project or copy the desired source code into your project and build it directly into your own binaries.
8.7.1. Get the sources
The simplest way to obtain the sources for the contrib modules is to download the source release from http://lucene.apache.org. If you’d like to instead use the latest and greatest version you can check out the source code using a Subversion client (see http://subversion.tigris.org). Follow the instructions provided at the Apache site: http://wiki.apache.org/lucene-java/SourceRepository. Specifically, this step involves executing the following command from the command line:
svn checkout http://svn.apache.org/repos/asf/lucene/java/trunk lucene
This is read-only access to the repository. In your current directory, you’ll now have a subdirectory named lucene-trunk. Under that directory is a contrib directory where all the goodies discussed here, and more, reside. Let’s build the JARs.
8.7.2. Ant in the contrib directory
Next, let’s build the components. You’ll need Ant 1.7.0 or later in order to run the contrib build files. At the root of the lucene-trunk directory is a build.xml file. From the command line, with the current directory lucene-trunk, execute the following:
ant build-contrib
Most of the components will build and create a distributable JAR file in the build subdirectory. Now is also a good time to execute the Ant test, which runs all core and contrib unit tests, to confirm all Lucene’s tests are passing.
Some components aren’t currently integrated into this build process, so you may need to copy the necessary files into your project. Some outdated contributions are still there as well (these are the ones we didn’t mention in this chapter), and additional contributions will probably arrive after we’ve written this.
Each contrib subdirectory, such as analyzers and Ant, has its own build.xml file. To build a single component, set your current working directory to the desired component’s directory and execute ant. This is still a fairly crude way of getting your hands on these add-ons to Lucene, but it’s useful to have direct access to the source. You may want to use the contrib modules for ideas and inspiration, not necessarily for the exact code.
8.8. Summary
Don’t reinvent the wheel. Someone has no doubt encountered the same situation you’re struggling with. The contrib modules and the other resources listed on the Lucene website should be your first stops.
In this chapter we’ve covered the truly essential extensions to Lucene. Google clearly sets a high bar as the baseline expectation of search users when it comes to spell checking and hit highlighting. Fortunately, Lucene’s contrib modules include the spellchecker package and two packages for performing hit highlighting, giving you an excellent starting point for providing these functions to your users.
We saw Luke, which is an incredibly useful graphical tool for peeking into your index to see what terms and documents are present, as well as for running queries and basic index operations like optimization. Luke is an invaluable Swiss army knife of a tool that all Lucene applications should make use of.
If you’re working with languages other than English, take advantage of the numerous analyzers for non-English languages; often you can choose from more than one analyzer to try per language. Beyond language-specific analyzers, we saw some other interesting analyzers like ngram, which creates tokens out of adjacent letters in each word, and shingle, which creates single tokens out of multiple adjacent words. Using the shingle filter is a particularly useful approach to allow phrase searches to include stop words.
We also saw a slew of interesting new Query implementations, including a generic MoreLikeThis class for finding documents similar to a specified original; FuzzyLikeThisQuery, which combines MoreLikeThis and FuzzyQuery; BoostingQuery, for mixing the scores of a positive and negative query; and RegexQuery, for matching documents containing terms that match a provided regular expression. The queries package also provides TermsFilter, to accept documents containing any of an arbitrary set of terms, and DuplicateFilter, to remove documents that seem to be duplicates of one another according to a specified field.
In the next chapter we continue our coverage of Lucene’s contrib modules, visiting some of the less commonly used contrib modules.