
Chapter 2. Building a search index
This chapter covers
- Performing basic index operations
- Boosting documents and fields during indexing
- Indexing dates, numbers, and sortable fields
- Advanced indexing topics
So you want to search files stored on your hard disk, or perhaps search your email, web pages, or even data stored in a database. Lucene can help you do that. But before you can search something, you’ll have to index it, and Lucene will help you do that as well, as you’ll learn in this chapter.
In chapter 1, you saw a simple indexing example. This chapter goes further and teaches you about index updates, parameters you can use to tune the indexing process, and more advanced indexing techniques that will help you get the most out of Lucene. Here you’ll also find information about the structure of a Lucene index, important issues to keep in mind when accessing a Lucene index with multiple threads and processes, the transactional semantics of Lucene’s indexing API, sharing an index over remote file systems, and the locking mechanism that Lucene employs to prevent concurrent index modification.
Despite the great detail we’ll go into, don’t forget the big picture: indexing is simply a means to an end. What matters is the search experience your applications present to your users; indexing is “merely” the necessary evil you must go through in order to enable a strong user search experience. So although there are fun details here about indexing, your time is generally better spent working on how to improve the search experience. In nearly every application, the search features are far more important than the details of indexing. That being said, implementing search features requires important corresponding steps during indexing, as you’ll see here.
Be warned: this is a rather long chapter. The length is necessary because Lucene exposes many details of indexing. The good news is that most applications don’t need to use any of Lucene’s advanced indexing options. In fact, sections 2.1, 2.2, and 2.3 may be all that’s needed for many applications, or to simply get started. If you’re the curious type, and you just won’t leave any stone unturned, or your application needs to use all the bells and whistles, the rest of this chapter is for you!
Let’s begin now with Lucene’s conceptual model for content.
2.1. How Lucene models content
Let’s first walk through its conceptual approach to modeling content. We’ll start with Lucene’s fundamental units of indexing and searching, documents and fields, then move on to important differences between Lucene and the more structured model of modern databases.
2.1.1. Documents and fields
A document is Lucene’s atomic unit of indexing and searching. It’s a container that holds one or more fields, which in turn contain the “real” content. Each field has a name to identify it, a text or binary value, and a series of detailed options that describe what Lucene should do with the field’s value when you add the document to the index. To index your raw content sources, you must first translate it into Lucene’s documents and fields. Then, at search time, it’s the field values that are searched; for example, users could search for “title:lucene” to find all documents whose title field value contains the term lucene.
At a high level, there are three things Lucene can do with each field:
- The value may be indexed (or not). A field must be indexed if you intend to search on it. Only text fields may be indexed (binary valued fields may only be stored). When a field is indexed, tokens are first derived from its text value, using a process called analysis, and then those tokens are enrolled into the index. See section 2.4.1 for options that control how the field’s value is indexed.
- If it’s indexed, the field may also optionally store term vectors, which are collectively a miniature inverted index for that one field, allowing you to retrieve all of its tokens. This enables certain advanced use cases, like searching for documents similar to an existing one (more uses are covered in section 5.7). See section 2.4.3 for options that control how term vectors are indexed.
- Separately, the field’s value may be stored, meaning a verbatim copy of the unanalyzed value is written away in the index so that it can later be retrieved. This is useful for fields you’d like to present unchanged to the user, such as the document’s title or abstract. See section 2.4.2 for options that control how the field’s values are stored.
How you factor your raw content sources into Lucene’s documents and fields is typically an iterative design process that’s application dependent. Lucene couldn’t care less which fields you use, what their names are, and so forth. Documents usually have quite a few fields, such as title, author, date, abstract, body text, URL, and keywords. Sometimes a catchall field is used, combining all text into a single field for searching. Once you’ve created your document, you add it to your index. Then, at search time, you can retrieve the documents that match each query and use their stored fields to present results to the end user.
Lucene is often compared to a database, because both can store content and retrieve it later. But there are important differences. The first one is Lucene’s flexible schema.
Note
When you retrieve a document from the index, only the stored fields will be present. For example, fields that were indexed but not stored won’t be in the document. This behavior is frequently a source of confusion.
2.1.2. Flexible schema
Unlike a database, Lucene has no notion of a fixed global schema. In other words, each document you add to the index is a blank slate and can be completely different from the document before it: it can have whatever fields you want, with any indexing and storing and term vector options. It need not have the same fields as the previous document you added. It can even have the same fields, with different options, than in other documents.
This feature is quite powerful: it allows you to take an iterative approach to building your index. You can jump right in and index documents without having to predesign the schema. If you change your mind about your fields, start adding additional fields later on and then go back and reindex previously added documents, or rebuild the index.
Lucene’s flexible schema also means a single index can hold documents that represent different entities. For instance, you could have documents that represent retail products with fields such as name and price, and documents that represent people with fields such as name, age, and gender. You could also include unsearchable “meta” documents, which simply hold metadata about the index or your application (such as what time the index was last updated or which product catalog was indexed) but are never included in search results.
The second major difference between Lucene and databases is that Lucene requires you to flatten, or denormalize, your content when you index it.
2.1.3. Denormalization
One common challenge is resolving any “mismatch” between the structure of your documents versus what Lucene can represent. For example, XML can describe a recursive document structure by nesting tags within one another. A database can have an arbitrary number of joins, via primary and secondary keys, relating tables to one other. Microsoft’s Object Linking & Embedding (OLE) documents can reference other documents for embedding. Yet Lucene documents are flat. Such recursion and joins must be denormalized when creating your documents. Open source projects that build on Lucene, like Hibernate Search, Compass, LuSQL, DBSight, Browse Engine, and Oracle/Lucene integration, each has different and interesting approaches for handling this denormalization.
Now that you understand how Lucene models documents at a conceptual level, it’s time to visit the steps of the indexing process at a high level.
2.2. Understanding the indexing process
As you saw in chapter 1, only a few methods of Lucene’s public API need to be called in order to index a document. As a result, from the outside, indexing with Lucene looks like a deceptively simple and monolithic operation. But behind the simple API lies an interesting and relatively complex set of operations that we can break down into three major and functionally distinct groups, as described in the following sections and shown in figure 2.1.
Figure 2.1. Indexing with Lucene breaks down into three main operations: extracting text from source documents, analyzing it, and saving it to the index.
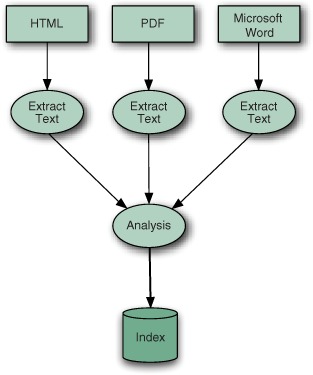
During indexing, the text is first extracted from the original content and used to create an instance of Document, containing Field instances to hold the content. The text in the fields is then analyzed to produce a stream of tokens. Finally, those tokens are added to the index in a segmented architecture. Let’s talk about text extraction first.
2.2.1. Extracting text and creating the document
To index data with Lucene, you must extract plain text from it, the format that Lucene can digest, and then create a Lucene document. In chapter 1, we limited our examples to indexing and searching .txt files, which allowed us to easily slurp their content and use it to populate Field instances. But things aren’t always that simple: the Build Document step from figure 1.4 has quite a bit of work hidden behind it.
Suppose you need to index a set of manuals in PDF format. To prepare these manuals for indexing, you must first find a way to extract the textual information from the PDF documents and use that extracted text to create Lucene documents and their fields. No methods would accept a PDF Java type, even if such a type existed. You face the same situation if you want to index Microsoft Word documents or any document format other than plain text. Even when you’re dealing with XML or HTML documents, which use plain-text characters, you still need to be smart about preparing the data for indexing, to avoid indexing the XML elements or HTML tags and index only the real text.
The details of text extraction are in chapter 7 where we describe the Tika framework, which makes it almost too simple to extract text from documents in diverse formats. Once you have the text you’d like to index, and you’ve created a document with all fields you’d like to index, all text must then be analyzed.
2.2.2. Analysis
Once you’ve created Lucene documents populated with fields, you can call IndexWriter’s addDocument method and hand your data off to Lucene to index. When you do that, Lucene first analyzes the text, a process that splits the textual data into a stream of tokens, and performs a number of optional operations on them. For instance, the tokens could be lowercased before indexing, to make searches case insensitive, using Lucene’s LowerCaseFilter. Typically it’s also desirable to remove all stop words, which are frequent but meaningless tokens, from the input (for example a, an, the, in, on, and so on, in English text) using StopFilter. Similarly, it’s common to process input tokens to reduce them to their roots, for example by using PorterStemFilter for English text (similar classes exist in Lucene’s contrib analysis module, for other languages). The combination of an original source of tokens, followed by the series of filters that modify the tokens produced by that source, make up the analyzer. You are also free to build your own analyzer by chaining together Lucene’s token sources and filters, or your own, in customized ways.
This important step, covered under the Analyze Document step in figure 1.4, is called analysis. The input to Lucene can be analyzed in so many interesting and useful ways that we cover this process in detail in chapter 4. The analysis process produces a stream of tokens that are then written into the files in the index.
2.2.3. Adding to the index
After the input has been analyzed, it’s ready to be added to the index. Lucene stores the input in a data structure known as an inverted index. This data structure makes efficient use of disk space while allowing quick keyword lookups. What makes this structure inverted is that it uses tokens extracted from input documents as lookup keys instead of treating documents as the central entities, much like the index of this book references the page number(s) where a concept occurs. In other words, rather than trying to answer the question “What words are contained in this document?” this structure is optimized for providing quick answers to “Which documents contain word X?”
If you think about your favorite web search engine and the format of your typical query, you’ll see that this is exactly the query that you want to be as quick as possible. The core of today’s web search engines are inverted indexes.
Lucene’s index directory has a unique segmented architecture, which we describe next.
Index Segments
Lucene has a rich and detailed index file format that has been carefully optimized with time. Although you don’t need to know the details of this format in order to use Lucene, it’s still helpful to have some basic understanding at a high level. If you find yourself curious about all the details, see appendix B.
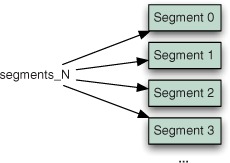
Every Lucene index consists of one or more segments, as depicted in figure 2.2. Each segment is a standalone index, holding a subset of all indexed documents. A new segment is created whenever the writer flushes buffered added documents and pending deletions into the directory. At search time, each segment is visited separately and the results are combined.
Figure 2.2. Segmented structure of a Lucene inverted index
Each segment, in turn, consists of multiple files, of the form _X.<ext>, where X is the segment’s name and <ext> is the extension that identifies which part of the index that file corresponds to. There are separate files to hold the different parts of the index (term vectors, stored fields, inverted index, and so on). If you’re using the compound file format (which is enabled by default but you can change using IndexWriter.setUseCompoundFile), then most of these index files are collapsed into a single compound file: _X.cfs. This reduces the number of open file descriptors during searching, at a small cost of searching and indexing performance. Chapter 11 covers this trade-off in more detail.
There’s one special file, referred to as the segments file and named segments_<N>, that references all live segments. This file is important! Lucene first opens this file, and then opens each segment referenced by it. The value <N>, called “the generation,” is an integer that increases by one every time a change is committed to the index.
Naturally, over time the index will accumulate many segments, especially if you open and close your writer frequently. This is fine. Periodically, IndexWriter will select segments and coalesce them by merging them into a single new segment and then removing the old segments. The selection of segments to be merged is governed by a separate MergePolicy. Once merges are selected, their execution is done by the MergeScheduler. These classes are advanced topics, covered in section 2.13.6.
Let’s now walk through the basic operations (add, update, delete) you do when indexing.
2.3. Basic index operations
We’ve covered Lucene’s conceptual approach to modeling documents, and then we described the logical steps of the indexing process. Now it’s time to look at some real code, using Lucene’s APIs to add, remove, and update documents. We start with adding documents to an index since that’s the most frequent operation.
2.3.1. Adding documents to an index
Let’s look at how to create a new index and add documents to it. There are two methods for adding documents:
- addDocument(Document)—Adds the document using the default analyzer, which you specified when creating the IndexWriter, for tokenization.
- addDocument(Document, Analyzer)—Adds the document using the provided analyzer for tokenization. But be careful! In order for searches to work correctly, you need the analyzer used at search time to “match” the tokens produced by the analyzers at indexing time. See section 4.1.2 for more details.
Listing 2.1 shows all the steps necessary to create a new index and add two tiny documents. In this example, the content for the documents is contained entirely in the source code as Strings, but in the real world the content for your documents would typically come from an external source. The setUp() method is called by the JUnit framework before every test.
Listing 2.1. Adding documents to an index
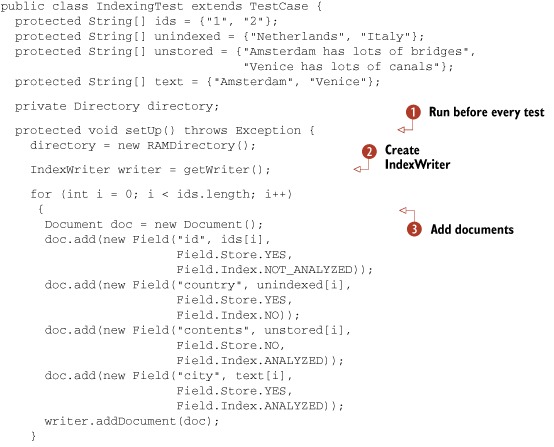
The index contains two documents, each representing a country and a city in that country, whose text is analyzed with WhitespaceAnalyzer. Because setUp() is called before each test is executed, each test runs against a freshly created index.
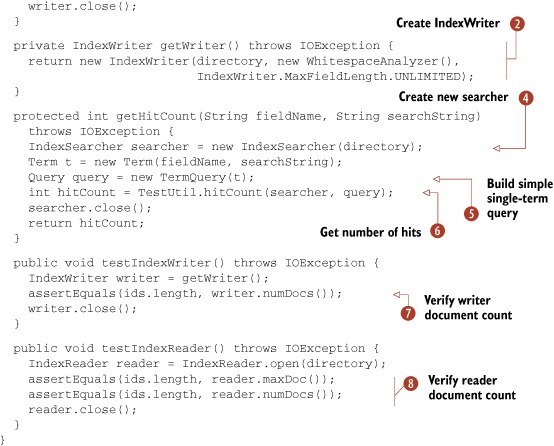
In the getWriter method, we create the IndexWriter with three arguments:
- Directory, where the index is stored.
- The analyzer to use when indexing tokenized fields (analysis is covered in chapter 4).
- MaxFieldLength.UNLIMITED, a required argument that tells IndexWriter to index all tokens in the document (section 2.7 describes this setting in more detail).
IndexWriter will detect that there’s no prior index in this Directory and create a new one. If there were an existing index, IndexWriter would simply add to it.
Note
The IndexWriter constructors that don’t take an explicit boolean create argument will first check whether an index already exists in the provided Directory. If one exists, IndexWriter will append to that index. Otherwise, it will create a new index in the Directory.
There are numerous IndexWriter constructors. Some explicitly take a create argument, allowing you to force a new index to be created over an existing one. More advanced constructors allow you to specify your own IndexDeletionPolicy or IndexCommit for expert use cases, as described in section 2.13.
Once the index is created, we construct each document using the for loop. It’s quite simple: first we create a new empty Document, then one by one we add each Field we’d like to have on the document. Each document gets four fields, each with different options (Field options are described in section 2.4). Finally, we call writer.addDocument to index the document. After the for loop, we close the writer, which commits all changes to the directory. We could also have called commit(), which would commit the changes to the directory but leave the writer open for further changes.
Notice how we use the static method TestUtil.getHitCount to get the number of hits for a query. TestUtil is a utility class, included with the book’s source code, that includes a small number of common methods that we reuse throughout the book. Its methods are self-explanatory, and as we use each for the first time we’ll show you the source code. For example, this is the one-line method hitCount:
public static int hitCount(IndexSearcher searcher, Query query)throws IOException { return searcher.search(query, 1).totalHits; }
This method runs the search and returns the total number of hits that matched. Next let’s look at the opposite of adding documents: deleting them.
2.3.2. Deleting documents from an index
Although most applications are more concerned with getting documents into a Lucene index, some also need to remove them. For instance, a newspaper publisher may want to keep only the last week’s worth of news in its searchable indexes. Other applications may want to remove all documents that contain a certain term or replace an old version of a document with a newer one whenever the original source of the document has changed. IndexWriter provides various methods to remove documents from an index:
- deleteDocuments(Term) deletes all documents containing the provided term.
- deleteDocuments(Term[]) deletes all documents containing any of the terms in the provided array.
- deleteDocuments(Query) deletes all documents matching the provided query.
- deleteDocuments(Query[]) deletes all documents matching any of the queries in the provided array.
- deleteAll() deletes all documents in the index. This is exactly the same as closing the writer and opening a new writer with create=true, without having to close your writer.
If you intend to delete a single document by Term, you must ensure you’ve indexed a Field on every document and that all field values are unique so that each document can be singled out for deletion. This is the same concept as a primary key column in a database table, but in no way is it enforced by Lucene. You can name this field anything you want (ID is common). This field should be indexed as an unanalyzed field (see section 2.4.1) to ensure the analyzer doesn’t break it up into separate tokens. Then, use the field for document deletion like this:
writer.deleteDocuments(new Term("ID", documentID));
Be careful with these methods! If you accidentally specify the wrong Term (for example, a Term from an ordinary indexed text field instead of your unique ID field), you could easily and quickly delete a great many documents from your index. In each case, the deletes aren’t done immediately. Instead, they’re buffered in memory, just like the added documents, and periodically flushed to the directory. As with added documents, you must call commit() or close() on your writer to commit the changes to the index. Even once the deletes are flushed to the directory, the disk space consumed by that document isn’t immediately freed. Rather, the documents are simply marked as deleted. Section 2.13.2 describes this process in more detail.
Let’s look at listing 2.2 to see deleteDocuments in action. We created two test cases to show the deleteDocuments methods and to illustrate the effect of optimizing after deletion.
Listing 2.2. Deleting documents from an index
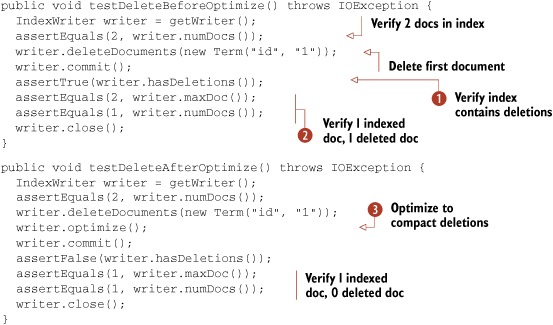
Note
Users often confuse the maxDoc() and numDocs() methods in IndexWriter and IndexReader. The first method, maxDoc() returns the total number of deleted or undeleted documents in the index, whereas numDocs() returns only the number of undeleted documents.
We’ve finished adding and deleting documents; now we’ll visit updating documents.
2.3.3. Updating documents in the index
In many applications, after initially indexing a document you may still want to make further changes to it, requiring you to reindex it. For example, if your documents are crawled from a web server, one way to detect that the content has changed is to look for a changed ETag HTTP header. If it’s different from when you last indexed the document, that means changes have been made to the content and you should update the document in the index.
In some cases you may want to update only certain fields of the document. Perhaps the title changed but the body was unchanged. Unfortunately, although this is a frequently requested feature, Lucene can’t do that: instead, it deletes the entire previous document and then adds a new document to the index. This requires that the new document contains all fields, even unchanged ones, from the original document. IndexWriter provides two convenience methods to replace a document in the index:
- updateDocument(Term, Document) first deletes all documents containing the provided term and then adds the new document using the writer’s default analyzer.
- updateDocument(Term, Document, Analyzer) does the same but uses the provided analyzer instead of the writer’s default analyzer.
The updateDocument methods are probably the most common way to handle deletion because they’re typically used to replace a single document in the index that has changed. Note that these methods are simply shorthand for first calling deleteDocuments(Term) and then addDocument. Use updateDocument like this:
writer.updateDocument(new Term("ID", documenteId), newDocument);
Because updateDocument uses deleteDocuments under the hood, the same caveat applies: be sure the Term you pass in uniquely identifies the one document you intend to update. Listing 2.3 is an example.
Listing 2.3. Updating indexed Documents
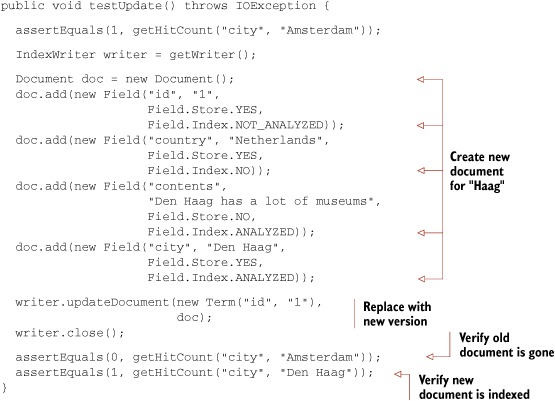
We create a new document that will replace the original document with id 1. Then we call updateDocument to replace the original one. We have effectively updated one of the documents in the index.
We’ve covered the basics on how to add, delete, and update documents. Now it’s time to delve into all the interesting field-specific options available to you when you’re creating a document.
2.4. Field options
Field is perhaps the most important class when indexing documents: it’s the actual class that holds each value to be indexed. When you create a field, you can specify numerous options to control what Lucene should do with that field once you add the document to the index. We touched on these options at a high level at the start of this chapter; now it’s time to revisit this topic and enumerate each in more detail.
The options break down into multiple independent categories, which we cover in each subsection which follows: indexing, storing, and using term vectors. After describing those options, we’ll see other values (besides String) that you can assign to a field. Finally we’ll show the common combinations of field options.
Let’s start with the options to control how the field’s value is added to the inverted index.
2.4.1. Field options for indexing
The options for indexing (Field.Index.*) control how the text in the field will be made searchable via the inverted index. Here are the choices:
- Index.ANALYZED—Use the analyzer to break the field’s value into a stream of separate tokens and make each token searchable. This option is useful for normal text fields (body, title, abstract, etc.).
- Index.NOT_ANALYZED—Do index the field, but don’t analyze the String value. Instead, treat the Field’s entire value as a single token and make that token searchable. This option is useful for fields that you’d like to search on but that shouldn’t be broken up, such as URLs, file system paths, dates, personal names, Social Security numbers, and telephone numbers. This option is especially useful for enabling “exact match” searching. We indexed the id field in listings 2.1 and 2.3 using this option.
- Index.ANALYZED_NO_NORMS—A variant of Index.ANALYZED that doesn’t store norms information in the index. Norms record index-time boost information in the index but can be memory consuming when you’re searching. Section 2.5.3 describes norms in detail.
- Index.NOT_ANALYZED_NO_NORMS—Just like Index.NOT_ANALYZED, but also doesn’t store norms. This option is frequently used to save index space and memory usage during searching, because single-token fields don’t need the norms information unless they’re boosted.
- Index.NO—Don’t make this field’s value available for searching.
When Lucene builds the inverted index, by default it stores all necessary information to implement the Vector Space Model. This model requires the count of every term that occurred in the document, as well as the positions of each occurrence (needed, for example, by phrase searches). But sometimes you know the field will be used only for pure Boolean searching and need not contribute to the relevance score. Fields used only for filtering, such as entitlements or date filtering, are a common example.
In this case, you can tell Lucene to skip indexing the term frequency and positions by calling Field.setOmitTermFreqAndPositions(true). This approach will save some disk space in the index, and may also speed up searching and filtering, but will silently prevent searches that require positional information, such as PhraseQuery and SpanQuery, from working. Let’s move on to controlling how Lucene stores a field’s value.
2.4.2. Field options for storing fields
The options for stored fields (Field.Store.*) determine whether the field’s exact value should be stored away so that you can later retrieve it during searching:
- Store.YES —Stores the value. When the value is stored, the original String in its entirety is recorded in the index and may be retrieved by an IndexReader. This option is useful for fields that you’d like to use when displaying the search results (such as a URL, title, or database primary key). Try not to store very large fields, if index size is a concern, as stored fields consume space in the index.
- Store.NO —Doesn’t store the value. This option is often used along with Index.ANALYZED to index a large text field that doesn’t need to be retrieved in its original form, such as bodies of web pages, or any other type of text document.
Lucene includes a helpful utility class, CompressionTools, that exposes static methods to compress and decompress byte arrays. Under the hood it uses Java’s built-in java.util.Zip classes. You can use CompressionTools to compress values before storing them in Lucene. Note that although doing so will save space in your index, depending on how compressible the content is, it will also slow down indexing and searching. You’re spending more CPU in exchange for less disk space used, which for many applications isn’t a good trade-off. If the field values are small, compression is rarely worthwhile.
Let’s visit options for controlling how term vectors are indexed.
2.4.3. Field options for term vectors
Sometimes when you index a document you’d like to retrieve all its unique terms at search time. One common use is to speed up highlighting the matched tokens in stored fields. (Highlighting is covered more in sections 8.3 and 8.4.) Another use is to enable a link, “Find similar documents,” that when clicked runs a new search using the salient terms in an original document. Yet another example is automatic categorization of documents. Section 5.9 shows concrete examples of using term vectors once they’re in your index.
But what exactly are term vectors? Term vectors are a mix between an indexed field and a stored field. They’re similar to a stored field because you can quickly retrieve all term vector fields for a given document: term vectors are keyed first by document ID. But then, they’re keyed secondarily by term, meaning they store a miniature inverted index for that one document. Unlike a stored field, where the original String content is stored verbatim, term vectors store the actual separate terms that were produced by the analyzer, allowing you to retrieve all terms for each field, and the frequency of their occurrence within the document, sorted in lexicographic order. Because the tokens coming out of an analyzer also have position and offset information (see section 4.2.1), you can choose separately whether these details are also stored in your term vectors by passing these constants as the fourth argument to the Field constructor:
- TermVector.YES—Records the unique terms that occurred, and their counts, in each document, but doesn’t store any positions or offsets information
- TermVector.WITH_POSITIONS—Records the unique terms and their counts, and also the positions of each occurrence of every term, but no offsets
- TermVector.WITH_OFFSETS—Records the unique terms and their counts, with the offsets (start and end character position) of each occurrence of every term, but no positions
- TermVector.WITH_POSITIONS_OFFSETS—Stores unique terms and their counts, along with positions and offsets
- TermVector.NO—Doesn’t store any term vector information
Note that you can’t index term vectors unless you’ve also turned on indexing for the field. Stated more directly: if Index.NO is specified for a field, you must also specify TermVector.NO.
We’re done with the detailed options to control indexing, storing, and term vectors. Now let’s see how you can create a field with values other than String.
2.4.4. Reader, TokenStream, and byte[] field values
There are a few other constructors for the Field object that allow you to use values other than String:
- Field(String name, Reader value, TermVector termVector) uses a Reader instead of a String to represent the value. In this case, the value can’t be stored (the option is hardwired to Store.NO) and is always analyzed and indexed (Index.ANALYZED). This can be useful when holding the full String in memory might be too costly or inconvenient—for example, for very large values.
- Field(String name, Reader value), like the previous value, uses a Reader instead of a String to represent the value but defaults termVector to TermVector.NO.
- Field(String name, TokenStream tokenStream, TermVector termVector) allows you to preanalyze the field value into a TokenStream. Likewise, such fields aren’t stored and are always analyzed and indexed.
- Field(String name, TokenStream tokenStream), like the previous value, allows you to preanalyze the field value into a TokenStream but defaults termVector to TermVector.NO.
- Field(String name, byte[] value, Store store) is used to store a binary field. Such fields are never indexed (Index.NO) and have no term vectors (TermVector.NO). The store argument must be Store.YES.
- Field(String name, byte[] value, int offset, int length, Store store), like the previous value, indexes a binary field but allows you to reference a sub-slice of the bytes starting at offset and running for length bytes.
It should be clear by now that Field is quite a rich class and exposes a number of options to express to Lucene precisely how its value should be handled. Let’s see some examples of how these options are typically combined in practice.
2.4.5. Field option combinations
You’ve now seen all the options for the three categories (indexing, storing, and term vectors) you can use to control how Lucene handles a field. These options can nearly be set independently, resulting in a number of possible combinations. Table 2.1 lists commonly used options and their example usage, but remember you are free to set the options however you’d like.
Table 2.1. A summary of various field characteristics, showing you how fields are created, along with common usage examples
|
Index |
Store |
TermVector |
Example usage |
|---|---|---|---|
| NOT_ANALYZED_NO_NORMS | YES | NO | Identifiers (filenames, primary keys), telephone and Social Security numbers, URLs, personal names, dates, and textual fields for sorting |
| ANALYZED | YES | WITH_POSITIONS_OFFSETS | Document title, document abstract |
| ANALYZED | NO | WITH_POSITIONS_OFFSETS | Document body |
| NO | YES | NO | Document type, database primary key (if not used for searching) |
| NOT_ANALYZED | NO | NO | Hidden keywords |
Next let’s see how to index fields we intend to sort on.
2.4.6. Field options for sorting
When returning documents that match a search, Lucene orders them by their score by default. Sometimes, you need to order results using other criteria. For instance, if you’re searching email messages, you may want to order results by sent or received date, or perhaps by message size or sender. Section 5.2 describes sorting in more detail, but in order to perform field sorting, you must first index the fields correctly.
If the field is numeric, use NumericField, covered in section 2.6.1, when adding it to the document, and sorting will work correctly. If the field is textual, such as the sender’s name in an email message, you must add it as a Field that’s indexed but not analyzed using Field.Index.NOT_ANALYZED. If you aren’t doing any boosting for the field, you should index it without norms, to save disk space and memory, using Field.Index.NOT_ANALYZED_NO_NORMS:
new Field("author", "Arthur C. Clark", Field.Store.YES,
          Field.Index.NOT_ANALYZED_NO_NORMS);
Note
Fields used for sorting must be indexed and must contain one token per document. Typically this means using Field.Index.NOT_ANALYZED or Field.Index.NOT_ANALYZED_NO_NORMS (if you’re not boosting documents or fields), but if your analyzer will always produce only one token, such as KeywordAnalyzer (covered in section 4.7.3), Field.Index.ANALYZED or Field.Index.ANALYZED_NO_NORMS will work as well.
Now that we’re done with the exhaustive indexing options for fields, let’s visit one final field topic, multivalued fields.
2.4.7. Multivalued fields
Suppose your documents have an author field, but sometimes there’s more than one author for a document. One way to handle this would be to loop through all the authors, appending them into a single String, which you could then use to create a Lucene field. Another, perhaps more elegant way is to keep adding the same Field with different value, like this:
Document doc = new Document();
for (String author : authors) {
  doc.add(new Field("author", author,
                    Field.Store.YES,
                    Field.Index.ANALYZED));
}
This is perfectly acceptable and encouraged, as it’s a natural way to represent a field that legitimately has multiple values. Internally, whenever multiple fields with the same name appear in one document, both the inverted index and term vectors will logically append the tokens of the field to one another, in the order the fields were added. You can use advanced options during analysis that control certain important details of this appending, notably how to prevent searches from matching across two different field values; see section 4.7.1 for details. But, unlike indexing, when the fields are stored they’re stored separately in order in the document, so that when you retrieve the document at search time you’ll see multiple Field instances.
We’re done with our coverage of Lucene’s field options. The wide variety of options has evolved over time to accommodate the diverse application of Lucene. We showed you the numerous specific options to control how a field is indexed, whether a field is stored, and whether term vectors will be computed and stored. Besides Strings, field values can also be binary values (for storing), a TokenStream value (for preanalyzed fields), or a Reader (if holding the full String in memory is too costly or inconvenient). Fields that will be used for sorting (covered more in section 5.2) must be indexed properly. Finally, in this section we’ve seen that Lucene gracefully handles fields with multiple values.
Next we cover another field capability, boosting, that controls how important specific fields and documents are during Lucene’s scoring.
2.5. Boosting documents and fields
Not all documents and fields are created equal—or at least you can make sure that’s the case by using boosting. Boosting may be done during indexing, as we describe here, or during searching, as described in section 5.7. Search-time boosting is more dynamic, because every search can separately choose to boost or not to boost with different factors, but also may be somewhat more CPU intensive. Because it’s so dynamic, search-time boosting also allows you to expose the choice to the user, such as a checkbox that asks “Boost recently modified documents?”.
Regardless of whether you boost during indexing or searching, take caution: too much boosting, especially without corresponding transparency in the user interface explaining that certain documents were boosted, can quickly and catastrophically erode the user’s trust. Iterate carefully to choose appropriate boosting values and to ensure you’re not doing so much boosting that your users are forced to browse irrelevant results. In this section we’ll show you how to selectively boost documents or fields during indexing, then describe how boost information is recorded into the index using norms.
2.5.1. Boosting documents
Imagine you have to write an application that indexes and searches corporate email. Perhaps the requirement is to give company employees’ emails more importance than other email messages when sorting search results. How would you go about doing this?
Document boosting is a feature that makes such a requirement simple to implement. By default, all documents have no boost—or, rather, they all have the same boost factor of 1.0. By changing a document’s boost factor, you can instruct Lucene to consider it more or less important with respect to other documents in the index when computing relevance. The API for doing this consists of a single method, setBoost(float), which can be used as shown in listing 2.4. (Note that certain methods, like getSenderEmail and isImportant, aren’t defined in this fragment, but are included in the full examples sources included with the book.)
Listing 2.4. Selectively boosting documents and fields

In this example, we check the domain name of the email message sender to determine whether the sender is a company employee.
| When we index messages sent by an important domain name (say, the company’s employees), we set their boost factor to 1.5, which is greater than the default factor of 1.0. | |
| When we encounter messages from a sender associated with a fictional bad domain, as checked by isUnimportant, we label them as nearly insignificant by lowering their boost factor to 0.1. |
During searching, Lucene will silently increase or decrease the scores of documents according to their boost. Sometimes you need finer per-field boosting granularity, which Lucene also makes possible.
2.5.2. Boosting fields
Just as you can boost documents, you can also boost individual fields. When you boost a document, Lucene internally uses the same boost factor to boost each of its fields. Imagine that another requirement for the email-indexing application is to consider the subject field more important than the field with a sender’s name. In other words, search matches made in the subject field should be more valuable than equivalent matches in the senderName field in our earlier example. To achieve this behavior, we use the setBoost(float) method of the Field class:
Field subjectField = new Field("subject", subject,
                               Field.Store.YES,
                               Field.Index.ANALYZED);
subjectField.setBoost(1.2F);
In this example, we arbitrarily picked a boost factor of 1.2, just as we arbitrarily picked document boost factors of 1.5 and 0.1 earlier. The boost factor values you should use depend on what you’re trying to achieve; you’ll need to do some experimentation and tuning to achieve the desired effect. But remember when you want to change the boost on a field or document, you’ll have to fully remove and then read the entire document, or use the updateDocument method, which does the same thing.
It’s worth noting that shorter fields have an implicit boost associated with them, due to the way Lucene’s scoring algorithm works. While indexing, IndexWriter consults the Similarity.lengthNorm method to perform this computation. To override this logic, you can implement your own Similarity class and tell IndexWriter to use it by calling its setSimilarity method. Boosting is, in general, an advanced feature that many applications can work well without, so tread carefully!
Document and field boosting come into play at search time, as you’ll learn in section 3.3.1. Lucene’s search results are ranked according to how closely each document matches the query, and each matching document is assigned a score. Lucene’s scoring formula consists of a number of factors, and the boost factor is one of them.
How does Lucene record these boost factors in the index? This is what norms are for.
2.5.3. Norms
During indexing, all sources of index-time boosts are combined into a single floatingpoint number for each indexed field in the document. The document may have its own boost; each field may have a boost; and Lucene computes an automatic boost based on the number of tokens in the field (shorter fields have a higher boost). These boosts are combined and then compactly encoded (quantized) into a single byte, which is stored per field per document. During searching, norms for any field being searched are loaded into memory, decoded back into a floating-point number, and used when computing the relevance score.
Even though norms are initially computed during indexing, it’s also possible to change them later using IndexReader’s setNorm method. setNorm is an advanced method that requires you to recompute your own norm factor, but it’s a potentially powerful way to factor in highly dynamic boost factors, such as document recency or click-through popularity.
One problem often encountered with norms is their high memory usage at search time. This is because the full array of norms, which requires one byte per document per separate field searched, is loaded into RAM. For a large index with many fields per document, this can quickly add up to a lot of RAM. Fortunately, you can easily turn norms off by either using one of the NO_NORMS indexing options in Field.Index or by calling Field.setOmitNorms(true) before indexing the document containing that field. Doing so will potentially affect scoring, because no index-time boost information will be used during searching, but it’s possible the effect is trivial, especially when the fields tend to be roughly the same length and you’re not doing any boosting on your own.
Beware: if you decide partway through indexing to turn norms off, you must rebuild the entire index because if even a single document has that field indexed with norms enabled, then through segment merging this will “spread” so that all documents consume one byte even if they’d disabled norms. This happens because Lucene doesn’t use sparse storage for norms.
We explore how to index numbers, dates, and times next.
2.6. Indexing numbers, dates, and times
Although most content is textual in nature, in many cases handling numeric or date/time values is crucial. In a commerce setting, the product’s price, and perhaps other numeric attributes like weight and height, are clearly important. A video search engine may index the duration of each video. Press releases and articles have a timestamp. These are just a few examples of important numeric attributes that modern search applications face.
In this section we’ll show you how to handle such numbers with Lucene. There are two very different situations where applications need to handle numbers, and you’ll learn how Lucene supports both. When Lucene indexes a number, it’s actually building up a rich data structure in the index, which we’ll touch on. Finally, we’ll explore several approaches for handling dates and times.
2.6.1. Indexing numbers
There are two common scenarios in which indexing numbers is important. In one scenario, numbers are embedded in the text to be indexed, and you want to make sure those numbers are preserved and indexed as their own tokens so that you can use them later as ordinary tokens in searches. For instance, your documents may contain sentences like “Be sure to include Form 1099 in your tax return”: you want to be able to search for the number 1099 just as you can search for the phrase “tax return” and retrieve the document that contains the exact number.
To enable this, simply pick an analyzer that doesn’t discard numbers. As we discuss in section 4.2.3, WhitespaceAnalyzer and StandardAnalyzer are two possible candidates. If you feed them the “Be sure to include Form 1099 in your tax return” sentence, they’ll extract 1099 as a token and pass it on for indexing, allowing you to later search for 1099 directly. On the other hand, SimpleAnalyzer and StopAnalyzer discard numbers from the token stream, which means the search for 1099 won’t match any documents. If in doubt, use Luke, which is a wonderful tool for inspecting all details of a Lucene index, to check whether numbers survived your analyzer and were added to the index. Luke is described in more detail in section 8.1.
In the other scenario, you have a field that contains a single number and you want to index it as a numeric value and then use it for precise (equals) matching, range searching, and/or sorting. For example, you might be indexing products in a retail catalog, where each product has a numeric price and you must enable your users to be able to restrict a search by price range.
In past releases, Lucene could only operate on textual terms. This required careful preprocessing of numbers, such as zero-padding or advanced number-to-text encodings, to turn them into Strings so that sorting and range searching by the textual terms worked properly. Fortunately, as of version 2.9, Lucene includes easy-to-use built-in support for numeric fields, starting with the new NumericField class. You simply create a NumericField, use one of its set<Type>Value methods (accepting types int, long, float, and double, and then returning itself) to record the value, and then add the NumericField to your document just like any other Field. Here’s an example:
doc.add(new NumericField("price").setDoubleValue(19.99));
Under the hood, Lucene works some serious magic to ensure numeric values are indexed to allow for efficient range searching and numeric sorting. Each numeric value is indexed using a trie structure, which logically assigns a single numeric value to larger and larger predefined brackets. Each bracket is assigned a unique term in the index, so that retrieving all documents within a single bracket is fast. At search time, the requested range is translated into an equivalent union of these brackets, resulting in a high-performance range search or filter.
Although each NumericField instance accepts only a single numeric value, you’re allowed to add multiple instances, with the same field name, to the document. The resulting NumericRangeQuery and NumericRangeFilter will logically “or” together all the values. But the effect on sorting is undefined. If you require sorting by the field, you’ll have to index a separate NumericField that has only one occurrence for that field name.
An advanced parameter, precisionStep, lets you control the gap (in bits) between each successive bracket. The default value is 4 bits. Smaller values result in more trie brackets, thus increasing the size of the index (usually by a minor amount) but allowing for potentially faster range searching. The Javadocs provide full details of these trade-offs, but likely the default value is sufficient for most applications. Section 3.5.4 describes how to search numeric fields.
NumericField can also easily handle dates and times by converting them to equivalent ints or longs.
2.6.2. Indexing dates and times
Email messages include sent and received dates, files have several timestamps associated with them, and HTTP responses have a LastModified header that includes the date of the requested page’s last modification. Chances are, like many other Lucene users, you’ll need to index dates and times. Such values are easily handled by first converting them to an equivalent int or long value, and then indexing that value as a number. The simplest approach is to use Date.getTime to get the equivalent value, in millisecond precision, for a Java Date object:
doc.add(new NumericField("timestamp")
 .setLongValue(new Date().getTime()));
Alternatively, if you don’t require full millisecond resolution for your dates, you can simply quantize them. If you need to quantize down to seconds, minutes, hours, or days, it’s straight division:
doc.add(new NumericField("day")
 .setIntValue((int) (new Date().getTime()/24/3600)));
If you need to quantize further, to month or year, or perhaps you’d like to index hour of day or day of week or month, you’ll have to create a Calendar instance and get fields from it:
Calendar cal = Calendar.getInstance();
cal.setTime(date);
doc.add(new NumericField("dayOfMonth")
 .setIntValue(cal.get(Calendar.DAY_OF_MONTH)));
As you’ve seen, Lucene makes it trivial to index numeric fields. You’ve seen several approaches for converting dates and times into equivalent numeric values for indexing. Now let’s visit one final topic related to fields: truncation.
2.7. Field truncation
Some applications index documents whose sizes aren’t known in advance. As a safety mechanism to control the amount of RAM and hard disk space used, you may want to limit the amount of input they are allowed index per field. It’s also possible that a large binary document is accidentally misclassified as a text document, or contains binary content embedded in it that your document filter failed to process, which quickly adds many absurd binary terms to your index, much to your horror. Other applications deal with documents of known size but you’d like to index only a portion of each. For example, you may want to index only the first 200 words of each document.
To support these diverse cases, IndexWriter allows you to truncate per-Field indexing so that only the first N terms are indexed for an analyzed field. When you instantiate IndexWriter, you must pass in a MaxFieldLength instance expressing this limit. MaxFieldLength provides two convenient default instances: MaxFieldLength.UNLIMITED, which means no truncation will take place, and MaxFieldLength.LIMITED, which means fields are truncated at 10,000 terms. You can also instantiate MaxFieldLength with your own limit.
After creating IndexWriter, you may alter the limit at any time by calling setMaxFieldLength or retrieve the limit with getMaxFieldLength. However, any documents already indexed will have been truncated at the previous value: changes to maxFieldLength aren’t retroactive. If multiple Field instances with the same name exist, the truncation applies separately to each of them, meaning each field has its first N terms indexed. If you’re curious about how often the truncation is kicking in, call IndexWriter.setInfoStream(System.out) and search for any lines that say "maxFieldLength reached for field X, ignoring following tokens". (Note that the infoStream also receives many other diagnostic details, useful in their own right.)
Please think carefully before using any field truncation! It means that only the first N terms are available for searching, and any text beyond the Nth term is completely ignored. Searches that would’ve matched a document after the Nth term will silently fail to match the document. Eventually users will notice that your search engine fails to find certain documents in certain situations and will assume it’s buggy. Many times someone asks the Lucene users list, “Why doesn’t this search find this document?” and the answer is inevitably, “You’ll have to increase your maxFieldLength."
Note
Use maxFieldLength sparingly! Because truncation means some documents’ text will be completely ignored, and thus unavailable for searching, your users will eventually discover that your search fails to find some documents. This will quickly erode their trust in your application (“What else can’t it find?”), which can be catastrophic to your user base and perhaps your whole business if search is its core. User trust is the most important thing to protect in your business.
We’re done visiting all the interesting things you can do with fields. As you’ve seen, Lucene’s Field class includes a rich array of options to support the many ways that a value can be handled. Next, we explore how to minimize the turnaround time between adding a document and then being able to search it.
2.8. Near-real-time search
New in Lucene 2.9 is an important feature called near-real-time search, which addresses a frequent challenge for all search engines: the ability to search on documents quickly after indexing them. Many applications have such a requirement, but it’s a challenge for search engines to implement. Fortunately, Lucene now makes this simple, by providing this method in IndexWriter:
IndexReader getReader()
This method immediately flushes any buffered added or deleted documents, and then creates a new read-only IndexReader that includes those documents. We’ll see how IndexReader is used for searching in the next chapter, but for now, just trust us! Under the hood, the newly opened reader is instantiated in an efficient manner, so that any old segments in common with the previously opened reader are shared. Thus, if only a few documents have been added, the turnaround time will generally be fast. Note that calling getReader necessarily slows down your indexing throughput because it causes the IndexWriter to immediately flush a new segment instead of waiting until its RAM buffer is full. Section 3.2.5 shows an example of searching using a near-real-time reader.
Next we describe the optimization process.
2.9. Optimizing an index
When you index documents, especially many documents or using multiple sessions with IndexWriter, you’ll invariably create an index that has many separate segments. When you search the index, Lucene must search each segment separately and then combine the results. Although this works flawlessly, applications that handle large indexes will see search performance improvements by optimizing the index, which merges many segments down to one or a few segments. An optimized index also consumes fewer file descriptors during searching. After describing the optimization process and the available methods, we’ll talk about disk space consumed during optimization.
Note
Optimizing only improves searching speed, not indexing speed.
It’s entirely possible that you get excellent search throughput without optimizing, so be sure to first test whether you need to consider optimizing. IndexWriter exposes four methods to optimize:
- optimize() reduces the index to a single segment, not returning until the operation is finished.
- optimize(int maxNumSegments), also known as partial optimize, reduces the index to at most maxNumSegments segments. Because the final merge down to one segment is the most costly, optimizing to, say, five segments should be quite a bit faster than optimizing down to one segment, allowing you to trade less optimization time for slower search speed.
- optimize(boolean doWait) is just like optimize, except if doWait is false then the call returns immediately while the necessary merges take place in the background. Note that doWait=false only works for a merge scheduler that runs merges in background threads, such as the default ConcurrentMergeScheduler. Section 2.13.6 describes merge schedulers in more detail.
- optimize(int maxNumSegments, boolean doWait) is a partial optimize that runs in the background if doWait is false.
Remember that index optimization consumes substantial CPU and input/output (I/O) resources, so use it judiciously. It is a trade-off of a large onetime cost for faster searching. If you update your index only rarely, and do lots of searching between updates, this trade-off is worthwhile. If a single computer is doing both indexing and searching, consider scheduling optimize after hours or over the weekend so that it doesn’t interfere with ongoing searching.
Another important cost to be aware of is that optimizing requires substantial temporary disk space. Because Lucene must merge segments together, while the merge is running temporary disk space is used to hold the files for the new segment. But the old segments can’t be removed until the merge is complete and the changes are committed, either by calling IndexWriter.commit or by closing the IndexWriter. This means you should expect the size of your index to roughly triple (temporarily) during optimization. Once optimization completes, and once you call commit(), disk usage will fall back to a lower level than the starting size. Any open readers on the index will also potentially impact the transient disk usage. Section 11.3.1 describes overall disk usage of Lucene in more detail.
Note
During optimization, the index will require substantial temporary disk space, up to three times its starting size. After optimization completes, the index will consume less disk space than at the start.
Let’s now look at some Directory implementations other than FSDirectory.
2.10. Other directory implementations
Recall from chapter 1 that the purpose of Lucene’s abstract Directory class is to present a simple file-like storage API, hiding away the details of what underlying mechanism is performing the storage. Whenever Lucene needs to write to or read from files in the index, it uses the Directory methods to do so. Table 2.2 lists the five core Directory implementations available in Lucene 3.0.
Table 2.2. Lucene’s several core Directory implementations
|
Directory |
Description |
|---|---|
| SimpleFSDirectory | A simplistic Directory that stores files in the file system, using java.io.* APIs. It doesn’t scale well with many threads. |
| NIOFSDirectory | A Directory that stores files in the file system, using java.nio.* APIs. This does scale well with threads on all platforms except Microsoft Windows, due to a longstanding issue with Sun’s Java Runtime Environment (JRE). |
| MMapDirectory | A Directory that uses memory-mapped I/O to access files. This is a good choice on 64-bit JREs, or on 32-bit JREs where the size of the index is relatively small. |
| RAMDirectory | A Directory that stores all files in RAM. |
| FileSwitchDirectory | A Directory that takes two directories in, and switches between these directories based on file extension. |
Of these classes, three are concrete Directory implementations to read and write files from the file system. They’re all subclasses of the abstract FSDirectory base class. Unfortunately, there’s no single best FSDirectory implementation. Each has potentially serious limitations in certain situations:
- SimpleFSDirectory uses java.io.* APIs for access. Unfortunately, this Directory implementation doesn’t scale during reading when multiple threads are in use because it must do internal locking to work around the lack of positional reads in java.io.*.
- NIOFSDirectory uses positional reads in java.nio.* APIs, and thus has no internal locking and scales very well with many threads when reading. Unfortunately, due to a longstanding Windows-only issue on Sun’s JREs, NIOFSDirectory will perform badly, perhaps worse than SimpleFSDirectory, on Windows.
- MMapDirectory uses memory-mapped I/O when reading and also doesn’t have any locking, so it scales well with threads. But because memory-mapped I/O consumes process address space equal to the size of your index, it’s best to use it only on a 64-bit JRE, or on a 32-bit JRE if you’re absolutely certain that your index size is very small relative to the actual portion of 32-bit address space available to your process (typically 2-3 GB, depending on the OS). Java doesn’t provide a way to cleanly “unmap” memory-mapped sections of a file, which means it’s only when garbage collection happens that the underlying file is closed and memory is freed. This means you could easily have many leftover maps, consuming large chunks of process address space and leaving the underlying index files open far longer than you’d expect. Furthermore, on 32-bit JREs, you may hit false OutOfMemoryError due to fragmentation issues. MMapDirectory provides the setMaxChunkSize method to work around this.
All of these Directory implementations share the same code (from SimpleFSDirectory, using java.io.*) for writing.
So which implementation should you use? One good approach is to use the static FSDirectory.open method. This method attempts to pick the best default FSDirectory implementation given your current OS and platform, and may improve its decision making with each Lucene release (though note that as of Lucene 3.0, it won’t ever return an MMapDirectory). Alternatively, you can directly instantiate the precise class that you want, as long as you understand the previous issues (be sure to read the Javadocs for all the latest details!).
Lucene also provides RAMDirectory, which is a Directory implementation that stores all “files” in memory instead of on disk. This makes reading and writing exceptionally fast, and is useful in cases where the index is small enough to fit in available memory and where the index is easily and quickly regenerated from the source documents. But if the computer has enough RAM, most OSs will use free RAM as an I/O cache. This means, after warming up, the FSDirectory will be about as fast as the RAMDirectory for searching. Lucene’s unit tests make extensive use of RAMDirectory to create short-lived indexes for testing. To build a new index in RAMDirectory, instantiate your writer like this:
Directory ramDir = new RAMDirectory();
IndexWriter writer = new IndexWriter(ramDir, analyzer,
                                IndexWriter.MaxFieldLength.UNLIMITED);
You can then use the writer as you normally would to add, delete, or update documents. Just remember that once the Java Virtual Machine (JVM) exits, your index is gone!
Alternatively, you can copy the contents of another Directory otherDir into RAMDirectory like this:
Directory ramDir = new RAMDirectory(otherDir);
This is typically used to speed up searching of an existing on-disk index when it’s small enough, though modern OSs do a good job of caching recently used bytes in the I/O cache so it’s likely the gains in practice are minimal. A more general API is this static method, to copy all files between any two Directory instances:
Directory.copy(Directory sourceDir,
               Directory destDir,
               boolean closeDirSrc);
But be aware that this blindly replaces any existing files in destDir, and you must ensure no IndexWriter is open on the source directory because the copy method doesn’t do any locking. If the destDir already has an index present and you’d like to add in all documents from srcDir, keeping all documents already indexed in otherDir, use IndexWriter.addIndexesNoOptimize instead:
IndexWriter writer = new IndexWriter(otherDir, analyzer,
                                     IndexWriter.MaxFieldLength.UNLIMITED);
writer.addIndexesNoOptimize(new Directory[] {ramDir});
There are other addIndexes methods in IndexWriter, but each of them does its own optimize, which likely you don’t need or want.
In past versions of Lucene, it was beneficial to control memory buffering by first batch-indexing into a RAMDirectory and then periodically adding the index into an index stored on disk. But as of Lucene 2.3, IndexWriter makes efficient use of memory for buffering changes to the index and this is no longer a win. See section 11.1.4 for other ways to improve indexing throughput.
The final Directory implementation, FileSwitchDirectory, switches between two Directory implementations you provide, based on the extension of the file. This implementation could be used to store certain index files in a RAMDirectory and others in a backing MMapDirectory, for example. But realize this is an advanced use and you must rely on the extensions of the current Lucene index file format, which is free to change between releases.
Let’s discuss the complex topic of concurrency next.
2.11. Concurrency, thread safety, and locking issues
In this section, we cover three closely related topics: accessing an index from multiple JVMs, thread safety of IndexReader and IndexWriter, and the locking mechanism that Lucene uses to enforce these rules. A thorough understanding of these topics is essential, because it will eliminate surprises that can result when your indexing application starts serving multiple users simultaneously or when it scales up by parallelizing some of its operations.
2.11.1. Thread and multi-JVM safety
Lucene’s concurrency rules are simple:
- Any number of read-only IndexReaders may be open at once on a single index. It doesn’t matter if these readers are in the same JVM or multiple JVMs, or on the same computer or multiple computers. Remember, that within a single JVM it’s best for resource utilization and performance reasons to share a single IndexReader instance for a given index using multiple threads. For instance, multiple threads or processes may search the same index in parallel.
- Only a single writer may be open on an index at once. Lucene uses a write lock file to enforce this (described in detail in section 2.11.3). As soon as an IndexWriter is created, a write lock is obtained. Only when that IndexWriter is closed is the write lock released. Note that if you use IndexReader to make changes to the index—for example, to change norms (section 2.5.3) or delete documents (section 2.13.1)—then that IndexReader acts as a writer: it must successfully obtain the write lock before making the first change, only releasing it once closed.
- IndexReaders may be open even while an IndexWriter is making changes to the index. Each IndexReader will always show the index as of the point in time that it was opened. It won’t see any changes being done by the IndexWriter until the writer commits and the reader is reopened. It’s even fine to open a new IndexWriter with create=true while an IndexReader is already open: that IndexReader will continue searching its point-in-time view of the index.
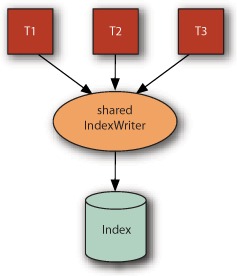
- Any number of threads can share a single instance of IndexReader or IndexWriter. These classes are not only thread safe but also thread friendly, meaning they generally scale well as you add threads (assuming
your hardware has concurrency, because the amount of synchronized code inside these classes is kept to a minimum). Figure 2.3 depicts such a scenario. Sections 11.2.1 and 11.2.2 describe issues related to using multiple threads for indexing and searching.
Figure 2.3. A single IndexWriter can be shared by multiple threads.
As you can see, Lucene works well with multiple threads and multiple JVMs. But there are interesting challenges if you need to share an index over a remote file system.
2.11.2. Accessing an index over a remote file system
If you intend to have multiple JVMs, on different computers, accessing the same index, you’ll have to expose access to that index over a remote file system. One common configuration is to have a single dedicated computer that writes to the index stored in a file system local to that computer, and then multiple computers that perform searching of that index via a remote file system. Such a configuration can be made to work, but the performance will usually be far worse than searching an index stored on a local file system (see table 2.3). It’s possible to gain some performance back by mounting the remote file system as read-only, but to maximize performance it’s best to replicate a copy of the index onto the local file system of each computer that will do searching. Solr, the enterprise search server built on top of Lucene, supports replication out of the box.
Table 2.3. Issues related to accessing a Lucene index across remote file systems
|
Remote file system |
Notes |
|---|---|
| Samba/CIFS 1.0 | The standard remote file system for Windows computers. Sharing a Lucene index works fine. |
| Samba/CIFS 2.0 | The new version of Samba/CIFS that’s the default for Windows Server 2007 and Windows Vista. Lucene has trouble due to incoherent client-side caches. |
| Networked File System (NFS) | The standard remote file systems for most Unix OSs. Lucene has trouble due to both incoherent client-side caches as well as how NFS handles deletion of files that are held open by another computer. |
| Apple File Protocol (AFP) | Apple’s standard remote file system protocol. Lucene has trouble due to incoherent client-side caches. |
If you still intend to access the index over a remote file system, it’s important to be aware of the possible limitations. Unfortunately, certain popular remote file systems are known to be problematic, as summarized in table 2.3. NFS, AFP, and Samba/CIFS 2.0 are known to have intermittent problems when opening or reopening an index due to incoherent client-side caching. The problem only occurs when the writer has just committed changes to an index, and then on another computer a reader or another writer is opened or reopened. Thus you’re more likely to encounter this if you frequently try to reopen your readers and writer and often commit changes to the index. When you do encounter the issue, you’ll see an unexpected FileNotFoundException inside the open or reopen methods. Fortunately, the workaround is quite simple: retry a bit later, because typically the client-side caches will correct themselves after a certain amount of time.
NFS in particular presents a further challenge because of how it handles deletion of files that are still held open on other computers. Most file systems protect open files from deletion. For example, Windows simply disallows deletion of an open file, whereas most native Unix file systems allow the deletion to proceed but the actual bytes of the file remain allocated on disk until all open file handles are closed (this is called “delete on last close” semantics). In both approaches, an open file handle can still be used to read all bytes in the file after the file deletion is attempted. NFS does neither of these, and simply removes the file, so that the next I/O operation attempted by a computer with an open file handle will encounter the much-dreaded “Stale NFS file handle” IOException.
To prevent this error from hitting your searchers, you must create your own IndexDeletionPolicy class to control deletion of previous commit points until all searchers on the index have reopened to the newer commit point. For example, a common approach is to remove an index commit only if it’s older than, say, 4 hours, as long as you can ensure that every IndexReader reading the index reopens itself less than 4 hours after a commit. Alternatively, on hitting the “Stale NFS file handle” during searching, you could at that moment reopen your searcher and then redo the search. This is a viable approach only if reopening a searcher is not too time consuming. Otherwise, the unlucky query that hit the error will take unacceptably long to get results.
As you’ve seen, Lucene allows highly concurrent access to an index. Many readers can share an index, many threads can share an IndexWriter and IndexReader, and so forth. The only strong concurrency limitation is that no more than one writer may be open at once. We’ll now describe how Lucene enforces this, and how you can control it, using Lucene’s locking implementations. In general, locking is a complex topic, and even Lucene’s simple exposure of locking options is no exception. So we spend even more time enumerating the choices than we did on all of Lucene’s concurrency rules!
2.11.3. Index locking
To enforce a single writer at a time, which means an IndexWriter or an IndexReader doing deletions or changing norms, Lucene uses a file-based lock: if the lock file (write.lock by default) exists in your index directory, a writer currently has the index open. Any attempt to create another writer on the same index will hit a LockObtainFailedException. This is a vital protection mechanism, because if two writers are accidentally created on a single index, that would quickly lead to index corruption.
Lucene allows you to change your locking implementation: any subclass of LockFactory can be set as your locking implementation by calling Directory.setLockFactory. Be sure to call this before opening an IndexWriter on that Directory instance. Normally you don’t need to worry about which locking implementation you’re using. It’s usually only those advanced applications that have multiple computers or JVMs that take turns performing indexing that may need to customize the locking implementation. Table 2.4 lists the core locking implementations provided with Lucene.
Table 2.4. Locking implementations provided by Lucene
|
Locking class name |
Description |
|---|---|
| NativeFSLockFactory | This is the default locking for FSDirectory, using java.nio native OS locking, which will never leave leftover lock files when the JVM exits. But this locking implementation may not work correctly over certain shared file systems, notably NFS. |
| SimpleFSLockFactory | Uses Java’s File.createNewFile API, which may be more portable across different file systems than NativeFSLockFactory. Be aware that if the JVM crashes or IndexWriter isn’t closed before the JVM exits, this may leave a leftover write.lock file, which you must manually remove. |
| SingleInstanceLockFactory | Creates a lock entirely in memory. This is the default locking implementation for RAMDirectory. Use this when you know all IndexWriters will be instantiated in a single JVM. |
| NoLockFactory | Disables locking entirely. Be careful! Only use this when you are absolutely certain that Lucene’s normal locking safeguard isn’t necessary—for example, when using a private RAMDirectory with a single IndexWriter instance. |
Note that none of these locking implementations are “fair.” For example, if a lock is already held by an existing writer, the new writer will simply retry, every one second by default, to obtain the lock. There’s no queue that would allow the new writer to get the lock as soon as the old one releases it. If you have an application that requires such fairness, it’s best to implement your own locking.
If you do choose to create your own locking implementation, be certain it works correctly. There’s a simple but useful debugging tool, LockStressTest, which can be used in conjunction with LockVerifyServer and VerifyingLockFactory to verify that a given locking implementation is functioning properly. These classes are in the org.apache.lucene.store package; see their Javadocs for how to use them. If you aren’t sure whether your new lock factory is working properly, use LockStressTest to find out.
You should be aware of two additional methods related to locking:
- IndexWriter’s isLocked(Directory)—Tells you whether the index specified in its argument is locked. This method can be handy when an application needs to check whether the index is locked before attempting to create an IndexWriter.
- IndexWriter’s unlock(Directory)—Does exactly what its name implies. Although this method gives you power to unlock any Lucene index at any time, using it is dangerous. Lucene creates locks for a good reason, and unlocking an index while it’s being modified will quickly result in a corrupted and unusable index.
Although you now know about Lucene’s write lock, you should resist touching this file directly. Instead, always rely on Lucene’s API to manipulate it. If you don’t, your code may break if Lucene starts using a different locking mechanism in the future, or even if it changes the name or location of its lock files.
To demonstrate locking, listing 2.6 shows how the write lock prevents more than one writer from accessing an index simultaneously. In the testWriteLock() method, Lucene blocks the second IndexWriter from opening an index that has already been opened by another IndexWriter. This is an example of write.lock in action.
Listing 2.5. Using file-based locks to enforce a single writer at a time

When we run the code in listing 2.5, we see an exception stack trace caused by the locked index, which resembles the following stack trace:
org.apache.lucene.store.LockObtainFailedException: Lock obtain timed out:
As we mentioned earlier, new users of Lucene sometimes don’t have a good understanding of the concurrency issues described in this section and consequently run into locking issues, such as the one shown in the previous stack trace. If you see similar exceptions in your applications, please don’t disregard them if the consistency of your indexes is at all important to you. Lock-related exceptions are typically a sign of a misuse of the Lucene API; if they occur in your application, you should scrutinize your code to resolve them promptly.
Our next topic shows you how to gain insight into the internal operations IndexWriter is doing.
2.12. Debugging indexing
If you ever need to debug Lucene’s index-writing process, remember that you can get Lucene to output information about its indexing operations by calling IndexWriter’s setInfoStream method, passing in a PrintStream such as System.out:
IndexWriter writer = new IndexWriter(dir, analyzer,
                                     IndexWriter.MaxFieldLength.UNLIMITED);
writer.setInfoStream(System.out);
This reveals detailed diagnostic information about segment flushes and merges, as shown here, and may help you tune indexing parameters described earlier in the chapter. If you’re experiencing an issue during indexing, something you may believe to be a bug in Lucene, and you take your issue to the Lucene user’s list at Apache, the first request you’ll get back is someone asking you to post the output from setting infoStream. It will look something like this:
flush postings as segment _9 numDocs=1095 oldRAMSize=16842752 newFlushedSize=5319835 docs/MB=215.832 new/old=31.585% IFD [main]: now checkpoint "segments_1" [10 segments ; isCommit = false] IW 0 [main]: LMP: findMerges: 10 segments IW 0 [main]: LMP: level 6.2247195 to 6.745619: 10 segments IW 0 [main]: LMP: 0 to 10: add this merge IW 0 [main]: add merge to pendingMerges: _0:C1010->_0 _1:C1118->_0
In addition, if you need to peek inside your index once it’s built, you can use Luke, a handy third-party tool that we discuss in section 8.1. Our final section covers some advanced indexing topics.
2.13. Advanced indexing concepts
We’ve covered many interesting topics in this chapter—you should be proud for getting this far. You’ve seen how Lucene models content, the steps for indexing at a high level, and the basics of how to add, delete, and update documents in an index. You understand all the field options that tell Lucene precisely what to do with each field’s value, and you now know how to handle interesting cases like multivalued fields, field truncation, document/field boosting, and numeric and date/time values. We’ve covered why and how to optimize and index, and the liberal thread safety and locking customizability that Lucene supports. Very likely you can stop here and move on to the next chapter. But if you’re still curious, read on.
We’ll now drill down into the advanced topics in Lucene’s indexing, including the surprising ability to use IndexReader for performing deletions, how Lucene decides when to create a new segment, and Lucene’s transactional semantics. We’ll show you how to eliminate wasted disk space consumed by deleted documents. Although these are undoubtedly advanced topics, and you could happily perform indexing without understanding these concepts, you may someday find yourself wondering exactly when and how changes made by IndexWriter become visible to new readers on the index. Let’s begin by seeing when you may want to use IndexReader to perform deletions.
2.13.1. Deleting documents with IndexReader
IndexReader also exposes methods to delete documents. Why would you want two ways to do the same thing? Well, there are some interesting differences:
- IndexReader is able to delete by document number. This means you could do a search, step through matching document numbers, perhaps apply some application logic, then pick and choose which document numbers to delete. Although frequently requested, IndexWriter can’t expose such a method because document numbers may change suddenly due to merging (see section 2.13.6).
- IndexReader can delete by Term, just like IndexWriter. But IndexReader returns the number of documents deleted; IndexWriter doesn’t. This is due to a difference in the implementation: IndexReader determines immediately which documents were deleted, and is therefore able to count up the affected documents; IndexWriter simply buffers the deleted Term and applies it later.
- IndexReader’s deletions take effect immediately, if you use that same reader for searching. This means you can do deletion and immediately run a search, and the deleted documents will no longer appear in the search results. With IndexWriter, the deletions aren’t visible until you open a new reader.
- IndexWriter is able to delete by Query, but IndexReader isn’t (though it’s not hard to run your own Query and simply delete every document number that was returned).
- IndexReader exposes a sometimes useful method, undeleteAll, which as you might infer reverses all pending deletions in the index. Note that this only reverses deletions that haven’t been merged yet. This is possible because IndexWriter simply marks the document as deleted, but does not in fact remove the document from the index until the segment containing the document is merged, as described in the next section.
If you’re tempted to use IndexReader for deletion, remember that Lucene allows only one “writer” to be open at once. Confusingly, an IndexReader that’s performing deletions counts as a “writer.” This means you are forced to close any open IndexWriter before doing deletions with IndexReader, and vice versa. If you find that you are quickly interleaving added and deleted documents, this will slow down your indexing throughput substantially. It’s better to batch up your additions and deletions, using IndexWriter, to get better performance.
Generally, unless one of these differences is compelling for your application, it’s best to simply use IndexWriter for all deletions. Let’s look at the disk space consumed by deleted documents.
2.13.2. Reclaiming disk space used by deleted documents
Lucene uses a simple approach to record deleted documents in the index: the document is marked as deleted in a bit array, which is a quick operation, but the data corresponding to that document still consumes disk space in the index. This technique is necessary because in an inverted index, a given document’s terms are scattered all over the place, and it’d be impractical to try to reclaim that space when the document is deleted. It’s not until segments are merged, either by normal merging over time or by an explicit call to optimize, that these bytes are reclaimed. Section 2.13.6 describes how and when Lucene merges segments.
You can also call expungeDeletes to explicitly reclaim all disk space consumed by deleted documents. This call merges any segments that have pending deletions. Although this will generally be a lower-cost operation than optimizing, it’s still quite costly and is likely only worthwhile when you know you’ve finished doing deletions for quite a while. In the worst case, if your deletions are scattered all over the segments so that all segments have deletions, then expungeDeletes does exactly the same thing as optimize: it merges all segments down to one. Let’s see next how IndexWriter chooses to make a new segment.
2.13.3. Buffering and flushing
As shown in figure 2.4, when new documents are added to a Lucene index, or deletions are pending, they’re initially buffered in memory instead of being immediately written to the disk. This buffering is done for performance reasons to minimize disk I/O. Periodically, these changes are flushed to the index Directory as a new segment.
Figure 2.4. An in-memory document buffer helps improve Lucene’s indexing performance.

IndexWriter triggers a flush according to three possible criteria, which are controlled by the application:
- To flush when the buffer has consumed more than a preset amount of RAM, use setRAMBufferSizeMB. The RAM buffer size shouldn’t be taken as an exact maximum of memory usage because you should consider many other factors when measuring overall JVM memory usage. Furthermore, IndexWriter doesn’t account for all of its RAM usage, such as the memory required by segment merging. Section 11.3.3 describes ideas to minimize overall JVM memory usage.
- It’s also possible to flush after a specific number of documents have been added by calling setMaxBufferedDocs.
- You can trigger flushing whenever the total number of buffered deleted terms and queries exceeds a specified count by calling setMaxBufferedDeleteTerms.
Flushing happens whenever one of these triggers is hit, whichever comes first. There’s a constant IndexWriter.DISABLE_ AUTO_FLUSH, which you can pass to any of these methods to prevent flushing by that criterion. By default, IndexWriter flushes only when RAM usage is 16 MB.
When a flush occurs, the writer creates new segment and deletion files in the Directory. However, these files are neither visible nor usable to a newly opened IndexReader until the writer commits the changes and the reader is reopened. It’s important to understand this difference. Flushing is done to free up memory consumed by buffered changes to the index. Committing is done to make all changes (buffered or already flushed) persistent and visible in the index. This means IndexReader always sees the starting state of the index (when IndexWriter was opened), until the writer commits.
Note
While an IndexWriter is making changes to the index, a newly opened IndexReader won’t see any of these changes until commit() or close() is called and the reader is reopened. This even applies to opening a new IndexWriter with create=true. But a newly opened near-real-time reader (see section 2.8) is able to see the changes without requiring a commit() or close().
Let’s drill down to understand more about index commits.
2.13.4. Index commits
A new index commit is created whenever you invoke one of IndexWriter’s commit methods. There are two such methods: commit() creates a new index commit, and commit(Map<String,String> commitUserData) records the provided string map as opaque metadata into the commit for later retrieval. Closing the writer also calls commit(). Note that a newly opened or reopened IndexReader or IndexSearcher will only see the index as of the last commit, and all changes made by IndexWriter in between calls to commit are invisible to readers. The one exception to this is the near-real-time search functionality, covered in section 2.8, which is able to search changes made with the IndexWriter without first committing those changes to disk.
Note that commit can be a costly operation, and doing so frequently will slow down your indexing throughput. If for some reason you decide that you want to discard all changes, you can call rollback() to remove all changes in the current IndexWriter session since the last commit to the index. Here are the steps IndexWriter takes during commit:
- Flush any buffered documents and deletions.
- Sync all newly created files, including newly flushed files as well as any files produced by merges that have finished since commit was last called or since the IndexWriter was opened. IndexWriter calls Directory.sync to achieve this, which doesn’t return until all pending writes in the specified file have been written to stable storage on the underlying I/O system. This is usually a costly operation as it forces the OS to flush any pending writes. Different file systems also show wide variance in the cost of this operation.
- Write and sync the next segments_N file. Once this completes, IndexReaders will suddenly see all changes done since the last commit.
- Remove old commits by calling on IndexDeletionPolicy to remove old commits. You can create your own implementation of this class to customize which commits are deleted, and when.
Because old index files referenced only by the last commit aren’t removed until a new commit is completed, waiting a long time between commits will necessarily consume more disk space than performing more frequent commits. If your Lucene index is interacting with an external transactional resource, such as a database, you may be interested in the advanced APIs that Lucene exposes to enable a two-phase commit.
Two-Phase Commit
For applications that need to commit a transaction involving a Lucene index and other external resources, such as a database, Lucene exposes the prepareCommit() and prepareCommit(Map<String,String> commitUserData) methods. Each method does steps 1 and 2 in our list, as well as most of step 3, but it stops short of making the new segments_N file visible to a reader. After prepareCommit() is called, you should either call rollback() to abort the commit or commit() to complete it. Commit() is a fast call if prepareCommit() was already called. If an error will be hit, such as “disk full,” most likely prepareCommit() will hit the error, not commit(). The separation of these two phases of committing allows you to build a distributed two-phase commit protocol involving Lucene.
By default, after creating a new commit, IndexWriter removes all prior commits. But you can override this behavior by creating a custom IndexDeletionPolicy.
Indexdeletionpolicy
IndexDeletionPolicy is the class that tells IndexWriter when it’s safe to remove old commits. The default policy is KeepOnlyLastCommitDeletionPolicy, which always removes all prior commits whenever a new commit is complete. Most of the time you should use this default. But for some advanced applications where you’d like to keep an old point-in-time snapshot around even though further changes have been committed to the index, you may implement your own policy.
For example, when you’re sharing an index over NFS, it may be necessary to customize the deletion policy so that a commit isn’t deleted until all readers using the index have switched to the most recent commit, based on application specific logic (see section 2.11.2 for details). Another example is a retail company that would like to keep the last N versions of its catalog available for searching. Note that whenever your policy chooses to keep a commit around, that commit will necessarily consume additional disk space in the index.
If you keep multiple commits in your index, there are some useful APIs to help you tell them apart.
Managing Multiple Index Commits
Normally, a Lucene index will have only a single commit present, which is the last commit. But by implementing a custom deletion policy, you can easily accumulate many commits in the index. You can use the static IndexReader.listCommits() method to retrieve all commits present in an index. Then, you can step through each and gather whatever details you need. For example, if you previously called IndexWriter.commit(Map<String,String> commitUserData), then that string map is available from each commit by calling its getUserData() method. This string map may store something meaningful to your application, enabling you to pick out a particular commit of interest.
Once you’ve found a commit, you can open an IndexReader on it: several of the static open methods accept an IndexCommit. You could use this to explicitly search a previous version of the index.
Using the same logic, you can also open an IndexWriter on a prior commit, but the use case is different: it allows you to roll back to a previous commit and start indexing new documents from that point, effectively undoing all changes to the index that had happened after that commit. This is similar to IndexWriter’s rollback method, except that method only rolls back changes done within the current IndexWriter session, whereas opening on a prior commit lets you roll back changes that were already committed to the index, perhaps long ago.
Next we’ll see that Lucene supports a simplified ACID transactional model.
2.13.5. ACID transactions and index consistency
Lucene implements the ACID transactional model, with the restriction that only one transaction (writer) may be open at once. Here’s what ACID stands for, along with details about how Lucene meets it:
- Atomic— All changes done with the writer are either committed to the index, or none are; there is nothing in-between.
- Consistency— The index will also be consistent; for example, you’ll never see a delete without the corresponding addDocument from updateDocument; you’ll always see all or none of the indexes added from an addIndexes call.
- Isolation— While you are making changes with IndexWriter, no changes are visible to a newly opened IndexReader until you successfully commit. This even includes passing create=true to a newly opened IndexWriter. The IndexReader only sees the last successful commit.
- Durability— If your application hits an unhandled exception, the JVM crashes, the OS crashes, or the computer suddenly loses power, the index will remain consistent and will contain all changes included in the last successful commit. Changes done after that will be lost. Note that if your hard drive develops errors, or your RAM or CPU flips bits, that can easily corrupt your index.
Note
If your application, the JVM, the OS, or the machine crashes, the index won’t be corrupted and will automatically roll back to the last successful commit. But Lucene relies on the OS and I/O system that holds the index to properly implement the fsync system call by flushing any OS or I/O write caches to the actual underlying stable storage. In some cases, it may be necessary to disable write caching on the underlying I/O devices.
Next we describe how Lucene merges segments, and what you can do to control this process.
2.13.6. Merging
When an index has too many segments, IndexWriter selects some of the segments and merges them into a single, large segment. Merging has a couple of important benefits:
- It reduces the number of segments in the index because once the merge completes, all of the old segments are removed and a single large segment is added in their place. This makes searching faster since there are fewer segments to search, and also prevents hitting the file descriptor limit enforced by the OS.
- It reduces the size of the index. For example, if there were deletes pending on the merged segments, the merging process frees up the bytes consumed by deleted documents. Even if there are no pending deletions, a single merged segment will generally use fewer bytes to represent exactly the same set of indexed documents.
So when exactly is a merge necessary? What specifically does “too many segments” mean? That’s decided by the MergePolicy. But MergePolicy only decides which merges should be done; it’s up to MergeScheduler to carry out these merges. Let’s first drill into MergePolicy.
Mergepolicy
IndexWriter relies on a subclass of the abstract MergePolicy base class to decide when a merge should be done. Whenever new segments are flushed, or a previously selected merge has completed, the MergePolicy is consulted to determine if a merge is now necessary, and if so, precisely which segments will be merged. Besides picking “normal” segment merges to do, the MergePolicy also selects merges necessary to optimize the index and to run expungeDeletes.
Lucene provides two core merge policies, both subclassing from LogMergePolicy. The first, which is the default used by IndexWriter, is LogByteSizeMergePolicy. This policy measures the size of a segment as the total size in bytes of all files for that segment. The second one, LogDocMergePolicy, makes the same merging decisions except it measures size of a segment by the document count of the segment. Note that neither merge policy takes deletions into account. If you have mixed document sizes, it’s best to use LogByteSizeMergePolicy because it’s a more accurate measure of segment size.
If the core merge policies don’t suit your application, you can subclass MergePolicy to implement your own. For example, you could implement a time-dependent policy that defers large merges until off-peak hours, to ensure merging doesn’t conflict with ongoing searches. Or perhaps you’d like a policy that tries harder to select segments with many pending deletions, so as to reclaim disk space sooner in the index.
Table 2.5 shows the parameters that control how LogByteSizeMergePolicy chooses merges. Some of these are also exposed as convenience methods in IndexWriter.
Table 2.5. Parameters that control merge selection with the default MergePolicy, LogByteSizeMergePolicy
|
IndexWriter method |
LogByteSizeMergePolicy Method |
Default value |
Description |
|---|---|---|---|
| setMergeFactor | setMergeFactor | 10 | Controls segment merge frequency and size |
| setMinMergeMB | 1.6 MB | Sets a floor on the smallest segment level | |
| setMaxMergeMB | Long.MAX_VALUE | Limits the size in bytes of a segment to be merged | |
| setMaxMergeDocs | setMaxMergeDocs | Integer.MAX_VALUE | Limits the number of documents for a segment to be merged |
To understand these parameters we first must understand how both of these policies select merges. For each segment, its level is computed using this formula:
(int) log(max(minMergeMB, size))/log(mergeFactor)
This effectively groups the segments of roughly equal size (in log space) into the same level. Tiny segments, less than minMergeMB, are always forced into the lowest level to prevent too many tiny segments in the index. Each level contains segments that are up to mergeFactor times larger than the previous level. For example, when using LogByteSizeMergePolicy, level 0 segments are up to mergeFactor bytes in size; level 1 segments are up to mergeFactor^2 bytes in size, level 2 segments are up to mergeFactor^3 bytes in size, and so on. When using LogDocMergePolicy, the same progression holds but the size is measured as number of documents in each segment, not byte size.
Once a given level has mergeFactor or more segments, they are merged. Thus, mergeFactor controls not only how segments are assigned to levels based on size, and thus when to trigger a merge, but also how many segments are merged at once. The larger this setting is, the more segments will exist in your index and the less frequently merges will be done, for a given number of documents in the index. Larger values generally result in faster indexing throughput, but may result in too many open file descriptors (see section 11.3.2 for details on controlling file descriptor usage). It’s probably best to leave this at its default value (10) unless you see strong gains when testing different values. When the merge completes, a new segment at the next higher level replaces the merged segments. To prevent merges of large segments, set maxMergeMB or maxMergeDocs. If ever a segment is over maxMergeMB in byte size, or maxMergeDocs in its document count, that segment will never be merged. By setting maxMergeDocs you can force extremely large segments to remain separate forever in your index.
Besides selecting merges for normal ongoing maintenance of the index, MergePolicy is responsible for selecting merges when optimize or expungeDeletes is called. In fact, it’s up to the MergePolicy to define what these methods mean. For example, maybe during optimization you want to skip segments larger than a certain size. Or perhaps for expungeDeletes you only want to merge a segment if it has more than 10 percent of its documents deleted. These examples can be easily achieved by creating your own MergePolicy that subclasses LogByteSizeMergePolicy.
Over time, LogByteSizeMergePolicy produces an index with a logarithmic staircase structure: you have a few very large segments, a few segments mergeFactor smaller, and so on. The number of segments in your index is proportional to the logarithm of the net size, in bytes or number of documents, of your index. This generally does a good job of keeping segment count low while minimizing the net merge cost. But some of these settings can be tuned to improve indexing throughput, as described in section 11.1.4.
Mergescheduler
Selection of a merge is only the first step. The next step is the actual merging. IndexWriter relies on a subclass of MergeScheduler to achieve this. By default, IndexWriter uses ConcurrentMergeScheduler, which merges segments using background threads. There’s also SerialMergeScheduler, which always merges segments using the caller’s thread, which means you could suddenly see methods like addDocument and deleteDocuments take a long time while it executes a merge. You could also implement your own MergeScheduler.
Generally, customizing MergePolicy settings, or implementing your own MergePolicy or MergeScheduler, are extremely advanced use cases. For most applications, Lucene’s default settings work very well. If you’re curious about when IndexWriter is flushing and merging, you can call its setInfoStream method, as described in section 2.12. Finally, if for some reason you need to wait for all merges to finish, call IndexWriter’s waitForMerges method.
2.14. Summary
We’ve covered a lot of good ground in this chapter! Fear not: all of your hard work learning these juicy details of Lucene’s indexing will shortly pay off, once you build search functionality on top of your index. You now have a solid understanding of how to make changes to a Lucene index. You saw Lucene’s conceptual model for documents and fields, including a flexible but flat schema (when compared to a database).
We saw that the indexing process consists of gathering content, extracting text, creating documents and fields, analyzing the text into a token stream, and then handing it off to IndexWriter for addition to an index. We also briefly discussed the interesting segmented structure of an index.
You now know how to add, delete, and update documents. We delved into a great many interesting options for controlling how a field is indexed, including how the value is added to the inverted index, stored fields, and term vectors, and how a field can hold certain values other than a String. We described variations like multivalued fields, field and document boosting, and value truncation. You now know how to index dates, times, and numbers, as well as fields for sorting.
We discussed segment-level changes, like optimizing an index and using expungeDeletes to reclaim disk space consumed by deleted documents. You now know of all the Directory implementations you could use to hold an index, such as RAMDirectory and NIOFSDirectory. We discussed Lucene’s concurrency rules, and the locking it uses to protect an index from more than one writer.
Finally we covered a number of advanced topics: how and why to delete documents using IndexReader instead of IndexWriter; buffering, flushing, and committing; IndexWriter’s support for transactions; merging and the classes available for customizing it; using an index over remote file systems; and turning on IndexWriter’s infoStream to see details on the steps it’s taking internally.
Much of this advanced functionality won’t be needed by the vast majority of search applications; in fact, a few of IndexWriter’s APIs are enough to build a solid search application. By now you should be dying to learn how to search with Lucene, and that’s what you’ll read about in the next chapter.