
Chapter 9. Managing bundles
- Versioning packages and bundles in a meaningful way
- Configuring bundles using the Configuration Admin Service
- Describing bundle configuration data using the Metatype Service
- Saving bundle settings using the Preferences Service
- Deferring bundle startup using lazy activation
We’ve covered a lot of ground so far. You know how to use modularity to improve the cohesiveness of your application code; how to use lifecycles to bring dynamic installations and updates to application environments; and how to use services to decouple your modules via interface-based programming techniques. You’ve also learned approaches and techniques for creating, testing, and debugging bundles. In this chapter and the next, we’ll move our focus away from coding bundles to issues of managing bundles and OSGi-based applications.
With the OSGi Service Platform, your deployed set of bundles becomes your application’s configuration. As such, the task of managing bundles is one of the most important skills you’ll need to fully master OSGi. In this chapter, we’ll explore different aspects of bundle management, including the following:
- Evolving a bundle using versioning policies
- Managing a bundle’s configuration data
- Configuring a bundle’s activation policy
With these skills, you’ll be better equipped to deploy and manage bundles in various application configurations. Let’s start by looking at versioning.
9.1. Versioning packages and bundles
From what you’ve learned so far, you know that versioning is a core part of any OSGi application. Both bundles and their exported packages have versions. When the framework resolves bundle dependencies, it takes these versions into account. In this section, we’ll discuss the recommended policy for versioning these artifacts and discuss advantages and disadvantages of different versioning strategies. To get things started, let’s provide some motivation for OSGi’s approach to versioning.
9.1.1. Meaningful versioning
In traditional Java programming, versioning is an afterthought. OSGi, on the other hand, treats versioning as a first-class citizen, which makes it easier to handle versioning in a meaningful way. This emphasis on versioning means that a proper versioning strategy is important for maintaining application consistency.
You must be thinking, “Hey! I already version my JAR files!” Tools like Maven and Ivy let you specify versions for JAR files and declare dependencies on those versions. These tools work with module-level dependencies, which we talked about in chapters 2 and 5. You know that module-level dependencies are brittle when it comes to expressing finegrained dependencies between units of code.
Likewise, applying versions only at the module level has some drawbacks. Such a model is too simple and forces all packages in a JAR file to be versioned in lockstep with the other packages. Let’s look at some of these issues in more detail.
Module Versioning is Opaque
Consider a case where you bundle related packages together and assign a version number to the resulting JAR file. Later, you may need to alter some code in one of the contained packages; such a change may be the result of a bug fix or a change to the API contract. This new JAR file needs a new version number associated with it.
With a single version number for all the packages, it’s left to upstream users of the JAR file to decide whether the change warrants their making the update. Because the only information they have is the module-level version-number change, it’s often a stab in the dark as to whether the updated functionality is required for their application. Upstream users don’t typically use all the functionality provided by a JAR file and depend on only a subset of it. Depending on which subset they use, it’s possible that nothing of importance has changed for them.
A counterargument is that if the bundle is highly cohesive, it makes no sense to update a single package without its siblings. Although this is true, it’s not uncommon for JAR files to be less than optimally cohesive. OSGi already caters to this situation with uses constraints, which we introduced in chapter 2. These constraints ensure that the cohesiveness of packages is maintained by capturing internal package dependencies. This means upstream users aren’t forced to depend on anything more than the API-level contract of the exported packages.
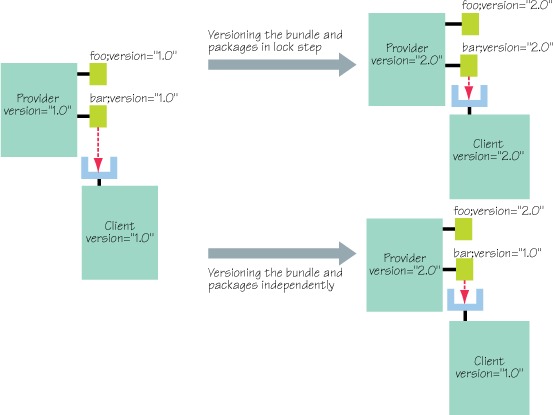
Luckily, in OSGi, you can version your packages either independently or in lockstep with the bundle, as shown in figure 9.1. The OSGi approach of package-level versioning and dependencies leads to less churn in the development lifecycle. Less churn implies less risk, because existing modules are better understood than updated modules, which may introduce unexpected behavior into a complex system. This concept is extremely powerful and removes a lot of the pain from assembling applications out of independent JAR files, because you can make better-informed decisions about when and what to update.
Figure 9.1. Versioning packages independently
Multiple Versions in the Same JVM
Package-level versioning is also helpful when it comes to running different versions side by side. Java doesn’t explicitly support this by default, but OSGi does. In many cases, this seemingly unimportant feature frees you from worrying about backward compatibility or changes to artifacts outside your control. Your bundles can continue to use the versions of packages with which they’re compatible, because your entire application no longer has to agree on a single version to place on the class path.
There’s a price to pay for this flexibility. Versioning must be done as a core task throughout the development process, not as an afterthought. Versioning packages and maintaining a versioning policy is a lot of work. One easy way to reduce the amount of work is to have less to version. In OSGi, you have the option to not expose the implementation packages of a bundle (assuming that no other bundle needs them). As a consequence, the simplest option you have is to not export packages to avoid the need to version them. When you need to export packages, then you need to version them. Let’s look more closely at how you can implement a versioning policy for packages in OSGi.
9.1.2. Package versioning
Let’s consider a package named org.foo with a version of 1.0.0.r4711 provided by a bundle called foo that is itself at version 1.0.0. Its manifest looks like this:
Bundle-ManifestVersion: 2
Bundle-SymbolicName: foo
Bundle-Version: 1.0.0
Export-Package: org.foo;version:="1.0.0.r4711"
As we mentioned previously, the OSGi specification doesn’t define a versioning policy, which means you can use any scheme that makes sense to you. But the OSGi specification does recommend the following policy behind version-number component changes:
- Major number change— Signifies an incompatible update
- Minor number change— Signifies a backward-compatible update
- Micro number change— Signifies an internal update (such as a bug fix or performance improvement)
- Qualifier change— Signifies a trivial internal change (such as line-number refactoring)
This is a common version compatibility policy. Why? Versions are important for the consumer to specify what’s needed, and this policy makes it possible to easily express a floor and a ceiling version in between which all versions are acceptable. As you saw in chapter 2, a version range is expressed as a pair of version numbers inside braces or parentheses. This follows mathematical interval notation, where a square brace signifies an inclusive value and a parenthesis signifies an exclusive value. As an example, consider a typical definition of a package import:
Import-Package: org.foo;version:="[1.0,2.0)"
The org.foo package is imported from version 1.0.0 up to, but excluding, 2.0.0. This makes sense if the recommended version policy is being used, because it includes all backward-compatible versions and excludes all non-backward-compatible versions, which a change in the major number would signify. Being able to specify such ranges is useful because the import can be satisfied by a wider range of exports. This scheme works only if producers and consumers operate with a shared understanding of the kind of compatibility being expressed by a given version number.
Downsides and Pitfalls
The recommended OSGi versioning policy sounds good, and it’s been used successfully by many projects. But new users should still take care due to a subtlety regarding the use of Java interfaces, which is related to whether an interface is being used or implemented.
The difference seems trivial, but it becomes important in the context of versioning. Consider the following 1.0.0 version of the Foo interface:
public interface Foo {
  Bar getBar();
}
What happens if you change this simple interface? For example, suppose you add a method:
public interface Foo {
  Bar getBar();
  void setBar();
}
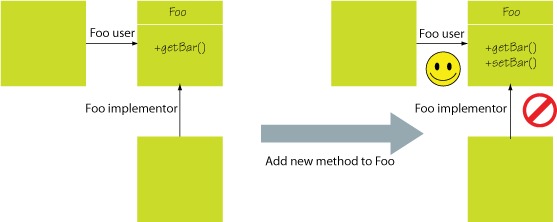
The question to ponder is whether this change should cause a major or minor version-number increase. It depends on whether the interface is intended to be implemented or used by the consumer. In the former case, the addition of the method is a binary-incompatible change to the interface and should cause the major version number to increase to 2.0.0. In the latter case, increasing the minor version number to 1.1.0 is sufficient because method addition is a backward-compatible update to the interface. Figure 9.2 shows the situation.
Figure 9.2. Impact on versioning between using and implementing the interface
If you’re in control of all the bundles, you can define a policy to ensure that method addition always causes a change in the major version number, which allows all consumers of a package to use a [1.0,2.0) version range. In reality, you’re unlikely to be in control of all the bundles. Furthermore, such a drastic policy would limit the reusability of your bundles, because consumers only using the interfaces would have no way to express that they’re fine with an added method.
The best strategy devised so far is to shift the burden to the consumer. This is pretty straightforward and requires implementers to specify a version range of [1.0,1.1), while users can specify the broader version range of [1.0,2.0) as shown in the following figure.

Another important requirement for versioning is consistency. You don’t want to define your versioning policy on a bundle-by-bundle basis. So, whether you follow the recommended approach or not, you should at least try to use the same policy globally.
This gives you a fairly good understanding of versioning policy for packages, but what about versioning bundles? We’ll explore bundle-versioning policies next.
9.1.3. Bundle versioning
Bundles and packages are related through containment: bundles contain packages. Because both bundles and packages have version numbers, what is the relationship between them? You need to adopt a versioning policy to define this relationship. Let’s look at that in more detail.
In the simple case, a bundle may contain several related implementation packages, all with the same version number. Here it’s advisable to make the bundle version mirror the version of the implementation packages. When you’re dealing with a bundle containing packages of different versions, the most consistent versioning policy is to increment the bundle version based on the highest change of a package inside it. For example, if any package has a major number increase, the major number of the bundle should increase as well; the same is true if the highest change was to a minor or micro portion of the version. With this policy, it’s possible to judge the impact of an updated bundle based on its version number. Unfortunately, this may not always make sense, especially if the versions of the individual packages represent a well-known product version.
For example, let’s assume you want to create a bundle for the core API of the OSGi framework. In this case, you have several independently versioned packages, but the collection of packages in this bundle has a version number based on the OSGi specification. Figure 9.3 graphically depicts this situation.
Figure 9.3. The platform implementation contains many subpackages that must evolve in step with the specification, but what’s the version of the implementation?
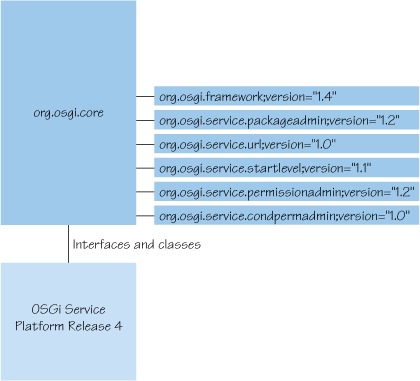
Now, the question is, what version should you assign to the org.osgi.core bundle? There’s no single answer. You could increase the major number on every major release of the OSGi specification, but this would indicate a binary-incompatible change in at least one of the provided packages, which clearly isn’t the case (as indicated by the individual package versions). Another approach is to keep the version number at 1, indicating that no binary-incompatible change has happened. You would then need to use the minor number to match the release number of the specification. Because the OSGi specification has also had minor number releases (such as 4.1), you would then need to use the micro number for the minor number of the specification.
Unfortunately, this wouldn’t be exactly what you want either, because there have been updates in the minor numbers of the contained packages. To make matters worse, if you ever needed to update the bundle for a different reason (like a packaging mistake), then you’d need to use the qualifier to express that the bundle had changed. In the specific case of the core OSGi specification, the OSGi Alliance makes API JAR files available based on the version of the specification (4.1.0, 4.2.0, and so on).
Although there’s no single policy you can prescribe for versioning bundles, at a minimum you should try to reflect incompatible changes at the package level in your bundle version number. The management task to take away from this section is that versioning is important and shouldn’t be left as an afterthought. If done correctly, the OSGi concept of versioning is extremely powerful and removes a lot of the pain from assembling applications. To get it right, you need to define a versioning policy and enforce it on all your bundles and exported packages.
With versioning covered, let’s look into another important management task: configuring your bundles.
9.2. Configuring bundles
To make your bundles more reusable, it’s a good idea to introduce configuration properties to control their behavior. Recall from chapter 3, when we introduced the shell example, that you used configuration properties to alter its behavior, such as the port on which it listened for client connections. Configuring bundles is an important aspect of using them, so it would be beneficial if there was a standard way of managing this. At a minimum, it would be nice to have the following:
- A common way to set the configuration information for a given bundle
- A common format for specifying the type of configuration data a given bundle expects
- A common mechanism for bundles to safely store bundle- and user-related configuration information
Fortunately, the OSGi Alliance defines the following three compendium specifications to help you address these issues:
- Configuration Admin Service— Manages key/value pair configuration properties for bundles
- Metatype Service— Allows bundles to describes their configuration properties
- Preferences Service— Provides a place to store bundle- and user-related information
Even with these specifications to help you, adding bundle configurations to the mix creates more issues for you to worry about. Configuration data becomes yet another artifact to manage. For example, you have to make sure to consider this data when you change the bundles in your systems, because configuration data generally isn’t compatible across bundles or even bundle versions. The data is subject to deployment and provisioning just like bundles.
In the remainder of this section, we’ll introduce you to these configuration-related services and show you how you can manage configurations. We’ll start with the Configuration Admin Service.
9.2.1. Configuration Admin Service
The Configuration Admin Service is an important piece of the deployment of the OSGi Service Platform. It allows you to set the configuration information of deployed bundles. You use this service to set a bundle’s configuration data, and it ensures that the bundle receives the data when it becomes active.
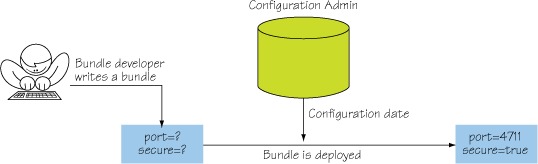
What happens is pretty simple. Consider the scenario in figure 9.4, where a bundle needs an integer port number and a Boolean secure property. In this case, you provide these values to the Configuration Admin Service, and it provides these values to the bundle when it’s activated. Using this approach, bundles have a simple, standard way of obtaining configuration data.
Figure 9.4. An administrator configures a bundle in the framework by interacting with the Configuration Admin Service. This approach decouples the administrator from having to know the internal workings of the bundle using the configuration data.
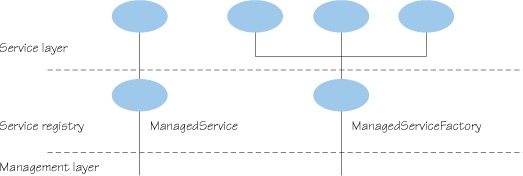
How does this work? The Configuration Admin Service maintains a database of Configuration objects, each of which has an associated set of name-value pair properties. The Configuration Admin Service follows the whiteboard pattern and monitors the service registry for two different managed services: ManagedService and Managed-ServiceFactory. If you have a bundle that needs configuration data, it must register one of these two services defined in the Configuration Admin specification. The difference between these two is that a ManagedService accepts one configuration to configure a single service, whereas a ManagedServiceFactory accepts any number of configurations and configures a different service instance for each configuration; figure 9.5 illustrates this difference.
Figure 9.5. Difference between a ManagedService and ManagedServiceFactory
When you’re registering one of these managed services, you need to attach a service.pid (service persistent identity) service property to it. Each managed Configuration object also has a service.pid associated with it, which the Configuration Admin Service uses as a key to match configuration data to the bundle needing it.
In a nutshell, you can associate a persistent identity, or PID, with each registered service by specifying it in the service property dictionary when you register its managed service. If you specify a service.pid property, it must be unique for each service. Its purpose is to uniquely and persistently identify a given service, which allows the Configuration Admin Service to use it as a primary key for bundles needing configuration data. This means the Configuration Admin Service requires the use of a PID with ManagedService and ManagedServiceFactory service registrations. As a convention, PIDs starting with a bundle identifier and a dot are reserved for the bundle associated with that identifier. For example, the PID 42.4711 belongs to the bundle associated with bundle identifier 42. You’re free to use other schemes for your PIDs; just make sure they’re unique and persistent across bundle activations.
You may have noticed you’re dealing with two conceptually different layers when using the Configuration Admin Service. On one layer, you have a published Managed-Service or ManagedServiceFactory service. On the other layer, you have a bundle and the services it provides that you want to configure. The Configuration Admin Service connects these two layers together when it delivers the configuration data. Of course, the reverse is also possible, and the Configuration Admin Service may tell a managed service that its configuration has gone away, which means it needs to stop performing its functionality because it no longer has a valid configuration. This approach gives you a flexible system, where you can configure and control any kind of service or any number of service instances in a common way. Let’s look into the details of implementing a managed service next.
Implementing a Managed Service
Now that you understand the underlying basics of how the Configuration Admin Service works by associating configuration data to managed services, let’s explore an example. The actual interface you need to implement looks like the following:
public interface ManagedService {
  public void updated(Dictionary properties) throws ConfigurationException;
}
The following listing shows an example ManagedService implementation.
Listing 9.1. Example of a managed service
public class ManagedServiceExample implements ManagedService {
  private EchoServer m_server = null;

  public synchronized void updated(Dictionary properties)
    throws ConfigurationException {
    if (m_server != null) {
      m_server.stop();
      m_server = null;
    }
    if (properties != null) {
      String portString = (String) properties.get("port");
      if (portString == null) {
        throw new ConfigurationException(null, "Property missing");
      }
      int port;
      try {
        port = Integer.parseInt(portString);
      } catch (NumberFormatException ex) {
        throw new ConfigurationException(null, "Not a valid port number");

      }
      try {
        m_server = new EchoServer(port);
        m_server.start();
      } catch (IOException e) {
        e.printStackTrace();
      }
    }
  }
...
}
The ManagedService interface has a single updated() method. The argument to this method is a Dictionary containing the configuration properties.
A configuration dictionary contains a set of properties in a Dictionary object. The name or key of a property must always be a String object and isn’t case sensitive during lookup, but preserves the original case. The values should be of type String, Integer, Long, Float, Double, Byte, Short, Character, Boolean, or the primitive counterparts. Furthermore, they can be arrays or collections of them. For arrays and collections, they must only contain values of the same type.
In this example, a simple echo server listens on a port and sends back whatever it receives. Because it’s good practice, you make the port configurable. When you receive a new configuration, you first stop the existing server, if there is one. Then, you check whether you received a null configuration, which indicates that the previous configuration was deleted and there is no new one. If this is the case, there’s nothing else to do. Otherwise, you get the port number from the dictionary and verify its existence. If it exists, you parse it and create and start a new server for the given port.
A ManagedService is associated with one configuration object. A bundle can register any number of ManagedService services, but each must be identified with its own PID. You should use a ManagedService when configuration is needed for a single entity in the bundle or where the service represents an external entity like a device. Then, for each detected device, a ManagedService is published with a PID related to the identity of the device, such as the address or serial number.
What about cases where you want to configure more than a single entity using the same PID, such as creating multiple instances of the same service with different configurations? You use a ManagedServiceFactory, which we’ll explore next.
Implementing a Managed Service Factory
You should use a ManagedServiceFactory when a bundle doesn’t have an internal or external entity associated with the configuration information, but can handle more than one configuration at the same time. Remember, with a ManagedService, there’s only one configuration: the configuration for the specific PID. With a ManagedServiceFactory, the same factory can have any number of configurations. Using this approach, you can instantiate a service for each configuration associated with your managed service factory, for example. This way, by creating a new configuration for the managed service factory, you create new service instances. A slightly different use case is related to services representing entities that can’t be identified directly, such as devices on a USB port that can’t provide information about their type. Using a ManagedServiceFactory, you can define configuration information for each available device attached to the USB port.
How does this work with respect to the PIDs? The trick in this case is that you register the ManagedServiceFactory with a factory.pid service property. This way, the Configuration Admin Service can differentiate between a managed service factory and a managed service. For the managed service factory, it assigns a new and unique PID to each created configuration for the factory. The interface to implement looks like this:
public interface ManagedServiceFactory{
  public String getName();
  public void updated(String pid, Dictionary properties)
    throws ConfigurationException;
  public void deleted(String pid);
}
The following example uses a ManagedServiceFactory to configure echo services that read from their configured port and send back whatever they receive along with their name.
Listing 9.2. ManagedServiceFactory example

This example isn’t significantly different from the last one. You now implement the ManagedServiceFactory interface. Because you’re going to manage a number of servers, you introduce a map to hold them. The factory interface defines
two new methods, deleted() and getName(). The latter is a descriptive name for the factory, and the former notifies your factory that a previously updated configuration
has gone away, which results in you stopping the corresponding server. Notice that the updated() method has a different signature from the ManagedService interface ![]() . It now accepts a PID, which is necessary because your managed service factory needs to know the PID for the supplied configuration;
it correlates the PID with a specific echo server. For each one, you need a PID and a configuration. The rest is similar to
what you did for a single server in the ManagedService example. The only exception is that now you must add the resulting server instance to your list of servers
. It now accepts a PID, which is necessary because your managed service factory needs to know the PID for the supplied configuration;
it correlates the PID with a specific echo server. For each one, you need a PID and a configuration. The rest is similar to
what you did for a single server in the ManagedService example. The only exception is that now you must add the resulting server instance to your list of servers ![]() .
.
This covers the basics of what you need to do to make your bundles configurable. Now we need to look into how you configure bundles by creating configurations.
Creating Configurations
It’s one thing to make your bundles configurable, but you need some way to specify and set the property values you want to use to configure them. You need to learn how to create and manage configurations; you use the Configuration Admin Service for this. It provides methods to maintain configuration data by means of Configuration objects associated with specific configuration targets that can be created, listed, modified, and deleted. The ConfigurationAdmin service interface is defined as follows:
public interface ConfigurationAdmin{
  public Configuration createFactoryConfiguration(String factoryPid)
    throws IOException;
  public Configuration createFactoryConfiguration(String factoryPid,
    String location) throws IOException;
  public Configuration getConfiguration(String pid, String location)
    throws IOException;

  public Configuration getConfiguration(String pid) throws IOException;
  public Configuration[] listConfigurations(String filter) throws
    IOException, InvalidSyntaxException;
}
Configuration objects are represented by the following interface:
public interface Configuration{
  public String getPid();
  public Dictionary getProperties();
  public void update(Dictionary properties) throws IOException;
  public void delete() throws IOException;
  public String getFactoryPid();
  public void update() throws IOException;
  public void setBundleLocation(String location);
  public String getBundleLocation();
}
To illustrate how these all fit together, you continue to improve the shell example in the following listing by creating a new command to manage configurations.
Listing 9.3. ConfigurationAdmin service shell command
public class ConfigAdminCommand extends BasicCommand {
  public void exec(String args, PrintStream out, PrintStream err)
    throws Exception {
    args=args.trim();
    if (args.startsWith("list")) {
      listConfigurations(args.substring("list".length()).trim(),
        out);
    } else if (args.startsWith("add-cfg")) {
      addConfiguration(args.substring("add-cfg".length()).trim());
    } else if (args.startsWith("remove-cfg")) {
      removeConfiguration(args.substring(
        "remove-cfg".length()).trim());
    } else if (args.startsWith("add-factory-cfg")) {
      addFactoryConfiguration(args.substring("add-factory-
      cfg".length()).trim());
    } else if (args.startsWith("remove-factory-cfg")) {
      removeFactoryConfiguration(args.substring(
        "remove-factory-cfg".length()).trim());
    }
  }
In this example, you create a cm command that accepts five different subcommands: list, add-cfg, remove-cfg, add-factory-cfg, and remove-factory-cfg. The code is largely responsible for delegating to private methods to perform the functionality of the subcommands.
The following code shows how cm list lists available configurations.
Listing 9.4. Implementing the cm list subcommand
private void listConfigurations(String filter, PrintStream out)
  throws IOException, InvalidSyntaxException {
  Configuration[] configurations = admin().listConfigurations(

    ((filter.length() == 0) ? null : filter));
  if (configurations != null) {
    for (Configuration configuration : configurations) {
      Dictionary properties = configuration.getProperties();
      for (Enumeration e = properties.keys(); e.hasMoreElements();) {
        Object key = e.nextElement();
        out.println(key + "=" + properties.get(key));
      }
      out.println();
    }
  }
  ...
}
You get the ConfigurationAdmin service and use its listConfigurations() method to get the Configuration objects. You can optionally specify an LDAP filter to limit which configurations are returned; specifying no filter results in all configurations. In either case, an array of Configuration objects is returned, which are the holders of the actual configuration properties. Then you print the configuration properties, using the getProperties() method of the Configuration object to retrieve them.
You can use the add-cfg subcommand to create new Configuration objects. The subcommand accepts the PID of the ManagedService and the configuration properties as a whitespace-delimited list of name-value pairs, where the name and value are separated by an equals sign. The implementation is as follows:
private void addConfiguration(String args) {
  String pid = args.substring(0, args.indexOf(" ")).trim();
  Configuration conf = admin.getConfiguration(pid, null);
  createConfiguration(args.substring(pid.length()).trim(), pid, conf);
}
To create a Configuration object, you call getConfiguration() on Configuration-Admin. This method creates the Configuration object on the first call and returns the same object on subsequent calls. You initialize the new configuration with a call to the private method createConfiguration(), which is defined next.
Listing 9.5. Private method to initialize Configuration objects
private void createConfiguration(
  String args, String pid, Configuration conf) throws IOException {
  conf.setBundleLocation(null);
  Dictionary dict = conf.getProperties();
  if (dict == null) {
    dict = new Properties();
  }
  StringTokenizer tok = new StringTokenizer(args, " ");
  while (tok.hasMoreTokens()) {
    String[] entry = tok.nextToken().split("=");
    dict.put(entry[0], entry[1]);
  }
  conf.update(dict);
}
This sets the Configuration object’s bundle location to null, which means it isn’t currently associated with any bundle. You finish initializing the new configuration by getting any existing properties, parsing the specified properties and merging them with existing properties, and finally updating the configuration. Because you handle existing properties, you can use the add-cfg subcommand to create and modify configurations.
When you create a Configuration object using either getConfiguration() or createFactoryConfiguration(), it becomes bound to the location of the calling bundle. You can obtain this location via the calling bundle’s getLocation() method. Location binding is a security feature to ensure that only management bundles can modify configuration data, and other bundles can only modify their own configuration data.
If the bundle location of a configuration for a given PID is set to null (as in listing 9.5), the Configuration Admin Service binds the first bundle registering a managed service with the given PID to this configuration. After the bundle location is set, then configurations for the given PID are only delivered to the bundle with that location. When this dynamically bound bundle is subsequently uninstalled, the location is set to null again automatically so it can be bound again later.
You can use the remove-cfg subcommand to remove Configuration objects. The implementation of this subcommand is much simpler:
private void removeConfiguration(String pid) {
  Configuration conf = admin.getConfiguration(pid);
  conf.delete();
}
The subcommand accepts a PID that you use to get the Configuration object from the ConfigurationAdmin service. When you have the Configuration object, you call delete() on it.
The add-factory-cfg subcommand creates a Configuration object for a managed service factory. It’s implemented as follows:
private void addFactoryConfiguration(String args) {
  String pid = args.substring(0, args.indexOf(" ")).trim();
  Configuration conf = admin.createFactoryConfiguration(pid, null);
  createConfiguration(args.substring(pid.length()).trim(), pid, conf);
}
It accepts the PID of the managed service factory and the configuration properties as a whitespace-delimited list of name-value pairs. It’s similar to the add-cfg subcommand, except that you use ConfigurationAdmin.createFactoryConfiguration() to create a new Configuration object for the factory. This always creates a new Configuration object for the factory service (unlike getConfiguration(), which creates one only the first time for a given PID).
The remove-factory-cfg subcommand allows you to remove a factory configuration. It’s implemented as follows:
private void removeFactoryConfiguration(String pid) {
  Configuration[] configurations = admin.listConfigurations(
    "(service.pid=" + pid + ")");
  configurations[0].delete();
}
The subcommand accepts a PID that you use to find the associated configuration using listConfigurations() with a filter. When you have it, you call delete() on it as before.
To experiment with this new command, go into the chapter09/combined-example/ directory of the companion code. Type ant to build the example and java -jar launcher.jar bundles to execute it. To interact with the shell, use telnet local-host 7070. This example uses the Apache Felix Configuration Admin implementation (http://felix.apache.org/site/apache-felix-configuration-admin-service.html). Here’s a session using the cm command:
-> cm add-cfg org.foo.managed.service port=6251
-> cm add-factory-cfg org.foo.managed.factory port=6252
-> cm list
service.pid=org.foo.managed.service
port=6251

service.pid=org.foo.managed.factory.89706c08-3902-4f4d-87f5-7da5a504cb94
port=6252
service.factoryPid=org.foo.managed.factory

-> cm remove-cfg org.foo.managed.service
-> cm remove-factory-cfg
[CA]org.foo.managed.factory.89706c08-3902-4f4d-87f5-7da5a504cb94
-> cm list
->
This session creates configurations for your managed service and managed service factory. As you should be aware now, the result of these two commands is subtly different. The first directly configures the service associated with the PID, whereas the latter causes a service to be created from the managed service factory. For the combined example, if you go to another operating system shell after performing the first two steps, you can telnet into your configured echo servers using the specified port numbers. Finally, you remove the configurations.
That finishes our quick tour of the Configuration Admin Service. You should now be able to use Configuration Admin to create externally configurable bundles, instantiate services using configurations, and manage configurations. But wait, how do you know what kind of data your configurable bundles accept? All we’ve said so far is that managed services are configured with simple name-value pairs. Sometimes that may suffice, but often you may want to tell other bundles or entities, such as a user, about the structure of your bundle’s configuration data. The Metatype Service, which we’ll introduce next, allows you to define your own metatypes and associate them with your bundles and services.
9.2.2. Metatype Service
Assume for a moment that you’re deploying a new bundle for the first time into a framework that has your Configuration Admin shell command available. If this new bundle provides some services that are configurable, you can use your shell command to configure it, right? Unfortunately, because this bundle is new to you, you have no idea which properties it accepts, nor which ones are required for it to operate. In this kind of scenario, it would certainly be helpful if the bundle could convey to you what a valid configuration look likes.
The OSGi standard Metatype Service makes this possible. It aggregates metatypes (descriptions of types) contributed by bundles and allows others to look up these definitions. Using this service allows you to introspect what a managed service accepts as a valid configuration and also validate configurations against these schema, which are subject to the same update and versioning mechanisms as the bundles that provide them.
As you can see in figure 9.6, there are two ways to provide metatype information about your managed services:
Figure 9.6. Metatype Service overview

- A bundle can contain XML resources in its OSGI-INF/metatype directory, which are picked-up by the Metatype Service using the extender pattern.
- A managed service can implement a second interface called MetaTypeProvider.
If for some reason a bundle does both, only the XML resources are considered, and the MetaTypeProvider service is ignored.
From a client perspective, the Metatype Service defines a dynamic typing system for properties. This allows you, for example, to construct reasonable user interfaces dynamically. The service itself provides unified access to the metatype information provided by deployed bundles. A client can request MetaTypeInformation associated with a given bundle, which in turn provides a list of ObjectClassDefinition objects for this bundle. An object class contains descriptive information and a set of name-value pairs. Here’s what this looks like for the example echo server:
<?xml version="1.0" encoding="UTF-8"?>
<MetaData xmlns="http://www.osgi.org/xmlns/metatype/v1.0.0">
  <OCD name="EchoServer" id="4.7.1.1" description="Echo Server Config">
    <AD name="port" id="4.7.1.1.1" type="Integer"
     description="The port the Echo Server listens on"/>
  </OCD>
 <Designate pid="org.foo.managed.service">
  <Object ocdref="4.7.1.1"/>
 </Designate>
</MetaData>
Don’t let this somewhat obtuse XML fool you. It’s simple. You first define an Object-ClassDefinition (OCD) called EchoServer, with a unique identifier of 4.7.1.1 (if you have a matching LDAP/X.500 object class OSGi object identifier (OID), you can use that one; otherwise, use any other reasonably unique name that follows the same grammar as the LDAP/X.500 OID and a human-readable description). You specify an attribute definition (AD) to describe the configuration properties the echo server needs. In this case, there’s only one: port. Notice the Designate element: this is where you make the link between the type (the OCD) and the instance (the PID). In this example, the EchoServer description applies to the configurations of managed services with the PID org.foo.managed.service.
Using Metatype Information
To use metatype information, you use the Metatype Service to look up metatype definitions. The Metatype Service is represented by the following interface:
public interface MetaTypeService {
    public MetaTypeInformation getMetaTypeInformation(Bundle bundle);
}
Using the discovered metatype information, you can generate user interfaces or validate configurations, for example. To demonstrate how to use the Metatype Service, let’s add a type command to the shell to display metatype information, as follows.
Listing 9.6. Metatype Service shell command example
public class MetaDataCommand extends BasicCommand {

  public void exec(String args, PrintStream out, PrintStream err)
    throws Exception {
    MetaTypeService mts = getMetaTypeService();
    Bundle b = getBundle(args);
    MetaTypeInformation mti = mts.getMetaTypeInformation(b);
    String[] pids = mti.getPids();
    for (int i = 0; i < pids.length; i++) {
      out.println(pids[i]);
      ObjectClassDefinition ocd = mti.getObjectClassDefinition(
        pids[i], null);
      AttributeDefinition[] ads = ocd
        .getAttributeDefinitions(ObjectClassDefinition.ALL);
      for (int j = 0; j < ads.length; j++) {
        out.println("	OCD=" + ocd.getName());

        out.println("		AD=" + ads[j].getName() + " - " +
          ads[j].getDescription());
      }
    }
  }

  private MetaTypeService getMetaTypeService() {...}

}
The command is simple: you ask the MetaTypeService if a specified bundle has Meta-TypeInformation objects associated with it. The type command accepts a bundle identifier as an argument. You get the MetaTypeService and retrieve the Bundle object associated with the specified bundle identifier. You invoke the getMetaType-Information() method to retrieve the associated metatype information. If there is metatype information, you get the PIDs; and for each PID, you get the object class definition. Likewise, for each object class definition, you get the AttributeDefinitions and print their names and descriptions. You can now use this command to get a list of all known PIDs and their respective properties for any given bundle identifier.
To run this example, go back into the chapter09/combined-example/ directory of the companion code. If you haven’t already done so, type ant to build the example and java -jar launcher.jar bundles to execute it. To interact with the shell, use telnet localhost 7070. This example uses the Apache Felix Metatype implementation (http://felix.apache.org/site/apache-felix-metatype-service.html). Here’s a session using the type command:
-> bundles
...
[   2] [   ACTIVE] managed.service
                   Location: file:bundles/managed.service-2.0.jar
                   Symbolic Name: org.foo.managed.service
...
-> type 2
org.foo.managed.service
    OCD=EchoServer
       AD=port - The port the Echo Server listens on
->
All you need to do is execute the type command with the bundle identifier of a bundle providing metadata, and you get a description of what kind of properties any associated PIDs can understand. This makes it a little easier to properly configure arbitrary services.
Where are we now? You’ve learned how to configure bundles and provide meta-type information about configuration properties. This combination allows you to create externally and generically configurable applications. What more do you need? Not all configuration information is intended to be externally managed; for example, most preference settings in an application fall in this category. Where should a bundle store such configuration information? The OSGi Preferences Service can help you here; let’s look at how it works next.
9.2.3. Preferences Service
In many cases, applications need to store preferences and settings persistently. Of course, this chapter is about managing bundles, and, technically, dealing with preference settings isn’t really a management activity. Still, we include it here because it’s related to configuration data in general, and this gives us an opportunity to present another standard OSGi Compendium service.
The OSGi Preferences Service gives bundles a mechanism to persistently store data. You may recall from chapter 3 that a bundle already has a private file system area, which it can access via BundleContext.getDataFile(). You could use this mechanism to store preference settings, but the Preferences Service has several advantages:
- It defines a standard way to handle such data.
- It supports a hierarchical system and per-user settings.
- It doesn’t require a file system.
- It can abstract access to the underlying operating system’s settings mechanism, if one exists.
The Preferences Service provides simple, lightweight access to stored data. It doesn’t define a general database service but is optimized to deliver stored information when needed. It will, for example, return defaults instead of throwing exceptions when the back-end store isn’t available.
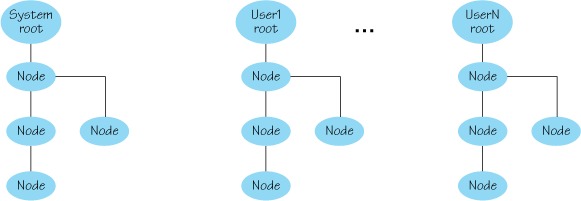
The Preferences Service data model is a multirooted hierarchy of nodes: a system root node exists for system settings, and you can create any number of named user root nodes for user settings. Each one of these root nodes is the root of a tree of Preferences objects. A Preferences object has a name, a single parent node (except for a root node, which has no parent), and zero or more child nodes. It’s possible to navigate a tree either by walking from one node to its parent or children or by addressing nodes directly via a relative or absolute path. This is possible using the node names separated with the / character, much like file system paths. Figure 9.7 shows a conceptual picture of such trees.
Figure 9.7. System and user-preferences trees
Each Preferences object has a set of key/value pairs, called properties. The key is a case-sensitive string that lives in a separate namespace from that of the child nodes, which means a node can have a property with the same key as one of its children. The value must always be able to be stored and retrieved as a string. Therefore, it must be possible to encode/decode all values into/from strings. A number of methods are available to store and retrieve values as primitive types.
The preferences saved by one bundle are completely distinct from the preferences saved by another bundle. The Preferences Service doesn’t provide a mechanism for one bundle to access another bundle’s preferences storage. If this is needed, you must obtain a reference to the source bundle’s preferences in another way, such as directly passing a reference to the other bundle.
Using the Preferences Service is straightforward. It’s represented by the following simple interface:
public interface PreferencesService {
  Preferences getSystemPreferences();
  Preferences getUserPreferences(String name);
  String[] getUsers();
}
The getSystemPreferences() method provides access to the system preferences root, whereas the getUserPreferences() method provides access to a given user’s preferences root. You can use the getUsers() method to enumerate all usernames that have stored preferences.
When you have a node, you can navigate the preference tree using the children-Names(), parent(), and node() methods on the returned Preferences node. For setting values, the Preferences interface offers some simple methods to store key/value pairs:
public void put(String key, String value);
public void putInt(String key, int value);
public void putLong(String key, long value);
public void putBoolean(String key, boolean value);
public void putFloat(String key, float value);
public void putDouble(String key, double value);
public void putByteArray(String key, byte[] value);
For each of these methods, a corresponding getter method exists. Getter methods always accept two arguments: the first to specify the key of the property to retrieve, and the second to specify a default value in case the property doesn’t exist (or in case of errors). For instance:
public float getFloat(String key, float def);
Assuming you want to store the last time your bundle was started, you can do this using the system preferences:
Preferences startPreferences =
  service.getSystemPreferences().node("start");
startPreferences.putLong("time", new Date().getTime());
This stores the current time as a long in the system preferences start node. As you can see, this is pretty simple stuff, but it’s convenient to have a standard service definition rather than having to invent it yourself.
Generally speaking, the Preferences Service is similar to java.util.prefs.Preferences, introduced in Java 1.4. One of the reasons the OSGi Preferences service exists is because the Java Preferences API isn’t available before Java 1.4 and OSGi still supports Java 1.3. At the same time, the OSGi Preferences Service saves preferences for each bundle independently of other bundles, whereas Java Preferences saves preferences of one user of the system independently of other users. So the two, although similar, aren’t identical.
This concludes our discussion of bundle configuration. We’ve covered a lot of ground. The combination of the Configuration Admin, Metatype, and Preferences Services provides for flexible approaches when it comes to configuring your bundles, which can save you a lot of management effort.
So far in this chapter, we’ve talked about how to manage versions and spent a fair amount of time showing how to manage bundle configuration data. Now we’ll switch to our final topic: managing when a given bundle is activated after it’s started.
9.3. Starting bundles lazily
From chapter 3, you know that starting a bundle involves invoking the Bundle.start() method on its corresponding Bundle object. If the bundle has a BundleActivator, and it’s resolvable, the framework creates an instance of the bundle’s activator and invokes start() on it, allowing the bundle to initialize itself. The act of starting a bundle and of it being activated are two independent concepts, although typically they occur together. Sometimes you may want to start a bundle but not necessarily activate it until some later time. Why? There are two main reasons:
- Your bundle’s exported packages aren’t able to function properly without a BundleContext (for example, perhaps they require a service from the registry).
- Your bundle’s initialization is costly, and you want to defer it until it’s needed.
The OSGi specification allows bundles to declare a lazy activation policy, which indicates to management agents that something like one of the previous two issues applies to it. Of course, you can use alternative approaches to deal with these situations. For the first issue, you can program the bundle classes to always throw exceptions until activated. For the second, you can minimize initialization in the bundle activator and use threads to do work in the background. Sometimes these alternative approaches are feasible, but sometimes throwing exceptions isn’t so clean, nor is it possible to completely reduce all startup overhead, especially if you’re starting lots of bundles. In these cases, you can use the lazy activation policy.
9.3.1. Understanding activation policies
Although the OSGi specification defines activation policies in an open-ended way, there’s currently only one activation policy: lazy. The main gist of the lazy activation policy is this:
- A bundle declares itself to be lazy.
- A management agent installs a lazy bundle and starts it lazily. The framework marks the bundle as started but doesn’t yet activate it.
- The lazy bundle’s activation is deferred until a class is loaded from it.
- After a class is loaded from the lazy bundle, the framework completes its activation as normal.
This is fairly straightforward, but some small details lurk inside. Let’s revisit the bundle lifecycle diagram in figure 9.8 to get a better understanding of the impact.
Figure 9.8. The lazy activation policy causes a bundle to defer activation and linger in the STARTING state until a class is loaded from it, at which point the framework completes its activation.

The bold arrows in figure 9.8 depict additional transitions in the bundle lifecycle state diagram. When a bundle is started lazily, it transitions to the STARTING state, which is denoted by the framework by firing a BundleEvent of type LAZY_ACTIVATION, instead of the normal STARTING event. The bundle stays in this state until it’s stopped or a class is loaded from it. Stopping a lazy bundle in the STARTING state returns it to the RESOLVED state and results in STOPPING and STOPPED bundle events. When a class is loaded from a lazy bundle in the STARTING state, this acts as a trigger for the framework to automatically activate the bundle, which completes the normal process of creating the bundle activator and calling its start() method, resulting in the normal STARTING and STARTED bundle events.
Because loading a class from one lazy bundle may require other classes to be loaded from other lazy bundles, the framework may end up activating chains of lazy bundles. The framework doesn’t activate the lazy bundles as it loads classes from them, because this can lead to arcane class-loading errors. Instead, the framework delays the activation of each lazy bundle it discovers in a class-loading chain until it finishes loading the instigating class. At that point, the framework activates the detected lazy bundles in reverse order. For example, assume ClassA is loaded from bundle A, which requires ClassB from bundle B, which in turn requires ClassC from bundle C. If all of the bundles are lazy and in the STARTING state, the framework will activate bundle C, bundle B, and then bundle A before returning ClassA to the requester.
Be aware that loading resources from a bundle doesn’t trigger lazy activation, only classes. Also, the specification doesn’t unambiguously define how the framework should treat the class-loading trigger, so the precise behavior may vary. In particular, some frameworks may scope the trigger to the lifetime of the bundle’s class loader (it needs to be re-triggered only if the bundle is refreshed), whereas others may scope the trigger to the bundle’s ACTIVE lifecycle state (it needs to be re-triggered after the bundle is stopped and restarted).
Now that you know how the lazy activation policy works, let’s look into the details of using it.
9.3.2. Using activation policies
The process of using activation policies involves both the bundle wishing to be lazily activated and the management agent deciding whether to start a bundle lazily. For the first, when you create a bundle that can be lazily activated, you use the Bundle-ActivationPolicy header in its manifest metadata to declare the activation policy.
Bundle-ActivationPolicy
Specifies the activation policy of a bundle where the only defined policy is lazy activation, which is specified with the value lazy. The default behavior is eager activation, although there is no explicit way to specify this value.
To use this in the bundle manifest, you do this:
Bundle-ActivationPolicy: lazy
Only bundles containing this manifest header can have their activation deferred. It’s not possible to lazily activate an arbitrary bundle. The reasoning behind this goes back to one of the main use cases motivating deferred activation: a bundle that requires a BundleContext for its exported packages to function properly. In this use case, only the bundle itself knows if this is the case; thus, only the bundle itself can declare the policy.
This may sound a little odd, because deferring activation sounds like a good thing to do all the time. Why pay the cost of activating a bundle before it’s needed? You could start all bundles lazily and they would only activate when another bundle used them, right? There’s a fly in the ointment with this approach. Suppose your bundle provides a service. If your bundle isn’t activated, it won’t ever get a chance to publish its service in its bundle activator. Thus, no other bundles will be able to use it, and it will never be activated lazily. So, even if it were possible to apply an activation policy to a bundle externally, it wouldn’t always end up working the way you intended.
One final detail for bundles declaring an activation policy: the specification offers fine-grained control over which precise packages trigger lazy activation. The specification defines include and exclude directives, which declare a comma-separated list of included and excluded packages, respectively. For example:
Bundle-ActivationPolicy: lazy; include:="com.acme.service"
A bundle with this metadata will only be lazily activated if a class is loaded from its com.acme.service package.
Assuming you have bundles with the declared lazy activation policy, the management agent has the final say as to whether their activation is deferred. In chapter 3, you learned about using Bundle.start() to start and eagerly activate a bundle. If you call Bundle.start() with no arguments on a bundle with lazy activation policy, it will be activated eagerly, as normal. To start the bundle with lazy activation, you must call Bundle.start() with the Bundle.START_ACTIVATION_POLICY flag. When you use this flag, you’re saying that you want to start the bundle using its declared activation policy. A bundle with no activation policy will be started eagerly as usual, whereas one with the lazy policy will have its activation deferred as described in the previous section.
There’s no requirement to start bundles declared as “lazy” lazily. Eagerly starting a bundle is always acceptable; it means you’re willing to pay for the startup cost immediately. In most cases, eager activation is more than sufficient, so you won’t need to worry about activation policies. But in those situations where it’s required, it can make your life simpler.
That’s it! We’ve covered a variety of bundle management topics. Let’s review what you’ve learned in this chapter.
9.4. Summary
In this chapter, we discussed how to manage bundles, including a range of issues:
- You must carefully consider the versioning of both packages and bundles when working with OSGi.
- The OSGi specification recommends, but doesn’t prescribe, versioning policies. It’s up to you to define and adhere to such as policy.
- Managing bundles also involves managing bundle configuration data.
- The Configuration Admin Service provides a way to externalize and standardize management of bundle configuration data, and the Metatype Service provides a standard way to describe a bundle’s configuration data.
- Related to configuration data, the Preferences Service provides a standard mechanism for bundles to manage system- and user-preference settings.
- The lazy activation policy defers bundle activation until a class is loaded from the lazily started bundle, allowing management agents to defer the cost of bundle startup.
These topics have given you a fairly good foundation for managing your bundles. Next, let’s look at how to build and manage OSGi-based applications. This is the topic of the next chapter.