
Chapter 6. Coarse-grained testing with stubs
Galileo
This chapter covers
- Introducing stubs
- Using an embedded server in place of a real web server
- Unit testing an HTTP connection with stubs
As you develop your applications, you’ll find that the code you want to test depends on other classes, which themselves depend on other classes, which then depend on the environment. For example, you might be developing an application that uses JDBC to access a database, a Java EE application (one that relies on a Java EE container for security, persistence, and other services), an application that accesses a file system, or an application that connects to some resource using HTTP, SOAP, or another protocol.
In the previous chapters, we introduced the JUnit framework. Starting in this chapter, we look at using JUnit to test an application that depends on external resources.
For applications that depend on a specific runtime environment, writing unit tests is a challenge. Your tests need to be stable, and when run repeatedly, they need to yield the same results. You need a way to control the environment in which the tests run. One solution is to set up the real required environment as part of the tests and run the tests from within that environment. In some cases, this approach is practical and brings real benefits (see chapter 8, which discusses in-container testing). But it works well only if you can set up the real environment on your development and build platforms, which isn’t always feasible.
For example, if your application uses HTTP to connect to a web server provided by another company, you usually won’t have that server application available in your development environment. Therefore, you need a way to simulate that server so you can still write and run tests for your code.
Alternatively, suppose you’re working with other developers on a project. What if you want to test your part of the application, but the other part isn’t ready? One solution is to simulate the missing part by replacing it with a fake that behaves the same way.
There are two strategies for providing these fake objects: stubbing and using mock objects. Stubs, the original solution, are still very popular, mostly because they allow you to test code without changing it to make it testable. This isn’t the case with mock objects. This chapter is dedicated to stubbing, whereas chapter 7 covers mock objects.
6.1. Introducing stubs
Stubs are a mechanism for faking the behavior of real code or code that isn’t ready yet. Stubs allow you to test a portion of a system even if the other part isn’t available. Stubs usually don’t change the code you’re testing but instead adapt to provide seamless integration.
Definition
A stub is a piece of code that’s inserted at runtime in place of the real code, in order to isolate the caller from the real implementation. The intent is to replace a complex behavior with a simpler one that allows independent testing of some part of the real code.
Here are some examples of when you might use stubs:
- When you can’t modify an existing system because it’s too complex and fragile
- For coarse-grained testing, such as integration testing between different subsystems
Stubs usually provide high confidence in the tested system. With stubs, you aren’t modifying the objects under test, and what you are testing is the same as what will execute in production. A build or developer usually executes tests involving stubs in their running environment, providing additional confidence.
On the downside, stubs are usually hard to write, especially when the system to fake is complex. The stub needs to implement the same logic as the code it’s replacing, and that’s difficult to get right for complex logic. Here are some cons of stubbing:
- Stubs are often complex to write and need debugging themselves.
- Stubs can be difficult to maintain because they’re complex.
- Stubs don’t lend themselves well to fine-grained unit testing.
- Each situation requires a different stubbing strategy.
In general, stubs are better adapted for replacing coarse-grained portions of code.
You usually use stubs to replace a full-blown external system such as a file system, a connection to a server, a database, and so forth. Stubs can replace a method call to a single class, but it’s more difficult. (We demonstrate how to do this with mock objects in chapter 7.)
6.2. Stubbing an HTTP connection
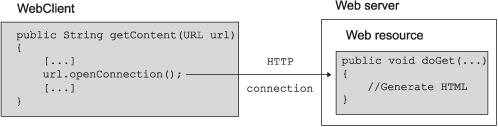
To demonstrate what stubs can do, let’s build some stubs for a simple application that opens an HTTP connection to a URL and reads its content. Figure 6.1 shows the sample application (limited to a WebClient.getContent method) opening an HTTP connection to a remote web resource. The remote web resource is a servlet, which generates an HTML response. The web resource in figure 6.1 is what we called the “real code” in the stub definition.
Figure 6.1. The sample application opens an HTTP connection to a remote web resource. The web resource is the “real code” in the stub definition.
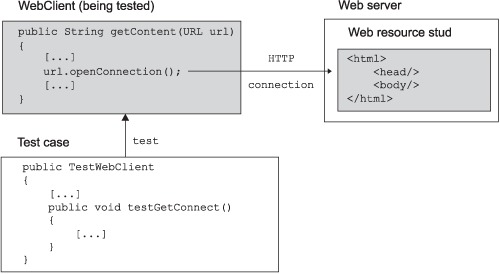
Our goal in this chapter is to unit test the getContent method by stubbing the remote web resource, as demonstrated in figure 6.2. You replace the servlet web resource with the stub, a simple HTML page returning whatever you need for the TestWebClient test case. This approach allows you to test the getContent method independently of the implementation of the web resource (which in turn could call several other objects down the execution chain, possibly down to a database).
Figure 6.2. Adding a test case and replacing the real web resource with a stub
The important point to notice with stubbing is that we didn’t modify getContent to accept the stub. The change is transparent to the application under test. In order to allow stubbing, the target code needs to have a well-defined interface and allow plugging in of different implementations (a stub, in our case). In the figure 6.1 example, the interface is the public abstract class java.net.URLConnection, which cleanly isolates the implementation of the page from its caller.
Let’s look at a stub in action using the simple HTTP connection example. Listing 6.1 from the example application demonstrates a code snippet opening an HTTP connection to a given URL and reading the content found at that URL. Imagine the method is one part of a bigger application that you want to unit test.
Listing 6.1. Sample method opening an HTTP connection
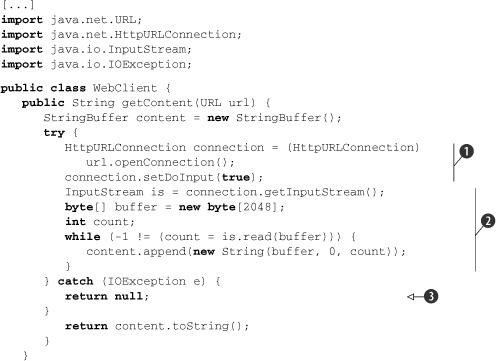
We start ![]() by opening an HTTP connection using the HttpURLConnection class. We then read the stream content until there’s nothing more to read
by opening an HTTP connection using the HttpURLConnection class. We then read the stream content until there’s nothing more to read ![]() . If an error occurs, we return null
. If an error occurs, we return null ![]() . One might argue that a better implementation should throw an exception. But for testing purposes, returning null is fine.
. One might argue that a better implementation should throw an exception. But for testing purposes, returning null is fine.
6.2.1. Choosing a stubbing solution
There are two possible scenarios in the example application: the remote web server (see figure 6.1) could be located outside the development platform (such as on a partner site), or it could be part of the platform where you deploy the application. But in both cases, you need to introduce a server into your development platform in order to be able to unit test the WebClient class. One relatively easy solution would be to install an Apache test server and drop some test web pages in its document root. This is a typical, widely used stubbing solution.
But it has several drawbacks, listed in table 6.1.
Table 6.1. Drawbacks of the chosen stubbing solution
|
Drawback |
Explanation |
|---|---|
| Reliance on the environment | You need to be sure the full environment is up and running before the test starts. If the web server is down and you execute the test, it’ll fail and you’ll spend time debugging the failure. You’ll discover that the code is working fine and it’s only a setup issue generating a false failure. When you’re unit testing, it’s important to be able to control as much as possible of the environment in which the tests execute, such that test results are reproducible. |
| Separated test logic | The test logic is scattered in two separate locations: in the JUnit test case and in the test web page. You need to keep both types of resources in sync for the tests to succeed. |
| Difficult tests to automate | Automating the execution of the tests is difficult because it involves deploying the web pages on the web server, starting the web server, and then running the unit tests. |
Fortunately, an easier solution exists using an embedded web server. Because we’re testing in Java, the easiest solution is to use a Java web server that you can embed in the test case. You can use the free and open source Jetty server for this exact purpose. In this book, we use Jetty to set up our stubs. For more information about Jetty, visit http://www.eclipse.org/jetty/.
We use Jetty because it’s fast (important when running tests), it’s lightweight, and your test cases can programmatically control it. In addition, Jetty is a very good web, servlet, and JSP container that you can use in production. You seldom need this for most tests, but it’s always nice to use best-of-breed technology.
Using Jetty allows you to eliminate the drawbacks outlined previously: the JUnit test case starts the server, you write the tests in Java in one location, and automating the test suite is a nonissue. Thanks to Jetty’s modularity, the real point of the exercise is to stub only the Jetty handlers and not the whole server from the ground up.
6.2.2. Using Jetty as an embedded server
In order to understand how to set up and control Jetty from your tests, let’s implement a simple example. Listing 6.2 shows how to start Jetty from Java and how to define a document root (/) from which to start serving files.
Listing 6.2. Starting Jetty in embedded mode—JettySample class
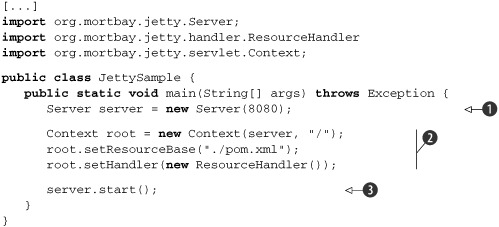
We start by creating the Jetty Server object ![]() and specifying in the constructor which port to listen to for HTTP requests (port 8080). Next, we create a Context object
and specifying in the constructor which port to listen to for HTTP requests (port 8080). Next, we create a Context object ![]() that processes the HTTP requests and passes them to various handlers. We map the context to the already-created server instance
and to the root (/) URL. The setResourceBase method sets the document root from which to serve resources. On the next line, we attach a ResourceHandler handler to the root to serve files from the file system. Because this handler will return an HTTP 403-Forbidden error if
we try to list the content of a directory, we specify the resource base to be a file. In this example, we specify the file
pom.xml in the project’s directory. Finally, we start the server
that processes the HTTP requests and passes them to various handlers. We map the context to the already-created server instance
and to the root (/) URL. The setResourceBase method sets the document root from which to serve resources. On the next line, we attach a ResourceHandler handler to the root to serve files from the file system. Because this handler will return an HTTP 403-Forbidden error if
we try to list the content of a directory, we specify the resource base to be a file. In this example, we specify the file
pom.xml in the project’s directory. Finally, we start the server ![]() .
.
If you start the program from listing 6.2 and navigate your browser to http://localhost:8080, you should be able to see the content of the pom.xml file (see figure 6.3).
Figure 6.3. Testing the JettySample class in a browser

Figure 6.3 displays the results of running the code in listing 6.2 after opening a browser on http://localhost:8080.
Now that you’ve seen how to run Jetty as an embedded server, we show next how to stub the server’s resources.
6.3. Stubbing the web server’s resources
You now know how to easily start and configure Jetty, so let’s focus on the HTTP connection unit test. You’ll write a first test that verifies you can call a valid URL and get its content.
6.3.1. Setting up the first stub test
To verify that the WebClient works with a valid URL, you need to start the Jetty server before the test, which you can implement in a test case setUp method. You can also stop the server in a tearDown method. Listing 6.3 shows the code.
Listing 6.3. First test to verify that WebClient works with a valid URL
[...]
import java.net.URL;
import org.junit.test;
import org.junit.Before;
import org.junit.After;

public class TestWebClientSkeleton {

   @Before
public void setUp() {

   }
   @After
public void tearDown() {
      // Stop Jetty.
   }

   @Test
public void testGetContentOk() throws Exception {
      WebClient client = new WebClient();
      String result = client.getContent(new URL(
         "http://localhost:8080/testGetContentOk"));

      assertEquals ("It works", result);
   }
}
In order to implement the @Before and @After methods, you have two options. You can prepare a static page containing the text "It works", which you put in the document root (controlled by the call to context.setResourceBase(String) in listing 6.2). Alternatively, you can configure Jetty to use your own custom Handler that returns the string "It works" instead of getting it from a file. This is a much more powerful technique, because it lets you unit test the case when the remote HTTP server returns an error code to your WebClient client application.
Creating a Jetty Handler
Listing 6.4 shows how to create a Jetty Handler that returns the string "It works".
Listing 6.4. Create a Jetty Handler that returns "It works" when called

This class creates a handler ![]() by extending the Jetty AbstractHandler class and implementing a single method, handle. Jetty calls the handle method to forward an incoming request to our handler. After that, we use the Jetty ByteArrayISO8859Writer class
by extending the Jetty AbstractHandler class and implementing a single method, handle. Jetty calls the handle method to forward an incoming request to our handler. After that, we use the Jetty ByteArrayISO8859Writer class ![]() to send back the string "It works", which we write in the HTTP response
to send back the string "It works", which we write in the HTTP response ![]() . The last step is to set the response content length to be the length of the string written to the output stream (this is
required by Jetty) and then send the response
. The last step is to set the response content length to be the length of the string written to the output stream (this is
required by Jetty) and then send the response ![]() .
.
Now that this handler is written, you can tell Jetty to use it by calling context.setHandler(new TestGetContentOkHandler()). You’re almost ready to run your test. The last issue to solve is the one involving the @Before and @After methods. The solution shown in listing 6.3 isn’t optimal because JUnit will start and stop the server for every test method. Even though Jetty is fast, this process isn’t necessary. A better solution is to start the server only once for all the tests by using the JUnit annotations we described in the second chapter of the book: @BeforeClass and @AfterClass. These annotations let you execute code before and after all @Test methods in a class.
In previous chapters, we went to great lengths to explain why each test should run in a clean environment (even to the extent of using a new class loader instance). But sometimes there are other considerations to take into account. Performance is a typical one. In the case of Jetty, even if starting the server takes only 1 second, once you have 300 tests, it will add an overhead of 300 seconds (5 minutes). Test suites that take a long time to execute are a handicap; you’ll be tempted not to execute them often, which negates the regression feature of unit testing. You must be aware of this tradeoff. Depending on the situation, you may choose to have longer-running tests that execute in a clean environment or instead tune the tests for performance by reusing some parts of the environment. In the example at hand, you use different handlers for different tests, and you can be fairly confident they won’t interfere with each other.
Writing the test class
We can now easily write the test class using the @BeforeClass annotation, as demonstrated in listing 6.5.
Listing 6.5. Putting it all together
[...]
import java.net.URL;
[...]

public class TestWebClient {

   @BeforeClass
public static void setUp() throws Exception() {
      Server server = new Server(8080);

      TestWebClient t = new TestWebClient();

      Context contentOkContext = new Context(server, "/testGetContentOk");
      contentOkContext.setHandler(t.new TestGetContentOkHandler());

      server.setStopAtShutDown(true);
      server.start();

   }

   @Test
public void testGetContentOk() throws Exception {
      WebClient client = new WebClient();
      String result = client.getContent(new URL(
         "http://localhost:8080/testGetContentOk"));
      assertEquals("It works", result);
   }

   @AfterClass
public static void tearDown() {
      //Empty
   }

private class TestGetContentOkHandler extends AbstractHandler {
      //Listing 6.4 here.
   }

}
The test class has become quite simple. The @BeforeClass setUp method constructs the Server object the same way as in listing 6.2. Then come the @Test methods, and we leave our @AfterClass method empty intentionally because we programmed the server to stop at shutdown.
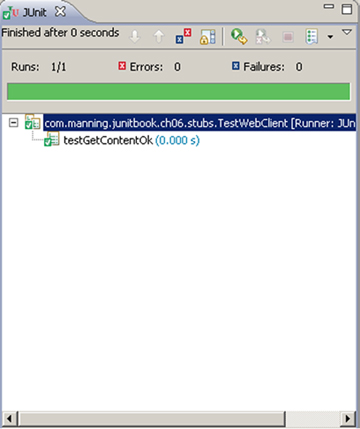
If you run the test in Eclipse, you’ll see the result in figure 6.4—our test passes.
Figure 6.4. Result of the first working test using a Jetty stub. JUnit starts the server before the first test, and the server shuts itself down after the last test.
So far, so good—our tests have been testing the good side of our code. But it seems logical to test the behavior of what would happen if the server crashed or the application deployed in the server crashed. The next section answers exactly those questions.
6.3.2. Testing for failure conditions
Now that you have the first test working, let’s see how to test for server failure conditions. The WebClient.getContent(URL) method returns a null value when a failure occurs. You need to test for this possibility too. With the infrastructure you’ve put in place, you need to create a new Jetty Handler class that returns an error code and register it in the @Before method of the TestWebClientSetup1 class.
Let’s add a test for an invalid URL—a URL pointing to a file that doesn’t exist. This case is quite easy, because Jetty already provides a NotFoundHandler handler class for that purpose. You only need to modify the TestWebClient setUp method as follows (changes are in bold):
@BeforeClass
public static void setUp() throws Exception {
   Server server = new Server(8080);
   TestWebClient t = new TestWebClient();

   Context contentOkContext = new Context(server, "/testGetContentOk");
   contentOkContext.setHandler(t.new TestGetContentOkHandler());

Context contentNotFoundContext = new Context(server,
"/testGetContentNotFound");
contentNotFoundContext.setHandler(t.new
TestGetContentNotFoundHandler());

   server.start();
}
Here’s the code for the TestGetContentNotFoundHandler class:
private class TestGetContentNotFoundHandler extends AbstractHandler {
   public void handle(String target, HttpServletRequest request,
          HttpServletResponse response, int dispatch) throws IOException {
      response.sendError(HttpServletResponse.SC_NOT_FOUND);
   }
}
Adding a new test in TestWebClient is also a breeze:
@Test
public void testGetContentNotFound() throws Exception {
   WebClient client = new WebClient();
   String result = client.getContent(new URL(
      "http://localhost:8080/testGetContentNotFound"));
   assertNull(result);
}
In similar fashion, you can easily add a test to simulate the server having trouble. Returning a 5xx HTTP response code indicates this problem. To do so, you’ll need to write a Jetty Handler class, using HttpServletResponse.SC_SERVICE_UNAVAILABLE, and register it in the @Before method of the TestWebClientSetup1 class.
A test like this would be very difficult to perform if you didn’t choose an embedded web server like Jetty.
6.3.3. Reviewing the first stub test
You’ve now been able to fully unit test the getContent method in isolation by stubbing the web resource. What have you really tested? What kind of test have you achieved? You’ve done something quite powerful: you’ve unit tested the method, but at the same time, you’ve executed an integration test. In addition, not only have you tested the code logic, but you’ve also tested the connection part that’s outside the code (through the Java HttpURLConnection class).
The drawback to this approach is that it’s complex. It can take a Jetty novice half a day to learn enough about Jetty to set it up correctly. In some instances, you’ll have to debug stubs to get them to work properly. Keep in mind that the stub must remain simple and not become a full-fledged application that requires tests and maintenance. If you spend too much time debugging your stubs, a different solution may be called for.
In these examples, you need a web server—but another example and stub will be different and will need a different setup. Experience helps, but different cases usually require different stubbing solutions.
The example tests are nice because you can both unit test the code and perform some integration tests at the same time. But this functionality comes at the cost of complexity. More solutions that are lightweight focus on unit testing the code without performing integration tests. The rationale is that although you need integration tests, they could run in a separate test suite or as part of functional tests.
In the next section, we look at another solution that can still qualify as stubbing. It’s simpler in the sense that it doesn’t require you to stub a whole web server. It brings you one step closer to the mock object strategy, which is described in the following chapter.
6.4. Stubbing the connection
So far, you’ve stubbed the web server’s resources. Next, we stub the HTTP connection instead. Doing so will prevent you from effectively testing the connection, but that’s fine because it isn’t your real goal at this point. You want to test your code in isolation. Functional or integration tests will test the connection at a later stage.
When it comes to stubbing the connection without changing the code, we benefit from Java’s URL and HttpURLConnection classes, which let us plug in custom protocol handlers to process any kind of communication protocol. You can have any call to the HttpURLConnection class redirected to your own class, which will return whatever you need for the test.
6.4.1. Producing a custom URL protocol handler
To implement a custom URL protocol handler, you need to call the URL method setURLStreamHandlerFactory and pass it a custom URLStreamHandlerFactory. Whenever the URL openConnection method is called, the URLStreamHandlerFactory class is called to return a URLStreamHandler. Listing 6.6 shows the code to perform this feat. The idea is to call the URL static method setURLStreamHandlerFactory in the JUnit setUp method. (A better implementation would use a TestSetup class, such that this is performed only once during the whole test suite execution.)
Listing 6.6. Providing custom stream handler classes for testing
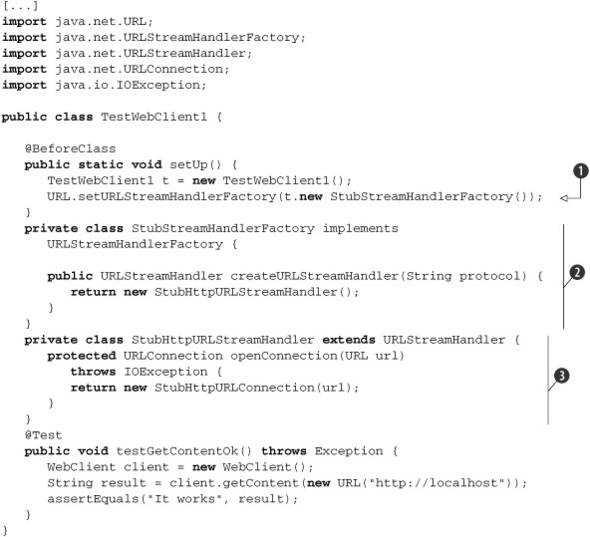
We use several (inner) classes (![]() and
and ![]() ) to be able to use the StubHttpURLConnection class. We start by calling setURLStreamHandlerFactory
) to be able to use the StubHttpURLConnection class. We start by calling setURLStreamHandlerFactory ![]() with our first stub class, StubStreamHandlerFactory. In StubStreamHandlerFactory, we override the createURLStreamHandler method
with our first stub class, StubStreamHandlerFactory. In StubStreamHandlerFactory, we override the createURLStreamHandler method ![]() , in which we return a new instance of our second private stub class, StubHttpURLStreamHandler. In StubHttpURLStreamHandler, we override one method, openConnection, to open a connection to the given URL
, in which we return a new instance of our second private stub class, StubHttpURLStreamHandler. In StubHttpURLStreamHandler, we override one method, openConnection, to open a connection to the given URL ![]() .
.
You could also use anonymous inner classes for conciseness, but that approach would make the code more difficult to read. Note that you haven’t written the StubHttpURLConnection class yet, which is the topic of the next section.
6.4.2. Creating a JDK HttpURLConnection stub
The last step is to create a stub implementation of the HttpURLConnection class so you can return any value you want for the test. Listing 6.7 shows a simple implementation that returns the string "It works" as a stream to the caller.
Listing 6.7. Stubbed HttpURLConnection class
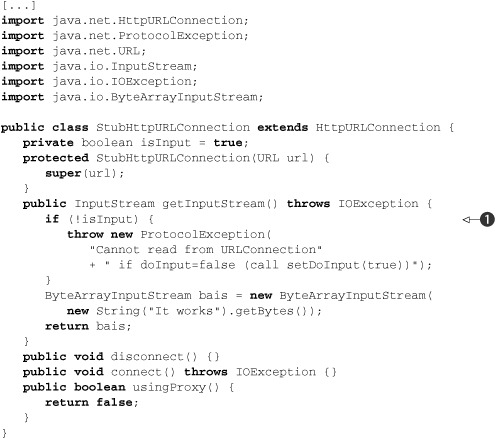
HttpURLConnection is an abstract public class that doesn’t implement an interface, so you extend it and override the methods wanted by the
stub. In this stub, you provide an implementation for the getInputStream method because it’s the only method used by your code under test. Should the code to test use more APIs from HttpURLConnection, you’d need to stub these additional methods. This is where the code would become more complex—you’d need to reproduce completely
the same behavior as the real HttpURLConnection. For example, at ![]() , you test that if setDoInput(false) has been called in the code under test, then a call to the getInputStream method returns a ProtocolException. (This is the behavior of HttpURLConnection.) Fortunately, in most cases, you need to stub only a few methods and not the whole API.
, you test that if setDoInput(false) has been called in the code under test, then a call to the getInputStream method returns a ProtocolException. (This is the behavior of HttpURLConnection.) Fortunately, in most cases, you need to stub only a few methods and not the whole API.
6.4.3. Running the test
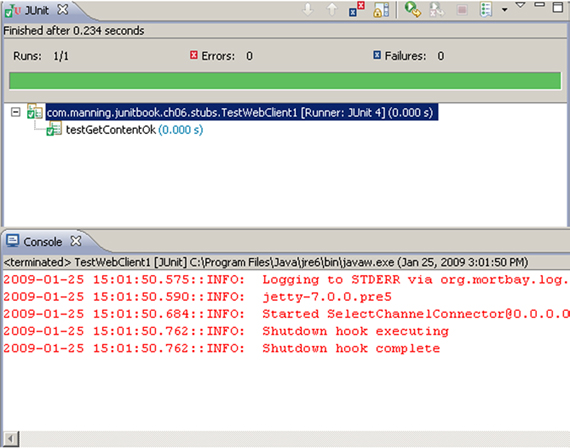
Let’s run the TestWebClient1 test, which uses the StubHttpURLConnection. Figure 6.5 shows the result of the execution of the test in Eclipse.
Figure 6.5. Result of executing TestWebClient1 (which uses the StubHttpURLConnection)
As you can see, it’s much easier to stub the connection than to stub the web resource. This approach doesn’t bring the same level of testing (you aren’t performing integration tests), but it enables you to more easily write a focused unit test for the WebClient logic.
6.5. Summary
In this chapter, we demonstrated how using a stub has helped us unit test code accessing a remote web server using the Java HttpURLConnection API. In particular, we showed how to stub the remote web server by using the open source Jetty server. Jetty’s embeddable nature lets you concentrate on stubbing only the Jetty HTTP request handler, instead of having to stub the whole container. We also demonstrated a more lightweight solution by stubbing the Java HttpURLConnection class.
The next chapter demonstrates a technique called mock objects that allows finegrained unit testing, which is completely generic, and (best of all) forces you to write good code. Although stubs are very useful in some cases, some consider them more a vestige of the past, when the consensus was that tests should be a separate activity and shouldn’t modify existing code. The new mock objects strategy not only allows modification of code but favors it. Using mock objects is more than a unit testing strategy; it’s a completely new way of writing code.