
Chapter 7. Testing with mock objects
Programming today is a race between software engineers striving to build bigger and better idiot-proof programs, and the Universe trying to produce bigger and better idiots. So far, the Universe is winning.
Rich Cook
This chapter covers
- Introducing and demonstrating mock objects
- Performing different refactorings
- Practicing on the HTTP connection sample application
- Introducing the EasyMock and the JMock libraries
Unit testing each method in isolation from the other methods or the environment is certainly a nice goal. How do you perform this feat? You saw in chapter 6 how the stubbing technique lets you unit test portions of code by isolating them from the environment (for example, by stubbing a web server, the file system, a database, and so on). What about fine-grained isolation, like being able to isolate a method call to another class? Is that possible? Can you achieve this without deploying huge amounts of energy that would negate the benefits of having tests?
Yes! It’s possible. The technique is called mock objects. Tim Mackinnon, Steve Freeman, and Philip Craig first presented the mock objects concept at XP2000. The mock objects strategy allows you to unit test at the finest-possible level and develop method by method, while providing you with unit tests for each method.
7.1. Introducing mock objects
Testing in isolation offers strong benefits, such as the ability to test code that has not yet been written (as long as you at least have an interface to work with). In addition, testing in isolation helps teams unit test one part of the code without waiting for all the other parts.
The biggest advantage is the ability to write focused tests that test only a single method, without side effects resulting from other objects being called from the method under test. Small is beautiful. Writing small, focused tests is a tremendous help; small tests are easy to understand and don’t break when other parts of the code are changed. Remember that one of the benefits of having a suite of unit tests is the courage it gives you to refactor mercilessly—the unit tests act as a safeguard against regression. If you have large tests and your refactoring introduces a bug, several tests will fail; that result will tell you that there’s a bug somewhere, but you won’t know where. With fine-grained tests, potentially fewer tests will be affected, and they’ll provide precise messages that pinpoint the exact cause of the breakage.
Mock objects (or mocks for short) are perfectly suited for testing a portion of code logic in isolation from the rest of the code. Mocks replace the objects with which your methods under test collaborate, offering a layer of isolation. In that sense, they’re similar to stubs. But this is where the similarity ends, because mocks don’t implement any logic: they’re empty shells that provide methods to let the tests control the behavior of all the business methods of the faked class.
We discuss when to use mock objects in section 7.6 at the end of this chapter, after we show them in action on some examples.
7.2. Unit testing with mock objects
In this section, we present an application and a test using mock objects. Imagine a simple use case where you want to be able to make a bank transfer from one account to another (figure 7.1 and listings 7.1 and 7.2).
Figure 7.1. In this simple bank account example, we use a mock object to test an account transfer method.
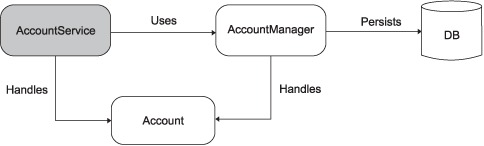
The AccountService class offers services related to Accounts and uses the AccountManager to persist data to the database (using JDBC, for example). The service that interests us is materialized by the AccountService.transfer method, which makes the transfer. Without mocks, testing the AccountService.transfer behavior would imply setting up a database, presetting it with test data, deploying the code inside the container (Java EE application server, for example), and so forth. Although this process is required to ensure the application works end to end, it’s too much work when you want to unit test only your code logic.
Listing 7.1 presents a simple Account object with two properties: an account ID and a balance.
Listing 7.1. Account.java
[...]
public class Account {
private String accountId;
private long balance;
public Account(String accountId, long initialBalance) {
this.accountId = accountId;
this.balance = initialBalance;
    }
public void debit(long amount) {
this.balance -= amount;
    }
public void credit(long  amount) {
this.balance += amount;
    }
public long getBalance() {
return this.balance;
    }
}
The AccountManager interface that follows manages the lifecycle and persistence of Account objects. (We’re limited to finding accounts by ID and updating accounts.)
[...]
  public interface AccountManager {
     Account findAccountForUser(String userId);
            void updateAccount(Account account);
  }
Listing 7.2 shows the transfer method for transferring money between two accounts. It uses the AccountManager interface we previously defined to find the debit and credit accounts by ID and to update them.
Listing 7.2. AccountService.java
[...]
public class AccountService {
private AccountManager accountManager;
public void setAccountManager(AccountManager manager) {
this.accountManager = manager;
    }
public void transfer(String senderId, String beneficiaryId, long amount) {
      Account sender = this.accountManager.findAccountForUser(senderId);
      Account beneficiary =
this.accountManager.findAccountForUser(beneficiaryId);

      sender.debit(amount);
      beneficiary.credit(amount);
this.accountManager.updateAccount(sender);
this.accountManager.updateAccount(beneficiary);
    }
}
We want to be able to unit test the AccountService.transfer behavior. For that purpose, we use a mock implementation of the AccountManager interface (listing 7.3). We do this because the transfer method is using this interface, and we need to test it in isolation.
Listing 7.3. MockAccountManager.java
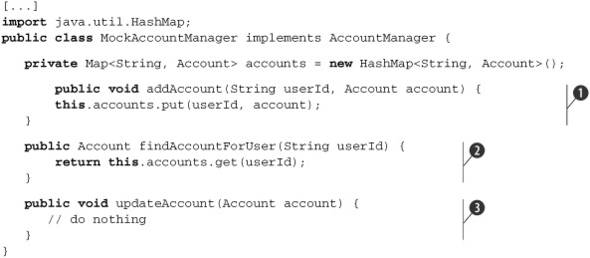
The addAccount method uses an instance variable to hold the values to return ![]() . Because we have several account objects that we want to be able to return, we store the Account objects to return in a HashMap. This makes the mock generic and able to support different test cases: one test could set up the mock with one account, another
test could set it up with two accounts or more, and so forth.
. Because we have several account objects that we want to be able to return, we store the Account objects to return in a HashMap. This makes the mock generic and able to support different test cases: one test could set up the mock with one account, another
test could set it up with two accounts or more, and so forth.
In ![]() we implement a method to retrieve the account from the accounts map—we can retrieve only accounts that have been added before that. The updateAccount method updates an account but doesn’t return any value
we implement a method to retrieve the account from the accounts map—we can retrieve only accounts that have been added before that. The updateAccount method updates an account but doesn’t return any value ![]() . We do nothing. When it’s called by the transfer method, it will do nothing, as if the account had been correctly updated.
. We do nothing. When it’s called by the transfer method, it will do nothing, as if the account had been correctly updated.
The most important point to consider when writing a mock is that it shouldn’t have any business logic. It must be a dumb object that does only what the test tells it to do. It’s driven purely by the tests. This characteristic is exactly the opposite of stubs, which contain all the logic (see chapter 6).
There are two nice corollaries. First, mock objects can be easily generated, as you’ll see in following chapters. Second, because mock objects are empty shells, they’re too simple to break and don’t need testing themselves.
We’re now ready to write a unit test for AccountService.transfer. Listing 7.4 shows a typical test using a mock.
Listing 7.4. Testing transfer with MockAccountManager
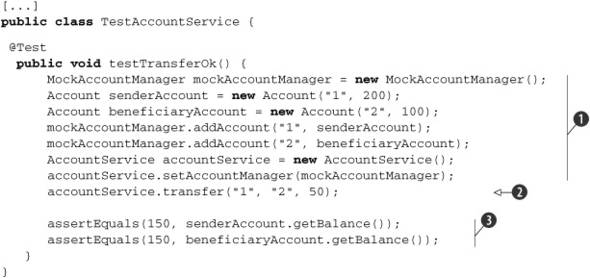
As usual, a test has three steps: the test setup ![]() , the test execution
, the test execution ![]() , and the verification of the result
, and the verification of the result ![]() . During the test setup, we create the MockAccountManager object and define what it should return when called for the two accounts we manipulate (the sender and beneficiary accounts).
We’ve succeeded in testing the AccountService code in isolation of the other domain object, AccountManager, which in this case didn’t exist, but which in real life could have been implemented using JDBC.
. During the test setup, we create the MockAccountManager object and define what it should return when called for the two accounts we manipulate (the sender and beneficiary accounts).
We’ve succeeded in testing the AccountService code in isolation of the other domain object, AccountManager, which in this case didn’t exist, but which in real life could have been implemented using JDBC.
At this point in the chapter, you should have a reasonably good understanding of what a mock is. In the next section, we show you that writing unit tests with mocks leads to refactoring your code under test—and that this process is a good thing!
You may have noticed that we didn’t mock the Account class. The reason is that this data access object class doesn’t need to be mocked—it doesn’t depend on the environment, and it’s simple. Our other tests use the Account object, so they test it indirectly. If it failed to operate correctly, the tests that rely on Account would fail and alert us to the problem.
7.3. Refactoring with mock objects
Some people used to say that unit tests should be totally transparent to your code under test, and that you should not change runtime code in order to simplify testing. This is wrong! Unit tests are first-class users of the runtime code and deserve the same consideration as any other user. If your code is too inflexible for the tests to use, then you should correct the code.
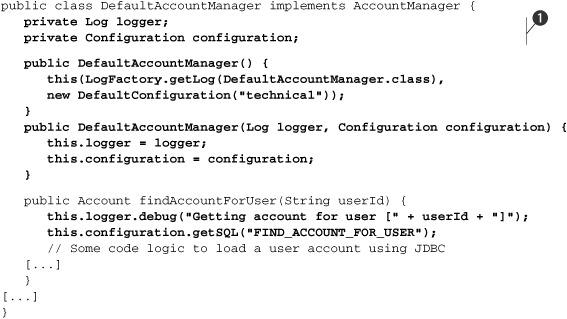
For example, what do you think of the following piece of code?
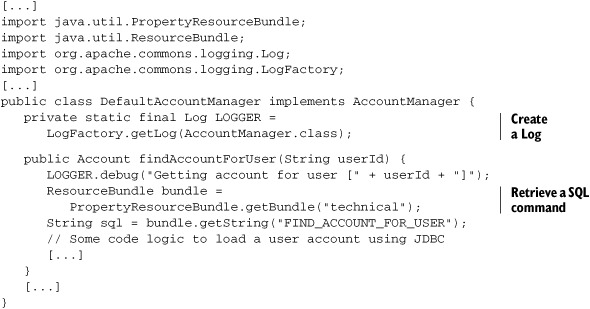
Does the code look fine to you? We can see two issues, both of which relate to code flexibility and the ability to resist change. The first problem is that it isn’t possible to decide to use a different Log object, because it’s created inside the class. For testing, for example, you probably want to use a Log that does nothing, but you can’t.
As a rule, a class like this should be able to use whatever Log it’s given.
The goal of this class isn’t to create loggers but to perform some JDBC logic. The same remark applies to the use of PropertyResourceBundle. It may sound okay right now, but what happens if you decide to use XML to store the configuration? Again, it shouldn’t be the goal of this class to decide what implementation to use.
An effective design strategy is to pass to an object any other object that’s outside its immediate business logic. The choice of peripheral objects can be controlled by someone higher in the calling chain. Ultimately, as you move up in the calling layers, the decision to use a given logger or configuration should be pushed to the top level. This strategy provides the best possible code flexibility and ability to cope with changes. And, as we all know, change is the only constant.
7.3.1. Refactoring example
Refactoring all code so that domain objects are passed around can be time consuming. You may not be ready to refactor the whole application just to be able to write a unit test. Fortunately, there’s an easy refactoring technique that lets you keep the same interface for your code but allows it to be passed domain objects that it shouldn’t create. As a proof, let’s see how the refactored DefaultAccountManager class could look. See listing 7.5; modifications are shown in bold.
Listing 7.5. Refactoring DefaultAccountManager for testing
Notice that at ![]() , we swap the PropertyResourceBundle class from the previous listing in favor of a new Configuration interface. This makes the code more flexible because it introduces an interface (which will be easy to mock), and the implementation
of the Configuration interface can be anything we want (including using resource bundles). The design is better now because we can use and reuse
the DefaultAccountManager class with any implementation of the Log and Configuration interfaces (if we use the constructor that takes two parameters). The class can be controlled from the outside (by its caller).
Meanwhile, we haven’t broken the existing interface, because we’ve only added a new constructor. We kept the original default
constructor that still initializes the logger and configuration field members with default implementations.
, we swap the PropertyResourceBundle class from the previous listing in favor of a new Configuration interface. This makes the code more flexible because it introduces an interface (which will be easy to mock), and the implementation
of the Configuration interface can be anything we want (including using resource bundles). The design is better now because we can use and reuse
the DefaultAccountManager class with any implementation of the Log and Configuration interfaces (if we use the constructor that takes two parameters). The class can be controlled from the outside (by its caller).
Meanwhile, we haven’t broken the existing interface, because we’ve only added a new constructor. We kept the original default
constructor that still initializes the logger and configuration field members with default implementations.
With this refactoring, we’ve provided a trapdoor for controlling the domain objects from your tests. We retain backward compatibility and pave an easy refactoring path for the future. Calling classes can start using the new constructor at their own pace.
Should you worry about introducing trapdoors to make your code easier to test? Here’s how Extreme Programming guru Ron Jeffries explains it:
My car has a diagnostic port and an oil dipstick. There is an inspection port on the side of my furnace and on the front of my oven. My pen cartridges are transparent so I can see if there is ink left.
And if I find it useful to add a method to a class to enable me to test it, I do so. It happens once in a while, for example in classes with easy interfaces and complex inner function (probably starting to want an Extract Class).
I just give the class what I understand of what it wants, and keep an eye on it to see what it wants next.[1]
1 Ron Jeffries, on the TestDrivenDevelopment mailing list: http://groups.yahoo.com/group/testdrivendevelopment/message/3914.
Applying the IoC pattern to a class means removing the creation of all object instances for which this class isn’t directly responsible and passing any needed instances instead. The instances may be passed using a specific constructor, using a setter, or as parameters of the methods needing them. It becomes the responsibility of the calling code to correctly set these domain objects on the called class.[2]
2 See the Jakarta Avalon framework for a component framework implementing the IoC pattern (http://avalon.apache.org).
IoC makes unit testing a breeze. To prove the point, let’s see how easily we can now write a test for the findAccountByUser method:
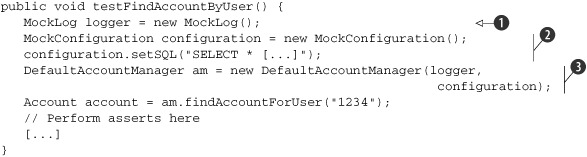
At ![]() , we use a mock logger that implements the Log interface but does nothing. Next, we create a MockConfiguration instance
, we use a mock logger that implements the Log interface but does nothing. Next, we create a MockConfiguration instance ![]() and set it up to return a given SQL query when Configuration.getSQL is called. Finally, we create the instance of DefaultAccountManager
and set it up to return a given SQL query when Configuration.getSQL is called. Finally, we create the instance of DefaultAccountManager ![]() that we test, passing to it the Log and Configuration instances.
that we test, passing to it the Log and Configuration instances.
We’ve been able to completely control our logging and configuration behavior from outside the code to test, in the test code. As a result, our code is more flexible and allows for any logging and configuration implementation to be used. You’ll see more of these code refactorings in this chapter and later ones.
One last point to note is that if you write your test first, you’ll automatically design your code to be flexible. Flexibility is a key point when writing a unit test. If you test first, you won’t incur the cost of refactoring your code for flexibility later.
7.4. Mocking an HTTP connection
To see how mock objects work in a practical example, let’s use the simple application that opens an HTTP connection to a remote server and reads the content of a page. In chapter 6 we tested that application using stubs. Let’s now unit test it using a mock object approach to simulate the HTTP connection.
In addition, you’ll learn how to write mocks for classes that don’t have a Java interface (namely, the HttpURLConnection class). We show a full scenario in which you start with an initial testing implementation, improve the implementation as you go, and modify the original code to make it more flexible. We also show how to test for error conditions using mocks.
As you dive in, you’ll keep improving both the test code and the sample application, exactly as you might if you were writing the unit tests for the same application. In the process, you’ll learn how to reach a simple and elegant testing solution while making your application code more flexible and capable of handling change.
Figure 7.2 introduces the sample HTTP application.
Figure 7.2. The sample HTTP application before introducing the test
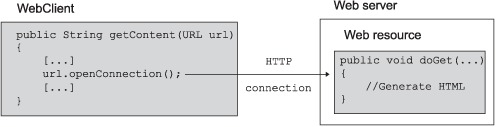
This application consists of a simple WebClient.getContent method performing an HTTP connection to a web resource executing on a web server. We want to be able to unit test the getContent method in isolation from the web resource.
7.4.1. Defining the mock objects
Figure 7.3 illustrates the definition of a mock object. The MockURL class stands in for the real URL class, and all calls to the URL class in getContent are directed to the MockURL class. As you can see, the test is the controller: it creates and configures the behavior the mock must have for this test; it (somehow) replaces the real URL class with the MockURL class; and it runs the test.
Figure 7.3. The steps involved in a test using mock objects
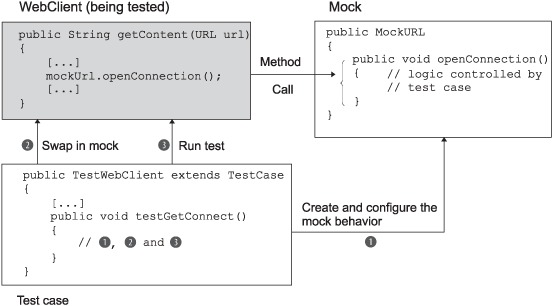
Figure 7.3 shows an interesting aspect of the mock objects strategy: the need to be able to swap the mock into the production code. The perceptive reader will have noticed that because the URL class is final, it’s not possible to create a MockURL class that extends it.
In the coming sections, we demonstrate how to perform this feat in a different way (by mocking at another level). In any case, when using the mock objects strategy, swapping in the mock instead of the real class is the hard part. This may be viewed as a negative point for mock objects, because we usually need to modify our code to provide a trapdoor. Ironically, modifying code to encourage flexibility is one of the strongest advantages of using mocks, as explained in section 7.3.1.
7.4.2. Testing a sample method
The example in listing 7.6 demonstrates a code snippet that opens an HTTP connection to a given URL and reads the content found at that URL. Let’s imagine that it’s one method of a bigger application that we want to unit test, and let’s unit test that method.
Listing 7.6. A sample method that opens an HTTP connection

If an error occurs, we return null. Admittedly, this isn’t the best possible error-handling solution, but it’s good enough for the moment. (And our tests will give us the courage to refactor later.)
7.4.3. First attempt: easy method refactoring technique
The idea is to be able to test the getContent method independently of a real HTTP connection to a web server. If you map the knowledge you acquired in section 7.2, it means writing a mock URL in which the url.openConnection method returns a mock HttpURLConnection. The MockHttpURLConnection class would provide an implementation that lets the test decide what the getInputStream method returns. Ideally, you’d be able to write the following test:

Unfortunately, this approach doesn’t work! The JDK URL class is a final class, and no URL interface is available. So much for extensibility. We need to find another solution and, potentially, another object to mock. One solution is to stub the URLStreamHandlerFactory class. We explored this solution in chapter 6, so let’s find a technique that uses mock objects: refactoring the getContent method. If you think about it, this method does two things: it gets an HttpURLConnection object and then reads the content from it. Refactoring leads to the class shown in listing 7.7 (changes from listing 7.6 are in bold). We’ve extracted the part that retrieved the HttpURLConnection object.
Listing 7.7. Extracting retrieval of the connection object from getContent
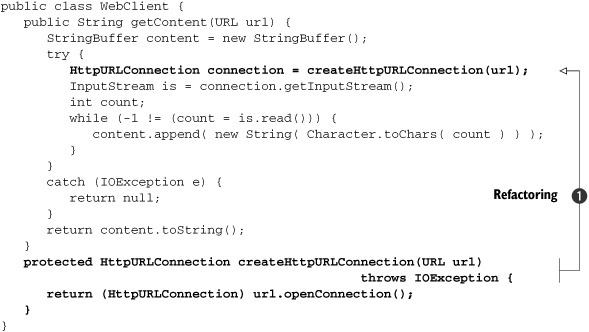
In the listing, we call createHttpURLConnection ![]() to create the HTTP connection.
to create the HTTP connection.
How does this solution let us test getContent more effectively? We can now apply a useful trick, which consists of writing a test helper class that extends the WebClient class and overrides its createHttpURLConnection method, as follows:
private class TestableWebClient extends WebClient {
private HttpURLConnection connection;
public void  setHttpURLConnection(HttpURLConnection connection) {
this.connection = connection;
   }
public HttpURLConnection createHttpURLConnection(URL url)
throws IOException {
return this.connection;
   }
}
In the test, we can call the setHttpURLConnection method, passing it the mock HttpURLConnection object. The test now becomes the following (differences are shown in bold):
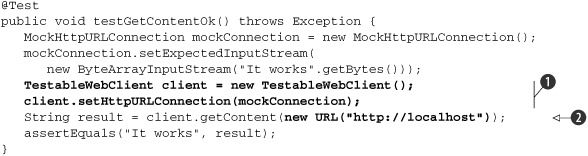
In this code, we configure TestableWebClient ![]() so that the createHttpURLConnection method returns a mock object. Next, the getContent method is called
so that the createHttpURLConnection method returns a mock object. Next, the getContent method is called ![]() .
.
This is a common refactoring approach called method factory refactoring, which is especially useful when the class to mock has no interface. The strategy is to extend that class, add some setter methods to control it, and override some of its getter methods to return what we want for the test. In the case at hand, this approach is okay, but it isn’t perfect. It’s a bit like the Heisenberg uncertainty principle: the act of subclassing the class under test changes its behavior, so when we test the subclass, what are we truly testing?
This technique is useful as a means of opening up an object to be more testable, but stopping here means testing something that’s similar to (but not exactly the same as) the class we want to test. It isn’t as if we’re writing tests for a third-party library and can’t change the code—we have complete control over the code to test. We can enhance it and make it more test friendly in the process.
7.4.4. Second attempt: refactoring by using a class factory
Let’s apply the Inversion of Control pattern, which says that any resource we use needs to be passed to the getContent method or WebClient class. The only resource we use is the HttpURLConnection object. We could change the WebClient.getContent signature to
public String getContent(URL url, HttpURLConnection connection)
This means we’re pushing the creation of the HttpURLConnection object to the caller of WebClient. But the URL is retrieved from the HttpURLConnection class, and the signature doesn’t look nice. Fortunately, there’s a better solution that involves creating a ConnectionFactory interface, as shown in listings 7.8 and 7.9. The role of classes implementing the ConnectionFactory interface is to return an InputStream from a connection, whatever the connection might be (HTTP, TCP/IP, and so on). This refactoring technique is sometimes called a class factory refactoring.[3]
3 J. B. Rainsberger calls it Replace Subclasses with Collaborators: http://www.diasparsoftware.com/template.php?content=replaceSubclassWithCollaborator.
Listing 7.8. ConnectionFactory.java
[...]
import java.io.InputStream;
public interface ConnectionFactory {
   InputStream getData() throws Exception;
}
The WebClient code then becomes as shown in listing 7.9. (Changes from the initial implementation in listing 7.6 are shown in bold.)
Listing 7.9. Refactored WebClient using ConnectionFactory
[...]
import java.io.InputStream;

public class WebClient {
public String getContent(ConnectionFactory connectionFactory) {
      StringBuffer content = new StringBuffer();
try {
InputStream is = connectionFactory.getData();
         int count;
         while (-1 != (count = is.read())) {
            content.append( new String( Character.toChars( count ) ) );
         }
      }
      catch (Exception e) {
         return null;
      }
      return content.toString();
   }
}
This solution is better because we’ve made the retrieval of the data content independent of the way we get the connection. The first implementation worked only with URLs using HTTP. The new implementation can work with any standard protocol (file://, http://, ftp://, jar://, and so forth) or even your own custom protocol. For example, listing 7.10 shows the ConnectionFactory implementation for HTTP.
Listing 7.10. HttpURLConnectionFactory.java
[...]
import java.io.InputStream;
import java.net.HttpURLConnection;
import java.net.URL;

public class HttpURLConnectionFactory implements ConnectionFactory {
private URL url;
public HttpURLConnectionFactory(URL url) {
this.url = url;
   }
public InputStream getData() throws Exception {
      HttpURLConnection connection =
         (HttpURLConnection) this.url.openConnection();
return connection.getInputStream();
   }
}
Now we can easily test the getContent method by writing a mock for ConnectionFactory (see listing 7.11).
Listing 7.11. MockConnectionFactory.java
[...]
import java.io.InputStream;

public class MockConnectionFactory implements ConnectionFactory {
private InputStream inputStream;

public void setData(InputStream stream) {
this.inputStream = stream;
      }
public InputStream getData() throws Exception {
return this.inputStream;
      }
   }
As usual, the mock doesn’t contain any logic and is completely controllable from the outside (by calling the setData method). We can now easily rewrite the test to use MockConnectionFactory, as demonstrated in listing 7.12.
Listing 7.12. Refactored WebClient test using MockConnectionFactory
[...]
import java.io.ByteArrayInputStream;

public class TestWebClient {

   @Test
public void testGetContentOk() throws Exception {
      MockConnectionFactory mockConnectionFactory =
new MockConnectionFactory();
      mockConnectionFactory.setData(
new ByteArrayInputStream("It works".getBytes()));

      WebClient client = new WebClient();
      String result = client.getContent(mockConnectionFactory);
      assertEquals("It works", result);
   }
}
We’ve achieved our initial goal: to unit test the code logic of the WebClient.getContent method. In the process we had to refactor it for the test, which led to a more extensible implementation that’s better able to cope with change.
7.5. Using mocks as Trojan horses
Mock objects are Trojan horses, but they’re not malicious. Mocks replace real objects from the inside, without the calling classes being aware of it. Mocks have access to internal information about the class, making them quite powerful. In the examples so far, we’ve used them only to emulate real behaviors, but we haven’t mined all the information they can provide.
It’s possible to use mocks as probes by letting them monitor the method calls the object under test makes. Let’s take the HTTP connection example. One of the interesting calls we could monitor is the close method on the InputStream. We haven’t been using a mock object for InputStream so far, but we can easily create one and provide a verify method to ensure that close has been called. Then, we can call the verify method at the end of the test to verify that all methods that should have been called were called (see listing 7.13). We may also want to verify that close has been called exactly once and raise an exception if it was called more than once or not at all. These kinds of verifications are often called expectations.
Definition
Expectation—When we’re talking about mock objects, an expectation is a feature built into the mock that verifies whether the external class calling this mock has the correct behavior. For example, a database connection mock could verify that the close method on the connection is called exactly once during any test that involves code using this mock.
To see an example of an expectation, look at listing 7.13.
Listing 7.13. Mock InputStream with an expectation on close
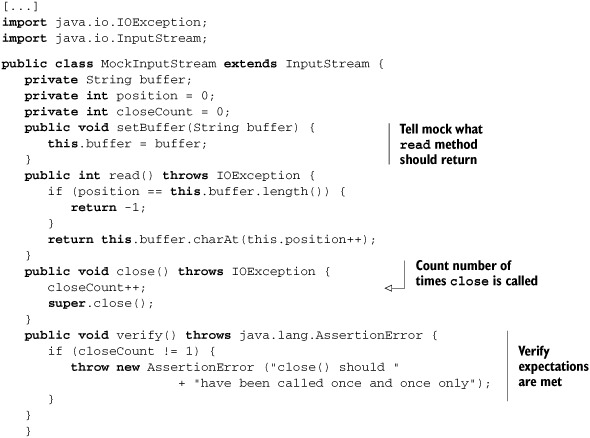
In the case of the MockInputStream class, the expectation for close is simple: we always want it to be called once. But most of the time, the expectation for closeCount depends on the code under test. A mock usually has a method like setExpectedCloseCalls so that the test can tell the mock what to expect.
Let’s modify the TestWebClient.testGetContentOk test method to use the new MockInputStream:
[...]

public class TestWebClient {

   @Test
   public void testGetContentOk() throws Exception {
      MockConnectionFactory mockConnectionFactory =
            new MockConnectionFactory();

      MockInputStream mockStream = new MockInputStream();
      mockStream.setBuffer("It works");
      mockConnectionFactory.setData(mockStream);
      WebClient client = new WebClient();
      String result = client.getContent(mockConnectionFactory);

      assertEquals("It works", result);
      mockStream.verify();
   }
}
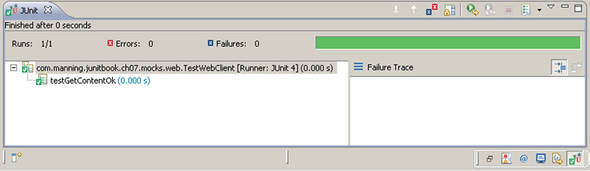
Instead of using a real ByteArrayInputStream as in previous tests, we now use the MockInputStream. Note that we call the verify method of MockInputStream at the end of the test to ensure that all expectations are met. The result of running the test is shown in figure 7.4.
Figure 7.4. Running TestWebClient with the new close expectation
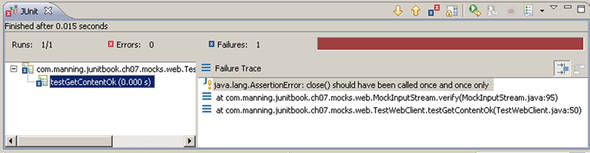
The test fails with the message close() should have been called once and once only.
Why? Because we haven’t closed the input stream in the WebClient.getContent method. The same error would be raised if we were closing it twice or more, because the test verifies that it’s called once and only once.
Let’s correct the code under test (see listing 7.14).
Listing 7.14. WebClient closing the stream

We now get a nice green bar (figure 7.5).
Figure 7.5. Working WebClient that closes the input stream
There are other handy uses for expectations. For example, if you have a component manager calling different methods of your component lifecycle, you might expect them to be called in a given order. Or, you might expect a given value to be passed as a parameter to the mock. The general idea is that, aside from behaving the way you want during a test, your mock can also provide useful feedback on its usage.
The next section demonstrates the use of some of the most popular open source mocking frameworks—they’re powerful enough for our needs, and we don’t need to implement our mocks from the beginning.
7.6. Introducing mock frameworks
So far we’ve been implementing the mock objects we need from scratch. As you can see, it’s not a tedious task but rather a recurring one. You might guess that we don’t need to reinvent the wheel every time we need a mock. And you’re right—there are many good projects already written that can help us facilitate the usage of mocks in our projects. In this section we take a closer look at two of the most widely used mock frameworks: the EasyMock and the JMock. We try to rework the example HTTP connection application so that we can demonstrate how to use the two frameworks.
7.6.1. Using EasyMock
EasyMock (http://easymock.org/) is an open source framework that provides useful classes for mocking objects. To use the framework you need to download the zip archive from the website of the project, unpack it somewhere, and include the contained easymock.jar in your classpath.
To show you how easy it is to construct mock objects in your test cases using EasyMock, we revise some of the mocks we constructed in the previous sections. We start with a simple one: reworking the AccountService test from listing 7.2. See listing 7.15.
Listing 7.15. Reworking the TestAccountService test using EasyMock

As you see, listing 7.15 is pretty much the same size as listing 7.4, but we are spared the writing of any additional mock classes. We start the listing by defining the imports from the EasyMock
library that we need ![]() . EasyMock relies heavily on the static-import feature of Java 5+. In
. EasyMock relies heavily on the static-import feature of Java 5+. In ![]() we declare the object that we’d like to mock. Notice that our AccountManager is an interface. The reason behind this is simple: the core EasyMock framework can mock only interface objects. In
we declare the object that we’d like to mock. Notice that our AccountManager is an interface. The reason behind this is simple: the core EasyMock framework can mock only interface objects. In ![]() we call the createMock method to create a mock of the class that we want. In
we call the createMock method to create a mock of the class that we want. In ![]() , as in listing 7.4, we create two account objects that we’re going to use in our tests. After that we start declaring our expectations. With
EasyMock we declare the expectations in two ways. When the method return type is void, we call it on the mock object (as in
, as in listing 7.4, we create two account objects that we’re going to use in our tests. After that we start declaring our expectations. With
EasyMock we declare the expectations in two ways. When the method return type is void, we call it on the mock object (as in
![]() ), or when the method returns any kind of object, then we need to use the expect and andReturn methods from the EasyMock API
), or when the method returns any kind of object, then we need to use the expect and andReturn methods from the EasyMock API ![]() . Once we’ve finished defining the expectations, we need to call the replay method to announce it
. Once we’ve finished defining the expectations, we need to call the replay method to announce it ![]() . In
. In ![]() we call the transfer method to transfer some money between the two accounts, and in
we call the transfer method to transfer some money between the two accounts, and in ![]() we assert the expected result. The @After method, which gets executed after every @Test method, holds the verification of the expectations. With EasyMock we can call the verify method with any mock object
we assert the expected result. The @After method, which gets executed after every @Test method, holds the verification of the expectations. With EasyMock we can call the verify method with any mock object ![]() , to verify that the method-call expectations we declared were triggered.
, to verify that the method-call expectations we declared were triggered.
That was pretty easy, wasn’t it? So how about moving a step forward and revising a more complicated example? No problem; listing 7.16 shows the reworked WebClient test from listing 7.12.
What we’d like is to test the getContent method of the WebClient. For this purpose we need to mock all the dependencies to that method. In this example we have two dependencies: one is the ConnectionFactory and one is the InputStream. It looks like there’s a problem because EasyMock can mock only interfaces, and the InputStream is a class.
Here is a nice-to-know tip on the createMock method. If you check the API of EasyMock, you’ll see that the createMock method comes with numerous signatures. The signature that we use is
createMock(String name, Class claz);
But there’s also
createMock(Class claz);
So which one should you use? The first one is better. If you use the second one and your expectations aren’t met, then you’ll get an error message like the following:
java.lang.AssertionError:
  Expectation failure on verify:
    read(): expected: 7, actual: 0
As you can see, this message isn’t as descriptive as we want it to be. If we use the first signature instead, and we map the class to a given name, we get something like the following:
java.lang.AssertionError:
  Expectation failure on verify:
    name.read(): expected: 7, actual: 0
To be able to mock the InputStream class, we’re going to use the Class Extension of EasyMock. Class Extension is an extension project of EasyMock that lets you generate mock objects[4] for classes and interfaces. You can download it separately from the EasyMock website.
4 Final and private methods can’t be mocked.
Listing 7.16. Reworking the WebClient test using EasyMock
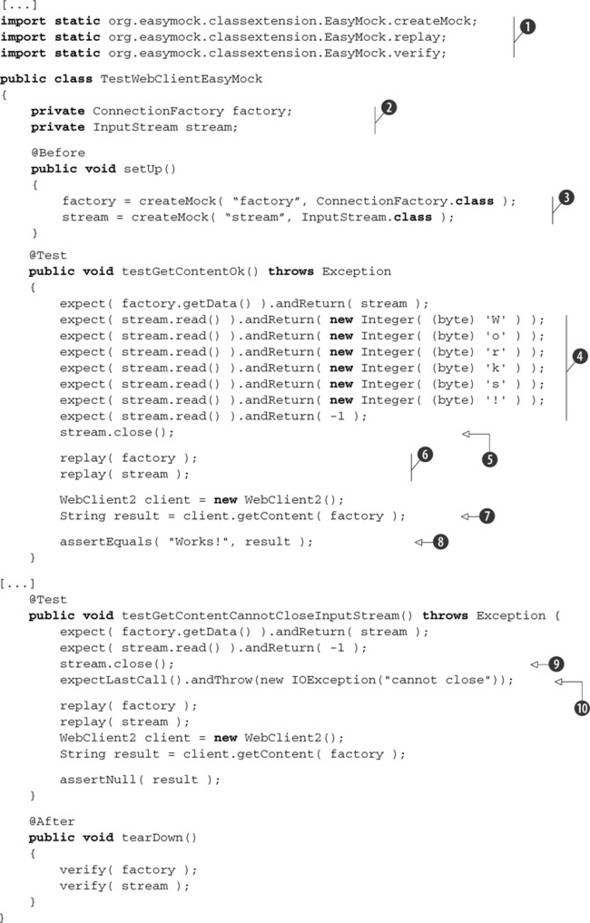
We start the listing by importing the objects that we need ![]() . Notice that because we use the classextensions extension of EasyMock, we now need to import the org.easymock.classextension.EasyMock object instead of org.easymock.EasyMock. That’s it! Now we’re ready to create mock objects of classes and interfaces using the statically imported methods of classextensions. In
. Notice that because we use the classextensions extension of EasyMock, we now need to import the org.easymock.classextension.EasyMock object instead of org.easymock.EasyMock. That’s it! Now we’re ready to create mock objects of classes and interfaces using the statically imported methods of classextensions. In ![]() , as in the previous listings, we declare the objects that we want to mock, and in
, as in the previous listings, we declare the objects that we want to mock, and in ![]() we call the createMock method to initialize them.
we call the createMock method to initialize them.
In ![]() we define the expectation of the stream when the read method is invoked (notice that to stop reading from the stream, the last thing to return is -1), and in
we define the expectation of the stream when the read method is invoked (notice that to stop reading from the stream, the last thing to return is -1), and in ![]() we expect the close method to be called on the stream. Now we need to denote that we’ve finished declaring our expectations; we do this by calling the replay method
we expect the close method to be called on the stream. Now we need to denote that we’ve finished declaring our expectations; we do this by calling the replay method ![]() . The rest is invoking the method under test
. The rest is invoking the method under test ![]() and asserting the expected result
and asserting the expected result ![]() .
.
We also add another test to simulate a condition when we can’t close the InputStream. We define an expectation where we expect the close method of the stream to be invoked ![]() , and on the next line we declare that an IOException should be raised if this call occurs
, and on the next line we declare that an IOException should be raised if this call occurs ![]() .
.
As the name of the framework suggests, using EasyMock is easy, and you should use it whenever possible. But to make you aware of the entire mocking picture, we’d like to introduce another framework, so you have a better taste of what mocking is.
7.6.2. Using JMock
So far we showed how to implement our own mock objects and how to use the EasyMock framework. In this section we introduce the JMock framework (http://jmock.org/), so that we can have a full view of the different mocking techniques. As in the previous section, we start with a simple example: reworking listing 7.4 by means of JMock. See listing 7.17.
Listing 7.17. Reworking the TestAccountService test using JMock
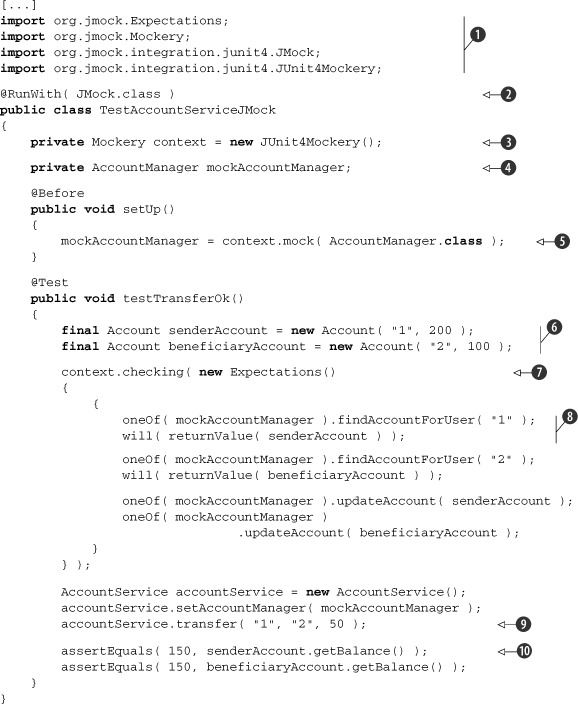
As always, we start the listing by importing all the necessary objects we need ![]() . As you can see, unlike EasyMock, the JMock framework doesn’t rely on any static import features. Luckily enough, the JMock
framework provides a JUnit 4 runner[5] that will facilitate a lot. In
. As you can see, unlike EasyMock, the JMock framework doesn’t rely on any static import features. Luckily enough, the JMock
framework provides a JUnit 4 runner[5] that will facilitate a lot. In ![]() we instruct JUnit to use the JMock runner that comes with the framework. In
we instruct JUnit to use the JMock runner that comes with the framework. In ![]() we declare the context Mockery object that will serve us to create mocks and to define expectations. In
we declare the context Mockery object that will serve us to create mocks and to define expectations. In ![]() we declare the AccountManager that we’d like to mock. Just like EasyMock, the core JMock framework provides mocking only of interfaces. In the @Before method, which gets executed before each of the @Test methods, we create the mock by means of the context object
we declare the AccountManager that we’d like to mock. Just like EasyMock, the core JMock framework provides mocking only of interfaces. In the @Before method, which gets executed before each of the @Test methods, we create the mock by means of the context object ![]() . As in any of the previous listings, we declare two accounts that we’re going to use to transfer money between
. As in any of the previous listings, we declare two accounts that we’re going to use to transfer money between ![]() . Notice that this time the accounts are declared final. This is because we use them in an inner class defined in a different method. In
. Notice that this time the accounts are declared final. This is because we use them in an inner class defined in a different method. In ![]() we start declaring the expectations by constructing a new Expectations object. In
we start declaring the expectations by constructing a new Expectations object. In ![]() we declare the first expectation, each expectation having the following form:
we declare the first expectation, each expectation having the following form:
5 You can see how to implement a custom JUnit runner in appendix B of the book.
invocation-count (mock-object).method(argument-constraints);
    inSequence(sequence-name);
    when(state-machine.is(state-name));
    will(action);
    then(state-machine.is(new-state-name));
All the clauses are optional, except for the bold ones: invocation-count and mock-object. We need to specify how many invocations will occur and on which object. After that, in case the method returns some object, we can declare the return object by using the will(returnValue()) construction.
In ![]() we start the transfer from one account to the other, and after that we assert the expected results
we start the transfer from one account to the other, and after that we assert the expected results ![]() . It’s as simple as that! But wait; what happened with the verification of the invocation count? In all of the previous examples
we needed to verify that the invocations of the expectations happened the expected number of times. Well, with JMock you don’t have to do that; the JMock JUnit runner takes care of this, and in case any of the expected calls
were not made, the test will fail.
. It’s as simple as that! But wait; what happened with the verification of the invocation count? In all of the previous examples
we needed to verify that the invocations of the expectations happened the expected number of times. Well, with JMock you don’t have to do that; the JMock JUnit runner takes care of this, and in case any of the expected calls
were not made, the test will fail.
Following the pattern from the previous section about EasyMock, let’s rework listing 7.12, shown in listing 7.18, showing the WebClient test, this time using JMock.
Listing 7.18. Reworking the TestWebClient test using JMock

Once again, we start the test case by instructing JUnit to use the JMock test runner ![]() . This will save us the explicit verification of the expectations. To tell JMock to create mock objects not only for interfaces
but also for classes, we need to set the imposteriser property of the context
. This will save us the explicit verification of the expectations. To tell JMock to create mock objects not only for interfaces
but also for classes, we need to set the imposteriser property of the context ![]() . That’s all; now we can continue creating mocks the normal way. In
. That’s all; now we can continue creating mocks the normal way. In ![]() we declare and initialize the two objects we’d like to create mocks of. In
we declare and initialize the two objects we’d like to create mocks of. In ![]() we start the declaration of the expectations. Notice the fine way we declare the consecutive execution of the read() method of the stream
we start the declaration of the expectations. Notice the fine way we declare the consecutive execution of the read() method of the stream ![]() and also the returned values. In
and also the returned values. In ![]() we call the method under test, and in
we call the method under test, and in ![]() we assert the expected result.
we assert the expected result.
For a full view of how to use the JMock mocking library, we also provide another @Test method, which tests our WebClient under exceptional conditions. In ![]() we declare the expectation of the close() method being triggered, and in
we declare the expectation of the close() method being triggered, and in ![]() we instruct JMock to raise an IOException when this trigger happens.
we instruct JMock to raise an IOException when this trigger happens.
As you can see, the JMock library is as easy to use as the EasyMock one. Whichever you prefer to use is up to you, as long as you remember that what increases your software quality isn’t the framework you use but rather how much you use it.
7.7. Summary
This chapter described a technique called mock objects that lets you unit test code in isolation from other domain objects and from the environment. When it comes to writing fine-grained unit tests, one of the main obstacles is to extract yourself from the executing environment. We’ve often heard the following remark: “I haven’t tested this method because it’s too difficult to simulate a real environment.” Well, not any longer!
In most cases, writing mock object tests has a nice side effect: it forces you to rewrite some of the code under test. In practice, code is often not written well. You hardcode unnecessary couplings between the classes and the environment. It’s easy to write code that’s hard to reuse in a different context, and a little nudge can have a big effect on other classes in the system (similar to the domino effect). With mock objects, you must think differently about the code and apply better design patterns, like interfaces and Inversion of Control.
Mock objects should be viewed not only as a unit testing technique but also as a design technique. A new rising star among methodologies called test-driven development (TDD) advocates writing tests before writing code. With TDD, you don’t have to refactor your code to enable unit testing: the code is already under test! (For a full treatment of the TDD approach, see Kent Beck’s book Test Driven Development: By Example.[6] For a brief introduction, see chapter 5.)
6 Kent Beck, Test Driven Development: By Example (Boston: Addison-Wesley, 2003).
Although writing mock objects is easy, it can become tiresome when you need to mock hundreds of objects. In the following chapters, we present several open source frameworks that automatically generate ready-to-use mocks for your classes, making it a pleasure to use the mock objects strategy.