
Chapter 12. Presentation-layer testing
If debugging is the process of removing software bugs, then programming must be the process of putting them in.
Edsger Dijkstra
This chapter covers
- Introducing presentation-layer testing
- Testing with HtmlUnit
- Testing with Selenium
Simply stated, presentation-layer testing means finding bugs in the graphical user interface (GUI) of an application. Finding errors here is as important as finding errors in other application tiers. A bad user experience can cost you a customer or discourage a web surfer from visiting your site again. Furthermore, bugs in the user interface may cause other parts of the application to malfunction.
Because of its nature and interaction with a person, GUI testing presents unique challenges and requires its own set of tools and techniques. This chapter covers testing web application user interfaces.
We address here what can be objectively, or programmatically, asserted about the GUI. Outside the scope of this discussion are whether the choice of subjective elements like fonts, colors, and layout cause an application to be difficult or impossible to use.
What we can test is the content of web pages to any level of detail (we could include spelling), the application structure or navigation (following links to their expected destination, for example), and the ability to verify user stories with acceptance tests.[1] We can also verify that the site works with required browsers and operating systems.
1 Extreme programming acceptance tests: http://www.extremeprogramming.org/rules/functionaltests.html
12.1. Choosing a testing framework
We look at two free open source tools to implement presentation-layer tests within JUnit: HtmlUnit and Selenium.
HtmlUnit is a 100 percent Java headless browser framework that runs in the same virtual machine as your tests. Use HtmlUnit when your application is independent of operating system features and browser-specific implementations not accounted for by HtmlUnit, like JavaScript, DOM, CSS, and so on.
Selenium drives various web browsers programmatically and checks the results from JUnit. Selenium also provides a simple IDE to record and play back tests and can generate test code. Use Selenium when you require validation of specific browsers and operating systems, especially if the application takes advantage of or depends on a browser’s specific implementation of JavaScript, DOM, CSS, and the like. Let’s start with HtmlUnit.
12.2. Introducing HtmlUnit
HtmlUnit is an open source Java headless browser framework. It allows tests to imitate programmatically the user of a browser-based web application. HtmlUnit tests don’t display a user interface. The framework lets you test all aspects of a web application. We describe here the most common tasks; for the rest, you’ll find the API quite intuitive and easy to use.
In the remainder of this HtmlUnit section when we talk about “testing with a web browser,” it’s with the understanding that we’re testing by emulating a specific web browser.
To install HtmlUnit, see appendix E, “Installing software.”
12.2.1. A live example
Let’s jump in with the example in listing 12.1. You can test now, assuming you can connect to the internet. The test will go to the HtmlUnit website, navigate the Javadoc, and make sure a class has the proper documentation.
Listing 12.1. Our first HtmlUnit example

Let’s step through the example. We always start by creating an HtmlUnit web client ![]() , which gives us an Internet Explorer 7 web client by default. We get to the home page from the web client
, which gives us an Internet Explorer 7 web client by default. We get to the home page from the web client ![]() and then to the list of classes on the page in the bottom-left frame
and then to the list of classes on the page in the bottom-left frame ![]() . Next, we get the link for the class we’re interested in and click it as a user would
. Next, we get the link for the class we’re interested in and click it as a user would ![]() . This gives us a new page for the link we clicked, which we then query for the first paragraph element
. This gives us a new page for the link we clicked, which we then query for the first paragraph element ![]() . Finally, we check that the paragraph starts with the text we expect should be there
. Finally, we check that the paragraph starts with the text we expect should be there ![]() and release resources
and release resources ![]() .
.
This example covers the basics: getting a web page, navigating the HTML object model, and asserting results. You’ll notice a lack of standard JUnit assertions in the code that navigates the HTML model. If HtmlUnit doesn’t find an element or encounters a problem, it will throw an exception on our behalf.
12.3. Writing HtmlUnit tests
When you write an HtmlUnit test, you write code that simulates the action of a user sitting in front of a web browser: You get a web page, enter data, read text, and click buttons and links. Instead of manually manipulating the browser, you programmatically control an emulated browser. At each step, you can query the HTML object model and assert that values are what you expect. The framework will throw exceptions if it encounters a problem, which allows your test cases to avoid checking for these errors, thereby reducing clutter.
12.3.1. HTML assertions
As you’re familiar with by now, JUnit provides a class called Assert to allow tests to fail when they detect an error condition. Assert is the bread and butter of any unit test.
HtmlUnit provides a class in the same spirit called WebAssert, which contains standard assertions for HTML like assertElementPresent, assertLinkPresent, and assertTextPresent. HtmlUnit itself uses WebAssert notNull extensively to guard against null parameters. Make sure to check the WebAssert class before you write code that may duplicate its functionality.
If a method you need is absent, you should consider creating your own assert class for additional HTML assertions. You should also consider creating an application-specific assertion class to reuse across your unit tests. Remember, code duplication is the enemy.
12.3.2. Testing for a specific web browser
HtmlUnit, as of version 2.7, supports the browsers shown in table 12.1.
Table 12.1. HtmlUnit-supported browsers
|
Web browser and version |
HtmlUnit BrowserVersion constant |
|---|---|
| Firefox 2 (deprecated) | BrowserVersion.FIREFOX_2 |
| Firefox 3 | BrowserVersion.FIREFOX_3 |
| Internet Explorer 6 | BrowserVersion.INTERNET_EXPLORER_6 |
| Internet Explorer 7 | BrowserVersion.INTERNET_EXPLORER_7 |
| Internet Explorer 8 | BrowserVersion.INTERNET_EXPLORER_8 |
By default, WebClient emulates Internet Explorer 7. In order to specify which browser to emulate, you provide the WebClient constructor with a BrowserVersion. For example, for Firefox 3 use
WebClient webClient = new WebClient(BrowserVersion.FIREFOX_3);
12.3.3. Testing more than one web browser
You’ll probably want to test your application with the most common version of Internet Explorer and Firefox. For our purposes, we define our test matrix to be all HtmlUnit-supported web browsers.
Listing 12.2 uses the JUnit Parameterized feature to drive the same test with all browsers in our text matrix.
Listing 12.2. Testing for all HtmlUnit-supported browsers
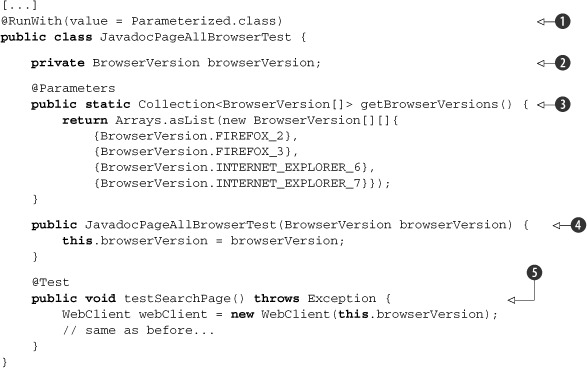
Based on our previous example, we made the following changes: We used the Parameterized JUnit test runner ![]() . We added a BrowserVersion instance variable
. We added a BrowserVersion instance variable ![]() to track the browser context. We added the method getBrowserVersions
to track the browser context. We added the method getBrowserVersions ![]() to return a list of BrowserVersion objects corresponding to the browsers we want to test. The signature of this method must be @Parameters public static java.util.Collection, without parameters. The Collection elements must be arrays of identical lengths. This array length must match the number of arguments of the only public constructor.
In our case, each array contains one element because the public constructor has one argument.
to return a list of BrowserVersion objects corresponding to the browsers we want to test. The signature of this method must be @Parameters public static java.util.Collection, without parameters. The Collection elements must be arrays of identical lengths. This array length must match the number of arguments of the only public constructor.
In our case, each array contains one element because the public constructor has one argument.
Now let’s step through the test. JUnit calls the static method getBrowserVersions ![]() . JUnit loops for each array in the getBrowserVersions collection
. JUnit loops for each array in the getBrowserVersions collection ![]() . JUnit calls the only public constructor
. JUnit calls the only public constructor ![]() . If there’s more than one public constructor, JUnit will throw an assertion error. JUnit calls the constructor with an argument
list built from the array elements. In our case, JUnit calls the one argument constructor with the only element in the array.
JUnit then calls each @Test method
. If there’s more than one public constructor, JUnit will throw an assertion error. JUnit calls the constructor with an argument
list built from the array elements. In our case, JUnit calls the one argument constructor with the only element in the array.
JUnit then calls each @Test method ![]() as usual. We repeat the process for the next array in the getBrowserVersions collection
as usual. We repeat the process for the next array in the getBrowserVersions collection ![]() .
.
When you compare the test results with the previous example, you’ll see that instead of running one test, the parameterized JUnit test runner ran the same method four times, once for each value in our @Parameters collection.
12.3.4. Creating standalone tests
You may not always want to use actual URL addressed pages as test fixtures, HTTP, files, or otherwise. Next, we show you how to embed and run HTML in the unit test code itself.
The framework allows you to plug a mock[2] HTTP connection into a web client. In listing 12.3, we set up a mock connection with a default HTML response string. The test can then get this default page by using any URL value.
Listing 12.3. Configuring a standalone test

We start by defining our expected HTML page title and HTML test fixture. Then we create the web client, a MockWebConnection ![]() , and install the HTML fixture as the default response for the mock connection
, and install the HTML fixture as the default response for the mock connection ![]() . We can then set the web client’s connection to our mock connection
. We can then set the web client’s connection to our mock connection ![]() . We’re now ready to go, and we get the test page. Any URL will do here because we set up our HTML fixture as the default
response. Finally we check that the page title matches our HTML fixture.
. We’re now ready to go, and we get the test page. Any URL will do here because we set up our HTML fixture as the default
response. Finally we check that the page title matches our HTML fixture.
To configure a test with multiple pages, you call one of the MockWebConnection setResponse methods for each page. The code in listing 12.4 sets up three web pages in a mock connection.
Listing 12.4. Configuring a test with multiple page fixtures
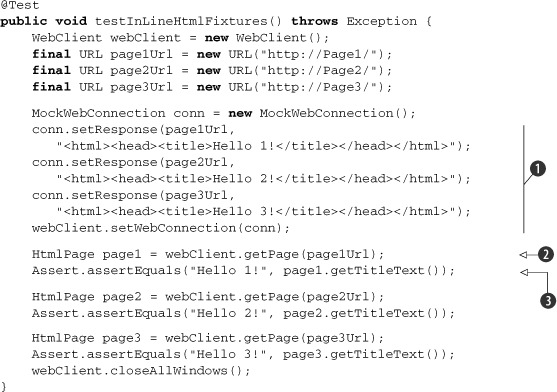
This example installs three pages ![]() in the mock connection and tests getting each page
in the mock connection and tests getting each page ![]() and verifying each page title
and verifying each page title ![]() .
.
Don’t forget the trailing slash (/) in the URL; “http://Page1/” will work but “http://Page1” won’t be found in the mock connection and will therefore throw an exception.
12.3.5. Navigating the object model
HtmlUnit provides an object model that parallels the HTML object model. You’ll use it to navigate through your application’s web pages. Let’s explore it now.
To get to an HTML page, you always start with a WebClient and call getPage:
WebClient webClient = new WebClient();
HtmlPage page = (HtmlPage) webClient.getPage("http://www.google.com");
HtmlPage is HtmlUnit’s model of an HTML page returned from a server. Once you have a page, you access its contents in one of three ways:
- Call methods reflecting specific HTML concepts like forms, anchors, and frames.
- Call methods that address HTML elements by references using names and IDs.
- Call methods using XPath, a web standard for addressing XML document nodes.
Let’s now look at each technique.
12.3.6. Accessing elements by specific element type
The HtmlPage API provides methods reflecting the HTML element model: for anchors, getAnchorByName, getAnchors, and others; for a body, getBody; for forms, getFormByName, getForms; for frames, getFrameByName, getFrames; for meta tags, getMetaTags. We explore specifically how to work with form and frame elements in the following sections.
12.3.7. Accessing elements by name versus index
This discussion applies to all methods that return a List: getAnchors, getForms, and getFrames. You should consider the implication of addressing these lists with indexes. For example, consider the following snippet:
HtmlForm form = page.getForms().get(0);
The index access creates an assumption in your test that the HTML form you want to test will always be the first form in the list. If the page changes and the search form changes position, your test will fail, even though the page’s functionality may not have changed. By addressing the form by index, you’re explicitly testing the form order on the page. Address an element only through a list index if you want to test the order of an element in that list.
To make the code resistant to list-order change, replace
HtmlForm form = page.getForms().get(0);
with
HtmlForm form = page.getFormByName("f");
Well, you might say, now you have a dependency on the form name “f” instead of on form position 0. The benefit is that when you change the form order on a page, the form name doesn’t have to change, but the form index must change.
Lists are useful when the order of its elements matter. You may want to assert that an anchor list is alphabetical or that a product list is in ascending price order.
12.3.8. Accessing elements with references
As you just saw, HtmlPage allows you to get specific elements by name. HtmlPage also lets you get to any element by name, ID, or access key with any of the methods starting with getElementBy such as getElementById, getElementsByName, and others. These methods allow you to ask generic questions about the HTML model. For example, when we wrote
HtmlForm form = page.getFormByName("f");
we ask specifically for a form named “f”. We can also write
HtmlForm form = (HtmlForm) page.getElementsByName("f").get(0);
which asks for all elements named “f” and then asks for the first element of that list. Note two changes in the code: First, we cast the result to the desired type unless we can work with an HtmlElement. Second, because element names aren’t unique in a page, getElementsByName returns a list of HtmlElement, which is why we have the call to get.
If you can address the desired element by ID, you can use getElementById and do away with the get call.
Calling get introduces some brittleness to this test because we’re introducing a dependency on the list order. If we wanted a more resilient test, and the element didn’t contain an ID, we’d need to resort to one of the following:
- Traverse the list until we find the right element.
- Use getChildren or getChildNodes to navigate down to the desired element.
Neither option is appealing, so the lesson here is to use HTML IDs if you can. This will allow you to create tests that are more resistant to change.
In general, for each HTML {Element}, there’s a class called Html{Element}, for example, HtmlForm. Some class names are more explicit than their HTML element names: for the HTML element “a”, the class is HtmlAnchor; for “h1”, the class is HtmlHeading1.
12.3.9. Using XPath
Use XPath[3] for complex searches to reduce test code complexity. XPath is a language specified by the W3C for querying nodes in an XML document. We won’t cover the XPath language itself here; we focus on its usage in HtmlUnit to perform two types of tasks: getting to a specific element and gathering data.
3 XPath 1.0: http://www.w3.org/TR/xpath
Accessing elements with XPath
You call one of two methods to run an XPath query: getByXPath returns a list of elements and getFirstByXPath returns a single element. Because DomNode implements both methods, it’s accessible not only to HtmlPage but to all DomNode subclasses, which include the HTML classes.
Knowing which XPath expression to use can involve a lot of trial and error. Fortunately, you can inspect any website with XPath Checker[4] or Firebug,[5] free open source Firefox add-ons, and create an XPath from the current selection. For example, to access the text input field on Google’s home page, use /html/body/center/form/table/tbody/tr/td[2]/input[2].
4 XPath Checker: http://slesinsky.org/brian/code/xpath_checker.html
5 Firebug: http://getfirebug.com/
Note that expressions generated automatically from such tools usually suffer from the same indexing issue we discussed earlier in section 12.3.7 “Accessing elements by name versus index.” By inspecting the code, you can create the following expression, which is more resilient to changes in the page:
//input[@name='q']
We all know there’s no such thing as a free lunch,[6] and this expression’s gain in page-change resilience and brevity comes with a small performance price: XPath must find all input elements on the page that match the criteria [@name='q'] and then give us the first one. This is in contrast to the first expression, which drills down to a known spot in the page or fails along the way if an element is missing. To run this XPath query, the call is
6 TANSTAAFL: http://en.wikipedia.org/wiki/TANSTAAFL
page.getFirstByXPath("//input[@name='q']");
We look next at a powerful XPath feature supported by the HtmlUnit API: the ability to collect data.
Data gathering with XPath
An extremely powerful feature of XPath is its ability to return a set of nodes. This feature allows us to perform, with one expression, a query that returns a data set. This is a great way to gather values on a page, whether or not the values are formally present in a list-like structure like an HTML table, list, or form.
For example, this expression returns an anchor list from the Java 6 Javadoc page for all package names:
//a[contains(@href, 'package-frame.html') and @target='packageFrame']
To see this XPath expression in action, go to the Java 6 Javadoc page:
client = new WebClient();
mainPage = (HtmlPage) client.getPage("http://java.sun.com/javase/6/docs/api/index.html");
Then go to the package list page:
HtmlPage packageListPage = (HtmlPage) mainPage.getFrameByName
From that page, we can gather all links that point to a Java package:
List<DomNode> anchors = (List<DomNode>) packageListPage.getByXPath
Beware that there’s an XPath version 1.0[7] and 2.0[8] specification. HtmlUnit includes the Apache Xalan XPath implementation, which supports only 1.0. If you want to use XPath 2.0 features, you need to get an XPath 2.0 engine, which usually means an XSL 2.0 engine, like Saxon. You’ll also need to write some code, an advanced endeavor.
7 XPath 1.0: http://www.w3.org/TR/1999/REC-xpath-19991116
8 XPath 2.0: http://www.w3.org/TR/xpath20/
12.3.10. Test failures and exceptions
Tests check for error conditions with the JUnit Assert class and the HtmlUnit WebAssert class and by letting the HtmlUnit API throw unchecked exceptions. We already covered the WebAssert class in section 12.3.1, “HTML assertions.” For example, if you query for a form with an invalid name by calling HtmlPage getFormByName, you’ll get the exception
com.gargoylesoftware.htmlunit.ElementNotFoundException:
If you call WebClient getPage and the page doesn’t exist, you’ll get the exception
java.net.UnknownHostException: unknown_page
HtmlUnit defines exceptions like ElementNotFoundException in the package com.gargoylesoftware.htmlunit. To verify that a method throws an expected exception, annotate the method with the expected attribute:
@Test(expected = ElementNotFoundException.class)
Because these exceptions are all unchecked, you don’t have to throw them from your methods, but you’ll need to remember to catch them if you want to examine the particular state of a failure. For example, the exception ElementNotFoundException contains specific information as to what exactly caused the failure: the name of the element, the name of attribute, and the attribute value.
Although not explicitly documented in the WebAssert Javadoc, WebAssert methods will throw exceptions for unexpected conditions. Many WebAssert methods throw ElementNotFoundException.
JavaScript and ScriptException
By default, all JavaScript errors will throw a ScriptException and cause your unit test to fail. This may not be acceptable, especially if you’re testing integration with third-party sites or if the exception is due to a shortcoming in the Mozilla JavaScript library or in HtmlUnit itself. You can avoid aborting your unit test on a JavaScript error by calling setThrowExceptionOnScriptError on a web client:
webClient.setThrowExceptionOnScriptError(false);
Logging
You’ll notice that HtmlUnit logs warnings on the console whenever it encounters problems. To disable these messages, you need to tell the logger to skip warnings and report only severe problems. The following example sets all HtmlUnit loggers to the severe level:
@BeforeClass
public static void setUpLogging() {
  Logger.getLogger("com.gargoylesoftware.htmlunit").setLevel(Level.SEVERE);
}
HtmlUnit uses Apache Commons Logging to do its logging, which in turns uses the JRE logging facility by default. Our example reconfigures a JRE Logger instance directly. Apache Commons Logging doesn’t allow you to reconfigure logs generically; you must do so with the actual log implementation.
12.3.11. Application and internet navigation
You can navigate through an application and the web in general by getting an HTML page and then clicking a link or clicking a user interface element like a button. The API can perform all forms of navigation. Let’s look at various types of navigation.
Page navigation
Getting a page is done with the WebClient getPage() methods. You can get a page by URL or URL string, for example:
WebClient webClient = new WebClient();
webClient.setThrowExceptionOnScriptError(false);
HtmlPage page = (HtmlPage) webClient.getPage("http://www.google.com");
HtmlPage page2 = (HtmlPage) webClient.getPage
If a page is absent or isn’t reachable, the API throws an exception. See section 12.3.10, “Test failures and exceptions.”
Click navigation
The click and dblClick methods conveniently navigate through a link or any clickable user interface element. For example, continuing from the previous example, we enter a web query and click the Search button:
HtmlForm form = page.getFormByName("f");
HtmlTextInput queryText = (HtmlTextInput) form.getInputByName("q");
queryText.setValueAttribute("Manning Publications Co.");
HtmlSubmitInput searchButton = (HtmlSubmitInput) form.getInputByName("btnG");
HtmlPage resultPage = (HtmlPage) searchButton.click();
You can call the click and dblClick methods on all classes descending from HtmlElement. Click methods simulate clicking an element (remember, HtmlUnit is an emulator) and return the page in the window that has the focus after the element has been clicked.
The HTML 4.01 specification[9] defines clickable HTML elements. HtmlElement is the base class for all HTML elements except frame and iframe.
See the HtmlElement Javadoc[10] or select HtmlElement in Eclipse and hit F4 to display the class hierarchy.
10http://htmlunit.sourceforge.net/apidocs/com/gargoylesoftware/htmlunit/html/HtmlElement.html
Keyboard navigation
To simulate the user hitting the Enter key instead of clicking the Search button, replace getting and clicking the search button with the following:
HtmlPage resultPage = (HtmlPage) queryText.type('
'),
You can code the Enter key with the ' ' character. You can also simulate the user tabbing around the page with the HtmlPage methods tabToNextElement and tabToPreviousElement. Hitting the Enter key or any key may not be enough or the right process to test. You can set the focus to any element with the HtmlPage method setFocusedElement. Be aware that this will trigger any onfocus and onblur event handlers. Let’s now put these concepts together with another example and test forms.
12.3.12. Testing forms with HtmlUnit
HTML form support is built into the HtmlPage API, where form elements can be accessed with getForms (returns List<HtmlForm>) to get all form elements and getFormByName to get the first HtmlForm with a given name. You can call one of the HtmlForm getInput methods to get HTML input elements and then simulate user input with setValueAttribute.
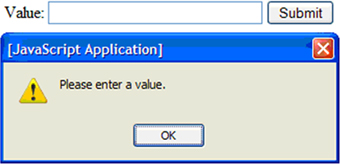
The following example focuses on the HtmlUnit mechanics of driving a form. First, we create a simple page to display a form with an input field and Submit button. We include form validation via JavaScript alerts in listing 12.5 as a second path to test. The section “Testing JavaScript alerts” describes this in more detail.
Listing 12.5. Example form page
<!DOCTYPE html PUBLIC "-//W3C//DTD XHTML 1.0 Transitional//EN"
<html xmlns="http://www.w3.org/1999/xhtml">
<head>
<script type="text/javascript">
function validate_form(form) {
if (form.in_text.value=="") {
alert("Please enter a value.");
form.in_text.focus();
return false;
}
}
</script>
<title>Form</title></head>
<body>
<form name="validated_form" action="submit.html"
Value:
<input type="text" name="in_text" id="in_text" size="30"/>
<input type="submit" value="Submit" id="submit"/>
</form>
</body>
</html>
This form looks like figure 12.1 when you click the button without input.
Figure 12.1. Sample form and alert
We test normal user interaction with the form in listing 12.6.
Listing 12.6. Testing a form
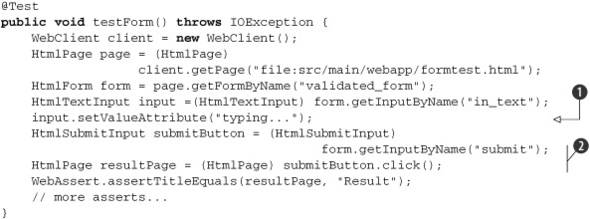
Let’s work through this example. We create the web client, get the page containing the form, and get the form. Next, we get
the input text field from the form, emulate the user typing in a value ![]() , and then get and click the Submit button
, and then get and click the Submit button ![]() . We get a page back from clicking the button, and we make sure it’s the expected page.
. We get a page back from clicking the button, and we make sure it’s the expected page.
If at any step, the framework doesn’t find an object, the API throws an exception and the test automatically fails. This allows you to focus on the test and let the framework handle failing your test if the page or form isn’t as expected. The section “Testing JavaScript alerts” completes this example.
12.3.13. Testing frames
HTML frame support is built into the HtmlPage API, where frames can be accessed with getFrames (returns List<FrameWindow>) to get all iframes and frames and getFrameByName to get the first iframe or frame with a given name. You then call FrameWindow getEnclosedPage to get the HTML page in that frame. Listing 12.7 navigates through the Java 6 Javadoc.
Listing 12.7. Page navigation through frames
@Test
public void testFramesByNames() throws IOException {
    WebClient webClient = new WebClient();
    HtmlPage mainPage = (HtmlPage)
     webClient.getPage("http://java.sun.com/javase/6/docs/api/index.html");

    // Gets page of the first Frame (upper left)
    HtmlPage packageListPage = (HtmlPage)
       mainPage.getFrameByName("packageListFrame").getEnclosedPage();
    packageListPage.getAnchorByHref("java/lang/package-
                                                    frame.html").click();

    // get page of the Frame named 'packageFrame' (lower left)
    HtmlPage packagePage = (HtmlPage)
       mainPage.getFrameByName("packageFrame").getEnclosedPage();
    packagePage.getAnchors().get(1).click();

    // get page of the Frame named 'classFrame' (right)
    HtmlPage classPage = (HtmlPage)
                mainPage.getFrameByName("classFrame").getEnclosedPage();
    webClient.closeAllWindows();
}
This example uses getFrameByName to get frames and then calls getEnclosedPage. Unit tests can use the list API getFrames as well, but we point you to the issues discussed in section 12.3.7, “Accessing elements by name versus index,” earlier in this chapter.
The intermediary FrameWindow returned by getFrameByName isn’t used in this example. Note that it represents the actual web window for a frame or iframe and provides APIs to dig deeper through the GUI such as getFrameElement, which returns a BaseFrame. BaseFrame in turn provides access to attributes like longdesc, noresize, scrolling, and so on.
By now, you should have the hang of using the API, so let’s move on to JavaScript, CSS, and other topics.
12.3.14. Testing JavaScript
HtmlUnit processes JavaScript automatically. Even when, for example, HTML is generated with Document.write(), you follow the usual pattern: call getPage, find an element, call click on it, and check the result.
You can toggle JavaScript support on and off in a web client by calling setJavaScriptEnabled. HtmlUnit enables JavaScript support by default. You can also set how a long a script is allowed to run before being terminated with setJavaScriptTimeout and passing it a timeout in milliseconds.
To deal with JavaScript alert and confirm calls, you can provide the framework with callbacks routines. We explore these next.
Testing JavaScript alerts
Your tests can check which JavaScript alerts have taken place. We reuse our form example from section 12.3.12, “Testing forms with HtmlUnit,” which includes JavaScript validation code to alert the user of empty input values.
The test in listing 12.8 loads our form page and checks calling the alert when the form detects an error condition. In a second example, we enhance our existing test from section 12.3.12 to ensure that normal operation of the form doesn’t raise any alerts. Our test will install an alert handler that gathers all alerts and checks the result after the page has been loaded. The stock class CollectingAlertHandler saves alert messages for later inspection.
Listing 12.8. Asserting expected alerts
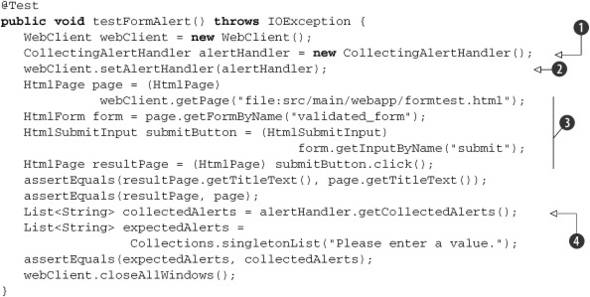
Let’s work through the example: We start by creating the web client and alert handler ![]() , which we install in the web client
, which we install in the web client ![]() . Next, we get the form page, get the form object, get the Submit button, and click it
. Next, we get the form page, get the form object, get the Submit button, and click it ![]() . This invokes the JavaScript, which calls the alert. Clicking the button returns a page object, which we use to check that
the page has not changed by comparing current and previous page titles. We also check that the page has not changed by comparing
current and previous page objects. Note that this comparison uses Object equals, so we’re really asking whether the page objects are identical. This might not be a great test if a future version of the
framework implements equals in an unexpected manner. Finally, we get the list of alert messages that were raised
. This invokes the JavaScript, which calls the alert. Clicking the button returns a page object, which we use to check that
the page has not changed by comparing current and previous page titles. We also check that the page has not changed by comparing
current and previous page objects. Note that this comparison uses Object equals, so we’re really asking whether the page objects are identical. This might not be a great test if a future version of the
framework implements equals in an unexpected manner. Finally, we get the list of alert messages that were raised ![]() , create a list of expected alert messages, and compare the expected and actual lists.
, create a list of expected alert messages, and compare the expected and actual lists.
When using any assertion that use the equals methods, make sure you understand the semantics of the equals implementation of the objects you’re comparing. The default implementation of equals in Object returns true if the objects are the same.
Next, listing 12.9 rewrites the original form test to make sure that normal operation raises no alerts.
Listing 12.9. Asserting no alerts under normal operation

The differences with the original test are that at the beginning of the test ![]() we install a CollectingAlertHandler in the web client, we simulate a user entering a value
we install a CollectingAlertHandler in the web client, we simulate a user entering a value ![]() , and at the end of the test we check that the alert handler’s list of messages is empty
, and at the end of the test we check that the alert handler’s list of messages is empty ![]() .
.
To customize the alert behavior, you need to implement your own AlertHandler. Listing 12.10 will cause your test to fail when a script raises the first alert.
Listing 12.10. Custom alert handler
client.setAlertHandler(new AlertHandler() {
public void handleAlert(final Page page, final String message) {
                fail("JavaScript alert: " + message);
        }
});
You can apply the same principles to test JavaScript confirm calls by installing a confirm handler in the web client with setConfirmHandler.
12.3.15. Testing CSS
You can toggle CSS support on and off in a web client by calling setCssEnabled. By default, HtmlUnit enables CSS support.
When calling APIs, the standard HtmlUnit behavior is to throw an exception when encountering a problem. In contrast, when HtmlUnit detects a CSS problem, it doesn’t throw an exception; instead, it reports problems to the log through the Apache Commons Logging[11] library. You can customize this behavior in a WebClient with an org.w3c.css.sac.ErrorHandler. Two ErrorHandler implementations are provided with HtmlUnit:
11 Apache Commons Logging: http://commons.apache.org/logging/
- DefaultCssErrorHandler is the default handler and logs all CSS problems.
- SilentCssErrorHandler ignores all CSS problems.
To install an error handler, use the setCssErrorHandler method on a web client. For example, the following causes all CSS problems to be ignored:
webClient.setCssErrorHandler(new SilentCssErrorHandler());
If you want any CSS problem to cause test failures, create an error handler that always rethrows the CSSException it’s given.
12.3.16. SSL errors
You’ll find that many websites have expired or incorrectly configured SSL certificates. By default, the Java runtime throws exceptions if it detects errors. If this gets in the way of your testing, you can call WebClient.setUseInsecureSSL(true) to allow the test to proceed. Using this API causes HtmlUnit to use an insecure SSL handler, which trusts everyone.
Now, that we’ve covered testing from the client point of view, let’s go to the server side and examine how HtmlUnit can be used for in-container testing with the Cactus framework.
12.4. Integrating HtmlUnit with Cactus
Cactus[12] is a free, open source test framework for unit testing server-side Java code including servlets, EJBs, and much more. Chapter 14, “Server-side Java testing with Cactus,” discusses Cactus in detail.
12 Cactus site: http://jakarta.apache.org/cactus/
Where does HtmlUnit fit in? Let’s look at the various opportunities to test an application from the inside out:
- JUnit can test the data tier.
- Cactus testing takes place in the business middle tier by extending JUnit.
- HtmlUnit lives in the presentation tier.
In the standard HtmlUnit unit test scenario, HtmlUnit drives the test. More specifically, JUnit invokes your unit test classes and methods, from which you call HtmlUnit to emulate a web browser to test your application.
Cactus unit testing manages a different interaction; Cactus calls your HtmlUnit unit tests at just the right time to verify that the web pages returned to the client. The main difference here is that HtmlUnit unit testing takes place in-container instead of through an emulated web client.
To install HtmlUnit in Cactus, see appendix E. For details on managing Cactus tests with tools like Ant and Maven, we refer you to chapter 14.
12.4.1. Writing tests in Cactus
Because HtmlUnit tests normally work with HtmlPage objects, we need to plug into the Cactus test execution at the point where a page is about to be returned to the client. Cactus tests for Java-based code like servlets are subclasses of org.apache.cactus.ServletTestCase. If the test class contains a method whose name starts with end, Cactus will call this method with a WebResponse, which contains the contents of the server’s response. Take great care to import the appropriate WebResponse class for your tests, because three variations are supported:
- com.meterware.httpunit.WebResponse for HtmlUnit 1.6
- com.gargoylesoftware.htmlunit.WebResponse for HtmlUnit 2.7
- org.apache.cactus.WebResponse for Cactus itself
Your boilerplate test class should look like listing 12.11.
Listing 12.11. Boilerplate HtmlUnit ServletTestCase subclass
[...]
public class HtmlUnitServletTestCase extends ServletTestCase {
public static Test suite() {
return new TestSuite(HtmlUnitServletTestCase.class);
    }
public HtmlUnitServletTestCase(String name) {
super(name);
    }

public void end(WebResponse webResponse) {
        // asserts
    }

public void test() throws ServletException {
        SampleServlet servlet = new SampleServlet();
        servlet.init(this.config);
        // asserts
    }
}
There are a couple of things to note in this example:
- The ServletTestCase provides the following instance variables for your use:
AbstractServletConfigWrapper config
AbstractHttpServletRequestWrapper request
HttpServletResponse response
HttpSession session - The test method creates the servlet to test and initializes it.
- Cactus integrates with JUnit 3; it doesn’t provide JUnit 4 niceties.
If your test class doesn’t contain a begin method, the end method name must be end. If your test class includes a begin method, the end method name must match, for example, beginFoo and endFoo; otherwise the end method won’t be called.
Next, let’s create the simple servlet in listing 12.12.
Listing 12.12. A simple servlet
[...]
public class SampleServlet extends HttpServlet {
public void doGet(HttpServletRequest request,
       HttpServletResponse response) throws ServletException, IOException {
       response.setContentType("text/html");
       PrintWriter out = response.getWriter();
       out.println("<html><head><title>Hello
             World</title></head><body><p>Hello World</p></body></html>");
   }
}
This servlet returns an HTML document with a title and a single paragraph. The next step is to flesh out our end method; we need to get an HtmlPage from the WebResponse argument and validate its contents. Getting an HtmlPage from a WebResponse requires parsing the HTML. To do so, we use the HtmlUnit HTMLParser class:
public void end(WebResponse webResponse) throws IOException {
    WebClient webClient = new WebClient();
    HtmlPage page = HTMLParser.parse(webResponse,
                                      webClient.getCurrentWindow());
    WebAssert.assertTitleEquals(page, "Hello World");
    webClient.closeAllWindows();
}
We create a WebClient only to fulfill the needs of the HTMLParser API, which requires a WebWindow, which the WebClient holds.
In Cactus, you don’t use getPage to get an HtmlPage. Instead, you parse it from the WebResponse with HTMLParser.parse.
Once you have an HtmlPage, you’re back to using the standard HtmlUnit API.
We’ve finished covering HtmlUnit for this chapter; the API is intuitive and straightforward, so we invite you to explore the rest on your own. Let’s now look at Selenium, a testing framework that differs from HtmlUnit in a fundamental way: instead of emulating a web browser, Selenium drives a real web browser process.
12.5. Introducing Selenium
Selenium[13] is a free open source tool suite used to test web applications. Selenium’s strength lies in its ability to run tests against a real browser on a specific operating system. This is unlike HtmlUnit, which emulates the browser in the same VM as your tests. This strength comes at a cost: the complexity of setting up and managing the Selenium runtime. Although Selenium provides many components, we consider the following components: the Selenium Remote Control (RC) server, IDE, and client driver API.
13 Selenium site: http://seleniumhq.org/
The Selenium IDE is a Firefox add-on used to record, play back, and generate tests in many languages, including Java. The Selenium client driver API is what tests call to drive the application; it communicates to the remote control server, which in turns drives the web browser.
The client driver connects to the server over TCP/IP; the server doesn’t need to run in the JVM or even on the same physical machine. Selenium recommends[14] running the server on many different machines, with different operating systems and browser installations. A test connects to a server by specifying a hostname and port number to the DefaultSelenium class.
14 Selenium Server setup: http://seleniumhq.org/documentation/remote-control/languages/java.html
Figure 12.2 shows the main Selenium IDE (1.0 Beta 2) window. The IDE generates code against the client driver API but doesn’t support change management. You should consider the IDE a one-way, use-once tool you use to get started for any given test case. You must handle any change in the application by manually changing the generated tests.
Figure 12.2. The main Selenium IDE window
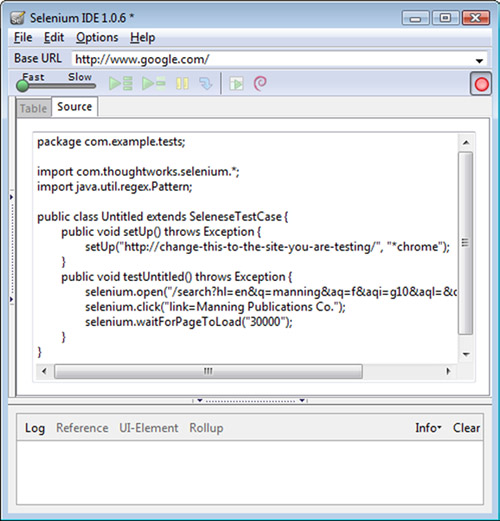
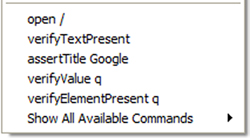
To use the IDE, start by choosing a language (in the menu Options > Format > Format Java (JUnit)), click the red record button, use the browser as a user would, and click the record button again to stop. Because the IDE records everything you do, you should plan in advance which user stories you want to verify and create one or more test cases for each. At any point in the recording, you can ask the IDE to generate an assertion from the browser’s context menu; the current web page selection determines the choices. Figure 12.3 shows an example context menu.
Figure 12.3. Selenium IDE context menu
To install Selenium, see appendix E, “Installing software.” Once you’ve done that, we can start generating Selenium tests.
12.6. Generating Selenium tests
The Selenium IDE is a great way to get up and running fast. Before you record a test, edit the package name and class name in the IDE Source pane to match the directory and Java filename you desire. Note that the generated code is JUnit 3 code, and as such it subclasses the Selenium class SeleneseTestCase.
12.6.1. A live example
The same user interaction as in our first HtmlUnit test generated the following example. Go to Google, enter a query, and click to go to the expected site. Listing 12.13 shows our first Selenium example.
Listing 12.13. Our first Selenium example
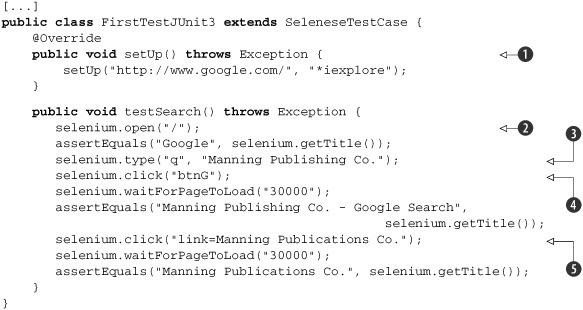
First, the setUp method ![]() calls the superclass’s setUp method with the base URL for the tests and the browser launcher to use, in this case, Internet Explorer (see section 12.8 1, “Testing for a specific web browser” for other settings). This initializes the selenium instance variable to a DefaultSelenium instance.
calls the superclass’s setUp method with the base URL for the tests and the browser launcher to use, in this case, Internet Explorer (see section 12.8 1, “Testing for a specific web browser” for other settings). This initializes the selenium instance variable to a DefaultSelenium instance.
In the test method, we start by opening the home page ![]() . Next, we set the value of the input field
. Next, we set the value of the input field ![]() , as if a user had typed it in, and we click the Search button
, as if a user had typed it in, and we click the Search button ![]() . The click argument is a Selenium locator, which here is the button name (more on the locator concept later). We wait for the new page
to load and assert the opened page’s title. Then, we click a link
. The click argument is a Selenium locator, which here is the button name (more on the locator concept later). We wait for the new page
to load and assert the opened page’s title. Then, we click a link ![]() using a Selenium link locator. Again, we wait for the new page to load and assert the opened page’s title.
using a Selenium link locator. Again, we wait for the new page to load and assert the opened page’s title.
Selenium tests subclass SeleneseTestCase, which in turn subclasses JUnit’s TestCase class. You’ll note that methods aren’t annotated; Selenium-generated tests are JUnit 3 tests.
The immediate issue raised by running within the JUnit 3 framework is the performance of a test class. Each time JUnit calls a test method, JUnit also calls the setUp and tearDown methods; this means starting and stopping a web browser, which is slow. We remedy this performance problem in section 12.7.2, “Running Selenium tests with JUnit 4.”
Another issue to consider when using the Selenium IDE is that you’re recording tests in Firefox 3. If your browser requirements are different from Firefox 3, what you recorded may not play back the same in a different browser. Web pages can behave differently, sometimes in a subtle manner, from browser to browser. In addition, pages can contain scripts to customize behavior based on the host browser. Server-side code can customize replies based on the agent making the request. Consider these issues before generating code from Firefox with the Selenium IDE; you may need to write the tests from scratch, a la HtmlUnit, if your application has code paths for a non-Firefox browser, such as Internet Explorer or Safari.
Next, we look at what it takes to run Selenium tests.
12.7. Running Selenium tests
Now that you know the basic concepts surrounding a Selenium test case, we describe the setup and mechanics of running Selenium tests: managing a Selenium server and integrating Selenium with JUnit 4.
12.7.1. Managing the Selenium server
To run Selenium tests, you must use the Selenium server included in the Selenium Remote Control download.
The Selenium server launches the web browser and acts as a proxy server to your tests; the server then runs the tests on your behalf. This architecture works for any browser and operating system combination; you can also use it to test Ajax applications. This proxy server setup is why you may get certificate warnings.
To start the server manually, open a command-line window in the server directory, for example: selenium-remote-control-1.0-beta-2selenium-server-1.0-beta-2. Assuming the JVM is on your PATH, type the following:
java -jar selenium-server.jar
You’ll see, for example:
22:14:11.367 INFO - Java: Sun Microsystems Inc. 11.2-b01
22:14:11.382 INFO - OS: Windows XP 5.1 x86
22:14:11.382 INFO - v1.0-beta-2 [2571], with Core v1.0-beta-2 [2330]
22:14:11.539 INFO - Version Jetty/5.1.x
22:14:11.554 INFO - Started HttpContext[/selenium-server/driver,/
22:14:11.554 INFO - Started HttpContext[/selenium-server,/selenium-server]
22:14:11.554 INFO - Started HttpContext[/,/]
22:14:11.570 INFO - Started SocketListener on 0.0.0.0:4444
22:14:11.585 INFO - Started org.mortbay.jetty.Server@109a4c
You’re now ready to run tests. When you run tests, you’ll see two browser windows open and close. The first will contain the tested application; the second will display commands sent to the browser and log entries if you have logging enabled.
If you’re building with Ant or Maven, you can manage the lifecycle of the Selenium server from these tools. We recommend that you manage the server from the test class or suite directly, as we show next. This allows you, as a developer, to run the tests directly from the command line or an IDE like Eclipse.
12.7.2. Running Selenium tests with JUnit 4
The Selenium requirement for JUnit is version 3; as of Selenium version 1.0 Beta 2, there’s no out-of-the-box integration with JUnit 4. This is a problem because the performance associated with a default SeleneseTestCase is bad; JUnit starts and stops a browser around each test method invocation through the setUp and tearDown methods.
We present a two-stage solution to this problem by first managing a server for all test methods in a given class and then managing a server for all classes in a test suite. To do so, you’ll need to add the server JAR file to your classpath, for example, selenium-remote-control-1.0-beta-2selenium-server-1.0-beta-2selenium-server.jar.
In our first solution, JUnit starts and stops the server once per class run in the @BeforeClass and @AfterClass methods, as listing 12.14 demonstrates.
Listing 12.14. Managing the Selenium server from a test
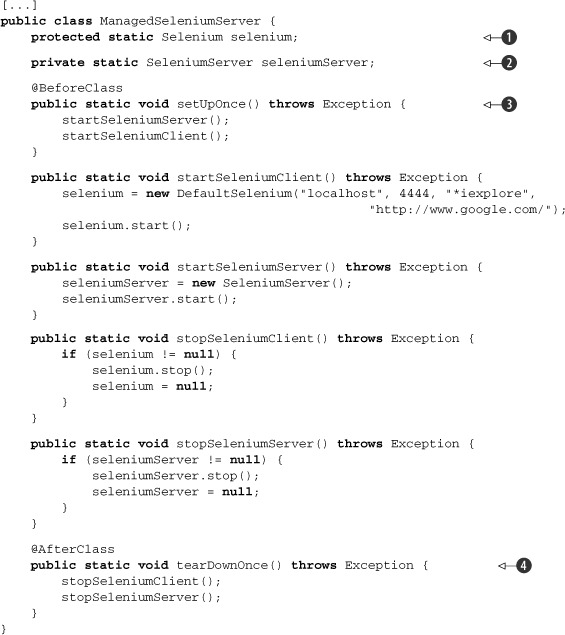
Let’s examine this code. The test manages two static variables: a Selenium client driver ![]() and a Selenium server
and a Selenium server ![]() . The @BeforeClass method starts the Selenium server and then the Selenium client
. The @BeforeClass method starts the Selenium server and then the Selenium client ![]() . The @AfterClass method stops the client and then the server
. The @AfterClass method stops the client and then the server ![]() . We can now run tests from ManagedSeleniumServer subclasses, as this next example demonstrates.
. We can now run tests from ManagedSeleniumServer subclasses, as this next example demonstrates.
This class doesn’t subclass SeleneseTestCase to avoid inheriting its setUp and tearDown methods, which respectively start and stop a web browser. If you want to subclass SeleneseTestCase, make sure you override the setUp and tearDown methods to do nothing. Let’s look at an example of a managed test:
public class ManagedTestJUnit4v2 extends ManagedSeleniumServer {
    @Test
    public void testSearch() {
        // test...
    }
}
As a ManagedSeleniumServer subclass, this class needs only test methods. JUnit will call the @BeforeClass methods declared in superclasses before those of the current class and will call the @AfterClass methods in superclasses after those of the current class.
If you aren’t going to manage a Selenium server farm for different browsers and operating systems, using this class as a superclass for tests offers a simple solution to get you up and running managing the Selenium server within your tests and VM.
The drawback to this approach is that JUnit starts and stops the Selenium server for each test class. To avoid this, you could create a test suite with first and last test classes that start and stop the server, but you’ll need to remember to do this for each suite, and you’ll also need to share the Selenium server through what amounts to a global variable. We take care of this problem next.
Our second solution, in listing 12.15, creates a JUnit Suite class to manage a Selenium server. This custom suite will start the Selenium server, run all the test classes in the suite, and then stop the server.
Listing 12.15. A test suite to manage a Selenium server
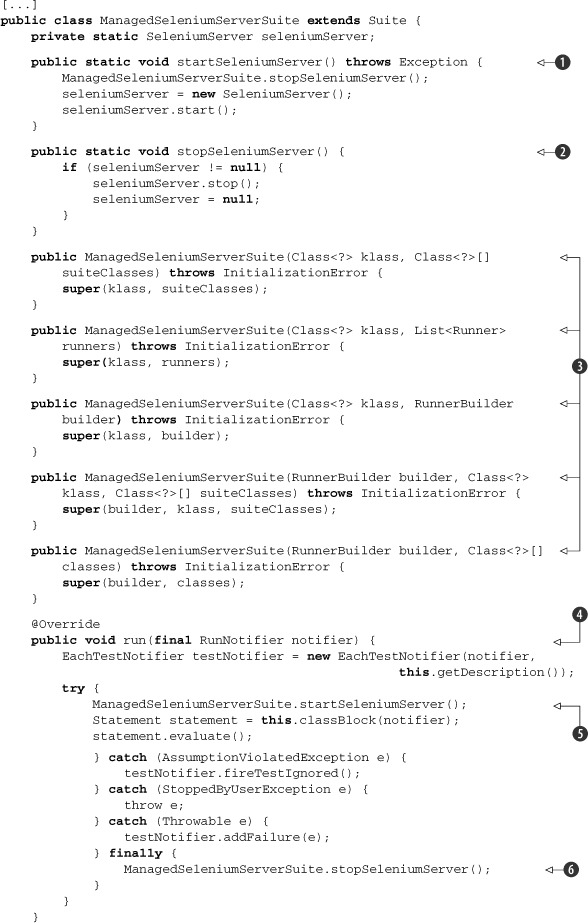
The key to this class is our implementation of the run method ![]() . We clone the method from the superclass and insert calls to our methods to start
. We clone the method from the superclass and insert calls to our methods to start ![]() and stop
and stop ![]() the Selenium server. The startSeleniumServer
the Selenium server. The startSeleniumServer ![]() and stopSeleniumServer
and stopSeleniumServer ![]() methods are straightforward enough. The rest of the code consists of duplicating constructors from the superclass
methods are straightforward enough. The rest of the code consists of duplicating constructors from the superclass ![]() . This allows us to write our test suite simply and succinctly as follows:
. This allows us to write our test suite simply and succinctly as follows:
@RunWith(ManagedSeleniumServerSuite.class)
@SuiteClasses( {
   UnmanagedFirstTestJUnit3.class, UnmanagedFirstTestJUnit4.class })
public class ManagedExampleSuiteTest {}
Each test class in the suite is responsible for connecting to the local server. Check that classes, like UnmanagedFirstTestJUnit4, connect to the server with the hostname "localhost" and the default port 4444. You can further enhance the suite to customize these settings.
Now that we can generate and run Selenium tests, let’s focus on writing our own.
12.8. Writing Selenium tests
With an efficient test infrastructure in place, we can now explore writing individual tests with Selenium. We look at how to test for multiple browsers and how to navigate the object model, and we work through some example tests.
12.8.1. Testing for a specific web browser
Selenium, as of version 1.0 Beta 2, supports the browser launch strings shown in table 12.2.
Table 12.2. Selenium browser launcher strings
|
Web browser |
SeleneseTestCase and DefaultSelenium browser strings |
|---|---|
| Chrome | *googlechrome |
| Firefox | *firefox |
| Firefox | *firefoxproxy |
| Firefox Chrome URL[15] | *chrome |
| Internet Explorer | *iexplore |
| Internet Explorer HTML application[16] | *iehta |
| Internet Explorer | *iexploreproxy |
| Opera | *opera |
| Safari | *safari |
| Specific executable | c:\path\to\a\browser.exe" |
15 Chrome URL: https://developer.mozilla.org/En/XUL
16 IE HTML application: http://msdn.microsoft.com/en-us/library/ms536496(VS.85).aspx
If you don’t call SeleneseTestCase’s setUp(String,String), the default web browser launch string used on Windows is *iexplore, and it’s *firefox for all other operating systems. If you use the class DefaultSelenium, you must provide a browser launch string, for example:
selenium = new DefaultSelenium("localhost", 4444, "*iexplore",
   "http://www.google.com/");
Note that experimental[17] browser launchers exist for elevated security privileges and proxy injection.
17 Experimental browser launchers: http://seleniumhq.org/documentation/remote-control/experimental.html
12.8.2. Testing multiple browsers
We can apply the same JUnit @Parameterized feature we used with HtmlUnit in order to run the same test class with more than one browser. In listing 12.16, we rework our previous example with class-level and instance-level JUnit initialization in order to combine the ability to run all tests with one client driver instance and then repeat the test for different browsers.
Listing 12.16. Running the test class for multiple browsers
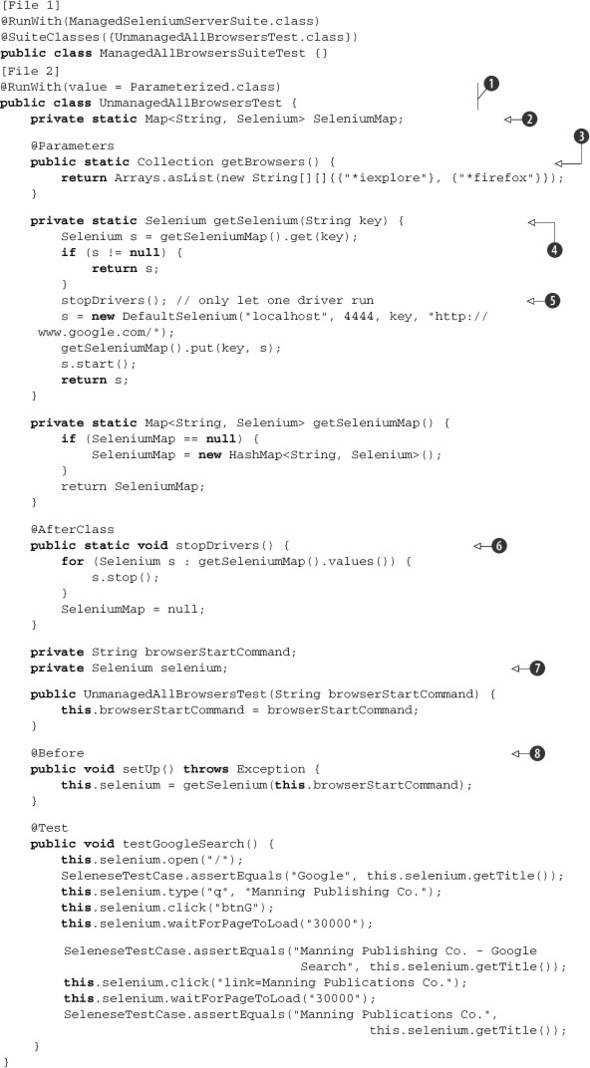
Let’s examine this more complex setup. The test class is annotated with @RunWith(value = Parameterized.class) ![]() , which directs JUnit to run the test class as many times as there are values returned from our @Parameters method getBrowsers
, which directs JUnit to run the test class as many times as there are values returned from our @Parameters method getBrowsers ![]() . By contract with JUnit, this method must return a Collection of arrays; in our case, we return a list of browser launch strings, one for each browser we want to test.
. By contract with JUnit, this method must return a Collection of arrays; in our case, we return a list of browser launch strings, one for each browser we want to test.
JUnit will run all test methods with the test class initialized with "*iexplore" and then do it all over again with "*firefox". You’ll need to have both browsers installed on your machine for this to work.
Let’s walk through this JUnit subtlety more carefully. When running the test class, JUnit creates test class instances for
the cross product of the test methods and the test collection elements. One instance of the class is created for "*iexplore" and for a single @Test method in the class. JUnit runs that @Test method and repeats the process for all @Test methods in the class. JUnit then repeats that whole process with "*firefox" and so on for all elements in the @Parameters collection ![]() .
.
We no longer have a @BeforeClass method; instead we use a @Before method ![]() to initialize the selenium instance variable
to initialize the selenium instance variable ![]() for each test method. The selenium instance variable gets its value from a lazy-initialized static variable
for each test method. The selenium instance variable gets its value from a lazy-initialized static variable ![]() . This can work only by using a @Before method and lazy initializing our client driver. Remember, we want our test class to reuse the same driver instance for each
test method in a given parameterized run.
. This can work only by using a @Before method and lazy initializing our client driver. Remember, we want our test class to reuse the same driver instance for each
test method in a given parameterized run.
We have an @AfterClass method ![]() to clean up the driver at the end of the class run. Even though we use a static Map
to clean up the driver at the end of the class run. Even though we use a static Map ![]() to save our driver across test runs, there’s only one driver in the map at any given time. The getSelenium method
to save our driver across test runs, there’s only one driver in the map at any given time. The getSelenium method ![]() can safely stop
can safely stop ![]() the current driver when creating a new driver because we know that JUnit finished one of its parameterized runs.
the current driver when creating a new driver because we know that JUnit finished one of its parameterized runs.
Now that you know how to run tests efficiently for a browser suite, let’s survey the API used to navigate an application.
12.8.3. Application and internet navigation
Unlike HtmlUnit, there’s no Selenium HTML object model to navigate; instead, you call the com.thoughtworks.selenium.Selenium interface, using a locator string to address elements (see section 12.8.4, “Accessing elements with references”). This interface contains more than 140 methods and provides all of the services and setting toggles needed to write tests. Although there’s no object model per se, the API provides some methods to work with certain types of elements. For example, getAllFields returns the IDs of all input fields on a page.
Here’s a brief sample of how tests can manipulate page elements:
- Call click and doubleClick to click an element and get the resulting page.
- Call check and uncheck to toggle a radio button or check box.
- Call type to set the value of an input field.
We now look at the different ways to access elements.
12.8.4. Accessing elements with references
In our first example, we saw HTML elements referred to by locators. Selenium provides a String format to address elements with different schemes. The two locators we saw are the default scheme, id, and link used to find anchor elements. The format for API arguments that take a locator is LocatorType=Argument. Table 12.3 describes the different locators and their formats.
Table 12.3. Locators and their formats
|
Locator type |
Argument |
Example |
|---|---|---|
| css | W3C CSS2 and CSS3 selectors | css=a[href="#AnId"] |
| dom | JavaScript expression | dom=document.forms['f1'].intxt |
| id | @id attribute | id=AnId |
| identifier | @id attribute or the first element where the @name attribute equals id | identifier=AnId |
| link | Anchor element matching the text | link=I'm feeling lucky |
| name | First element with the @name attribute | name=lucky |
| ui | Uses a Selenium UI-Element | ui=loginPages::loginButton() |
| xpath | XPath expression | xpath=//*[text()="lucky"] |
To get the value of a field, for example, you’d write
String actualMsg = selenium.getText("name=serverMessage");
If you run into XPath cross-browser compatibility issues, you can either refactor tests with browser-specific XPath expressions or call allowNativeXpath(false) to force expressions to be evaluated in Selenium’s JavaScript library.
12.8.5. Failing tests with exceptions
Although a generated test method throws an exception, it doesn’t throw any checked exceptions, nor do APIs you use to write tests. The generated code and APIs throw unchecked exceptions to make sure your tests fail under the proper conditions. Even though Selenium defines SeleniumException and SeleniumCommandTimedOutException as unchecked exceptions, some APIs also throw RuntimeException.
Let’s now look at various examples of using the API and navigating an application.
12.8.6. Testing forms with Selenium
The API doesn’t provide explicit support for forms; instead, you work with forms as you would any other elements, calling APIs for typing, clicking, and pressing keys.
The following example recasts the HtmlUnit example from the “Testing forms with HtmlUnit” section to the Selenium API. To remind you, in the HtmlUnit section, we created a simple page to display a form with an input field and a Submit button. We included form validation via JavaScript alerts in the example as a second path to test, as described in the section “Testing JavaScript alerts.”
We test normal user interaction with the form as follows:
@Test
public void testForm() throws IOException {
   selenium.open("file:///C:/path/to/src/main/webapp/formtest.html");
   selenium.type("id=in_text", "typing...");
   selenium.click("id=submit");
   SeleneseTestCase.assertEquals("Result", selenium.getTitle());
}
Let’s step through the example. We open the form page, type in a value, and click the Submit button to go to the next page. Finally, we make sure we land on the right page.
If at any step Selenium can’t find an object, the framework throws an exception and your test automatically fails. This allows you to focus on the test and let the framework handle failing your test if the page or form is not as expected.
12.8.7. Testing JavaScript alerts
A test can check to see whether a JavaScript alert has taken place. We reuse our form example from section 12.3.12, “Testing forms with HtmlUnit,” which includes JavaScript validation code to alert the user of empty input values.
The following test loads our form page and checks that the browser raised the alert when the error condition occurred. The key method is getAlert, which returns the most recent JavaScript alert message. Calling getAlert has the same effect as clicking OK in the dialog box.
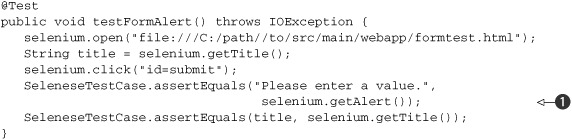
Let’s look at this example. We open the form page, save the current page title, and click the Submit button. This raises the
alert because we didn’t type in a value. Next, we call getAlert ![]() to check whether the code raised the correct alert. Finally, we make sure we’re still on the same page by comparing the new
page title with the saved title.
to check whether the code raised the correct alert. Finally, we make sure we’re still on the same page by comparing the new
page title with the saved title.
As of version Selenium 1.0 Beta 2, JavaScript alerts won’t pop up a visible alert dialog box. JavaScript alerts generated from a page’s onload event handler aren’t supported. If this happens, JavaScript will open a visible dialog box, and Selenium will wait until someone clicks the OK button.
We don’t need to create a test to check whether an alert has taken place during normal operation of our page. If the test generates an alert but getAlert doesn’t consume it, the next Selenium action will throw a SeleniumException, for example:
com.thoughtworks.selenium.SeleniumException:
12.8.8. Capturing a screen shot for a JUnit 3 test failure
Selenium provides the ability to capture a screen shot at the time of failure to subclasses of SeleneseTestCase. Selenium disables this feature by default; to enable it, call setCaptureScreenShotOnFailure(true). By default, the screen shot is written to a PNG file in the Selenium server directory with the same name as the test name given to the SeleneseTestCase String constructor.
12.8.9. Capturing a screen shot for a JUnit 4 test failure
To access this feature from a JUnit 4 test case, you’ll need to modify the search example as shown in listing 12.17.
Listing 12.17. Capturing a screen shot on JUnit 4 test failure

We’ve added a new method called captureScreenshot ![]() , which takes a Throwable argument and calls the Selenium captureScreenshot method
, which takes a Throwable argument and calls the Selenium captureScreenshot method ![]() . We refactored our test method by creating a new method testSearchOnErrSaveScreen
. We refactored our test method by creating a new method testSearchOnErrSaveScreen ![]() , removing @Test from testSearch, and adding it to the new method instead.
, removing @Test from testSearch, and adding it to the new method instead.
To avoid repeating this code pattern in every method that wants to capture a screen shot on failure requires extending JUnit, which is beyond the scope of this section.
This concludes our Selenium survey; next, we contrast and compare HtmlUnit and Selenium before presenting our chapter summary.
12.9. HtmlUnit versus Selenium
Here’s a recap of the similarities and differences you’ll find between HtmlUnit and Selenium.
The similarities are that both are free and open source and both require Java 5 as the minimum platform requirement.
The major difference between the two is that HtmlUnit emulates a specific web browser, whereas Selenium drives a real web browser process. When using Selenium, the browser itself provides support for JavaScript. In HtmlUnit 2.7, Mozilla’s Rhino[18] 1.7 Release 2 engine provides JavaScript support, and specific browser behavior is emulated.
18 Mozilla Rhino: http://www.mozilla.org/rhino/
Use HtmlUnit when
Use HtmlUnit when your application is independent of operating system features and browser-specific implementations not accounted for by HtmlUnit, like JavaScript, DOM, SCC, and so on.
Use Selenium when
Use Selenium when you require validation of specific browsers and operating systems, especially if the application takes advantage of or depends on a browser’s specific implementation of JavaScript, DOM, CSS, and the like.
The HtmlUnit pros are that it’s a 100 percent Java solution, it’s easy to integrate in a build process, and Cactus can integrate HtmlUnit code for in-container testing, as can other frameworks. HtmlUnit provides an HTML object model, which can validate web pages to the finest level of detail. HtmlUnit also supports XPath to collect data; Selenium XPath support is limited to referencing elements.
The Selenium pros are that the API is simpler and drives native browsers, which guarantees that the behavior of the tests is as close as possible to a user installation.
12.10. Summary
In this chapter, we examined presentation-layer testing and explored the use of two free open source tools to test the user interface of a web application: HtmlUnit and Selenium.
HtmlUnit is a 100 percent Java solution with no external requirements; it offers a complete HTML object model, which, although creating rather verbose test code, offers great flexibility.
Selenium is a more complex offering; it includes a simple IDE and many complementary components. The IDE generates test code but doesn’t maintain it. The strength of the product comes from its architecture, which allows the embeddable Selenium Remote Control server to control different browsers on assorted operating systems. The Selenium API is much simpler and flatter than with HtmlUnit, resulting in more concise test code.
Use HtmlUnit when your application is independent of operating system features and browser-specific implementations of JavaScript, DOM, CSS, and so on.
Use Selenium when you require validation of specific browsers and operating systems, especially if the application takes advantage of or depends on a browser’s specific implementation of JavaScript, DOM, CSS, and so on.
In the next chapter, we add a layer of complexity by considering Ajax technologies in our applications and test cases.