
Chapter 13. Ajax testing
Should array indices start at 0 or 1? My compromise of 0.5 was rejected without, I thought, proper consideration.
Stan Kelly-Bootle
This chapter covers
- Introducing Ajax testing
- Testing the Ajax stack
- Testing JavaScript
- Testing server services
- Testing Google Web Toolkit applications
This chapter covers testing Ajax applications. It’s a continuation of chapter 12, which discusses presentation-layer testing in general and introduces two of the libraries and tools used in this chapter: HtmlUnit and Selenium. As in the previous chapter, our goal is finding bugs in the graphical user interface of an application. We describe a divide-and-conquer approach by breaking up tests into three groups: functional testing, testing client-side scripts, and testing server services. We present the technologies relevant to testing each tier. We end by looking at the unique testing challenges presented by Google Web Toolkit (GWT) applications. We start by reviewing Ajax and why testing is difficult.
13.1. Why are Ajax applications difficult to test?
In 2005, the article “A New Approach to Web Applications”[1] coined the term Ajax to describe the architecture of a new generation of web applications like Google Maps[2] and Google Suggest.[3] These new applications were richer, more interactive, and more responsive than their predecessors. Critical to the user experience, they left behind the need to constantly reload or refresh an entire web page to keep any portion of its information updated. Although still browser based, these applications started to give the web the look and feel of what had been strictly the domain of desktop applications.
1http://www.adaptivepath.com/ideas/essays/archives/000385.php
Although Ajax is often associated with its all-uppercase sibling AJAX, the acronym, it’s today much more than Asynchronous JavaScript and XML. You build an Ajax application by combining the following technologies: CSS, DOM, JavaScript, server-side scripting, HTML, HTTP, and web remoting (XMLHttpRequest).
Beyond its associated technologies, Ajax reflects the mindset of a new breed of web applications built on standards and designed to give users a rich and interactive experience. In this chapter, we study how to test these applications.
To understand the challenge of testing an Ajax application, let’s look at a web-classic interaction and then step through the stages of an Ajax application interaction.
13.1.1. Web-classic interaction
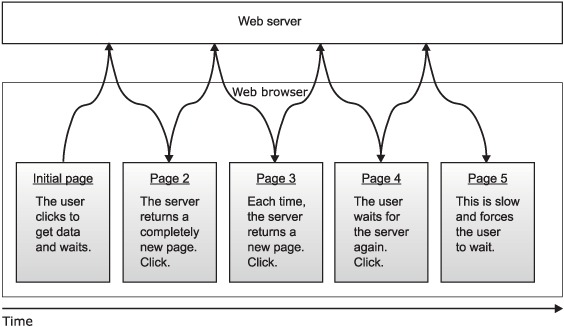
In a web-classic interaction, the user opens the browser on a page, and each time the page needs data, it asks the server for a new page. Figure 13.1 illustrates this process.
Figure 13.1. New pages are downloaded for each interaction in a web-classic application.
13.1.2. Ajax interaction
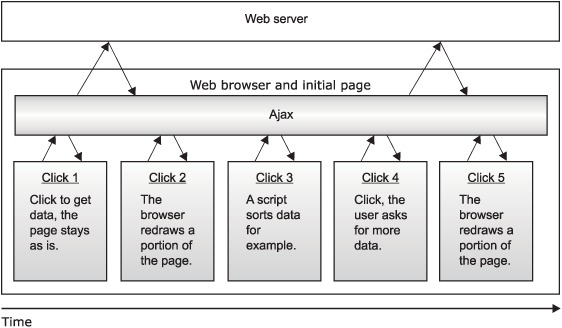
In an Ajax application, the page communicates with the server to get data for the part of the page that needs updating and then updates only that part of the page. Figure 13.2 illustrates this process.
Figure 13.2. Relevant portions of a page downloaded for each Ajax web application interaction
The user starts by opening an Ajax application’s start page in a browser; this causes the HTML page to load. The browser displays the HTML using any associated CSS and runs client-side JavaScript code to set up the page’s event handlers. The page is now ready to respond to user interactions. The user interacts with the page, triggering a JavaScript event handler. In an application like Google Suggest, each keystroke creates a server request for a list of suggestions that are displayed in a drop-down list box. The JavaScript event handler builds an XHR object and calls the server with a specific request using HTTP. The XHR object includes a JavaScript callback function the browser will invoke when results are ready. The server processes the request and returns a response using HTTP. The browser invokes the XHR callback and uses the data returned by the server, in the form of XML or text, to update the page in the browser. In order to update the page, the callback function uses the DOM API to modify the model, which the browser displays immediately.
13.1.3. A brave new world
This interaction is quite different from the web-classic architecture where a page is loaded, a user interacts with the page causing another page to load, and then the cycle repeats. With Ajax, the page is loaded once, and everything happens within that page. JavaScript code runs in the page to perform I/O with the server and updates the in-memory DOM of the page, which the browser displays to the user.
13.1.4. Testing challenges
The challenge in writing tests for the application interaction described previously is the asynchronous aspect of HTTP communications and the DOM manipulation by JavaScript code. The difficulty is how to drive a self-changing application when those changes are asynchronous to the test itself.
In addition to testing the traditional page state described in chapter 12, you should also test an Ajax application’s best practices. Tests should exercise features[4] like drag and drop, form validation and submission, event handling, back button, refresh button, undo and redo commands, fancy navigation, state management and caching, and user friendliness (latency, showing progress, timing out, and multiple clicks).
4 See Ajax in Action: http://www.manning.com/crane/.
Further complicating matters, different implementations of Ajax component technologies like JavaScript, DOM, and XMLHttpRequest exist in different browsers from different vendors. Although various free and open source libraries abstract these differences away, an application is nonetheless more complicated to test. You may want to ensure test coverage for all code paths for all supported browsers on all supported operating systems.
Next, we split up testing this complex application stack into more manageable tiers through functional testing, testing client-side scripts, and testing server services.
13.2. Testing patterns for Ajax
Before we jump into test code, we survey the testing patterns we use to verify the various aspects of an Ajax application. We can orchestrate testing with three types of tests:
- Functional testing drives the whole application from the client-browser and usually ends up exercising all application layers.
- Client-side script unit testing covers the JavaScript scripts running in the browser. The application page hosting the script isn’t tested.
- Service testing verifies services provided by the server and accessed from JavaScript XHR objects.
Let’s look at these types of tests in more detail before we turn to implementation.
13.2.1. Functional testing
Functional testing drives the whole application from the client browser and usually ends up exercising all application layers. As we discussed in chapter 12, a functional test simulates a user and checks the state of visited web pages. You can choose to have the tests emulate a web browser (HtmlUnit) or drive a live web browser (Selenium.) As always with browser-emulation software, the key is how well it supports JavaScript.
13.2.2. Client-side script unit testing
Here we divide the scripts into two piles: the ones that use XHR to manipulate a DOM and the ones that don’t.
Although we can test some script functions and libraries independently from their hosting page where scripts call XHR objects and modify the DOM of the current page, we need a JavaScript engine and browser; the browser in turn may be emulated or live. For these scripts, we should use a functional test.
For other scripts, we’re testing a library of functions, and we prefer to deliver these functions in standalone files as opposed to embedded in HTML pages.
We can test all scripts through functional tests of the pages that call on them, but we want to provide a lighter-weight test pass that’s more along the line of a true unit test. Heavier-weight and slower functional tests using web browsers should ideally be reserved for when scripts can’t be otherwise verified.
Let’s look at JavaScript unit testing. What should you look for in a JavaScript testing framework? From the TDD point of view, the most important feature is the ability to automate tests. We must be able to integrate JavaScript testing in our Ant or Maven build. Second, we want the ability to run the tests from JUnit. You’ll find many JavaScript frameworks that provide for creating and running tests by embedding test invocation in an HTML page (JsUnit,[5] JsUnitTest,[6] script.aculo.us[7]), whereas others do it all from JavaScript (RhinoUnit).[8] The best integration for our purposes must include support for JUnit. Although JUnit or Ant integration can be custom coded for a specific JavaScript testing framework, JsUnit provides this functionality out of the box. JsUnit is a free, open source framework integrated with JUnit that goes one step further by providing advanced Selenium-type distributed configuration options.
JsUnit is to JavaScript testing what Selenium is to web application testing. JsUnit allows you to test JavaScript, from JUnit, by controlling a web browser process on a local or remote machine. We discuss JsUnit in action in the section “JavaScript testing with JsUnit.”
13.2.3. Service testing
Service testing verifies services provided by the server and accessed from JavaScript XHR objects. The HTML page and JavaScript aren’t tested. Because HTTP is the standard used by XHR objects to communicate with the server, we can use any HTTP client to test the service independently of XHR and the browser. Free, open source Java HTTP libraries suitable for unit testing include HtmlUnit, HttpUnit, and Apache Commons HttpClient. We examine HttpClient in action in the section “Testing services with HttpClient.”
In this chapter, we test server services for Ajax applications, which we distinguish from testing web services, a different web standard.
We now examine each technique in more detail with implementation examples. We start with functional testing with Selenium and HtmlUnit.
13.3. Functional testing
We now look at testing the application stack by continuing our demonstration of Selenium and HtmlUnit started in the previous chapter on presentation layer testing. We show you how to use Selenium and HtmlUnit to write the same kind of tests. We show how to deal with the asynchronous aspect of an Ajax application before going on to test specific components that make up the stack, such as JavaScript libraries and server-provided services (as opposed to web services). The key aspect of writing tests for an Ajax application is to know when an action causes a change in the DOM. We show how to do this and create functional tests using Selenium and then HtmlUnit.
13.3.1. Functional testing with Selenium
If you’re not familiar with Selenium, please consult the previous chapter to get an understanding of the fundamentals we build on here. We pick up Selenium where we left off, this time testing Ajax, a more advanced task.
Once a page is loaded in the browser, Selenium sees that version of the page. To see the updated DOM, you must use a different API than what we showed you in the previous chapter.
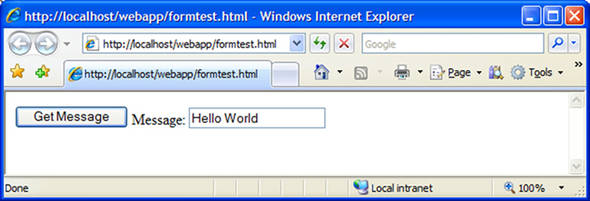
Let’s take as an example the form in figure 13.3. When you click the Get Message button, the page queries the server and returns a simple text message: Hello World. JavaScript code then updates the DOM with the message, and the browser displays the input field value, as you can see in the screenshot.
Figure 13.3. A simple Ajax form
Listing 13.1 shows the HTML source for the page, which includes the JavaScript to perform the HTTP XML Request.
Listing 13.1. testform.html—a simple form (client)
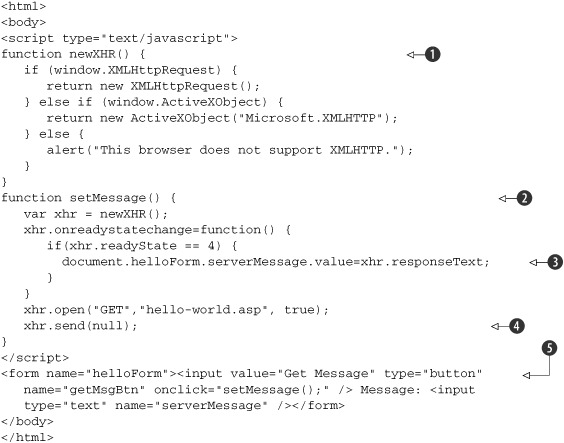
Let’s examine the key elements in the HTML. The form ![]() defines a button, which when clicked invokes the JavaScript function setMessage
defines a button, which when clicked invokes the JavaScript function setMessage ![]() . The first thing the setMessage function does is call newXHR
. The first thing the setMessage function does is call newXHR ![]() , which creates a new HTTP XML request object. setMessage then calls the server
, which creates a new HTTP XML request object. setMessage then calls the server ![]() and updates the DOM
and updates the DOM ![]() when the response is ready.
when the response is ready.
The following shows the server-side source for this example (hello-world.asp).

The response is the string "Hello World" ![]() . To run this example locally with IIS, you’ll need to create a virtual directory for the example webapp directory and use
the IIS Permission Wizard to grant it default rights.
. To run this example locally with IIS, you’ll need to create a virtual directory for the example webapp directory and use
the IIS Permission Wizard to grant it default rights.
In order to test the form and check that the message is what we expect it to be, we use the same JUnit scaffolding from the previous chapter and first set up a test suite to manage the Selenium server:
[...]
@RunWith(ManagedSeleniumServerSuite.class)
@SuiteClasses( { UnmanagedFormTester.class })
public class ManagedFormTest {
    // See annotations.
}
This code shows the test suite ManagedFormTest that runs the test case UnmanagedFormTester containing the @Test methods. The JUnit test runner ManagedSeleniumServerSuite manages the Selenium server and drives the unit test.
Without knowing anything about Ajax, you might create the test method testFormNo in listing 13.2.
Listing 13.2. UnmanagedFormTester.java bad test method
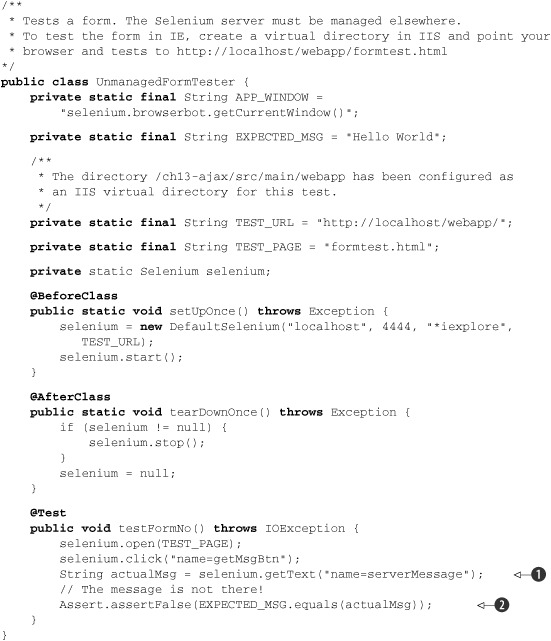
All is well from the beginning of the file UnmanagedFormTester.java until the call to getText ![]() . The call takes a Selenium locator to retrieve the content of the element named serverMessage. The return value is the empty string
. The call takes a Selenium locator to retrieve the content of the element named serverMessage. The return value is the empty string ![]() because the DOM model in the object model isn’t up to date. Perhaps we need to wait for the server to do its work and the
result to come back. Calling waitForPageToLoad doesn’t work because the code doesn’t reload the page. Recall that this is an Ajax application; pages don’t reload. Calling
Thread.sleep after clicking the button doesn’t work either. Fortunately, Selenium provides a single powerful API for this purpose: waitForCondition. Here it is in action in the class UnmanagedFormTester:
because the DOM model in the object model isn’t up to date. Perhaps we need to wait for the server to do its work and the
result to come back. Calling waitForPageToLoad doesn’t work because the code doesn’t reload the page. Recall that this is an Ajax application; pages don’t reload. Calling
Thread.sleep after clicking the button doesn’t work either. Fortunately, Selenium provides a single powerful API for this purpose: waitForCondition. Here it is in action in the class UnmanagedFormTester:
@Test
public void testFormWithJavaScript() throws IOException {
   selenium.open(TEST_PAGE);
   selenium.click("name=getMessageButton");
   selenium.waitForCondition(APP_WINDOW +
      ".document.helloForm.serverMessage.value=='" + EXPECTED_MSG + "'",
      "1000");
}
Alternatively, without the refactoring, the JavaScript expression in the first argument to waitForCondition reads:
selenium.browserbot.getCurrentWindow().document.helloForm.serverMessage.
value == 'Hello World'
The waitForCondition method waits for a given condition to become true or a timeout to expire. The method takes two arguments: the first is JavaScript code where the last expression must evaluate to a Boolean; the second is a timeout String expressed in milliseconds.
In order for JavaScript to access the application window, you must use the following expression:
selenium.browserbot.getCurrentWindow()
For example, to get to the document, use
selenium.browserbot.getCurrentWindow().document
The art of testing Ajax with Selenium is about embedding JavaScript in your JUnit code. This can be confusing because you’re embedding JavaScript in Java, but it’s what’s required because the Selenium server controlling the web browser will run the JavaScript for you. In contrast, let’s go back to HtmlUnit and see how this test looks in that framework.
13.3.2. Functional testing with HtmlUnit
We return now to testing with HtmlUnit, which we document in chapter 12. Though the HtmlUnit API is more verbose than that of Selenium, you write tests entirely in Java. Listing 13.3 tests the form with HtmlUnit.
Listing 13.3. Testing the same form with HtmlUnit
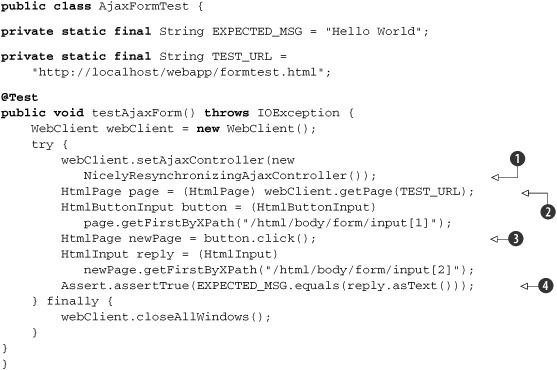
Let’s walk through this example. As usual, we start by creating an HtmlUnit web client and getting the application’s start
page ![]() . We get our button, we click it, and the result is a new page
. We get our button, we click it, and the result is a new page ![]() . From this page, we get the entry field that was updated through the DOM by the XHR call and assert that the contents are
what we expect
. From this page, we get the entry field that was updated through the DOM by the XHR call and assert that the contents are
what we expect ![]() .
.
The general pattern with HtmlUnit is to get a page, find the element, click it, and check the resulting page contents.
Because the test thread can finish before HtmlUnit reads the Ajax response from the server, you must synchronize the test
code with the response to guarantee predictable results from run to run. Although a simple approach is to sleep the thread
for a while, HtmlUnit provides APIs to guarantee that Ajax tests are synchronous and predictable. This example illustrates
this with the call to setAjaxController ![]() .
.
The setAjaxController method and the NicelyResynchronizingAjaxController class work together to turn asynchronous Ajax calls into synchronous Ajax calls. The class NicelyResynchronizingAjaxController is the only subclass of the AjaxController class delivered with HtmlUnit. By default, a web client initializes itself with an instance of AjaxController, which leaves Ajax calls asynchronous.
Create predictable tests by synchronizing Ajax calls. To do so, set the web client’s Ajax controller to an instance of NicelyResynchronizingAjaxController:
webClient.setAjaxController(new NicelyResynchronizingAjaxController());
If you want finer-grained control over the behavior of tests, the framework provides experimental[9] APIs to wait for various JavaScript tasks to complete. The method waitForBackgroundJavaScript waits for all background JavaScript tasks to complete execution, defined as tasks scheduled for execution via window.setTimeout, window. setInterval, and asynchronous XMLHttpRequest. For example, you call waitForBackgroundJavaScript after an action invokes a script with a timeout in milliseconds:
9 HtmlUnit 2.5 Javadoc warns that these APIs may change behavior or may not exist in future versions.
HtmlPage newPage = button.click();
int jobs = this.webClient.waitForBackgroundJavaScript(1000);
The return value is the number of jobs still executing or scheduled for execution. If you have an idea of when your background JavaScript is supposed to start executing, but you’re not necessarily sure how long it will take to execute, use the method waitForBackgroundJavaScriptStartingBefore. You should use the wait methods instead of the methods internal to HtmlUnit provided by JavaScriptJobManager.
You’ve now seen how to create functional tests with Selenium and HtmlUnit. Although this can prove that an application works from the perspective of a client, it doesn’t assert the quality of the underlying building blocks. It’s now time to dive deeper into testing by dealing with testing these building blocks: JavaScript and server services. We start with JavaScript.
13.4. JavaScript testing
Here, you face the same choice you had between HtmlUnit and Selenium: do you want to emulate a browser or drive a live browser? We look next at two JavaScript testing frameworks, RhinoUnit and JsUnit. RhinoUnit is like HtmlUnit, a 100 percent Java solution, and JsUnit is akin to Selenium in that it drives local or remote web browsers. To wrap up JavaScript testing, we use JSLint to check our code against best practices.
13.4.1. JavaScript testing with RhinoUnit
RhinoUnit allows you to run JavaScript unit tests from Ant. You write unit tests in JavaScript and invoke them from Ant with the help of the Java Scripting Framework and the Mozilla Rhino JavaScript engine included in Java 6. If you’re on an older version of Java, you’ll need the Apache Bean Scripting Framework[10] (BSF) and the Mozilla Rhino JavaScript engine as documented in appendix E, “Installing software.” As a bonus, RhinoUnit includes JSLint,[11] which allows you to check from Ant that your JavaScript code follows best practices. Download and unzip RhinoUnit.[12] If you’re on Java 6, you’ve finished; if not, some additional steps are documented in appendix E.
Let’s create a simple function to test; the following code defines a factorial function (factorial.js.)
function factorial(n) {
if ((n === 0) || (n === 1)) {
        return 1;
    }
return n * factorial(n - 1);
}
The following JavaScript unit tests the factorial function (test-example.js.)
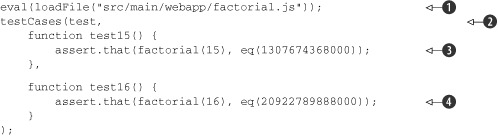
We start the test by including the library of functions we want to test ![]() with a call to eval. Note that the path to the file is relative to where we’re running the test from; in this case, it’s the project’s root directory.
Next, we must call testCases, passing in test as the first variable
with a call to eval. Note that the path to the file is relative to where we’re running the test from; in this case, it’s the project’s root directory.
Next, we must call testCases, passing in test as the first variable ![]() , followed by our test functions. You can pass in any number of functions; note the comma separating the test functions. For
this simple test, we call our factorial function from two different tests and make sure that the computation results in the
expected value
, followed by our test functions. You can pass in any number of functions; note the comma separating the test functions. For
this simple test, we call our factorial function from two different tests and make sure that the computation results in the
expected value ![]()
![]() , for example, checking that calling factorial(15) yields 1307674368000
, for example, checking that calling factorial(15) yields 1307674368000 ![]() . The assert.that call is how to make an assertion in RhinoUnit. The first value is the value we’re testing, the actual value; the second value, the predicate, defines the actual test. Here we use eq to test for equality to its argument, 1307674368000. The general format is
. The assert.that call is how to make an assertion in RhinoUnit. The first value is the value we’re testing, the actual value; the second value, the predicate, defines the actual test. Here we use eq to test for equality to its argument, 1307674368000. The general format is
assert.that(actual, predicate)
The RhinoUnit site lists[13] the functions you can use in addition to eq; these are the most widely used:
- The function eq(expected) uses === to compare actual and expected values.
- The function matches(regExp) tests the actual value against the given regular expression.
- The function isTrue(message) tests that the actual value is true, displaying an optional message if it isn’t.
- The function isFalse(message) tests that the actual value is false, displaying an optional message if it isn’t.
- The function not(predicate) inverts the predicate.
- The function isNull(message) tests that the actual value is null, returning the message if it isn’t.
The following example shows how to match regular expressions:
![]()
The example calls the match function first to assert that “in” is in the test string ![]() and then to check that “out” isn’t
and then to check that “out” isn’t ![]() .
.
The assert object contains other useful functions: fail is like the JUnit fail method. The various mustCall functions check that the tests causing the given functions have or have not been invoked.
In order to run the tests, you’ll need an Ant build script. Listing 13.4 is the sample build script used to run our examples.
Listing 13.4. Ant build.xml for JavaScript unit tests
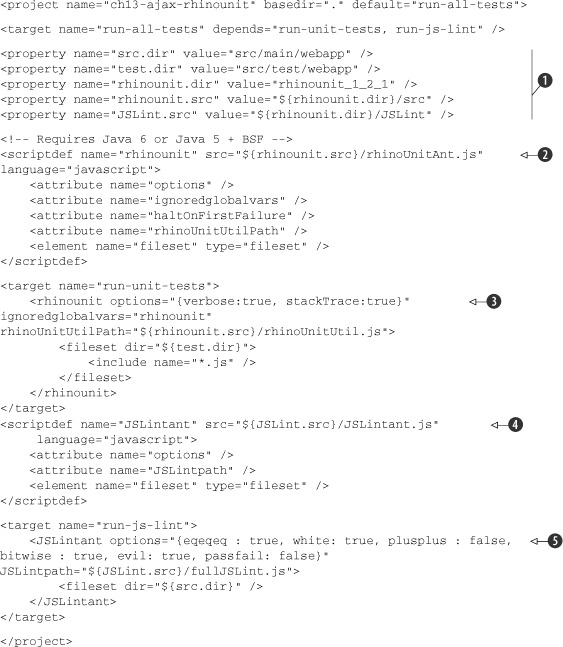
We start our Ant script by defining properties for the locations of directories and files ![]() relative to where we run the Ant build. Next, we define a rhinounit Ant script
relative to where we run the Ant build. Next, we define a rhinounit Ant script ![]() and its arguments by loading its source from rhinoUnitAnt.js. We call the script
and its arguments by loading its source from rhinoUnitAnt.js. We call the script ![]() with a fileset pointing to our JavaScript unit test source, where we include all files with the js extension. In the same way that we defined
a script for rhinounit and ran our tests, we define a script for JSLint
with a fileset pointing to our JavaScript unit test source, where we include all files with the js extension. In the same way that we defined
a script for rhinounit and ran our tests, we define a script for JSLint ![]() to help us detect scripting issues, and we finish by running this JSLint script
to help us detect scripting issues, and we finish by running this JSLint script ![]() on our source directory. For more on JSLint, please see section 13.6, “Checking best practices with JSLint.”
on our source directory. For more on JSLint, please see section 13.6, “Checking best practices with JSLint.”
When you invoke the rhinounit Ant script, make sure you point the rhinoUnitUtilPath argument to the location of the rhinoUnitUtil.js file, for example:
rhinoUnitUtilPath="${rhinounit.src}/rhinoUnitUtil.js"
This takes care of JavaScript unit testing in the build file; please consult the RhinoUnit[14] website for additional documentation. Next, we look at the alternative to RhinoUnit and browser emulation with JsUnit, a framework that drives a web browser á la Selenium.
14 RhinoUnit: http://code.google.com/p/rhinounit/
13.4.2. JavaScript testing with JsUnit
JsUnit[15] is a JavaScript unit-testing framework written in JavaScript and in Java. We use it from Ant to drive a web browser in order to validate the same JavaScript we just tested in the previous section. JsUnit is similar to Selenium in that it controls a web browser and the tests run in that browser’s JavaScript engine.
Let’s start by showing how to run a test from JsUnit and then automating the test from Ant. The source code for this chapter includes a copy of JsUnit; for details please see appendix E.
13.4.3. Writing JsUnit tests
You write a JsUnit test by creating an HTML page containing JavaScript test functions. You then run the test from a web browser. You use HTML only as the container for the JavaScript. Listing 13.5 is our factorial test.
Listing 13.5. jsFactorialTests.html
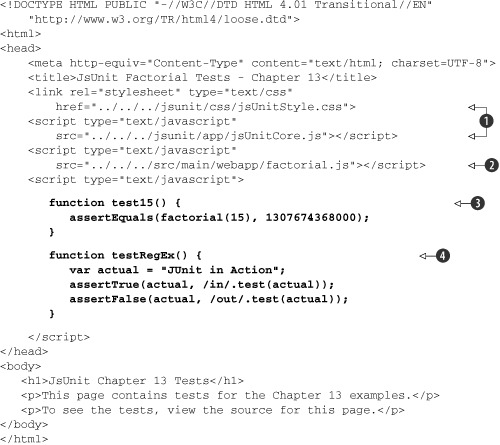
You define the JsUnit test in the HTML head element and start with the references needed to bring in the JsUnit framework ![]() and the JavaScript code to test
and the JavaScript code to test ![]() .
.
The references in the link href and script src attributes are relative to the location of the HTML test file.
A JavaScript script element defines the test functions for our factorial ![]() and regular expression
and regular expression ![]() tests. As with JUnit 3, we define test functions with the function name prefix test. The set of JsUnit assert functions is smaller than the set of JUnit assert methods and is listed here. Like JUnit, the API defines a version of assert functions with and without a message argument. The square brackets in the following list denote that the argument is optional.
tests. As with JUnit 3, we define test functions with the function name prefix test. The set of JsUnit assert functions is smaller than the set of JUnit assert methods and is listed here. Like JUnit, the API defines a version of assert functions with and without a message argument. The square brackets in the following list denote that the argument is optional.
- assert([message,] booleanValue)
- assertTrue([message,] booleanValue)
- assertFalse([message,] booleanValue)
- assertEquals([message,] expectedValue, actualValue)
- assertNotEquals([message,] expectedValue, actualValue)
- assertNull([message,] value)
- assertNotNull([message,] value)
- assertUndefined([message,] value)
- assertNotUndefined([message,] value)
- assertNaN([message,] value)
- assertNotNaN([message,] value)
- fail(message)
Like JUnit, JsUnit lets you use setUp and tearDown functions. JsUnit calls your setUp function before each test function and your tearDown function after each test function.
JsUnit supports an equivalent to @BeforeClass if you define a function called setUpPage. JsUnit calls setUpPage once after the page is loaded but before it calls any test functions. When your setUpPage function ends, it must set the variable setUpPageStatus to 'complete' to indicate to JsUnit that it can proceed to execute the page.
JsUnit differs from JUnit in that JsUnit doesn’t define the order of test function invocation; in JUnit, the order of methods in the source file defines the invocation order.
In addition, although JUnit creates a new test object instance to invoke each method, JsUnit doesn’t use a corresponding action, like reloading the page, which means that JsUnit preserves page-variable values across test function invocations.
13.4.4. Writing JsUnit test suites
As in JUnit, you can group JsUnit tests into a suite of related tests. Listing 13.6 wraps our previous test page into a test suite.
Listing 13.6. jsUnitTestSuite.html
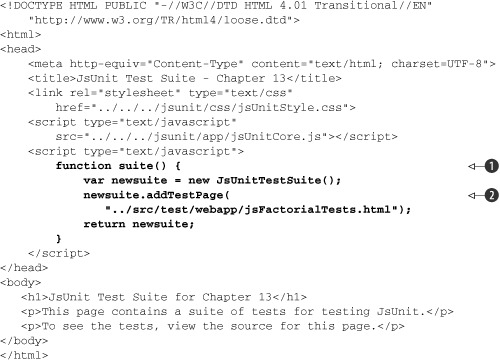
To define a test suite, create a function called suite ![]() , which returns a JsUnitTestSuite object. You then build up a suite object by adding test pages or other suite objects. In our example, we add one page
, which returns a JsUnitTestSuite object. You then build up a suite object by adding test pages or other suite objects. In our example, we add one page ![]() , the page we previously defined by calling the addTestPage function. The rest of the code in this HTML page is the same as our previous example with the exception that we don’t need
to refer to our JavaScript factorial library.
, the page we previously defined by calling the addTestPage function. The rest of the code in this HTML page is the same as our previous example with the exception that we don’t need
to refer to our JavaScript factorial library.
The addTestPage argument is a location relative to the test runner page you’ll use. In our examples, we use the test runner jsunit/testRunner.html.
To add a test suite to another test suite, create a new JsUnitTestSuite object, and call the addTestSuite API. This allows you to organize your tests just as you can in JUnit. Listing 13.7 defines and adds two test suites to a main test suite.
Listing 13.7. Building a JsUnit test suite
function featureASuite() {
    var result = new JsUnitTestSuite();
    result.addTestPage("../tests/featureA/Test1.html");
    result.addTestPage("../tests/featureA/Test2.html");
    return result;
}
function featureBSuite() {
    var result = new JsUnitTestSuite();
    result.addTestPage("../tests/featureB/Test1.html");
    result.addTestPage("../tests/featureB/Test2.html");
    return result;
}

function suite() {
    var newsuite = new JsUnitTestSuite();
    newsuite.addTestSuite(featureASuite());
    newsuite.addTestSuite(featureASuite());
    return newsuite;
}
We now show you how to run the tests manually during development and then through Ant for builds.
13.4.5. Running JsUnit tests manually
To run your tests manually, open a web browser on jsunit/testRunner.html, enter into the file entry field a URL (file:// or http://) or file reference (c:path oafile) to an HTML test page for a test or a suite, and click the Run button. In figure 13.4, we show the result of running our test suite with the familiar green bar.
Figure 13.4. The JsUnit test runner

You can run a self-test on JsUnit itself by running the test suite jsunit/tests/jsUnitTestSuite.html. The result will show you the green bar with 90 successful tests.
JsUnit doesn’t give you much feedback when something goes wrong. If you see Aborted in the JsUnit Status field, check your paths starting with link href and script src and then addTestPage.
Now that we have a manual way to run tests, let’s move on to automating tests with Ant.
13.4.6. Running JsUnit tests with Ant
JsUnit includes the file jsunit/build.xml, which you can use as a template to call JsUnit tests from Ant. The Ant build file will manage web browsers, invoke tests, and create reports.
The version of JsUnit tested here, version 2.2, will run only with Java 6 or greater. If you use an earlier version of Java you will see the error java.lang.UnsupportedClassVersionError: Bad version number in .class file.
Listing 13.8 shows the build.xml file that excerpts invoke our test suite.
Listing 13.8. JsUnit build.xml excerpts
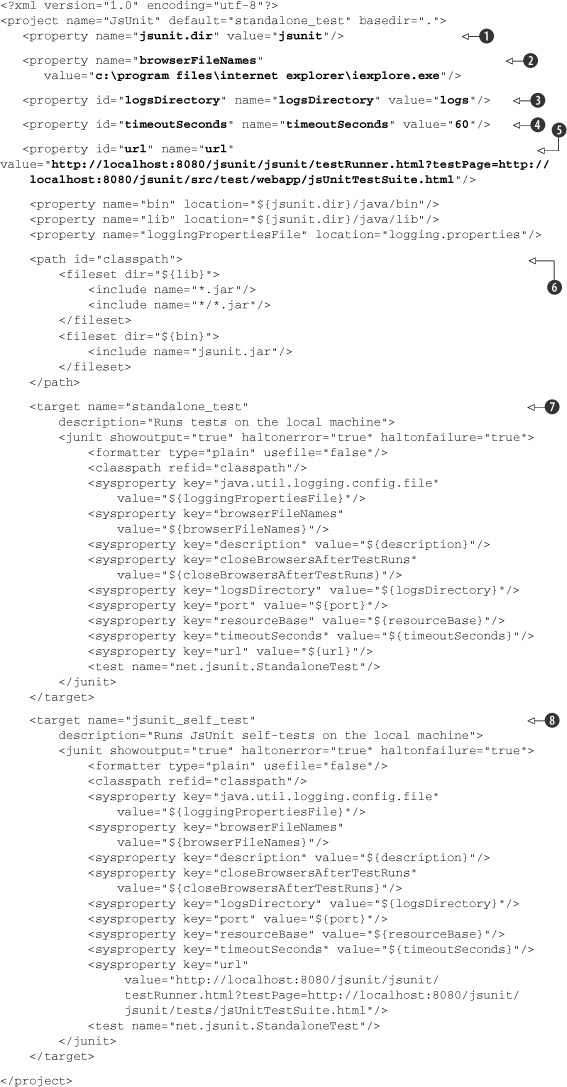
We start our build.xml file by defining the location of the JsUnit installation directory ![]() ; in this case, it’s a subdirectory of the directory containing our example build.xml. Then we define which web browsers JsUnit
will use to test our code with the property browserFileNames
; in this case, it’s a subdirectory of the directory containing our example build.xml. Then we define which web browsers JsUnit
will use to test our code with the property browserFileNames ![]() . This property is a comma-separated list of browser executable paths. Next, we define logsDirectory
. This property is a comma-separated list of browser executable paths. Next, we define logsDirectory ![]() to hold the directory location for test report XML files. The property timeoutSeconds
to hold the directory location for test report XML files. The property timeoutSeconds ![]() is a timeout in seconds to wait for a test run to complete; if absent, the default value is 60 seconds. The url property
is a timeout in seconds to wait for a test run to complete; if absent, the default value is 60 seconds. The url property ![]() defines which test runner to use and which test or test suite it should invoke. It’s worth breaking down this URL into its
component parts. The example URL is http://localhost:8080/jsunit/jsunit/testRunner.html?testPage=http://localhost:8080/jsunit/src/test/webapp/jsUnitTestSuite.html.
defines which test runner to use and which test or test suite it should invoke. It’s worth breaking down this URL into its
component parts. The example URL is http://localhost:8080/jsunit/jsunit/testRunner.html?testPage=http://localhost:8080/jsunit/src/test/webapp/jsUnitTestSuite.html.
The URL starts with http://localhost:8080 because we’re running our tests locally. The next segment, jsunit, specifies the jsunit servlet and from there the location to the JsUnit stock test runner, relative to build.xml, which is jsunit/testRunner.html. All of this yields the first part of the URL: http://localhost:8080/jsunit/jsunit/testRunner.html. The testPage URL parameter points to the test page or suite page to run. It too starts with the same local server plus the jsunit servlet prefix and is followed by the path to the test suite page relative to where the test is run. Put it all together and we have the complete URL.
Next, we give Ant all of the JAR files needed to run JsUnit ![]() , and then we can proceed to running our test with the target standalone_test
, and then we can proceed to running our test with the target standalone_test ![]() , which we invoke from the command line in the build.xml directory with a simple call to Ant by typing the following in a
console:
, which we invoke from the command line in the build.xml directory with a simple call to Ant by typing the following in a
console:
ant standalone_test
Ant starts, and you’ll see the web browser open, run the tests in the test runner page, and close. You’ll also see a couple of pages of Ant and JsUnit output on the console detailing the test run, too much to reproduce here. We can look for the next-to-last line of Ant output for the familiar BUILD SUCCESSFUL message.
You can even add to your test run the JsUnit self-tests as a sanity check by adding the target jsunit_self_test ![]() to your Ant invocation:
to your Ant invocation:
ant jsunit_self_test standalone_test
For the self-test to work in your build, make sure that your jsunit_self_test target points to the JsUnit test suite located in jsunit/tests/jsUnitTestSuite.html, as our example build.xml does.
We wrap up this section by noting that more advanced test configurations are possible with JsUnit because it provides support for driving farms of JsUnit servers. A JsUnit server is what allows tests to be performed from Ant; it acts under the covers of our examples to drive web browsers on the local machine or on remote machines and also creates the result logs.
If you get a permission denied error in Firefox, set the security.fileuri. strict_origin_policy to false.
13.5. RhinoUnit versus JsUnit
Should you use RhinoUnit or JsUnit? The answer to this question is quite similar to the HtmlUnit versus Selenium question, which we presented in the previous chapter. The similarity is that both are free and open source.
The major difference between the two is that RhinoUnit emulates a web browser, whereas JsUnit drives a real web browser process. When using JsUnit, the browser itself provides support for JavaScript. In RhinoUnit, Java 6 or Apache BSF plus the Mozilla Rhino[16] engine provide JavaScript support.
The RhinoUnit pros are that it’s a 100 percent Java solution and is easy to integrate in a build process. The JsUnit pros are that it drives native browsers and can manage a farm of JsUnit test servers.
Use RhinoUnit when
Use RhinoUnit when your application is independent of operating system features and browser-specific implementations of JavaScript, DOM, CSS, and so on.
Use JsUnit when
Use JsUnit when you require validation of specific browsers and operating systems, especially if the application takes advantage of or depends on a browser’s specific implementation of JavaScript, DOM, CSS, and so on.
You’ve seen how to test client-side scripts with RhinoUnit and JsUnit. Next, we show how you can check best practices with JSLint.
13.6. Checking best practices with JSLint
We now move on to checking our code for best practices with JSLint.[17] As we did for the unit-testing script, we use scripts to define and run JSLint from Ant:
17 JSLint: http://www.JSLint.com/
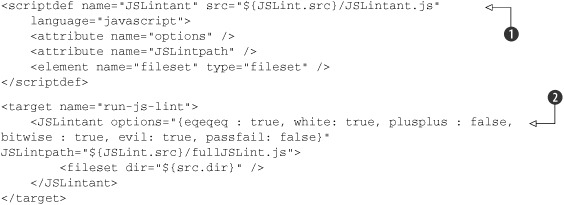
When you invoke the JSLintant Ant script, make sure you point the JSLintpath argument to the location of the full JSLint.js file, for example:
JSLintpath="${JSLint.src}/fullJSLint.js"
We start by defining an Ant script for JSLint ![]() and then call the script
and then call the script ![]() and pass it the source location to our JavaScript library directory.
and pass it the source location to our JavaScript library directory.
You run this example script by typing ant on the command line in the ch13-ajax-rhinounit directory for this chapter example, which displays the results shown in listing 13.9.
Listing 13.9. Ant build results
Buildfile: build.xml

run-unit-tests:
[rhinounit] Testsuite: test-all-valid.js
[rhinounit] Tests run: 17, Failures: 0, Errors: 0
[rhinounit]
[rhinounit] Testsuite: test-example.js
[rhinounit] Tests run: 2, Failures: 0, Errors: 0
[rhinounit]

run-js-lint:
[JSLintant] Attribute options = {eqeqeq : true, white: true, plusplus :
false, bitwise : true, evil: true, passfail: false}
[JSLintant] JSLint: No problems found in ch13-
rhinounitsrcmainwebappfactorial.js

run-all-tests:

BUILD SUCCESSFUL
Total time: 0 seconds
JSLint is quite verbose and comprehensive in its output; please see the JSLint[18] website for details.
We started by looking at functional testing from the client perspective. Next, we dove into testing one of the underlying building blocks of an Ajax application: client-side scripts with RhinoUnit and JsUnit. We also checked these scripts for best practices with JSLint. Next, we move to the server side and another building block: testing server-side services with HttpClient.
13.7. Testing services with HttpClient
The idea behind testing the application services layer separately is to validate each service independently from HTML, JavaScript, and DOM and how the application uses the data. An application calls a service from JavaScript through the XMLHttpRequest object. Here, we use XMLHttpRequest to refer to the standard JavaScript XMLHttpRequest object and to the Microsoft ActiveX XMLHTTP objects Microsoft.XMLHTTP and Msxml2.XMLHTTP. Our goal is to emulate an XMLHttpRequest object by using HTTP as the transport mechanism and XML and JSON as example data formats. We use the Apache Commons HttpClient to provide HTTP support, Java’s built-in XML support, and jslint4java to check that JSON documents are well formed.
13.7.1. Calling an XML service
To simplify this example, we’ve made the chapter’s example webapp directory an IIS virtual directory so that we can run the unit tests from Ant locally. A production Ant build would start and stop a web container like Jetty around the unit test invocations. Our first XML service test in listing 13.10 makes sure that we’re getting back from the server the expected XML document. A second test validates the document.
Listing 13.10. An XML service test
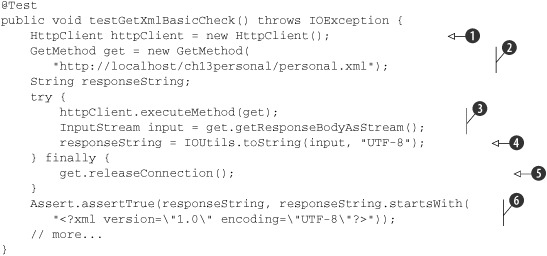
The test starts by creating an Apache Commons HttpClient ![]() and defining the HTTP GET method
and defining the HTTP GET method ![]() with a URL for our XML document fixture. The URL specified in the GetMethod constructor is application specific and must include parameters if appropriate for a given test. The test then executes the
HTTP GET method
with a URL for our XML document fixture. The URL specified in the GetMethod constructor is application specific and must include parameters if appropriate for a given test. The test then executes the
HTTP GET method ![]() and reads the data back from the server. Note the use of the Apache Commons IO API IOUtils.toString to read the response stream in a string as a one-liner
and reads the data back from the server. Note the use of the Apache Commons IO API IOUtils.toString to read the response stream in a string as a one-liner ![]() . The code does this synchronously, unlike a standard Ajax application. We then guarantee that HttpClient resources are freed by calling releaseConnection from a finally block
. The code does this synchronously, unlike a standard Ajax application. We then guarantee that HttpClient resources are freed by calling releaseConnection from a finally block ![]() . We can now check that the data from the server is as expected. For this first test, all we do is a simple string comparison of the start of the document
. We can now check that the data from the server is as expected. For this first test, all we do is a simple string comparison of the start of the document ![]() . You could also use Java regular expressions to do some further XML string-based checks; next, we use an important XML feature:
XML validation.
. You could also use Java regular expressions to do some further XML string-based checks; next, we use an important XML feature:
XML validation.
13.7.2. Validating an XML response
If you can parse an XML document, you know that it’s well formed, meaning that the XML syntax is obeyed, nothing more. XML provides a standard called XML Schema, which you use to define a vocabulary of XML, specifying which elements and attributes make up a valid document. In this next example, the schema is stored in a file called personal.xsd. Listing 13.11 uses the standard Java XML APIs to validate the XML document returned from a server call against an XML Schema.
Listing 13.11. A validating XML service test
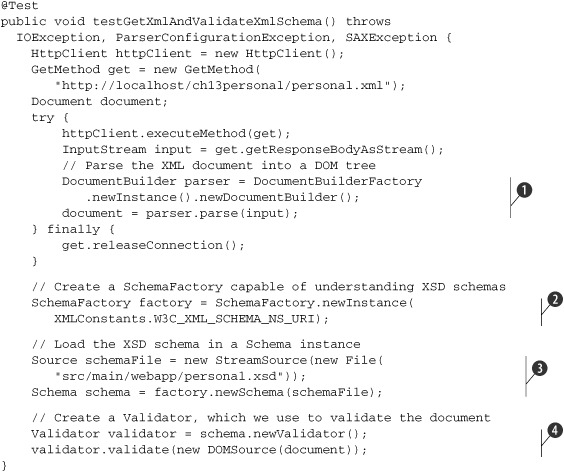
This example starts as the previous one did, but after the test executes the HTTP GET method, we read the server response directly with an XML parser ![]() . If the DOM document parses successfully, we know the document is well formed, a nice sanity check. If we don’t get a valid
XML document from the server, we might have a server error message in the response or a bug in server-side XML document generation.
We can now move to the meat of the test, XML validation. We create a schema factory for the kind of grammar to use, in our case, XML Schema
. If the DOM document parses successfully, we know the document is well formed, a nice sanity check. If we don’t get a valid
XML document from the server, we might have a server error message in the response or a bug in server-side XML document generation.
We can now move to the meat of the test, XML validation. We create a schema factory for the kind of grammar to use, in our case, XML Schema ![]() , and load the XSD schema file in a Schema instance
, and load the XSD schema file in a Schema instance ![]() . Finally, we can create an XML Validator for our schema and validate the DOM document
. Finally, we can create an XML Validator for our schema and validate the DOM document ![]() . At this point, we know that our document is valid and well formed.
. At this point, we know that our document is valid and well formed.
The next step would be to check that the application data is as expected. The DOM document API can be painful to use, so at this point you have several options. The JDOM[19] API is a friendlier interface to XML than DOM. You can use Java’s XPath[20] support to check the contents of a document. You can also use Sun’s JAXB[21] framework, although it’s not trivial, to transform XML into POJOs.
20http://java.sun.com/j2se/1.5.0/docs/api/javax/xml/xpath/package-summary.html
Next, let’s consider JSON as the data format.
13.7.3. Validating a JSON response
JSON[22] (JavaScript Object Notation) is a data-interchange language based on a subset of the JavaScript Programming Language, Standard ECMA-262 3rd Edition, December 1999.[23] Applications use JSON instead of XML as their data format because it’s text based and easy for people and machines to read and understand. In this first example in listing 13.12, we show a simple check of a JSON document.
23http://www.ecma-international.org/publications/files/ecma-st/ECMA-262.pdf
Listing 13.12. A JSON service test
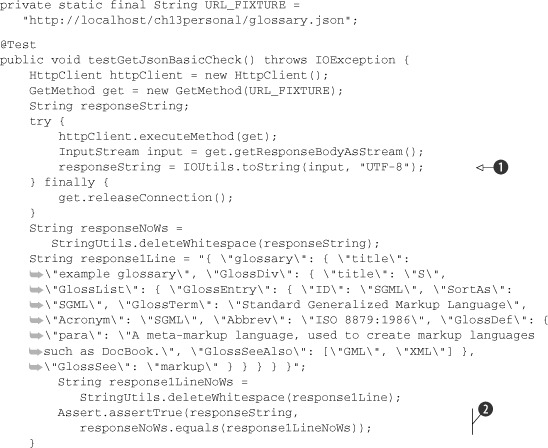
In this test, we perform the same steps as our first XML example: we create an HttpClient, an HTTP GET method that we execute, and then read the results from the server into a String ![]() . Unlike XML, JSON has no APIs to support checks for well-formed and valid documents. We strip whitespaces from our JSON document
fixture, the server response, and compare the two
. Unlike XML, JSON has no APIs to support checks for well-formed and valid documents. We strip whitespaces from our JSON document
fixture, the server response, and compare the two ![]() . Although this check is brute force, we use it to provide a simple check that’s free of formatting issues. The Apache Commons
Lang API StringUtils.deleteWhitespace performs the whitespace removal.
. Although this check is brute force, we use it to provide a simple check that’s free of formatting issues. The Apache Commons
Lang API StringUtils.deleteWhitespace performs the whitespace removal.
The next-best thing we can do is implement a well-formed check by parsing the document. Although www.json.org lists many libraries, including Java libraries to parse JSON, we use the JSLint wrapper jslint4java[24] to go beyond a simple well-formed check. As you saw earlier in the RhinoUnit section, JSLint provides lint-style reporting for JavaScript. In listing 13.13, we call JSLint through jslint4java and check its results.
24 jslint4java site: http://code.google.com/p/jslint4java/
Listing 13.13. A JSON service test with JSLint
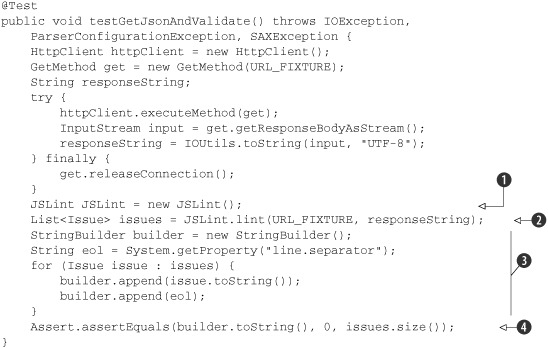
Our test starts as usual, and we check for results using a JSLint object ![]() . We don’t provide options in this example, but the JSLint class provides an addOption method to support the underlying JSLint options. The test calls the lint method by specifying two arguments: a String describing the source location and another String for the JavaScript code to check, in this case, a JSON document
. We don’t provide options in this example, but the JSLint class provides an addOption method to support the underlying JSLint options. The test calls the lint method by specifying two arguments: a String describing the source location and another String for the JavaScript code to check, in this case, a JSON document ![]() . The test uses the lint results to create a message String
. The test uses the lint results to create a message String ![]() used in the Assert call. If there’s a problem, the test provides the assertEquals call
used in the Assert call. If there’s a problem, the test provides the assertEquals call ![]() with a full description of all issues JSLint found.
with a full description of all issues JSLint found.
You’ll notice that jslint4java is always behind JSLint in terms of features and fixes. This is because jslint4java embeds JSLint (fullJSLint.js) in its JAR file. If you need to use a newer or different version of JSLint in jslint4java, you’ll need to download jslint4java, drop in the version of JSLint (fullJSLint.js) you need on top of the existing one, and rebuild jslint4java.
In this section, you’ve seen how to validate server-side services that participate in an Ajax application independently of the pages and code using them. We’ve used Apache Commons HttpClient as our HTTP communication library, Java’s XML APIs, and JSLint through jslint4java. We’ve separated our tests along the boundary of the Ajax architecture.
We’ve now tested the full Ajax application stack. Let’s now consider a different way to build, run, and test an Ajax application with the Google Web Toolkit.
13.8. Testing Google Web Toolkit applications
The Google Web Toolkit (GWT)[25] is a free, open source framework used to create JavaScript frontends to web applications. GWT application development has a twist, though: you write your applications in Java. To this end, Google provides the Google Plug-in for Eclipse; you develop and test in Java, and when your application is ready for deployment, GWT translates your Java into JavaScript. GWT allows you to run and test your application in hosted mode, which runs in Java, and in web mode, where you application is translated to JavaScript and then is run in a browser.
13.8.1. Choosing a testing framework for a GWT application
GWT supports JUnit with the GWTTestCase and GWTTestSuite classes, which both extend the JUnit TestCase class. GWT normally integrates with JUnit 3.8.2 and works with 4.6. GWT includes junitCreator, a program used to generate empty GWT test cases for a given GWT module. As a bonus, GWT can also benchmark your application. Because Java and JavaScript aren’t the same, you should test in both hosted and web modes.
It’s important to understand that GWTTestCase doesn’t account for testing the user interface of an application. You use GWTTestCase to test the asynchronous portions of the application normally triggered by user actions. This means that you must factor your application and test cases with this element in mind. You can think of GWT tests as integration tests. The tests can’t rely on any user interface element driving the application. Testing the GUI requires using the techniques presented in this and the previous chapters; you can create functional GUI tests with Selenium or HtmlUnit.
You use the GWTTestCase class to test the application logic of the web client, not the user interface. Although seemingly an obstacle, this forces you to factor your GWT application cleanly between code for user interaction and application logic. This is a design best practice that you should follow.
Let’s first look at how to create a GWTTestCase manually before we show how to use junitCreator. The example we use in this section is adapted from the GWT StockWatcher example[26] and extended with an RPC. Figure 13.5 shows what the application looks like running in hosted mode.
Figure 13.5. Running StockWatcher in hosted mode
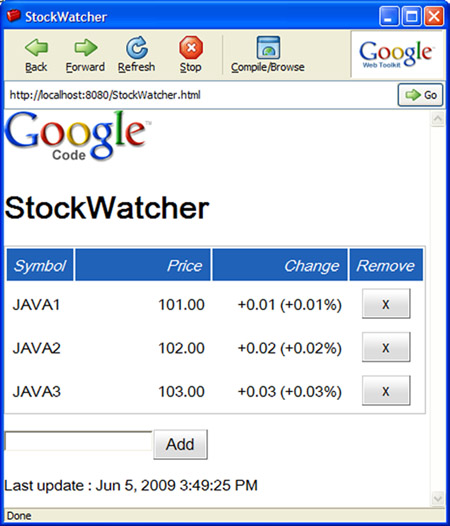
Our example tests the StockWatcher remote procedure call (RPC) to get stock price information for an array of stock symbols. We focus on RPC, because it’s the heart of GWT JUnit testing.
13.8.2. Creating a GWTTestCase manually
We start our asynchronous GWT RPC example test in familiar GWT territory with listing 13.14, where the refreshWatchList method performs a standard GWT RPC call.
Listing 13.14. The asynchronous RPC call
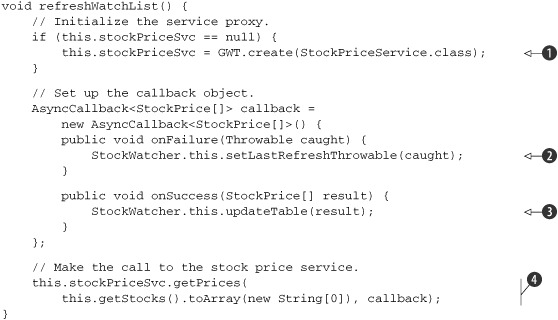
The implementation of refreshWatchList follows the standard pattern for GWT RPC; the method creates a new StockPriceService instance ![]() and defines the service callback. The callback defines two methods; in onFailure
and defines the service callback. The callback defines two methods; in onFailure ![]() we save the given exception, and in onSuccess
we save the given exception, and in onSuccess ![]() , which is typed for our application model (StockPrice[]), we update the application. Next, we call service’s getPrices method
, which is typed for our application model (StockPrice[]), we update the application. Next, we call service’s getPrices method ![]() with input data and our callback. The key point to remember is that the call to the getPrices method is asynchronous, so the call to refreshWatchList is also asynchronous. Next, we test this method with a unit test.
with input data and our callback. The key point to remember is that the call to the getPrices method is asynchronous, so the call to refreshWatchList is also asynchronous. Next, we test this method with a unit test.
To create a GWT test case, you start by creating a subclass of GWTTestCase, along the lines of listing 13.15.
Listing 13.15. StockWatcherTest.java—testing GWT RPC

A GWT test case must extend the GWT class GWTTestCase ![]() and implement a method with the signature public String getModuleName() to return the name of the module being tested
and implement a method with the signature public String getModuleName() to return the name of the module being tested ![]() . We start the test method by instantiating the model class and initializing it with input data
. We start the test method by instantiating the model class and initializing it with input data ![]() , the three stock symbols "S1", "S2", and "S3". Next, we call the refreshWatchList method in listing 13.14, which performs the asynchronous RPC
, the three stock symbols "S1", "S2", and "S3". Next, we call the refreshWatchList method in listing 13.14, which performs the asynchronous RPC ![]() .
.
We need to allow the test method to complete while allowing assertions to run. To do so, we use a GWT Timer ![]() to schedule our assertions. Our Timer’s run method starts by checking that the stock watcher RPC was able to run in the first place. We do this by checking to see whether the
asynchronous callback caught an exception
to schedule our assertions. Our Timer’s run method starts by checking that the stock watcher RPC was able to run in the first place. We do this by checking to see whether the
asynchronous callback caught an exception ![]() . This arrangement is helpful in determining an incorrect test setup, in particular as it relates to the classpath and module
file (see the tip in the section on running tests). If no exception is present, the validity checks on the StockWatcher object can proceed. We check that table headers are still there
. This arrangement is helpful in determining an incorrect test setup, in particular as it relates to the classpath and module
file (see the tip in the section on running tests). If no exception is present, the validity checks on the StockWatcher object can proceed. We check that table headers are still there ![]() and then check the contents of the table
and then check the contents of the table ![]() for values we expect to be returned from the service. In this test, we changed the stock GWT example to return predictable
values instead of randomly generated values. If the test calls the GWTTestCase finishTest
for values we expect to be returned from the service. In this test, we changed the stock GWT example to return predictable
values instead of randomly generated values. If the test calls the GWTTestCase finishTest ![]() method before the delay period expires, then the test succeeds.
method before the delay period expires, then the test succeeds.
Now that the Timer object is in place, we call delayTestFinish to tell GWT to run this test in asynchronous mode ![]() . You give the method a delay period in milliseconds much longer than what is expected to run the test setup, do the RPC,
and perform the assertions. When the test method exits normally, GWT doesn’t mark the test as finished; instead, the delay
period starts. During the delay period, GWT checks for the following:
. You give the method a delay period in milliseconds much longer than what is expected to run the test setup, do the RPC,
and perform the assertions. When the test method exits normally, GWT doesn’t mark the test as finished; instead, the delay
period starts. During the delay period, GWT checks for the following:
- If the test calls the GWTTestCase finishTest method before the delay period expires, then the test succeeds.
- If an exception propagates to GWT, then the test fails with that exception.
- If the delay period expires and neither of the previous conditions is true, then the test fails with a TimeoutException.
- The last task in the test is to get the job off and running with a call to the Timer’s schedule method
 . The argument is a delay in milliseconds, after which control returns to the caller.
We just examined asynchronous testing in GWT; next, we show how to use junitCreator to create starter tests and how to run the tests.
13.8.3. Creating a GWTTestCase with junitCreator
The junitCreator utility allows you to create a GWTTestCase based on a module to which you then add your own test methods. junitCreator is a good place to get started on your first GWT test. For subsequent tests, you may prefer to clone a template class or write test case classes from scratch. junitCreator also creates Eclipse launch configurations and command-line scripts for hosted and web modes. To get your command processor to find junitCreator and other GWT programs, remember to add GWT to your path. Here’s a sample invocation for our example:
junitCreator -junit /java/junit4.6/junit-4.6.jar -module
com.google.gwt.sample.stockwatcher.StockWatcher -eclipse ch13-gwt-
StockWatcher com.google.gwt.sample.stockwatcher.client.StockWatcherTest
The (abbreviated) console output is as follows:
Created file
   testcomgooglegwtsamplestockwatcherclientStockWatcherTest.java
Created file StockWatcherTest-hosted.launch
Created file StockWatcherTest-web.launch
Created file StockWatcherTest-hosted.cmd
Created file StockWatcherTest-web.cmd
The .launch files are Eclipse launch configurations and the .cmd files are command-line scripts. Use these files to invoke the generated test case in web or hosted mode. You may need to adapt the scripts for your location of the JUnit and GWT .jar files.
13.8.4. Running test cases
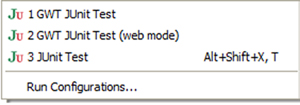
Using Eclipse, running a test is easy. You right-click a test case class and choose Run As or Debug As and then choose GWT JUnit Test to run the test in hosted mode or GWT JUnit Test (Web Mode) to run the test in web mode, as shown in figure 13.6.
Figure 13.6. Running a test
To use Ant, you need to make sure your build file points to the GWT SDK. Using a GWT example build file as a template, edit the gwt.sdk property to point to the GWT directory.
13.8.5. Setup and teardown
A GWTTestCase subclass can override the JUnit methods setUp and tearDown with the following restrictions:
- You can’t call GWT JavaScript Native Interface (JSNI) methods.
- You can’t call code that depends on deferred binding, which includes most of the UI library.
GWT 1.5 remedies these issues by the addition of two methods available for overriding:
- gwtSetUp runs before each test case method.
- gwtTearDown runs after each test case method.
13.8.6. Creating a test suite
The benefit of using a test suite with GWT goes beyond grouping related tests together. A performance gain is possible by using a GWT test suite. GWT sorts test cases in a suite by module name as returned by getModuleName. This causes all tests with the same module name to run one after the other.
To create a test suite, you can start with the Eclipse JUnit Test Suite Wizard. For example, to create a test suite that includes all test cases in a package, go to the Packages view, right-click a package, and choose New and then Other. In the New dialog box, open the JUnit node and choose JUnit Test Suite. Listing 13.16 shows the generated code with two changes we explain next.
Listing 13.16. A GWT test suite

We made the class extend GWTTestSuite ![]() to make this suite a GWT test suite. We also replaced the String in the TestSuite constructor with the class name of the generated class
to make this suite a GWT test suite. We also replaced the String in the TestSuite constructor with the class name of the generated class ![]() . This allows us to double-click the class name in the JUnit view and jump to an editor for that test suite. The rest is standard
JUnit code; we call addTestSuite with a class object to add a test case to the suite.
. This allows us to double-click the class name in the JUnit view and jump to an editor for that test suite. The rest is standard
JUnit code; we call addTestSuite with a class object to add a test case to the suite.
13.8.7. Running a test suite
In addition to the requirements for running a GWT test case, you must configure a GWT test suite with more memory than the default settings allocate. Configure the Java VM running the tests with at least 256 megabytes of RAM. With the Sun JVM, use the following option: -Xmx256M. You must also add to the classpath the source directories for application and test code.
To wrap up GWT testing, recall that GWT test cases verify the asynchronous aspects of your application, not the user interface. To test the GUI, use functional tests with Selenium or HtmlUnit.
Although we’ve finished our brief tour of GWT testing, it’s worth noting that GWT includes the Speed Tracer tool to help you identify and fix performance problems by visualizing instrumentation data taken from the browser.
13.9. Summary
In this chapter, we built on what you learned in chapter 12 about testing the presentation layer of applications, specifically as it relates to Ajax applications.
We showed that Ajax applications use many technologies layered in broad tiers: HTML and JavaScript are used on the client; HTTP, XML, and JSON provide communication and data services; and the server side is viewed as a black box implementing services accessed over the internet with HTTP.
We divided our testing strategies along similar patterns. We used functional tests for the whole application stack as it appears to a user by driving and testing the application with HtmlUnit and Selenium. We isolated JavaScript into libraries and tested those independently with RhinoUnit and JsUnit. We validated server-side XML and JSON services using Apache Commons HttpClient, JSLint, and jslint4java.
You use RhinoUnit when your application is independent of operating system features and browser-specific implementations of JavaScript, DOM, CSS, and the like. You use JsUnit when you require validation of specific browsers and operating systems, especially if the application takes advantage of or depends on a browser’s specific implementation of JavaScript, DOM, CSS, and so on.
Finally, we looked at the unique challenge posed by GWT, a framework that translates your Java code to JavaScript.
This chapter concludes our survey of user interface testing, and we now move to the server side and testing with Cactus.