
Appendix A. Differences between JUnit 3 and JUnit 4
- Changes between version 3.x and 4.x of JUnit
- API changes
- New features in JUnit 4.x
As you’ve probably seen, the new 4.x version of JUnit is a completely new framework. It’s more of a totally new project than a bug-fixing improvement of the old one. But it still deals with unit testing your Java code. That said, we will try to define all the differences between the latest version of JUnit and the 3.x version.
A.1. Global changes
This section discusses the changes in the requirements for using JUnit.
A.1.1. JDK required
JUnit 4 uses a lot from Java 5 annotations, generics, and static import features. Although the JUnit 3.x version can work with JDK 1.2+, this usage requires that the new version of JUnit be used with Java 5 or higher.
A.1.2. Backward/forward compatibility
All of the JUnit 4.x test runners are able to execute JUnit 3.x tests with no modification whatsoever. But what about executing JUnit 4.x tests with the JUnit 3.x test runner? Now this is a trickier one, but it’s absolutely necessary to support so that external tools such as Ant or Eclipse can work with JUnit without needing an update.
The key is to use the JUnit4TestAdapter and wrap all of your tests like the one shown in listing A.1.
Listing A.1. JUnit4TestAdapter to wrap your JUnit 4.x tests

It’s that simple. At ![]() you need to pass your JUnit 4.x tests to the JUnit4TestAdapter, and they immediately get converted to JUnit 3.x tests so that they can be run with the JUnit 3.x runners.
you need to pass your JUnit 4.x tests to the JUnit4TestAdapter, and they immediately get converted to JUnit 3.x tests so that they can be run with the JUnit 3.x runners.
A.2. Changes in the API
The changes listed here concern the inner structure of JUnit: all the new features added to the API that we need to know.
A.2.1. Package structure
The new version of JUnit is built on the idea of backward compatibility. The developers wanted to make sure that you, as a software developer, are able to execute any JUnit 3.x test case with the JUnit 4.x library in your classpath. That’s why they included all the new features in a new package, org.junit. The old package, junit.framework, is also bundled in the distribution.
A.2.2. Constructors
If you’re maintaining tests written prior to JUnit 3.8.1, your class needs a String constructor, for example:
public CalculatorTest(String name) { super(name); }
This is no longer required with JUnit 3.8.1 and later.
A.2.3. Extending TestCase
In the new version of JUnit, your test cases no longer need to extend the junit.framework.TestCase class. Instead, any public class with a zero-argument public constructor can act as a test class.
A.2.4. Test method names
In the new version of JUnit, test names no longer need to follow the testXXX pattern. Instead, any method that you want to be considered a test method should be annotated with the @Test annotation. For instance, the method shown in listing A.2 is a valid test method.
Listing A.2. Test method annotations in JUnit 4.x
@Test
public void substract () {
  assertEquals(2, 5-3);
}
A.3. Annotations and static imports added
JUnit 4.x is based on annotations, a concept introduced in JDK 1.5 along with static imports and some other features. This section lists those changes to the JUnit API.
A.3.1. @Before and @After annotations
If you remember, with JUnit 3.x we used to override the setUp() and tearDown() methods when we extended the junit.framework.TestCase class. These methods (or fixtures, as they’re called) are executed right before/after each of the tests gets executed. Their purpose is to execute some common logic before or after each of the tests. As we already mentioned (several times, at least), in JUnit 4.x you no longer extend the junit.framework.TestCase class. So how can we execute some common logic before/after each of the tests?
The answer is again (guess what?) an annotation. You can annotate any of the methods you want to execute before your tests with the @Before annotation. And you can have as many annotated methods as you want. In the 3.x version of JUnit, you can have only one setUp() and only one tearDown() method (the method name restricts you). But in the 4.x version of the framework, the declaration shown in listing A.3 is pretty normal.
Listing A.3. @Before and @After annotations in action
public class CalculatorTest {
[...]

    @Before
public void initializeMocks() { ... }
    @Before
public void prepareFilesForReading() { ... }
[...]
}
Warning
Indeed, you can have as many @Before and @After annotated methods as you want, but be aware that nothing is specified about the order of execution of these methods. There is no guarantee, whatsoever, that any of the @Before methods will be executed before/after the other ones.
Also, there’s one possible pitfall. If you have several test classes that extend from a common superclass, what will be the order of execution of the @Before and @After methods? The answer is that @Before methods in the superclass get executed earlier than the ones in the subclasses. The @After methods, on the contrary, have a mirrored execution; the @After methods in the subclass get executed first.
You need to remember that the @Before annotated methods must be public by signature and return void.
The same thing applies to the @After annotated methods.
A.3.2. @BeforeClass and @AfterClass annotations
One of the features that people wanted most from JUnit is the ability to execute some common logic before/after a whole set of tests. For instance, if your setUp() or tearDown() methods consume a lot of resources (like opening a connection to a database or creating some file structure), you’ll find it useful to have a way of executing the setUp() or tearDown() methods not before every test but instead before a whole set of tests.
JUnit 4.x offers such an option with the @BeforeClass and @AfterClass annotations. Just like the @Before and @After annotations that we already covered, you can annotate any of your methods with the @BeforeClass and @AfterClass annotations. In listing A.4 we show how to use these annotations in your tests.
Listing A.4. @BeforeClass and @AfterClass annotations in action
[...]
public class CalculatorTest {

    @BeforeClass
public static void setupFileStructure() { ... }

    @AfterClass
public static void cleanupFileStructure() { ... }
}
There are several things to notice here. First of all, you can add as many @BeforeClass and @AfterClass annotated methods as you want. Again, the same condition applies as with the @Before/@After annotated methods; no guarantee whatsoever is given for the order of execution. One more thing to notice is that the methods that are annotated with @BeforeClass and @AfterClass must not only be public and return void type but also be static.
A.3.3. Differences in ignoring a test
Sometimes, because of a system reconfiguration or a change of client requirements, you need to skip the execution of a certain test method. In the 3.x version of JUnit, the only way to do that is to comment the whole test method or rename the method. This way, if you start commenting your test methods, you get no detailed statistics of how many methods were skipped during test execution.
This is significantly improved in JUnit 4.x, by the introduction of the @Ignore annotation. You can use it to annotate any of your test methods, with the result that this method will be skipped at the time of test execution. The best part is that at the end of the execution you get detailed statistics of not only how many of your tests were successful or failed but also the number of the skipped tests.
One last thing—from version 4.3 on of JUnit, you can annotate not only test methods but also the whole class with @Ignore. As a result, all of the tests in that class will be skipped.
A.3.4. Static imports
As mentioned already, your test cases no longer need to extend the junit.framework.TestCase class, whereas in the previous versions of JUnit the assert methods would come from the junit.framework.TestCase class that you used to extend. The question that you’ll ask now is, “How on earth do I get the assert methods in my class?”
The answer to this question is one of the new features of Java 5: static imports. With Java’s static imports, you can write the code shown in listing A.5.
Listing A.5. Static imports in action
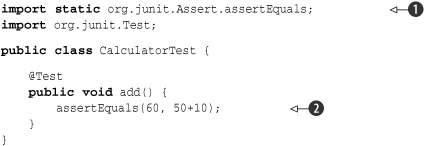
At ![]() we use the static import feature to import one of the assert methods we need, and later on, at
we use the static import feature to import one of the assert methods we need, and later on, at ![]() , we call it.
, we call it.
A.3.5. Exception testing
One of the most important aspects of unit testing is the ability to test exceptional situations in your code. You need to make sure that whenever an exception is thrown, it’s handled properly. In listing A.6 you can see how exception handling is done in the previous version of JUnit.
Listing A.6. Exception handling the old 3.x way
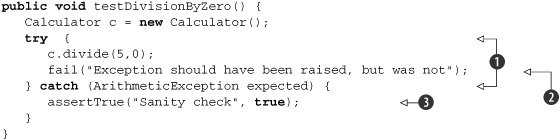
Basically, what you do is surround the troublesome code with a try-catch block ![]() and after that deliberately fail the test
and after that deliberately fail the test ![]() if the exception was not thrown. A good practice is also to place a dummy assert in the catch clause
if the exception was not thrown. A good practice is also to place a dummy assert in the catch clause ![]() just to make sure you always pass through the catch clause.
just to make sure you always pass through the catch clause.
In JUnit 4 we have a better solution for handling exceptional situations than we had in JUnit 3. Every time you want to make sure that an exception is thrown, you can use an expected parameter with the @Test annotation. Listing A.7 shows you how to ensure that an Arithmetic exception is thrown.
Listing A.7. Exception handling with the expected parameter of the @Test annotation
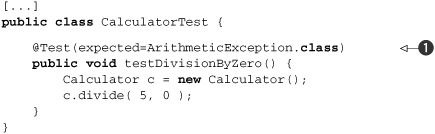
As you can see in ![]() , we’ve added the expected attribute to the @Test annotation to denote that this method is supposed to throw an exception of the provided type.
, we’ve added the expected attribute to the @Test annotation to denote that this method is supposed to throw an exception of the provided type.
A.3.6. Timeout testing
Another parameter you can add to the @Test annotation is the timeout parameter. This feature was also missing in the “old” JUnit. With this parameter, you can specify a value in milliseconds that you expect to be the upper limit of the time you spend executing your test. What happens when the time runs out? An exception will be raised, and the test will marked as failed, telling you that the test couldn’t finish execution in the given Test timeout parameter. Listing A.8 shows you how to use the timeout parameter of the @ annotation.
Listing A.8. Timeout parameter in the @Test annotation
public class CalculatorTest {

    @Test(timeout=5000)
public void testSomethingTimeConsuming() {
        [...]
    }
}
A.4. New JUnit runners
This section briefly covers some of the new JUnit runners included in JUnit 4.x.
A.4.1. Test runners
The 3.x version of JUnit comes with Swing and AWT test runners that are no longer part of the JUnit distribution. The test runner façade that you can use to start your tests from the console is now called org.junit.JUnitCore.
With no GUI test runners included in the distribution, the only way to glimpse the old green bar is to use your favorite IDE; they all have JUnit 4.x support.
A.4.2. Test suites
The old way of constructing sets of your tests involved writing a suite() method and manually inserting all the tests that you want to be present in the suite. Because the new version of JUnit is annotation oriented, it seems somehow logical that the construction of suites is also done by means of annotation. Further, the suite construction is done not by one annotation but by two annotations: the @RunWith and @SuiteClasses annotations.
The first annotation lets you define test runners that you can use to run your tests. The @RunWith annotation accepts a parameter called value, where you need to specify the test runner to run your suite: Suite.class. This test runner is included with JUnit, along with some other runners. But in this annotation you can also specify a custom runner. You can find out how to implement your own JUnit runners in appendix B.
The second annotation declares all the tests that you want to include in the suite. You list the classes that hold your tests in the value parameter of the @SuiteClasses annotation.
Listing A.9 shows how to construct test suites in JUnit 4.x.
Listing A.9. Constructing test suites with JUnit 4.x
@RunWith(value=Suite.class)
@SuiteClasses(value={CalculatorTest.class, ComputerTest.class})
public class CalculatorTests {
  [...]
}
Some people find the way test suites are done in JUnit 4.x unnatural, and indeed, at first sight it is. But once you start writing tests, you’ll see that there’s nothing unnatural in the way things are done. Remember that you can include the @BeforeClass and @AfterClass annotated methods in the suite. This wasn’t possible with the 3.x versions of JUnit.
A.4.3. Parameterized tests
As you saw, the @RunWith annotation lets you define a test runner to use. The Suite test runner that we already presented lets you run your test cases in a suite. Another test runner that’s bundled with the JUnit distribution is the Parameterized test runner. This test runner lets you run the same tests with different input test data. We know that an example is worth several pages of explanation, so listing A.10 shows the example.
Listing A.10. Parameterized test runner in action
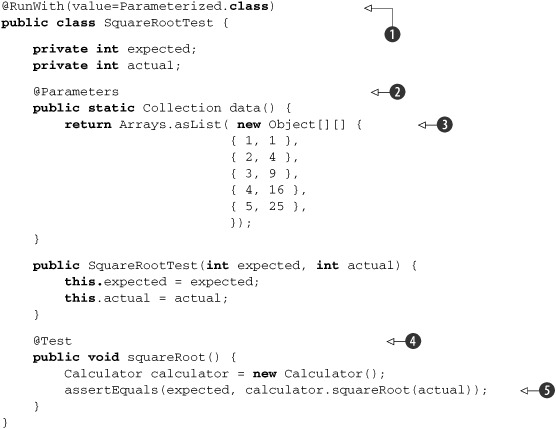
Imagine that we have a squareRoot method in our Calculator class that we want to test. This listing demonstrates how to test this method with different input test data. We start by
declaring the use of the Parameterized test runner at ![]() . Then, at
. Then, at ![]() , we define the static data() method that we annotate with @Parameters, denoting that this method returns the actual test data for our test. This test data is made from a java.util.List, and each element of the List is a two-dimensional array, the elements of which will be used to make a new instance of the SquareRootTest. At
, we define the static data() method that we annotate with @Parameters, denoting that this method returns the actual test data for our test. This test data is made from a java.util.List, and each element of the List is a two-dimensional array, the elements of which will be used to make a new instance of the SquareRootTest. At ![]() we fill in the test data and return it. At
we fill in the test data and return it. At ![]() we start the test method, and inside it we instantiate the Calculator object. After that, at
we start the test method, and inside it we instantiate the Calculator object. After that, at ![]() we assert the correctness of the result of the Calculator’s squareRoot() method with all of the test data.
we assert the correctness of the result of the Calculator’s squareRoot() method with all of the test data.
If you run this example, you’ll get a result like what you’d see if you’d just run five distinct assertions like the following:
assertEquals( 1, calculator.squareRoot ( 1 ) );
assertEquals( 2, calculator.squareRoot ( 4 ) );
assertEquals( 3, calculator.squareRoot ( 9 ) );
assertEquals( 4, calculator.squareRoot ( 16 ) );
assertEquals( 5, calculator.squareRoot ( 25 ) );
A.5. New assertions and assumptions
This final section deals with the new assertion and assumption mechanisms introduced in JUnit 4.x. It also reveals the integration between JUnit and the Hamcrest matcher—something that allows you to write useful match statements to simplify your assertions.
A.5.1. Hamcrest assertions
In version 4.4 of JUnit, the Hamcrest assertion mechanism was incorporated. The Hamcrest assertion mechanism was introduced in JMock and provides a new, robust, fluent API for assertions. With Hamcrest assertions, you’re able to write more readable and flexible test assertions like these in listing A.11.
Listing A.11. Hamcrest assertions in JUnit 4.4+
[...]
import org.junit.Test;
import static org.junit.Assert.*;
import static org.hamcrest.CoreMatchers.is;
import static org.hamcrest.CoreMatchers.not;

public class CalculatorTest {

    @Test
public void squareRoot() {
        Calculator c = new Calculator();
        assertThat(2, is(c.squareRoot(4)));
        assertThat(3, is(not(c.squareRoot(4))));
    }
}
The org.hamcrest.CoreMatchers and org.junit.matchers.JUnitMatchers packages are distributed with JUnit and contain numerous matchers. The Hamcrest matchers that come with JUnit are the first third-party classes included in JUnit.
If you find them insufficient, you can always get the full Hamcrest project from the internet and use any of those matchers with JUnit.
A.5.2. Assumptions
As a developer, you always strive to execute your tests against various scenarios. But sometimes you have no control over the environment the tests are run in, as in the case when the test depends on the operating system path-separator character (in Windows it is and in UNIX it is /). This may mandate that your test cases run in Windows boxes and not in Linux boxes. It would be good if you could make an assumption as to what the character separator is and execute the tests only if your assumption is correct.
With the 4.4 release of JUnit, assumptions were introduced. assumeThat is the natural way in JUnit to run a given test against assumptions you make. You can assume that a given condition is set and then assert that the tests pass. Consider listing A.12.
Listing A.12. Assumptions in JUnit

As you can see, we use the assumeThat method to make sure the file separator is UNIX style ![]() and then assert that the database configuration file path is correct
and then assert that the database configuration file path is correct ![]() . What happens if the assumption is wrong, and we’re running the tests on a Windows box? Our tests are marked as passing,
regardless of the assertions we make!
. What happens if the assumption is wrong, and we’re running the tests on a Windows box? Our tests are marked as passing,
regardless of the assertions we make!
A.5.3. New assertions
The assertXXX methods in JUnit 3.x are thorough enough, but they lack any method to compare equality of arrays. Two methods with these signatures
assertEquals(Object[] expected, Object[] actual)
assertEquals(String message, Object[] expected, Object[] actual)
were added to the JUnit 4.0 framework to help with that task. These methods, given two arrays, start by checking the sizes of the arrays. If the sizes are the same, they will call the equals() method on each of the elements.
In version 4.3 these two methods were deprecated in the way they’re used, and a whole new bunch of methods named assertArrayEquals() were introduced.
From version 4.6 on of the JUnit framework, you can use a convenient new method for testing the equality of two arrays of doubles:
assertArrayEquals(double[]first ,double[] second, double delta);
This compares every element of the first element with the corresponding element of the second array using the given delta.
A.5.4. Assertion errors
When you test with the 3.x version of JUnit, and any part of your assert is wrong, you get a junit.framework.AssertionFailedError message. With the new version of JUnit, that’s no longer true, and in case of wrong assertions you see the java.lang.AssertionError message. The java.lang.AssertionError class was introduced in JDK 1.4.