
Chapter 19. JUnit on steroids
Make everything as simple as possible, but not simpler.
Albert Einstein
This chapter covers
- Transparent mocks utilization
- Out-of-the-box DbUnit integration
- Extended assertion capabilities
- Bypassing encapsulation through reflection
Throughout this final part of the book, we’ve analyzed tools focused on testing specific technologies, such as AJAX applications and database access. In this final chapter, we evaluate tools that don’t fit a particular niche but rather facilitate overall test development by providing helper methods and plumbing infrastructure. By using such tools, the developer can focus on the real functionality being tested, which can greatly improve productivity.
Functionally speaking, we analyze tools that automate mock usage, provide a wider number of assertion methods, use reflection to access private members of tested objects, and make DbUnit usage easier. Because these tools provide generic testing support, many of these features are provided by more than one tool. Such feature overlap might sound redundant (the classic NIH[1] syndrome), but this diversity allows you to choose the most appropriate tool for your needs.
1 Not Invented Here
19.1. Introduction
Let’s take a brief look at the tools analyzed and how to run this chapter’s examples. All of these tools are open source projects; some are active and mature, and others have been stalled in development for quite awhile.
19.1.1. Tools overview
Following are descriptions of all tools analyzed in this chapter.
Unitils
Unitils (http://unitils.org) is a library that provides plumbing infrastructure for many types of testing needs, such as database access, mocks usage, and Spring integration. Although it’s a relatively new framework (created at the end of 2006), it’s a mature project and has been designed from the ground up with modern testing concepts in mind. It’s framework agnostic (works with JUnit 3.x, JUnit 4.x, and TestNG), its features are offered as modules (which provides room for extensibility), and it makes heavy use of Java annotations.
JUnit-addons
Created in 2002, JUnit-addons is the oldest tool analyzed in this chapter. As the website (http://sourceforge.net/projects/junit-addons) states, “JUnit-addons is a collection of helper classes for JUnit.” Sounds quite simple, and indeed it is. But despite its simplicity and the fact that its development has pretty much stalled (the last version was released in 2003!), it’s still a useful tool, especially for projects based on JUnit 3.x, because many of the features it provides are already available on JUnit 4.x.
FEST
FEST (http://fest.easytesting.org) stands for Fixtures for Easy Software Testing, and as the name implies, it’s another library providing a useful testing infrastructure. Similarly to Unitils, FEST also works with JUnit or TestNG[2] and is based on modules. Although most of the modules provide functionalities already offered by other tools, they do it in different ways, which might sound more natural for developers used to the JMock style of declarations, more specifically, to the fluent interface style, as defined at http://martinfowler.com/bliki/FluentInterface.html. But regardless of these overlapping features, it offers a module (FEST Swing) that’s quite unique, because it provides support for GUI testing.
2 The project was initialized under the name TestNG-Abbot.
Mycila Testing Framework
Mycila (http://code.google.com/p/mycila) is an umbrella for many subprojects, each one focused on particular needs, such as testing. It’s the latest offspring of this new breed of general-purpose testing libraries (which also includes Unitils and FEST), and at the time this chapter was written it was still in its infancy. Although all of its features we analyze in this chapter are provided by other tools, this project also offers unique features, such as a module to test Guice[3] -based applications; if it fulfills its ambitious goal of providing “Powerful projects for everyday needs!” it could be another valuable asset in the toolbox.
3 Guice (http://code.google.com/p/google-guice) is “a lightweight dependency injection framework for Java 5 and above, brought to you by Google.” In other words, it’s the simplified Google-based version of Spring.
19.1.2. Running the examples
The test cases for this sample application are available in two flavors: Maven and Ant. To run the tests on Maven, run mvn clean test. Similarly, to run them using Ant, type ant clean test. Some of these tools might require esoteric dependencies at runtime (for instance, Unitils database support uses Spring for transaction management), but all such dependencies are commented in the build.xml file. The application is also available as two Eclipse projects, one with the required libraries and another with the project itself.
Now that all introductions have been made, let’s get down to business.
19.2. Transparent mock usage
When you use mocks in your test cases,[4] the test method is typically structured as follows:
- Create an instance of the object being tested.
- Create mock instances for dependent objects, and inject them into the tested object.
- Set mock expectations.
- Call the method being tested.
- Optionally, verify mock expectations.
You could manually write these five steps in every test (that’s the approach we’ve taken so far, in chapters 6 and 16), but as you learned in chapter 17 (section 17.7.1), such repetitive workflow is a strong candidate for refactoring through the Template Design Pattern. Only steps 3 and 4 are test specific; all other steps are pretty much the same for all tests.
In this section, we analyze three tools that provide infrastructure for transparent mock usage, and we refactor the existing UserFacadeImplTest (originally defined in listing 18.5) to use each of them.
19.2.1. Unitils EasyMock support
Before we dig into Unitils mock support, let’s first see how Unitils works so we can configure it properly.
Unitils is configured through standard Java properties (those defined by a pair of strings in the form name=value), and these properties can be defined in three distinct files. The first file is called unitils-default.properties, and it’s provided on Unitils’ JAR.[5] As the name implies, it provides default values for most of the properties, so Unitils could be used out of the box without custom configuration. But default properties aren’t always enough—if they were, there’d be no need for properties at all—so Unitils allows project-specific properties to be overridden in a unitils.properties file, which should be available either in the classpath or in the user’s home directory.[6] Finally, Unitils also allows each developer to override the properties in a user-specific file called unitils-locals.properties,[7] which should also be present in the classpath or user’s home directory.
5 The contents of this file are also documented online, at http://unitils.org/unitils-default.properties.
6 The home directory is defined by the Java system property user.home.
7 The name of this file is defined itself by a property, so it could have any name, as long as the name property is changed in unitils.properties.
This configuration mechanism allows a high degree of flexibility, which can be dangerous. If tests rely too heavily on the user-specific properties, they might be hard to reproduce. Ideally, the whole test suite should be runnable using only the project-specific properties, and the user-specific ones should be used only in some particular cases, like when each user has its own testing database.
That being said, each module has its own properties, and even which modules are available are defined by a property, unitils.modules, which by default includes all modules. For our mock example (listing 19.1), it isn’t necessary to change any properties, although the mock configuration is quite extensive (two modules are involved, as you can see in the listing).
Listing 19.1. UserFacadeImpl test refactored to use Unitils mock support
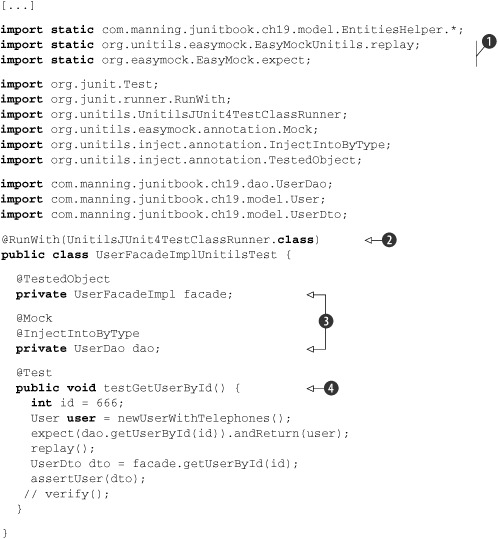
In order to use Unitils, first the test class must either extend the superclass that provides support for the testing framework
being used (like UnitilsJUnit4) or annotate it with the proper JUnit runner; in this example, we opted for the latter ![]() . The next step is to declare fields representing the object being tested and the mocks; Unitils provides annotations for
both, as shown in
. The next step is to declare fields representing the object being tested and the mocks; Unitils provides annotations for
both, as shown in ![]() . Notice that the @Mock annotation will create an EasyMock mock; although Unitils mock support is provided through modules, currently only EasyMock
is available. Next comes the test method itself
. Notice that the @Mock annotation will create an EasyMock mock; although Unitils mock support is provided through modules, currently only EasyMock
is available. Next comes the test method itself ![]() , whose content is pretty much the same as before; the only differences are that it uses Unitils’ replay() method instead of EasyMock’s (that’s why in
, whose content is pretty much the same as before; the only differences are that it uses Unitils’ replay() method instead of EasyMock’s (that’s why in ![]() we statically imported any methods explicitly, instead of using *) and it isn’t necessary to call verify() (Unitils will automatically do that after the test is run, although such behavior could also be changed by modifying a property).
we statically imported any methods explicitly, instead of using *) and it isn’t necessary to call verify() (Unitils will automatically do that after the test is run, although such behavior could also be changed by modifying a property).
Compare this example with chapter 18’s (shown in listing 18.5). Although the core of the class (the test method itself) is the same, this new example requires much less setup. It might not sound like a big difference in these two simple examples, but in a real project, with dozens or even hundreds of such test cases, such small local improvement results in a big gain in the global productivity.
Behind the scenes, Unitils uses two modules, inject and easymock. Because we didn’t configure anything, Unitils loaded all modules. The default value for the modules property is
unitils.modules=database,dbunit,hibernate,mock,easymock,inject,spring,jpa
If this property isn’t overridden, Unitils will load all modules, which means more implicit setup methods need to be called before and after each test. If you don’t need all modules, set this property with just the necessary ones. In our example, it would be
unitils.modules=easymock,inject
If you forget to include a module, Unitils won’t instantiate the attributes that use annotations from that module, and the test case will eventually throw an exception. For instance, if the easymock module was not included, the dao reference wouldn’t be set, and the expect(dao.getUserById(id)) statement would throw a NullPointerException.
Besides configuring which modules are used, you can also change some module behavior through module-specific properties. For instance, to disable calls to EasyMock’s verify() after the test cases are run, you set EasyMockModule.autoVerifyAfterTest.enabled to false. It’s also possible to set the mock behavior mode (lenient or strict), even if the order of calls should be taken into account.
Another interesting Unitils feature is the @Dummy concept. Attributes annotated with @Dummy behave similarly to those annotated with @Mock, except that you don’t need to set expectations: all method calls will return default values (such as 0 for methods that return an int). These dummies are convenient for cases where your tested objects need a valid reference to another object, but the behavior of that object is irrelevant for the test case where it’s used.
19.2.2. FEST-Mocks
Listing 19.2 shows the same example using FEST-Mocks.
Listing 19.2. UserFacadeImpl test refactored to use FEST-Mocks
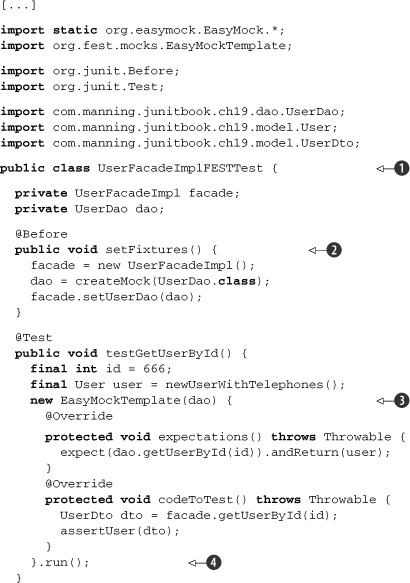
FEST-Mocks doesn’t require the test class ![]() to extend any class or to use any special runner; as a drawback, it’s necessary to manually instantiate the mocks and objects
being tested
to extend any class or to use any special runner; as a drawback, it’s necessary to manually instantiate the mocks and objects
being tested ![]() . All it does is provide an abstract template class that must be extended on each test case
. All it does is provide an abstract template class that must be extended on each test case ![]() , which in turn must explicitly set the expectations and run the code to be tested. Then when the method run() is called
, which in turn must explicitly set the expectations and run the code to be tested. Then when the method run() is called ![]() , it executes a workflow similar to that described at the beginning of this section (the main difference is that the verify
step isn’t optional, and verify() is always called).
, it executes a workflow similar to that described at the beginning of this section (the main difference is that the verify
step isn’t optional, and verify() is always called).
Overall, FEST-Mocks is a bit convoluted, because it explicitly uses the Template Design Pattern, but in a complex way. Its creators claim that separating the mock’s expectation and code being tested makes the test case clear. Although we agree that the result is clear to read, it seems less natural and more verbose to develop.
19.2.3. Mycila
Mycila mock support is similar to Unitils in the way that you mark your mock attributes with annotations. Unlike Unitils, however, you still need to do some manual setup in a @Before method, such as creating the objects being tested and calling the Mycila initialization method. Listing 19.3 shows our example converted to Mycila.
Listing 19.3. UserFacadeImpl test refactored to use Mycila EasyMock plug-in
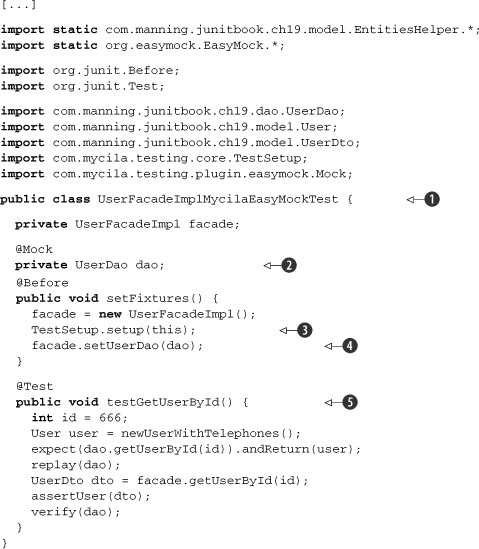
As you can see on ![]() , Mycila doesn’t require any special inheritance or custom runner, which forces the test case to explicitly call its TestSetup.setup() in a @Before method
, Mycila doesn’t require any special inheritance or custom runner, which forces the test case to explicitly call its TestSetup.setup() in a @Before method ![]() . That method then scans the test class looking for @Mock annotations and does the proper EasyMock setup when they’re found, such as in
. That method then scans the test class looking for @Mock annotations and does the proper EasyMock setup when they’re found, such as in ![]() . Notice that each test case statement that requires a reference to these mocks (like the dependency injection defined in
. Notice that each test case statement that requires a reference to these mocks (like the dependency injection defined in
![]() ) must be executed after TestSetup.setup() is called. Mock injection is the only mock support Mycila provides; the test method itself
) must be executed after TestSetup.setup() is called. Mock injection is the only mock support Mycila provides; the test method itself ![]() is responsible for calling replay() and verify() in the mocks.
is responsible for calling replay() and verify() in the mocks.
Mycila also supports other mock frameworks, such as JMock (also analyzed in chapter 6) and Mockito (http://mockito.org). Listing 19.4 shows the same example using the JMock plug-in.
Listing 19.4. UserFacadeImpl test refactored to use Mycila JMock plug-in
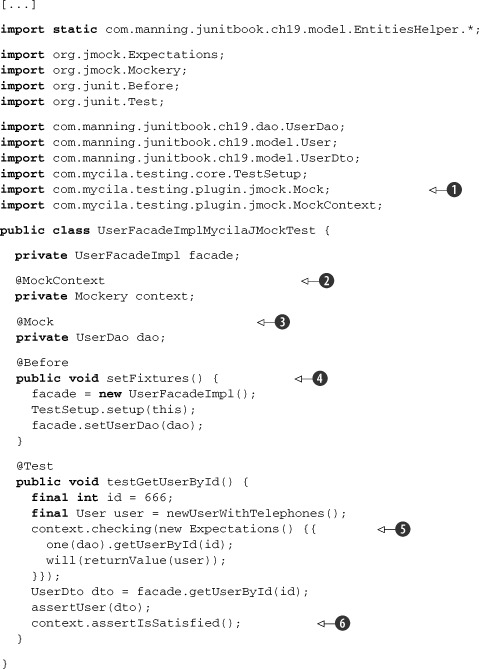
This new example is similar to the previous one; the test setup ![]() is even exactly the same. The only differences are the dao reference
is even exactly the same. The only differences are the dao reference ![]() being marked with a @Mock annotation defined in another package
being marked with a @Mock annotation defined in another package ![]() , the need for a Mockery object
, the need for a Mockery object ![]() , and the way expectations are set and verified (
, and the way expectations are set and verified (![]() and
and ![]() respectively).
respectively).
So, given the mock support offered by these three tools, which one should you use in your project? If you’re looking for transparent EasyMock usage, Unitils is clearly the best option, because it requires less effort in the test cases (no setup or calls to verify) and is highly configurable. But if you need to use JMock or prefer a clear separation between expectations and tested code, then Mycila or FEST, respectively, is the more suitable option.
19.3. DbUnit integration
In chapter 17 we presented an in-house framework that uses Java annotations to facilitate usage of DbUnit datasets in test cases. Wouldn’t it be nice if such a framework was offered out of the box? Well, guess what? Unitils’ dbunit module provides exactly that!
Unitils provides four modules related to database testing: database, dbunit, hibernate, and jpa. The database module is mainly responsible for providing a database connection that will be used by tests and managing transactions, although it offers other features, such as a database maintainer that can be used to synchronize the developer’s databases. Then the dbunit module scans the test class for annotations that define which DbUnit datasets should be used on each test. Finally, the hibernate and jpa modules can be used to inject the necessary ORM classes (such as Hibernate’s Session or JPA’s EntityManager) into the test cases, which can also be done through the use of annotations.
The dbunit module works similarly to the infrastructure provided in chapter 17: you mark the test methods with annotations (@DataSet and/or @ExpectedDataSet), and Unitils takes care of preparing the database or asserting its content with the dataset defined by these annotations. The main differences are where the datasets are located (relative to the class’s package directory in the classpath) and also the fact that the annotations could be defined at class or method levels (class level is useful when many methods use the same dataset; individual methods could then override it by using the annotation again with different values).
In chapter 17 we used DbUnit to test a JDBC-based DAO, and in chapter 18 we used it to test a JPA-based DAO that used Hibernate as the JPA implementation. Let’s rewrite these two test cases using Unitils, starting with the JDBC version in listing 19.5.
Listing 19.5. Refactored UserDaoJdbcImplTest using Unitils
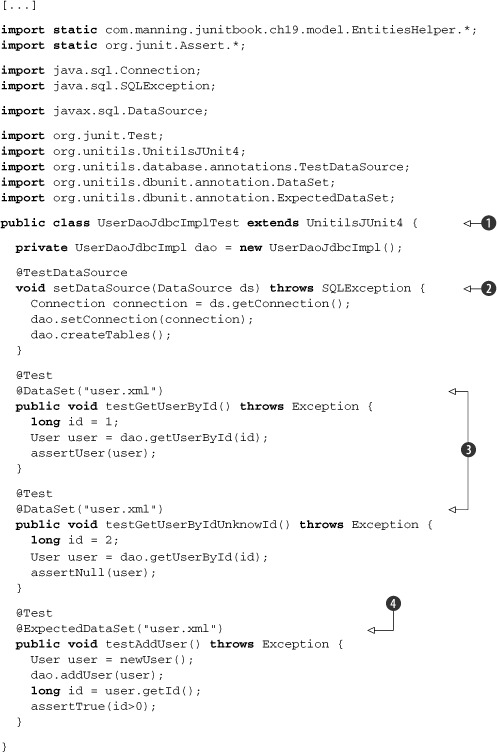
In the mock example we used a custom runner to provide Unitils integration; this time we opt to extend in ![]() the proper Unitils superclass. The next step is to signal the database module that the test case needs a data source (which
in turn will be used to configure the DAO); that’s accomplished through the @TestDataSource annotation, which could be used in an attribute or a method. In our case, we use it in a method
the proper Unitils superclass. The next step is to signal the database module that the test case needs a data source (which
in turn will be used to configure the DAO); that’s accomplished through the @TestDataSource annotation, which could be used in an attribute or a method. In our case, we use it in a method ![]() , because it’s necessary to pass the database connection to the DAO and call the DAO to create the database tables;[8] otherwise, the dbunit module will fail when it tries to load the datasets.
, because it’s necessary to pass the database connection to the DAO and call the DAO to create the database tables;[8] otherwise, the dbunit module will fail when it tries to load the datasets.
8 If we weren’t using an embedded database but rather a developer database with the tables already created, then we could use @TestDataSource in a DataSource attribute and use a @Before method to pass the connection to the DAO.
Then in ![]() we have tests that load data from the database, so we use the @DataSet annotation to define a dataset that will be used to prepare the database before the test. Notice that the name “user.xml” refers to a dataset file located in the classpath within the same directory structure as the test class package (in our
example, com/ manning/junitbook/ch19/dao/user.xml). The content of this file is the same as the one listed in chapter 17, listing 17.5. Finally, on
we have tests that load data from the database, so we use the @DataSet annotation to define a dataset that will be used to prepare the database before the test. Notice that the name “user.xml” refers to a dataset file located in the classpath within the same directory structure as the test class package (in our
example, com/ manning/junitbook/ch19/dao/user.xml). The content of this file is the same as the one listed in chapter 17, listing 17.5. Finally, on ![]() we have a test case where data is inserted into the database and DbUnit is used to compare the results; we use @ExpectedDataSet in this case.
we have a test case where data is inserted into the database and DbUnit is used to compare the results; we use @ExpectedDataSet in this case.
The JPA example is pretty much the same; the main difference is the code to set up the EntityManager and the DAO. Listing 19.6 shows the new test case, focusing on test setup and showing only one test method.
Listing 19.6. Relevant changes to UserDaoJpaImplTest
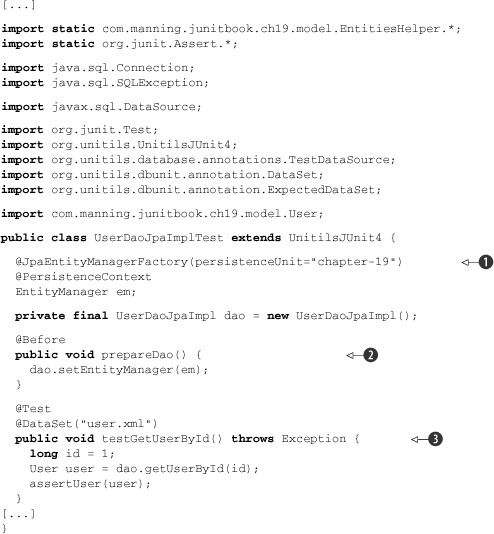
The only differences in this test case are that in ![]() two annotations are used to mark the EntityManager (which will be injected by Unitils before the tests are run), and then in
two annotations are used to mark the EntityManager (which will be injected by Unitils before the tests are run), and then in ![]() the EntityManager is passed to our DAO. At
the EntityManager is passed to our DAO. At ![]() we have the test method itself; notice that it’s identical to the same test method in listing 19.5 (even though the DAO implementation is different) and similar to chapter’s 18 test, except that in this new example it isn’t
necessary to manage the transaction, because Unitils does that automatically for us.[9]
we have the test method itself; notice that it’s identical to the same test method in listing 19.5 (even though the DAO implementation is different) and similar to chapter’s 18 test, except that in this new example it isn’t
necessary to manage the transaction, because Unitils does that automatically for us.[9]
9 Unitils starts a transaction before each test and commits it afterward, although it could be configured to roll back instead (through the DatabaseModule.Transactional.value.default property).
Besides the test classes themselves, it’s necessary to set the database connection on unitils.properties, as shown in listing 19.7.
Listing 19.7. unitils.properties settings for the DbUnit examples

The database information is set on ![]() , and
, and ![]() lists the modules used in these tests. Notice that
lists the modules used in these tests. Notice that ![]() could be omitted, because by default Unitils uses all modules.
could be omitted, because by default Unitils uses all modules.
As shown in these examples, Unitils DbUnit support is similar to the framework developed in chapter 17, although each has its pros and cons. For instance, Unitils allows you to use merged datasets, whereas the in-house framework provides EL support. Another major difference is that Unitils automatically manages the transaction.
From the tools analyzed, Unitils is the only one currently supporting DbUnit, although Mycila seems to have plans to provide a DbUnit plug-in in the near future.
19.4. Assertions made easy
Having a powerful toolbox of assertion methods readily available is an important asset in test case development. Why? For two main reasons: productivity and clarity.
When you’re writing a test case, your focus is on the test case logic; assertions are just an accessory. For example, if you need to assert that a variable is greater than a certain number, your first instinct is to write something like assertTrue(x>42). Such assertions work fine when the condition holds true, but when it fails, all you get is a junit.framework.AssertionFailedError: null message, which is far from clear. A second approach would be to include a message in the assertion, such as assertTrue("X should be greater than 42, but it is "+x, x>42). Sure, the clarity is improved but at the cost of productivity: you now need to create a long string, which contains the name of the variable (X), the operand (greater), and the current value concatenated, which is not only boring but also error prone. A better approach would be to have an assertion method specialized in comparisons, which would make it as simple as assertGreaterThan(x, 42).
JUnit provides a handful of assertions out of the box through the org.junit.Assert class, and although such features cover the basic needs, they come up short in some particular cases, such as comparing collections or properties in a JavaBean (not to mention the example in the previous paragraph). Fortunately, many third-party libraries provide complementary assertions, and in this section we analyze a few of them.
19.4.1. JUnit-addons assertions package
JUnit-addons provides a bunch of XXXAssert classes (such as ListAssert and FileAssert) in the junitx.framework package, and each of them provides static methods aimed to assert specific objects. Although some of the assertion features they offer are now present in JUnit 4.x,[10] some are still surprisingly missing. For instance, JUnit’s Assert class provides assertTrue(), assertFalse(), and assertEquals() methods, but there isn’t an assertNotEquals() method, which is provided by JUnit-addons’ Assert.
10 Such as the AssertArray class, whose methods provides the same functionality as Assert.assertArrayEquals().
Let’s start with our prologue example, comparing a variable to a number. For that purpose, JUnit-addons offers the ComparableAssert class, which provides methods to assert objects implementing java.lang.Comparable (numbers happen to be a subset of such objects). For instance, to assert that a variable x is greater than 42, we’d write
ComparableAssert.assertGreater(42, x);
And in the case of failure, the message would be
junit.framework.AssertionFailedError: expected greater than:<42> but was:<23>
The next interesting class is ListAssertions, which, as the name implies, provides methods to verify lists. More specifically, it has only two methods: assert Equals (List, List) and assertContains(List, Object).[11] Before we see them in action, let’s define a few List fixtures:
11 Technically speaking, it provides four methods, because each assert method has an overloaded version that also takes a message.
List<Integer> LIST1 = Arrays.asList(4, 8, 15, 16, 23, 42);
List<Integer> LIST2 = Arrays.asList(108);
List<Integer> LIST3 = Arrays.asList(4, 8, 15, 16, 42, 23);
List<Integer> LIST4 = Arrays.asList(4, 8, 15, 16, 108, 23);
The first list (LIST1) contains six random numbers and is the list that will be compared with a list with a different number of elements (LIST2), a list with the same elements but in a different order (LIST3), and a list with the same number of elements but some different ones (LIST4).
If you used JUnit’s assertEquals() method to compare LIST1 and LIST4, the message would be
java.lang.AssertionError: expected:<[4, 8, 15, 16, 23, 42]> but was:<[4, 8, 15, 16, 108, 23]>
Although the message contains a clear description of the list’s content, it’s not easy to realize why they aren’t equal. The reason is that JUnit’s assertEquals() method treats the list as any other object, delegating its message formatting to Java’s String class.
If we used the JUnit-addons alternative (ListAssert.assertEquals()) instead, the result would be
junit.framework.AssertionFailedError: expecting <42> in
That’s a better message, although it doesn’t inform us as to where the lists are different, only that one element is missing. The way the method works, it would fail to detect that LIST1 and LIST3 are different, because they have the same elements but in different order. It sounds like a bug, but it’s a design decision, as stated in the Javadoc: “Asserts that two lists are equal (the order is not relevant).”[12] If the lists have different sizes (like LIST1 and LIST2), the message is even more confusing:
12 It’s still a conceptual bug; such behavior would make more sense comparing sets.
junit.framework.AssertionFailedError: expecting <4> in <108>
So, long story short, ListAssert.assertEquals() isn’t that much better than JUnit’s cousin. You’ll see better options for list comparison, but don’t throw the JAR away yet, because it provides the useful assertContains() method. For instance, calling ListAssert.assertContains(LIST1, 666) would result in
junit.framework.AssertionFailedError: expecting <666>
JUnit-addons offers a couple more assertion classes, such as FileAssert (which provides methods to compare contents of text and even binary files), NamingAssert (for JNDI-related assertions), StringAssert (which contain assert methods for String’s own methods, such as assertStartsWith()), and even ObjectAssert (which contains methods such as assertInstanceOf()). These classes are pretty straightforward—simple, but quite useful for what they offer.
19.4.2. Unitils’ ReflectionAssert
Unitils has only one class that provides extended assertions: org.unitils.reflectionassert.ReflectionAssert. That class is powerful, though, because it knows how to compare many types of objects, from simple JavaBeans to collections and Hibernate proxies, using reflection. More specifically, it uses reflection to compare the value of each field and offers options to harden or relax the comparison (for instance, comparing only fields when a value isn’t null or ignoring dates).
ReflectionAssert contains literally dozens of methods, and their usage isn’t trivial. Some methods are named similarly (like assertLenEquals() and assertLenientEquals(); the former is deprecated and calls the latter); many methods take as a parameter an array of ReflectionComparatorMode (which is an enum that defines the comparison behavior); and the array is a vararg (which means the method also works without that parameter!). That being said, let’s start with the class’s main method, assertReflectionEquals().
The full signature[13] of this method is assertReflectionEquals(Object expected, Object actual, ReflectionComparatorMode... modes). Because the modes parameter uses a vararg, it’s optional, so if you don’t pass a comparator mode, it does a strict comparison in all fields. For instance, having two User objects (as defined in listing 19.1), with the difference being that user1’s username field is null, calling assertReflectionEquals(user1, user2) would result in the following:
13 Here, and throughout this whole chapter, we’re ignoring the most complete version that also takes a message, because it isn’t relevant to what’s being explained.
junit.framework.AssertionFailedError: Found following differences:

 username
    =>  null
    =>  "ElDuderino"
--- Difference details ---

 =>  User<id=0, username=null, firstName="Jeffrey", lastName="Lebowsky",
     telephones=[]>
 =>  User<id=0, username="ElDuderino", firstName="Jeffrey",
     lastName="Lebowsky", telephones=[]>

username =>  null
username =>  "ElDuderino"
Not only did it find the difference, but it printed both brief and detailed messages of what went wrong (and all assertion methods from this class behave this way).
If you want to ignore the fields that are null, you need to pass the ReflectionComparatorMode.IGNORE_DETAILS mode as a parameter, such as assertReflectionEquals(user1, user2, IGNORE_DETAILS). Be aware that the order is important here, because fields are ignored only when their value is null in the expected parameter. Calling assertReflectionEquals(user2, user1, IGNORE_DETAILS) with these same User instances would fail, whereas assertReflectionEquals(user1, user2, IGNORE_DETAILS) would pass.
The other two comparison modes are LENIENT_DATES, which ignores in the comparison any field that’s a java.util.Date, and LENIENT_ORDER, which is relevant only when comparing collections. Because the lenient comparison is common, most of the ReflectionAssert assertReflectionXXX() methods offer a counterpart called assertLenientXXX() that automatically includes IGNORE_DETAILS and LENIENT_ORDER, such as assertLenientEquals(Object expect, Object actual). The idea behind this behavior is that in many cases the functionality being tested doesn’t fill every field of an object, and having to compare all of them would require a lot more work. That’s particularly useful in database access tests, such as in a getLoginAndPassword() method where the user’s table has dozens of fields but only two of them are filled and need to be compared.
These methods can also be used to compare collections. For instance, using the lists defined a few examples ago and calling assertReflectionEquals(LIST1, LIST4) results in the following:
junit.framework.AssertionFailedError: Found following differences:

  [4]
    =>  23
    =>  108
  [5]
    =>  42
    =>  23

--- Difference details ---

 =>  [4, 8, 15, 16, 23, 42]
 =>  [4, 8, 15, 16, 108, 23]

[4] =>  23
[4] =>  108
[5] =>  42
[5] =>  23
This message might look cryptic at first sight, but it’s pretty straightforward: it says that elements on indexes 4 and 5 are different (23 instead of 108, and 42 instead of 23, respectively). If the order of the elements isn’t important, you could pass LENIENT_ORDER as parameter or call assertLenientEquals() instead. The message in this case would be slightly different, though, as shown here:
junit.framework.AssertionFailedError: Found following differences:

 [5,4]
    =>  42
    =>  108

--- Difference details ---

 =>  [4, 8, 15, 16, 23, 42]
 =>  [4, 8, 15, 16, 108, 23]

[5,4] =>  42
[5,4] =>  108
Here it shows that these lists have only one element that’s different, although they’re different in distinct locations (indexes 5 and 4, respectively).
Overall, ReflectionAssert is a powerful class. Once you break the learning curve barrier, you get a valuable tool for your day-to-day assertions.
19.4.3. FEST Fluent Assertions Module
FEST Fluent Assertions Module (also called FEST-Assert) provides custom assertion for many types of objects, such as collections, strings, exceptions, files, BigDecimals, and even BufferedImages. And not only does it supports a great variety of objects, but the assertions are expressed in a different syntax, similar to the Hamcrest syntax (described in chapter 3) but even more natural, because the assertion methods can be chained.
The entry point for the assertions is the method assertThat(actual) from the org.fest.assertions.Assertions class. That method is overloaded a dozen times, each with a different type for the actual parameter and returning the proper assertion class for that type. Sound confusing? It’s quite clever and simple (once you get used to it), so let’s use the x > 42 example to make it clear. Assuming a variable x of type int, that assertion would be
Assertions.assertThat(x).isGreaterThan(42);
And the result would be
java.lang.AssertionError: actual value:<23> should be greater than:<42>
Behind the scenes, all Assertions.assertThat() methods return a subclass of Assert, in this case an IntAssert (because x is an int), which has methods such as isGreaterThan(int). These methods, in turn, also return IntAsserts, allowing many calls to be chained, as follows:
Assertions.assertThat(x).isGreaterThan(42).isLessThan(108);
You can make this easier to read if you static import Assertions and split the methods one per line:
assertThat(x).isGreaterThan(42)
             .isLessThan(108) ;
All asserts have common methods, like as(String description), which can be used to describe the actual object. In the previous example, we could describe it as "X":
assertThat(x).as("X").isGreaterThan(42)
                     .isLessThan(108);
And the message would be
java.lang.AssertionError: [X] actual value:<23> should be greater than:<42>
Overall, FEST-Assert assertions are easy to use and straightforward, especially when using an IDE with autocompletion. But for comparison purposes, here are some examples of collection assertions, similar to the ones we looked at so far (using other tools).
- Comparing collections contents (assertThat(LIST1).isEqualTo(LIST4)):
java.lang.AssertionError: expected:<[4, 8, 15, 16, 108, 23]>
but was:
<[4, 8, 15, 16, 23, 42]> - Checking that a list has a given element (assertThat(LIST1).contains(666)):
java.lang.AssertionError: collection:<[4, 8, 15, 16, 23, 42]>
does not contain element(s):
<[666]> - Checking that a list has many given elements (assertThat(LIST1).contains(108, 666)):
java.lang.AssertionError: collection:<[4, 8, 15, 16, 23, 42]>
does not contain element(s):
<[108, 666]> - Asserting that a collection doesn’t have duplicates (assertThat(Arrays. asList(42,42)).doesNotHaveDuplicates()):
java.lang.AssertionError: collection:<[42,42]>
contains duplicate(s):
[42]>
19.4.4. Mycila extend assertions
Mycila also provides a module for assertions, which uses a Hamcrest-like style similar to FEST, as shown in the examples at the project’s wiki page (http://code.google.com/p/mycila/wiki/ExtendedAssertions). Unfortunately though, this module was not widely available at the time the book was written, so we had to skip it. But it’s a project that’s worth watching.
As you can see in this section, custom assertions are provided by many tools. Whatever your assertion needs are, most likely one (or more) of these tools supports it. And by using them, you can easily increase the productivity and/or clarity of the failure messages. The gain might sound small, but every small improvement adds up when you write hundreds or even thousands of test cases.
19.5. Using reflection to bypass encapsulation
Ideally, test cases should not know anything about the internal state of the test objects. But the truth is, even in a perfect world where classes were designed with good encapsulation and testability in mind, sometimes it’s still necessary to bypass encapsulation and access internal members. With the advent of dependency injection (DI) containers such as Spring and Java EE 5 application servers, it’s common to have attributes defined as private without any getter or setter, only a Java annotation (like @Resource or @Autowired), which is the hint for the container to inject the dependency at runtime.
When fields of tested objects are private, most likely they will be accessed through reflection later on by some framework class. So, instead of complaining about privacy concerns, why don’t you play by the same rules and use reflection to access these fields in the test cases?
For instance, the UserFacadeImpl object defined in listing 19.4 has a private reference to a UserDao, and so far this reference could be set only through a public setUserDao() method. But if that method isn’t available, we could use reflection to access it instead. In this section we show how to do so, first using an in-house utility class and then analyzing two tools that provide such features for free.
19.5.1. In-house alternative
If you eventually need to set a private field in an object being tested, your first attempt might be using the reflection API directly in the test method. This isn’t a good approach, though, because the API is cumbersome to use, and most likely such a need will arise in other test cases. In situations like this, it’s better to add a new method to an existing utility class or create a new one if none exists yet. This particular method requires three parameters: a reference to the object whose field will be set, the name of the field, and its new value. And because you’ll probably need to get the value of the field at some point, why not add a helper method for that as well? Listing 19.8 shows these two methods.
Listing 19.8. Initial implementation of TestingHelper using the reflection API directly
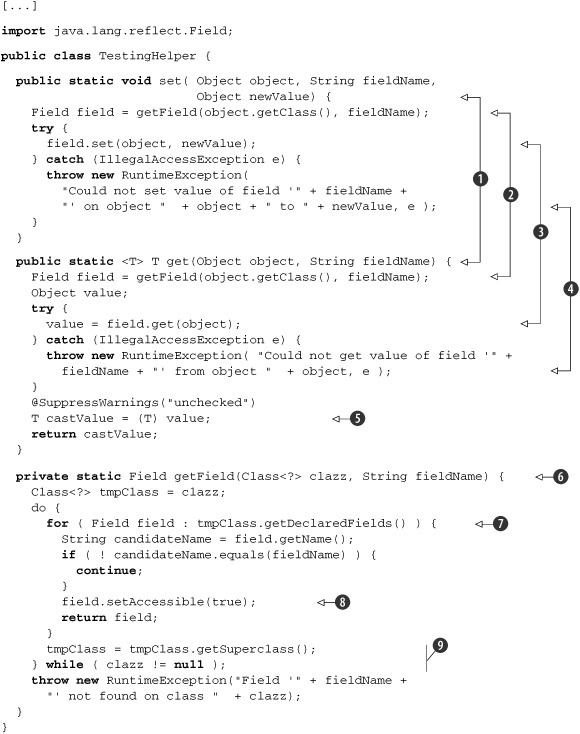
This class provides two helper methods ![]() , set() and get(), whose implementation follows the same workflow: get a reference to a java.lang.reflect.Field
, set() and get(), whose implementation follows the same workflow: get a reference to a java.lang.reflect.Field ![]() , do something with it
, do something with it ![]() , and convert
, and convert ![]() any reflection API exceptions to a RuntimeException so callers don’t need to worry about checked exceptions. get() also runs the extra Java 5 mile and casts the result
any reflection API exceptions to a RuntimeException so callers don’t need to worry about checked exceptions. get() also runs the extra Java 5 mile and casts the result ![]() to the expected type, so callers don’t need an explicit cast when assigning it to a variable.[14]
to the expected type, so callers don’t need an explicit cast when assigning it to a variable.[14]
14 This might sound like black magic, but what happens is that the compiler knows what type is expected and does the proper casting (because the method returns a parameterized type, <T>). That doesn’t eliminate ClassCastExceptions at runtime, but it does make the code cleaner, which is particularly welcome in test cases (in fact, many tools analyzed in the book, such as EasyMock and FEST, use this trick).
The dirtiest part is getting the Field reference ![]() ; this method has to scan all methods of the object’s class
; this method has to scan all methods of the object’s class ![]() and its superclass
and its superclass ![]() , and once the method is found, it must be made accessible
, and once the method is found, it must be made accessible ![]() .
.
Going back to our UserFacadeImpl example, once it doesn’t offer a setter for UserDao and these new helper methods are available, we could rewrite the facade.setUserDao(dao) statement on UserFacadeImplTest.setFixtures() (defined in listing 19.5) as
TestingHelper.set(facade, "userDao", dao);
One of the first things you learn when studying object-oriented languages is that they’re built on three pillars: encapsulation, inheritance, and polymorphism. And encapsulation best practice dictates that attributes should be defined as private and accessed only through getters and setters. As a good student and disciplined developer, you follow that practice and happily declare all your object fields as private, using a few hotkeys from your favorite IDE to generate those boring getters and setters. Then after a hard day at the office, you decide to read a few more pages of this book at home to relax, when you read something disturbing: those tightly encapsulated fields that you protected with so much care can be easily accessed throughout reflection! Your whole world falls apart, and your first instinct is to sell all your Java books and buy Y2K survival kits with the few bucks you get from the sale. Well, if that happens to you, please go back to the couch and relax again: you can only bypass encapsulation if you grant the permissions to the JVM to do so. More specifically, when you call methods such as Field.setAccessible(true), the JVM will first check with the SecurityManager to see if the calling method has permission to change the accessibility rules. You could argue that the permission is granted by default and hence the fields are wide open, but the truth is that such behavior is convenient most of the times, at least in the Java SE environment.
Anyway, the fact that such access is allowed or not by default is out of the scope of the book. Even if the JVM had a more strict default behavior, you could still configure the SecurityManager to lower the restrictions in your test case environment.
19.5.2. JUnit-addons
Junit-addons’ PrivateAccessor class provides methods similar to the ones we implemented from scratch in the previous section. The only differences are the name (getField() and setField(), instead of get() and set()); how they’re implemented (although the logic is the same, they use for instead of while); and the fact that get-Field() doesn’t return a parameterized value (because JUnit-addons predates Java 5).
Using PrivateAccessor directly, we’d rewrite our set DAO statement at setFixtures() as
PrivateAccessor.setField(facade, "userDao", dao);
Although using PrivateAccessor directly is fine, it has three drawbacks: getField() isn’t parameterized (so you’d need to cast its returned value on each test case), the caller would have to check for NoSuchFieldException, and you’d have to add a direct dependency on a third-party tool on all test cases (which would make it harder to switch to another tool later on). A better approach would be to use PrivateAccessor indirectly in the TestingHelper methods, rather than in the test cases themselves, as shown in listing 19.9.
Listing 19.9. TestingHelper refactored to use JUnit-addons
[...]

import junitx.util.PrivateAccessor;

public class TestingHelperJUnitAddons {

public static void set( Object object, String fieldName,
    Object newValue ) {
try {
      PrivateAccessor.setField(object, fieldName, newValue);
    } catch (Exception e) {
throw new RuntimeException( "Could not set value of field '" +
        fieldName + "'  on object "  + object + " to " + newValue, e );
    }
  }

public static <T> T get(Object object, String fieldName) {
try {
      Object value = PrivateAccessor.getField(object, fieldName);
      @SuppressWarnings("unchecked")
      T castValue = (T) value;
return castValue;
    } catch (NoSuchFieldException e) {
throw new RuntimeException( "Could not get value of field '" +
        fieldName + "' from object  "  + object, e );
    }
  }
PrivateAccessor also provides a few more methods, such as invoke() (to invoke any instance or static method), and overloaded versions of getField() and setField() to deal with static methods.
19.5.3. FEST-Reflect
FEST-Reflect offers helper classes to access all sorts of Java entities, such as fields, methods, constructors, and even inner classes. And as is the case with all other FEST modules, it follows the fluent interface approach, this time using org.reflect.core.Reflection as the entry point. For instance, to create an instance of a User object, you use the constructor() method:
User user = Reflection.constructor().in(User.class).newInstance();
Behind the scenes, constructor() returns a TargetType object, whose method in() returns an Invoker, which in turn creates the actual User instance through the newInstance() method. All these methods use parameterized arguments and return values (similar to the get() method in listing 19.9), so the result can be used without an explicit cast. The only catch is that most of the time you must pass the expected class as a parameter somewhere in the chain; for instance, to use FEST to set our DAO, it would be necessary to explicitly indicate that the field is of type UserDao, as shown here:
Reflection.field("userDao").ofType(UserDao.class).in(facade).set(dao);
Because of such requirements, TestingHelper couldn’t be rewritten using FEST without changing its signature to include the field class (as shown in listing 19.10), which would also require a change in the set DAO statement:
TestingHelperFESTReflect.set(facade, "userDao", UserDao.class, dao);
Listing 19.10. TestingHelper refactored to use FEST-Reflect
[...]

import org.fest.reflect.core.Reflection;

public class TestingHelperFESTReflect {

public static <T> void set(Object object, String fieldName,
                              Class<T> fieldClass, T newValue) {
    Reflection.field(fieldName).ofType(fieldClass).in(object).set(newValue);
  }

public static <T> T get(Object object, String fieldName,
                          Class<T> fieldClass) {
return Reflection.field(fieldName).ofType(fieldClass).in(object).get();
  }
}
Given these two alternatives, the choice again depends on personal style: FEST-Reflect is more powerful and follows a more natural syntax than its JUnit-addons counterpart, at the cost of being more complex (its syntax is less natural for developers who are not used to it) and requiring one more piece of information (the type of the field being accessed).
19.6. Summary
In this chapter we analyzed a few tools that complement JUnit, provide additional features, or make some tasks more productive.
We learned three different ways to use mocks in our test cases in a more productive way, how to leverage DbUnit usage through third-party annotations, many custom assertions that cover a wide variety of object comparisons, and how to access private fields without dealing with the low-level reflection API directly.
Some of the features analyzed were offered by more than one tool, which might make it hard to decide which one to use. Although we described the pros and cons of each option, typically the best option depends on the project’s needs and your personal style. What is most important, though, is to be aware that such tools exist, so you can evaluate them early in the project. The sooner such tools are used, the more time is saved because of productivity gains.