
Chapter 3. Models and binding
- Creating models
- Creating observable properties
- Binding data from the model to the view
Any sufficiently advanced technology is indistinguishable from magic, at least according to Arthur C. Clarke. And getting data to automatically update itself in several places with a few simple declarations looks magical at first, but when you learn to identify the process that’s occurring it seems more mechanical than magical.
Why are models used in the MVC framework, and what is their role? Models are to some extent a shared whiteboard, where a controller or a view can update abstract values and respond when it observes a change. The key in these instances is the binding of the data, and to the uninitiated the bindings can appear magical.
To understand and appreciate just how magical the binding support is in Griffon, it’s necessary to go down to the lowest levels of code and see how you would construct these patterns, and then show how the bind calls build on them. It’s like long division: you can teach a child to use a calculator, but if they know how the arithmetic works it seems a lot less magical and is conceptually easier to grasp.
But as with all magic, there are some dues to be paid. Before we dig into how it works, you need to understand why you need to make it work.
To give you some quick exposure to models and bindings, we’ll start by looking at a form application with some bindings. If you’ve ever had to do binding manually, this will excite you. Once you have some appreciation for models and bindings, the next step is seeing how the model acts as a communication hub for the application. Then, you’ll learn to make changes to the model observable to the application and how an application can automagically respond to changes in the model. Sometimes you need a little more control, so we’ll look at controlling when an application responds to model changes. To bring it all together, you’ll build a mortgage calculator.
3.1. A quick look at models and bindings
The goal of this section is to help you gain an appreciation of the importance and power of models and bindings. This preview will help you focus on the rest of the chapter.
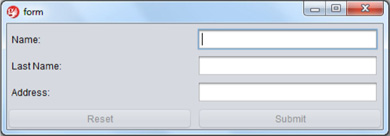
You’ll begin by building a simple application: a registration form. For this application, you need the user’s name, last name, and address. Of course, you need a way to submit the information: a Submit button. Let’s also assume that you need a way of clearing all the information: a Reset button. From a requirements perspective, you’ve been told that the Submit button shouldn’t be available until the user has entered all the information, and the Reset button should be available once the user has entered any information. Most people are visually oriented, so the application should look something like figure 3.1.
Figure 3.1. The completed registration application
Now that you know the functional requirements of the application and how it should look, you can get started building it.
3.1.1. Creating the project
If you’ve been working on the previous examples in the book, you know what’s coming. First you create a project. Open a shell prompt into the directory in which you want to create the Griffon application, and create a new form application:
$ griffon create-app form
As you’ve come to expect, Griffon sets up the project directory. Now let’s turn our attention to creating the model, view, and controller.
3.1.2. Creating the model
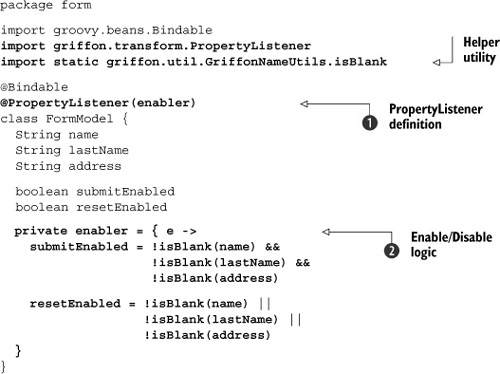
Looking at figure 3.1, it’s easy to see that the model will need to have the following properties: name, lastName, and address. But you also have requirements for enabling and disabling the Reset and Submit buttons. To accomplish that requirement, the model needs a couple of additional properties: submitEnabled and resetEnabled. You’ll use these two properties to determine when the buttons should be enabled. The following listing shows how the model should look; please make sure to copy and paste the contents into your Model file.
Listing 3.1. FormModel.groovy
package form

import groovy.beans.Bindable

@Bindable
class FormModel {
  String name
  String lastName
  String address

  boolean submitEnabled
  boolean resetEnabled
}
In chapter 1, the @Bindable annotation was on the individual fields. What’s up here? By moving the @Bindable up to the class level, all the fields become observable properties with PropertyChangeSupport. This is another way that Griffon makes our lives better.
That takes care of the information needs, but we’re not done with the model just yet; now let’s focus on the rules, as well as enabling and disabling the buttons. The buttons will use the value of the submitEnabled and resetEnabled properties to determine if the buttons should be enabled or disabled. How do you deal with the rules and logic of setting the values of the properties? You can create a helper closure (enabler) that contains the rules and logic. The next listing shows the new helper closure.
Listing 3.2. FormModel.groovy with enabler logic
The code contains two additional imports: a @PropertyListener annotation and the enabler closure. The imports are straightforward and don’t need any additional explanation. The enabler closure ![]() takes an event as input. The closure uses the isBlank helper to determine the value of submitEnabled and resetEnabled. Why use isBlank in the first place? For one thing, it’s a utility method provided by the Griffon runtime, which means it’s readily available
at any time. Second, this utility is written in such a way that it doesn’t require any external dependencies or additional
libraries other than the Griffon runtime itself.
takes an event as input. The closure uses the isBlank helper to determine the value of submitEnabled and resetEnabled. Why use isBlank in the first place? For one thing, it’s a utility method provided by the Griffon runtime, which means it’s readily available
at any time. Second, this utility is written in such a way that it doesn’t require any external dependencies or additional
libraries other than the Griffon runtime itself.
The enabler closure is in place, but how is it invoked? This is where the @PropertyListener annotation ![]() comes into play. The @Bindable annotation adds PropertyChangeSupport to all fields of the class. This means that when any of the field values change, a property change event is fired. The @PropertyListener is set up at the class level to listen to all property-change events associated with the class. When an event is fired, the
enabler closure is invoked with the event. That’s pretty slick. You can also apply @PropertyListener locally to a property; this will have the same effect as registering a PropertyChangeListener that handles change events for that property alone. One thing to keep in mind when you’re using @PropertyListener in combination with closures like enabler is that it’s highly recommended to apply the private visibility modifier to them. This keeps the code from bleeding out to other classes. You may recall that everything in Groovy
is public unless declared otherwise; the inner workings of such closures don’t concern classes other than the one that holds their
definition.
comes into play. The @Bindable annotation adds PropertyChangeSupport to all fields of the class. This means that when any of the field values change, a property change event is fired. The @PropertyListener is set up at the class level to listen to all property-change events associated with the class. When an event is fired, the
enabler closure is invoked with the event. That’s pretty slick. You can also apply @PropertyListener locally to a property; this will have the same effect as registering a PropertyChangeListener that handles change events for that property alone. One thing to keep in mind when you’re using @PropertyListener in combination with closures like enabler is that it’s highly recommended to apply the private visibility modifier to them. This keeps the code from bleeding out to other classes. You may recall that everything in Groovy
is public unless declared otherwise; the inner workings of such closures don’t concern classes other than the one that holds their
definition.
With the model out of the way, it’s time to focus on the rest of the application. Let’s move on to the view to see how it uses the model’s properties.
3.1.3. Creating the view
Now it’s time to create the user interface. Take a quick look at figure 3.1: you need three labels, three text fields, and two buttons. The following listing contains the view code.
Listing 3.3. FormView.groovy
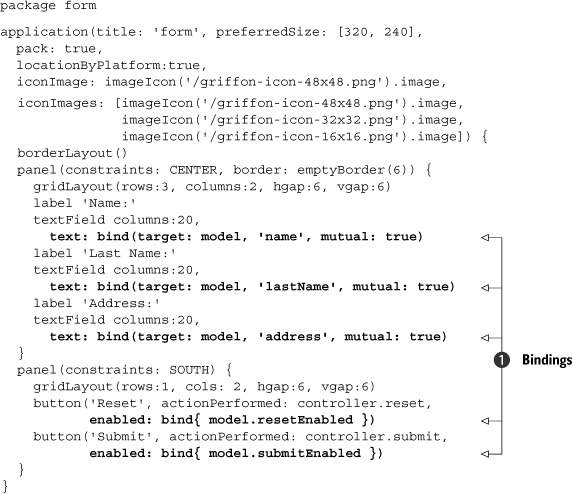
You’ve seen view code before, and chapter 4 will go into more details, so we won’t go into the view too deeply here. The view is set up as two panels. The first panel holds the name, lastName, and address textFields and their associated labels. The second panel holds the Reset and Submit buttons.
The important thing to focus on right now is the bindings ![]() . The binding is the mechanism that associates the view component with the model property. The text-Field bindings contain an extra parameter, mutual. Setting mutual to true creates a bidirectional binding. When the view is changed, the model is updated, and when the model is changed, the view
is updated. You also see bindings on the buttons. Here the binding determines whether the button is enabled or disabled. When
the user clicks a button, the associated actionPerformed is invoked.
. The binding is the mechanism that associates the view component with the model property. The text-Field bindings contain an extra parameter, mutual. Setting mutual to true creates a bidirectional binding. When the view is changed, the model is updated, and when the model is changed, the view
is updated. You also see bindings on the buttons. Here the binding determines whether the button is enabled or disabled. When
the user clicks a button, the associated actionPerformed is invoked.
As you can see, the buttons invoke methods on the controller. Let’s look at the controller next.
3.1.4. Creating the controller
The controller is responsible for orchestrating the application. In this simple application, there isn’t much to do but reset the model values when the Reset button is clicked and submit the model values when the Submit button is clicked. For Submit, you’ll print the model values. The next listing contains the code you need.
Listing 3.4. FormController.groovy
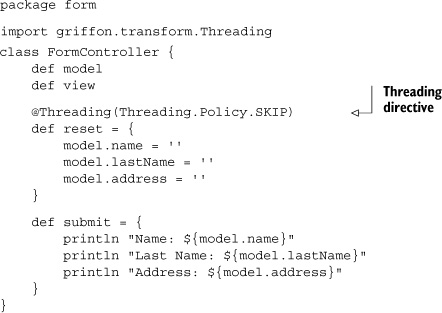
Don’t worry too much about threading right now. Chapter 7 is devoted to multithreaded applications, and it will fill in the blanks. In this case, @Threading(Threading.Policy.SKIP) causes the reset method to be executed on the same thread that called the action: the event dispatch thread (EDT), because the action will be linked to a button.
The controller is pretty straightforward—and now the application is complete. Go ahead and run it. It’s amazing how much functionality you can enable with so little code.
Models and bindings are important parts of a Griffon application. Although we would love to take the credit for coming up with the idea to use models this way, Griffon stands on the shoulders of giants. In the next section, we’ll take a quick tour of the history of models.
3.2. Models as communication hubs
As we discussed in chapter 1, the Model-View-Controller pattern has gone through a metamorphosis since its introduction in the late 1970s. Most relevant is the role of the model portion of the triad and how it’s used in Griffon. Models in Griffon’s MVC groups don’t fill exactly the same role they did decades ago; but after a long, strange trip, the role of the model matches the original more closely than most models do in typical web stacks.
As originally implemented in Smalltalk-80 (http://en.wikipedia.org/wiki/Smalltalk), the model portion of the triad came in two different types (although the names weren’t codified until later releases):[1]
- Domain model
- Application model
The distinction between the two is mostly in what the type models. The domain model is supposed to be ignorant of the UI and to serve the data needs of the particular problem domain being modeled.
The application model is fully cognizant of the UI. Its responsibility is to serve as an adapter between the domain model and the view by holding references to domain models using fields, properties, or collections. Many support classes in Smalltalk, such as ApplicationModel and ValueModel, supported the application model in this role. Griffon’s model aligns with Smalltalk’s usage of ApplicationModel and ValueModel. This is a bit of a departure from how Grails views models.
Let’s continue by looking at how web frameworks view MVC and then contrast that with Griffon’s usage of MVC.
3.2.1. MVC in the age of web frameworks
When web frameworks started using the MVC pattern, the role of the model was almost exclusively served by the domain model. The duties of the application model were split between the controller and the view. This was possible because the interaction model of a web application changed from a triangle to being more like a layer cake. This mirrors the classic three-tier web architecture that separated the database (model) from the web browser (view), with an application server (controller) to run the show.
This paradigm shift brought a renewed emphasis on the domain model and encouraged business rules that dictate correctness of data and the interactions themselves in domain-model objects—in other words, domain models became the most important component that everything else revolved around.
Web frameworks also are hampered by their connection between the model and the view because of this layer-cake structure: any connection between the model and the view must pass through the controller. There’s no way a model can notify a view that there’s new data available to be consumed without the controller taking an active role in the matter. They’re also usually hindered by the fact that the view must initiate all activity and can’t react to changes in the model (although there are libraries and frameworks to address this specific problem). Because of this, whenever you hear a web framework calling itself an MVC framework, its model is almost always of the domain model variety.
All this work in domain models on the web has resulted in some great object-relational mapping (ORM) libraries and database façade libraries that interact with plain old Java objects (POJOs). This effort isn’t lost to a Griffon application, because all the objects needed to access these domain models can be placed directly in the model class and accessed by the view and the controller. These database-driven domain models, however, lie outside the scope of this book.
3.2.2. Rethinking the pattern
Looking beyond the domain model, Griffon allows for the application model to make a comeback. Unlike a web application, all the portions of the model, view, and controller exist in the same JVM. The proximity of the view to the model allows for the change in the model to precipitate updates in the view, bypassing the controller class. The view objects also have a direct reference to the model objects.
One of the differences between Smalltalk and Griffon is how the role of the application model is performed. Smalltalk placed a great emphasis on using objects as a reification of the variables in the model. Griffon places a greater emphasis on the declarations of the relationship. Griffon does generate objects in the background to manage the duties of the application model, but the developer doesn’t need to interact with these unless they choose explicitly to do so.
In that sense, the model in a Griffon application becomes a communication hub: a place to store data and have other pieces of the equation react to it. A network service may retrieve a new instant message and store that in the model object. The relevant view can see this data loaded, automatically animate a globe to spin to the appropriate area, and post a floating text box with the new message from a user on the other side of the world. Once they’re set up, these interactions are easy to declare.
Notification of these changes is the crux of the model. If a tree falls in a forest and no one is there to see it, then it doesn’t matter if it makes a sound, because nobody will react to the event. In order to react to a change, you must be able to observe it. Observing the change in your beans is the next step.
3.3. Observable beans
Observable changes are one of the cornerstones of making binding work. Why are observing and being observable important? Because if you can’t see something, you can’t react to it. In programming, the act of observing a change can be difficult unless you take certain preparatory steps to ensure that efficient observation occurs.
One of the most accessible ways of observing a change is to look. But that can be surprisingly expensive. You have to look all the time, because you aren’t sure when something will change, what is going to change, or even if anything can change. You could look now and then look again later. How do you know if something has changed unless you mentally noted it? One alternative is to react to the new look as if it were a change, but that leads to a lot of wasted effort when you’re observing something that rarely changes.
The solution in these instances is to provide cues as to what can change, and provide facilities to track those changes. It’s kind of like a stage magician: good magicians make it clear what they want the audience to follow. Sometimes it’s a flashy wand, or attractive assistants, or the stage lights. But the effect is the same: if you follow the cues, then when something changes you’re directly drawn to that change. The patterns used in observable beans share at least one aspect with stage magic: sometimes the change you’re observing isn’t what really happened, but it’s the change the magician wants you to see. The rabbit that was placed in the collapsing box may not be the same rabbit that was pulled out of the hat, but it’s meant to look like it is. Similarly, the 10-digit phone number posted to the model may not be the same 7 digits entered into the text field: an area code may have been added.
JavaBeans provide a mechanism to point out where notable events may change, and they even provide a mechanism for the user of an object to be notified when the value of a property changes.
3.3.1. JavaBeans bound properties: the Java way
The upside of using JavaBeans is that it’s a well-established pattern with clear meaning and a standard way to provide access. The downside is the large quantity of boilerplate text that goes in to creating an observable property. Consider the following example, which creates a model with two properties: stringProperty and longProperty.
Listing 3.5. JavaBeans bound properties in Java, the long way
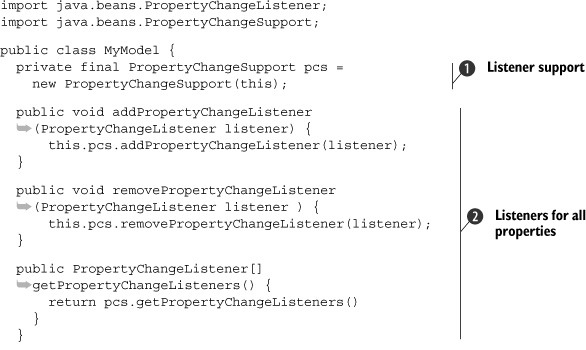
Wow! That’s a lot of code. What’s surprising is that the code shared across the two properties takes up more space than the
code handing the individual properties combined! But we shouldn’t be too hard on plain old Java, because there could have
been a lot more code. The PropertyChangeSupport field ![]() handles most of the bookkeeping of tracking and firing the property-change events. The handling code in that class would
translate to about another four pages of code. The support isn’t perfect, because you still need to create methods that match
the bound properties pattern. First you wire the prescribed methods to handle listening to all property changes
handles most of the bookkeeping of tracking and firing the property-change events. The handling code in that class would
translate to about another four pages of code. The support isn’t perfect, because you still need to create methods that match
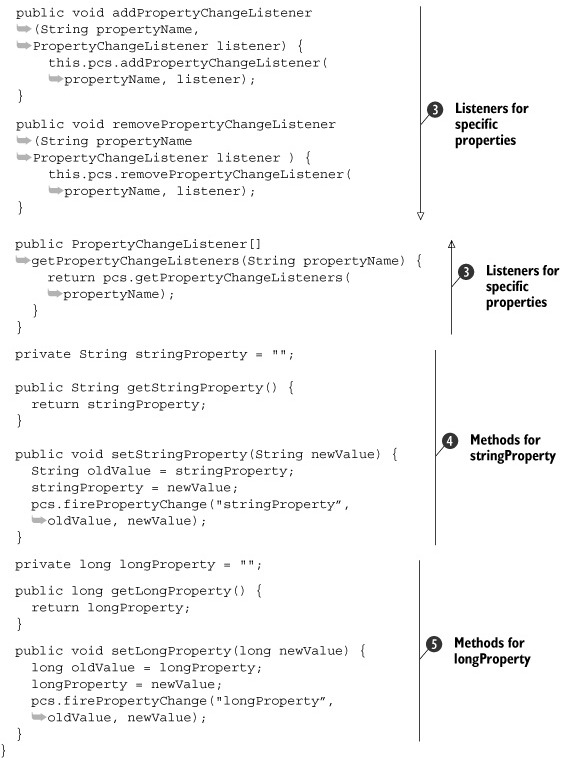
the bound properties pattern. First you wire the prescribed methods to handle listening to all property changes ![]() , and then you add listeners for particular properties instead of all properties
, and then you add listeners for particular properties instead of all properties ![]() .
.
Now that you’ve written well over half the code, it’s time to write the property methods. First let’s examine stringProperty ![]() . The field and getter are exactly the same as for a nonbound property. The only difference is the setter. Instead of changing
the field, you must first cache the old value. Then you set the field and fire the change event. It’s important that you do
these items in this particular order, because the JavaBeans spec requires calls to the getter during a property-change event
to reflect the new value.
. The field and getter are exactly the same as for a nonbound property. The only difference is the setter. Instead of changing
the field, you must first cache the old value. Then you set the field and fire the change event. It’s important that you do
these items in this particular order, because the JavaBeans spec requires calls to the getter during a property-change event
to reflect the new value.
Looking at longProperty ![]() , you can see that the evolution of the Java language has also made some of the handling easier. PropertyChangeSupport has fireProperty-Change methods for firing property changes for Object, int, and boolean. How can this code compile? Java 5 added support for autoboxing, so the long primitive values are automatically converted into Long wrapper objects.
, you can see that the evolution of the Java language has also made some of the handling easier. PropertyChangeSupport has fireProperty-Change methods for firing property changes for Object, int, and boolean. How can this code compile? Java 5 added support for autoboxing, so the long primitive values are automatically converted into Long wrapper objects.
Considering all the boilerplate code and nuances in the implementation of Java-Beans bound properties, it’s no wonder many developers choose not to implement this pattern in their code. But how does Groovy make this easier?
3.3.2. JavaBeans bound properties: the Groovy way
Groovy has several language features that were specifically designed with JavaBeans in mind. The first is the notion of a GroovyBean property. Whenever a field is declared without a visibility modifier, Groovy automatically creates the boilerplate getter and setter for it in the JVM bytecode, including the private field that backs the property. To mirror the declaration of a property, Groovy also gives priority to JavaBeans properties whenever a field is accessed on an object. To be more precise, instead of a field access on an object, Groovy has property access. If there is a correctly constructed getter method, then the results of that method are used. Only if no property exists is the field on the object directly accessed. In other words, writing a class in Groovy like the following one
class Person {
    String name
}
has the same effect and produces equivalent bytecode to writing it the Java way:
public class Person {
    private String name;
    public static void setName(String name) { this.name = name; }
    public String getName() { return name; }
}
Groovy has a second language feature that assists in creating bound properties: the Abstract Syntax Tree (AST) Transformation framework. When Groovy encounters an annotation while compiling a class, the compiler will inspect the metadata on the annotation itself. Some metadata will instruct the compiler to load additional classes to do secondary alterations to the syntax tree of the compilation in progress. These annotations are called AST Transformations, and when attached to particular fields, classes, and/or methods, they can add boilerplate code that the developer need not write. One of the annotations that come packaged with Groovy handles the generation of bound JavaBeans.
Making simple things easy
When you want to mark a property in your model as one that can be observed, all you need to do is make sure the property is annotated with the groovy.beans.Bindable annotation. The Groovy compiler will see the annotation and automatically generate the long boilerplate to ensure that a property change will be observed. This is accomplished via AST annotations.
The @Bindable annotation can be applied in two places. First, it can be applied on the class itself. This causes all Groovy properties in that class to be treated as though they’re observable. In the following code, all the properties declared in the class will be observable via PropertyChangeEvent events:
import groovy.beans.Bindable
@Bindable class MyApplicationClass {
    String propertyOne
    int propertyTwo
    boolean propertyThree
}
The topic of AST annotations is interesting and could fill a book of its own. We’ve said before that Groovy supports a feature called metaprogramming: the ability to change the behavior of a class at runtime. It turns out AST annotations allow developers to have their say with regard to metaprogramming at compile time. For thorough coverage of the AST Transformation framework, we recommend that you see the AST chapter in Groovy in Action, second edition (Manning, 2012).
The annotation can also be applied to individual properties in a class. This allows a class to pick and choose the properties that need to be exposed as bound properties. This may be useful to prevent properties that change too frequently or infrequently from being observable. It also allows the user to keep implementation details free from prying eyes.
In the following class, only the changes in propertyOne and propertyThree can be observed via PropertyChangeEvent events:
import groovy.beans.Bindable
class myApplicationClass {
    @Bindable String propertyOne
    int propertyTwo
    @Bindable propertyThree
}
By using the AST Transformation facilities introduced in Groovy 1.6, you can make standard read/write properties into bound properties. But in a large application, not everything is standard; sometimes you need a little more magic than is commonly called for.
Making difficult things possible
Often, a JavaBean property does more than stash a value. Not all changes are simple: sometimes they have side effects, sometimes the property is a contributing part of other properties, and sometimes the property may not represent what you think it does. That was part of the thinking behind the JavaBeans getter/setter pattern. We don’t want to make the ease of use get in the way of the cool stuff.
How do you deal with complex setters without making users roll it all themselves? By using conventions. The supporting items, when added by the @Bindable transformation, follow the same pattern and naming conventions
The first thing the transformation does is look for an existing field of type Property-ChangeSupport. If it finds such a field, the magic trick is over. This assumes the user has a clear understanding of what they’re doing and what they want to do. On the other hand, if such a field doesn’t exist, you create one and name it this$Property-ChangeSupport. Yes, that’s a weird name for a field, but rest assured that the JVM is perfectly capable of understanding such names. The Groovy compiler chooses that name to keep the chances of a name collision very, very low. The transformation then performs the burden of adding the boilerplate methods required to follow the Java-Beans bound properties pattern: addPropertyChangeListener, removePropertyChangeListener, and getPropertyChangeListeners in their various overloaded forms. Finally, you add one last method of convenience: firePropertyChange.
Once the groundwork is laid, the transformation can work on the custom parts of the code: the bound setter methods. If no setter methods exists, then one is generated using either an existing PropertyChangeSupport field or one that is generated by the transformation. If the setter exists, already defined by the user, then the body of the setter method is wrapped with code that will store the old value of the property and fire a property-change event with the new value before returning from the method. All this is handled without you having to write any boilerplate code.
This isn’t the end of the road when it comes to bound properties. There’s one last option: manual support. If there’s another property in the class being written (or its superclass), then you can call the firePropertyChange method directly as needed. This provides one last escape hatch for bizarre properties that defy standard configurations.
The end result is that you as a developer don’t have to worry much when you add an observable property to a class. As long as you follow the conventions, the compiler will work its magic. It’s also good to know how you can deviate from the conventional path and enter into the realm of configuration. The following listing shows several options being used at once, each with specific effects.
Listing 3.6. Bound properties with @Bindable
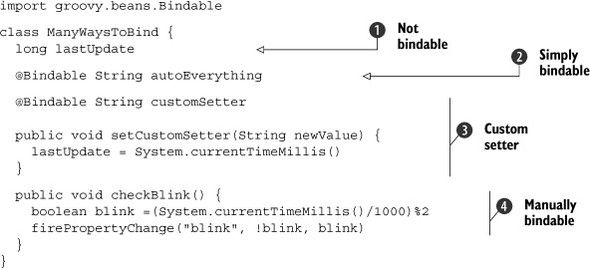
This code sample demonstrates the four ways you can declare a bound property in Groovy. The first example ![]() is to have the property not be bound. Groovy will generate a non-eventful setter. The second example
is to have the property not be bound. Groovy will generate a non-eventful setter. The second example ![]() is the most common case of a bound property: a simple write to the backing field followed by a PropertyChangeEvent event. But all the code to handle that is generated by the compiler and not seen in the bean class. A less common example
is the third case
is the most common case of a bound property: a simple write to the backing field followed by a PropertyChangeEvent event. But all the code to handle that is generated by the compiler and not seen in the bean class. A less common example
is the third case ![]() , where other tasks need to be performed in parallel to setting the property. The transformation wraps the corresponding setter
method body with the needed code to create a PropertyChangeEvent event. Finally there’s the last case
, where other tasks need to be performed in parallel to setting the property. The transformation wraps the corresponding setter
method body with the needed code to create a PropertyChangeEvent event. Finally there’s the last case ![]() , where nothing short of almost total control will suffice. If the transformation has added the support classes by being attached
to other properties, then you can easily fire a property-change event whenever you need to. This isn’t the best way to simulate
a cursor blink, but there are worse ways.
, where nothing short of almost total control will suffice. If the transformation has added the support classes by being attached
to other properties, then you can easily fire a property-change event whenever you need to. This isn’t the best way to simulate
a cursor blink, but there are worse ways.
3.3.3. Handy bound classes
In addition to creating your own model and adding @Bindable annotations, Groovy has two other handy classes that provide simple property-change support semantics without the ceremony of a full class: groovy.util.ObservableMap and groovy.util.ObservableList. You would typically choose one or the other when looking for an observable collection.
Observable map
When it comes to property access, the map class in Groovy is one of the classes that get the most special treatment from the runtime (see the following listing).
Listing 3.7. java.util.Map access in Groovy
Map map = [:]

map.put('key', 'value')
result = map.get('key')

map['key'] = 'value'
result = map['key']

map.key = 'value'
result = map.key
A value stored in the map can be accessed in one of three ways: via the put(K, V) and get(K) methods, via subscript notation, and via property notation. The most interesting one for this discussion is the property notation. This makes a map look like a custom defined class without having to define the properties and methods of the class it’s implementing. The ability of a map to support both types of notations for property access pretty much makes the distinction between a POJO instance (or bean) and a map disappear. The same can be said in regard to property access from a bean’s point of view: both notations are supported.
Observable maps make all the key/value pairs stored in the map react as though they’re observable properties. They also add the option to filter out what properties you want to fire the property events, as shown in the next listing.
Listing 3.8. ObservableMap in action
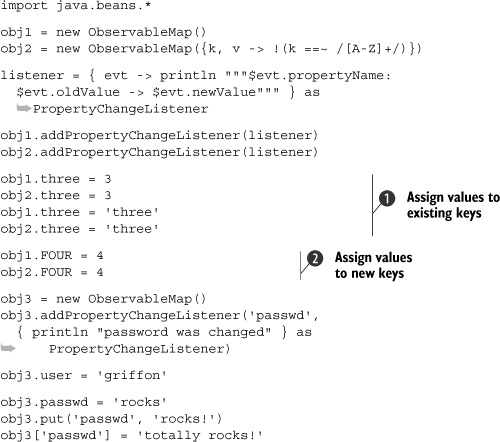
To begin this example, you compare the functionality of two observable maps. The first object is a no-frills observable map,
and the second is an observable map with a filter that prevents properties that only contain capital letters from firing events.
A listener is attached to report any changes. When changing the objects, the first set of events fire identically, with both
objects reporting a change from null to 3 and a change from 3 to the string three ![]() . The next set of changes only fires once, because obj2 has a filter that prohibits properties like FOUR from generating events
. The next set of changes only fires once, because obj2 has a filter that prohibits properties like FOUR from generating events ![]() . Next you create a new object and only listen to changes for the property passwd. Setting the property user doesn’t trigger the event listener you’ve registered on obj3 because you’re only listening to the property passwd. But if you set the value of passwd in any of the acceptable ways, a property change event is fired, thus sending the following message to the output:
. Next you create a new object and only listen to changes for the property passwd. Setting the property user doesn’t trigger the event listener you’ve registered on obj3 because you’re only listening to the property passwd. But if you set the value of passwd in any of the acceptable ways, a property change event is fired, thus sending the following message to the output:
password was changed
That message should appear three times because you changed the value of the passwd property exactly three times.
Observable List
The other class that gets a lot of built-in use from Groovy is the list. Because lists don’t associate names with their content but instead associate ordinal positions, there’s no mapping of properties as there is with maps. Instead, some of the operators in Groovy are overloaded when used on objects that are lists: the subscript operator and the left-shift (<<) operator. The ObservableList fires its events when its contents change.
One important change from the property-change listeners for a map is the event object that’s generated from an ObservableList. The properties don’t change: the contents of the list change. In order to properly reflect that, you add an additional field to the property change event: index. This is the actual index in the list of the relevant change, as demonstrated in the following code.
Listing 3.9. ObservableList in action
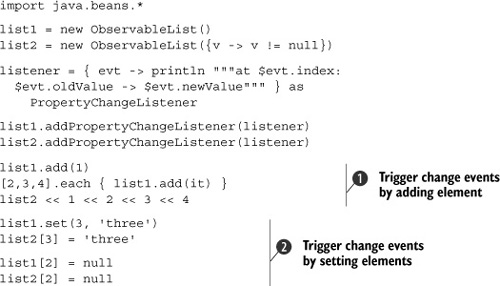
You make two lists here. The first will react to all content changes, and the second won’t report property changes if the
element added is null. Next you create an element listener. Instead of worrying about the propertyName on the event object, you worry about the index on the event object. Adding an object to the list is treated the same whether you use the ordinary add method or the left-shift (or insert) operator, and each add generates a distinct event ![]() . Changing the particular values also generates the same event, whether you do it via the method or the array accessor
. Changing the particular values also generates the same event, whether you do it via the method or the array accessor ![]() . These two lists aren’t identical; the second list won’t generate events for null objects. If you set the second position to null, an event is generated only for the change to list1.
. These two lists aren’t identical; the second list won’t generate events for null objects. If you set the second position to null, an event is generated only for the change to list1.
These are the principal ways you can create changes in Groovy objects that can be observed by an interested party. It’s nice that you can see these changes, but that’s only half the story. You want to do cool stuff with these changes, and it would be magical if you could do some of it automatically, as if one value was bound to another value...
3.4. Have your people call my people: binding
What is a binding? In Griffon, a binding has the following three constituent parts:
- Trigger —Tells the binding that it needs to update
- Read —Tells the binding what the new value is
- Write —Takes the new value and does something with it
JavaBeans bound properties provide the simplest manifestation of a binding. From a JavaBeans point of view, the trigger means the property is being changed, the read means the source is reading the value of the property, and the write means the target is storing the new property value in the variable.
But you can make any of the three pieces of a binding as complex as you need to. When you write a Griffon application, you’re probably using some complex binding magic without even knowing it. That’s the point.
3.4.1. A basic binding call
The SwingBuilder class in Groovy contains more than just visual widgets; it also contains helper nodes that are useful in building GUI applications. One of those is the bind node that allows you to cleanly bind together the state of two objects. As we’ll discuss later, it can bind both bound and unbound properties. Let’s start with the simple tricks first, as shown in the next listing.
Listing 3.10. Simple binding example

You can paste the contents of listing 3.10 into a file (for example, bindExample.groovy) and run it directly from the command line, as long as you have Groovy installed in your environment. Run the following command to satisfy your curiosity:
groovy bindExample.groovy
The execution of this script yields the following output:
foo=One bar=One
foo=Three bar=Three
Because this is an all-in-one example as a standalone Groovy script, you have to take care of a bit of ceremony that you normally wouldn’t need to do. First, you import SwingBuilder and instantiate an instance of it. Normally you wouldn’t need to do this in Griffon, but because this is a standalone script you must do it explicitly. The next step is something you would normally do in a model class: you declare the class and the @Bindable attribute.
With the ceremony over, you can get to the meat of the example. You now bind the field bar on sample to be the same value as foo ![]() . This binding takes effect instantly; when you check the value of bar you see that it’s now 'One', which was the value the field foo had when you instantiated the object. When you change the value of the field foo
. This binding takes effect instantly; when you check the value of bar you see that it’s now 'One', which was the value the field foo had when you instantiated the object. When you change the value of the field foo ![]() , it’s also reflected in the field bar, which is now 'Three' as well.
, it’s also reflected in the field bar, which is now 'Three' as well.
That wasn’t so hard, was it? You’ve specified all the required members of a binding: a source and the property to be read, along with a target and its property where the value will be written. But there are different ways to create a binding.
3.4.2. The several flavors of binding
There’s more than one way to call the bind method. You’re expressing the essence of the binding and extracting the needed ceremony from the context of the bind call. But just as with long division, before you can understand the essence of the binding, we need to examine a few fully expressed binding calls. There are three basic flavors:
- By and large the most common flavor of binding is a property-to-property binding.
- A less common but equally valuable flavor separates the trigger from the read.
- The last flavor to fully declare a binding is a hybrid of the previous two forms.
Source and target property binding
Here’s a simple property-to-property binding:
bind(source: ownedCheckBox, sourceProperty: 'selected',
     target: model, targetProperty: 'owned')
In this case, the read and the trigger are expressed as the same thing: a bound property on a particular object instance. The instance that will provide both the change notification and the changed values is declared in the source attribute. The property that will both provide the value and provide the trigger when it’s changed is declared in the sourceProperty attribute. Both of these attributes constitute the trigger and the read. The location to which you’ll write the value is declared in two parallel values, the target attribute and the targetProperty attribute. Both properties together constitute the write.
Event trigger, closure read, and property write binding
Separating the trigger from the read is usually done when the property providing the read value isn’t observable, but other events in the widget may notify you that states need to be updated. One classic example is JTextComponent:
bind(source: myJTextArea.document,
     sourceEvent: 'undoableEditHappened',
     sourceValue: {myUndoManager.canUndo()},
     target: undoBtn, targetProperty: 'enabled')
The text property of the JTextComponent and its many subclasses doesn’t provide a means to directly notify you when the value has changed, primarily because it isn’t directly backed by a field but is the result of calculations done against the Document object backing the text field. The Document object does provide events that you can latch on to in order to detect changes. To declare a non-property event trigger, you need to declare source and sourceEvent attributes in the bind call.
In addition to binding to an event, you can bind to values that aren’t directly properties. For example, if you’re updating an Undo button, the trigger is the document manager but the actual value is managed by a third-party UndoManager instance. In this case, you need to declare a sourceValue element and pass in a closure that will provide the value to be read. This attribute is entirely independent of any other attributes.
Targets, on the other hand, don’t provide as much flexibility as sources and triggers. Both the target and targetProperty attributes are needed to determine where to write the value. If you need to do fancy stuff, you can convert the value to something else. Say, for example, you bind a numeric property of the model to an input field that has a currency format. The text coming from the input field will have a format that may not be appropriate for a numeric algorithm; this is where you require aconverter.
Source event and property, target property
The last way to fully declare a binding is a hybrid of the previous two. It isn’t nearly as common as the other two methods and is mentioned here for completeness. You can trigger from an arbitrary event on an object and also read the property from the same object:
bind(source: myToggleButton,
     sourceEvent: 'actionPerformed',
     sourceProperty: 'selected',
     target: model, targetProperty: 'toggleSelected')
The same source attribute can be shared between a sourceEvent and a source-Property element. In fact, they must share the same source if both attributes are declared. If you need to have different sources, you’re better served by using the sourceValue attribute and expressing the read as a closure. Finally, the write is expressed by the target bean and the targetProperty.
That covers the three basic forms of a fully expressed binding. But there are ways to tease out the essence from the ceremony.
3.4.3. Finding the essence
You can use three approaches to more clearly express the essence of the binding:
- Provide the source property and target property as unnamed arguments.
- Imply source and target property bindings by using the bind() node as part of another SwingBuilder node.
- Express the trigger and read as closures.
Implicit Argument Property
In chapter 4, we’ll go deeper into the structure of a builder node, but for this discussion suffice to say that nodes can take arguments and attributes. Arguments don’t have labels, but attributes do. When a bind node is passed an argument of type String, it’s presumed to be the value for the sourceProperty and targetProperty attributes if those attributes aren’t passed in and are needed (see the following listing).
Listing 3.11. Implicit argument property examples
bind('selected', source: ownedCheckBox,
     target: model, targetProperty: 'owned')

bind(source: myJTextArea.document,
     sourceEvent: 'undoableEditHappened',
     sourceValue: {myUndoManager.canUndo()},
     'enabled', target: undoBtn)

bind('selected', source: myToggleButton,
     sourceEvent: 'actionPerformed',
     target: model, targetProperty: 'toggleSelected')

bind('selected',
     source: firstCheckBox,
     target: secondCheckBox)
The first three nodes in the example are reworked versions of the prior three examples, except that in the first and the third nodes the sourceProperty attribute is implied by the argument value, and in the second node it’s the targetProperty attribute that’s implied. Note that the argument value can also imply both the sourceProperty and targetProperty attributes, as shown in the fourth node. The result of the fourth bind node is that the state of the secondCheckbox selection is driven by the first check box.
Contextual Property Bindings
Another instance in which you can glean the essence of the ceremony is when the bind node is constructed in the context of a view script and provides the declared value of the attribute. In this case, the object that the node is creating becomes either a source or a target object, and the attribute becomes the property for the implied portion of the binding. The four nodes shown in the next listing are semantically identical to the four nodes in listing 3.11, except that you recast them to be written as properties in the declaration of the visual nodes.
Listing 3.12. Contextual property binding examples
checkbox('Owned',
  selected: bind(target: model, 'owned'))

button('Undo',
  enabled: bind(source: myJTextArea.document,
    sourceEvent: 'undoableEditHappened',
    sourceValue: {myUndoManager.canUndo()})

button('State Toggle',
  selected: bind(sourceEvent: 'actionPerformed',
    target: model, targetProperty: 'toggleSelected')

checkbox('Second',
  selected: bind('selected', source:firstCheckBox))
What is notable about these examples is that half of the contextual properties result in the source being represented by the context, and the other half result in the target being represented by the binding. How does Griffon know where to use the context? It looks at what is already explicitly provided and then provides the rest from the context. But what happens if you provide both the source and the target in the binding but still do the bind() node as the value to an attribute? The context of the bean then isn’t used to calculate the binding; instead, the attribute is set with a BindingUpdatable object, which stores the realization of the binding.
How does the bind node deal with contextual properties? In part by using a stand-in object and using an attribute delegate in the FactoryBuilderSupport to finish the processing.
Semantically, the bind node is evaluated before the parent object is calculated. So at the time the bind node is processed, it doesn’t have any way to get at the contextual property. The BindFactory does whatever work it can with the explicit portion of the node and then returns the half-built objects to stand in for its fully bound state.
Once the parent node starts processing, the FactoryBuilderSupport allows registered attribute delegates a chance to post-process the attribute values before it applies them as properties to the resulting object. The BindFactory registers a delegate that will identify the stand-in object and finish the processing of the binding with the name of the attribute and the instance of the object being constructed.
Binding to a Closure
The final way to extract the essence of the binding from the full ceremonial declaration of the bind node is to express the trigger and read values as a closure containing the values to be queried. This is by far the most concise and expressive way to declare a binding in Groovy or Griffon. This is the preferred way to define bindings where the binding direction is from source to target only, as well as when the binding itself is very simple. The following snippet shows how such closures can be defined:
checkbox('Owned', selected: bind { model.owned } )

checkbox('Second',
  selected: bind { firstCheckBox.selected } )

label(text: bind { "$model.completed / $model.total Completed" } )
You’ll note that only two of the samples from the previous set of examples have been repeated. Binding to a closure isn’t possible for all scenarios. A binding closure can only be used to express the source and the source values. If a binding needs to trigger from a non-property event, or the binding gets its source context from the node, then a closure binding can’t be used.
The closure binding is deceptive in its simplicity and power. The first two examples show a simple closure binding: a single object reading a single property value. The third example shows a more powerful use: multiple properties being processed into a new value. In this example, you can see that the closure binding represents a fourth form of a fully expressed binding, one that triggers an update when one of several distinct properties determined at runtime are changed.
The ability to trigger from multiple properties is mostly a side effect of how the closure binding is implemented. Two language aspects of Groovy combine to allow for the closure binding to work. The first is the fully dynamic nature of each of its method invocations. When a method is invoked in Groovy, the invocation is passed through the metaclass to allow it to provide alternate options dynamically at runtime. This is what makes a dynamic language dynamic: the presence of some sort of Meta Object Protocol.
The second aspect of Groovy that allows the closure binding to work is the use of a delegate on the closure object. Each closure is represented by a distinct Java object, and a delegate can be assigned to that object. The unbound variables in the closure are then resolved against either the object in which the closure was declared or the delegate object.
The closure binding uses both of these features to get a listing of the objects and properties that will be inspected for operability. When the binding instance is bound, the properties for which changes can be observed are listened to for changes. When any of the properties change, the value of the closure is evaluated, the target is updated, and, if needed, new properties have listeners attached.
3.4.4. Other binding options
Beyond the basic requirements of the binding, you can wire in some other options that affect the processing of a binding update. The binding can convert values being read into other values, and it can also validate values and keep invalid values from being passed to the target. When you’re using a binding, you aren’t stuck with a one-to-one, take-it-or-leave-it update; values can be adjusted and even rejected. Extra attributes can be added to the bind node to provide this added functionality. There are also corner cases relating to some uses of the bind node that can be resolved by additional attributes.
Converting values read from a binding
A common requirement is to translate one value into another. For example, a data field may have a public name such as Red, Green, or Blue, but the data model may require these values to be stored as ints: 0xff0000, 0x00ff00, and 0x0000ff, respectively. This is clearly a task that should be done as close to the view as possible, to maximize the time that the data can be stored in its preferred format. To do this, you pass an attribute converter into the binding arguments and provide a closure. This closure is given the value obtained from the read of the binding, and the result of the closure is passed into the write of the binding. The following listing maps the common names of colors to the internal AWT object representing those colors.
Listing 3.13. Converting a binding value
def colors = [Red:   Color.RED,
              Green: Color.GREEN,
              Blue:  Color.BLUE]

comboBox(items:colors.collect {k, v -> k}, id:'combo')

label('Look at my colors!',
  foreground: bind (source:combo, 'selectedItem',
    converter: {v -> colors[v]}))
The issue is that the user expects to see the String names, but the label wants a color object. The closure you provide takes the String value and maps it to the regular value.
But what about instances where the bound values aren’t translatable to a model value? How do you ensure that only the valid values are written to the target? Enter the validator attribute.
Validating values read from a binding
In listing 3.14, the validator closure is called when the content of the text field changes, and if it returns a Boolean value of true, the binding update continues. If the validator returns any other value, the binding update is silently stopped, and the value read from the source is neither converted nor written to the target. In this listing you change things up slightly from the previous incarnation. Instead of a combo box that limits the user’s entries, you make the user type a valid color name into a text field.
Listing 3.14. Validating a binding value
def colors = [Red:   Color.RED,
              Green: Color.GREEN,
              Blue:  Color.BLUE]

textField('Green', id: 'colorField')

label('Type a color!',
  foreground: bind (source: colorField, 'text',
    validator: {colors.containsKey(colorField.text) },
    converter: {v -> colors[v]}))
To ensure that you only try to change the color for valid values, you add a validator closure that checks to see if the color in the text field exists in the colors map. If it doesn’t exist, then it’s as if the binding doesn’t exist. But if you pass the test, then the label’s color is changed.
It’s important to note here the relative order of evaluation of converters and validators. Validators are called and evaluated before converters so that if a value isn’t valid, you won’t attempt to convert or write the value. This is a good thing for the converter, because it can presume that the value has been vetted prior to being passed in to the converter. The converter doesn’t have to check for bad values such as nulls or division by zero if they’re stopped by the validator. In addition, if the converter has side effects (such as caching values), then those side effects occur only when the values are actually updated.
Setting an Initial Value
One corner case that can result from a contextual binding is that the attribute being declared on the node is the source, and usually the declaration of the value is where the bind node goes. There are two ways to solve this. The first is to place the bind node on the target attribute on the target node. But this isn’t always desirable, for many reasons. It may make the code harder to read, or the target node may not be declared and may be a value passed into the script binding. In those cases, you can use the value attribute to specify a value to be passed into the declaring source node.
Why would you need to set the value? Because often the default isn’t what you want to begin with:
checkbox("Check spelling before sending mail",
  selected: bind(target:model, 'spelcheck', value:true))
Some UI option should always be turned on by default. The checkbox widget defaults to unselected, and if you don’t set a value, some people will always send poorly written email. After the binding is set up, the value of the source is set to the value set in the value attribute, and if this represents a change, the binding will automatically fire.
Turning a Binding Off
Sometimes you don’t need a binding to fire the updates automatically. The resulting object representing a fully assembled binding has the option to fire the bindings manually or on demand. This allows the binding to represent the data flow between two different properties without necessarily requiring them to be constantly in sync.
The bind attribute controls whether a binding is set to automatically update. The attribute accepts Boolean values, and by default it’s set to true.
When would you not want a binding to be automatic? One example is a form that directly updates the application model preferences when the user clicks OK. But what if the user doesn’t want the changes set immediately? By setting the bind option to false, the binding updates can be managed manually, as you’ll see later in the chapter.
Two-Way Binding
All the bindings we’ve covered so far establish a one-way street between source and target. In other words, the value travels from the source to the target. Sometimes, however, you want the value to travel in both directions. A first approach to solving this issue could be defining two bindings, exchanging the source for the target, like this:
checkbox(id: 'check', selected: bind('value', source: model))
bean(model, value: bind('selected', source: 'check'))
Don’t worry too much about the bean node for the moment; we’ll cover it in the next chapter. Suffice to say it allows you to use the builder syntax with any object. Unfortunately, these bindings will cause an endless loop of events as soon as one of the two properties changes value. This happens because one binding isn’t aware of the other—they don’t communicate in any way. You can use an additional property to get rid of the endless loop; its name is mutual, and it takes a Boolean as a value. Keeping both properties in sync is done as follows:
checkbox(selected: bind('value', source: model, mutual: true))
You must pay attention to which object is set as the source, because it dictates the initial value transferred to the target. In the previous example, the value property of the model object is bound immediately to the selected property of the check box. The following example shows the inverse:
checkbox(selected: bind('value', target: model, mutual: true))
Take special notice of the subtle difference.
How do you get access to the objects managing the bindings? It’s as if they have their own secret life. There are, however, ways to access that secret life. Fair warning: the next section includes specific details, and the discussion is fairly technical.
3.5. The secret life of BindingUpdatable
When you’re creating a binding, you need to use several objects to monitor and manage all the moving parts. Listeners need to be added to events, notes about the values of objects being read need to be maintained, and the ultimate target of the write also needs to be referenced. Wouldn’t it be nice if there was a nice, organized object to track the end result of a binding? The good news keeps coming, because such an object does indeed exist: BindingUpdatable! In this section, we’ll look at the Binding-Updatable object and how you can manage bindstorms. You’ll also see how to manually manage and group bindings.
3.5.1. Keeping track of bindings with the BindingUpdatable object
Enter the BindingUpdatable interface. This interface handles operations that may be of interest to an outsider that has found the object tracking the binding. The Binding-Updatable object’s binding can be turned on or off, can be reset, can fire the update immediately, and in some cases can even run in reverse! This object doesn’t expose every detail directly, because the details vary wildly between declarations of the binding. If you know what you’re expecting, however, you can always cast or duck-type down to a more specific application.
The trick comes in getting the access to this BindingUpdatable object. The object returned from the bind node is a BindingUpdatable, so you would think that getting it would be simple. But one way won’t work: setting it as an attribute on some other node. Why won’t this work? Because it looks the same as a contextual binding, and this object is specifically checked for during the contextual binding magic (see the “Peeking behind the curtain” sidebar earlier in this chapter).
What options are left? You could try to use the assignment operator. This can result in some funny-looking (but effective) code:
label(text: statusBinding = bind(source:model, 'status'))
The problem is that many programmers aren’t used to seeing assignments that aren’t standalone expressions. Some neat hacks result from using the assignment operator, and they can yield terse code. But it’s often called write-only code and is error-prone for even the most seasoned programmers. For maintenance reasons, clarity over cleverness should be the standard.
The last option, and the preferable one, is to use an id: attribute in your bind node. As we discussed in chapter 1 and will discuss in depth in chapter 4, every node built by the builders in Griffon accepts the id: attribute and stores the resulting object in the binding as though it were set with an assignment expression. You use it just like any other attribute:
label(text: bind(source:model, 'status', id:'statusBinding'))
This serves to keep the information about the binding in the binding node. It also has the nice side effect of making the code entirely declarative, with no imperative statements obscuring the intended declarations.
3.5.2. Managing the bindstorm: bind(), unbind(), and rebind()
When it comes to binding, one of its strengths can also be one of its greatest weaknesses: automatic updates. On the one hand, they magically make values update when the source value changes; on the other hand, the target value can unexpectedly change without much warning or explanation. Many bindings happening at the same time has gained a nickname: a bindstorm, where automatic updates fire en masse and sometimes trigger other updates that continue to fire. The orderly execution of the application has no choice but to run away and hide until the storm passes. To address this problem, the BindingUpdatable object has three methods to tweak the automatic nature of the binding in question: bind(), unbind(), and rebind().
The bind() and unbind() methods work as a pair. The first serves to enable any automatic portion of the binding. This includes adding event listeners (including property-change listeners) to the appropriate objects for the binding. The unbind() method does the opposite: it disables any automatic portion of the binding. This generally results in the removal of any listeners that the current binding may have in place.
We need to point out two caveats about the finer parts of these two methods. First, the automatic update portion of the binding may not be driven by JavaBeans events. For example, the animate() node in the SwingXBuilder runs its updates from a javax.swing.Timer instance, so bind() and unbind() methods in this case start and stop the timer. This may have the side effect of preventing a program from exiting if the bindings are left in place. The second caveat is that these methods are idempotent, meaning 1 call to bind() has the same effect as 100 (until unbind() is called). The listeners will be added only once until they’re removed.
But how do you keep a binding in good working order in a constantly changing environment? That is the purpose of the rebind() method: it causes a binding to unbind and rebind itself, but only if it’s currently bound. This method usually wouldn’t need to be called by external implementations, but there are corner cases that Griffon can’t handle by itself. One example is a closure binding where one of the observed properties is held in an array, and the array changes. There are no ways to track the update of the array by observation. A quick call to rebind() ensures that the listeners are properly attached without having to also check to see if the binding is currently active; the checking is done under the covers.
3.5.3. Manually triggering a binding: update() and reverseUpdate()
A BindingUpdatable object for a binding that isn’t currently bound isn’t totally useless. In addition to having its binding activated, the binding can also be manually fired via the update() method. When this method is called, the read and write portions of the binding are fired as if the trigger for the property change had caused their update to occur automatically. This is particularly useful when the unbind() method has been called or the binding was created with bind: false as an attribute. It’s worth remarking that the read is performed on the source and the write happens on the target.
The update() method also has a corresponding method, reverseUpdate(), that will, if possible, reverse the role of the read and the write methods and do the update in reverse. This method won’t work in all situations; in those cases, the reverse update will silently fail. In particular, this will happen if the binding is a closure binding or the source comes from a sourceValue closure. Principally this works with property-source bindings where the source property is writable.
3.5.4. Grouping bindings together
Having all these accessible features in the BindingUpdatable class allows for powerful manipulation. But some of the more complex binding scenarios often involve a large number of bindings that need to be managed in concert. Manually calling each one individually can be a drag, even with all the syntactic sugar that Groovy affords. This brings us to the final piece of the puzzle: binding groups. Binding groups allow you to aggregate multiple BindingUpdatable objects into a single BindingUpdatable object that passes the method calls to each component binding.
SwingBuilder (discussed in chapter 4) has a node named bindGroup() that creates an instance of org.codehaus.groovy.binding.AggregateBinding. The only attributes of note are the id: attribute for storing a reference to the binding group, and the bind: attribute for the initial binding state. The group usually begins in a bound state, and any bindings added to it will be bound (this is where the idempotent nature of bind() comes in handy) unless the bind: attribute has been set to false.
Generally you’ll want to define your binding groups before declaring any of your bindings. That’s because the best way to add a binding is to add a group: attribute in the binding as you declare it, passing in the binding group you bound earlier. This will automatically add the binding generated into the binding group.
For a concrete example, consider a form where the user may want to keep updates from hitting the model until they apply the changes explicitly. For brevity, let’s consider only two possible options, each represented by two Boolean fields in the model. The view code may look something like this:
bindGroup(id:'formElements', bound:false)

checkbox('Option A', selected: bind (target:model,
  'optA', group:formElements))
checkbox('Option B', enable: bind (target:model,
  'optB', group:formElements))

button('Apply', actionPerformed:
  { formElements.update() })
button('Reset', actionPerformed:
  { formElements.reverseUpdate() })

formElements.reverseUpdate()
Because this is an update-on-demand situation, you set the binding group to unbind its contents with the bound attribute being set to false. Then, in the widgets, the bindings to the selected property are added to the bind group form-Elements; you can later push updates to the model or pull updates from the model. And for good measure, at the end of the script, you pull the values from the model into the check boxes.
There’s more than one way to add a binding to a binding group. Doing so using the bindGroup attribute make sense when you’re declaring bindings in a view. But you aren’t limited to creating bindings in declarative code. Two methods on the Aggregate-Binding allow you add and remove bindings to its internal set: addBinding() and removeBinding(). These methods (keeping with the theme) are also mostly idempotent. We say mostly idempotent because order does matter. The order in which a binding is added to the binding group is the order in which it will be called when the relevant BindingUpdatable methods are called. Removing the object will result in a later call to add the same object, placing that object last in line, as though it had never been seen.
3.6. Putting it all together
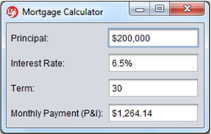
When you’re creating a model and view that magically bind their values together, the binding can include a lot of moving parts. But as we’ve said, knowing about these moving parts is a lot like using long division: on some level you need to know how it works, but you can take most of it for granted. A full example will help illustrate the point that in general, once the bindings are in place, you can take their magic for granted. In this section, you’ll create a mortgage calculator like the one shown in figure 3.2.
Figure 3.2. The completed Mortgage Calculator app
A ubiquitous part of any mortgage website is enabling the user to enter their loan amount, the interest rate, and the term (the number of years over which they want to pay the mortgage). The resulting formula to calculate the principal and interest (P&I) payment is fairly simple (when compared to some other financial calculations):
PI = P * (r /(1 – (1 + r) ^ – N ))
In this formula, PI represents the monthly principal and interest due, P is the initial principal, r is the fractional monthly rate, and N is length of the loan in months. This is enough to get started.
3.6.1. Setting up the model
First you create a project. Open a shell prompt into the directory where you want to create the application, and create a new MortgageCalc application:
$ griffon create-app mortgageCalc
For a model, you want fields for the principal, rate, and term. You also need a property that will calculate the P&I value from the provided fields.
Listing 3.15. MortgageCalcModel.groovy
import groovy.beans.Bindable

@Bindable
class MortgageCalcModel {
    float principal
    float monthlyRate
    float months

    float getPayment() {
      return principal * monthlyRate /
        (1-Math.pow(1/(1+monthlyRate),months))
    }
}
The principal, monthly rate, and months fields are all observable, because you need to know when the model’s writeable values have been updated so you can get the new payment value.
3.6.2. Defining a view
The next step is to create the view. You’ll do this iteratively so you can see how some of the pieces of the binding make their way in; we’ll show pieces of the view only as they’re needed. The first pass is to create form elements for each model field and map them to their model fields (see the next listing).
Listing 3.16. Bindings on the model properties
label('Principal:')
textField(text: bind(target:model, 'principal',
  value:'330000'))

label('Interest Rate:')
textField(text: bind(
  target:model, 'monthlyRate', value:'6.0'))

label('Term (Years):')
textField(text: bind(
  target:model, 'months', value:'30'))

label('Monthly Payment (P&I) :')
textField(editable:false,
  text: bind(source: model, sourceProperty: 'payment'))
The first problem you run into is that the payment field doesn’t automatically update when the user changes the editable values. This is because the payment property of the model isn’t an observable property. The simplest solution is to have the payment field update when any of the other fields are updated:
label('Monthly Payment (P&I) :')
textField(editable:false,
  text: bind(source: model, sourceProperty: 'payment',
    sourceEvent: 'propertyChange'))
The next problem is that the data formats of the fields don’t match those of the model. This is one of the primary uses of converters: converting one type of data to another type. With a float conversion, the principal text field should now look like this:
label('Principal:')
textField(text: bind(target:model, 'principal',
  value:'330000',
  converter: Float.&parseFloat))
Once the other input fields have the same converter, you should begin getting updates to the payment field. The payment values will be completely nonsensical at this point, with a payment in excess of the initial mortgaged amount. The problem (which the astute reader may have seen coming miles away) is that the formula is expressed in different units than the user expects: months and a fractional monthly rate versus years and an annual percentage. This is the second primary purpose of converters: to massage data values before they’re set in the model.
The next question is to decide where to put the logic for validating and converting the results. There’s no absolute answer. But because the logic can be somewhat arbitrary, it sounds like it should be stored in the controller. With closures stored in the model, the code for the converters and validators looks something like this:
label('Interest Rate:')
textField(text: bind(target:model, 'monthlyRate',
  value:'6.5%',
  validator: controller.validateRate,
  converter: controller.convertRate))
Finally, you don’t want to visually cram all the fields together. The fields also shouldn’t hug the edge of the frame. There are many ways to do this, but for this example you’ll use an empty border and a grid layout with vertical and horizontal padding. After putting all the pieces together, you get the final view for the application, as shown in the next listing.
Listing 3.17. MortgageCalcView.groovy
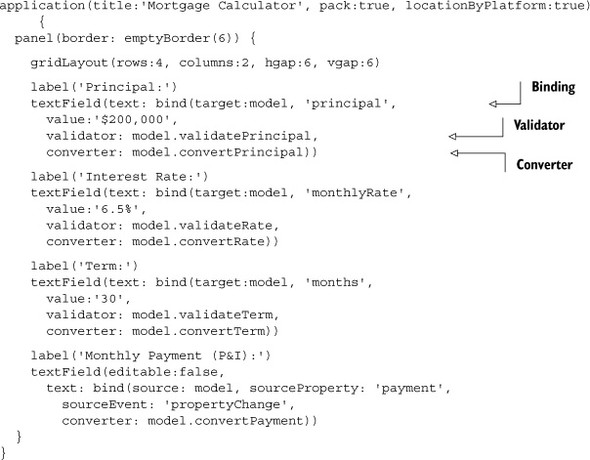
The final task is to write what constitutes the validation logic.
3.6.3. Adding the missing validations to the model
In this example, the model holds all pertinent functions that affect its own values. In other applications, you might feel like placing the validators in a controller, which is OK, too. One reason for choosing the model instead of the controller is multithreading concerns. For the moment, we ask you to trust our judgment; all will become clearer in chapters 6 and 7.
There are laws restricting how long a mortgage can be held, how much interest can be charged, and, for some loans, how much principal can be borrowed. These decisions should in no way affect the visual representation, so they shouldn’t be in the view. The other option is to place them in the model, and this is a decision between a concise model and a verbose model. For this example, you’ll choose a concise model and place the constraints in the controller (see the next listing).
Listing 3.18. Updated MortgageCalcModel with validation and conversion logic
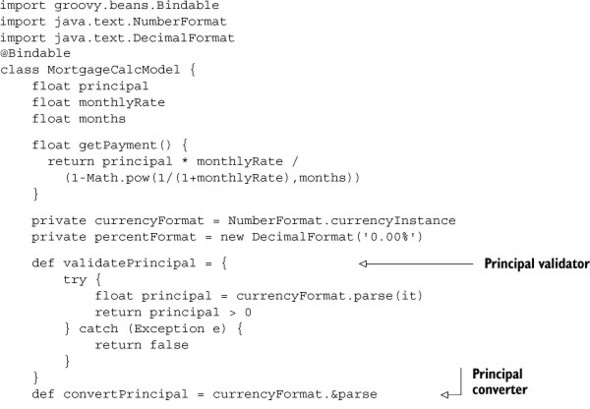
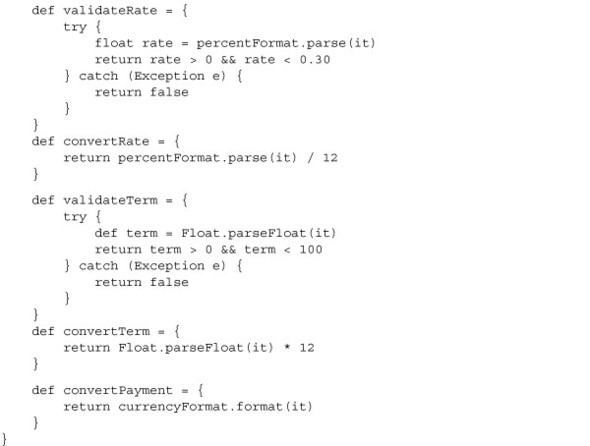
The model code also contains another often-overlooked aspect of simple GUIs like this one: ease of use. By using the currency and percentage formats from the java.text package, you present the numbers to the user in a format that more easily matches their common usage: with currency symbols, comma-separated number groups, and a percentage sign for the rate. One nice side effect of using the percentage format is that it automatically converts the percentage values to fractional values. Earlier drafts of the code did this conversion by hand.
3.7. Summary
The model is a collection of data that exists to be shown and changed by the view and the controller. But in order to make the process flow smoothly, the view needs to have its data fed to it automatically. To do so, you mark the properties that you want to be observable with the @Bindable annotation (or use the handy ObservableMap class), and you find the places in the view class that need to be updated when properties in the model are updated. The bind node can be used directly on the attributes of the node or can be declared outside of the view tree.
When declaring a binding operation, it’s essential that the three main pieces of the bind be declared in some fashion: what triggers the update, what provides the value, and where the value is placed. For simple property-to-property bindings, these are provided by the properties themselves (assuming that the property providing the value has been marked @Bindable). More advanced techniques trigger updates from JavaBeans events and provide source values from arbitrary closures. The result of the binding must go into a JavaBeans property. Finally you can do powerful things with the objects the Griffon framework creates to track bindings.
If we were magicians, we would be out of work by now, because we’ve laid bare some of the best parts of the magic trick that is data-model binding. Whenever you see a well-bound MVC group in action, it will still look magical. You’ll know how things work, but you won’t have to worry about the details. It’s the magician who has to wash the rabbit fur out of his hair every night, not the spectators!
With models and bindings in your bag of tricks, it’s time to move on to views.