
Chapter 6. Understanding MVC groups
We touched on the subject of MVC groups in previous chapters. As a matter of fact, we covered each of the default individual members in the last three chapters. But there’s more to groups than what you’ve seen so far. At this point, you know that a group comprises model, view, and controller members, each of which follows a naming convention. But did you know you can define additional members in a group that don’t necessarily follow the MVC pattern? Or that you can define a group with only a view and a model? Also, recall from the first example in this book that you can programmatically create new group instances on the fly, not just use those initialized by default upon application startup.
In this chapter, we’ll discuss all these features and more. Our goal is to help you gain a better understanding of the inner workings of MVC groups.
Let’s begin the journey by recapping how MVC groups can be created and how they behave. Some cautionary advice: the first two sections explain in detail what the framework does when instantiating and managing groups. If you’re only interested in working with MVC groups directly, you can skim through these sections to get a basic understanding of the underlying mechanism and jump directly to section 6.3. Of course, we recommend that you visit sections 6.1 and 6.2 if you have doubts or concerns about the topics they discuss.
6.1. Anatomy of an MVC group
The easiest way to create an MVC group is via the Griffon command line. Assuming you’re already inside a project like GroovyEdit (see chapter 1), you can create a filePanel group like this:
$ griffon create-mvc filePanel
Executing this command does two things: it generates a set of files representing the members (model, view, and controller) of the MVC group, and it changes the configuration files to tell the framework that you have a new MVC group.
Griffon generates four files, each in the appropriate functional directory: a model, a view, a controller, and a test file. Each of the files also has a name derived from the group name. And each of the files is in the same package, even though they live in different directories. Why? Because of convention over configuration: placing together the files that fill the same responsibility encourages you to make sure the labor stays appropriately divided.
Let’s walk through each of the generated files. Don’t worry, this will be a quick look. Because of Groovy’s power as a dynamic language, it strips away a lot of the ceremony you may expect to see—unless you’ve been using Groovy for a while already, in which case its relative brevity won’t be a surprise.
6.1.1. A look at each member
The first stop on our MVC group tour is the model. Griffon generates a model file for you based on the name of your MVC group in griffon-app/models. In this case, the name of the file is FilePanelModel.groovy:
import groovy.beans.Bindable

class FilePanelModel {
   // @Bindable String propName
}
Yes, this code snippet is the entire contents of the file. Because you don’t yet know what properties you want to add to your model, you don’t add any; the comment serves to show how simple it is to create a bound property named propName. Uncommenting that line is all that’s required to get an observable property! But you knew this already, because models were discussed in ample detail back in chapter 3.
Next up is the view. The view files live under griffon-app/views/ and are named based on the group name. This view will be called FilePanelView.groovy. Remember the pattern? It’s a convention: all MVC group members are stored in griffon-app/<portion name>/, and the names are <MVC Group name><portion name>.groovy. If you put your MVC group in a package, then the file will also be in an appropriately named set of directories beneath the storage directory, just like any other Java file:
application(title:'GroovyEdit',
  //size:[320,480],
  pack:true,
  //location:[50,50],
  locationByPlatform:true,
  iconImage: imageIcon('/griffon-icon-48x48.png').image,
  iconImages: [imageIcon('/griffon-icon-48x48.png').image,
               imageIcon('/griffon-icon-32x32.png').image,
               imageIcon('/griffon-icon-16x16.png').image]) {
    // add content here
    label('Content Goes Here') // deleteme
}
It’s a bit longer than the model, mostly because you need to do something to get a minimally functional MVC group going. The first thing you’ll notice is that there’s a lot of nesting. That is because GUIs in Griffon are written in a declarative fashion (this goes here, that goes there, these interact like this) rather that in the imperative fashion (create the panel, create the button, add the button to the panel, create a listener, add the listener to the button). This may seem weird at first, but it greatly improves the readability and maintainability of the application.
In the default view, you first declare an outer application (it could be a JFrame or an applet; Griffon smooths over the differences for you). You set the Griffon logo as the frame icons, and you do this in the view rather than apply a default because you’ll likely want to create your own icon for your applications. Inside the frame, you create a label indicating that the content goes here because—guess what?—the content goes here. What kind of content? The components, widgets, and pixels that make up the visual part of your application. Feel free to go back to chapter 4 to refresh your knowledge of views and widget nodes.
Your third stop is the controller. As per convention, you’ll find the controller file in griffon-app/controllers/FilePanelController.groovy:
class FilePanelController {
    // these will be injected by Griffon
    def model
    def view

    void mvcGroupInit(Map args) {
        // this method is called after model and view are injected
    }

    /*
    def action = { evt = null ->
    }
    */
}
The truth is that almost all of this content could be erased, and the MVC group you generated would still function. This code is a stub for features you’ll almost certainly need to add to get a reasonably useful MVC group—for example, one that defines actions that respond to menu inputs, as you saw back in chapter 1 with GroovyEditController.
At the top of the class definition are two fields to hold the references to the model and the view. Griffon will inject these fields into the class when it instantiates it for you, so all you need is appropriate properties for them to wind up in. There are uncommon cases where you may not need to reference the model or the view, so you could conceivably delete these properties.
Next you have a method named mvcGroupInit. This method serves as a constructor of sorts; it’s called after all of the portions are instantiated and fields have been injected. You may remember we mentioned this method in the last chapter. We’ll go into more detail in sections 6.2 and 6.3.
Finally, a commented-out section of code represents the execution portion of an action. In a well-behaved Swing application, actions are king, so first-class support of actions is important. Actions can be implemented by defining either closure properties (as the template suggests) or public methods. The choice is yours. There’s a slight performance advantage if the action is implemented as a public method, though; recall our discussion of controller actions from chapter 5.
Thought you were done, didn’t you? Sorry, but you’re not finished until you have proper testing code. Because it isn’t strictly a part of the MVC group, only part of the convention applies: the testing stub will be in the tests/integration directory. It will be named as expected, though—FilePanelTests.groovy:
class FilePanelTests extends GroovyTestCase {
    void testSomething() {
        fail("Not implemented yet!")
    }
}
Again, the generated code is fairly sparse. Generated tests are wired to fail if left unimplemented. It’s up to you to decide how they should be implemented. After all, Griffon alone can’t decide the best way to test your production code. Griffons may be magical beasts, but they’re only mounts you ride into battle: you still need to fight the battle. You can flip to chapter 9 to see how best to win the testing battle.
Finally, after all the necessary files are generated, you need to register your MVC group with the framework.
6.1.2. Registering the MVC group
Where do you register a group? In the Application.groovy file that lives in griffonapp/conf. We won’t look at the whole file here; the following code shows just the parts relating to MVC groups.
Listing 6.1. MVC group declarations in Application.groovy
. . .
mvcGroups {
    // MVC Group for "FilePanel"

    'filePanel' {
        model       = 'FilePanelModel'
        view       = 'FilePanelView'
        controller = 'FilePanelController'
    }

    // MVC Group for "GroovyEdit"
    'groovyEdit' {
        model      = 'GroovyEditModel'
        view        = 'GroovyEditView'
        controller = 'GroovyEditController'
    }
}
. . .
The declaration of the MVC group is fairly straightforward: in the mvcGroups section of the configuration, you declare the name of the MVC group and open a block describing all the portions that compose the group. The group portions are assigned to the names of the classes representing that portion of the MVC group. Note that the class names are defined as strings, for the sole reason of avoiding eager class resolution when the group configuration is loaded and parsed. The MVC group type itself is also in single quotes; this enables you to create groups that may not be groovy identifiers, possibly including spaces, dots, and any other characters you feel like adding. A key aspect of group names is that they must be unique within the application. If a duplicate name is encountered, the last group registered will win over the previous ones.
But what is this second MVC group doing in your pristine application? The groovyEdit MVC group configuration listed in this example existed before you created the filePanel MVC group; it was created when the application was created and is the MVC group that serves as the master group of the whole application. We’ll go over the ins and outs of multiple MVC groups in section 6.3.
The last declarative detail is how MVC groups are bootstrapped.
6.1.3. Startup groups
In the Application.groovy file, there’s a property named application.startup-Groups. This property is a list of the MVC groups that should be automatically started up when the application framework starts up. These groups are created without parameters and in the same order as they’re found in the list.
By default, the MVC group created as a part of the initial application is added to the list of startup groups. You’re free to add any number of groups that you declare later. You could even leave the list empty, having no startup groups initialized automatically. Of course, you would then need to bring up your MVC groups manually in one of the life-cycle scripts like Startup or Ready. You may choose this option if one of the initial groups requires additional parameters, for example.
This concludes our quick summary of creating an MVC group from scratch. We turn our gaze now to the runtime aspects of an MVC group, starting with finding out how a group can be instantiated at any time.
6.2. Instantiating MVC groups
You’ve seen the static view of an MVC group, where the code lives, where the declarations about its details are made, and what defaults the framework puts in place. But how do these pieces come to life? What is the man behind the curtain doing? We’ll now look at the different methods that play a role in the group’s life cycle.
6.2.1. Creation methods
MVC groups usually don’t come into being by themselves. The one exception is the startup groups discussed in section 6.1.3. After the bootstrap processes all initial groups, you’re on your own to instantiate any group whenever you deem necessary. The good news is that doing so is fairly simple. Three related methods are available to every MVC member and the application instance: buildMVCGroup(), createMVCGroup(), and withMVCGroup().
Every artifact that implements griffon.core.GriffonArtifact has access to the methods we’ll discuss shortly. All basic artifact types (model, controller, view, and service) implement this interface. To safely determine whether an artifact supports this feature, you can query its GriffonClass for its clazz property.
The first two methods are identical except for the return type. buildMVCGroup() returns an instance of griffon.core.MVCGroup where each member can be found by name, and createMVCGroup() returns a three-element array, with the contents being model, view, and controller, in order. When coupled with the multiple-assignment syntax introduced in Groovy 1.6, the createMVCGroup() method can make for some very readable code. But when your MVC group is more than model, view, and controller, the buildMVCGroup() method gives you access to all the created members.
The methods have one required parameter and a couple of optional ones:
- groupName—The only required parameter for createMVCGroup() and build-MVCGroup(). It’s the MVC type to instantiate. groupName is the same as the key used in the Application.groovy file.
- groupId—Optional. This is a name you want to give to this particular instance of the MVC group. If the name isn’t provided, the MVC
type is used in its place. The value of this parameter is important when you want to create multiple instances of the same
group type. In chapter 1, the GroovyEdit example used this parameter, assigning a different value per tab.
Calls to createMVCGroup() and buildMVCGroup() check for collisions with existing MVC groups. If the specified group name already exists as a group instance, then the application
may react in two ways: it either throws an exception alerting you (the developer) that the code is performing an illegal operation,
or it alerts you of the problem but doesn’t throw an exception. In that case, the old group is destroyed and the new one takes its
place. You can alternate between these two behaviors by changing the value of a configuration flag in Config.groovy:
griffon.mvcid.collision = 'warning' Valid values for this flag are warning and exception. Throwing an exception is the default behavior. - params—Optional map of arguments to be passed into the creating process. You can use Groovy-style named parameters with this method. According to normal Groovy conventions, each named parameter will be amalgamated into the map that is passed into the method as its third parameter. These parameters can be used to pass in configuration data, contextual data, or even portions of other MVC groups. In the GroovyEdit example, this parameter was used to let the newly created group know which title it should use for its tab, as well as where it should add the new tab: in other words, the owning JTabbedPane instance.
The third method that lets you create a new instance of an MVC group is withMVC-Group(). This method is aware of the life cycle common to all groups.
A group created with this method will be automatically destroyed as soon as it’s no longer of use. The typical case is a modal dialog that requires a few customizations before displaying itself, perhaps capturing some input and returning back to the original caller. Here’s an example of what we just described. Suppose a group named query is responsible for capturing a user selection in a model property named choice. The group’s controller also has an action named show that takes care of displaying the dialog:
def output = null
withMVCGroup('query') { m, v, c ->
    c.show()
    output = m.choice
}
Using this construct liberates you from explicitly destroying the group instance after it has been put to use. Destroying a group will be covered later in this chapter.
6.2.2. Marshaling the MVC type instances
Now that you’ve told the Griffon framework what MVC group you want to create and given some parameters for this creation, the framework will dutifully run off and create the MVC group and hand it back. Ordinarily, this process is a black box where magic occurs. How Griffon creates the MVC groups may appear magical, but once you know the secret, it isn’t. If you look behind the curtain, you see only a few interactions that, when observed without understanding, appear to be magic. But if you know what the interactions are, you can invoke what appears to be deeper magic later.
This section will dive deep into the technical details in order to dispel the magic and also give you a better understanding of what happens when a group is instantiated. Armed with this information, you should be able to make better choices when configuring groups and making group relationships.
Metaclass preparations
When creating the group, the first task the framework accomplishes is loading the Java class for the MVC group members. This is the plain Java part. What happens next is Groovy.
If the artifact or its superclass implements the griffon.core.GriffonArtifact interface and the superclass is Object, then the Griffon compiler switches the superclass to one that contains the app object and four method definitions (createMVC-Group(), buildMVCGroup(), withMVCGroup(), and destroyMVCGroup()). If the artifact or its superclass does not implement the griffon.core.GriffonArtifact interface, the app and the four method definitions are injected directly into the artifact’s byte code. The app field is a reference to the GriffonApplication object that serves as the central touchstone for the whole application, where all of the magic pixie dust is stored. The four injected methods are required for managing MVC groups. The first three methods exist for creating groups and the last one for destroying groups (more on that in the next section). These injections for an MVC member are compulsory; every member gets them. And they will overwrite any existing field or methods by the same name, so don’t even try!
The next step for the framework is to create the builder. The builder declarations in Builder.groovy have a syntax that allows various (features/behaviors) groups of builder nodes and properties to be injected into specific MVC portions. The default configuration has the threading group of methods being injected into the controller portion of the MVC group. Chapter 7 has more details on how to use those injected methods. But the injection of these properties and methods is under the control of the developer of the application.
Instantiations and injections
The next step is for the framework to instantiate each member. Note that until this point, you’ve been manipulating the metaclasses that represent the members, not actual instances of an object. When creating the instances, the framework creates the objects in true JavaBeans fashion by calling the public no-args constructor on the object class. There’s one wrinkle in this step, though. If a parameter passed into the build-MVCGroup(), withMVCGroup(), or createMVCGroup() method matches the name of a member, then you’ll use the provided value instead of creating a new one. Section 6.2.4 will discuss when and where you would want to do that.
After the members are initialized, they’re stored in the app object. The app object has a storage facility that exposes models, views, and controllers as properties, and a catchall groups property as well. These properties are exposed as maps where each member is keyed by its owner groupName: the unique group name, not the group type. Section 6.3 will cover this in greater detail.
The next listing depicts a controller with four properties defined. Two of them have special meaning because they follow the naming conventions for MVC members; the other two are run-of-the-mill properties. We’ll use this example to explain what happens during a group’s instantiation, as triggered by the call to the buildMVC-Group() method also shown in the listing.
Listing 6.2. Code injection example
class SampleController {
  def builder // injected by Griffon
  def model   // injected by Griffon
  def foo     // injected by Griffon
  def bar     // injected by Griffon
}
buildMVCGroup('sample', foo:1, baz:2)
Now that Griffon has live objects representing the members of your MVC group, you can start injecting values into the properties. Three types of properties are injected into the portion instances:
- builder—The builder that is created as part of the group. This property is easy to spot; it’s always called builder. You may want to access this field because it has the same variable scope as any of the scripts that make up the MVC group, such as the view script. This is how a controller can peek into elements defined in a view, for example, as long as those elements were either assigned to a variable in the view script or had a value set for their id property (a useful trick you might remember from chapter 5).
- Properties whose names match portion names (model, view, or controller)—These properties may vary with the particular setup of your MVC group. The intent of this class of property injections is to allow the portions of the MVC group to see and interact with each other, as if they were created as one object but having distinct identities. For the MVC pattern to work successfully, it’s essential that the controller have access to both the model and the view directly. By default, the controllers created by the create-mvc script have the necessary fields for injection of the model and the view. In listing 6.2, only the model will be injected, because only the model has a property.
- Properties whose names match parameter names passed in—These properties can be tricky to spot. They create wonderfully terse code, but they also can be considered too clever. This is where some good software engineering discipline comes in handy. When you’re declaring a property that’s meant to be injected, leave a comment around the property stating that fact. In the example, you passed in two named arguments, foo and baz. You also have two remaining properties in the controller, foo and bar. The framework will inject the value for foo into the controller, but it won’t inject the bar argument or inject anything into the baz property because the names don’t match up between the arguments and the properties.
- app—The GriffonApplication instance representing your app. (This will always be present, regardless of whether a property is present.)
- mvcType—The type of the MVC group.
- mvcName—The name of the MVC group. Must be unique.
- model—The model instance.
- view—The view script.
- controller—The controller instance.
- <other portions>—Other portions specified by the MVC group.
- <other args>—Anything passed in as a named parameter to build/with/ createMVCGroup.
But what do you do with arguments that aren’t injected and properties that aren’t injected to? How can you initialize them? That is an excellent question that we’ll address next.
6.2.3. Initializing group members
Another question you may be asking is, “When do I get to play?” We’ve been discussing how the framework creates some of the core parts of the application, and as yet it has been a mostly hands-off experience. Often, conventions and injection patterns won’t fill the bill. Compelling graphics are rarely made via injection, and we’ve reached the point where the MVC group members take an active role in their life cycle: initialization.
Griffon treats the initialization of the members in one of two wildly different fashions: scripts that are executed and classes that have methods called. You can think of this as the difference between two server-side technologies: JSPs and servlets. When it comes down to executing the bytecode, they are the same thing—a Java class that implements the javax.servlet.Servlet interface.
One other detail needs to be reiterated and will likely come into play as you write your members. They are initialized in the order in which they’re declared in the Application.groovy file. By default the order is model, then view, then controller, but you can change that order if you need to. The most common case for needing to do so is when the controller creates other sub MVC groups and injects portions of the child view into the view binding, so the view can wire those components directly into itself.
Classes and the mvcGroupInit() method
The simpler of the two initialization mechanisms is the means that Griffon applies to MVC portions classes, not scripts. Classes are members that don’t implement the groovy.lang.Script interface. In the classes instance, the framework looks for a method named mvcGroupInit() that takes a single argument java.util.Map. The map contains the builder and all the instantiated portions, as well as any named parameters passed into the call to buildMVCGroup() or createMVCGroup().
Notice that the contents of the map passed in as the sole argument is the same set of data that Griffon looks at to consider injections. This isn’t an accident, because some of the arguments may not be injected into the portion that is being initialized. This is especially true for model portions. The reason is that some of the arguments you pass in may only be needed for initialization and aren’t needed for the life of the portion.
Scripts and script execution
The other type of portion that Griffon encounters is Groovy scripts. Groovy scripts look like extended code snippets but are converted into fully functional classes implementing the groovy.lang.Script interface.
When an MVC group member is being initialized and it’s a script, the script itself is executed in the context of the builder that has been generated for the MVC group of which it’s a member. Even though Groovy scripts can expose methods as if they were object instances, any method named mvcGroupInit will be ignored in a script, deferring to the execution of the script.
One of the key differences of an MVC group script execution is that the execution occurs as a desired effect of the builder object’s build(Script) method. When the build method of a Griffon builder is called on a script instance, it does more than simply execute the script. Before the execution, the metaclass of the script instance is manipulated so that when a method is executed or a property is referenced, the builder is given a chance to intercept those calls and use the factories registered in the builder. Because of this metaclass integration, the script can declare the GUI in a context-free fashion. That is, there’s no need to prefix nodes with a variable that identifies the real builder type that contributed said nodes; there’s also no need for additional imports in many cases.
Note
The mvcGroupInit() method has a counterpart method that we’ll discuss later in this chapter.
6.2.4. Advanced techniques
The basic conventions of the declaration and creation of the MVC groups can sometimes betray the subtleness of some of the more advanced techniques that can greatly enhance the usability of the group instantiation facilities. Two of the most powerful are preexisting member instances and multiple view components.
Using preexisting member instances
When passing arguments to buildMVCGroup(), withMVCGroup(), or createMVC-Group(), what happens when you pass in an argument whose key turns out to be the same as a member name? In that case, the value provided is used as the member instance. The framework doesn’t initialize a new instance of that member but instead uses the value declared by the user directly.
When would you do want to do this? Common scenarios are where a model object is reused across multiple MVC groups. For example, a model representing a weather forecast may be represented with numbers and images in one MVC group and may also be represented via thermometers and colors in another view. Controllers may also be reused across multiple contexts where several UI buttons may have the same effect, such as in a tool bar view and a menu view.
This isn’t without side effects. The preexisting member will still participate in the injection and initialization phases. So new values may be overwritten in the old object, and the mvcGroupInit() method will be called multiple times. This can be turned into a positive, however, if the mvcGroupInit() method serves to move the items injected into the affected properties into internal collections.
Multiple view components
Another technique that may improve code readability is creating multiple unlinked components in the view script. All the examples included in the Griffon SDK create a single root component that’s composed of multiple children components, but nothing in the framework requires this. You could declare several related components that are driven by a single model and controller object.
An example of using multiple components is a master-detail view, where the master table and the detail panel are separate components. The master group defines a view that can display an aggregated snapshot of all elements; its controller most likely has a set of actions that allow you to navigate, edit, create, and delete such elements. When an element detail is required, the detail group comes into play; its job is to display each of the properties of the selected element. The detail’s model can hold those properties, and the detail’s view knows how to show them on the screen.
Another example is a complex graph and an associated control panel that’s used to manipulate the graph parameters. The MVC groups that use the graph can place the two components in any location.
One more possibility is a series of components that represent the underlying data in a cohesive set of more basic components, such as a tree, a list, and a table. The declaring MVC group is free to pick any number of the components to display as it sees fit.
Removing MVC group members
The MVC Pattern in Griffon isn’t an absolute requirement but a strongly worded suggestion. But sometimes you may wind up with empty portions. A widget that has no user interaction and merely reflects changes to its model may not need a controller component. The class can be deleted and the reference to the controller can be removed from Applications.groovy. Similarly, a group that reflects no data, such as a license dialog, or a group whose state is tracked by subgroups, may not need a model portion.
Creating additional groups
In addition to removing members, sometimes you may want to add members to the group. Two common examples are an action member and an animation member. The Greet example in the Griffon SDK adds an Actions member to the main Greet group and the login page group. The code for these members consists of Groovy scripts, so it’s evaluated with the same builder that evaluates the views.
To create an additional member, you’ll need to do three things, all of which follow the pattern set forth in section 6.1:
- Create a directory to store the member’s code: griffon-app/<member>.
- Create the class or script for the member, and name it <type><member>.
- Edit Application.groovy to refer to the new member.
The first step is to create a new directory to store the source code for the new member. This is typically added under griffon-app, and the name of the directory is the name of the member. For example, if you were adding an actions member, you would create a directory named griffon-app/actions. But the framework won’t enforce this—as long as the named class can be found in the classpath at runtime, it will be used. The class could live under the src/main directory or under any directory under griffon-app. That’s because almost any directory under griffon-app is compiled as though it were a source directory. The exceptions are i18n, resources, and most of conf.
The next step is to create the code file to represent the member. You have two choices: a Groovy script or a traditional class. The Groovy script will be executed by the builder for the member, so it will have access to the same set of methods that the view scripts have access to. It will also share the same binding context as the view script. This is handy when the additional member represents actions or animations for the view. The other option is to create a traditional class for the member. When you follow this path, the same injection and life cycle patterns that apply to models and controllers also apply to the new class. Either way, the class will be mutually injected like all other group members are.
To follow convention, you need to name the class with the member name as a suffix in camel case. For example, Greet[1] names its actions classes LoginPanelActions and GreetActions. Although the framework won’t throw errors if you don’t follow this convention, not doing so will create a problem in readability and maintenance of the application, so following the convention is strongly recommended. The following listing illustrates adding actions to the FilePanel.
1 Greet can be found in the samples directory of your Griffon installation.
Listing 6.3. Adding an actions member to FilePanel
mvcGroups {
    // MVC Group for "FilePanel"
    'filePanel' {
        model      = 'FilePanelModel'
        actions    = 'FilePanelActions'
        view       = 'FilePanelView'
        controller = 'FilePanelController'
    }
    //...
}
Finally, you need to register the member in the Application.groovy class. If you were going to add an actions member to the FilePanel group of GroovyEdit, you would add an entry under the mvcGroups.FilePanel group referring the name actions to the FilePanelActions class.
There’s one important item you must remember from earlier in this chapter: when declaring members, order matters. The order in which the members are listed is the order in which they will be initialized and executed. If the view is depending on objects declared in the actions script, then the actions member must come before the view script.
Now that you understand the basics of MVC groups, let’s look at using and managing multiple MVC groups.
6.3. Using and managing MVC groups
Where are we so far? You know what the MVC pattern is, you know how Griffon declares the pattern, and you know how to create an MVC group. Now you’re at perhaps the most pertinent part: what do you do with it? As far as patterns go, the MVC pattern requires a fair amount of setup and wiring. But the focus of the pattern is about how the pieces interact in a running environment. In this section, you’ll see how to access multiple MVC groups and destroy MVC groups when the application is finished with them.
6.3.1. Accessing multiple MVC groups
How does an MVC group interact with the world? MVC groups, after all, are a lot like atoms. They can do some interesting stuff all by their lonesome, but the real fireworks occur at the molecular level when several atoms are combined. There are entire classes in upper-level chemistry devoted to interesting combinations of carbon, oxygen, hydrogen, and nitrogen. The trick is getting them to interact with each other in specific ways.
Interacting with other MVC groups is easy. You access properties and methods on the members (model, view, and controller) that form the other MVC groups you wish to interact with. The difficult part is getting hold of the portions from the other MVC groups. There are two ways to obtain the other group portions: access them by their MVC group name, or track the relevant members at the time the MVC group is created, either by having the creating group store the created group’s members or by passing in the creating group’s members as parameters on the call to createMVC-Group(), withMVCGroup() or buildMVCGroup().
Accessing via references
Here’s a snippet from the Greet sample application of the parent MVC group working with the contents of a child MVC group. The parent group owns the following snippet, and the userPane variable holds a reference to the child group:
def userPaneGroup = buildMVCGroup('userPane', mvcName,
    user:twitterService.userCache[username], closable:true);

view.tweetsTabbedPane.addTab("@$username", userPaneGroup.view.userPane)
Here, the controller is generating an MVC group for a user tab. After the MVC group is created, the controller takes the relevant widget from the new view and adds it to a tabbed pane in the parent’s view.
You can also use this technique in reverse: the child group does the adding, and the parent fires and forgets. Here is how GroovyEdit does a similar action. First, in GroovyEditController you find
createMVCGroup('filePanel' mvcId,
    [file: file, tabGroup: view.tabGroup, tabName: file.name, mvcId: mvcId])
Next, in FilePaneView you encounter
tabbedPane(tabGroup, selectedIndex: tabGroup.tabCount) {
   panel(title: tabName, id: "tab") {
       //....
   }
}
The controller for the parent MVC group passes in an instance of a TabbedPane that it wants the child MVC group to add itself to. The child MVC group then uses the tabbed pane that was passed in as a value to its own tabbedPane widget. A new pane isn’t created; instead, the node will use the existing widget. This technique works with most container types built by SwingBuilder.
Accessing Via names
Another method is to access groups via a symbolic name. Remember the second, optional parameter on buildMVCGroup(), withMVCGroup(), and createMVCGroup()? This is why it exists; it’s an application-wide name that can be used to access the group’s parts without having to hold a direct reference to them. This frees the MVC groups from having to store direct references to the other MVC groups.
The object that is used to access the portions is the app property. This property is unique from the other injectable properties in that it’s always available in MVC group members because Griffon injects its value at the metaclass level. It also implements the griffon.core.GriffonApplication interface.
The relevant fields for MVC groups found in the aforementioned interface are the groups property and the models, views, and controllers properties. The groups property is a map containing all instantiated groups. Each group is keyed to the names of the MVC groups that have been created. Each MVC group member is keyed by name in its particular MVC group. The models, views, and controllers properties are quick-access properties that are keyed on the MVC group name and return the individual model, view, and controller of each group. If a member for the particular type doesn’t exist, it isn’t stored and a null is returned if the member key is accessed. These properties exist strictly as a convenience because they can be accessed from the groups property.
The Griffon SDK includes another sample application called WeatherWidget (look for it under $GRIFFON_HOME/samples/WeatherWidget). One of its controllers initializes four additional groups, as shown in the following listing.
Listing 6.4. WeatherWidgetController instantiating and using groups
void mvcGroupInit(Map args) {
    createMVCGroup('smallForecast', 'small1')
    createMVCGroup('smallForecast', 'small2')
    createMVCGroup('smallForecast', 'small3')
    createMVCGroup('smallForecast', 'small4')
}

 (1..4).each {
    def day = forecastData.simpleforecast.forecastday[it]
    def smallModel = app.models["small$it"]

    smallModel.day = day.date.weekday
    // ... other such updates
}
The parent WeatherWidgetController creates four instances of the smallForecast group and names them in a standard fashion. This explicit name is used in two places: in the update logic where you access model members by name, and in the view for the MVC group where you add the view widgets based on the explicit names given in the controller (see the following listing).
Listing 6.5. WeatherWidgetView wiring up views from the instantiated views
hbox {
    widget(app.views.small1.smallPanel)
    hstrut(6)
    widget(app.views.small2.smallPanel)
    hstrut(6)
    widget(app.views.small3.smallPanel)
    hstrut(6)
    widget(app.views.small4.smallPanel)
}
This example also touches on a relevant point: when interacting with other MVC groups, you won’t always do so at startup. Some interactions need to cross the MVC group barriers. Often, the best place for building such interactions is the mvcGroupInit() method of an artifact such as a controller. You can also use the life cycle scripts to build such group relationships. Finally, there’s the option for fine-grained event listeners, but we won’t explore that subject until chapter 8.
Like all models with life cycles, the MVC group life cycle has to deal with death and destruction, as we’ll discuss next.
6.3.2. Destroying MVC groups
A well-behaved application that runs for a long time will need to destroy at least some of the MVC groups it creates. These groups may represent things such as transient dialogs or documents that the user has closed. But if these MVC groups are kept around and none of their resources are reclaimed, eventually you’ll run out of memory.
The destroyMVCGroup() method is used to destroy an MVC group. It takes only one argument: a String that is the name of the MVC group (this is why mvcName is one of the auto-injected variables). Figure 6.1 illustrates how this method works.
Figure 6.1. destroyMVCGroup() sequence
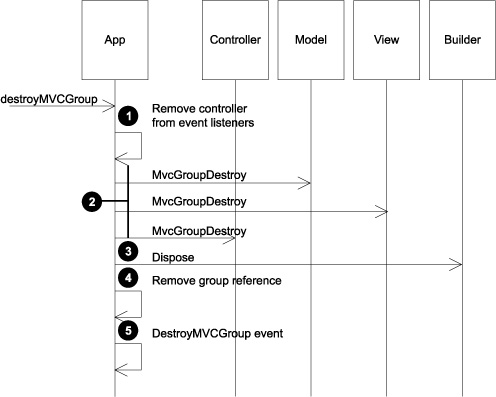
Calling destroyMVCGroup() will perform all the needed cleanup actions such as removing event listeners, invoking destroy callbacks, and disposing of
Swing components. The first action that the destroy method takes ![]() is to remove any application event listeners that the controller object may have registered with the framework. When you’re
tearing the group apart, you don’t want the framework asking it to respond to any actions it may not be prepared to deal with
any more.
is to remove any application event listeners that the controller object may have registered with the framework. When you’re
tearing the group apart, you don’t want the framework asking it to respond to any actions it may not be prepared to deal with
any more.
The next step in destruction is to call mvcGroupDestroy() on each of the MVC group members ![]() . Dispatching these methods is done mostly in the same manner as calls to mvcGroupInit(). The only real difference is that there are no arguments to this method. As in the init() call, the members are inspected in the order in which they’re declared in the Application.groovy file. Each instance is examined
for a method named mvcGroupDestroy() that takes no arguments. Regardless of whether the method terminates normally or throws an exception, the destruction of
the group will continue.
. Dispatching these methods is done mostly in the same manner as calls to mvcGroupInit(). The only real difference is that there are no arguments to this method. As in the init() call, the members are inspected in the order in which they’re declared in the Application.groovy file. Each instance is examined
for a method named mvcGroupDestroy() that takes no arguments. Regardless of whether the method terminates normally or throws an exception, the destruction of
the group will continue.
The next step is to call the dispose() method on the builder object ![]() . This will cause the dispose() method to be called on all the registered builders as well. Two important cleanup activities for SwingBuilder occur during
this process. First, any frame, dialog, or window that was created using the SwingBuilder APIs will have its dispose method called. This not only closes those windows but also frees up any native resources that were consumed by them.
Second, all bindings created with this builder are unbound via the unbind() call. Hence, any listeners that were registered to facilitate the binding will be removed.
. This will cause the dispose() method to be called on all the registered builders as well. Two important cleanup activities for SwingBuilder occur during
this process. First, any frame, dialog, or window that was created using the SwingBuilder APIs will have its dispose method called. This not only closes those windows but also frees up any native resources that were consumed by them.
Second, all bindings created with this builder are unbound via the unbind() call. Hence, any listeners that were registered to facilitate the binding will be removed.
Now you un-register the MVC group members from their registration in the Griffon-Application object ![]() . Why is this step saved until near the end? To allow the mvcGroupDestroy() methods and disposal closures to reference the other portions by name if required. Only when all the other cleanup activity
has been performed can the references to the members that make up the MVC group be removed.
. Why is this step saved until near the end? To allow the mvcGroupDestroy() methods and disposal closures to reference the other portions by name if required. Only when all the other cleanup activity
has been performed can the references to the members that make up the MVC group be removed.
The final step is to trigger an application-wide DestroyMVCGroup event notifying observers that the group has been destroyed ![]() . This allows for additional cleanup that other components might desire to perform. Be aware that at this point, the group
is no longer valid, and any references to its members have been purged from the application’s cache. Any component that listens
to this event should also purge any references it holds to the destroyed group or its members.
. This allows for additional cleanup that other components might desire to perform. Be aware that at this point, the group
is no longer valid, and any references to its members have been purged from the application’s cache. Any component that listens
to this event should also purge any references it holds to the destroyed group or its members.
We’ve covered all runtime aspects of MVC group. Now it’s up to you to experiment with the options at your disposal. Mixing the ability to create new groups with the introspection capabilities of the Artifacts API should give you enough ammo to build complex interactions with concise and readable code.
We’re almost done with this chapter, but we can’t close it without mentioning another useful feature of the Griffon framework. When it comes to creating MVC groups, custom artifact templates can play a significant role.
6.4. Creating custom artifact templates
Recall from section 6.1 that the files of each MVC member are initially created with a predetermined set of options. Well, each file is the result of a template being evaluated within the boundaries of a set of conventions.
Wouldn’t it be great if it were possible to override the default template of a certain artifact before its corresponding file was created? It turns out, it’s possible. Suppose you want to create a view that constructs a TabbedPane or a Dialog. If you have such a template ready, then you can use it instead of the default view template. This saves you the time of editing the freshly created view in order to replace the default code and paste what you need. Remember that Griffon favors convention over configuration, but that doesn’t mean it lets go of configuration altogether.
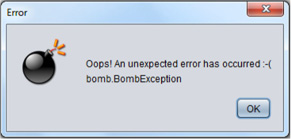
Let’s follow a pragmatic approach to learning about the artifact templating options by building a custom group whose main responsibility is to show an error dialog whenever an unknown error occurs. To give you an idea of what you’ll end up with, glance at Figure 6.2.
Figure 6.2. A dialog with custom title, icon, and message. The message’s text should change according to the error that occurred.
The first order of business will be to build the template of each MVC member.
6.4.1. Templates, templates, templates
A template in Griffon is a simple text file that may contain special placeholders for specific variables. You may have noticed that every time you create a controller, the class defined in the file matches the name of the file. A similar thing happens with the package name for the class. Here, for example, is the template used by default for a model class:
@artifact.package@import groovy.beans.Bindable

class @artifact.name@ {
   // @Bindable String propName
}
You can see two different placeholders: one for the package name and one for the class name. Table 6.1 lists all the available placeholders.
Table 6.1. Placeholders and their meaning
|
Placeholder |
Meaning |
|---|---|
| artifact.package | Defines the name of the package to be used in the class. May be empty. |
| artifact.name | Name of the artifact, including suffix. Example: BookController. |
| artifact.name.plain | Name of the artifact, excluding suffix. Example: Book. |
| artifact.superclass | Name of the superclass, if any was defined (use -super-class command flag). |
| griffon.version | Griffon version currently being used. Example: 0.9.5. |
| griffon.project.name | Name of the current project. |
| griffon.project.key | Same as the previous, but uses a dot (.) instead of a slash as a path separator. |
OK, you know what placeholders can be used, but how do you name your templates? And where do you put them? The answer to the first question is found in the naming convention that you know by heart by now. A view class is constructed with a view suffix, and a model class is constructed with a model suffix. This probably means there are View.groovy and Model.groovy files lying somewhere in the Griffon SDK.
If you guessed this too, you’re on the correct path. This leads to the second answer: Griffon is looking at a specific location for its own templates. That location could be configurable, or it could possibly allow for several locations to be specified. Well, it turns out the second guess is correct: there are several locations to be searched for templates. Any additional artifact templates can be placed under src/templates/artifacts—this includes both applications and plugins (we’ll cover plug-ins in chapter 11).
Armed with this knowledge, you can build the templates for each member of your group. Let’s call them DialogView, DialogModel, and DialogController; we’ll present them in this order. The next listing presents the template for the view. It’s sparse, yes, but you don’t need much for this type of view
Listing 6.6. Template definition for DialogView.groovy
@artifact.package@import javax.swing.JOptionPane
optionPane(
    id: 'pane',
    messageType: JOptionPane.INFORMATION_MESSAGE,
    optionType: JOptionPane.DEFAULT_OPTION,
    icon: nuvolaIcon('core', category: 'apps', size: 64),
    message: bind {model.message})
The template sets up an optionPane node (it resolves to an instance of JOptionPane) with a couple of properties. Note the use of the nuvolaIcon() node. This node is supplied by a plugin and as such isn’t available in a view unless you install the corresponding plugin in the target application that uses this template. If you’re curious, this is done by invoking the following command:
$ griffon install-plugin nuvolaicons
This view template also sets up a binding with its model, which means you need to supply an observable property on the group’s model as well. The next listing shows what the model template defines.
Listing 6.7. Template definition for DialogModel.groovy
@artifact.package@import groovy.beans.Bindable
class @artifact.name@ {
    @Bindable String message = ''
    @Bindable String title = 'Error'
}
The group you’re building is simple, yet the model defines two properties that can be used to provide a more personal touch when put to work.
The third and last template we’ll cover belongs to the controller member of the group. The controller is responsible for showing a dialog with the appropriate owner and setting the title on the dialog (see the following listing).
Listing 6.8. Template definition for DialogController.groovy
@artifact.package@ import java.awt.Window

class @artifact.name@ {
    def model
    def view

    def show = { Window window = null ->
        view.pane.createDialog(
            window ?: Window.windows.find{it.focused},
            model.title
        ).show()
    }
}
Once more you see the trick of defining a value for a parameter. This means the show() action of a controller created with this template can be called with a Window argument or with no argument at all. Either way, the dialog will be presented at the center of the currently focused Window.
Make sure you place these three files inside src/templates/artifacts at the root of your application. You’re ready to bring this group to life.
6.4.2. It’s alive!
Up to this point, we’ve covered the setup of the templates and their conventions. Now you can create your first MVC group from custom templates. In chapter 2, we discussed several of the command targets at your disposal, in particular the create-* command targets. This command target bootstraps a particular artifact using predefined template-naming conventions. The create-model command creates a model, the create-view command view creates a view, and create-controller creates a controller using standard templates. You can override those conventions and make the command targets do your bidding.
Every create-* command target requires an artifact type in order to work. Through this type, you can inject your custom templates and let them be resolved instead of the default ones. If a view requires a View.groovy template and has view as its suffix, it’s likely that its type is view too. Follow the same train of thought for the other artifacts.
You now have a custom template that you want to use. How do you put this template together with the command line?
The create-* command targets accepts an optional parameter that matches the lowercase name of the type it can manage. For instance, if you want to target only views, then you define a –view flag and the name of the target template as its values.
Let’s put this new knowledge to the test. The following command invocation is enough to create a group that uses all of your newly defined templates:
griffon create-mvc -view=DialogView
                   -model=DialogModel
                   -controller=DialogController sample
You should see output like this in your console after a few moments:
Running script /usr/local/griffon/scripts/CreateMvc.groovy
Environment set to development
Created DialogModel for Sample
Created DialogView for Sample
Created DialogController for Sample
Created IntegrationTests for Sample
Perfect! Now open each MVC member file in your favorite editor. Notice how every placeholder has been replaced with the correct value for each artifact.
Last, you need to instantiate this group in your code. Using the knowledge you’ve gained from previous sections of this chapter yields the following code:
def (m, v, c) = createMVCGroup('sample')
m.message = """
  Oops! An unexpected error has occurred :-(
  $exception
""".toString()
c.show()
destroyMVCGroup('sample')
The caller code construct an instance of the sample group, sets a value for the model’s message property, and calls the show() action on its controller. Finally, it performs proper cleanup and deletes the group instance from the app’s cache after the dialog has been dismissed.
One final remark about templates: you can also place them inside plugins. This means you can reuse the templates across several applications.
6.5. Summary
The MVC group facility is the means by which the Griffon framework encourages and rewards adherence to the Model-View-Controller pattern. It also makes using MVC groups the path of least resistance when it comes to creating GUIs—this resistance has often been the main reason the pattern was abandoned or ignored.
Griffon provides a bootstrapping mechanism to create the initial content of the MVC group artifacts. Each artifact follows both a naming and a place convention that can be exploited later to mix and match different values for each of its members.
An MVC group is formed from a model, a view, and a controller. You can create groups with fewer or more members, or reuse existing member instances between groups.
Griffon provides both a declarative means to create MVC groups and rich means to interact with the MVC groups once they’re created. Groups can be created, initialized, and destroyed at will.
Finally, you caught a glimpse of the templating mechanism the framework uses to create each file. Because the mechanism is powered by conventions, it’s possible to override the selection of the default templates and instruct the system to prefer a custom template of your choosing.
This concludes our journey through the basic building blocks of the Griffon framework. The next chapter will discuss the challenges of concurrency and threading, and how Griffon helps solve them.