
Chapter 7. Multithreaded applications
- Understanding the need for well-behaved multithreaded desktop applications
- Working with Griffon’s multithreading facilities for Swing-based applications
- Additional UI toolkit-agnostic threading facilities for all components
We’re halfway through our journey of discovering what Griffon has to offer to desktop application development. By now you should be familiar with the core concepts, such as the MVC pattern and the way Griffon implements it, its command utilities, and its configuration options, just to name a few. But there’s more to Griffon than that. For example, you can extend the framework’s capabilities to upgrade an application’s looks. And you can certainly create an application that’s prepared to deal with the terrible beast that is concurrent programming in the JVM.
Handling threading in desktop applications is a crucial task. Do it carelessly, and your users will walk away. Continue reading to find out the secrets for mastering multithreaded applications with Griffon.
7.1. The bane of Swing development
As noted back in chapter 1, the JVM is a great place to develop applications for many reasons. It’s an amazing piece of technology that harbors a huge ecosystem of libraries, tools, and languages. The designers of the JVM and the Java language made a conscious decision to include multithreading support since the beginning, thus allowing a wide range of applications to be built. Although many agree that building an application with concurrency in mind isn’t an easy job, it beats what we had before the JVM came forward.
But writing desktop applications with Swing while taking concurrency into account is a different game altogether, and it can get ugly pretty fast. It’s easy to make the wrong assumptions when working with multithreaded applications. The threading support found in the JVM and the Java programming language is certainly welcome, but it’s not enough by itself.
Swing is a powerful UI toolkit capable of handling a multitude of events at a time. It handles events generated by user interaction, such as the push of a button, the movement of the mouse over a component, or keyboard input. Swing also handles internal events generated by the application and by its own internals, such as a repaint request of a particular section of the UI. Swing handles the load by placing all events in a queue and later dispatching them in the same order they entered the queue. The responsibility of dispatching events falls to java.awt.EventQueue, and event dispatching must be performed in a special thread: the event dispatch thread (EDT).
It so happens that the majority of events posted to the event queue are paint requests; the rest deal with updates that may affect the UI state, possibly triggering another paint request as a byproduct. This means the EventQueue is busy properly updating the visuals of your application most of the time.
Can you imagine what happens when an operation that isn’t UI-related, such as reading a big file or querying a database, is executed in the EDT? In no particular order: disaster, despair, frustration, and a lot of stress, mainly because the EDT should be concerned with UI-related operations. Everything else should be run outside of the EDT.
Without further ado, let’s review what plain Java and Swing offer in terms of threading support. We’ll use this basic understanding to showcase the advantages of handling threading concerns with Groovy and SwingBuilder. Later we’ll show you how Griffon uses these new building blocks and adds a few of its own.
7.1.1. Java Swing without threading
Let’s review a typical Swing example, as shown in listing 7.1. Chances are you’ve encountered a similar piece of code around the web when searching for information about Swing. This application is a simple file viewer. We could have chosen a network-or database-aware application, but accessing the file system through I/O is a common task and requires less setup. The implementation is straightforward, but we’ll explain a little about the code.
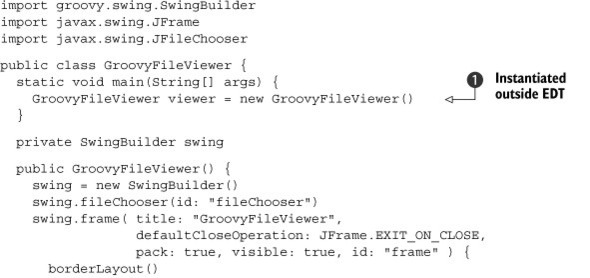
Listing 7.1. Java version of SimpleFileViewer
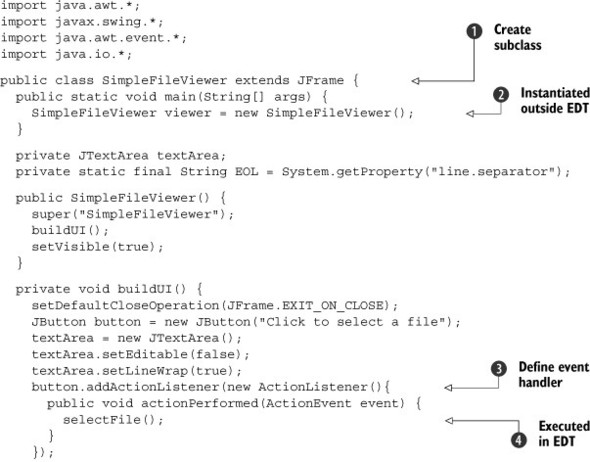
The code starts by defining a subclass of javax.swing.JFrame ![]() . In the good old days, inheritance was regarded as the way to go most of the time; these days, people tend to favor composition.
Although this particular aspect doesn’t hinder you in creating a multithreaded Swing application, it imposes a design constraint
that might affect you later. For example, any object that interacts with an instance of SimpleFileViewer could potentially change the layout, add or remove components from it, or even alter the button’s behavior; all these are
possible because the contract of a UI container (such as JFrame) is exposed via the inheritance mechanism.
. In the good old days, inheritance was regarded as the way to go most of the time; these days, people tend to favor composition.
Although this particular aspect doesn’t hinder you in creating a multithreaded Swing application, it imposes a design constraint
that might affect you later. For example, any object that interacts with an instance of SimpleFileViewer could potentially change the layout, add or remove components from it, or even alter the button’s behavior; all these are
possible because the contract of a UI container (such as JFrame) is exposed via the inheritance mechanism.
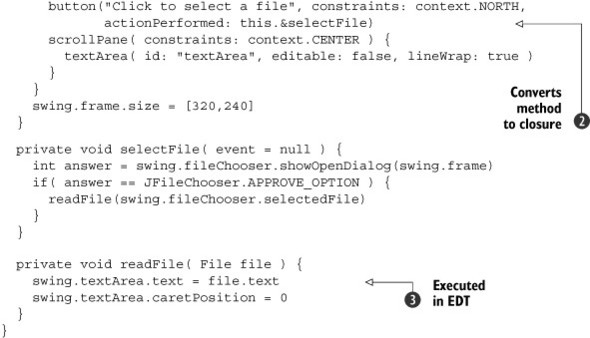
Another recurring idiom in Swing applications is the usage of inner classes to quickly define precise event handlers ![]() . This is a powerful mechanism that tries its best to be as friendly as anonymous functions are in other languages. They pretty
much behave like anonymous functions, other than their verbosity and some limitations to enclosing scope and visibility. But
we’re not about to discuss the merits of Java’s inner-class design versus real anonymous functions.
. This is a powerful mechanism that tries its best to be as friendly as anonymous functions are in other languages. They pretty
much behave like anonymous functions, other than their verbosity and some limitations to enclosing scope and visibility. But
we’re not about to discuss the merits of Java’s inner-class design versus real anonymous functions.
The catch is that while dealing with the amount of verbosity needed to wire up these handy classes, you may forget about the
intricacies of Swing threading. In case you were wondering, event listeners receive a notification in the same thread that
sent them the message—that would be the EDT. This means you have to plan for select-File() ![]() to be called in the EDT. As listing 7.1 shows, there’s no indication that the code is aware of this fact.
to be called in the EDT. As listing 7.1 shows, there’s no indication that the code is aware of this fact.
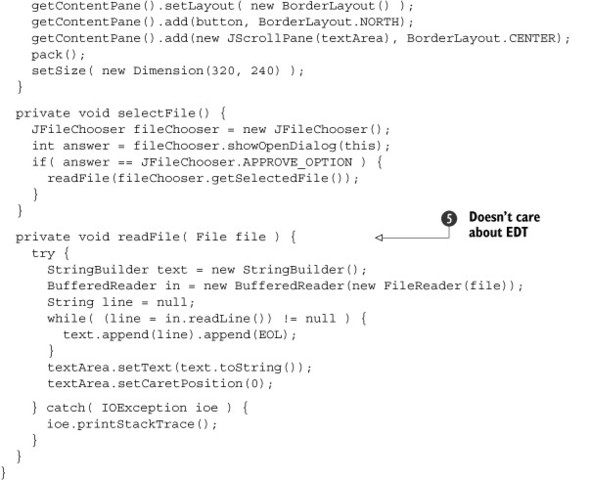
Because the implementation of selectFile() doesn’t display any special thread-handling code, it’s safe to assume that it will be executed in the same thread that called
it. This method will call readFile() ![]() if the user has selected a file to read. If there were any special code to properly handle threading, this would be it. Sadly,
that code isn’t there. The implementation will read the file’s contents in a buffer and update the textArea, text, and caretPosition properties.
if the user has selected a file to read. If there were any special code to properly handle threading, this would be it. Sadly,
that code isn’t there. The implementation will read the file’s contents in a buffer and update the textArea, text, and caretPosition properties.
Finally, at the application’s main entry point ![]() , an instance of the SimpleFileViewer class is created in the main thread. But there’s another catch: it’s recommended that Swing components be initialized in
the EDT. In this case, initialization occurs in the main thread.
, an instance of the SimpleFileViewer class is created in the main thread. But there’s another catch: it’s recommended that Swing components be initialized in
the EDT. In this case, initialization occurs in the main thread.
Now that you know some of the pitfalls you need to avoid, the next section will show how you can sort them out with plain Java.
7.1.2. Java Swing with threading
Let’s look now at a revised version that addresses the previously outlined problems: you use composition instead of inheritance, you make sure readFile() is protected against reading a file in the EDT, and you initialize all Swing components off the main thread (see the following listing).
Listing 7.2. RevisedSimpleFileViewer with threading taken into account
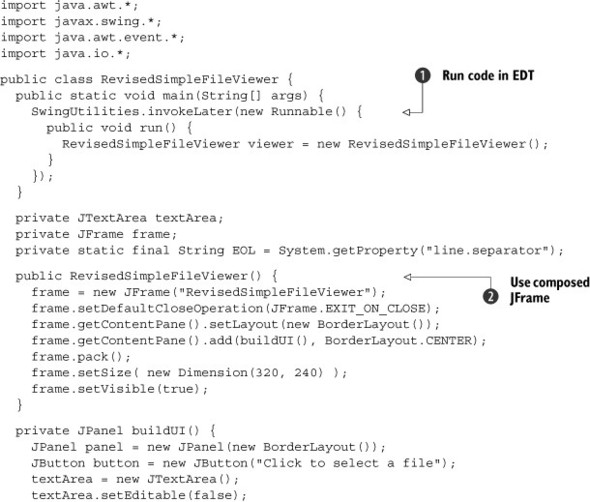
Although it’s not our intent to scare you off by incrementing the verbosity level, this is how inner classes can be used to cope with threading problems. You may have noticed that 15 lines have been added in the process of converting SimpleFileViewer to a well-behaved Swing application.
From top to bottom this time: A Swing utility class ![]() is used to explicitly invoke a piece of code in the EDT. You’ve now ensured that the UI is built in the correct thread. A
JFrame internal variable is used because RevisedSimpleFileViewer doesn’t inherit from JFrame
is used to explicitly invoke a piece of code in the EDT. You’ve now ensured that the UI is built in the correct thread. A
JFrame internal variable is used because RevisedSimpleFileViewer doesn’t inherit from JFrame ![]() . Notice that the button’s event handler
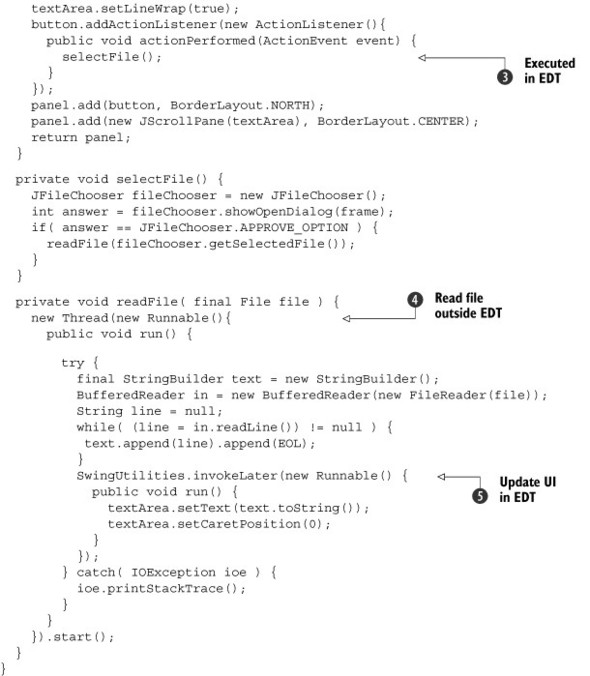
. Notice that the button’s event handler ![]() has been left untouched; you’ll make sure the helper methods receive proper threading updates as shown by
has been left untouched; you’ll make sure the helper methods receive proper threading updates as shown by ![]() and
and ![]() . A new thread is spun off
. A new thread is spun off ![]() , effectively executing the file-read code outside of the EDT; but once the contents have been finished, you need to update
the textArea. It’s back then into the EDT by using SwingUtilities.invokeLater() again. This particular Swing facility posts a new event into the event queue. On the other hand, SwingUtilities.invokeAndWait() executes code in the EDT and waits until code execution has finished. In other words, invokeLater() is an asynchronous call to the EDT, whereas invokeAndWait() is a synchronous one.
, effectively executing the file-read code outside of the EDT; but once the contents have been finished, you need to update
the textArea. It’s back then into the EDT by using SwingUtilities.invokeLater() again. This particular Swing facility posts a new event into the event queue. On the other hand, SwingUtilities.invokeAndWait() executes code in the EDT and waits until code execution has finished. In other words, invokeLater() is an asynchronous call to the EDT, whereas invokeAndWait() is a synchronous one.
As you’ve seen, the EDT is both a blessing and a curse. On one hand, it makes the job of dispatching events in a serialized way a reality. On the other hand, it spells disaster if developers don’t take special care to avoid executing long-running operations on it.
Oracle keeps tutorials online if you’d like to learn more about Java technologies. One of these tutorials is “Concurrency in Swing” (http://mng.bz/dKpA). This particular document tells you everything you need to know about threading and Swing. We did our best to sum up the contents and show you the common pitfalls.
You’re here to learn about making the job of building Swing applications easier and fun, so let’s look at the alternatives that Groovy offers.
7.2. SwingBuilder alternatives
Up to this point, you’ve seen numerous examples of Groovy’s SwingBuilder. You know it reduces visual clutter and increases readability, but that doesn’t mean you’re safe from shooting yourself in the foot just by relying on SwingBuilder alone. Groovy can work its magic, but you have to give it a few nudges in the right direction from time to time.
In this section, we’ll revisit SwingBuilder for its Swing DSL capabilities, but this time we’ll journey a bit deeper into the threading capabilities it exposes.
7.2.1. Groovy Swing without threading
Let’s revisit the first version of SimpleFileViewer (see listing 7.1), but switch to Groovy. As shown in the following listing, the code’s design is pretty much the same apart from using composition instead of inheritance from the get-go.
Listing 7.3. Groovy version of SimpleFileReader
Comparing lines of code, listing 7.3 is 20 lines shorter than listing 7.1, but it still lacks proper threading support. The application is still being instantiated in the main thread ![]() , which means the UI components are also being instantiated and configured in the main thread. Next a Groovy shortcut
, which means the UI components are also being instantiated and configured in the main thread. Next a Groovy shortcut ![]() obtains a closure from an existing method, a handy alternative to declaring an inlined closure. Back to the application’s
business end
obtains a closure from an existing method, a handy alternative to declaring an inlined closure. Back to the application’s
business end ![]() , where the file is read in the current executing thread (that would be the EDT again), and the textArea is updated in the same thread. In summary, you made the code more readable but didn’t rid yourself of the threading problems.
, where the file is read in the current executing thread (that would be the EDT again), and the textArea is updated in the same thread. In summary, you made the code more readable but didn’t rid yourself of the threading problems.
You could make a Groovy version of listing 7.2 too, using SwingUtilities and creating new threads, but Groovy has a tendency to simplify things. We’d like to show you what the language has to offer before we get into SwingBuilder threading proper.
7.2.2. Groovy Swing with threading
The ability to use closures in Groovy is a big selling point to many developers, but the ability to use Groovy closures with plain Java classes is perhaps the most compelling reason to switch.
Take a moment to look at the Java implementation of RevisedSimpleFileViewer.readFile() in listing 7.2. Try to visualize its behavior behind the verbosity of its implementation. Now look at the Groovy version of the same code, as shown in the next listing; it’s a rather different picture.
Listing 7.4. Groovy enhanced readFile()
  private void readFile( File file ) {
    Thread.start {
      String text = file.text
      SwingUtilities.invokeLater {
        swing.textArea.text = text
        swing.textArea.caretPosition = 0
      }
    }
  }
We can almost hear you shouting with anger and disbelief, “Not fair!” (that is, if you’re one of the countless developers who have been bitten by Swing threading problems in the past). Otherwise it’s probably something like, “I didn’t know I could do that!”
Among the several tricks Groovy has in its arsenal is one that is helpful with threading. You see, Groovy can translate a closure into an implementation of a Java interface that defines a single method. In other words, Groovy can create an object that implements the Runnable interface: the behavior of its run() method is determined by the closure’s contents. In listing 7.4, a new thread is created, the file’s contents are read in that thread, and then you’re back into the EDT to update the textArea’s properties.
This chapter would be over right now if these were the only things Groovy had to offer regarding threading. Luckily, that isn’t the case. SwingBuilder also has some tricks up its sleeve. The next listing shows the full rewrite of GroovyFileReader using SwingBuilder’s threading facilities.
Listing 7.5. SwingBuilder threading applied to GroovyFileReader
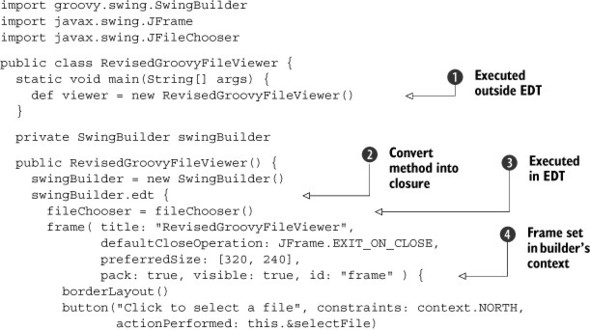
Judging by ![]() , the application is still being instantiated on the main thread; this would mean UI components are also being instantiated
in that thread, but
, the application is still being instantiated on the main thread; this would mean UI components are also being instantiated
in that thread, but ![]() says otherwise. At that line, SwingBuilder is being instructed to run the code by making a synchronous call to the EDT, thus
ensuring that UI building is done in the correct thread. Notice at
says otherwise. At that line, SwingBuilder is being instructed to run the code by making a synchronous call to the EDT, thus
ensuring that UI building is done in the correct thread. Notice at ![]() and
and ![]() that because fileChooser and frame variables are tied to the builder’s context, there’s no longer a need to define external variables to access those
components if you keep a reference to the builder (which you do). This design choice is taken into account where the builder’s
instance is used to get a reference to both fileChooser and frame
that because fileChooser and frame variables are tied to the builder’s context, there’s no longer a need to define external variables to access those
components if you keep a reference to the builder (which you do). This design choice is taken into account where the builder’s
instance is used to get a reference to both fileChooser and frame ![]() .
.
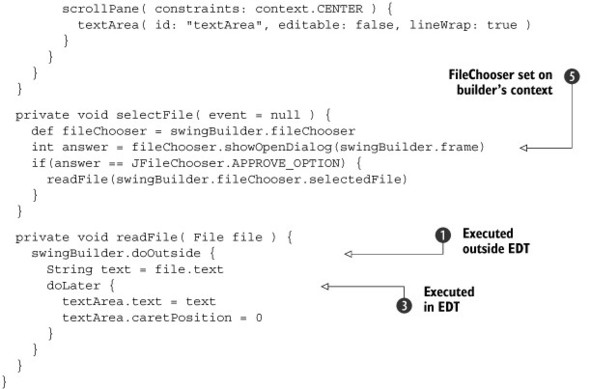
The more interesting bits can be found at ![]() and
and ![]() . Calling doOutside{} on SwingBuilder has pretty much the same effect as calling Thread.start{} except there is a slight but important difference: the SwingBuilder instance is used as the closure’s delegate. This means
you can access any variables tied to that particular instance and any SwingBuilder methods in the closure’s scope. That’s
why the next call to the SwingBuilder threading method
. Calling doOutside{} on SwingBuilder has pretty much the same effect as calling Thread.start{} except there is a slight but important difference: the SwingBuilder instance is used as the closure’s delegate. This means
you can access any variables tied to that particular instance and any SwingBuilder methods in the closure’s scope. That’s
why the next call to the SwingBuilder threading method ![]() doLater{} doesn’t need to be prefixed with the swing variable.
doLater{} doesn’t need to be prefixed with the swing variable.
But you can go further by combining selectFile() and readFile() in a single method, and by encapsulating the method body with a special Groovy construct, as shown in the next listing.
Listing 7.6. Simplified version of selectFile() and readFile()
  private void selectFile( event = null ) {
    swingBuilder.with {
      int answer = fileChooser.showOpenDialog(frame)
      if(answer == JFileChooser.APPROVE_OPTION) {
        doOutside {
          String text = fileChooser.selectedFile.text
          doLater {
            textArea.text = text
            textArea.caretPosition = 0
          }
        }
      }
    }
  }
This is quite the trick. By using the with{} construct, you’re instructing Groovy to override the closure’s delegate. In this case, its value will be the SwingBuilder instance your application is holding. This means the closure will attempt to resolve all methods and properties not found in RevisedGroovyFileViewer against the SwingBuilder instance. That’s why the references to fileChooser and name, as well as method calls to doOut-side{} and doLater{}, need not be qualified with the SwingBuilder instance. Sweet!
Tip
The trick related to the use of the with{} construct can be applied to any object—it isn’t SwingBuilder specific. This can greatly simplify the code you place on a controller or service, for example.
Now let’s take a moment to further inspect SwingBuilder’s threading facilities.
7.2.3. Synchronous calls with edt
We have already established that code put in the edt{} block is executed directly in the EDT—that is, the EDT thread will block until the code has completed its execution. This appears to be no different from explicitly calling SwingUtilities.invoke-AndWait{}, but in reality there are three important things to consider.
The first improvement found in edt{} is that the current SwingBuilder instance is set as the closure’s delegate, so you can call any SwingBuilder methods and nodes directly without needing to qualify them with an instance variable.
The second convenience has to do with a particular rule of executing code in the EDT. Once you’re executing code in the EDT, you can’t make an explicit call to Swing-Utilities.invokeAndWait{} again. A nasty exception will be thrown if you do make the call. Let’s see what happens when you naively make a synchronous call in the EDT when you’re already executing code in that thread. The following listing displays this example. Remember that the button’s ActionListeners are processed in the EDT.
Listing 7.7. Violating EDT restrictions

You were so infatuated with Groovy threading that you forgot for a moment that SwingUtilities.invokeAndWait{} can’t be called in the EDT! If you run the application and click the button, an ugly exception like the following is thrown:
Caused by: java.lang.Error: Cannot call invokeAndWait from the event
     dispatcher thread
        at java.awt.EventQueue.invokeAndWait(EventQueue.java:980)
        at javax.swing.SwingUtilities.invokeAndWait(SwingUtilities.java:1323)
        at javax.swing.SwingUtilities$invokeAndWait.call(Unknown Source)
But if you rely on SwingBuilder.edt{} to make the synchronous call at ![]() as shown in the following listing, you get a different result: a working, bug-free application!
as shown in the following listing, you get a different result: a working, bug-free application!
Listing 7.8. EDT restriction no longer violated
import groovy.swing.SwingBuilder

def swing = new SwingBuilder()
swing.edt {
  frame(title: "Synchronous calls #2", size: [200,100], visible: true) {
    gridLayout(cols: 1, rows:2)
    label(id: "status")
    button("Click me!", actionPerformed: {e ->
       status.text = "attempt #1"
       edt{ status.text = "attempt #2" }
    })
  }
}
Much better. The name change isn’t that hard to remember, is it?
The third and final difference is that edt{} is smart enough to figure out whether it needs to make a call to SwingUtilities.invokeAndWait{}. If the currently executing code is already on the EDT, then it will continue to be executed in the EDT; edt{} makes a call to SwingUtilities.isEventDispatchThread() to figure that out.
Making asynchronous calls to the EDT is your next goal.
7.2.4. Asynchronous calls with doLater
Posting new events to the EventQueue can be done by calling SwingUtilities.invokeLater{}. These events will be processed by the EDT the next time it gets a chance. That’s why these calls are called asynchronous; code posted this way may take a few cycles to be serviced depending on the currently executing code in the EDT and the EventQueue’s state.
Parallel to what we described in the previous section, a call to doLater{} is like a call to SwingUtilities.invokeLater{}. But you can guess the difference: just as with edt{}, this method makes sure the current SwingBuilder instance is set as the closure’s delegate. Again, you don’t need to qualify SwingBuilder methods and properties; they’ll be already in scope.
Because this threading facility always posts a new event to the EventQueue, there’s nothing much else to see here. There are no calling-EDT violations to worry about as in the previous section.
One aspect of SwingBuilder threading remains for review: executing code outside of the EDT.
7.2.5. Outside calls with doOutside
You may be detecting a trend. For every Groovy threading option, there’s a Swing-Builder-based alternative that adds a bit of spice: the ability to register the current SwingBuilder instance as the closure’s delegate, saving you from typing a lot of repeated identifiers. The trend continues in this case, which means that calling doOutside{} has the same effect as Thread.start{} with the added benefit of a proper delegate set on the closure.
This threading facility mirrors edt{} in the sense that when doOutside{} is invoked, it spawns a new thread if and only if the current thread is the EDT; otherwise it calls the code in the currently executing thread. This behavior was introduced in Groovy 1.6.3; previous versions spawn a new thread regardless of the currently executing thread.
It appears this is all that SwingBuilder has to offer in terms of threading goodness—or is it? We’ll revisit threading facilities in section 7.4; but before we get there, let’s see how Griffon enables all these goodies. After all, that’s what you’re here to learn.
7.3. Multithreaded applications with Griffon
Griffon goes to great lengths to make your life more comfortable when dealing with Swing threading. It’s as if the Swing threading problems don’t exist in the first place! Well, not quite, but you get the point. Let’s start with what happens when the application bootstraps itself.
7.3.1. Threading and the application life cycle
Back in chapter 2, we outlined the basic life cycle of each and every Griffon application. Here’s a quick reminder.
The Griffon launcher sets up the appropriate classpath and loads the application’s main class. Then it proceeds to read all of the application’s configuration files located at griffon-app/conf. These operations are carried out in the main thread.
The initialization phase kicks in, giving you the choice to call custom code defined at griffon-app/lifecycle/Initialize.groovy. The contents of this script are guaranteed to be executed in the EDT. As a matter of fact, all scripts under that directory will be executed in the EDT—no exceptions.
Between calling the initialization life-cycle script and the next phase, something amazing happens—each MVC group configured to be initialized at startup comes to life! View members are initialized in the EDT too, which ensures that all view scripts are given proper threading handling. It’s like each one was wrapped with an implicit call to edt{}.
Once initialization is finished, it’s time for the next phase, Startup, which offloads any custom code to its corresponding life-cycle script. Then comes the Ready phase, which is guaranteed to be called after all pending events posted to the EventQueue have been processed. After clearing this phase, the application is fully initialized and configured, and it’s time to display its main window (if any). This operation is also guaranteed to run in the EDT.
As you may recall from chapters 4 and 6, Griffon makes sure a SwingBuilder instance is available per view at all times. This facilitates the job of keeping references to UI components in the view. Given that the other two members of the MVC triad can read the view whenever they desire, all the dots are connected. Of course, this results in the ability to call edt{}, doLater{}, and doOutside{} from any view script, but as you saw in chapter 5, it’s the responsibility of controllers to provide the required behavior. They’re the ones that have to deal with threading explicitly more than any other MVC member.
You might be thinking that it would be simpler to create an instance of Swing-Builder during a controller’s initialization or perhaps tap into the MVC group’s associated builder by inspecting app.builders. But there’s a better way: the Griffon way.
7.3.2. Threading support the Griffon way
We’ve stressed on previous occasions that one of Griffon’s key components is the CompositeBuilder; this remarkable component is capable of creating a mish-mash of builders (albeit coherent and rather tasty). Every Griffon application sports a configuration file for its CompositeBuilder, located at griffon-app/conf/Builder.groovy. If that sounds familiar, it’s because this was explained in detail back in chapter 2. The following listing reproduces the file’s contents upon creating an application
Listing 7.9. Contents of griffon-app/conf/Builder.groovy
root {
    'groovy.swing.SwingBuilder' {
        controller = ['Threading']
        view = '*'
    }
}
Notice the Threading group being assigned to a controller property. That’s the secret! SwingBuilder nodes can be found in groups: text component groups, button and action groups, windows and containers, and so on. Of course, there’s a threading group too. When the CompositeBuilder is processing its configuration file, it pays attention to the group mechanism, assigning groups to views, controllers, or both.
To recapitulate what listing 7.9 describes, all nodes that are contributed by Swing-Builder are assigned to views; all nodes pertaining to SwingBuilder’s Threading group are assigned to controllers as well. Finally, all nodes contributed by Application-Builder are made available to views alone. With this configuration, you should be able to call edt{}, doLater{}, and doOutside{} from any controller.
Speaking of controllers, as you may recall from chapter 5, the main job of a controller action is to react to view events and signal views of new data availability. This means threading concerns are key when you’re implementing actions in controllers. For this reason, Griffon applies special policies to controller actions, which we’ll discuss next.
7.3.3. Controller actions and multithreading: a quick guide
We all know the end result when a long computation is run in the UI thread: unhappy users. We also know that to avoid this outcome, we must pay attention to proper threading etiquette. Griffon simplifies the task of keeping tabs on the thread in which a particular piece of code is being executed. Because controller actions hold a special place between views and models, it’s also true that they receive additional care: Griffon assumes that a controller action should be executed outside of the UI thread unless otherwise specified.
We’re back into the realm of convention over configuration. Most of the time, the actions that a developer wires up with the view are set up to execute a long-running computation or some logic that doesn’t affect the UI elements directly, and binding is used for the rest. If that’s the common case, then it makes no sense to force a developer to wrap an action with an explicit call to doOutside{}—let the framework do it! This is a great feature that removes some of the pain of constantly thinking about threading concerns. But it comes with a price: when you do need an action to be executed in a different threading mode, you must configure it that way. A typical scenario for such a case is an action that performs navigation on UI components. But don’t be afraid, the configuration is simple, as you’ll see in a moment.
Remember the different configuration files available at your disposal in griffonapp/conf? One in particular affects the build system. Yes, it’s BuildConfig.groovy. In this file, you can change the configuration read by the Griffon compiler, because as it turns out, it’s the compiler’s job to inject appropriate threading code into each action. This means you must instruct the compiler to skip certain actions when you don’t want the default threading wrapper code to be applied to them.
The following snippet shows the typical setup for marking a set of actions to be skipped from this special threading injection-handling mechanism:
compiler {
    threading {
        sample {
            SampleController {
                readAction = false
            }
            NoThreadingController = false
        }
        com {
            acme = false
        }
    }
}
Here’s a quick roundup of what’s happening. No threading code is injected into the action named readAction on controllers of type sample.SampleController. If this controller happens to define additional actions, they see their code updated with threading wrapper injections. Only readAction isn’t affected by the automatic wrapping code. In other words, this method disables injection with fine-grained control per action.
Next is sample.NoThreadingController. There’s no action name related to this type, which instructs the compiler to skip injection code to all actions found in that controller. This is how you disable threading injection for a group of actions belonging to the same type.
Finally, all controllers found in the package com.acme or any of its subpackages have their actions skipped from injection. This is how you can disable a whole set of controllers that belong to the same hierarchy.
Given that these settings affect the compilation process, you must recompile your code right after making any adjustments to this configuration. Otherwise the changes won’t be applied to the bytecode.
Let’s pause for a moment and recap what you now know. All controller actions are automatically executed outside of the UI thread because the compiler injects wrapping code into each one. The wrapping code is basically a call to doOutside{} as if you typed it explicitly. It’s also possible to disable threading injection by configuring compile-time settings. Actions marked this way will be executed in the same thread as the caller, which may be the UI thread. Is it possible to explicitly mark an action to be executed in the UI thread? Yes, of course. You can do so with explicit calls to edt{} and doLater{} as you saw before. But there’s another option in Griffon’s bag of tricks—one that can be applied to any Groovy class, not just controllers.
7.3.4. Fine-tuning threading injection
Threading concerns are most important to controllers, but other components may require special handling of threads too. It’s likely that those components (such as services or plain beans) don’t participate in the threading injections done by the builder, like controllers. But you can instruct the compiler to do the legwork for you, if you give it a few hints in the correct places.
Remember that @Bindable is a handy way to generate observable properties on a bean. It works by hooking into the AST transformation framework. The feature we’ll show you next also hooks into the compiler through the same mechanism. The following snippet demonstrates it in all its glory:
import griffon.transform.Threading
class SomeBean {
    @Threading(Threading.Policy.OUTSIDE_UITHREAD)
    void fetchData(URL endpoint) { ... }
}
The @Threading annotation is responsible for advising the compiler about the threading hints we spoke of. You can apply this annotation either to methods or closure properties; its value is the type of injection you want to see applied to the code. This type has four possible settings, as explained in table 7.1.
Table 7.1. Values for all types of injections that can be performed with @Threading
|
Setting |
Meaning |
|---|---|
| Policy.OUTSIDE_UITHREAD | The code will be executed outside of the UI thread as if it were wrapped with doOutside. This is the default value for the annotation. |
| Policy.INSIDE_UITHREAD_SYNC | The code will be executed synchronously in the UI thread, as if it were wrapped with edt. |
| Policy.INSIDE_UITHREAD_ASYNC | The code will be executed asynchronously in the UI thread, as if it were wrapped with doLater. |
| Policy.SKIP | No injection will be performed. The code will be executed in the same thread as the caller. |
Phew! That’s a lot to digest, and we still have a few more things to discuss. Don’t worry—the next sections build on what you already know.
7.3.5. What about binding?
If controller actions are automatically executed outside of the EDT by default, then the following snippet might be doing the wrong thing:
class SampleController {
    def model
    def someAction {
        String input = model.input
        model.output = input * 2
    }
}
This particular controller has an action that reads a value from the model and sends it back transformed. If the model properties are bound to UI components, this means the value written back to the model will be sent in the same thread executing the action, which you know is not the EDT. And that’s a problem.
You could fix the code by wrapping the write back with a call to doLater{}. Wouldn’t it be cool if Griffon knew about this case and automatically wrapped the call for you? Well, it turns out it can. The code you previously thought was unsafe is safe. We weren’t kidding about the great lengths Griffon goes to in order to make your life easier. This behavior is also configurable, should you encounter the need to change the default. The bind() node accepts the values listed in table 7.2 for a property named update.
Table 7.2. Update strategies applicable to bindings, and their meanings
|
Value |
Meaning |
|---|---|
| mixed | Proceeds if the current thread is the UI thread. Otherwise, delivers the update using doLater{}. This is the default for bound UI components. |
| async | Posts the update with doLater{}. |
| sync | Proceeds if the current thread is the UI thread. Otherwise, calls edt{}. |
| Outside | Proceeds if the current thread isn’t ExecutorService. |
| same | Proceeds in the current thread. This is the default for non-UI components. |
| defer | Submits the update to an ExecutorService. |
For example, if for some reason you want to force an update to always happen outside of the EDT, you can use the defer setting when creating the binding, like this:
textField(text: bind(source: model,
    sourceProperty: 'output',
    update: 'defer'))
A demonstration of the threading facilities on controllers is in order. But before we dive into it, we want to discuss one additional threading option.
7.4. SwingXBuilder and threading support
As you may be aware, the JDK provides many UI components, but it’s in no way complete. There are myriad components out there, available for free or by paying a fee. At some point, Sun Microsystems decided it was a good idea to create a repository that could serve as an incubator for new ideas and components that, given the proper time and maturity, could find their way into the JDK. And thus the SwingX project was born.
Sun engineers spotted early on that dealing with threads in Swing applications was a hard task, and they decided to alleviate the problem by creating a powerful threading-aware component: the SwingWorker. This component was fostered by the SwingX project and eventually found its way into the JDK when Java 6 was released in 2006. The powers that be saw that the enhancements brought by SwingWorker were too good to be left alone and decided to port it back to Java 5, but the code never made it to the JDK 5 proper; it stayed at the SwingX project as a separate download.
All this talk leads to the following: if your target platform is JDK 5, you’ll need a SwingX jar to harness SwingWorker’s power. On the other hand, if your target is JDK 6 or beyond, there’s no additional library to set up. You can bet Griffon has something up its sleeve, because it’s been good at facilitating things for you so far.
In this case, plain SwingBuilder comes to your rescue. You see, SwingBuilder isn’t the only builder capable of dealing with Swing components; a few others have ties to SwingBuilder and the Griffon project, as we’ll discuss in chapter 12. Right now, we’ll introduce SwingXBuilder, which is an official extension to SwingBuilder carried out as one of Google’s Summer of Code 2007 entries.
SwingXBuilder is capable of dealing with the complexity of setting up the proper SwingWorker class depending on your development and deployment targets. Excited? Let’s configure SwingXBuilder and explore its threading offerings.
7.4.1. Installing SwingXBuilder
Installing SwingXBuilder is as easy as fetching its latest release from http://griffon.codehaus.org/SwingXBuilder, along with its dependencies from the SwingX project. But there’s a quicker and painless option: you can install the swingx-builder plugin. We might be getting a few steps ahead of ourselves, because plugins will be discussed in full detail in chapter 11; nevertheless, here’s how you would install this plugin. Open a command prompt or shell, and type in the following, making sure the command is executed in your application’s main directory:
$ griffon install-plugin swingx-builder
If you have access to the network, the command downloads the latest version of the swingx-builder plugin and installs it on your application. That wasn’t so bad, was it? The installation procedure does more than just set up the proper classpath configuration by placing all required jars in your application’s lib directory; it also modifies CompositeBuilder’s configuration script. Take a peek at griffon-app/conf/Builder.groovy again, and you should see something like the following listing.
Listing 7.10. Updated configuration found on Builder.groovy
root {
    'groovy.swing.SwingBuilder' {
        controller = ['Threading']
        view = '*'
     }
}
jx {
     'groovy.swing.SwingXBuilder' {
        controller = ['withWorker']
        view = '*'
     }
}
There’s a new node, jx, which contains the definitions related to SwingXBuilder. This node exposes a Threading group too, and in that group you’ll find what you’re looking for: a withworker() node. What makes this node so special? Keep reading to find out.
7.4.2. The withWorker() node
As it turns out, withWorker() exposes the same public contract regardless of what version of SwingWorker you’re currently dealing with (JDK 5 or JDK 6). This ensures that no matter what platform your application is deployed to, it will behave the same.
Let’s get down to business. This node relies on the builder pattern to configure the underlying SwingWorker instance. There are four configurable nested nodes at your disposal: onInit(), work(), onUpdate(), and onDone(). Of these, only two are required to be defined by your code: work() and onDone(). This is how a typical usage looks:
jxwithWorker(start: true) {
   work {
     // work, work, and more work
   }
   onDone {
     // we're done!
   }
}
Let’s break down each pseudo-node, starting with the one responsible for initializing the worker.
Initializing the worker
Because you’re being shielded from the actual SwingWorker implementation chosen at runtime, there’s no way for you to provide a constructor for it. But you can run initialization code before the worker gets on with its job; this is the responsibility of onInit() pseudo-node. This node requires a closure that takes no parameters, so be aware that the code defined in the closure will be executed in the current thread.
Making the worker do something
When the worker is ready to be executed, either by defining a true value for its start property or by calling its start() method directly, it will call the code defined by the work() pseudo-node. But as opposed to onInit(), the code defined for work() is guaranteed to run outside the EDT. The onDone() pseudo-node will be called once this one has finished doing whatever you instructed it to do.
Occasionally, you’ll want to refresh the UI contents with the partial results, and you need a way to get back into the EDT. Before you glance at the previous threading facilities, you should know that the SwingWorker’s designers took this scenario into account; thus there is a handy publish() method available. It signals the worker to process whatever parameters you send to the publish() method in the EDT; that’s the job of the third pseudo-node.
One more thing: the last evaluated expression on this pseudo node will serve as the computed value for the whole operation. You can access that value by calling get(), typically in onDone().
Updating the UI as you go
If publish() is responsible for sending data back into the EDT to be processed, it’s the job of onUpdate() to do the actual processing. This node’s closure takes a single parameter of type List; because publish() is a method that takes variable arguments, all of them are collected in a List before being sent to onUpdate().
Finishing the job
It’s time up to tie any loose ends and process the results when the worker has finished its business. This is where the onDone() pseudo-node steps up to handle the situation. The closure you set to this node is executed back in the EDT. To obtain the value of the computation made by work(), you call get().
Enough theory. Let’s see all this in action!
7.5. Putting it all together
For demonstration purposes, and to draw a parallel to the discussion made throughout this chapter, you’ll develop yet another FileViewer application. The difference is that you’ll enable four different loading techniques using each of the threading options at your disposal. You’ll be constantly updating a UI element on screen, too; that way you’ll know right away if the application becomes unresponsive due to a threading problem. Figure 7.1 shows the application.
Figure 7.1. A threading-aware FileViewer application displaying a file using the first technique (Test #1) for reading a file’s contents. The other file-loading techniques (Test #2, #3, and Test #4) depend on the threading options employed.
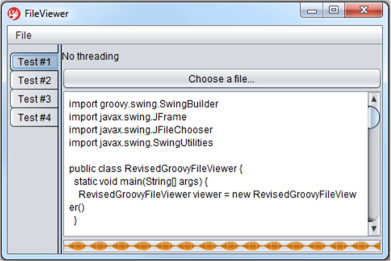
Each test executes a different loading technique. You’ll develop your threading-aware FileViewer application in the following steps:
- Outline the application.
- Set up the UI.
- Define the tabs.
- Code the four file-loading techniques.
Time to flex those thinking and writing muscles: you have an application to build.
7.5.1. Defining the application’s outline
Let’s ponder for a moment what you want to accomplish with the FileViewer application. The following actions are common to all file-loading techniques, regardless of threading approach:
- Display a button that lets you choose the file to load.
- Display a textArea with the file’s contents.
- Display a progressBar that is updated constantly.
- Provide each file-loading technique with its own tab and title.
You could pack each loading technique in its own MVC group, but that might lead to repeated code. Another option would be creating a second MVC group, similar to what you did with GroovyEdit back in chapter 1, but you would need a way to explicitly instantiate each copy and wire it up to the tabbedPane (here’s a hint: you could do it with one of the life-cycle scripts). Or you could keep it simple with a single MVC group, and have a looping construct instantiating and wiring up each tab, all in the view script. Let’s go with the third option, because it’s the simplest.
First, let’s create the application. Drop to your command prompt, and type the following:
$ griffon create-app FileViewer
Now change to the directory of the newly created application. To add the dependencies you’ll need for this application by installing the SwingXBuilder plugin, drop into your command prompt again and type
griffon install-plugin swingx-builder
Make sure SwingXBuilder’s Threading group is contributed to controller classes. Your griffon-app/conf/Builder.groovy should contain something like this:
jx {
    'groovy.swing.SwingXBuilder' {
        controller = ['withWorker']
        view = '*'
    }
}
You’re done setting up the application—the only thing left is adding the fun bits to it.
7.5.2. Setting up the UI elements
The next step for evaluating each loading technique with threading on this application is building the common UI elements. Open FileViewerView.groovy with your favorite text editor or IDE, and replace its contents with the code shown in the following listing.
Listing 7.11. Minimal implementation for FileViewerView.groovy without tabs
import javax.swing.JTabbedPane

actions {
   action(id: "quitAction",
      name: "Quit",
      mnemonic: "Q",
      accelerator: shortcut("Q"),
      closure: controller.quit)
}

fileChooser = fileChooser()
mainWindow = application(title:'FileViewer', size: [480,320],
     locationByPlatform:true,
  iconImage: imageIcon('/griffon-icon-48x48.png').image,
  iconImages: [imageIcon('/griffon-icon-48x48.png').image,
               imageIcon('/griffon-icon-32x32.png').image,
               imageIcon('/griffon-icon-16x16.png').image] ) {
   menuBar {
      menu("File") {
         menuItem(quitAction)
      }
   }
   borderLayout()
   tabbedPane(constraints: CENTER, tabPlacement: JTabbedPane.LEFT)
}
There’s one more thing to do before you try the application for the first time. quit-Action refers to an action named quit found in the controller, so let’s define that action in FileViewerController.groovy as shown here:
class FileViewerController {
   def model
   def view

   def quit = { evt = null ->
      app.shutdown()
   }
}
At this point the application should be functional, although it only displays a menu bar at this moment. You’ll fix that shortly by adding a tab for each of the loading techniques you’d like to explore.
7.5.3. Defining a tab per loading technique
You’re ready to create the tabs, and you’ll handle this operation as a four-step procedure:
- Define the common code for each tab.
- Graft each tab into the tabbedPane.
- Make sure the model is updated with the proper properties.
- Add skeleton implementations for each of the required controller actions.
Return to the view script, and paste the code shown in listing 7.12 before anything else. You can place this code anywhere in the script before the tabbedPane is defined, but putting it at the top makes the script look cleaner.
Listing 7.12. Parameterized tab creation

Let’s take a moment to review what’s going on with this piece of code. Each tab requires the following:
- Some heading text
 , such as “No threading” as shown in figure 7.1.
- A reference to a loadingTechnique
 . This is a direct link to the appropriate controller action.
- An additional parameter for the closure that defines a tab: technique
 .
.
Each loading technique is supposed to be independent from the rest. You don’t want them to step on each other’s toes, which is why there will be a separate space on the model. You’ll see how to do that when you get to the third step of this procedure.
First, though, you must wire up each tab into the tabbedPane. Scroll down in your editor, locate the tabbedPane definition, and replace it with the code shown in the next listing.
Listing 7.13. Adding parameterized tabs to the tabbedPane
tabbedPane(constraints: CENTER, tabPlacement: JTabbedPane.LEFT) {
 [[heading: "No threading", action: "readFileNoThreading"],
 [heading: "Threading - doOutside/doLater", action:
"readFileWithThreading"],
 [heading: "Threading - withWorker", action: "readFileWithWorker"],
 [heading: "Threading - progress update", action: "readFileWithUpdates"]]
     .eachWithIndex { entry, index ->
      index += 1
      def loadTechnique = controller."${entry.action}"
      def technique = model."technique$index"
      widget(title: "Test #"+index,makeTab(entry.heading, loadTechnique,
technique))
   }
}
You have a list of maps. A looping construct iterates over each entry, and the real values for loadTechnique and technique are calculated as you expect them to be.
The variable loadTechnique is indeed a reference to a controller action. Judging by the names on the maps, the first action will be resolved to controller.readFileNoThreading. Here you’re taking advantage of Groovy’s ability to let a property access call be resolved in a dynamic way, because you’re using a parameterized String.
The same trick is applied to the model property. Judging by that usage, there should be four observable beans on the model whose names are technique1, technique2, technique3, and technique4. That’s precisely what you’re about to implement.
Open FileViewerModel.groovy in your editor, and write the following:
class FileViewerModel {
  Map technique1 = [text: "", enabled: true] as ObservableMap
  Map technique2 = [text: "", enabled: true] as ObservableMap
  Map technique3 = [text: "", enabled: true] as ObservableMap
  Map technique4 = [text: "", enabled: true] as ObservableMap
}
You’re using a quick prototyping technique here. Do you remember ObservableMap and ObservableList from chapter 3? Usually you would create a simple class as a holder for a few properties like the ones you need, and those properties need to be made observable. Thanks to @Bindable, the code would’ve been shorter; but you went with ObservableMap instead, which works like any other observable bean with the added benefit that properties can be added at runtime (a fact you rely on). Look back to listing 7.12, where the progressBar is defined. A new property with name progress is added to the technique, and this means every ObservableMap in your model will hold three properties once the application has processed the view script. If you’re wondering why you need to keep a reference to the progressBar, the answer lies in the final implementation of the controller’s actions. Speaking of which, let’s finish up this procedure with the fourth step.
The following code adds a skeleton implementation to each action found on the controller:
class FileViewerController {
   def model
   def view

   def quit = { evt = null ->
      app.shutdown()
   }

   def readFileNoThreading = { evt = null -> }
   def readFileWithThreading = { evt = null -> }
   def readFileWithWorker = { evt = null -> }
   def readFileWithUpdates = { evt = null -> }
}
There you have it; this should be enough to launch the application and inspect its visuals. Feel free to make any adjustments you like. You’re at the final phase of making a multithreaded application: wiring up the different loading techniques using the various threading facilities provided by Griffon.
7.5.4. Adding the loading techniques
Here’s the attack plan for the four loading techniques you’ll implement:
- Technique 1, readFileNoThreading, will read the file and update the textArea in the current executing thread—in other words, you won’t use a threading facility. This will demonstrate what will happen if threading isn’t taken into account. Considering that each controller action is executed outside the UI thread by default, you must explicitly mark this one with @Threading.Policy.SKIP.
- Technique 2, readFileWithThreading, will use doOutside{} to read the file’s contents in a different thread other than the EDT. Then it’s back into the EDT with doLater{} to update the textArea.
- Technique 3, readFileWithWorker, is similar to the second, but it will perform its job by using SwingWorker.
- Technique 4, readFileWithUpdates, is a refined version of the previous one. It will use SwingWorker to read the file’s contents, and it will also publish timely updates as it reads the file. This is why you needed a reference to the progress-Bar; you’ll use it as a status display.
Another tidbit before you get into the code, given that you’ll read the file’s contents on a different thread than the EDT, is that the button that pops up the fileChooser can be clicked several times before the first request has been processed fully. You need to find a way to avoid this kind of situation. Fortunately, the button’s enable state is bound to a property on the model; you just have to make sure the value for that property is toggled at the appropriate time.
Without further ado, let’s open FileViewerController.groovy and add the code for the four loading techniques.
Read file, no threading
To replace the first threading action, paste in the code shown in the following listing.
Listing 7.14. Full implementation of the readFileNoThreading action
private doWithSelectedFile = { Map technique, Closure codeBlock ->
  def openResult = view.fileChooser.showOpenDialog(view.mainWindow)
  if( JFileChooser.APPROVE_OPTION == openResult ) {
    File file = new File(view.fileChooser.selectedFile.toString())
    technique.text = ""
    technique.enabled = false
    codeBlock(file)
  }
}

@Threading(Threading.policy.SKIP)
def readFileNoThreading = { evt = null ->
  def technique = model.technique1
  doWithSelectedFile(technique) { file ->
    technique.text = file.text
    technique.enabled = true
  }
}
Remember to include an import for javax.swing.JFileChooser and griffon.transform.Threading at the top of the file, or you’ll get compilation errors. That’s the minimal implementation for this action. The code isn’t protected against any I/O errors that might occur, such as no read permissions or something similar; error handling is left out to keep the code simple and on topic.
You take the precaution of factoring out the common code that each technique requires for selecting a target file and toggling the model’s enable property into a private method—recall from chapter 5 that public methods will be seen as actions too. This method takes two arguments; the first is the composed model space the technique requires (defined as an ObservableMap), and the second is a closure that defines the code that puts the technique to work.
Read file with threading
Defining the second technique is pretty straight forward, as shown in the next listing.
Listing 7.15. Full implementation of the readFileWithThreading action
def readFileWithThreading = { evt = null ->
  def technique = model.technique2
  doWithSelectedFile(technique) { file ->
    doOutside {
      technique.text = file.text
      technique.enabled = true
    }
  }
}
The second technique builds on the first. It makes sure that reading the file’s contents takes place on a thread that isn’t the EDT, and then it proceeds to update the UI after the text has been read. Of course, it does so back in the EDT because bindings will update UI components in the EDT by default.
Read file with worker
The following listing shows the code for the third technique.
Listing 7.16. Full implementation of the readFileWithWorker action
def readFileWithWorker = { evt = null ->
  def technique = model.technique3
  doWithSelectedFile(technique) { file ->
    jxwithWorker(start: true) {
      work { file.text }
      onDone {
        technique.text = get()
        technique.enabled = true
      }
    }
  }
}
Notice how similar listings 7.15 and 7.16 are. The most relevant change is how to obtain the computed value once the calculation is finished, which is unique to the withWorker() node.
Read file with updates
There’s one final technique to try. As we mentioned before, you use SwingWorker again, and this time the progressBar will serve as an indicator of how much progress you have made when reading the file (see the following listing).
Listing 7.17. Full implementation of the readFileWithUpdates action
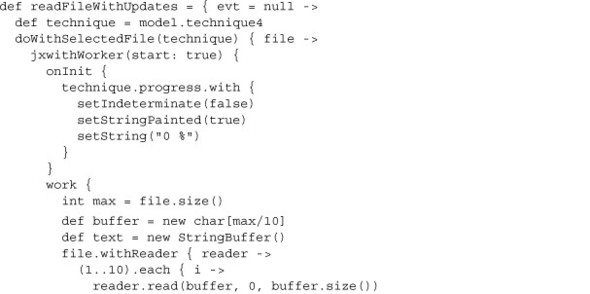

Here is what’s happening. As you may recall from listing 7.12, the progressBar is set to indeterminate mode. You need to change it to deterministic mode, and you accomplish that during the worker’s initialization. Notice you’re reusing the with{} trick to change the closure’s delegate. All three methods will be executed on the progressBar associated with this technique.
The worker reads the file in 10 chunks, one at a time, pausing briefly to simulate slow I/O, and finally publishing the current
chunk’s index ![]() . This index will serve to calculate the amount of progress the worker has made so far. Remember that all this happens outside
the EDT.
. This index will serve to calculate the amount of progress the worker has made so far. Remember that all this happens outside
the EDT.
Back in the EDT, the worker updates the UI state safely ![]() , mainly by changing the current value of the progressBar to a percentage of the total work so far. It updates both the text and the value.
, mainly by changing the current value of the progressBar to a percentage of the total work so far. It updates both the text and the value.
When the worker has finished its job ![]() , you’re again in the EDT, which is perfect because the only things left to do are update the textArea’s contents and revert the progressBar back to its previous state.
, you’re again in the EDT, which is perfect because the only things left to do are update the textArea’s contents and revert the progressBar back to its previous state.
7.5.5. FileViewer: the aftermath
It took you a few iterations, but you’ve finished the job you set out to do: demonstrate how the different threading facilities provided by SwingBuilder and Griffon can be used in a typical scenario. We tried to keep the code’s verbosity at a minimum. Just remember that the application isn’t completely safe from I/O errors occurring at unexpected times; but that job shouldn’t be difficult, especially if Groovy techniques such as closure currying and metaprogramming are added to the mix. We hope you enjoyed making this little application, and as a reward, here are the app’s stats:
+----------------------+-------+------- +
| Name                  | Files |  LOC  |
+----------------------+-------+------- +
| Models               |     1 |      7 |
| Views                |     1 |     55 |
| Controllers          |     1 |     85 |
| Lifecycle            |     5 |      3 |
| Integration Tests    |     1 |     14 |
+----------------------+-------+------- +
| Totals               |     9 |    164 |
+----------------------+-------+------- +
Can you believe you accomplished so much with so little? Only 147 of those 164 lines of code were explicitly written for this application.
7.6. Additional threading options
We’ve discussed all threading options related to Java Swing that Griffon has to offer. But Swing isn’t the only toolkit that can be used in the JVM.
There’s the Standard Widget Toolkit (SWT), for example. If you’re familiar with the Eclipse IDE, then you’ve seen SWT in action. Its driving goal is to provide a seamless integration with the native environment, allowing the running platform to draw the widgets by its own means; in Swing, on the other hand, an abstraction layer (implemented with Java 2D by the release of JDK 6) draws all the bits.
You’ve probably heard about JavaFX. It too is a UI toolkit that provides a modern set of features. Qt from Nokia (originally from Trolltech), Apache Pivot from the Apache Foundation, and GTK (on Linux) are other popular choices.
Regardless of which one you pick to develop your next application, you’ll soon face the problem of multithreading. Each toolkit deals with the problem in its own way, often differently from the others. What if there was a common way to handle multithreading regardless of the toolkit? Better yet, what if it was close to what you already know with Swing?
This is precisely what the following Griffon threading facilities do for you. Let’s start by finding out how you can call code in the UI thread. When dealing with Swing, the UI thread is the EDT, but other toolkits call it something different.
7.6.1. Synchronous calls in the UI thread
In section 7.2.3, we explained the concept of the edt{} block. Its toolkit-agnostic counterpart is execInsideUISync{}. This block guarantees that code passed to it is executed synchronously in the UI thread. You can be sure this block performs exactly the same motions as edt{} when running in Swing.
It’s safe to change all calls from edt{} to execInsideUISync{} in all parts of a Griffon application.
7.6.2. Asynchronous calls in the UI thread
Following the steps of the previous block, the next one mimics closely what you can do with doLater{}. Executing code in the UI thread in an asynchronous way can be achieved by means of the execInsideUIAsync{} block.
Similar to what Swing’s EDT does, all other toolkits have a way to post an event to be processed in the UI thread at a later point in time. This threading block exploits that option for each of the supported UI toolkits.
Next in the list is executing code outside of the UI thread, but we’re pretty sure you’ve guessed the name already.
7.6.3. Executing code outside of the UI thread
The name, as you probably guessed, is execOutsideUI{}, inspired by the already-discussed doOutside{}. This block also ensures that all code passed to it is executed in a thread that isn’t the UI thread.
On more recent versions of Griffon (since 0.9), you’ll discover a few hints here and there about the usage of these threading facilities. Their usage is preferred over the Swing facilities, not just because they’re newer but because they make your code less fragile to a sudden UI toolkit change if it’s required by your application. They also make the code look more consistent across different toolkits. That way you can read code of an SWT application and understand it more easily, even if the only toolkit you know is Swing.
But you can use a few additional methods besides the three we just discussed. They complete the set of threading options that Griffon has to offer.
7.6.4. Is this the UI thread?
In Swing, how do you find if the current thread is the EDT? That’s right: you ask the JVM using SwingUtilities.isEventDispatchThread(). But as we said before, other UI toolkits have decided to use their own conventions that may or may not match Swing’s, so you can be sure SwingUtilites won’t work for all cases. You need a way to query whether a thread is the UI thread, and that’s the job of the isUIThread() method.
This method, as well as the other threading methods introduced in section 7.6, are available to all MVC artifacts and the application instance; you can call them pretty much from anywhere.
7.6.5. Executing code asynchronously
Wait, didn’t we talk about this one before? Yes, we did, but in the context of executing code asynchronously in the UI thread. This case is for executing code asynchronously outside of the UI thread, as a promise for a future execution. And with that, we gave away the name of the method: execFuture(). It may take either a Closure or a Callable as argument and returns a Future instance. You’re free to do with the Future object as you please.
By default, this method is invoked using an ExecutorService that should be configured to the number of cores available in the running platform. A variant of this method accepts an ExecutorService instance. In this way, you can configure all the details of the execution.
7.7. Summary
This chapter has shown that you don’t need to be driven to the verge of despair while making sure your Swing applications take concurrency and threading into account. Thanks to the power of Groovy SwingBuilder and Griffon’s additional threading facilities, this process doesn’t need to be a crazy ride.
You learned that Groovy provides an advantage for threading by allowing any closure to be used as the body of a Runnable. You have two threading options: create a closure and set it either as the parameter for a new Thread or as the parameter for the helpful SwingUtilities.invokeAndWait() and SwingUtilities.invokeLater(). As a third option, Groovy’s SwingBuilder makes the job of properly handling threading in a Swing application much easier. A fourth threading option is based on JDK 6’s SwingWorker or SwingX’s SwingWorker, a handy class that facilitates the job of offloading work from the EDT.
We also explored how Griffon makes sure the application life cycle is executed in the correct threads depending on the particular phase. And you worked through a full example of all of Griffon’s threading techniques. We’re confident it will inspire you to thread into concurrency with more confidence (pun intended).
Finally, we surveyed additional, UI-toolkit-agnostic threading options that Griffon exposes.
Now that you know how to deal with threading concerns, we’re ready to address the subject of notifications and events. Given that many of them will occur at any point of the execution of your application, you’ll have to either deal with them immediately or delay their handling.