
Chapter 5. Understanding controllers and services
- Controllers and their responsibilities
- Services
- Metaprogramming and inspection capabilities on artifacts
Wading through Griffon’s MVC is quite a journey, but we’re almost done reviewing what it has to offer. The final piece we’ll look at takes care of routing all of the user’s input to and from the appropriate handlers. We’re talking about the brains of your application: the controller member of the MVC triad. In Griffon, this member is mostly represented by controllers; services are also used to a lesser extent.
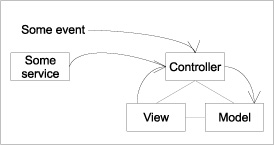
Simply put, controllers have the responsibility to react to inputs, usually coming from the UI. Inputs may also come from other locations, such as a service or an application event (application events will be covered in chapter 8). But regardless of the input’s source, the controller will most likely update the model, which in turn may update the view. Figure 5.1 illustrates the controller reacting to multiple inputs.
Figure 5.1. Controller receives stimulus from event, service, or UI then updates the model
Controllers also have the ability to create and destroy other MVC groups, as you saw back in chapter 1. The GroovyEditController creates a new MVC group (FilePanel) for every tab that’s required. The FilePanelController cleans up the group when the tab is disposed.
Controllers are positioned right in the middle between inputs and outputs, orchestrating who talks to whom and where inputs are routed, and thus interacting with many components. Given this, they’re a good location to apply metaprogramming to components when such a need arises.
In this chapter, we’ll discuss what makes controllers tick, their relationship to services, and the metaprogramming options you can apply to any application artifact.
Artifacts are major building blocks of a Griffon application. You’ve already been using them. Out of the box, Griffon supplies the following artifacts: model, view, controller, and service.
Let’s take a closer look at controllers and their parts.
5.1. Dissecting a controller
A controller, in its most basic form, can be thought of as a collection of action handlers. By now, you shouldn’t be surprised when we tell you that Griffon adds a couple of convenience mechanisms to make working with controllers easy. Just like views, controllers have access to injected properties and methods that will make your job easier. In some circumstances, when a controller is fully initialized, you may want to perform additional setup or initialization. For example, you may want to cache some data from a web service or a database. Griffon provides a post-initialization hook to help you; we’ll look at that too. Once we have that foundation set, we’ll examine the primary purpose of controllers: actions.
Let’s get started on our dissection of controllers by looking at injected properties and methods.
5.1.1. Quick tour of injected properties and methods
Controllers don’t exist in a vacuum. They interact with other parts of the application, such as their view, the model, and the application. To understand controllers, let’s preview some of the information we’ll cover in chapter 6: the properties and methods that are injected into every controller managed by Griffon. We’ll start with four properties.
App
The app property points to the current running application. This property is useful because you can access the application’s configuration through it. By manipulating app.config (an instance of groovy.util.ConfigObject), you can determine what options and flags were set in Application.groovy.
Through the app property, a controller can inspect other MVC groups, because the application instance keeps a map of all currently instantiated MVC groups. Going back to the GroovyEdit example, it’s possible for the GroovyEditController to determine how many instances of the FilePanelController have been created either by counting the number of tabs on the view or by inspecting app.controllers and checking for their type. An application also exposes views (app.views), models (app.models), and builders (app.builders).
The app property also comes in handy when you’re dealing with application events. Thanks to app, controllers can send events to other components of your application.
Model
The model property, when defined, lets the controller access the model that’s related to its group. A controller usually updates the view via the model, assuming the proper bindings are put into place. But there’s no strict requirement for a controller to always have a model. If you feel your controller doesn’t require a model, you can safely delete this property from the code; there won’t be an error, because Griffon will check for the property declaration before setting the value.
View
The view property references the third member of the MVC triad: the view. Like the model, this property is optional. In some cases the controller may interact with the view solely by updating the model, in which case deleting this property from the code is safe.
Builder
The last of the optional properties, builder points to the builder used to create the view related to this controller. The view and the builder may share the same variables, but they’re two distinct objects: the view is a script that tells you what you just built, and the builder is a CompositeBuilder instance that allows the controller to build new UI components if needed.
Now let’s look at the methods every controller shares.
createMVCGroup()and buildMVCGroup()
These two methods allow a controller to instantiate a new group. The former relies on the latter: whereas createMVCGroup() returns a List of three elements (model, view, and controller), buildMVCGroup() returns an MVCGroup instance with all the elements that were created, including the builder. This is because an MVC group may have additional configured members, such as actions or dialogs. This being said, when you only care about the canonical MVC group members, the first method is preferred; but if you need to reference additional MVC members, the second method is the one you should use.
Here’s an example usage of createMVCGroup(). You use the assertions to verify that you got the correct types for each member as defined in the group’s configuration:
def (m, v, c) = createMVCGroup("filePanel", [tabPane: view.tabPane])
assert m.class == FilePanelModel
assert v.class == FilePanelView
assert c.class == FilePanelController
Notice that you’re taking advantage of a cool feature found in Groovy since version 1.6: multiple assignment. Compare the previous snippet with an invocation of buildMVC-Group() with the same arguments:
MVCGroup group = buildMVCGroup("filePanel", [tabPane: view.tabPane])
assert group.model.class == FilePanelModel
assert group.view.class == FilePanelView
assert group.controller.class == FilePanelController
That’s right, you get each member keyed by its type, and the value is the proper instance of each member.
destroyMVCGroup()
This is the counterpart of the previous two methods. The destroyMVCGroup() method removes the group reference from the application, thus making each MVC member a candidate for garbage collection if no one else holds a reference to any member of the group. The following snippet shows how this method can be used:
def (m, v, c) = createMVCGroup("filePanel", [tabPane: view.tabPane])
...
destroyMVCGroup("filePanel")
It’s important that every group is destroyed at the appropriate time. The application will destroy every group that remains at the time of shutdown. But there may be times when you need the group to be removed before the shutdown phase is triggered, such as when closing one of the tabs in the GroovyEdit application; that’s when you’ll use this method.
withMVCGroup()
As we just explained, createMVCGroup() and destroyMVCGroup() are two sides of the same coin. They help you create and destroy a particular group. The withMVCGroup() method is a handy mixture of the two that makes sure the created group is destroyed immediately after it’s no longer of use. For example:
withMVCGroup("dialog",[owner: window]) { m, v, c ->
    m.message = "Account processed succesfully"
    m.title = "Result"
    c.show()
}
The previous snippet assumes there’s an MVC group called dialog: it’s a short-lived group by design, whose job is to display a customized dialog. The group will be automatically destroyed once the dialog is dismissed by the user. How does the code know? It’s likely that the dialog is a modal one, which means that when the dialog is shown, it will block the current window until the dialog is dismissed. In terms of code, the closure used as a parameter to withMVCGroup() is halted after the call to c.show() is executed.
When the dialog is dismissed, the closure will resume execution; but there are no more sentences to execute, thus returning control to the withMVCGroup() method. The method in turn realizes there’s nothing left to do and immediately proceeds to destroy the group.
newInstance()
Last is the newInstance() method. Its responsibility is to create a new instance of a particular class, with an associated type as metadata. Why is this method important? Because it triggers an application event every time it’s invoked. You’ll see the repercussions of such an event before the end of the chapter, when we discuss complex services.
This method takes two arguments: the class to be instantiated and an optional type. The following snippet shows its usage:
newInstance(BookService, "service")
newInstance(Book, "")
In the first example, you create an instance of the BookService class and let every listener know that this instance is of type service. This is of course just for demonstration purposes; there’s no need to explicitly instantiate a service like this, as you’ll see later in this chapter. Next you instantiate a Book. Given that this class is a regular bean and has no ties to Griffon’s artifacts, you omit the type by setting the second argument to an empty string. It could also have a null value.
This sums up the properties and methods that every controller has. Now let’s look at how you can do some additional setup of the controller using the post-initialization hook.
5.1.2. Using the post-initialization hook
Naturally, with every Java or Groovy class, you can define a constructor that performs initialization tasks as you see fit. But what if you’d like to perform additional initialization after all members of a controller have been injected? That’s the reason we have the mvcGroupInit() method.
Note
Remember that the initialization order of MVC members is determined by their definition order in Application.groovy. The order is set to model, controller, view by default.
The signature of the method is this:
void mvcGroupInit(Map<String, Object> args)
It’s an optional method, so nothing bad will happen if you delete it from the source generated by the default template, because it won’t be called if it’s not present. The template adds it for your convenience and to remind you that you may perform additional initialization with it.
Remember the map argument that the createMVCGroup() and buildMVCGroup() methods require? It’s the same map you get as the input for mvcGroupInit(). You may recall from the GroovyEdit application that FilePanelController defined this method. It did so to keep track of its mvcId, read the file’s text, and place the text on the model. The following snippet reproduces the contents of that method:
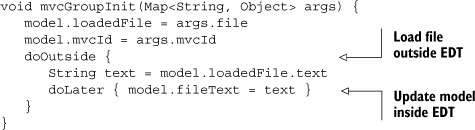
This snippet also serves as a reminder that you can add other methods to controllers, depending on the configuration you set in Builder.groovy. Suffice it to say that threading-related methods are added to controllers by default. Those methods are edt{}, doLater{}, and doOutside{}, which will receive full coverage in chapter 7. For now, we’ll just say that these three methods make your life much easier when it comes to multithreading code.
It’s time to dive into the main responsibility of a controller: being an action handler.
5.1.3. Understanding controller actions
We’ve reached the core of a controller. Actions are the main reason for a controller’s existence. You’ve seen them before in previous examples, and now it’s time to define them properly.
An action is nothing more than a closure property or a method that follows a conventional set of arguments. It looks like the following when defined as a closure property:
def openFile = { evt = null -> ... }
The alternate form, for an action defined as a method, looks like this:
void openFile(evt = null) { ... }
Why allow two modes? The reason behind this design selection is that developers like to have choices too. Some prefer the closure property notation, because it aligns perfectly with the conventions of Grails controllers. Others prefer a method definition, because that’s what they’re used to, coming from Java. One thing is certain: it doesn’t matter which mode you pick. Griffon will make sure it works.
But there’s an advantage to using closure properties over method definitions. When it comes to testing, it’s easier to overwrite an action implemented as a closure than it is to mock out a method.
About the conventional arguments: an action is usually tied to an event generated by the UI. It may vary in type depending on the element to which you tie it. For example, it may be an ActionEvent if you set the action as an ActionListener. Or it may be a MouseEvent if you set the action to handle mousePressed on a button. Leaving the type of the evt parameter as undefined gives you enough elbow room to switch an action from one place to another without needing to change the action’s signature. What do we mean by this? Say your intention is to react to events generated when a button or a menu is clicked. These components generate events of type ActionEvent. Then you change your mind and would like to have the action react to mouse movements, which are typically handled by MouseEvent. If the type of the evt argument is strictly set and left unchanged, then it’s likely you’ll get a runtime exception when running the application. But if the type of evt isn’t set, you can freely assign the action to react to MouseEvents. This assumes that the action code doesn’t depend directly on behavior available exclusively to a particular event type.
There’s another advantage to omitting the type on the evt parameter: testing. Assume for a moment that a controller has the following action:
def handleEvent = { evt = null ->
    if(evt?.source?.selected)
       doSomething()
    else
       doSomethingDifferent()
}
You’d like to test this code, but it may be a difficult task because the code expects a nested element with a specific property to be defined in the evt argument. You may need to create an event instance and populate it with the correct data, but which event class should you use? Because there are no types involved, you can use Groovy’s duck-typing approach. Yes, we’re suggesting you use a map as the value for evt. The following code shows how to do this:
def evt = [source: [selected: true]]
myControllerInstance.handleEvent(evt)
evt.source.selected = false
myControllerInstance.handleEvent(evt)
The second line causes doSomething() to be called, and the last line causes doSomethingDifferent() to be called.
One last thing we must cover about method arguments is the recommendation that you define a default value. The template suggests that you set a null value, but it could be a predefined map, as shown in the previous snippet. It can be any value that makes sense for your action. Why would you need such a default value? Think for a moment about what default values in Groovy allow you to do. That’s right: you can call the method (or closure) without defining a value for a particular parameter. This means you can call handleEvent in either of the following forms:
handleEvent([source:[selected: true]])
handleEvent()
This can greatly simplify the code you’ll need to write to call an action from within its own controller—or any other MVC group member, for that matter.
Note
This is all you need to know about a controller’s responsibilities for now. But there’s more. In chapter 8, we’ll explain the relationship between controllers and application events.
Reusing business logic via services is an efficient way to scale an application, and we’ll look at that next.
5.2. The need for services
We’ve showed you what makes a controller tick. As you know, every MVC group may have its own controller. As you’ll learn in chapter 6, two or more MVC groups may share a few of their members, or even the controller. But this sharing ability doesn’t scale when what you need is a place to put your code where any controller or application component can access it. You need good old-fashioned modularity.
Not to get all philosophical, but the purpose of the controller is to control. Controllers respond to actions and events and see that the appropriate code is executed. Then the controller returns a response if appropriate. In general, in large applications that need to reuse code, in order to make it more manageable, reusable, and testable, the controller should delegate to some other component to fulfill business logic. Frequently, this other component is called a service. A service is an organizational technique for encapsulating logic for reuse.
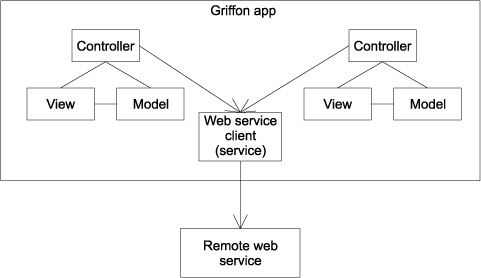
Services are flexible and have numerous uses. One example is accessing remote web services. Let’s say you have a customer relationship management (CRM) solution that exposes access via web services. Your application may need to access customer information from multiple components within the application. Instead of duplicating the code in each of the components, this is a good time to use a service. Figure 5.2 illustrates extracting web-service access used by two controllers into a shared service.
Figure 5.2. Controllers sharing logic to access a remote web service
Griffon comes with services support. A service in Griffon is stateless, akin to its MVC brethren, and it follows a naming and location convention. There’s also a creation script that uses a simple template.
In this section, you’ll see how to create simple and complex services. A simple service is a lightweight service that has few or no dependencies on other components. When a service gets more complex and has dependencies on other components, a more involved approach is available.
Let’s look at how simple and complex services are created with Griffon.
5.2.1. Creating a simple service
The recommended approach for creating services is to use Griffon’s create-service command. In a brand-new Griffon application, go to your command prompt and type
$ griffon create-service simple
This will create a new artifact named SimpleService.groovy under griffon-app/services. It will also create a SimpleServiceTest.groovy file under test/unit. This is why we recommend that you use the script; not only does it create an artifact that follows the naming conventions and contains a skeleton implementation, but it also generates a test script for you.
Now let’s peek into the generated code:
class SimpleService {
    def serviceMethod() {
    }
}
It couldn’t be any easier than this. A service class is like any other Groovy class you’ve encountered so far; there’s no magic to it. It may contain as many methods as you like, with the knowledge that public methods define the service contract. Service instances are automatically created and managed by the Griffon runtime; they’re treated as singletons, although if you look again at the service you just defined there’s nothing stopping you from creating your own instances. But it’s good to leave Griffon to do its own thing.
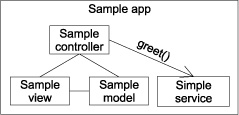
How do you wire up a service into a controller? You may be hoping that a convention exists to help you attain this goal—and you’re correct! Griffon injects an instance of a service on each MVC member that has a property name, which matches the simple name of the service. With the service injected into the controller, as illustrated in figure 5.3, the controller can invoke methods on the service.
Figure 5.3. Sample controller invoking the greet() method on a simple service
Does this sound familiar? It works the same as injecting model, view, and controller references on MVC members. Let’s look at an example.
Edit SimpleService.groovy in your favorite editor, making sure its contents look like this:
class SimpleService {
    def greet(String who) {
         "Hello $who"
    }
}
SimpleService.greet() implements a “Hello World” style service call. It returns its argument formatted as a greeting.
Now let’s inject this service into a controller. Remember, you only need to define a property that matches the simple name of the service; in this case, it will be simple-Service. Assuming you had a service class com.acme.DeliveryService, its simple name would be deliveryService. It’s important that the name match—otherwise the service instance won’t be injected. You can define the type of the service as well. It makes no difference to Griffon, but it may be important when editing your code in an IDE or a power editor that supports code completion:
class SampleController {
   def simpleService
   void mvcGroupInit(Map<String, Object> args) {
      assert simpleService.greet("Griffon") == "Hello Griffon"
   }
}
This is a contrived example, because the controller has no actions. But it serves to verify that the service instance has been properly injected and that calling its service method results in the expected output.
Now you know how to inject services into controllers. The option of lightweight service injection will work as long as your services are lean—in other words, they don’t have dependencies on additional components. Fortunately, there’s a solution to this problem too, which we’ll cover in the next section.
5.2.2. Creating a Spring-based service
As your application becomes more robust, you may need a more sophisticated service implementation. Assume for a moment that you have a service that requires an additional dependency on another component. This dependency may be a data source element that lets the service interact with a database, or it may be a JMS destination queue or some other custom component exposed by your application. Now imagine that those dependencies require additional setup as well. The list could go on and on.
Inversion of Control[1] (IoC) frameworks (or dependency injection,[2] as some prefer to call this approach) have risen to solve the problem of properly setting up a graph of dependencies (sometimes including circular references!). Arguably the most popular of such frameworks in the Java space are Guice (http://code.google.com/p/google-guice/) and the Spring framework (www.springsource.org/); there’s plenty of information available that can help you get up to speed on them.
Griffon comes with a couple of plugins that can help you use Guice or Spring. You’ll be able to set up complex services, as long as you follow the framework’s rules.
In this section, you’ll configure a complex service using the Spring plugin, because a handful of additional Griffon plugins take advantage of Spring support. Some of these plugins may be familiar to you if you come from a Grails background.
The first thing you need to do is install the Spring plugin. To do so, go to your command prompt, making sure you’re inside an application directory, and type the following command:
$ griffon install-plugin spring
Good. Let’s move on.
Creating a service
Now create another service, named complex:
$ griffon create-service complex
Let’s take a few more baby steps. First you’ll make sure both SimpleService and ComplexService will be injected into your SampleController via Spring injection, and then you’ll tweak ComplexService to have additional dependencies.
Modifying your service and controller
Edit ComplexService, and change its default service method to look like this:
class ComplexService {
   def call(String name = "") {
       "complex replies: $name"
   }
}
Now go back to SampleController, and change its contents to look like this:
class SampleController {
    def simpleService
    def complexService

    void mvcGroupInit(Map<String, Object> args) {
        assert simpleService.greet("Griffon") == "Hello Griffon"
        assert complexService.call("Griffon") == "complex replies: Griffon"
        println "All is well"
    }
}
Run the application. If no errors appear on your console and you see the message “All is well,” then you’re good to go with the next step. If there are errors, check to make sure the names of the services are correct. Next, you’ll give the complex service a dependency.
Creating a class and adding it to your service
Create a new class, and call it Thing. Make sure you place it under src/main/Thing.groovy. The file contents should look like this:
class Thing {
    String value
}
Go back to ComplexService, add a Thing property to it, and change the implementation of the call() method to use the new property:
class ComplexService {
   def thing

   def call(String name = "") {
       name ? "complex replies: $name" : thing.value
   }
}
You’re almost done.
Modifying the controller again
Now you’ll change the controller code again, and save the wiring setup of Thing into ComplexService for last. Open SampleController in your editor, and type the following:
void mvcGroupInit(Map<String, Object> args) {
    assert simpleService.greet("Griffon") == "Hello Griffon"
    assert complexService.call("Griffon") == "complex replies: Griffon"
    println complexService.call()
}
Now you’re ready for the final step.
Injecting Things into ComplexService
You need to instruct the Spring plugin that an instance of a Thing must be injected into an instance of ComplexService. There are many ways to configure injection in Spring. Perhaps the most popular is via XML, but many developers tend to shun anything XML related. Don’t fret, there’s a groovier solution.
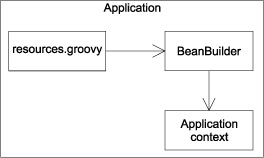
Rising from the core of the Grails framework, you find BeanBuilder (www.grails.org/Spring+Bean+Builder). This builder lets you configure an ApplicationContext using a groovy DSL, much as you do with Swing and the SwingBuilder DSL, or Ant build files via AntBuilder. Figure 5.4 illustrates the process of using BeanBuilder to inject resources .groovy configuration information into the ApplicationContext instance.
Figure 5.4. BeanBuilder processing the resources.groovy file to build the application context
It turns out the Spring plugin bundles BeanBuilder and its supporting classes, meaning the Spring beans DSL is yours to use on Griffon applications as well. Then how do you take advantage of the Spring beans DSL? Create a new file named resources.groovy under src/spring, and type in the following:
beans = {
    thing(Thing) {
        value = "All your Griffon are belong to us!"
    }
}
Tip
The plugin creates the src/spring directory when you install it.
The BeanBuilder DSL requires that you define a top-level variable named beans. Its value must be a closure containing bean definitions. A bean definition has the following elements:
- name—In this case, thing
- class—In this case, the Thing class
- optional—A nested closure containing property definitions
For the test example, we decided to grace thing’s value with a popular meme[3] from the early 2000’s; you may be familiar with it.
3http://en.wikipedia.org/wiki/All_your_base_are_belong_to_us. It keeps popping up from time to time!
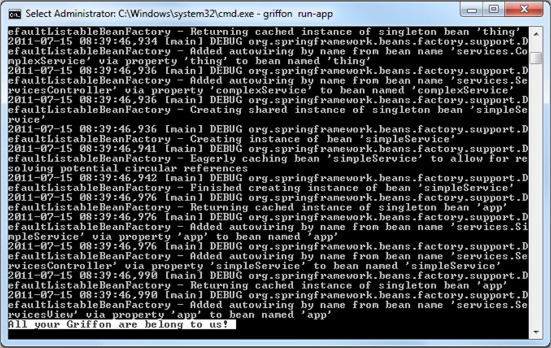
You’re good to go. Run the application again, and if everything goes right you should see the famous meme phrase printed on your console after a few logging statements from the Spring plugin. The output will be similar to figure 5.5.
Figure 5.5. Complex service results
Imagine wiring up data sources, JMS queues, and the like. It doesn’t seem that difficult now, does it?
You’ve seen how simple and complex services can enhance your application’s behavior. Services are often called from a controller, but given the choices of dependency injection at your disposal you may inject them into other components too.
Still, the behavior provided by controllers and services may not be enough to cover your application’s requirements. Sometimes you’ll need to enhance a particular class or a set of classes that belong to the same type, like models, for example. This goal can be achieved in several ways; we’ll discuss in the next section one that we’re sure you’ll find useful.
5.3. Artifact management
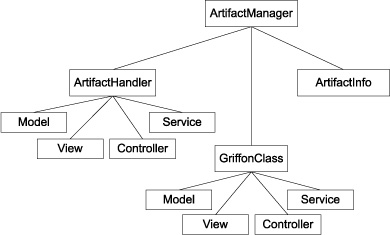
We’ve discussed the various features of Griffon’s MVC implementation using a common set of artifacts: models, views, and controllers. We also added services into the mix. They each possess their own individual properties, but they also share common traits. For example, each artifact is located in a specific directory that shares a name with the artifact’s type. Every file has a unique suffix that clearly indicates the artifact type. Because of this, Griffon is able to group all the artifacts into a runtime representation that we call GriffonClass (see figure 5.6) A GriffonClass is a metadata class that holds all the relevant info pertaining to artifacts, such as FilePanelController or GroovyEditView. The type of metadata you have access to is specific per artifact. For example, you can inspect controllers to figure out the names of all actions they expose. Or you may want to know the names of all the service methods that a particular service class defined.
Figure 5.6. Core Griffon classes that perform artifact management
In this section, we’ll discuss how the Artifact API comes into play. For example, it can be used at runtime to figure out the names of all the actions exposed by a controller. Suppose you wanted to build a form-based application where all interactions, represented by buttons or menus, were automatically mapped to the actions exposed by a controller. Having a list of all available actions in the controller would certainly make your job easier. You could then query all artifacts by means of the Artifact API, which is available to you though the ArtifactManager. Let’s see how it’s done.
5.3.1. Inspecting artifacts
Every Griffon application has an implementation of the ArtifactManager interface. At application startup, Griffon loads artifact metadata and makes it available for querying via ArtifactManager. You can access ArtifactManager by asking the application instance for it; you can either call the getArtifactManager() method on the app variable or use property access and call app.artifactManager.
Coming back to the hypothetical scenario we presented at the beginning of the previous section—gathering all actions exposed by a controller—the following snippet shows how this can be done in a view script:
def griffonClass = app.artifactManager.findGriffonClass('AuthorController')
griffonClass.actionNames.each { actionName ->
    button(actionName, actionPerformed: controller[actionName])
}
Table 5.1 summarizes the methods and properties you can use to query artifact metadata.
Table 5.1. A comprehensive list of methods and properties available on ArtifactManager
|
Method |
Returns |
|---|---|
| findGriffonClass (String className) | A GriffonClass instance whose artifact class matches the fully qualified class name sent as argument. Returns null if no match is found. Example: findGriffonClass ("com.acme.AnvilDeliveryService") |
| findGriffonClass (Objectobject) | A GriffonClass instance whose artifact class matches the class of the object sent as argument. Returns null if no match is found. Example: findGriffonClass(AnvilDeliveryServiceInstance) |
| findGriffonClass (Stringname, String type) | A GriffonClass instance whose artifact class matches the combination of class and type. Returns null if no match is found. Example: findGriffonClass ("Book", "controller") |
| findGriffonClass (Class clazz, String type) | A GriffonClass instance whose artifact class matches the combination of class name and type. Returns null if no match is found. Example: findGriffonClass (Author, "controller") |
| getClassesOfType (String type) | An array of GriffonClass instances whose type matches the specified argument. Never returns null; an empty array is returned if no match is found. Example: getClassesOfType("service") |
| getAllClasses() | An array of GriffonClass with all available artifact classes. Never returns null. |
| is<type>Class (Class clazz) | True if its argument is an artifact whose type matches <type>, or false otherwise. Example: isModelClass(FooModel) == true |
| get<type>Class (Class clazz) | A GriffonClass whose class matches the provided argument. Example: getViewClass(com.acme.BarView) |
| <type>Classes | An array of GriffonClass where <type> is a valid artifact type. Never returns null. This is the only dynamic property exposed by the ArtifactManager. Example: controllerClasses |
You may have noticed that some of the methods and properties use a <type> placeholder. This is because those methods and properties are dynamically generated when you use them. That is, there is no controllerClasses property on ArtifactManager until you call it for the first time. Why is this? Because as a developer, you have the ability to define new artifact classes. How else would ArtifactManager know about your new artifact types?
Now that you know how to query for artifact metadata, let’s see what you can do with it. The GriffonClass class has many methods that can be used to inspect an artifact, and the most useful are described in table 5.2.
Table 5.2. The most commonly used methods of GriffonClass
|
Method |
Behavior |
|---|---|
| getApp() | Returns the current application instance. Every artifact has this method. |
| newInstance() | Creates a new instance of the particular artifact. Instances created in this way benefit from the framework’s bean-management capabilities, such as service injection and event firing. |
| getArtifactType() | Returns the type of the artifact, such as controller or view. |
| getClazz() | Returns the real class of the artifact this GriffonClass describes. Example: com.acme.AnvilDeliveryService |
| getFullName() | Returns the fully qualified class name of the real class. Example: com.acme.AnvilDeliveryService |
| getPackageName() | Returns the package name only, if it exists. Example com.acme |
| getShortName() | Returns the class name without any preceding package. Example: AnvilDeliveryService |
| getPropertyName() | Returns a name suitable to be used as a property. Example: anvilDeliveryService |
| getName() | Returns the short class name without the trailing type convention. Example: anvilDelivery |
| getNaturalName() | Returns a string representation that is suitable for human consumption. Example: firstName becomes First Name |
In addition, custom subclasses and implementations of GriffonClass can expose more methods. For example, the GriffonClass for controllers (aptly named GriffonControllerClass) allows you to query all controller action names. In contrast, the GriffonClass for services (GriffonServiceClass) has a method for querying the names of all service methods defined by a particular service. You’ll find that plugins and addons can be used to deliver new GriffonClasses, such as charts and wizards.
Now that you know how to query for artifact metadata and what to expect of such metadata, we’re ready to explore the metaprogramming capabilities that the Artifact API enables.
5.3.2. Metaprogramming on artifacts
Groovy supports metaprogramming at compile time and runtime. Lower-level metaprogramming occurs at compile time. This can be done by using the AST transformation, which we are obliged to remind you isn’t for the faint of heart. @Bindable is a perfect example of this type of metaprogramming. Higher-level metaprogramming occurs at runtime. This is the most typical, and it’s well documented in many sources; Groovy in Action, 2nd edition (Manning, 2012, www.manning.com/koenig2) is a great source to start with. @Bindable is also the one we’ll illustrate.
Every class in the Groovy system has a companion MetaClass. Groovy uses this meta descriptor to implement much of its Meta Object Protocol[4] (MOP). When a method is invoked on an object or a property is accessed, the MOP gets to work. The MOP can follow several paths to resolve a method invocation; but for our purposes the short story is that if the MetaClass has the method definition the MOP is looking for, then the MOP will invoke it; if not, the MOP will try the class, resulting in an exception if the method isn’t found.
4 See “Practically Groovy: Of MOPs and mini-languages,” http://mng.bz/us97, for an example usage of the Groovy MOP.
One of the MetaClass features is that you can attach new methods and properties to it at virtually any point while the application is running. This is true if the MetaClass is an instance of ExpandoMetaClass,[5] another fine addition to the Groovy language that was incubated in the Grails project. Most of the time, when you set up additional methods on a Groovy MetaClass you’ll find an ExpandoMetaClass under the covers.
Enough with the theory. Let’s move ahead into exploiting the introspection abilities provided by GriffonClass.
5.3.3. Artifact API in action
Let’s say you need to build a form-based application that deals with personal records found in a database. We’ll keep the code short for the moment—you won’t see any database access shenanigans—but rest assured that Griffon has good support for connecting to databases and executing queries, thanks to its plugin system.
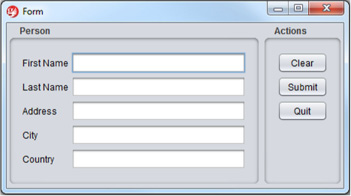
Say that an initial version of the application looks like figure 5.7.
Figure 5.7. First iteration of the form. There are three input fields and two actions.
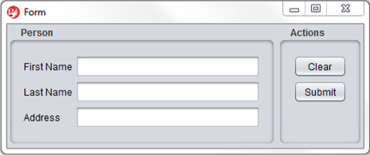
This screen suggests a particular structure for the MVC group that handles it. You can create a model that holds firstName, lastName, and address properties. You’ll have to find a way to deal with proper capitalization for each property label. The actions can be safely stored in a controller; label capitalization also plays a role here. But the application isn’t complete; additional properties will be added to the model. If you hard-code all values and properties in each MVC member, you’ll quickly reach a point where there’s too much repetition. You need a better way to mine the information found in the model and controller. This is where the Artifact API comes in.
First you’ll define the model with the three properties you just saw, as the following listing shows.
Listing 5.1. FormModel with three bindable properties
@groovy.beans.Bindable
class FormModel {
    String firstName
    String lastName
    String address
}
That takes care of the model. Don’t you love the simplicity of building observable beans with Groovy and Griffon? The property names resemble the labels shown in figure 5.7, but you haven’t figured out a way to properly capitalize them; you’ll leave that task to the view.
Next you’ll define the controller in the following listing. This is where you’ll catch a glimpse of the Artifact API at work.
Listing 5.2. FormController, which can handle any model properties

As expected, the controller has two actions that match the labels on the buttons shown in figure 5.7, although they also present the capitalization issue of the model properties. What’s interesting are the lines where the
controller queries the model for its griffonClass instance ![]() . Models have a custom GriffonClass that provides additional introspection capabilities; we mentioned this earlier. A model griffonClass exposes a method that returns a list of names of all the observable properties the model defined. In this case, this list
will contain firstName, lastName, and address. That’s precisely what you need. Inspecting the behavior of the controller further, notice that the clear action resets the value of each property, and the submit action opens a dialog with each value preceded by its label. And the mystery of proper capitalization is finally solved:
Griffon has a number of utility classes in its arsenal, and one of them, GriffonNameUtils, excels at transforming strings. Capitalization is one of the transformations.
. Models have a custom GriffonClass that provides additional introspection capabilities; we mentioned this earlier. A model griffonClass exposes a method that returns a list of names of all the observable properties the model defined. In this case, this list
will contain firstName, lastName, and address. That’s precisely what you need. Inspecting the behavior of the controller further, notice that the clear action resets the value of each property, and the submit action opens a dialog with each value preceded by its label. And the mystery of proper capitalization is finally solved:
Griffon has a number of utility classes in its arsenal, and one of them, GriffonNameUtils, excels at transforming strings. Capitalization is one of the transformations.
Next, you’ll define the view, as shown in the following listing. Notice that you’re using the GriffonNameUtils class again.
Listing 5.3. FormView with two panels: model properties and controller actions
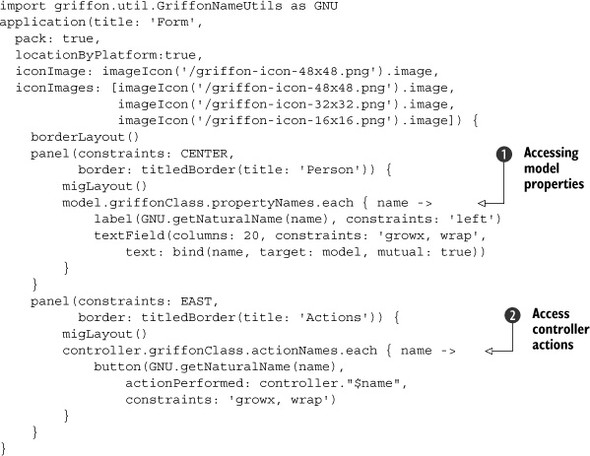
You can appreciate at ![]() that the same trick is used in the controller to query the model for all its observable properties (that is, asking the model’s
metadata about all the properties it holds that are of interest for this application to work). The left panel has a special
layout[6] that places each row nicely. A row is composed of a label and a text field. The text of the label is properly capitalized
thanks to GriffonNameUtils—aliased to GNU using one of Groovy’s tricks to shorten a class name. Controllers also have a special griffonClass of their own. This particular griffonClass has a method that provides the names of the actions declared by the controller. Again this is precisely your goal, and you
put that method to good use
that the same trick is used in the controller to query the model for all its observable properties (that is, asking the model’s
metadata about all the properties it holds that are of interest for this application to work). The left panel has a special
layout[6] that places each row nicely. A row is composed of a label and a text field. The text of the label is properly capitalized
thanks to GriffonNameUtils—aliased to GNU using one of Groovy’s tricks to shorten a class name. Controllers also have a special griffonClass of their own. This particular griffonClass has a method that provides the names of the actions declared by the controller. Again this is precisely your goal, and you
put that method to good use ![]() .
.
6migLayout() from the MigLayout plugin.
Now that all the portions of the code are ready, you can set up the application for running it. Install the MigLayout plugin by invoking the following command at the console prompt:
$ griffon install-plugin miglayout
MigLayout is a good Lava layout manager. In listing 5.3, it’s used in the constraint definitions. MigLayout defines the appearance and behavior of the fields and buttons. You can find out more at www.miglayout.com.
Once the plugin is installed and the application is running, filling out the form and clicking Submit (see figure 5.7) should result in a dialog similar to the one shown in figure 5.8.
Figure 5.8. A dialog opens when you click the Submit button. It shows all the information entered by the user on the form.

Let’s verify that the model and controller introspection are working as we just described. In theory, adding new properties to the model should result in additional labels and text fields being displayed on the left side the form; a similar thing should happen on the right side of the form if actions are added to the controller. Update the model by adding two more properties: city and country. Then update the controller by adding a new action, like this:
def quit = {
    app.shutdown()
}
Launch the application once more. Lo and behold, the UI reflects your changes! Figure 5.9 shows how the UI looks now.
Figure 5.9. The form displaying the new model properties and controller actions
Not bad at all. And you only had to add a few properties to the model and controller. You can expect additional features for each custom griffonClass. You can inspect them by using the options available to you, be it IDE code inspection or browsing the API documentation that comes bundled with the Griffon distribution.
5.4. Summary
Controllers are a vital part of the MVC pattern. They’re responsible for routing inputs and outputs between the other members of the MVC triad. Controllers in Griffon share common properties with their models and views.
You’ve seen how action handlers can be defined on a controller. You’ve also seen that controllers can take you only so far when it comes to defining an application’s logic. Sometimes you may need to put the logic on a service layer.
You created a simple service to see Griffon’s lightweight service support. We also examined a more complex service and saw the need for robust service support using Guice or Spring.
Finally, we covered the Artifact API, which gives you access to artifact metadata. Think of it as introspecting into your application internals.
In the next chapter, we’ll look at how models, views, and controllers form MVC groups, and you’ll learn how to create and use MVC groups in your applications.