
How do you use JavaScript and Smart Forms to build rich interfaces?
How do you navigate using menus?
How do you use search to navigate?
How do you increase discoverability using breadcrumbs and sitemaps?
What do you do to allow users to register with your site?
With all the emphasis on campaign landing pages, micro sites, and search engine friendly interior content pages, it is reasonable to ask whether a website's homepage matters much anymore. Although the homepage is often the most visited page on a website, its importance has been overshadowed by the increased focus on lead generation by marketing groups. But lead generation is not the only purpose for a website. Other major objectives mentioned by marketing managers include supporting branding initiatives, creating a positive image for the company and its products, building awareness of the organization, and distributing product and company information to existing and potential customers. The homepage plays an extremely important part in satisfying these objectives — no other page on your site will have such a pivotal and multipurpose role.
This chapter discusses ways to implement a successful homepage by focusing on a number of the most important elements of a homepage. Because the homepage must satisfy the needs of many types of visitors, this chapter focuses on using navigation to guide site visitors in the right direction through the use of menus, sitemaps, breadcrumbs, and search and goes in depth on the technology available through Ektron Framework used to implement them. In addition to navigation, the chapter also focuses on a specific technique for delivering attention-grabbing content that appeals to a wide audience. The technique uses a jQuery plug-in for rotating through images and is a nice way to deliver multiple messages on the homepage without diluting the focus and attention. Lastly, the chapter concludes with a discussion of the registration methods available for membership users, showing the internal registration methods as well as how to integrate Facebook Connect onto your site.
This section introduces the use cases implemented for this chapter. Most of the remaining technical chapters contain such a section. These sections give a discussion a meaningful context in which to understand the technology. Each of these sections contain: a wireframe describing the organization and composition of the page; the actors involved defining the roles and requirements of the site visitor; the scenario, which includes bullet points that capture the expected actions performed by the site visitor; and the outcome, which specifies the success criteria for the scenario in quantifiable terms and is typically tied to Web metrics for measurability.
LAUNCHING THE ONTREK WEBSITE
The OnTrek marketing team is leading the effort to launch the OnTrek website, with careful attention being given to the look, feel, and function of the homepage. The marketing team's objectives for the homepage include: supporting the marketing department's branding initiatives, creating a positive image for the company and its products, and distributing information to existing and potential customers.
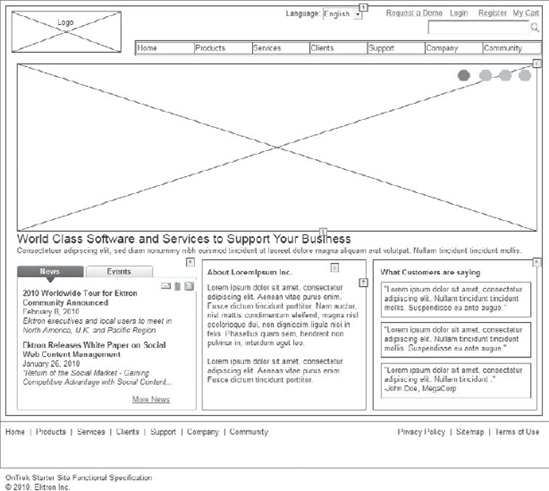
Wireframe
The Wireframe is a critical part of the Implementation Guide. In Chapter 2, you learned about the Discovery Phase and the process by which the Implementation Guide and Wireframes are created. Chapter 3 focused exclusively on the Implementation Guide and in this chapter, you learned what a best-practice Implementation Guide includes. For more detail on Wireframes and the Implementation Guide, see those chapters. The Wireframe for the OnTrek homepage is shown in Figure 7-1.
Actor
John is the Director of IT at Acme Inc. and is researching security-related software packages for his company's network. He is specifically looking for information on product functionality, supporting services, and licensing costs. In addition, John is looking for basic information about the company such as the number of years in business and the location of its headquarters.
Scenario
In this scenario, John:
Performs a Web search using an online search engine like Google or Bing to find companies that sell security related software packages.
Searches and clicks on a result in the results page that takes him to the OnTrek homepage.
Arrives on the site with the primary objective being to find product information.
Uses the site search and the menu navigation to locate the product info.
Outcome
A successful outcome in this use case is one where John visits the homepage and then travels to the product and company information pages. In general, by using Web Analytics (Chapter 9), you can track the abandon rate for the homepage, which is the number of homepage visits that result in no further page views. A high abandon rate implies that people visit the homepage and do not proceed any further. A general metric for success is a low abandon rate for the homepage.
It is difficult to predict why visitors will come to a homepage. Contrast this with a campaign-landing page, where you know exactly how someone arrived (through a search advertisement or e-mail marketing message) and you know what they're looking for (a particular product or service). In order to adequately address this visitor's needs, the homepage needs to do two apparently competing things:
The homepage needs to be general enough so that it is applicable to different users with diverse goals, both in terms of the content presented and the navigation structures available.
The homepage needs to deliver specific content and not dilute its message by being all things to all people.
If you add these requirements so that content is consistent with the marketing department's branding efforts, you'll begin to see how designing a persuasive homepage can be challenging.
One popular way to present relevant and compelling information to a diverse set of users is through the use of a prominently featured set of rotating graphics. This technique also increases the attractiveness of your site and provides an opportunity to display rich and interactive content. In this chapter you'll use the jQuery to create an RIA component for rotating through images promoting OnTrek's products and services. This component will be built using ASP.NET to generate markup, jQuery to render it as a slider, and CSS to style the presentation. Although the implementation uses jQuery, the described approach can be applied to components designed using Silverlight and Flex as well.
Another important factor for a successful homepage is navigation. The importance of navigation stems from the general purpose nature of the homepage and the need to present site visitors with clear indicators of possible next moves. There are a number of navigation aids that can be used and this chapter focuses on the use of menus, website search, sitemaps, and breadcrumbs. You'll use Ektron Menus to manage the global navigation structure in the Workarea and you'll render these on the page using the Flex Menu Server Control. The implementation shows how you can override the default behavior of the server control to provide tight management over the markup and the presentation using XSLT, CSS, and jQuery.
A good menu structure usually only provides links to a subset of the site's overall content. Considering that it's realistic for an average-sized website to have hundreds of pages of content, it makes sense for a navigation structure to provide site visitors with links to only the most important and relevant items and not overload them with links to all possible resources. Search is a good way to provide access to the remaining items and also give an alternative to menu navigation for those who prefer it. The implementation section discusses how to develop a successful search strategy using Ektron's search technology, including the use of Web Analytics for tracking search terms site visitors use and tweaking results based on that data. The section also covers a deep look into Ektron Search and provides architectural diagrams and code samples showing how to leverage the search architecture.
Providing site visitors with navigation indicators that help them understand their current position in the overall information architecture of the website is another critical factor for ensuring a happy visitor and increasing page views. This chapter will show how to implement navigation using Ektron's Breadcrumb and Sitemap features.
Keep in mind that not all visitors to the homepage are first-time visitors. The homepage is visited by new users and existing membership users alike. It's a good idea to offer membership users the ability to log in directly from the homepage. This chapter also discusses ways to use Ektron's registration functionality, including both its native registration methods as well as its ability to integrate with Facebook Connect.
Rich Internet Applications, or RIAs, have been an important part of Internet design ever since Flash became a commonly used Web element over a decade ago. Today the concept of RIAs has been greatly extended. RIAs have gone from being a replacement for traditional HTML-based development to including the concept of small pieces of rich functionality within a more typical page experience. The collection of technologies has grown from the basic functionality of Flash, to an ecosystem that includes Java, advanced Flash with server side data management, Silverlight, AJAX, and HTML 5. Whether or not you as a developer agree with the development of RIA interfaces as part of a Web experience, it is something that needs to be supported, and Ektron has made sure that there are ways of doing so.
In order to support as many developer use cases as possible, the Ektron approach has always been to supply a rich API in addition to the more typical server controls that are the usual first stop for developers. In addition to the API, there is also a built-in Web service package that is part of the Workarea. This collection of Web services was originally created as part of the Plugin and Extension architecture, but these Web services are also available to RIAs.
Solutions for rich client interaction can be logically divided into two areas:
When you want more than just a statically displayed page, but you don't require additional data round trips from the server
When you need to return to the server for more information based on user interaction
These are discussed in more detail in the following sections.
The first group pertains to the original designs of rich interfaces. A typical solution was to create a splash page, which might show a movie or some information before the users moved on to the site itself. This type of interstitial is widely regarded today as detrimental to the usability of the site, and is generally frowned upon.
The group of solutions that don't require additional data from the server today has grown to be more oriented towards producing a richer experience for the visitor. For instance, creating a client side sorted table through the use of JavaScript is a very typical interface requirement. Like many solutions requiring a richer sort of technology, this requirement can be solved through the use of a simple link that informs the server to render the page again with a different sort order. However, the modification to use JavaScript client side eliminates a round trip to the server. That round trip is a very expensive call, both in terms of wait time for the users, as well as in terms of server load, so eliminating the call is very desirable.
The second group of solutions — those that require returning to the server for more information in order to update the page for the users — first became common with the use of AJAX. Microsoft supplies a set of tools dubbed ASP.NET AJAX, which can simplify the development of these requirements through wrapping the calls back to the server in a standard framework that requires nothing of the developer except to wrap the portion of the page to be rendered again in an ASP.NET UpdatePanel Server Control. This solution provides a very simple way for developers to create a lighter feeling Web solution and in many cases is perfectly acceptable. However, using the standard Microsoft AJAX toolkit still requires a full-page lifecycle to occur on the server, even though only the updated portion of the page is returned to the user. This means that of the two downsides to using a standard anchor tag to update the page — the server render time and the client transfer time — only the transfer time is reduced; the server render time remains the same.
The use of Web services, or RESTful services, has increasingly become an accepted method for reducing both the bottlenecks at this point. While this solution is typically more complicated to develop, the decrease in server load can sometimes be a worthwhile reason for this approach. Any of the list of currently popular client side technologies allow for this mode of development. Additionally, ASP.NET makes it very easy to develop a simple Web handler that can respond in any format required.
This chapter covers two simplified examples to help you understand how best to approach these types of problems. The first example you will explore using the jQuery library to animate the slider on the homepage of the OnTrek website. The example starts by discussing the storage of content specific for the interface, allowing for benefits like localization and easy updating. You will then move onto generating appropriate output for the content to be displayed, and finally create some code to actually render the slider.
The second example is about the creation and consumption of RESTful generic handlers. For this example, you'll create a simple ASHX Web handler that responds to queries with JSON, and the authors will talk about consuming the results through the use of jQuery.
On the homepage of the OnTrek website, there is an image rotator at the top of the page. The images displayed, along with the accompanying text, all come from a settings content item stored in the CMS as Smart Form content based on the Rotating Ad Smart Form definition. You created that definition in the Smart Form section of Chapter 6. In this section, you will explore the following:
In this section, you'll be building the same example, that of the image rotator from the homepage of the OnTrek starter site, in two different forms. The first form, which you'll produce now, uses the same method used in the site itself. You'll use Smart Forms to create the structured content types, and then use existing query methods to render that data. In the next section, you'll build the same example, but with more home-grown code. In most cases, you'll want to follow the approach used in the first case as demonstrated on the OnTrek website, particularly if you're already familiar with jQuery. However, there is almost always more than one way to accomplish a task; it can pay to evaluate each method for the lessons learned.
The OnTrek start site comes prebuilt with a Smart Form definition called Home Page Banner." One of the common uses of Smart Forms is to use them to store settings for rich interface applications as they allow for simple management of XML based options. Since XML is such an open standard across languages and platforms, this allows developers to consume those settings from whatever platform they may be developing on. In addition, using content as the basis for the options means you have the ability to protect the configuration through permissions and have multilingual versions of the settings.
You read about how to use the Microsoft XML Schema Definition Tool in Chapter 6. In this approach, you'll build the class definition from the XSD for the Rotating Ad Smart Form, and then use that to deserialize the settings from the Smart Form settings content item. You will then databind the results into an ASP.NET Repeater Control to convert it to HTML. Once the results are in an HTML format, you will use a jQuery plug-in to render the results into a slider interface.
Follow these steps to create an Image Rotator using Smart Form Serialization, databinding, and jQuery.
Make sure your content item, based on the Home Page Banner Smart Form, has been created. Open the Workarea content tab and go to
MainSite/Content/Smart Forms/HomePageBanner. There should be a content item called HomePageBanner there. If there isn't, create a new piece of content based on the Home Page Banner Smart Form now, and make note of the ID of the newly created piece of content.Retrieve the XSD for the Smart Form and convert it using the Microsoft XML Schema Definition Tool into a serializable data class. Go to Settings

At this point, you can either retrieve the XSD for the Smart Form through the RESTful service as covered in Chapter 6, or you can enter the Data Designer for the Smart Form, and find the icon of a document overlaid with XSD. Clicking that icon on the toolbar brings up a modal window that contains the XSD. In either case, put the results into a file called HomePageBanner.xsd in the path c:. The HomePageBanner.xsd file is shown in Listing 7-1.
Example 7.1. HomePageBanner.xsd
<xs:schema elementFormDefault="qualified"
           attributeFormDefault="unqualified"
           xmlns:xs="http://www.w3.org/2001/XMLSchema">
  <xs:element name="GroupBox">
    <xs:complexType>
      <xs:sequence>
        <xs:element name="SlideSpeed">
          <xs:simpleType>
            <xs:restriction>
              <xs:simpleType>
                <xs:union memberTypes="xs:nonNegativeInteger">
                  <xs:simpleType>
                    <xs:restriction base="xs:string">
                      <xs:length value="0"/>
                    </xs:restriction>
                  </xs:simpleType>
                </xs:union>
              </xs:simpleType>
            </xs:restriction>
          </xs:simpleType>
        </xs:element>
        <xs:element name="Slides" maxOccurs="unbounded">
          <xs:complexType>
            <xs:sequence>
              <xs:element name="Image">
                <xs:complexType>
                  <xs:sequence>
                    <xs:element name="img" type="imgDesignType" minOccurs="0" />
                  </xs:sequence>
                </xs:complexType>
              </xs:element>
              <xs:element name="Title" type="xs:string" />
              <xs:element name="Summary" type="rich" />
              <xs:element name="Link">
                <xs:complexType>
                  <xs:sequence>
                    <xs:element name="a" type="aDesignType" minOccurs="0" />
                  </xs:sequence>
                </xs:complexType>
              </xs:element>
            </xs:sequence>
          </xs:complexType>
        </xs:element>
      </xs:sequence>
    </xs:complexType>
</xs:element> <xs:attributeGroup name="coreattrs"> <xs:attribute name="id" type="xs:ID" /> <xs:attribute name="class" type="xs:NMTOKENS" /> <xs:attribute name="style" type="xs:string" /> <xs:attribute name="title" type="xs:string" /> </xs:attributeGroup> <xs:attributeGroup name="i18n"> <xs:attribute name="lang" type="xs:language" /> <xs:attribute name="dir"> <xs:simpleType> <xs:restriction base="xs:token"> <xs:enumeration value="ltr" /> <xs:enumeration value="rtl" /> </xs:restriction> </xs:simpleType> </xs:attribute> </xs:attributeGroup> <xs:attributeGroup name="attrs"> <xs:attributeGroup ref="coreattrs" /> <xs:attributeGroup ref="i18n" /> </xs:attributeGroup> <xs:simpleType name="FrameTarget"> <xs:restriction base="xs:NMTOKEN"> <xs:pattern value="_(blank|self|parent|top)|[A-Za-z]c*" /> </xs:restriction> </xs:simpleType> <xs:complexType name="aDesignType" mixed="true"> <xs:sequence> <xs:any namespace="##any" processContents="skip" minOccurs="0" maxOccurs="unbounded" /> </xs:sequence> <xs:attributeGroup ref="attrs" /> <xs:attribute name="href" type="xs:anyURI" /> <xs:attribute name="target" type="FrameTarget" /> </xs:complexType> <xs:simpleType name="ImgAlign"> <xs:restriction base="xs:token"> <xs:enumeration value="top" /> <xs:enumeration value="middle" /> <xs:enumeration value="bottom" /> <xs:enumeration value="left" /> <xs:enumeration value="right" /> </xs:restriction> </xs:simpleType> <xs:simpleType name="Length"> <xs:restriction base="xs:string"> <xs:pattern value="[-+]?(d+|d+(.d+)?%)" /> </xs:restriction> </xs:simpleType> <xs:complexType name="imgDesignType"> <xs:attributeGroup ref="attrs" /> <xs:attribute name="src" use="required" type="xs:anyURI" /><xs:attribute name="alt" use="required" type="xs:string" /> <xs:attribute name="height" type="Length" /> <xs:attribute name="width" type="Length" /> <xs:attribute name="align" type="ImgAlign" /> <xs:attribute name="border" type="Length" /> <xs:attribute name="hspace" type="xs:nonNegativeInteger" /> <xs:attribute name="vspace" type="xs:nonNegativeInteger" /> </xs:complexType> <xs:complexType name="rich" mixed="true"> <xs:sequence> <xs:any namespace="##any" processContents="skip" minOccurs="0" maxOccurs="unbounded" /> </xs:sequence> </xs:complexType> </xs:schema>Use the Microsoft XML Schema Definition Tool to convert the XSD file into a C# class for use in serializing and deserializing data. Chapter 6 mentions where this tool could be found. It is run from the command line with the following syntax.
c:>xsd.exe HomePageBanner.xsd /classes /language:CS /namespace:SmartForm .HomePageBanner
Run that line now, after copying the HomePageBanner.xsd file to your C: drive. It generates a file called HomePageBanner.cs. A portion of this file is reproduced in Listing 7-2.
Example 7.2. AdRotator.cs
//-----------------------------------------------------------------------
// <auto-generated>
//     This code was generated by a tool.
//     Runtime Version:2.0.50727.3615
//
//     Changes to this file may cause incorrect behavior and will be lost if
//     the code is regenerated.
// </auto-generated>
//------------------------------------------------------------------------------

//
// This source code was auto-generated by xsd, Version=2.0.50727.3038.
//
namespace SmarForm.HomePageBanner {
    using System.Xml.Serialization;


    /// <remarks/>
    [System.CodeDom.Compiler.GeneratedCodeAttribute("xsd", "2.0.50727.3038")]
    [System.SerializableAttribute()]
    [System.Diagnostics.DebuggerStepThroughAttribute()]
    [System.ComponentModel.DesignerCategoryAttribute("code")]
    [System.Xml.Serialization.XmlTypeAttribute(AnonymousType=true)]
    [System.Xml.Serialization.XmlRootAttribute(Namespace="", IsNullable=false)]
public partial class GroupBox { private string slideSpeedField; private GroupBoxSlides[] slidesField; /// <remarks/> public string SlideSpeed { get { return this.slideSpeedField; } set { this.slideSpeedField = value; } } /// <remarks/> [System.Xml.Serialization.XmlElementAttribute("Slides")] public GroupBoxSlides[] Slides { get { return this.slidesField; } set { this.slidesField = value; } } } ...Now you have the basis for deserializing the homepage banner settings into an object that you can then databind to. The remaining steps are:
Create a repeater with the desired HTML structure.
Add some CSS.
Animate the results using jQuery.
The OnTrek site demonstrates this behavior in the default.aspx page, which then references a user control that lives at
~UserControlssliderslider.ascx. This user control contains all the code to build the slider interface, but for your efforts, you will create a new blank page that will recreate the functionality.Create a new page now in the root of your site called HomePageBannerSerialization.aspx.
Open the new page and put an ASP.NET Repeater Server Control on it.
Build the format for the HTML output. You have specific needs for the format of this output, since you are using an existing jQuery plug-in to create the slider effect.
For this plug-in, you need to output each frame to be displayed as an
liin aulelement. Within eachli, you need to display the title, summary, link, and background image for that frame. With that in mind, update the Repeater to match the output you need. You also need to add a Content Block Server Control so that you can retrieve the contents of the Ad Rotator Smart Form content item in order to deserialize it. The code to achieve this is shown in Listing 7-3.Example 7.3. HomePageBannerSerialization.aspx
<%@ Page Language="C#" AutoEventWireup="true"
    CodeFile="HomePageBannerSerialization.aspx.cs"
    Inherits="HomePageBannerSerialization" %>
<%@ Register Assembly="Ektron.Cms.Controls"
    Namespace="Ektron.Cms.Controls" TagPrefix="CMS" %>
<!DOCTYPE html PUBLIC "-//W3C//DTD XHTML 1.0 Transitional//EN"
 "http://www.w3.org/TR/xhtml1/DTD/xhtml1-transitional.dtd">

<html xmlns="http://www.w3.org/1999/xhtml">
<head runat="server">
  <title></title>
</head>
<body>
  <form id="form1" runat="server">
  <div>
    <CMS:ContentBlock ID="uxBannerContentBlock"
      runat="server" Visible="false" />
    <ul class="site-slider">
      <asp:Repeater runat="server" ID="uxBannerRepeater">
        <ItemTemplate>
          <li>
            <div class="content"
                 style="background: url('<%# DataBinder.Eval(
                                           Container.DataItem,
                                           "SlideImage")%>') no-repeat;">
              <div class="slideContent">
                <h1>
                  <%# DataBinder.Eval(Container.DataItem, "Title")%>
                </h1>
                <p>
                  <%# DataBinder.Eval(Container.DataItem, "Summary")%>
                </p>
                <p class="moreLink">
                  <a href="<%# DataBinder.Eval(Container.DataItem, "LinkUrl")%>">
                    <%# DataBinder.Eval(Container.DataItem, "LinkText")%>
                  </a>
                </p>
              </div>
            </div>
            <div class="clear">
            </div>
          </li>
        </ItemTemplate>
      </asp:Repeater>
    </ul>
  </div>
  </form>
</body>
</html>
Do the background data binding and ensure that the
SmartForm.HomePageBannerclasses are included properly. For this example, put the generated classes inline in the HomePageBannerSerialization.aspx codebehind. You will also hook into thePage_Loadevent to retrieve and deserialize the settings and do the databinding to the Repeater. This code is shown in Listing 7-4.Example 7.4. HomePageBannerSerialization.aspx.cs
using System;
using System.Collections.Generic;
using System.Linq;
using System.Web;
using System.Web.UI;
using System.Web.UI.WebControls;

public partial class HomePageBannerSerialization : System.Web.UI.Page
{
  protected void Page_Load(object sender, EventArgs e)
  {
    //Fill CB with SmartFormData//
    uxBannerContentBlock.DefaultContentID = 31;
    uxBannerContentBlock.Fill();
    string xml = uxBannerContentBlock.EkItem.Html;
    SmarForm.HomePageBanner.GroupBox groupBox = (SmarForm.HomePageBanner.GroupBox)
       Ektron.Cms.EkXml.Deserialize(
         typeof(SmarForm.HomePageBanner.GroupBox), xml);

    List<BannerSlide> slides = GetBannerSlides(groupBox.Slides);
    //DataBind//
    uxBannerRepeater.DataSource = slides;
    uxBannerRepeater.DataBind();
  }

  protected List<BannerSlide>
       GetBannerSlides(SmarForm.HomePageBanner.GroupBoxSlides[] groupBoxSlides)
  {
      List<BannerSlide> bSlides = new List<BannerSlide>();
      foreach (SmarForm.HomePageBanner.GroupBoxSlides gbSlide in groupBoxSlides)
      {
        bSlides.Add(new BannerSlide(gbSlide.Image.img.src, gbSlide.Title,
           gbSlide.Summary.Any[0].InnerText,
           gbSlide.Link.a.Any[0].InnerText, gbSlide.Link.a.href));
      }
      return bSlides;
  }

  public class BannerSlide
  {
    //properties//
    public string SlideImage { get; set; }
    public string Title { get; set; }
    public string Summary { get; set; }
    public string LinkText { get; set; }
    public string LinkUrl { get; set; }
//constructor// public BannerSlide(string slideImage, string title, string summary, string linkText, string linkUrl) { SlideImage = slideImage; Title = title; Summary = summary; LinkText = linkText; LinkUrl = linkUrl; } } } #region SmartForm.HomePageBanner autogenerated classesNote
For brevity's sake, this chapter has folded the autogenerated classes into the region marker at the end of the file. Aside from that, there are a number of moving parts in the codebehind. The first thing that happens is in the
Page_Loadevent; you set the Content Block Server Control on the declarative side to retrieve theHomePageBannercontent item. Then use theEkXmlobject to deserialize the object into your generated class.Note
This chapter uses the
EkXmlobject because it intelligently caches serializers. You could just as easily use the built-in serialization routines in System.Xml, but those are not logically cached in all situations, causing much longer page load times in certain circumstances. It also simplifies the calls into a single line versus the several lines necessary for a normal deserialization call using theSystem.Xmlobjects.The banner settings are then handed off to the
GetBannerSlidesmethod, which converts them into a list ofBannerSlideobjects. You do this intermediate step just to ease the databinding that takes place on the declarative side. Once that is done, simply set the list as the datasource for the repeater, and call databind. The repeater then converts the objects into your desired HTML.Now that the hard part is done, include some CSS and fire off some jQuery to convert the results into an actual rotating display. Of these two parts, you will use the CSS built for the homepage banner. On the jQuery side, the homepage uses a third party library called
bxSlider(available athttp://bxslider.com) to perform the animations. So in all, you will add two calls to register JavaScript files in the codebehind, and one call to register CSS in the codebehind. These lines should be put in thePage_Loadevent of the page as the first methods called in the event.
Ektron.Cms.API.JS.RegisterJS(this,
     "js/plugins/bxSlider/ektron.bxslider2.0.1.js", "EktronBxSliderJS");
Ektron.Cms.API.JS.RegisterJS(this,
"components/usercontrols/slider/ektron.site.slider.js", "EktronSiteSliderJS");
Ektron.Cms.API.Css.RegisterCss(this,
"components/usercontrols/slider/ektron.site.slider.css", "EktronSiteSliderCSS");The methods for registering client side scripts on a Web page are used for a couple of reasons. The register methods ensure that all registered files are only included once. They can additionally aggregate all registered files into a single JavaScript file and optionally minify the results.
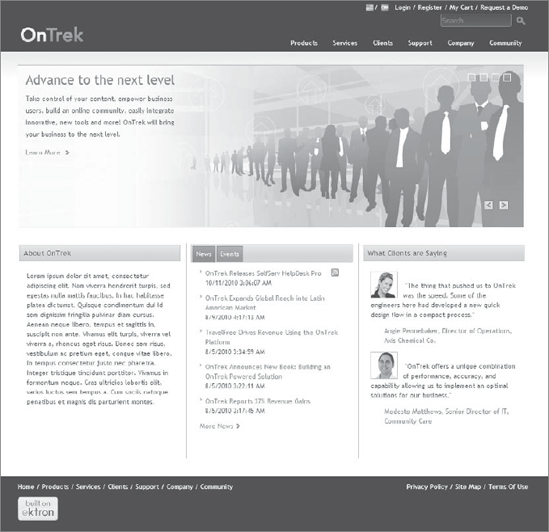
The first register call includes the bxSlider library. The second call includes the JavaScript required to initialize the bxSlider. Finally, include the CSS to render the whole thing properly. Now when the browser points to http://localhost/mainsite/homepagebannerserialization.aspx, the banner is displayed properly. The rotating image banner is shown rendered on the homepage in Figure 7-2.
The method covered in the previous section, using serialization and an ASP.NET Repeater Server Control to render the markup, is how the rotator built into the OnTrek starter site functions. In the interest of expanding your knowledge, you will now build the same example with a different approach. In this approach, you'll use an XSLT to transform the settings into HTML, and you won't use a pre-built jQuery plug-in. Instead, you'll write some custom jQuery to animate the results.
To create the custom XSLT, follow these steps:
Retrieve the XML for the settings content item. Log in to the Workarea, and in the content tree browse to
/MainSite/Content/Smart Forms/HomePageBanner.In the content list pane, select HomePageBanner and click the Edit icon.
When the data is published, it is saved as an XML document with a reference back to the Smart Form Design Package, which contains the automatically generated XSLT. Whenever the content is displayed through a Content Block Server Control, the XML is transformed against the built-in XSLT. Since that XSLT does not format the data as you want, you will write a custom XSLT for the content now. In order to do so, you need to look at the generated XML. At the bottom of the eWebEdit400 editor, there are two buttons

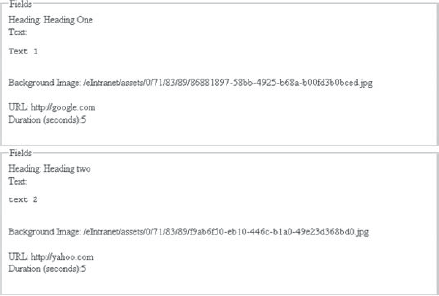
These buttons switch between the data designer view and the XML view. Click the second of these buttons now to view the automatically generated XML, and copy it to a text document for later reference. A portion of the generated XML is listed in the following code snippet.
<GroupBox>
  <SlideSpeed></SlideSpeed>
  <Slides>
    <Image>
      <img
      src="/OnTrek/uploadedImages/Content/Home/HomePageBanner/img-banner1.
png"
      alt="Banner1" />
    </Image>
    <Title>Lorem Ipsum</Title>
    <Summary>Vusce id nibh orci, sed tincidunt quam. Maecenas
    iaculis risus sed tortor tincidunt at egestas augue laoreet.
    Suspendisse consectetur, sem nec tempus elementum, felis lectus
    fermentum urna, id vehicula arcu turpis ac enim. Cum sociis
    natoque penatibus et magnis dis parturient montes, nascetur
    ridiculus mus. Vestibulum ante ipsum primis in faucibus orci
    luctus et ultrices posuere cubilia</Summary>
    <Link>
      <a href="http://www.Ektron.com">Learn More</a>
    </Link>
  </Slides>
  <Slides>
<Image> <img src="/OnTrek/uploadedImages/Content/Home/HomePageBanner/img-banner2. png" alt="Banner2" /> </Image> <Title>Vivamus vel metus vitae</Title> <Summary>Wusce id nibh orci, sed tincidunt quam. Maecenas iaculis risus sed tortor tincidunt at egestas augue laoreet. Suspendisse consectetur, sem nec tempus elementum, felis lectus fermentum urna, id vehicula arcu turpis ac enim. Cum sociis natoque penatibus et magnis dis parturient montes, nascetur ridiculus mus. Vestibulum ante ipsum primis in faucibus orci luctus et ultrices posuere cubilia</Summary> <Link> <a href="http://www.ektron.com">Learn More</a> </Link> </Slides> </GroupBox>Based on this XML, you need to output some simple HTML that can be read by indexing engines such as Google for SEO purposes. The HTML format you want to achieve is in the following code snippet.
<div class="rotator">
  <div class="panel"
    style="background-
      image:url(
      '/OnTrek/uploadedImages/Content/Home/HomePageBanner/img-banner1.png'),">
    <h1>Lorem Ipsum</h1>
    <p>
      Vusce id nibh orci, sed tincidunt quam. Maecenas
      iaculis risus sed tortor tincidunt at egestas augue laoreet.
      Suspendisse consectetur, sem nec tempus elementum, felis lectus
      fermentum urna, id vehicula arcu turpis ac enim. Cum sociis
      natoque penatibus et magnis dis parturient montes, nascetur
      ridiculus mus. Vestibulum ante ipsum primis in faucibus orci
      luctus et ultrices posuere cubilia
    </p>
    <a href="http://www.Ektron.com">Learn More</a>
  </div>
  <div class="panel"
    style="display:none;background-
      image:url(
      '/OnTrek/uploadedImages/Content/Home/HomePageBanner/img-banner2.
png'),">
    <h1>Vivamus vel metus vitae</h1>
    <p>
      Wusce id nibh orci, sed tincidunt quam. Maecenas
      iaculis risus sed tortor tincidunt at egestas augue laoreet.
      Suspendisse consectetur, sem nec tempus elementum, felis lectus
      fermentum urna, id vehicula arcu turpis ac enim. Cum sociis
      natoque penatibus et magnis dis parturient montes, nascetur
ridiculus mus. Vestibulum ante ipsum primis in faucibus orci luctus et ultrices posuere cubilia </p> <a href="http://www.ektron.com">Learn More</a> </div> </div>The elements in the HTML closely correspond to the elements in the XML. The items in the HTML should be self-evident.
Wrap the whole structure in a
divwith class rotator, and then that in turn contains panels. Each panel has a background image, and displays the heading, the text, and a link to more information. Then use jQuery to appropriately scroll through the items by hiding the current item and showing the next item.Next, you need to develop an XSLT that transforms from the XML into the format just discussed.
Finally, you need to add some minimal styles and JavaScript to animate the final rotator. The XSLT is listed in the following code snippet.
<?xml version="1.0" encoding="utf-8"?>
<xsl:stylesheet version="1.0"
   xmlns:xsl="http://www.w3.org/1999/XSL/Transform">
  <xsl:template match="/">
    <div class="rotator">
      <xsl:for-each select="/GroupBox/Slides">
        <div class="panel">
          <xsl:choose>
            <xsl:when test="position() != 1">
              <xsl:attribute name="style">
                display:none;background-image:url('<xsl:value-of
                                  select="Image/img/@src"/>'),
              </xsl:attribute>
            </xsl:when>
            <xsl:otherwise>
              <xsl:attribute name="style">
                background-image:url('<xsl:value-of
                                  select="Image/img/@src"/>'),
              </xsl:attribute>
            </xsl:otherwise>
          </xsl:choose>
          <h1>
            <xsl:value-of select="Title"/>
          </h1>
          <p>
            <xsl:value-of select="Summary"/>
          </p>
          <xsl:copy-of select="Link/a"></xsl:copy-of>
        </div>
      </xsl:for-each>
</div> </xsl:template> </xsl:stylesheet>
This XSLT is as simple as it can be while achieving the goals set here. After the header information, there is a single template, which matches the root of the document. Inside that template, there is a containing div element, which is the root of the output. Then do a for-each on the panels contained in the root node. Each panel is contained in a panel div. The panel div contains several other elements, like an h1, a p, and an anchor. Each of these elements contains the corresponding data. The choose acts as a switch based on whether or not the current panel is the first panel. In the case that it is, you simply set the background-image CSS property on the element. If it is not the first panel, then set the background-image property, but also mark the panel as invisible. You will then use jQuery to animate between them.
XSLTs can be very complex; fortunately there are many resources for learning more about writing them effectively. One point to consider that may assist your development efforts is how to debug an XSLT in Visual Studio. While this is not foolproof, as the Ektron Framework's internal XSL Transform engine can switch between two types of engines, it can frequently help a developer figure out just what is wrong with the transform.
To debug an XSLT in Visual Studio, you need to have a file for the input XML, and a file for the XSLT:
Take the XSLT shown in the previous section and save it into a file at
~XmlHomePageBannerRotator.xslt.Take the XML you copied from eWebEdit400, and save it to
~Xml HomePageBannerRotator.xml.Open both files in Visual Studio at the same time, and view the XSLT. In the Properties pane, one of the items listed is Input. This property informs Visual Studio where the XML file is against which it should perform the transform. This is shown in Figure 7-3.
Set the input to
C:Xml ia.xml.Test your transform by selecting XML
Note
Remember that .NET does not support XSLT 2. Ektron has worked around that by using the built in XSLT 1 engine by default for transforms, but using the bundled Saxon XSLT 2 processor for certain XSLT files that are marked appropriately. To signal to the Ektron Framework that your XSLT should be transformed via Saxon, you can either store the XSLT in a folder called "saxon," or you can include the line
<saxon></saxon>inside your XSLT. Remember that XSLT 2 files cannot be tested in Visual Studio.

Now that you have the XSLT you wish to use, you need to set up your code to use it. You created the first example in the file HomePageBannerSerialization.aspx. Now, follow these steps:
Add a new Web Form to the root of your site, and call it HomePageBannerXSLT.aspx.
Make sure that the language is set to Visual C#, and that the Place Code in Separate File checkbox is selected.
Once the file is created, drag a Content Block Server Control into the form element.
Set the
DefaultContentIDto the ID of the RIA Settings content item. For now, don't set theDisplayXSLTproperty. The code for HomePageBannerXSLT.aspx is shown in the following code snippet.<%@ Page Language="C#" AutoEventWireup="true" CodeFile="HomePageBannerXSLT.aspx.cs" Inherits="HomePageBannerXSLT" %> <%@ Register Assembly="Ektron.Cms.Controls" Namespace="Ektron.Cms.Controls" TagPrefix="CMS" %> <!DOCTYPE html PUBLIC "-//W3C//DTD XHTML 1.0 Transitional//EN""http://www.w3.org/TR/xhtml1/DTD/xhtml1-transitional.dtd"> <html xmlns="http://www.w3.org/1999/xhtml"> <head runat="server"> <title></title> </head> <body> <form id="form1" runat="server"> <div> <CMS:ContentBlock ID="SmartFormSettingsRetrieve" runat="server" DefaultContentID="31" /> </div> </form> </body> </html>Save the file and then load it in the browser at
http://localhost/OnTrek/HomePageBannerXSLT.aspx. The loaded page is shown in Figure 7-4.Note
The ContentBlock Server Control will use the default XSLT from the Data Design Package, which displays the data similarly to how it looked in the editor.
Set the Content Block Server Control to use the XSLT you developed. Set the property called
DisplayXSLTto the path~/xmlfiles/ HomePageBannerRotator.xslt. This modification is shown here:<CMS:ContentBlock ID="SmartFormSettingsRetrieve" runat="server" DefaultContentID="554" DisplayXslt="~/xmlfiles/HomePageBannerRotator.xslt" />Refresh the page in the browser to see the transformed HTML, as shown in Figure 7-5.
Clearly, you'll need some CSS to make this look right. The main thing you need to do is set the width and height of the panels to the size of the images you are displaying. On the homepage there are additional styles to set the font and display the text in appropriate places, but for this example you'll skip those complications.
Update the head of the HomePageBannerXSLT.aspx file to look like the following code snippet.
<head runat="server">
    <title></title>
    <style type="text/css">
        div.rotator {
           width:470px; height:296px; min-height:296px; }
        div.panel {
           background-position:center;
           background-repeat:no-repeat;
           width:470px; height:296px; }
    </style>
</head>
Finally, you need some JavaScript to do the actual rotation. The Ektron Framework internally uses jQuery for most of the client side heavy lifting, so you'll piggyback on that for your own code.
Remember that the Ektron copy of jQuery is renamed to
$ektronrather than$so it won't conflict with your code, but in all other respects it is effectively the same. The JavaScript to run the rotator is listed in the following code snippet.<script type="text/javascript" language="javascript"> //initialization of the rotator. We wrap it in the document ready so it //only runs after the entire DOM has been loaded. $ektron(document).ready(function() { if ("undefined" != typeof HomePageRotator) { //set up rotator HomePageRotator.setupRotator(); //set up callback to switch to second item. from then on, //the movenextrotator function will set up the timers. window.setTimeout( HomePageRotator.moveNextRotator, HomePageRotator.TimeOut) } }); //this will be our namespace for objects and //functions created for the rotator. if ("undefined" == typeof HomePageRotator) { var HomePageRotator = {Panels: {}, //this stores the set of panels to rotate through TimeOut: 3000, //this stores the length of time to show each panel CurrentItem: 0, //this is the panel currently being displayed setupRotator: function() { //set the panels property to the retrieved set of panels HomePageRotator.Panels = $ektron("div.panel"); }, moveNextRotator: function() { //current displayed panel var curItem = HomePageRotator.CurrentItem; //next panel to display var nextItem = curItem + 1; if (nextItem >= HomePageRotator.Panels.length) nextItem = 0; //Animate the fade out of the current panel. Once the //animation has completed, start fading in the next panel. //Wait until that animation has completed, then update the //current item pointer and set up the callback to perform //the action again once the timer has run out. HomePageRotator.Panels.eq(curItem).fadeOut(500, function() { HomePageRotator.Panels.eq(nextItem).fadeIn(500, function() { HomePageRotator.CurrentItem = nextItem; window.setTimeout( HomePageRotator.moveNextRotator, HomePageRotator.TimeOut); }); }); } }; } </script>

This JavaScript might be a little unfamiliar looking — you're using object oriented code for this. You can think of this in three chunks of code:
The first serves as the initialize, which only runs after the document has been loaded. This ensures when you run queries to find the panels, they exist in the DOM.
The second, as indicated in the comments, defines the namespace for your functions and variables. In it you store the panel set, the length of time to display each panel, and the current item that is displayed. You also have the
setupRotatorfunction, which sets thePanelsobject.The third is the
moveNextRotatorfunction, which animates the transitions between panels and sets up the callback to itself after the appropriate amount of time.
You've now created the image rotator for the homepage. This was a simple example of using JavaScript to create a richer interface than displaying static HTML would yield. A common need, however, is for the interface to dynamically update itself with fresh data based on user interaction.
In this example, you will create an interface that lists the child nodes of a taxonomy, and uses an AJAX call to retrieve the content items associated with the selected node. This particular set of functionality would typically be implemented through the use of the Directory Server Control, which does this out-of-the-box, but the example illustrates how to approach an AJAX requirement in an extensible way. The same approach can be used to create any interface that requires fast responses on the client page. In this example, you will do the following:
Create a page that renders the child nodes of a specified node.
Create a simple handler that accepts a JSON argument specifying the selected child node and returns a JSON object containing the list of items to display.
Modify the page to have a reusable template to display those items.
Create the JavaScript using jQuery to retrieve and render the children.
Start by creating a Web Form called SimpleHandler.aspx. Create this at the root of the site. The purpose of this file is to list the taxonomy nodes that are children of a given node. In this case, you will use the Taxonomies/OnTrek Site Navigation node, which has an ID of 189 in the default OnTrek database. The page you create will have three main elements on it:
A repeater to list the taxonomy nodes
A
divthat will be the container that you use to display the children of the selected nodeThe JavaScript to tie it all together
The code listing for SimpleHandler.aspx follows. In its current state it will display the ID of the clicked taxonomy node in the results div, as displayed in the following code snippet.
<html xmlns="http://www.w3.org/1999/xhtml">
<head runat="server">
  <title></title>
</head>
<body>
  <form id="form1" runat="server">
    <asp:Repeater ID="repeaterItemList" runat="server">
      <ItemTemplate>
        <a href="#" class="taxonomyLink" onclick="return false;">
          <span style="display:none;" class="taxonomyId">
            <%#
              DataBinder.Eval(Container.DataItem, "TaxonomyId")
            %>
          </span>
          <%#
            DataBinder.Eval(Container.DataItem, "TaxonomyName")
          %>
        </a>
        <br />
      </ItemTemplate>
    </asp:Repeater>
  <div id="ItemResults">
  </div>
<script language="javascript" type="text/javascript">
//initialization of the Taxonomy links.
//We wrap it in the document ready so it only runs
//after the entire DOM has been loaded.
$ektron(document).ready(function() {
if ("undefined" != typeof TaxonomyHandler) {
//When the link is clicked, fire the
//getTaxonomyItems handler.
$ektron("a.taxonomyLink").click(
TaxonomyHandler.getTaxonomyItems
);
}
});
//this will be our namespace for objects and functions
//created for the handler example.
if ("undefined" == typeof TaxonomyHandler) {
var TaxonomyHandler = {
getTaxonomyItems: function() {
//this function will look inside the clicked link
//to retrieve the id of the taxonomy item clicked.
//It will then display the taxonomy id in the results div.
var clickedAnchor = $ektron(this);
var taxonomyId = clickedAnchor.find("span.taxonomyId").text();
$ektron("div#ItemResults").html(taxonomyId);
}
};
}
</script>
</form>
</body>
</html>In the codebehind for the page, register the jQuery library to include it on the page, retrieve the children nodes using the API, and then databind the nodes to the repeater. This code is listed in the following snippet.
public partial class SimpleHandler : System.Web.UI.Page
{
  protected void Page_Load(object sender, EventArgs e)
  {
    //include jQuery library
    Ektron.Cms.API.JS.RegisterJS(
      this,
      Ektron.Cms.API.JS.ManagedScript.EktronJS
    );

    //set up objects we will use
    Ektron.Cms.API.Content.Taxonomy taxonomyAPI
      = new Ektron.Cms.API.Content.Taxonomy();
    Ektron.Cms.TaxonomyRequest taxonomyRequest
      = new Ektron.Cms.TaxonomyRequest();
    Ektron.Cms.TaxonomyData taxonomyData
      = null;
//initialize the taxonomyrequest object
//whether to include items or just sub nodes
taxonomyRequest.IncludeItems
= false;
//the taxonomy id to retrieve the children of
taxonomyRequest.TaxonomyId
= 189;
//the language of the items we should retrieve.
//set it to the currently selected language
taxonomyRequest.TaxonomyLanguage
= taxonomyAPI.RequestInformationRef.ContentLanguage;
//the taxonomy type
taxonomyRequest.TaxonomyType
= Ektron.Cms.Common.EkEnumeration.TaxonomyType.Content;
//get the taxonomy item and children
taxonomyData = taxonomyAPI.LoadTaxonomy(ref taxonomyRequest);
//ensure the result is good, and databind it to the repeater
if (taxonomyData != null && taxonomyData.TaxonomyHasChildren)
{
repeaterItemList.DataSource = taxonomyData.Taxonomy;
repeaterItemList.DataBind();
}
}
}Now that you have a page that lists the nodes, the next step is to create the handler to retrieve the children content of a selected node. You do this by following these steps:
Create a generic handler. You'll use a handler because it is significantly lighter than a full page in the .NET Framework. You then return results to the query through JSON.
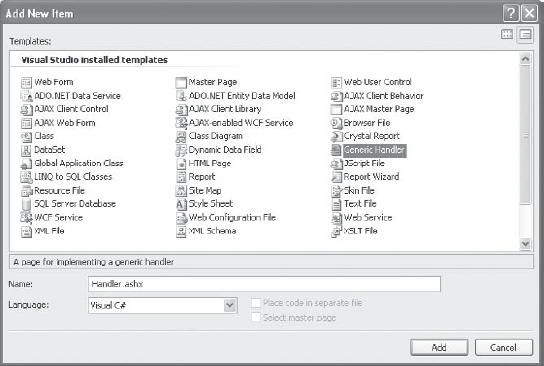
In the root of your site in Visual Studio, add a new item. Select Generic Handler for the template, and Visual C# as the language, as shown in Figure 7-6. Name it TaxonomyExampleService.ashx.
The code for this file uses the
DataContractJsonSerializerclass bundled with ASP.NET 3.5 to serialize the response and deserialize the request object. You also have the option at this point of using theSerialization.JavaScriptSerializerobject to serialize the JSON, but using aDataContracthas two large benefits:By marking the class as a
DataContract, you can serialize to anything that there is a serializer for, including XML.The
DataContractgives you additional flexibility because you can specify the property names to serialize to in the JSON object.
Using the standard serialization methods requires that you have a class definition for the objects being serialized. The first portion of the code is in the
RequestItemclass shown in the following code snippet.//this class is marked with the DataContract attribute //to specify that it is serializable. [System.Runtime.Serialization.DataContract] public class RequestItem { //this attribute marks that this property should be serialized. //the attached property specifies the parent taxonomy node of //the requested children. [System.Runtime.Serialization.DataMember] public long TaxonomyID { get; set; } //this static method will take the serialized //requestitem object and deserialize it public static RequestItem Deserialize(string serializedItem) { System.IO.MemoryStream memoryStream = null; //declare a new requestitem so we don't return a null object RequestItem requestItem = new RequestItem(); if (serializedItem != null) // ensure the argument string exists { //create a new serializer object System.Runtime.Serialization.Json.DataContractJsonSerializer requestItemSerializer = new System.Runtime.Serialization.Json.DataContractJsonSerializer( typeof(RequestItem)); try { //get the bytestream for the serialized object memoryStream = new System.IO.MemoryStream( System.Text.Encoding.Unicode.GetBytes(serializedItem)); //deserialize the object requestItem = requestItemSerializer.ReadObject(memoryStream) as RequestItem; } catch (Exception e) { throw new Exception("Could not deserialize request", e); } finally { //ensure the memorystream gets emptied memoryStream.Dispose(); } } else { throw new Exception("Request is null"); } return requestItem; } }The other class you need to define is
TaxonomyItem. The handler will return a generic list of these, each of which will store the content ID, title, and QuickLink for a content item. This class has aSerializeListmethod rather than a deserializer method, as you will serialize the list to return it to the requesting page. Otherwise it is very similar to theRequestItemclass. TheTaxonomyItemclass' code is listed in the following code snippet.//this class is marked with the DataContract //attribute to specify that it is serializable. [System.Runtime.Serialization.DataContract] public class TaxonomyItem { //the properties listed below store the relevant //data for a given piece of content. //each is marked as a serializable property. [System.Runtime.Serialization.DataMember] public long ItemID { get; set; } [System.Runtime.Serialization.DataMember] public string ItemName { get; set; } [System.Runtime.Serialization.DataMember] public string ItemQuicklink { get; set; } //the constructor takes all three properties to initialize the object public TaxonomyItem(long ID, string Name, string Quicklink){ ItemID = ID; ItemName = Name; ItemQuicklink = Quicklink; } //this method takes a list of taxonomyitems and serializes it as one unit. public static string SerializeList(List<TaxonomyItem> itemlist){ System.IO.MemoryStream memoryStream = null; string serializedList = ""; //the return value if (itemlist != null) //ensure the input is valid before continuing { //create the serialization object System.Runtime.Serialization.Json. DataContractJsonSerializer responseItemSerializer = new System.Runtime.Serialization.Json.DataContractJsonSerializer( typeof(List<TaxonomyItem>)); try { memoryStream = new System.IO.MemoryStream(); //serialize the object and then write it to the output string responseItemSerializer.WriteObject(memoryStream, itemlist); serializedList = System.Text.Encoding. Default.GetString(memoryStream.ToArray()); } catch (Exception e) { throw new Exception("Could not serialize results", e); } finally { memoryStream.Dispose(); } } return serializedList; } }Now that you have your input and output classes, you need to fill in the
ProcessRequestmethod, and also the code that actually retrieves the child content. You do this by:Writing the method to get the content. The method will be called
GetChildren, and is mostly a modified version of the taxonomy code you wrote to list the categories in the first place. The first modification to the earlier code is that you specify in theTaxonomyRequestobject to include content.Once you have the results, do not databind them to a repeater, but instead iterate over them building a
List<TaxonomyItem>to return from the method.
The code is listed in the following code snippet.
public List<TaxonomyItem> GetChildren(long taxonomyId)
{
  List<TaxonomyItem> contentItems = new List<TaxonomyItem>();

  //set up objects we will use
  Ektron.Cms.API.Content.Taxonomy taxonomyAPI
    = new Ektron.Cms.API.Content.Taxonomy();
  Ektron.Cms.TaxonomyRequest taxonomyRequest
    = new Ektron.Cms.TaxonomyRequest();
  Ektron.Cms.TaxonomyData taxonomyData
    = null;

  //initialize the taxonomyrequest object
  //whether to include items or just sub nodes
  taxonomyRequest.IncludeItems = true;
  //the taxonomy id to retrieve the children of
  taxonomyRequest.TaxonomyId = taxonomyId;
  //the language of the items we should retrieve.
  //set it to the currently selected language
  taxonomyRequest.TaxonomyLanguage
    = taxonomyAPI.RequestInformationRef.ContentLanguage;
  //the taxonomy type
  taxonomyRequest.TaxonomyType
    = Ektron.Cms.Common.EkEnumeration.TaxonomyType.Content;

  //get the taxonomy item and children
  taxonomyData = taxonomyAPI.LoadTaxonomy(ref taxonomyRequest);

  //ensure the result is good
  if (taxonomyData != null
    && taxonomyData.TaxonomyItems != null
    && taxonomyData.TaxonomyItems.Length > 0)
  {
    //iterate over the results, adding
    //converted items to the contentItems list
    foreach (TaxonomyItemData item in taxonomyData.TaxonomyItems)
    {
      contentItems.Add(
        new TaxonomyItem(
          item.TaxonomyItemId,
          item.TaxonomyItemTitle,
          item.TaxonomyItemQuickLink));
    }
  }

  return contentItems;
}
Add the
ProcessRequestmethod. This method is very straightforward; it simply deserializes the request item passed to the handler, callsGetChildren, and responds to the request with the serialized results. The code is listed in the following snippet.public void ProcessRequest (HttpContext context) { //we will return an empty string if there is a problem retrieving the //children.string serializedResult = ""; List<TaxonomyItem> results = null; //deserialize the request RequestItem request = RequestItem.Deserialize(context.Request["request"]); //get the child content items results = GetChildren(request.TaxonomyID); if (results != null) { //serialize the results serializedResult = TaxonomyItem.SerializeList(results); } context.Response.ContentType = "text/plain"; //write the serialized results context.Response.Write(serializedResult); }Now you have the complete code for your handler. Call this handler with an AJAX request from the Web page, specifying a single argument with the key request. That argument will be a serialized object containing the taxonomy ID. The complete code is reproduced in Listing 7-5.
Example 7.5. TaxonomyExampleService.ashx
<%@ WebHandler Language="C#" Class="TaxonomyExampleService" %>
using System;
using System.Web;
using Ektron.Cms;
using System.Collections.Generic;

public class TaxonomyExampleService : IHttpHandler {

  //this class is marked with the DataContract attribute
  //to specify that it is serializable.
  [System.Runtime.Serialization.DataContract]
  public class TaxonomyItem
  {
    //the properties listed below store the relevant
    //data for a given piece of content.
    //each is marked as a serializable property.
    [System.Runtime.Serialization.DataMember]
    public long ItemID { get; set; }
    [System.Runtime.Serialization.DataMember]
    public string ItemName { get; set; }
    [System.Runtime.Serialization.DataMember]
    public string ItemQuicklink { get; set; }

    //the constructor takes all three properties to initialize the object
    public TaxonomyItem(long ID, string Name, string Quicklink)
    {
ItemID = ID;
ItemName = Name;
ItemQuicklink = Quicklink;
}
//this method takes a list of taxonomyitems and serializes it as one unit.
public static string SerializeList(List<TaxonomyItem> itemlist){
System.IO.MemoryStream memoryStream = null;
string serializedList = ""; //the return value
if (itemlist != null) //ensure the input is valid before continuing
{
//create the serialization object
System.Runtime.Serialization.Json.
DataContractJsonSerializer responseItemSerializer
= new System.Runtime.Serialization.Json.DataContractJsonSerializer(
typeof(List<TaxonomyItem>));
try
{
memoryStream = new System.IO.MemoryStream();
//serialize the object and then write it to the output string
responseItemSerializer.WriteObject(memoryStream, itemlist);
serializedList = System.Text.Encoding.Default.GetString(
memoryStream.ToArray());
}
catch (Exception e)
{
throw new Exception("Could not serialize results", e);
}
finally
{
memoryStream.Dispose();
}
}
return serializedList;
}
}
//this class is marked with the DataContract
//attribute to specify that it is serializable.
[System.Runtime.Serialization.DataContract]
public class RequestItem
{
//this attribute marks that this property should be serialized.
//the attached property specifies the parent taxonomy node
//of the requested children.
[System.Runtime.Serialization.DataMember]
public long TaxonomyID { get; set; }//this static method will take the serialized requestitem
//object and deserialize it
public static RequestItem Deserialize(string serializedItem)
{
System.IO.MemoryStream memoryStream = null;
//declare a new requestitem so we don't return a null object
RequestItem requestItem = new RequestItem();
if (serializedItem != null) // ensure the argument string exists
{
//create a new serializer object
System.Runtime.Serialization.Json.
DataContractJsonSerializer requestItemSerializer
= new System.Runtime.Serialization.Json.DataContractJsonSerializer(
typeof(RequestItem));
try
{
//get the bytestream for the serialized object
memoryStream = new System.IO.MemoryStream(
System.Text.Encoding.Unicode.GetBytes(
serializedItem));
//deserialize the object
requestItem = requestItemSerializer.ReadObject(memoryStream)
as RequestItem;
}
catch (Exception e)
{
throw new Exception("Could not deserialize request", e);
}
finally
{
//ensure the memorystream gets emptied
memoryStream.Dispose();
}
}
else
{
throw new Exception("Request is null");
}
return requestItem;
}
}
public void ProcessRequest (HttpContext context) {
//we will return an empty string if there is a
//problem retrieving the children.
string serializedResult = "";
List<TaxonomyItem> results = null;
//deserialize the request
RequestItem request = RequestItem.Deserialize(
context.Request["request"]);//get the child content items
results = GetChildren(request.TaxonomyID);
if (results != null)
{
//serialize the results
serializedResult = TaxonomyItem.SerializeList(results);
}
context.Response.ContentType = "text/plain";
//write the serialized results
context.Response.Write(serializedResult);
}
public List<TaxonomyItem> GetChildren(long taxonomyId)
{
List<TaxonomyItem> contentItems = new List<TaxonomyItem>();
//set up objects we will use
Ektron.Cms.API.Content.Taxonomy taxonomyAPI
= new Ektron.Cms.API.Content.Taxonomy();
Ektron.Cms.TaxonomyRequest taxonomyRequest
= new Ektron.Cms.TaxonomyRequest();
Ektron.Cms.TaxonomyData taxonomyData
= null;
//initialize the taxonomyrequest object
//whether to include items or just sub nodes
taxonomyRequest.IncludeItems = true;
//the taxonomy id to retrieve the children of
taxonomyRequest.TaxonomyId = taxonomyId;
//the language of the items we should retrieve.
//set it to the currently selected language
taxonomyRequest.TaxonomyLanguage
= taxonomyAPI.RequestInformationRef.ContentLanguage;
//the taxonomy type
taxonomyRequest.TaxonomyType
= Ektron.Cms.Common.EkEnumeration.TaxonomyType.Content;
//get the taxonomy item and children
taxonomyData = taxonomyAPI.LoadTaxonomy(ref taxonomyRequest);
//ensure the result is good
if (taxonomyData != null
&& taxonomyData.TaxonomyItems != null
&& taxonomyData.TaxonomyItems.Length > 0)
{
//iterate over the results, adding converted
//items to the contentItems list
foreach (TaxonomyItemData item in taxonomyData.TaxonomyItems)
{contentItems.Add(
new TaxonomyItem(
item.TaxonomyItemId,
item.TaxonomyItemTitle,
item.TaxonomyItemQuickLink));
}
}
return contentItems;
}
public bool IsReusable {
get {
return false;
}
}
}Now you need to return to the SimpleHandler.aspx file to create the glue to retrieve and display these results. The first section you add to the SimpleHandler.aspx file is a div just below the repeater. This div is used by the JavaScript as a template for each item returned from the handler. There are other methods of handling this sort of templating, but we have found this method allows for the most flexibility to developers, and keeps the template as part of the HTML. The template then contains tokens that are replaced with the values from the handler. The HTML for the template is listed in the following code snippet.
<div id="ItemResults">
      <div id="ItemTemplate" style="display:none;">
        #ID#: <a href="#QUICKLINK#">#NAME#</a><br />
      </div>
      <div id="DisplayedItems"></div>
    </div>
Compared to the earlier version of this file, you modified the contents of the existing ItemResults div to contain a template container, as well as a div with ID DisplayedItems. This second div is what displays the results, rather than the outer div. The template div is styled to "display: none;" as it will not be displayed to the user.
Now you need to update the getTaxonomyItems method in the JavaScript to actually call the Web service, and update the displayed items div. The update JavaScript is listed in the following code snippet.
//initialization of the Taxonomy links.
//We wrap it in the document ready so it only runs
//after the entire DOM has been loaded.
$ektron(document).ready(function() {
  if ("undefined" != typeof TaxonomyWebService) {
    //When the link is clicked, fire the
    //getTaxonomyItems handler.
$ektron("a.taxonomyLink").click(
TaxonomyWebService.getTaxonomyItems
);
}
});
//this will be our namespace for objects and functions
//created for the handler example.
if ("undefined" == typeof TaxonomyWebService) {
var TaxonomyWebService = {
getTaxonomyItems: function() {
//this function will look inside the clicked link
//to retrieve the id of the taxonomy item clicked.
//It will then display the taxonomy id in the results div.
var clickedAnchor = $ektron(this);
//get the child span of the anchor-this contains the taxonomy id
var taxonomyId = clickedAnchor.find("span.taxonomyId").text();
//build the requestitem object
var requestItem = { 'TaxonomyID': taxonomyId };
//use the Ektron JSON library to serialize it
//and build the complete object to send to the handler.
var dataObject = { 'Request': Ektron.JSON.stringify(requestItem) };
//use the jQuery ajax method to perform an ajax call to the handler.
$ektron.ajax({
url: 'taxonomyexampleservice.ashx',
//this will cause jQuery to evaluate the return object as json
dataType: 'json',
type: 'POST', //the data should be sent as POST, not GET
data: dataObject, //the ItemRequest object
//the method to call when we get data back
success: TaxonomyWebService.updateDisplay
});
},
//the ajax method calls this when data is returned
updateDisplay: function(data, textStatus, XMLHttpRequest) {
//retrieve the template contents
var template = $ektron("div#ItemResults div#ItemTemplate").html();
//the string that will be built containing the html to display
var results = "";
for (var i in data) {
//perform string replacements for each token with the content
//of the results
var tmp = template;
tmp = tmp.replace(/#ID#/g, data[i].ItemID);
tmp = tmp.replace(/#QUICKLINK#/g, data[i].ItemQuicklink);
tmp = tmp.replace(/#NAME#/g, data[i].ItemName);
results += tmp;
}
//update the displayed items div with the constructed html
$ektron("div#ItemResults div#DisplayedItems").html(results);
}
};
}The changes in the JavaScript start with the addition of the AJAX call. You are setting the dataType to JSON so the results are evaluated, rather than returned as a string. You are also passing the dataObject as the POST data. The dataObject is comprised of a simple object you created, which you used the Ektron JSON library to serialize. Remember that to use the Ektron JSON library, you need to include the JSON file. The following code when placed in codebehind for this page does this.
Ektron.Cms.API.JS.RegisterJS(
  this, Ektron.Cms.API.JS.ManagedScript.EktronJsonJS);
The AJAX method also has a parameter called success which accepts a method. This method is set to updateDisplay. The updateDisplay method handles the templating output. With these changes your example is complete.
The complete code for the SimpleHandler.aspx file is shown in Listing 7-6.
Example 7.6. SimpleHandler.aspx
<%@ Page Language="C#" AutoEventWireup="true"
    CodeFile="WebService.aspx.cs" Inherits="WebService" %>

<!DOCTYPE html PUBLIC "-//W3C//DTD XHTML 1.0 Transitional//EN"
"http://www.w3.org/TR/xhtml1/DTD/xhtml1-transitional.dtd">
<html xmlns="http://www.w3.org/1999/xhtml">
<head runat="server">
  <title></title>
</head>
<body>
  <form id="form1" runat="server">
    <asp:Repeater ID="repeaterItemList" runat="server">
      <ItemTemplate>
        <a href="#" class="taxonomyLink" onclick="return false;">
          <span style="display: none;" class="taxonomyId">
            <%#
              DataBinder.Eval(Container.DataItem, "TaxonomyId")
            %>
          </span>
          <%#
            DataBinder.Eval(Container.DataItem, "TaxonomyName")
          %>
        </a>
        <br />
      </ItemTemplate>
    </asp:Repeater>
    <div id="ItemResults">
      <div id="ItemTemplate" style="display:none;">
        #ID#: <a href="#QUICKLINK#">#NAME#</a><br />
      </div>
      <div id="DisplayedItems"></div>
    </div>
    <script language="javascript" type="text/javascript">
//initialization of the Taxonomy links.
//We wrap it in the document ready so it only runs
//after the entire DOM has been loaded.
$ektron(document).ready(function() {
if ("undefined" != typeof TaxonomyWebService) {
//When the link is clicked, fire the
//getTaxonomyItems handler.
$ektron("a.taxonomyLink").click(
TaxonomyWebService.getTaxonomyItems
);
}
});
//this will be our namespace for objects and functions
//created for the handler example.
if ("undefined" == typeof TaxonomyWebService) {
var TaxonomyWebService = {
getTaxonomyItems: function() {
//this function will look inside the clicked link
//to retrieve the id of the taxonomy item clicked.
//It will then display the taxonomy id in the results div.
var clickedAnchor = $ektron(this);
//get the child span of the anchor-this contains the taxonomy id
var taxonomyId = clickedAnchor.find("span.taxonomyId").text();
//build the requestitem object
var requestItem = { 'TaxonomyID': taxonomyId };
//use the Ektron JSON library to serialize it, and build the complete
// object to send to the handler.
var dataObject = { 'Request': Ektron.JSON.stringify(requestItem) };
//use the jQuery ajax method to perform an ajax call to the handler.
$ektron.ajax({ url: 'taxonomyexampleservice.ashx',
dataType: 'json', //this will cause jQuery
//to evaluate the return object
type: 'POST', //the data should be sent as POST, not GET
data: dataObject, //the ItemRequest object
success: TaxonomyWebService.updateDisplay
//the method to call when
//we get data back
});
},
//the ajax method calls this when data is returned
updateDisplay: function(data, textStatus, XMLHttpRequest) {
//retrieve the template contents
var template = $ektron("div#ItemResults div#ItemTemplate").html();
//the string that will be built containing the html to display
var results = "";
for (var i in data) {
//perform string replacements for each token with the
//content of the results
var tmp = template;tmp = tmp.replace(/#ID#/g, data[i].ItemID);
tmp = tmp.replace(/#QUICKLINK#/g, data[i].ItemQuicklink);
tmp = tmp.replace(/#NAME#/g, data[i].ItemName);
results += tmp;
}
//update the displayed items div with the constructed html
$ektron("div#ItemResults div#DisplayedItems").html(results);
}
};
}
</script>
</form>
</body>
</html>Now visit http://localhost/OnTrek/simplehandler.aspx to see the completed page. As shown in Figure 7-7, the page first lists a set of links that correspond to the taxonomy nodes. When a user selects a link, the jQuery performs an AJAX call to the TaxonomyExampleService.ashx, where the request is deserialized and the child content is retrieved. The child content is then serialized and returned to the jQuery where it is evaluated and templated before being displayed as output.
You may have heard the phrase "content is king." The idea behind this is that the importance of quality content on a website is second to none. The better the information, the more likely you will have happy site visitors and growing traffic. But if content is king, then navigation is queen, because without navigational aids such as menus to direct site visitors to the content they're looking for, the content might as well not exist. Navigational structures such as menus make content accessible, and are therefore just as important as the content itself. It's no exaggeration to say that one of the most fundamentally important tasks for a developer is creating effective website navigation. Failing to create a well designed navigation will result in an overall decrease in your website's visitors, sales, conversions, and other metrics that define your website's success.
In the Implementation section, you'll learn to create the main navigation for the OnTrek website. This section focuses exclusively on the Ektron Menus feature and discusses strategies and best practices for using Ektron Menus. After reading this section, you'll understand what it takes to create a well designed navigation structure. You'll go through the process of implementing a globally accessible menu on the OnTrek website using the Ektron Flex Menu Server Control.
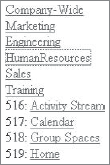
Let's start by covering the basics of Ektron menus. The term menu in this section refers specifically to the type of navigation structure that is created and managed using Ektron's Menu feature. Although you can use Ektron's other navigation aids, such as collections, to create single-level menu-like structures, this section covers only Ektron Menus.
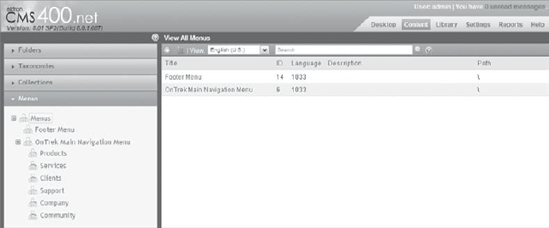
At a high level, creating a menu in Ektron is a two-phase process:
The menu hierarchy is created by content managers in the Workarea shown in Figure 7-8
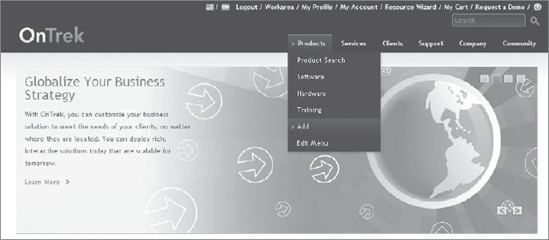
It is then displayed on the site by developers using a menu server control.
Once the menu is available through the website, further management of the menu (adding, updating, and removing menu items) happens in one of two ways. Since the server controls provides authenticated users with the GUI needed to do this, as shown in Figure 7-9, management can be done through the website itself or through the Workarea.
Note
To manage and create menu structures, CMS users need to be part of either the Administrators group (a CMS user belonging to the Collection and Menu Admin role) or be granted permissions to the collections on the root folder.
Menus contain links to managed content items, library assets, external hyperlinks, or other menus to create nested submenus. Because menus are language aware, you can create a language specific edition of any menu in each supported language. The main menu object itself has a number of properties that are defined through the menu creation process, such as a title, description, and an image link that controls the icon that appears on the Web page next to, or in place of, the menu item text.
To display a menu on the Web page, developers use one of the two Ektron Menu Server Controls:
The Flex Menu is extremely feature rich, has more configuration options and server control properties, and is therefore a bit more complex than its counterpart. The CMS Menu, on the other hand, has a minimalist feature set by design, and is less complex to set up and configure. Each menu has its pros and cons and which you choose should be determined by your project's requirements. Here are some things to keep in mind when choosing between the Flex Menu and the CMS Menu.
The Flex Menu's most prominent feature is its ability to intelligently highlight submenu items, based on the page that is being visited, when the page is loaded. For example, if a site visitor navigates directly to a website's "product page," the Flex Menu can automatically expand and highlight the appropriate submenu item. This is an extremely valuable feature — consider the annoyance site visitors often experience while navigating through a website using a standard hierarchical left-hand menu, only to have it collapse with each click and page refresh. Without auto-expanding menus, the site visitors have less indication of where they are in relation to the rest of the site and may miss opportunities to discover related information.
All the configuration information that determines which menu item to select is defined in the Workarea and executed by the server control, and therefore requires no custom coding. The server control derives which item to select based on a set of conditions that take into account both the menu's configuration options defined during the menu creation process and the data available at the page runtime, such as the page being visited and the ID of the content item displayed. The "Working with Menus" chapter of the Ektron Reference Manual lists the complete set of these rules; there are nine in all. It's a good idea to read through the complete list available in the Reference Manual before working with the Flex Menu, but the first two in the list are included here to give an understanding of what the rules look like.
The Flex Menu looks in the query string for parameters that indicate if a user has clicked on a menu item. If it finds the item, it marks all ancestor menus as selected and processing stops.
The Flex Menu looks in the query string to see if a query string parameter defining a Content ID or Form ID is present, and if so, checks to see if it matches an item in the menu. If a match is found, the item is selected and processing stops.
This type of processing continues through all of the nine rules listed in the Reference Manual. If a particular rule doesn't find a match, the processing continues to the next rule, otherwise it stops processing. Once all rules are executed, if no matches are found, the menu renders collapsed with no menu items selected. The processing rules are fixed and cannot be changed. However, the item that's selected is determined by your specific menu's configuration. The Flex Menu Server Control has a debug mode that logs information to help developers understand why the Flex Menu made a particular selection. The following steps describe the process of enabling this logging feature.
Open the website's web.config in a text editor.
In the system.diagnostics section, locate the setting for the LogLevel, and set it to verbose by using the value
"4", that is,<setting name="LogLevel" value="4"/>.The Flex Menu Server Control has a property called LogInfo that must also be set to True. This value is False by default. See Table 7-1 for an abbreviated list of Flex Menu Server Control properties. For a complete list, refer to the Flex Menu Server Control section of the Ektron Reference Manual.
Refresh the page and view the recent events in the system's event viewer.
Table 7.1. Flex Menu Server Control Properties
PROPERTY | VALUE | DATA TYPE |
|---|---|---|
When set to true, all open submenus close once a new submenu is expanded. When false, all open submenus remain open as new submenus are expanded. | Boolean | |
Specifies the amount of time in seconds that the menu's data is cached by the server control. | Double | |
The ID of the menu to display. | Long | |
The path to an XSLT file for rendering the menu. | String | |
When set to true, submenus expand once the cursor moves over them. When false, submenus appear only when clicked. | Boolean | |
When set to true, submenus will open automatically according to the menu configuration defined in the Workarea. When false, submenus do not automatically expand. | Boolean | |
When set to true, the default JavaScript is loaded. When false, it is not. You may want to set this to false if you're using a custom XSLT. | Boolean | |
When set to False, additional Add and Edit menu items are displayed and can be used from the site to further manage the menu. When set to True, the Add and Edit menu items are suppressed.. | Boolean |
The last thing to cover on the Flex Menu is controlling its presentation. The recommended method for styling the Flex Menu is to use CSS. There are a number of samples available in the CMS400Developer starter site (~/CMS400Developer/Developer/Menu/FlexMenu/) showing different menu styles achieved by changing exclusively the CSS, including rendering the Flex Menu horizontally (as used in a header navigation menu) and vertically (as used on a left-hand navigation menu).
Modifying the markup produced by the Flex Menu Server Control is achieved through modifying an XSLT file. Keep in mind that the default JavaScript produced by this control expects its HTML markup to conform to a particular schema. So if you decide to modify the markup through the XSLT, you'll also want to write your own JavaScript for manipulating it. This also requires an understanding of the XML structure produced by the Flex Menu Server Control, which contains attributes noting things such as a particular item being selected. This approach is demonstrated as you implement OnTrek's global navigation menus.
There is much less to say about the second of the two menu server controls since the CMS Menu Server Control does not try to solve the problem of auto-expanding menu items, and as such, is much more simplistic in its implementation. The CMS Menu renders the menu structure into the page and provides the markup, CSS, and JavaScript for default click event handling. If you don't need the menu to open itself, this is the menu to use. This control also allows you to modify its markup by modifying its default XSLT. However, in this case, the XML is simplified since it does not contain the same markup elements to denote when a menu item is selected. The benefit of using this control is that there is little overhead since it does not auto-expand menus. The obvious drawback of using this control is that your site visitors need to drill back into the menu each time the page loads, or you will need to write your own expansion logic.
There are three CMS Menu Server Control samples included in the CMS400Developer Menu section. Two of them include JavaScript for their demos: One is the local file called CSSMenu.js, and the other is the Workarea file ~/Workarea/java/cmsmenuapi.js. Both of these files are short and only a few JavaScript functions. The third sample (menu.aspx) does not include any JavaScript and does not open or close; it renders fully open.
Note
You may have seen or used the DHTML Menu Server Control before. This is a legacy menu that is still supported for upgrades and backwards-compatibility, but it should otherwise not be used. If you're using the DHTML Menu Server Control and have the opportunity to revisit old code, it's best to upgrade to either the CMS Menu or the Flex Menu. The Smart Menu Server Control, which was available in earlier versions of Ektron, has also been deprecated. You should not use the DHTML Menu or the Smart Menu, and instead, use the CMS Menu or the Flex Menu.
Now that you understand the basics of how to create a menu and how to render the menu on the site using either one of two menu server controls, let's go into more depth on the menu configuration options that influence which menu item is automatically selected when using the Flex Menu Server Control. Since the CMS Menu does not provide the auto-expanding capabilities of the Flex Menu Server Control, the Folder and Template Associations described next are ignored by the CMS Menu. You should know which type of menu you plan on using on your website prior to creating the structure in the Workarea, since one requires more configuration information than the other.
As discussed earlier, a menu can contain links to content items, library assets, external hyperlinks, or submenus. The Add Menu Screen in Figure 7-10 shows the fields available when choosing to add a new menu (or submenu).
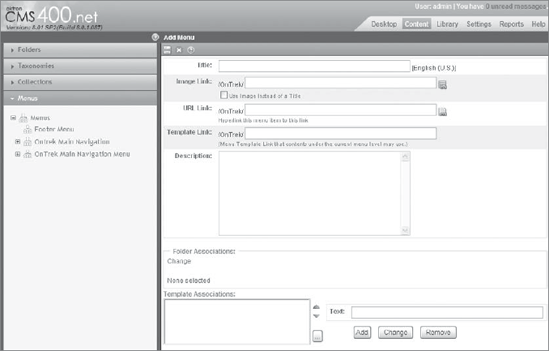
The field values are described in the Table 7-2. The final two fields, Folder Associations and Template Associations, are described outside of the table.
Table 7.2. Fields on the Add/Edit Menu Screen
FIELD | DESCRIPTION |
|---|---|
Title | The label that displays in the menu on the Web page. |
Image Link | The image that appears next to, or in place of, the title. This field is optional. |
URL Link | The URL that defines the hyperlink for the Title and Image Link. This field is optional. |
Template Link | This field applies to content only and defines the template used for all content on this menu. This field is optional. Not specifying a Template Link means the content's QuickLink is used. |
Description | The description of the menu used mostly in the Workarea. |
Folder Associations | See the following section. |
Template Associations | See the following section. |
The Folder Associations field and The Template Associations field are applicable only to the Flex Menu and provide it with the information needed by the Flex Menu to control which items are selected by default. Folder associations are used to instruct the menu to automatically expand when a user visits a page containing a content item that lives in the specified folders. For example, if you associate the menu to the /MainSite/Pages/Products folder, and a user navigates to any content item that resides in this folder, the Flex Menu automatically displays the items on the associated submenu. The template associations are used in a similar way. They allow you to instruct the menu to automatically expand when a user visits a page that uses the specified template. For example, suppose you have a template called ProductDetails.aspx that provides a detailed description for a given product, and you associate this template to the Products Menu. Any time a visitor travels to the Product Details template, the Flex Menu automatically displays the Products menu.
Designing your menu structure up front will help avoid a couple of painful pitfalls when working with the Flex Menu. These include creating nested associations that result in unexpected content from expanding, or creating impossible conditions that prevent any menus from expanding. If you run into such a situation, refer back to the steps described in earlier sections to enable its verbose logging.
There are two ways to create the menu structure in the Workarea. The first is through the Workarea's Content
The OnTrek website uses a persistent global navigation that displays in the header of each page on the site. The following steps walk through the process of creating a subset of the "Our Company" menu shown in Figure 7-11.
To create a new menu item via the Menus tab, follow these steps.
From the Workarea
In the Add Menu screen, shown in Figure 7-10, provide the title: OnTrek Main Navigation and leave all other fields blank.
To add items to this menu, click the Add button

Click the radio button next to Submenu and click Next.
In the Add Menu Item screen, provide the title Our Company and leave the other fields blank.
To add items to the "Our Company" submenu, click the Add button.

Click the radio button next to Content Item and click Next.
From the Add New Item "Our Company" screen, select the Contact Information item, then click the Save button.


If you've installed the OnTrek Starter Site, the complete navigation structure will already exist in the database.
The global navigation of the OnTrek website is located in the header section of each page on the site. You will now use a single Flex Menu rendered horizontally and placed in the website's master page. This implementation will use a custom XSLT to modify the markup, and also use the jQuery Superfish plug-in to provide its styling and subtle animations.
From Visual Studio, open
~/templates/masterpages/main.aspx.Place the Flex Menu Server Control onto the page by dragging and dropping from the Visual Studio Toolbox into the header region of the template, just after the opening
BODYtag. Use the following Flex Menu parameter values to guide your implementation.<CMS:FlexMenu ID="uxMenu" runat="server" DefaultMenuID="6" DisplayXslt="~/components/usercontrols/menu/lightweight.xsl" WrapTag="div" AutoCollapseBranches="True" StartCollapsed="True" EnableMouseOverPopUp="False" EnableSmartOpen="False" StartLevel="1" MenuDepth="0" EnableAjax="False" MasterControlId="" CacheInterval="600" IncludeJS="false" />Note
In this snippet, you can see that the
DefaultMenuIDis 6, which points to the ID of the root of the OnTrek menu created in the Workarea. Also note how the Flex Menu specifies its custom XSLT through theDisplayXsltproperty and then suppresses the output of the default JavaScript by setting theIncludeJSattribute to False. Custom JavaScript is needed anytime the Flex Menu's HTML is customized, as mentioned earlier, since the default JavaScript looks for HTML that conforms to a particular schema.Internally the Flex Menu Server Control receives the menu structure from the business tier in the following XML format. The custom XSLT is used by the Flex Menu to transform this XML into HTML, as shown in the following code snippet:
<MenuDataResult>
  <Info>
    <ControlMenuId>6</ControlMenuId>
    <CssFileName></CssFileName>
    <XslFileName>/OnTrek/components/usercontrols/menu/lightweight.xsl</XslFileName>
    <WrappingClassName></WrappingClassName>
    <ControlId>uxMenu</ControlId>
    <ControlIdHash>e6aab43b8</ControlIdHash>
    <MasterControlIdHash></MasterControlIdHash>
    <GroupId></GroupId>
    <AppPath>/OnTrek/WorkArea/</AppPath>
    <SitePath>/OnTrek/</SitePath>
    <ButtonNoScriptLink>http://ws10247/OnTrek/default.aspx</ButtonNoScriptLink>
    <AjaxEnabled>false</AjaxEnabled>
    <MenuFragment>false</MenuFragment>
<AutoCollapseBranches>true</AutoCollapseBranches> <StartCollapsed>true</StartCollapsed> <EnableSmartOpen>false</EnableSmartOpen> <EnableMouseOverPopUp>false</EnableMouseOverPopUp> <IsSlaveControl>false</IsSlaveControl> <StartLevel>1</StartLevel> <MenuDepth>0</MenuDepth> <SelectLevel>-1</SelectLevel> <SelectMenuIdString></SelectMenuIdString> <SelectItemIdString></SelectItemIdString> <SlaveStartLevelIds></SlaveStartLevelIds> <DefaultMenuIdString></DefaultMenuIdString> <SWRevision>8.0.0.073</SWRevision> <CacheInterval>600</CacheInterval> <UseCssHardLink>true</UseCssHardLink> <UseJavascriptHardLink>false</UseJavascriptHardLink> </Info> <Item> <Item> <ItemId>7</ItemId> <ItemType>Submenu</ItemType> <ItemSubType>0</ItemSubType> <ItemTitle>Products</ItemTitle> <ItemDescription></ItemDescription> <ItemImage></ItemImage> <ItemImageOverride>false</ItemImageOverride> <ItemSelected>false</ItemSelected> <ItemLevel>1</ItemLevel> <ItemIdString>e6aab43b8_6_7_7</ItemIdString> <Menu> <MenuId>7</MenuId> <Title>Products</Title> <Template></Template> <Type>content</Type> <Link></Link> <ParentId>6</ParentId> <AncestorId>6</AncestorId> <FolderId>0</FolderId> <Description></Description> <Image></Image> <ImageOverride>false</ImageOverride> <MenuIdString>e6aab43b8_6_7</MenuIdString> <MenuSelected>false</MenuSelected> <MenuLevel>1</MenuLevel> <ChildMenuSelected>false</ChildMenuSelected> <ChildMenuSelRelDepth>0</ChildMenuSelRelDepth>Copy the lightweight.xsl file from your samples directory into the
~/compontents/ usercontrols/menu/directory.Open this XSLT and see how it uses various templates for matching and transforming the XML.
In the CMS400Developer starter site, there are several fully functioning code samples showing various ways to use the Flex Menu and the CMS Menu (~/CMS400Developer/Developer/Menu/). These samples are shown in Tables 7-3 and 7-4
Table 7.3. Example Customizations of the CMS Menu
SAMPLE | DESCRIPTION |
|---|---|
Cms:Menu control | Demonstrates displaying the markup using the default XSLT, which creates an unordered list using |
Cms:Menu control Tree | Uses CSS to style the default Tree-XSLT as a navigable tree, without the use of JavaScript. |
Cms:Menu control Tree 2 | Displays the markup using the internal Unordered-List-XSLT together with styling from CSSMenu.css and client-side control from CSSMenu.js. |
Cms:Menu control as XML | This demonstrates how to display the control's XML, using the internal Unordered-List-XSLT (default) and a literal control; the codebehind sets the menu to invisible and copies the controls XML to the literal control for viewing. |
Table 7.4. Example Customizations of the Flex Menu
SAMPLE | DESCRIPTION |
|---|---|
Lightweight Menu | Largely follows the implementation steps of this chapter, though it may be useful as a starting point for future projects, as it uses a minimal yet functional JavaScript and XSLT files. |
Expanding | Demonstrates how to use CSS exclusively to render the Flex Menu as a vertically oriented accordion menu. |
Horizontal | Shows how to configure the Flex Menu to render horizontally for use in a header navigation. |
508 Compliance | This sample shows how to render the Flex Menu in such a way that it is Section 508 compliant to ensure visually impaired site visitors can access and navigate the menu structure. |
In addition to these samples, there is another called the Master Slave Menu sample that demonstrates a specific configuration of the Flex Menu commonly implemented. The Master Slave Flex Menu is a two-part menu system that uses two Flex Menus together on a single page. Before getting into the code sample, let's clarify its purpose and outline its approach.
The first of the two menus is the Master located in the page header, rendered just like the horizontally oriented navigation menu you created for the OnTrek website. The second of the two menus is located in the left-hand navigation area of the page, and renders vertically like an accordion menu, as shown in the CMS400Developer starter site in Figure 7-12.

The Master menu renders the entire first level of the menu horizontally while the Slave menu renders the first level and its children vertically. The Slave is called such because it follows the lead of the Master and automatically expands based on the item selected from the Master menu. So for example, if you click Departments
The ASP.NET Master Page is basic and it is simply used to render the Master Flex Menu horizontally. Use the following code snippet.
<cms:FlexMenu
                    ID="TopMenu"
                    runat="server"
                    DefaultMenuID="89"
                    EnableMouseOverPopUp="True"
                    EnableSmartOpen="False"
                    Stylesheet="top_horizontal.css"
                    DisplayXslt="Demo.xsl"
                    CacheInterval="0"
                    />
There are two tricks to getting the Slave Flex Menu to expand automatically.
The brute force approach: This uses a separate ASP.NET template for each second level node in the navigation menu and manually sets the
StartMenuIdparameter to the ID of the submenu item to expand. Note that thisStartMenuIdparameter does not need to be the root of the menu. Then, you configure your menu in the Workarea to expand (using the Template Associations described earlier) using a URL that references each of these ASP.NET templates. Use the following code snippet.<cms:FlexMenu ID="SideMenu" runat="server" DefaultMenuID="89" StartMenuId="91" EnableSmartOpen="True" Stylesheet="side_expand.css" DisplayXslt="Demo.xsl" CacheInterval="0" />Some codebehind required: This uses a single ASP.NET template and dynamically sets the
StartMenuIdin programmatically based on rules that you have to define and manage in your codebehind.
The CMS400Developer sample has a complete working sample for you to analyze and use as a starting point for your own Master Slave Flex Menu implementation.
Search is an important part of your website's navigation and fills a specific void not handled by the other navigation aids previously discussed. The importance of search appears to be well understood, given that almost all companies report search as one of the primary means of navigation on their sites. Unfortunately, as the study "Enriching Search: Efficiency Without Spending," by Jupiter Research found out, almost 70 percent of all visitors using site search report that their searches yielded useless information.
Deploying a successful site search requires more than simply making the Search textbox available on a Web page. This is where search-strategy planning comes in. Developing a search strategy requires you to consider the information needs of your site visitors and the information architecture of the website, and to understand what information is not readily available through the website's navigation structures. A successful search strategy takes these factors into account, uses search analytics to monitor its effectiveness, and tweaks the results in response regularly. The Ektron Framework provides technology to complement this process. This section discusses how a site search strategy can be used to ensure that your site search is effectively providing site visitors with the information they want.
Starting with Ektron version 8.5, Ektron's search technology leverages the Microsoft search stack. The 8.5 release featured a major architectural overhaul of search, replacing its previous search implementation which relied on Microsoft Index Server and redesigned it to leverage Microsoft's state of the art search technology.
Making sure that all information is accessible through a search interface is the most obvious and critical part of any search strategy. Ektron's core search engine satisfies this requirement by providing full text search for content such as HTML, Microsoft Office Documents, Smart Forms, and Shockwave Flash files. When content is published into the system, it is indexed and becomes available to site visitors through widgets, server controls, and any other code using Ektron's search APIs. All types of managed content, including those previously listed and community generated content, such as blog posts and discussion board topics, are indexed by default, as are searchable metadata values if any have been defined (see the metadata section in Chapter 5). If there are cases where you want to exclude particular content items from the search result, you have the ability to remove them by selecting the Content Searchable checkbox shown in Figure 7-13.

In addition to full text searches, Ektron also offers the ability to perform structured searches through the XML fields stored in Smart Form Designs (see the Smart Forms section in Chapter 6), taxonomy categories, as well as through searchable metadata definitions associated to content. Structured search is useful when you want to retrieve and filter data by a specific field, such as ContentType or ContentID. Combining both structured and full-text search is extremely powerful and lets you formulate queries equivalent to "get only PDF documents that contain the text OnTrek."
Continuing with the thread of making all information accessible through search is using Ektron's Integrated Search to include content from an external repository. Integrated Search is a natural fit when you have directories filled with files such as unmanaged HTML or Word documents in the server's file system (or accessible through a virtual path) and want them included in the search index.
To include a folder in the search index, follow these steps:
Click Workarea's Settings
Click the Add Icon

Ektron's social networking functionality demonstrates how Ektron Search can be used to search for people, colleagues, and community groups. The CommunitySearch Server Control allows you to find users by name and customize user properties, such as what department you work in, or your favorite type of food. There are also APIs available for retrieving this type of information about users and groups; these are discussed in more detail in Chapter 10 along with the rest of the community framework.
Knowing what people are searching for and understanding whether their searches are successful are essential parts of establishing an effective search strategy. The first part of this is straightforward. Start by looking at what search phrases people are using to find information. Ektron's Search Phrase Report displays a unique list of all the terms entered by site visitors, along with a count representing the number of times a term was used in a search, sorted in descending order with the most popular search terms at the top of the list.
To find this report, do the following:
This report is found in the Workarea by going to Reports
Click Search Phrase Report. You can see the form used to generate the report in Figure 7-14.
To make the most of the data, you need to filter the results. You can do this by specifying a date range, a particular language, the minimum number of occurrences of the term, and whether or not you want to include terms from the Workarea or the website, or both.
Determining whether a particular search was successful using the Search Phrase Report is not always easy. The crux of the issue is that it's close to impossible to determine whether a search is successful simply by identifying the search term and determining whether the searcher clicked on the result. This is because the search term alone does not give an accurate picture of a searcher's intent. Even still, there are a number of warning flags to look out for in this report that can indicate potential problems. These are discussed in detail in the following sections.
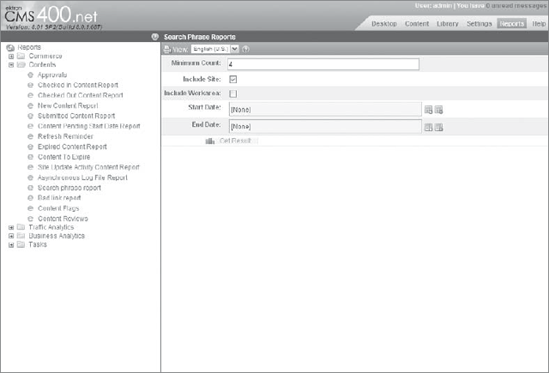
This could indicate an obscured or improperly positioning Search textbox. Do people recognize that search is available? You will most certainly have unhappy visitors if they don't recognize that search is a part of your navigation strategy. Offer search as part of your global navigation. Either put a Search box or a link to one on the global navigation header on every page of your site.
These are searches resulting in two sets of results, each with completely different meanings. For example, a search for the term "Saturn" might indicate a search for information on the planet, but might also be a term used by someone researching a car. The WebSearch Server Control has a property called ShowCategories that, when set to True, displays a navigable category tree when a search term is entered that exists in a taxonomy. To return to the Saturn example, assuming your content was categorized appropriately in a taxonomy and the ShowCategories property was set to True, the "Filter by Category" link would appear and display choices allowing the visitor to filter by Automobiles or Planets. If no content in the search results are assigned categories, the "Filter by Category" link would not appear. This feature provides a nice way to disambiguate queries as well as help site visitors filter search results when a site search returns too many results.
When this situation does occur, you have the opportunity to do a few things:
Adding a collection: Because a page with no results is typically a dead end, it's a good idea to give the site visitor some further search instruction or a list of potentially useful links. You might use a collection here to provide editorial control over which links are available.
Logging the event: You might want to consider logging this event in some way. The Search Phrase Report currently does not provide a report detailing search terms that yield no results, but this is forthcoming. In the meantime, this is a situation that is easily detected and logged. On the search results page, evaluate the number of search results available. If no results are returned, you can use standard .NET logging to capture the search term. Evaluate this information to determine why no results are returned. Is content missing? Are phrases commonly misspelled?
One common way to deal with common misspellings is to use Ektron's synonym search feature. When you create a set of synonyms, Ektron searches for all terms in the set when a site visitor searches for any of the terms. You can create a synonym set to contain each of the misspellings of the name, product or object, so that users who searched for those misspellings receive results containing the correct spelling. For example, assume that OnTrek has a common misspelling of OnTerk (notice the transposed 'e' and 'r'), which yields no results. Creating a synonym set containing the set {OnTerk, OnTrek} yields the same results, even when someone searched using an incorrect spelling. In addition to handling common misspellings, synonym search is also often used to:
Expand acronyms: For example, a synonym set could contain the terms {Web CMS, Web Content Management, WCMS}.
Create common word stems: Unless wildcards are used explicitly, search does not perform stemming or pluralize nouns. For example, if you think a site visitor might enter {run, running, runs} enter that set as a synonym set.
The following steps walk through the process of creating a synonym set for the misspellings, OnTech and OnTeck.
Note
You must be a member of the Administrators Group or assigned the Search Admin role to create, edit, and delete Synonym Sets.
In the Workarea, go to Settings, Configuration
Click the Add Icon

Give the synonym set a meaningful name. This is only used for identifying the search set in the Workarea.
Add the terms OnTech Plus and OnTeck Plus.
Click the Check for Duplicates button. This compares terms in this set against the other synonym sets in this language.
Click Save

An additional way to deal with misspellings is to use the Did You Mean Search Widget available through the Ektron Developer Exchange site. According to the developer of the widget, this component "provides a list of terms similar to the terms a visitor performs a search on. Additionally, CMS Administrators can promote items to Suggested Results or set a content item as unsearchable from within the display of items returned. The Did-You-Mean terms are generated from your website content, ensuring only relevant terms are returned. Each term in this result set has a corresponding number (displayed in parentheses), which represents the number of items associated with that term." This widget is available for free on the Ektron Exchange at http://dev.ektron.com/exchange/codeDownload.aspx?id=30638.
When site visitors use overly general search terms, they do not produce meaningful search results. Ektron's Suggested Results feature can be used here to force certain results to the top of the search results for specific queries.
You add a suggested result through the Workarea. Once a suggested result has been created, it is available immediately through all search APIs and server controls.
Note
You must be a member of the Administrators Group or assigned the Search-Admin role to create, edit, and delete Suggested Results.
From the Ektron CMS400.NET Workarea, go to Settings
From the language dropdown, select a language for the suggested results.
Click the Add button

Provide a title, link, and text, or browse to select an existing content item.
Click Save

You need to look for the presence of popular search terms that exist prominently in your primary navigation. This is because a high correlation between the Phrase Report and your primary navigation may indicate a possible flaw in the navigation's organization and design. Use this information as a call to action to perform another round of quick informal task-based usability testing on your menu navigation. Search should not be used as a crutch for poorly designed information architecture.
The OnTrek website follows the best practice recommendation of making search globally accessible by placing a search textbox in the header on each page of the website. The implementation has two parts:
The search textbox placed on the website's master page
The page that handles the form submit, performs the search, and displays the results
The SiteSearch Server Controls are used to display the search results and the following steps show how to configure SiteSearch Server Controls to handle submitting queries to another page. To see how this is implemented on the OnTrek website, start by looking at the global header code:
Open ~componentsuserControlsheaderheader.ascx.
Navigate to the bottom of the file, you'll find the following snippet:
<asp:TextBox ID="inputText" runat="server"></asp:TextBox>
Insert IconMargin   [FILENAME]
       <asp:LinkButton ID="search" runat="server" Text="Search"
  onclick="search_Click" />
code snippet header.ascx
In this snippet you can see the code that defines the look and feel of the Search textbox, which is very basic but which you can customize in any way you need. To force the search results to display on a separate page, the onclick property is used to reference the search_Click event handler, whose implementation can be seen in the following snippet:
protected void search_Click(object sender, EventArgs e)
    {
       Response.Redirect("~/SearchResults.aspx?q=" +
         Server.UrlPathEncode(inputText.Text));
    }
The SearchResults.aspx page then has the sole job of rendering search results for the search query that is passed to in the query string. The complete source code for the SearchResults.aspx.cs code-behind file is shown in code Listing 7-7.
Example 7.7. ~/SearchResults.aspx.cs
using System;
using System.Collections.Generic;
using System.Linq;
using System.Web;
using System.Web.UI;
using System.Web.UI.WebControls;
using Ektron.Cms.Controls;

public partial class SearchResults : System.Web.UI.Page
{
    protected void Page_PreRender(object sender, EventArgs e)
    {
        string searchText = Request.QueryString["q"];
        TextBox inputText = searchInput.FindControl("inputText") as TextBox;
        inputText.Text = searchText;

        searchDataSource.QueryText = searchText;
        searchResults.DataBind();
    }

    protected void search_Click(object sender, EventArgs e)
    {
        LinkButton searchButton = sender as LinkButton;
        TextBox inputText =
            searchButton.NamingContainer.FindControl("inputText") as TextBox;
        searchInput.BasicQuery(true, inputText.Text);
    }
}
Reviewing the code in Listing 7-7 reveals that the SearchResults.aspx has two server controls on it, one defining a datasource, and the other displaying the results. The relevant aspects of the SearchResults.aspx template are shown in the following snippet, showing how these server controls are used.
<CMS:SiteSearchInput
            ID="searchInput"
            DataSourceID="searchDataSource"
            runat="server">
            <ItemTemplate>

                <asp:TextBox
                    ID="inputText"
                    runat="server">
                </asp:TextBox>
                <asp:LinkButton
                    ID="search"
                    runat="server"
                    OnClick="search_Click"
                    Text="Search"
                    ></asp:LinkButton>

            </ItemTemplate>
        </CMS:SiteSearchInput>
        <CMS:SiteSearchDataSource
            ID="searchDataSource"
            runat="server"></CMS:SiteSearchDataSource>
        <CMS:SiteSearchResults
            ID="searchResults"
            DataSourceID="searchDataSource"
            runat="server"></CMS:SiteSearchResults>
code snippet SearchResults.aspx
The SiteSearchInput Server Control defines how the search input displays on the page. Because it supports nesting an ItemTemplate, you have full control over how the markup renders. Additionally you'll notice two more server control:
SiteSearchDataSource: Allows you to define the query data source and source text.
SiteSearchResults: Allows you to customize the markup and display of the search results.
These decoupled controls give you ultimate control over how the search results display on the page.
This section starts by discussing Ektron's new search architecture and the deep integration Ektron provides with Microsoft's advanced search technology. The three search technologies that Ektron supports are:
A standard installation of Ektron includes Microsoft Search Server Express by default. But don't let the Express lead you to believe that it is feature disabled — in fact, Microsoft Search Server Express is functionally equivalent to Microsoft Search Server in every way with only one important exception: That is, Search Server Express lacks the ability to run in a distributed search environment. This means if you need to create a load balance search cluster, Microsoft Search Server must be used. Otherwise, Microsoft Search Server Express will suit your needs. Additionally, integration with Microsoft FAST Enterprise Search Server is also available as an upgrade option, which gives you additional unique capabilities.
The version of Microsoft Search Server Express that is installed depends on the version of your Windows Server operating system. If you installed Windows Server 2008 64 bit, Ektron will install Search Server 2010 because it depends on this version to operate. Otherwise, Search Server 2008 will be installed.
On top of this Search Server, Ektron has built its deeply integrated Search Framework, which includes all the plumbing that handles crawling content, catalog management, as well as developer facing features like the Search Framework API, Search Widgets, SiteSearch Server Controls, Faceted Search, Federated Search, and Site Search Analytics, to name a few. All these features depend on the Ektron's Search Framework, so this section covers how Ektron integrates with Microsoft Search Server at the core, to give you an understanding of how content is crawled, indexed, and queried.
In Figure 7-15, you can see the Ektron Search Framework's overall architecture and process for crawling and indexing content.
The process begins on the left hand side of the diagram with the Ektron user authoring content either through the Workarea or directly on the website. This content item can be any type of managed content, such as a content block, structured Smart Form data, or document through a content API, server control, or widget. Through a CMS Extension (see Appendix A), the publish pipeline is modified to notify the Ektron Windows Service that new content has been pushed. The Ektron Windows Service then invokes a request for either a full or incremental crawl.
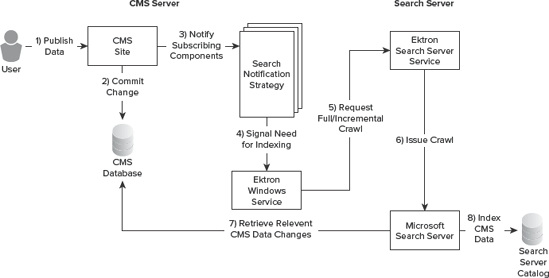
Incremental crawl: Crawls only what has changed without needing to rebuild the content index. Most data changes result in an incremental crawl, including the creation of new content, deleting content, adding a user, and such. So as not to over-burden the Search Server and the service, incremental crawl requests are issued on a user-configurable interval. The request to crawl is flagged and is issued when the interval expires. If no requests for an incremental crawl have been issued when the interval expires, no crawl occurs.
Full crawl: Crawls everything. The one type of action that requires you to initiate a full crawl is one in which metadata (or any other object that results in the creation of new searchable properties within Search Server, such as a taxonomy) is added. Full crawl requests, unlike the incremental ones, are issued immediately. If a crawl (incremental or full) is already in progress, it will be interrupted and restarted. Upon completion of a full crawl, new searchable properties in the system are mapped so that they can utilized in queries.
During the crawl, Search Server retrieves content by querying the database through the use of stored procedures — it does not spider the website in the way that public internet search engines do — and it is important to understand why. Crawling the database means that the search architecture has access to rich metadata, taxonomy, and other forms of structured information. This is an advantage that site search has over public search engines like Google, who are limited in this knowledge since all content is visible only through loosely structured HTML documents. It is because of this type of indexing that Ektron can provide faceted search on custom user properties.
The process of content indexing is performed using IFilters, which are components that understand how to handle a specific file format, such as Microsoft Word. The Ektron Framework is distributed with IFilters to handle all common file formats such as Office documents, text documents, Shockwave Flash files, and PDF documents. It's worth pointing out that IFilters can also index custom attributes on files. These attributes include the file level metadata you see when you right-click a file and choose Properties
In Figure 7-16, you can see the overall architecture and process for querying and retrieving information.
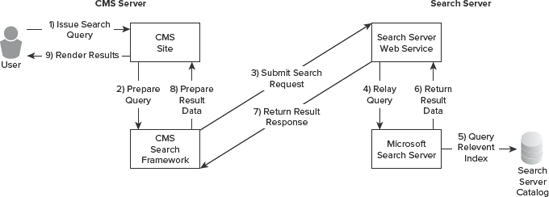
The process is as follows:
The site visitor initiating a query through a website search interface built using any of the site search server controls or APIs.
The query is processed and formatted into XML in preparation for querying the Search Server. The XML document can be thought of as a search request configuration file, and includes the search phrase and configuration parameters value, such as whether or not duplicates should be trimmed, stemming is enabled, spellcheck should be used, and so forth.
Note
The Microsoft Developer Network has an article describing the Schema for this XML document available here http://msdn.microsoft.com/en-us/library/ms563775.aspx.
Once the XML search request has been created, it is passed to the Search Server Web Service which manages all communication between Ektron and Microsoft Search Server.
Once the request has been received, the Search Server Query Engine is then responsible for performing the lookup against the relevant catalog indices and returning the results back.
The Search Framework APIs follow the overall pattern established in the Framework API, which was introduced briefly in Chapter 1 and is covered more thoroughly as a whole in Appendix B. This section builds on this by presenting code samples that implement various search-driven use cases. The Ektron Dev Center also features a screencast highlighting the design goals of the Framework API, why it was introduced, and how to work with it here: http://dev.ektron.com/FrameworkAPI/. Although it isn't required, it is recommended that you look through Appendix B and watch the screencast before reading through these samples.
In this section, you look at a use case and see the constructs used to implement it. The following snippet implements a search that defines two filters:
One that specifies that the content title must contain the phrase "ektron"
The other that specifies that the title must contain the phrase "corporation"
These two filtering criteria are grouped together using the SearchCriteriaFilterGroup. Because the LocalOperation is set to AND, both of these filters must be true for a search result to be included in the set. So content with the title "the ektron corporation" would be included, but "ektron, inc." would not.
public void SearchTitleWithTwoFilters()
        {
            SearchServerContentCriteria contentCriteria =
              new SearchServerContentCriteria();
            ISearchCriteriaFilter filter1 =
            New SearchCriteriaFilter<string>(
                    SearchCriteriaContentFields.Title,
                    SearchCriteriaFilterOperator.Contains,
                    "ektron");
            ISearchCriteriaFilter filter2 = new SearchCriteriaFilter<string>(
             SearchCriteriaContentFields.Title,
             SearchCriteriaFilterOperator.Contains,
             "corporation");

            SearchCriteriaFilterGroup groupFilter =
             new SearchCriteriaFilterGroup();
            groupFilter.AddFilter(filter1);
            groupFilter.AddFilter(filter2);
            groupFilter.Condition = LogicalOperation.And;

            contentCriteria.AddFilter(groupFilter);
            contentCriteria.PagingInfo = new PagingInfo(10, 1);

            ContentSearchResponse response = SearchManager.Search(contentCriteria);
            string query = response.ExecutedQuery;

            OutPutResult(response.RelavantResults);

          Console.WriteLine("Query '{0}'...", query);
          Console.WriteLine("Showing results {0} - {1} out of {2}
",
             contentCriteria.PagingInfo.StartRow,
             contentCriteria.PagingInfo.EndRow,
             response.AvailableResultCount.ToString());
        }
You can also nest filter groups, which gives you the full ability to create complex, nested filter expressions. The PagingInfo object defines how many results are returned and the current page in the resultset. In cases where you are using search as an Application Search, you might only need to return three results. Setting the paging info object to 3 ensures that you're never returned more results than needed.
The Search Framework APIs are also permission aware. This means that the results returned are properly trimmed according to the content permissions granted to the site visitor. Developers have the ability to force an administrator level access mode in cases where you're looking to use the Search Framework APIs as a general purpose API for content information retrieval. The following show the enumeration values that can be passed to the Search Manager constructor to force the Search Framework API into administrator level access mode.
ApiAccessMode.AdminApiAccessMode.LoggedInUser
This approach is often used when search is used for dynamic page generation using search. This approach is also sometimes referred to as "application search" which is a term used to describe applications built using search's highly denormalized search catalogs as a delivery system, instead of the highly normalized SQL database.
A major requirement of a website is to provide simple user and machine resources for discoverability. In addition to menus, breadcrumbs and sitemaps allow for simple discovery in different ways:
Sitemaps: Useful for indexing content by third-party search engines. The spiders that these search engines use are designed to follow links to find other pages. A sitemap makes it easy for the spider to find all the other pages on your site. The spider is a way of ensuring that all of your pages are cross-linked.
Breadcrumbs: These serve a slightly different purpose by allowing a site visitor to easily discover the information architecture of your site. This, in combination with a well thought out aliasing scheme, allows users to infer the location of interesting content based on where they have already been in your site.
In the Ektron Framework, breadcrumbs can function in two different ways:
The BreadCrumb Server Control acts as a positional indicator. It reads information from the folder the content belongs to, and displays a list of parent links. For example, if you are browsing a job listing, you may wish to display a breadcrumb like the following.
Jobs
The breadcrumbs can alternatively display a click trail for the current user. This shows users the pages they landed on leading them to the current page. This type of breadcrumb trail is less common, and less accepted due to usability concerns, but the option is there.
One point to remember is that the breadcrumb for a given piece of content is actually associated with the folder that content belongs to. The breadcrumbs are also not generated recursively from each folder, but are instead stored in their entirety in the folder the content appears in. These breadcrumbs can also be inherited down the folder chain.
This section includes three implementation tutorials:
Setting up breadcrumbs on the /Content/Products folder
Implementing breadcrumbs on the products.aspx page
Creating a sitemap.aspx page
On the dynamix.aspx page, from where most free content is loaded, part of the Wireframe indicates that between the menu and the Content Block Server Control there is a breadcrumb acting as a positional indicator.
As covered in the Folder section of Chapter 5, breadcrumb settings are managed through the folder properties screen in the Workarea. Enter the Workarea now, and navigate in the Content tab to /Content /Products. Select View
As shown in Figure 7-17, the last tab in the folder properties is for breadcrumb settings. The top checkbox is marked Inherit from parent folder. Breadcrumbs can be inherited from the parent folder. This can simplify creating a basic structure for breadcrumbs, but it is also frequently a point of confusion for content managers trying to set up breadcrumbs.
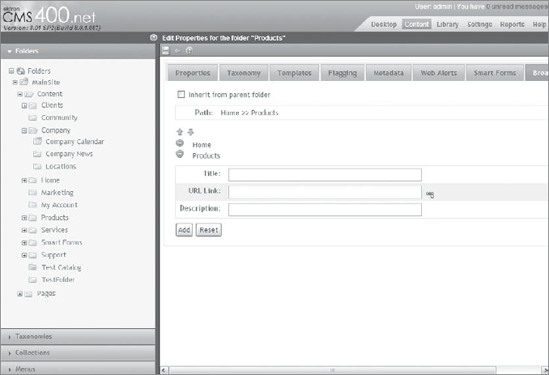
One might expect the breadcrumb structure to automatically recurse through parent folders to retrieve the appropriate list of links to display. Unfortunately, this is not how the system actually works. Instead, from a given Content ID, the folder is retrieved. The system then checks if the folder is marked to inherit breadcrumbs. If so, the system climbs through the parent folders until it finds a folder that is not set to inherit. Once found, the list of links is listed from that folder, and no other folders. What this means is that to construct the breadcrumbs you want to display, you create the root-most folders breadcrumb settings first and then move deeper into the tree breaking inheritance as you go. Each time you break inheritance, the parent breadcrumb structure is copied to the current folder, so you only are adding one level at a time.
Let's create the breadcrumb trail for a folder now.
Make sure the inheritance checkbox is deselected, and you have the rest of the options to work with. Because you are creating the root products folder, you want products directly within this folder to have a breadcrumb like the following:
Home
To create the breadcrumb, fill out the title, URL link, and description fields shown in Figure 7-17 with the following settings listed in Table 7-5.
Once you enter the settings, click the Add button, and the item will be added to the list displayed above the form.
Repeat the process for the Products breadcrumb fields in Figure 7-18 with the settings listed in Table 7-6.
Table 7.6. Settings for Products Breadcrumb
FIELD
VALUE
Title
Products
URL Link
products.aspx
Description
Products Home
The list of items can now be reordered, and a preview is displayed in the Path box.
Confirm that what is displayed is what you intended, and then click Save on the toolbar. Remember that this process must be repeated for each folder containing content that should have a different breadcrumb trail.
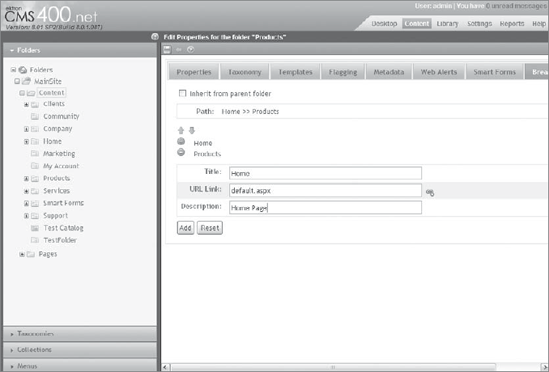
Now that the folder is configured, you need to implement the server control to display the breadcrumb on the page. Follow these steps:
Fire up Visual Studio, and open the Products.aspx file.
Just above the Content Block Server Control, place the following line.
<CMS:FolderBreadCrumb ID="Breadcrumb" runat="server" />
There is also a BreadCrumb Server Control, instantiated with the following line. The difference between the two is that the FolderBreadCrumb Server Control reads the breadcrumb you set in the folder properties, and the BreadCrumb Server Control uses the user history, where each page on the site that the user visits is appended to the breadcrumb trail.
<CMS:BreadCrumb ID="Breadcrumb" runat="server" />
The FolderBreadcrumb Server Control reads the ID parameter from the query string. The control then loads the appropriate breadcrumb for that piece of content. There are several other parameters that are useful in configuring the breadcrumb controls. These are listed in Table 7-7.
Table 7.7. BreadCrumb Server Control Properties
PROPERTY NAME | DESCRIPTION |
|---|---|
DefaultContentID | If there is not a valid value in the query string, this is the value used for the Content ID. |
DynamicParameter | Defaults to ID, which is what is used for normal content in QuickLinks. Depending on the use case, you may want to manage breadcrumbs based on a PageBuilder page rather than a content item displayed in a ContentBlock control, in which case you may want to set this to "pageid." |
Language | The LanguageID to use for display. |
Mode | Can be set to Normal or DisplayOnly — DisplayOnly will not render any links; it will only display text. |
Separator | This is the character to separate entries with. It defaults to ">." |
Now that you covered how to create the breadcrumb settings, you can move onto the SiteMap Server Control. You use the SiteMap Server Control to create a list of all the contents, recursively, from a given folder. Each item is listed with its corresponding breadcrumb from the parent folder.
The following steps show you how to create a new Web form in Visual Studio, in the root of your site.
Name it Sitemap.aspx, and set it to use a separate codebehind file.
Drag the SiteMap Server Control from the toolbox to the inside of the Form element on the page, as shown in the following code snippet.
<%@ Page Language="C#" AutoEventWireup="true" CodeFile="sitemap.aspx.cs"
Inherits="sitemap" %>
<%@ Register Assembly="Ektron.Cms.Controls" Namespace="Ektron.Cms.Controls"
TagPrefix="CMS" %>

<!DOCTYPE html PUBLIC "-//W3C//DTD XHTML 1.0 Transitional//EN" "http:// www.w3.org/
TR/xhtml1/DTD/xhtml1-transitional.dtd">

<html xmlns="http://www.w3.org/1999/xhtml">
<head runat="server">
    <title></title>
</head>
<body>
    <form id="form1" runat="server">
    <div>
      <CMS:Sitemap ID="Sitemap1" runat="server" />
    </div>
    </form>
</body>
</html>
The SiteMap Server Control works without any additional properties. When you load the page in the browser, you get the output shown in Figure 7-19.
You can optionally fine-tune the display to match your needs. These parameters are listed in the Table 7-8.
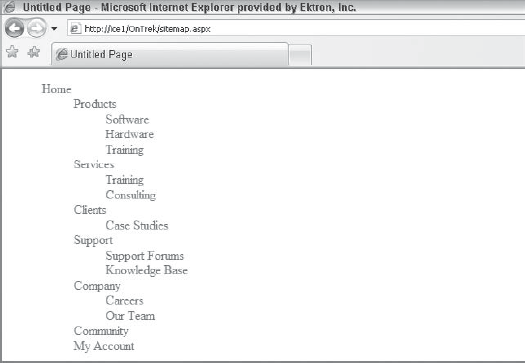
Table 7.8. SiteMap Server Control Properties
PROPERTY | DESCRIPTION |
|---|---|
| The CSS class to wrap the sitemap display. |
| The folder ID to display the sitemap below. Defaults to zero, which specifies the root folder. |
| Specifies the depth to go below the FolderID. Zero means unlimited. |
| Sets the number of levels to skip in the SiteMap. For instance, you may want to only show the third tier folders, but show all of them. In this case, FolderID would be zero, but |
Like most Ektron controls, the SiteMap Server Control also outputs XML and allows for custom transforms using XSLT. The SiteMap Server Control exposes a property called XmlDoc, which exposes the XML used for rendering; by setting the DisplayXSLT property you can specify a custom XSLT to transform that XML.
It is increasingly common for Web presences to invite interaction from visitors which can range from posting on forums to authoring wiki entries or just rating content. Most sites with these interactions have users to register on the site rather than just posting anonymously. The Ektron Framework provides for this necessity by supporting user membership.
Membership users in the Ektron Framework are a close relative to CMS users. The main distinction is that CMS users have access to the Workarea where membership users do not. With a typical Ektron license, the number of CMS users allowed is limited, whereas the number of membership users is usually unlimited.
Because membership users are a subset of CMS users, the management techniques and capabilities of the two groups are very similar. Membership users can be granted read permissions on private content, they can be members of groups, and they can even edit content from the website if allowed.
There are several server controls that make it easy to implement membership management on your site. This section covers these server controls.
When setting up membership capabilities on your site, there are a couple of main capabilities that you need to implement. These are:
Allowing users to register on the site
Allowing users to modify their properties
Implementing a password reset feature
Implementing Facebook registration
The last item on the list refers to Ektron's feature that lets a user log in to your site with their Facebook credentials. Ektron will then retrieve the user details from Facebook and create a user in the system for them.
The Membership Server Control handles three out of the four situations previously listed. By determining whether the user is logged in, and by setting attributes on the server control, you can have it handle most of the details of administering users. All of these examples are handled in the OnTrek starter site, but the following sections have you using a simple page to demo these examples.
Registration is handled through the Membership Server Control, along with many other functions. The Membership Server Control enforces custom attributes, and allows users to set up every aspect of their membership on the site through a single interface. You start this example by following these steps:
Create a new page called Membership.aspx. In Visual Studio, right-click the site root in the Solution Explorer and select Add New Item. Select Web Form, and name it Membership.aspx.
Make sure you are in Source view, and drag the Membership Server Control from the toolbox to within the form element. Listing 7-8 shows what the code will look like after you have done this.
Example 7.8. Membership.aspx
<%@ Page Language="C#" AutoEventWireup="true" CodeFile="Membership.aspx.cs"
Inherits="Membership" %>
<%@ Register Assembly="Ektron.Cms.Controls" Namespace="Ektron.Cms.Controls"
TagPrefix="CMS" %>

<!DOCTYPE html PUBLIC "-//W3C//DTD XHTML 1.0 Transitional//EN" "http://www.w3.org/
TR/xhtml1/DTD/xhtml1-transitional.dtd">

<html xmlns="http://www.w3.org/1999/xhtml">
<head runat="server">
    <title></title>
</head>
<body>
    <form id="form1" runat="server">
    <div>
      <CMS:Membership ID="Membership1" runat="server" />
    </div>
    </form>
</body>
</html>
The Membership control, when no options are specified, serves two functions. If the user on the site is not logged in, the Membership Server Control displays the registration interface, shown in Figure 7-20. The tabs for this interface are as follows:
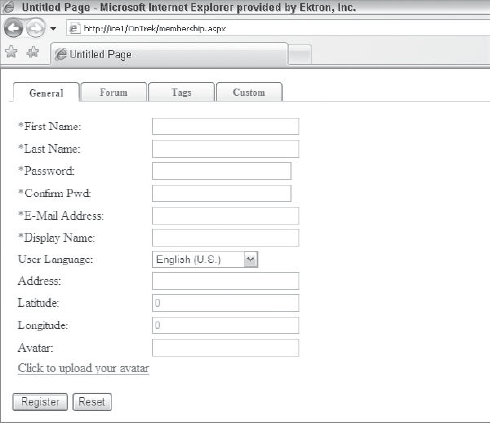
General: This has s for each category, starting with the key fields such as username and password. The option that might be non-obvious is the Address field. This field exists so that GeoMapping Server Control can search for users. By specifying the address, the Ektron Framework can convert it to an appropriate latitude and longitude behind the scenes.
Forum: Allows the users to specify options specifically for Forums on the site, such as which editor to use, and what the forum signature should be.
Tags: Allow the users to specify things such as interests or locations, which are then searchable by other users.
Custom: Contains a group of options that don't fit into the other categories. This tab is shown in Figure 7-21.
For the most part, these options are configured in the Workarea on the Settings tab as Custom User Attributes. More attributes can be added there, and some of the existing options can be modified or deleted. There are, however, a few options on this tab that cannot be modified:
Features: This checkbox creates a user calendar for the users. A user calendar allows users to add and share their schedules on the site through the WebCalendar interface. For more information on user calendars, see Chapter 8.
Time Zone: Also has to do with the WebCalendar. The WebCalendar internally stores events in GMT, and converts them to the logged-in user's time zone. This time zone list is the same list used in Windows, so it allows for an appropriate amount of granularity in location.
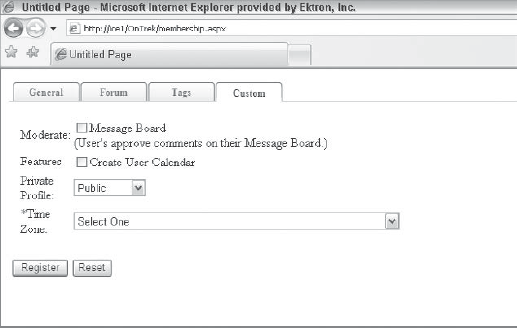
This interface may not be exactly what you as a developer want to display to the user at registration time. As usual, the Ektron Framework provides for developing custom interfaces through the use of the API. See the following code snippet for programmatically creating users.
Ektron.Cms.UserData memDetails = new Ektron.Cms.UserData();
memDetails.Username = "Username";
memDetails.FirstName = "First";
memDetails.LastName = "Last";
memDetails.Password = "Password";
memDetails.DisplayName = "Displayname";
try
{
  Ektron.Cms.Framework.Users.User user = new Ektron.Cms.Framework.Users.User();
  user.Add(memDetails);
}
catch (Exception ex)
{
  throw ex;
}In addition to allowing a user to register for the site, the Membership Server Control supports many other features. As you saw in the previous section, the server control generates an interface for users to enter the initial details of their accounts. The default interface also works when users are already logged in. Log in to your OnTrek site and refresh the Membership.aspx page. The interface now displays with your information populating the fields, as is shown in Figure 7-22.

The membership control handles CMS user accounts, including the admin account, not just membership users. As before, if you do not like the interface as shown, all of the actions can be performed through the API. The Framework User API class has methods for Update and Delete in addition to the Add method.
As mentioned earlier, the Membership Server Control handles more than just registering and managing users. By modifying the DisplayMode property on the Membership Server Control, you can have it manage other functions. The following figures show what these options mean.
DisplayMode="AccountActivate"is shown in Figure 7-23.This screen is needed only if the option Enable Verify E-mail in the Configuration
DisplayMode="ResetPassword"is shown in Figure 7-24.This mode allows users to reset their passwords. It will send an e-mail to the registered account. The e-mail sent will include a new randomly generated password. Remember that the System E-mail address must be specified in the Settings tab in the Workarea, under Configuration
DisplayMode="UnsubscribeSecured"is shown in Figure 7-25.It allows users to unsubscribe. Requires the username and password.
DisplayMode="UnsubscribeUnsecured" is shown in Figure 7-26.It allows users to unsubscribe. It does not require the users to be logged in or enter a password.
DisplayMode="UserRegistration" was shown previously in Figure 7-20.This mode is the default and was covered in the previous examples. It allows users to create and manage their accounts by inputting all the details necessary to deal with the Ektron Framework.
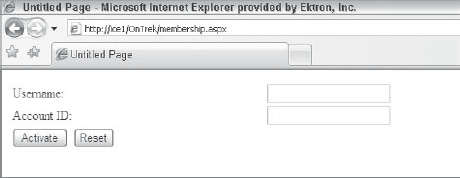

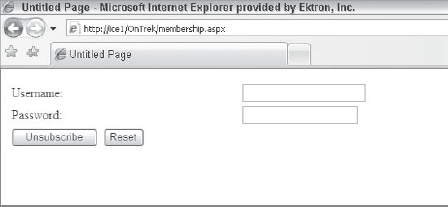
A relatively new feature in the Ektron Framework is support of Facebook authentication. Using the FacebookLogin Server Control allows users to authenticate against the Facebook servers. The process opens a window on the Facebook site — prompting the users to log in to their Facebook accounts and authorize the site to connect to their profiles — and then passes a token to your site. The token allows the Ektron Framework to connect to Facebook and retrieve details about the users.
The FacebookLogin Server Control allows users to simply log in to the site using their Facebook accounts. If the user is already logged in, the control allows connection between the two accounts. If details are updated on the Facebook side, the modifications are replicated to the other site.
The following steps walk through the user experience of the Facebook Connect feature.
The user clicks the Connect with Facebook button, shown in Figure 7-27.
When the user clicks the button, a new window pops up inviting the user to log in to Facebook and authorize the site to connect to their Facebook profile, as depicted in Figure 7-28.
Once the users have authenticated with Facebook, they are returned to your site, where they are invited to log in if they have an account, or register if they do not have an account. This step allows the system to collect any additional details that are required, such as the users' time zones.
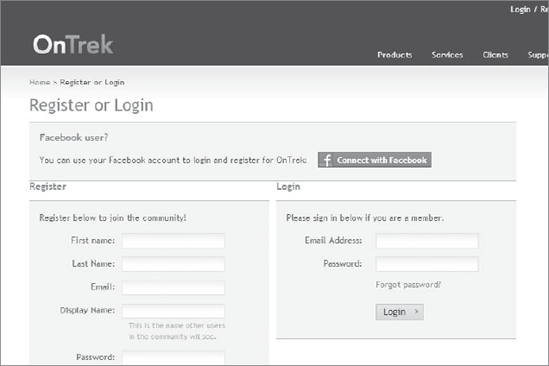
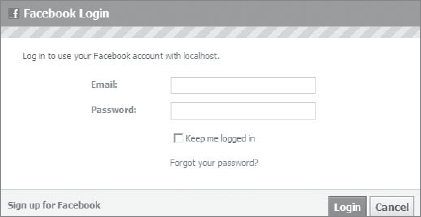
Allowing for this process requires a few steps from developers. They must first create a Facebook application for their website, and then they must log the details for that application in the web.config. Then the user interface must be defined for logging in.
The following steps walk you through creating a Facebook application.
First, if you don't have a Facebook account, register on
www.facebook.com.Go to the Facebook Developer site at
www.facebook.com/developerand log in.Click the link Set up New Application.
Fill in the name for your application. This name is displayed to the users allowing access to their profiles. It cannot contain any variation recognizable to the user as Facebook. The best bet is to go with your site's name or a variation of it.
A screen will come up displaying your Application ID, as shown in Figure 7-29, API key, and Secret key. Ektron Framework uses these keys to authenticate itself with Facebook, allowing it to connect to authenticated user profiles.
Open your web.config file in the root of your website, and copy the values you just received from Facebook into the corresponding keys — these keys are listed next. The default keys provided in your site are for use with localhost:
<add key="ek_FacebookApiKey" value="fed65adedd83eec7e1e56f32f03d7303" />
    <add key="ek_FacebookSecret" value="92b7e5245d455fd9213c0b9af14f5805" />
Save your modifications to the web.config, and return to the Facebook developer site. Select the Connect tab, and enter your website's URL, as shown in Figure 7-30. You can change this URL to the final address at any time.
Save your settings on Facebook.

Once this configuration has been complete, you can simply place the FacebookLogin Server Control on your page, and it will walk the users through the previous steps. For more information about modifying the Facebook login process, see section 3-19 in the CMS400 Manual, which is installed alongside the Ektron Framework in the Documentation folder (e.g. C:Program FilesEktronCMS400v80DocumentationCMS400Manual.pdf).
This chapter focused on the main elements of a successful homepage:
RIA: This section discussed using Smart Forms to store information usable in a rich format. Smart Forms are a powerful way of storing settings for rich interfaces and applications. Since the backend of a Smart Form is designed to store the content as straight XML, it is even possible to design a Smart Form to be directly serializable and deserializable from a class, while remaining editable in the eWebEdit400 editor. This flexibility means that content authors can update settings directly, rather than relying on developers to do so for them.
RESTful services: You use these to retrieve information from the Ektron Framework with light call backs. The chapter didn't cover platforms, such as Silverlight or Flash in these examples. However, you can certainly extend these examples in that direction. For example, a developer can use the same handler developed for the taxonomy example, and modify the JSON serializer to be an XML, YAML, or even some other type of serializer depending on the requirements of the consuming platform.
Menus: This covered creating the global navigation for the OnTrek website using Ektron's native menu feature and for displaying the menu on the website using a customized Flex Menu Server Control. You saw alternative ways to use the Flex Menu, including the Master Slave implementation, which uses two menus in tandem. A Master displays the global horizontal navigation menu. A Slave displays the left-hand vertical navigation menu, which alters its currently selected item based on the item selected from the Master menu.
Search: You learned the best practice strategies for creating a successful website search implementation, including implementation strategies and how to flag potential problems that your site visitors are having issues with finding relevant content. You saw how to create a globally accessible search box and did a deep dive into the search architecture.
The breadcrumb and sitemap: This showed basic navigational elements. The Ektron Framework easily manages these site elements through the information architecture and content. It also allows you to separate the conceptual hierarchy of the frontend of your site from the backend content management perspective by manually setting the sitemap entries.
BreadCrumb and FolderBreadCrumb Server Controls: The BreadCrumb Control creates easy-to-implement position indicators that you place site-wide so visitors can infer and deduce the architecture of the site. The SiteMap Server Control allows for the same thing for software discovery agents. When you team up both, you can expose the underpinnings of your site to the world, ensuring that your content is easy to find.
Registration: Showed the process of registering users for your site, keeping user details up to date, and allowing users to register through Facebook Connect. Membership management is a crucial part of any website that allows for user interaction, and these tools should be used as part of your site build out.
The Membership Server Control: A versatile tool that can handle a large portion of that user management. It allows for user registration, updating user profiles, and managing items like password reset functionality and unsubscribing users.
The Facebook Login Server Control: Users can connect their profiles to your website. This is desirable to users because they can maintain their profiles at a single location. It's desirable for website administrators because it can serve as a traffic driver. For instance, a user commenting on a story on your site can opt to cross-post her comment and a link to your story to her wall on Facebook. This can alert the entire network to the story on your site, driving what may be a substantial amount of traffic to your site.